System Restore
The System Restore section will allow you to select a System Backup file from a CIFS (Windows Share) and restore your system configuration and the email archive (if backup file includes email archive).
Important: Before starting a System Restore, ensure that the backup is from a system with the same build number as the system you are restoring UNLESS you are migrating from Hermes SEG 14.04-32 to Hermes SEG 16.04-64.
Important: A System Restore will remove ALL System Backup and Email Archive Jobs you currently have. Ensure you take note of the job settings before you proceed
Important: If you are migrating from Hermes SEG Pro 14.04-32 to Hermes SEG Pro 16.04-64, you must send your valid NON-TRIAL serial number to support@deeztek.com so that we can enable re-activation for that serial number before you proceed with the steps below.
The build number can be found under System --> System Status in the Version & Build No section.
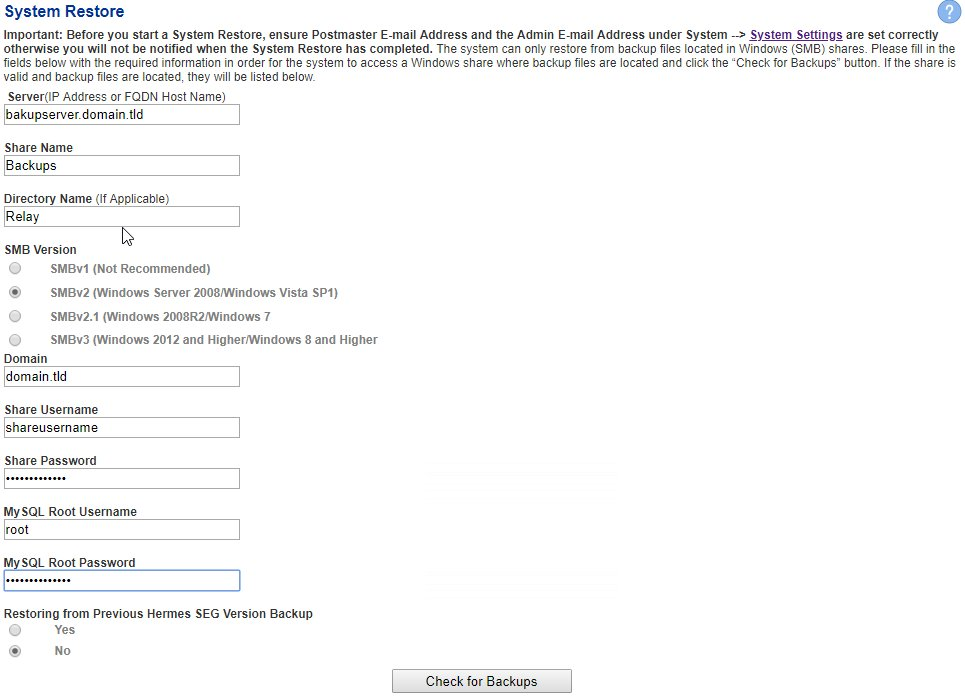
If you are migrating from Hermes SEG Version 14.04-32 to Hermes SEG Version 16.06-64 by restoring a Hermes SEG Version 14.04-32 backup to a Hermes SEG Version 16.06-64 system ensure you select the Yes option under the Restoring from Hermes SEG Version 14.04 Backup section (Figure 1).
Before starting a System Restore, ensure that the Postmaster E-Mail Address and the Admin E-Mail Address are set correctly under System --> System Settings otherwise you will not be notified when the restore has completed.
Mount Backups Share
- Under the Server field, enter an IP Address or the FQDN Host Name of the server hosting the share that contains one or more System Backup files.
- Under the Share Name field, enter the name of the share.
- If applicable, under the Directory Name, enter the directory under the share.
- Under the SMB Version, select the correct SMB version for your environment.
- Under the Domain field, enter the NETBIOS domain name.
- Under the Share Username field, enter the username of a user that has access to the share.
- Under the Share Password field, enter the the password for that user.
- Under the MySQL Root Username, enter the username of a user with root access to MySQL (Default username is root).
- Under the MySQL Root Password, enter the password for the MySQL root account.
- If you are restoring a Hermes SEG Version 14.04-32 backup to a Hermes SEG Version 16.04-64 system as part of a migration, ensure you select Yes under the Restoring from Hermes SEG Version 14.04 Backup section.
- Click on the Check for Backups button (Figure 1).
Figure 1
The system will attempt to mount the share based on the information you supplied, ensure the MYSQL credentials you suppled have access to the database and then check for backup files.
Share Mount Unsuccesful
If the system is not able to mount the share, one of the following errors below will be displayed (Figure 2):
Figure 2


Verify the supplied information and click the Check for Backups button again until it's succesful.
Share Mount Successful
If the system is able to mount the share, the message below will be displayed along with a listing of the System Backup files (Figure 3).
Figure 3

Running a Restore
- Click on the Select column of the the backup file you want to restore and click the Restore button at the bottom of the backup file listing (Figure 4)
Figure 4

- On the confirmation page, ensure you read the the warning throuroughly and click the YES button to proceed with the restore operation. If you wish to cancel, click on the NO button (Figure 5).
Figure 5

- When the Restore starts, the system will log you out of the Administration Console and you will not be able to log back in until the restore is complete. Once the restore is complete, the system will send a confirmation email to the Admin E-mail address. Addtionally, the restore progress will be logged in a restorelog-MM-DD-YYYY-HHMM.log file that will automatically get created in the backups share you specified. MM-DD-YYYY-HHMM indicates the Month, Day, Year, Hour and Minute the restore started. A succesful restore will be indicated in the log file by the following last entry:
RESTORE IS COMPLETE. SYSTEM MUST BE REBOOTED FOR CHANGES TO TAKE EFFECT
- Reboot the system by navigating to System --> System Reboot & Shutdown and click on the Reboot System button (Figure 6).
Figure 6

- Once the system finishes rebooting, log back in to the Administration Console.
- Goto System --> Network Settings and verify that all settings are correct and click on Save Settings & Apply Settings
- Goto System --> Change Password and change the default password.
- Goto System --> System Backup and re-create any System Backup jobs
- Goto System --> Email Archive and re-create any Email Archive jobs
- Goto Content Checks --> Perimeter Checks --> Save Settings & Apply Settings
- Goto Content Checks --> Global Block/Allow Sender List and add a test entry (Ex: domain.tld), select Block Action, click the Add button and then click the Apply Settings button. Next, delete the test entry you just added and click the Apply Settings button again.
- Goto Content Checks --> RBL Configuration and add a test Realtime Block/Allow List (Ex: test.domain.tld with a weight of 4) and click the Apply Settings button. Next, delete the test Realtime Block/Allow List your just added and click the Apply Settings button again.
- Goto Content Checks --> Antivirus Settings --> Save Settings & Apply Settings
- Goto Content Checks --> Initialize Pyzor --> Initialize Pyzor
- Goto Content Checks --> Initialize Vipul's Razor --> Initialize Razor
- Goto Encryption --> Encryption Settings, generate any missing Server, Client and Mail Secret Keywords and click on Save Settings.
The settings below apply ONLY if you have a SEG Pro License
- Goto System --> System Settings --> Enter Serial Number --> Enter New Serial Number --> Submit Serial
- Goto System --> Admin Console Firewall and ensure Firewall Status is set to Enabled and click on Save Settings button
- Goto Content Checks --> SPF Configuration --> Save Settings & Apply Settings
- Goto Content Checks --> DKIM Configuration --> Save Settings & Apply Settings
- Goto Content Checks --> DMARC Configuration --> Save Settings & Apply Settings
The setting below applies ONLY if you have a SEG Pro License and you have installed a 3rd Party Specified SSL Certificate.
- Goto System --> Console SSL Settings --> 3rd Party Specified SSL Certificate --> Save & Apply Changes
The setting below applies ONLY if you have a SEG Pro License and you have installed a SMTP TLS Certificate.
- Goto Gateway --> SMTP TLS Settings --> SMTP TLS Support Available --> Save & Apply Changes
The setting below applies ONLY if you have a SEG Pro License and you have configured Antivirus Signature Feeds.
- Goto Content Checks --> Antivirus Signature Feeds. Click the Configure button for each Feed that is Enabled and click the Apply Settings.