Relay Domains
In order for Hermes SEG to deliver email, you must first set the domain(s) that Hermes SEG will process email for along with their corresponding email server(s). You can add as many domains and email servers as required. An email server can be configured as an IP address or a Host Name as long as the Hermes SEG can reach it over Port TCP/25. Multiple domains can be pointed to the same email server if necessary.
Add Relay Domain with IP Address Destination
- Under the Relay Domain Destination Type, select the IP Address Destination option.
- In the Relay Domain field enter the domain name and in the Dest IP fields, enter the email server's IP address and click the Add button (Figure 1).
Figure 1

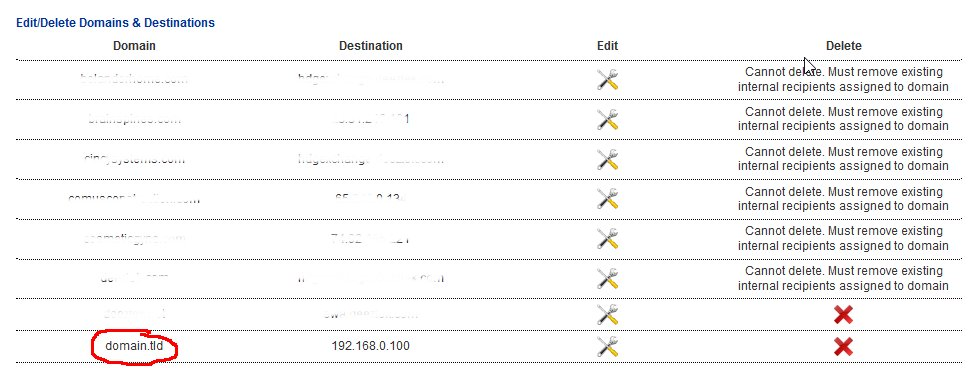
- After adding a Relay Domain and IP Address Destination, the entry will show up below the Edit/Delete domains & Destinations section (Figure 2).
Figure 2
Add Relay Domain with Host Name Destination
- Under the Relay Domain Destination Type, select the Host Name Destination option.
- In the Relay Domain field enter the domain name, in the Dest Host Name field, enter the email server's Host Name part of the FQDN address (without the domain part), in the Dest Host Domain field, enter the email server's domain part of the FQDN address and then click the Add button (Figure 3).
Figure 3

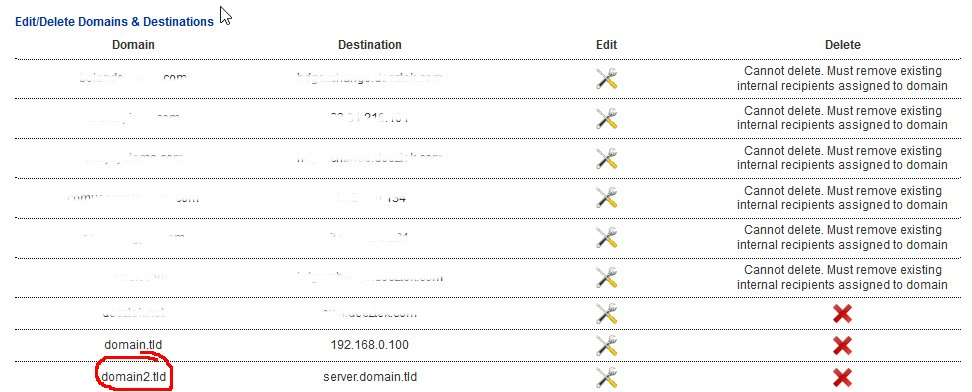
- After adding a Relay Domain and Host Name Destination, the entry will show up below the Edit/Delete domains & Destinations section (Figure 4).
Figure 4
Edit Existing Relay Domain Mapping
- Click on the edit icon
 under the Edit column of the Domain you wish to edit.
 - On the Edit Existing Relay Domain Mapping page, select either the IP Address Destination or the Host Name Destination option (Figure 5).
Figure 5

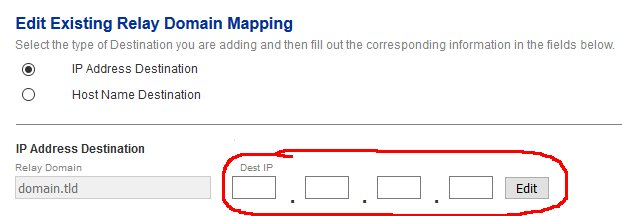
IP Address Destination
Selecting IP Address Destination will enable the IP Address Destination entry. Enter the IP Address of the destination email server under the Dest IP field and click the Edit button to save your changes (Figure 6). Note that the Relay Domain field is already pre-filled and cannot be changed.
Figure 6
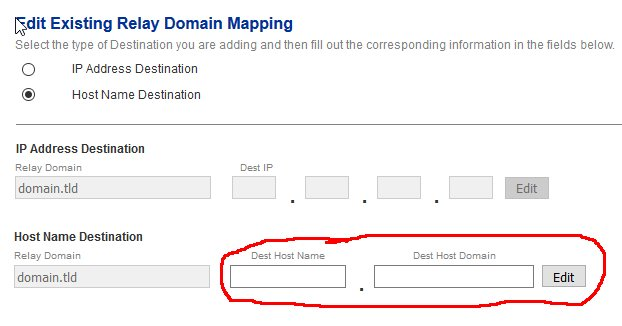
Host Name Destination
Selecting Host name Destination will enable the Host Name Destination entry. Enter the host name (without the domain) of the destination email server under the Dest Host Name field, enter the domain of the destination email server under the Dest Host Domain field and click the Edit button to save your changes (Figure 7). Note that the Relay Domain field is already pre-filled and cannot be changed.
Figure 7
- When finished making your changes, click on the Back to Relay Domains button on the bottom of the page to return to the Relay Domains page (Figure 8).
Figure 8

Delete Existing Relay Domain Mapping
Note: Deleting existing Relay Domain mappings can only be accomplished if there are are no existing Internal Recipients assigned to that domain. If there are existing Internal Recipients assigned to the domain, you will receive the following message under the Delete column of the Edit/Delete Domains & Destination section (Figure 9). In order to delete the domain, you must first navigate to Gateway --> Internal Recipients, delete all the Internal Recipients for that domain and then return to this section to delete the domain.
Figure 9

- Click on the
 icon under the Delete column of the Domain you wish to delete.
 - On the confirmation page, click on the Yes button to proceed with deleting the domain. Clicking on the No button will take you back to the Relay Domains page (Figure 10).

Figure 10
