Antivirus Signature Feeds
The Hermes SEG default antivirus engine (ClamAV) is not very effective at detecting malware when using only its own signatures. Therefore, 3rd party ClamAV signature feeds have been developed. Using the correct 3rd party signatures, ClamAV becomes extremely good at detecting malware with very few false positives. Currently, Hermes SEG supports the integration of the following 3rd party signature feeds:
- Linux Malware Detect
- Malware Patrol
- Sanesecurity
- SecuriteInfo
- YaraRules
In this page, you can enable and configure each one of the supported 3rd party signature feeds.
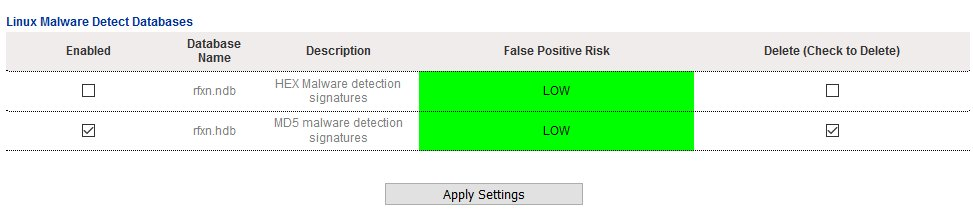
Linux Malware Detect
Linux Malware Detect (LMD) is a malware scanner for Linux released under the GNU GPLv2 license, that is designed around the threats faced in shared hosted environments. It uses threat data from network edge intrusion detection systems to extract malware that is actively being used in attacks and generates signatures for detection. In addition, threat data is also derived from user submissions with the LMD checkout feature and from malware community resources. The signatures that LMD uses are MD5 file hashes and HEX pattern matches, they are also easily exported to any number of detection tools such as ClamAV. More information can be found at https://www.rfxn.com/projects/linux-malware-detect/
Enable Linux Malware Detect feed and adjust update interval
- Click on the
 icon under the Configure column of the linuxmalwaredetect entry.
 - On the Linux Malware Detect Feed Configuration page under the Linux Malware Detect Feed section, ensure Enabled is selected (Linux Malware Detect is enabled by default).
- Under the Linux Malware Detect Database Update Interval, adjust the update interval as needed. The default is 8 hours. Change the interval with caution, because some feeds will ban your IP address if you connect for updates too often (Figure 1).

Figure 1

- Click on the Apply Settings button on the bottom of the page to apply your changes (Figure 2).
Figure 2

Add Linux Malware Detect Databases
Hermes SEG already comes preconfigured with Linux Malware Detect signatures. As far as we can tell, the only two signatures available for Linux Malware Detect have already been added to Hermes SEG. If more signatures become available in the future and you wish to add them, Linux Malware Detect signatures can be found at the following URL https://github.com/andrewelkins/Linux-Malware-Detect/tree/master/files/sigs.
Note: Adding or enabling databases that have a False Positive Risk of Medium or High can lead to false positives. Use those databases with caution.
- Click on the
 icon under the Configure column of the linuxmalwaredetect entry.
 - On the Linux Malware Detect Feed Configuration page click on the Add Linux Malware Detect Database button (Figure 3).

Figure 3

- On the Add Signature Database page, under the Database field, enter the signature you wish to add, under the Description field enter a description for the database, under the False Positive Risk field select a risk level and under the Enabled field select whether to enable to disable the signature and then click the Add button (Figure 4). Note that signatures can be added by not necessarilly enabled.
Figure 4

- Continue adding signature databases as needed. When finished, click on the Back to Feed Configuration button to return to the Linux Malware Detect Feed Configuration page (Figure 5).
Figure 5

- Back on the Linux Malware Detect Feed Configuration page, click on the Apply Settings button on the bottom of the page to save the new database signature(s) you just added to the configuration (Figure 6).
Figure 6

Delete or disable Linux Malware Detect Databases
Deleting a database will completely remove all the database signatures from the ClamAV configuration. Note that if you delete all of the database for a particular feed, the feed will be effectively disabled.
Disabling a database will prevent the system from downloading signature updates for that particular database on the Signature Feed update interval. However, the signatures (albeit old ones) will still be part of the ClamAV configuration.
- Place a checkmark on the checkbox under Enabled column if you wish to disable a database or the Delete (Check to Delete) column if you wish to delete the database of one or more database(s).
- Click on the Apply Settings button to apply your setting to the ClamAV configuration (Figure 6).
Figure 6
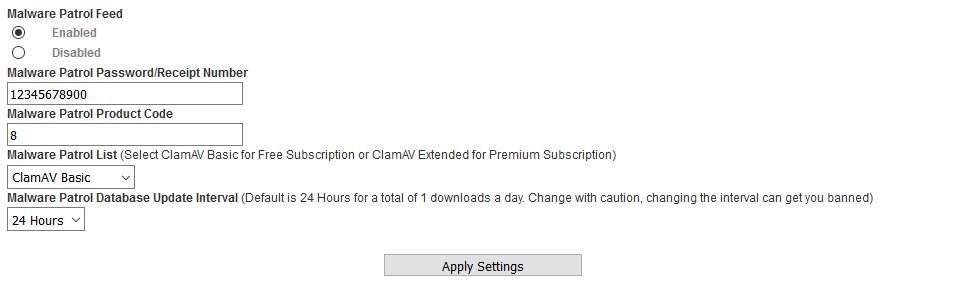
Malware Patrol
The Malware Patrol Project have been gathering and providing malware and ransomware threat data since 2005. This information is used by enterprises and open source members of their community to protect networks and assets in more than 130 countries. For ease of use, they offer data feeds in pre-defined and customized contents and formats compatible with the most popular security systems. More information can be found at https://www.malwarepatrol.net/
Enable and configure Malware Patrol feed
- Click on the
 icon under the Configure column of the malwarepatrol entry.
 - Sign up for an account at https://www.malwarepatrol.net/signup-free.shtml. Choose either a Free or a Premium subscription.
- After signing up, you will receive an email that contains your Password/Receipt number.Login to your account at https://www.malwarepatrol.net/login.php
- In the My Account page, under the URL block lists, locate the Regular List Download link for either ClamAV Virus DB (Basic) if you have a Free Subscription or ClamAV Virus DB (ext) if you have a Premium Subscription. Never use the Aggresive List Download links.
- The Download link you select will be formatted like: https://lists.malwarepatrol.net/cgi/getfile?receipt=521901267812&product=15&list=clamav_basic for a Free Subscription or https://lists.malwarepatrol.net/cgi/getfile?receipt=521901267812&product=15&list=clamav_ext for a Premium Subscription. From the Download link, please note the receipt=521901267812 will be your actual password/receipt number, product=15 is the product code and list=clamav_basic or list=clamav_ext depending on your subscription.
- On the Malware Patrol Feed Configuration page under the Malware Patrol Feed section, ensure Enabled is selected (Malware Patrol is disabled by default).
- Under the Password/Receipt Number field, enter the number after receipt= from Step 5. Ensure you enter your own number and don’t use the number from the example above.
- Under the Malware Patrol Product Code field, enter the number after the product= from Step 5. Ensure you enter your own number and don’t use the number from the example above.
- Under the Malware Patrol List drop-down field, select either ClamAV Basic if you signed up for a Free Subscription or ClamAV Extended if you signed up for Premium Subscription.
- Under the Linux Malware Detect Database Update Interval, adjust the update interval as needed. The default is 24 hours. If you have a Premium Subscription, you can change to 2 Hours. Change the interval with caution, because some feeds will ban your IP address if you connect for updates too often (Figure 7).

Figure 7
- Click on the Apply Settings button on the bottom of the page to apply your changes (Figure 8).
Figure 8

Add Malware Patrol Databases
The Malware Patrol feed does not require any databases to be added.
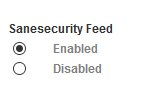
Sanesecurity
Sanesecurity produces add-ons signatures to help improve the ClamAV detection rate on Zero-Day malware and even on Zero-Hour malware. Since 2006 they have provided professional quality ClamAV signatures to protect against the following email types: Macro malware, Zip malware, Rar malware, Javascript malware, 7z malware, Phishing, Spear phishing and other types of common emailed malware and spam. Sanesecurity 3rd Party ClamAV signatures can also help prevent TeslaCrypt, Cryptowall, Cryptolocker and other ransomware, who’s source usually starts as a malicious email. Sanesecurity signatures are free, however we highly recommend donating to this worthwhile cause. More information can be found at http://sanesecurity.com/
Enable Sanesecurity feed and adjust update interval
- Click on the
 icon under the Configure column of the sanesecurity entry.
 - On the Sanesecurity Feed Configuration page under the Sanesecurity Feed section. ensure Enabled is selected (Sanesecurity is enabled by default) (Figure 9).

Figure 9
- Click on the Apply Settings button on the bottom of the page to apply your changes (Figure 10).
Figure 10

Add Sanesecurity Databases
Hermes SEG already comes preconfigured with the safest Sanesecurity signatures (Low False Positive Risk). Additional Sanesecurity signatures can be found at the following URL http://sanesecurity.com/usage/signatures/.
Note: Adding or enabling databases that have a False Positive Risk of Medium or High can lead to false positives. Use those databases with caution.
- Click on the
 icon under the Configure column of the sanesecurity entry.
 - On the Sanesecurity Feed Configuration page click on the Add Sanesecurity Database button (Figure 3).

Figure 11

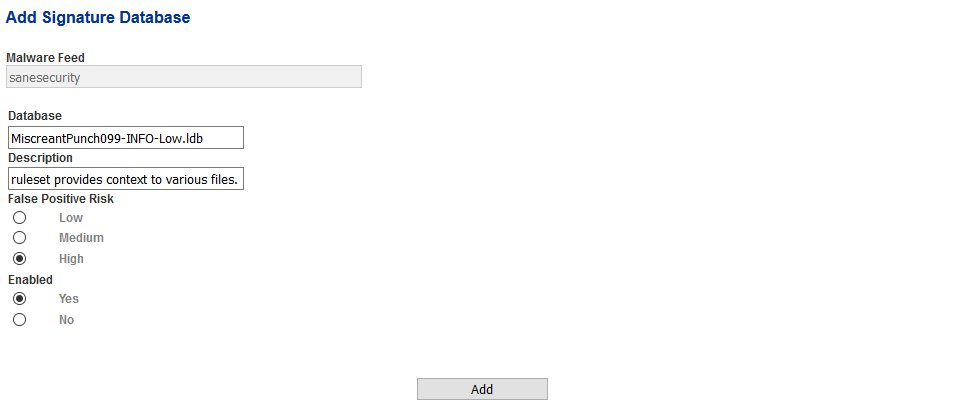
- On the Add Signature Database page, under the Database field, enter the signature you wish to add, under the Description field enter a description for the database, under the False Positive Risk field select a risk level and under the Enabled field select whether to enable to disable the signature and then click the Add button (Figure 12). Note that signatures can be added by not necessarilly enabled.
Figure 12
- Continue adding signature databases as needed. When finished, click on the Back to Feed Configuration button to return to the Sanesecurity Feed Configuration page (Figure 13).
Figure 13

- Back on the Sanesecurity Feed Configuration page, click on the Apply Settings button on the bottom of the page to save the new database signature(s) you just added to the configuration (Figure 14).
Figure 14

Delete or disable Sanesecurity Databases
Deleting a database will completely remove all the database signatures from the ClamAV configuration. Note that if you delete all of the database for a particular feed, the feed will be effectively disabled.
Disabling a database will prevent the system from downloading signature updates for that particular database on the Signature Feed update interval. However, the signatures (albeit old ones) will still be part of the ClamAV configuration.
- Place a checkmark on the checkbox under Enabled column if you wish to disable a database or the Delete (Check to Delete) column if you wish to delete the database of one or more database(s) (Figure 15).
Figure 15

- Click on the Apply Settings button on the bottom of the database listing to apply your setting to the ClamAV configuration (Figure 16) .
Figure 16

SecuriteInfo
SecuriteInfo.com is a french computer security company. They provide state-of-the-art technologies to deliver security audits and products, like vulnerability audits for websites, network audits and firewall/proxy appliances. More information can be found at https://www.securiteinfo.com/.
Enable and configure SecuriteInfo feed
- Click on the
 icon under the Configure column of the securiteinfo entry.
 - Sign up for an account at https://www.securiteinfo.com/clients/customers/signup.
- You will receive an activation e-mail and after a succesful activation, you will receive an e-mail with your login name and a temporary password.
- Login to your newly created account at https://www.securiteinfo.com/clients/customers/account and click on the Setup tab.
- In the Setup tab, you will see a listing of Database Custom URLs like the example below:

DatabaseCustomURL http://www.securiteinfo.com/get/signatures/fdag7f8vga2s822yqr4mit0dyu7qahji1r91ke2rffsta0ry3qw2cdyerh9c937cwmd0eyg3d1c0rpjy2ybb6rtz5apke6c04dnjmdh1mre3nsdo2bdsatbt r7hl798c/securiteinfo.hdb- The bold 128-character string from the example above represents your unique SecuriteInfo Authorization Signature.
- On the SecuriteInfo Feed Configuration page under the SecuriteInfo section, ensure Enabled is selected (SecuriteInfo is disabled by default).
- Copy the 128-character string (Ensure you copy ONLY the string NOT the URL) from Step 6 and paste it under the SecuriteInfo Authorization Signature field, Ensure you enter your own 128-character string and don’t use the number from the example above.
- Under the SecuriteInfo Database Update Interval, adjust the update interval as needed. The default is 4 hours. Change the interval with caution, because some feeds will ban your IP address if you connect for updates too often (Figure 17).
Figure 17

- Click on the Apply Settings button on the bottom of the page to apply your changes (Figure 18).
Figure 18

Add SecuriteInfo Databases
Hermes SEG already comes preconfigured with the safest SecuriteInfo signatures (Low False Positive Risk). Additional SecuriteInfo signatures can be found by either logging in your SecuriteInfo account and then going under Setup or the Sanesecurity signatures website under the SecuriteInfo section.
Note: Adding or enabling databases that have a False Positive Risk of Medium or High can lead to false positives. Use those databases with caution.
- Click on the
 icon under the Configure column of the securiteinfo entry.
 - On the SecuriteInfo Feed Configuration page click on the Add SecuriteInfo Database button (Figure 19).

Figure 19

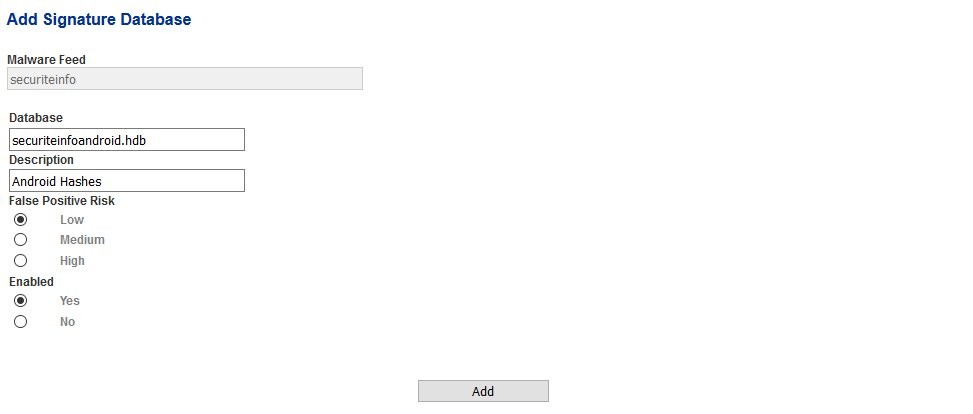
- On the Add Signature Database page, under the Database field, enter the signature you wish to add, under the Description field enter a description for the database, under the False Positive Risk field select a risk level and under the Enabled field select whether to enable to disable the signature and then click the Add button (Figure 12). Note that signatures can be added by not necessarilly enabled.
Figure 20
- Continue adding signature databases as needed. When finished, click on the Back to Feed Configuration button to return to the SecuriteInfo Feed Configuration page (Figure 21).
Figure 21

- Back on the SecuriteInfo Feed Configuration page, click on the Apply Settings button on the bottom of the page to save the new database signature(s) you just added to the configuration (Figure 22).
Figure 22

Delete or disable SecuriteInfo Databases
Deleting a database will completely remove all the database signatures from the ClamAV configuration. Note that if you delete all of the database for a particular feed, the feed will be effectively disabled.
Disabling a database will prevent the system from downloading signature updates for that particular database on the Signature Feed update interval. However, the signatures (albeit old ones) will still be part of the ClamAV configuration.
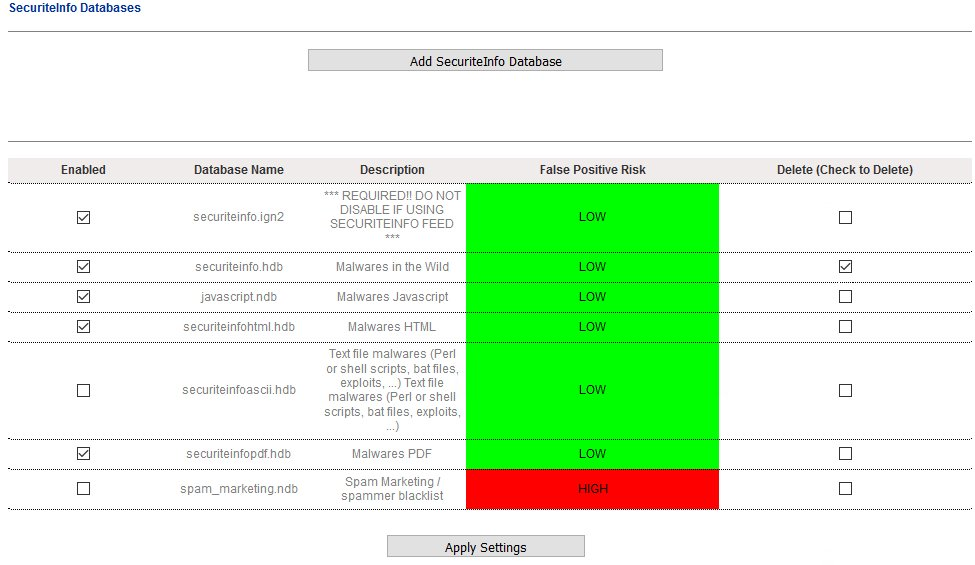
- Place a checkmark on the checkbox under Enabled column if you wish to disable a database or the Delete (Check to Delete) column if you wish to delete the database of one or more database(s) (Figure 23). Note that you should NEVER disable or remove the securiteinfo.ign2 signature database from the configuration or the SecuriteInfo feed will stop working.
Figure 23
- Click on the Apply Settings button on the bottom of the database listing to apply your setting to the ClamAV configuration (Figure 24) .
Figure 24

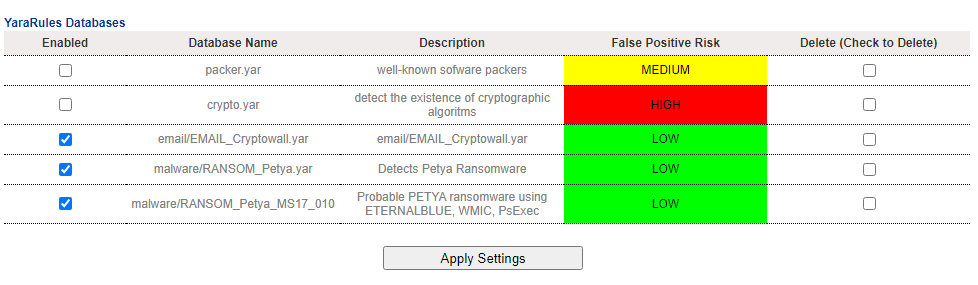
YaraRules
This project covers the need of a group of IT Security Researches to have a single repository where different Yara signatures are compiled, classified and kept as up to date as possible, and begin as an open source community for collecting Yara rules. The Yara ruleset is under the GNU-GPLv2 license and open to any user or organization, as long as you use it under this license. More information can be found at https://github.com/Yara-Rules/rules.
Enable YaraRules feed and adjust update interval
- Click on the
 icon under the Configure column of the yararules entry.
 - On the YaraRules Feed Configuration page under the YaraRules Feed section, ensure Enabled is selected (YaraRules is enabled by default).
- Under the YaraRules Database Update Interval, adjust the update interval as needed. The default is 24 hours. Change the interval with caution, because some feeds will ban your IP address if you connect for updates too often (Figure 25).

Figure 25

- Click on the Apply Settings button on the bottom of the page to apply your changes (Figure 26).
Figure 26

Add YaraRules Databases
Hermes SEG already comes preconfigured with the safest YaraRules signatures (Low False Positive Risk). Additional YaraRules signatures at the YaraRules Github Page. It's important to note that when adding database signatures from the YaraRules Githug page, that you include the directory it's under if applicable. For example, consider the following database signature: Malicious_Documents/Maldoc_APT_OLE_JSRat.yar. If you were to add that to the YaraRules configuration, ensure you include Malicious_Documents/ part before the database signature .
Note: Adding or enabling databases that have a False Positive Risk of Medium or High can lead to false positives. Use those databases with caution.
- Click on the
 icon under the Configure column of the yararules entry.
 - On the YaraRules Feed Configuration page click on the Add YaraRules Database button (Figure 27).

Figure 27

- On the Add Signature Database page, under the Database field, enter the signature you wish to add, under the Description field enter a description for the database, under the False Positive Risk field select a risk level and under the Enabled field select whether to enable to disable the signature and then click the Add button (Figure 28). Note that signatures can be added by not necessarilly enabled.
Figure 28

- Continue adding signature databases as needed. When finished, click on the Back to Feed Configuration button to return to the Linux Malware Detect Feed Configuration page (Figure 29).
Figure 29

- Back on the Linux Malware Detect Feed Configuration page, click on the Apply Settings button on the bottom of the page to save the new database signature(s) you just added to the configuration (Figure 30).
Figure 30

Delete or disable YaraRules Databases
Deleting a database will completely remove all the database signatures from the ClamAV configuration. Note that if you delete all of the database for a particular feed, the feed will be effectively disabled.
Disabling a database will prevent the system from downloading signature updates for that particular database on the Signature Feed update interval. However, the signatures (albeit old ones) will still be part of the ClamAV configuration.
- Place a checkmark on the checkbox under Enabled column if you wish to disable a database or the Delete (Check to Delete) column if you wish to delete the database of one or more database(s).
- Click on the Apply Settings button to apply your setting to the ClamAV configuration (Figure 31).
Figure 31