Groups, Users, and Access Control
Credit: Blueriver
Permissions
When it comes to permissions in Mura CMS, the most important thing to keep in mind is that all permissions are "group-based." So, instead of thinking about individual users, it's better to think in terms of groups. This concept applies whether we are talking about restricting access to a specific section of your site, or we are talking about "editing" privileges for various groups throughout your website. As you'll see, you can always create a group with only one individual assigned to it, if you really need to only allow one person access to something in particular.
That said, Mura CMS has included some very powerful features to assist you in setting up your desired permissions for various sections of the administration area, including the rights and privileges each group has when it comes to creating and managing content, or even accessing different areas of the front-end, public-facing side of your site.
Creating & Managing Groups
All permissions in Mura are group-based. As such, it's important to take time to think about the structure of your site, and how you wish to enable and/or restrict access throughout it. Also, as discussed in the "Author vs. Editor Roles" section, you should consider these roles/privileges when creating your groups.
There are two main "pools" of groups within Mura: System Groups, and Member Groups. The key difference between these pools of groups is System Groups have access to the back-end administration area of Mura, and Member Groups do not. This doesn't mean Member Groups cannot edit content, it simply means users of Member Groups cannot log in to the back-end administration area, unless they are also a member of a System Group.
This may sound somewhat confusing if you're new to managing groups and users. However, be patient, read through this entire section, and you will find Mura can accommodate some of the most complicated scenarios you can think of with ease.
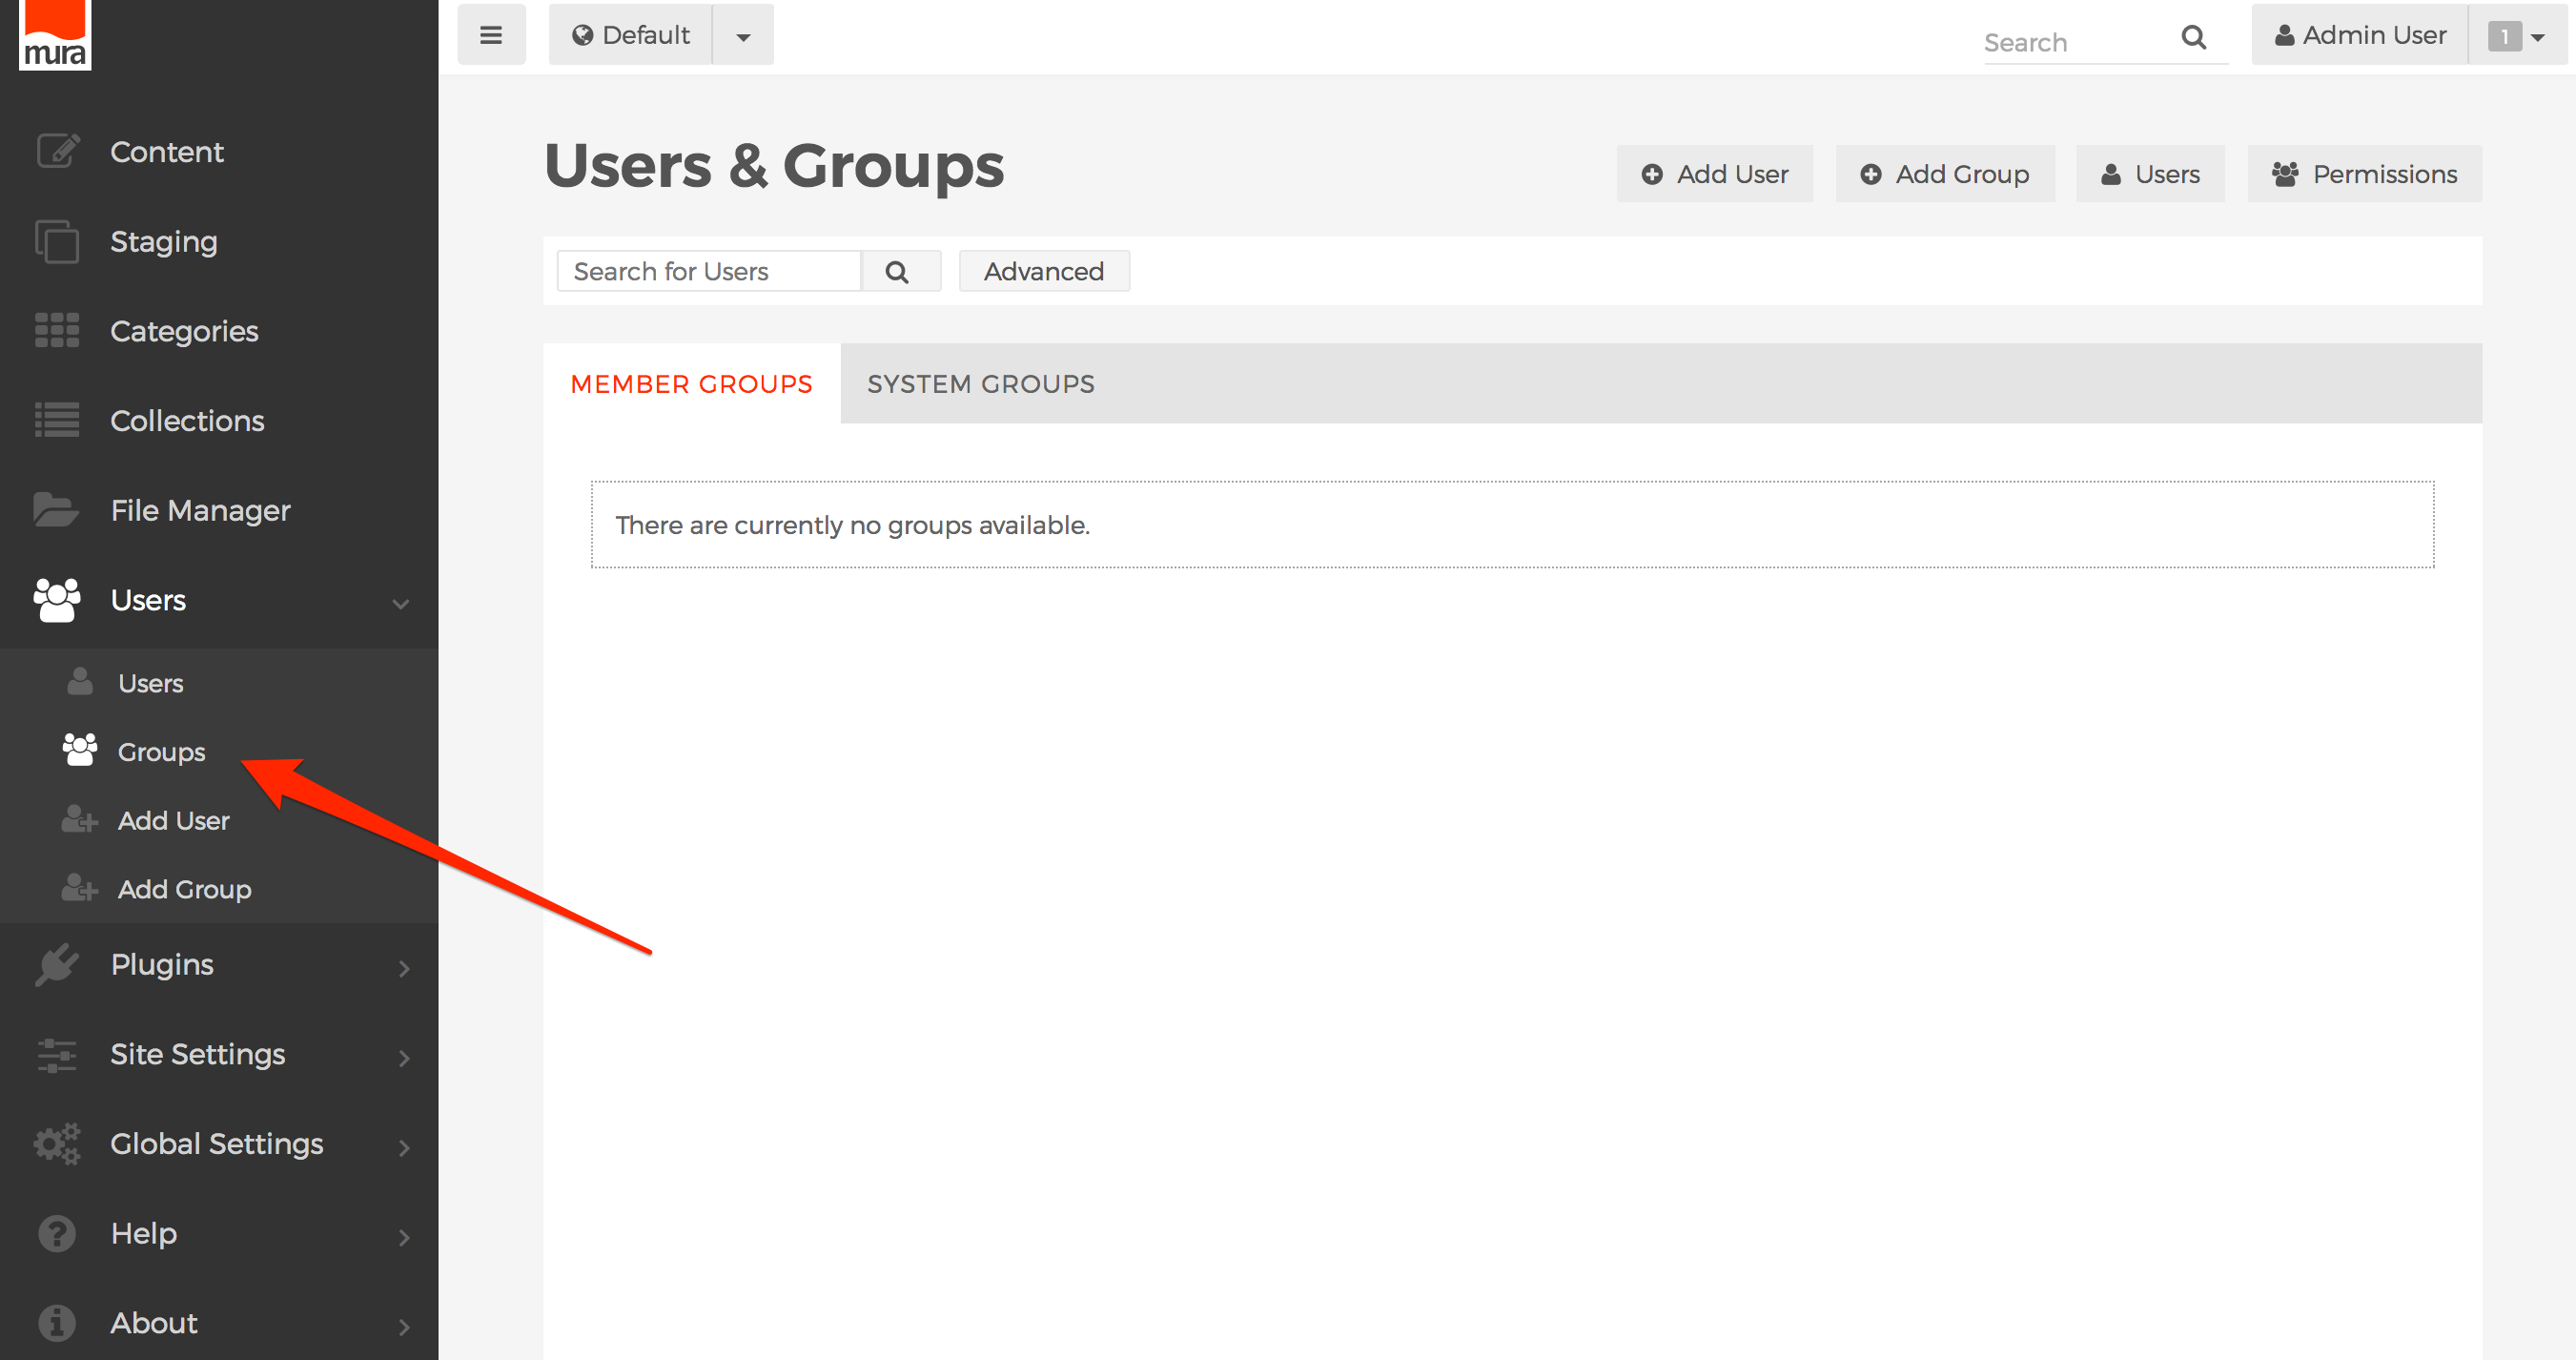
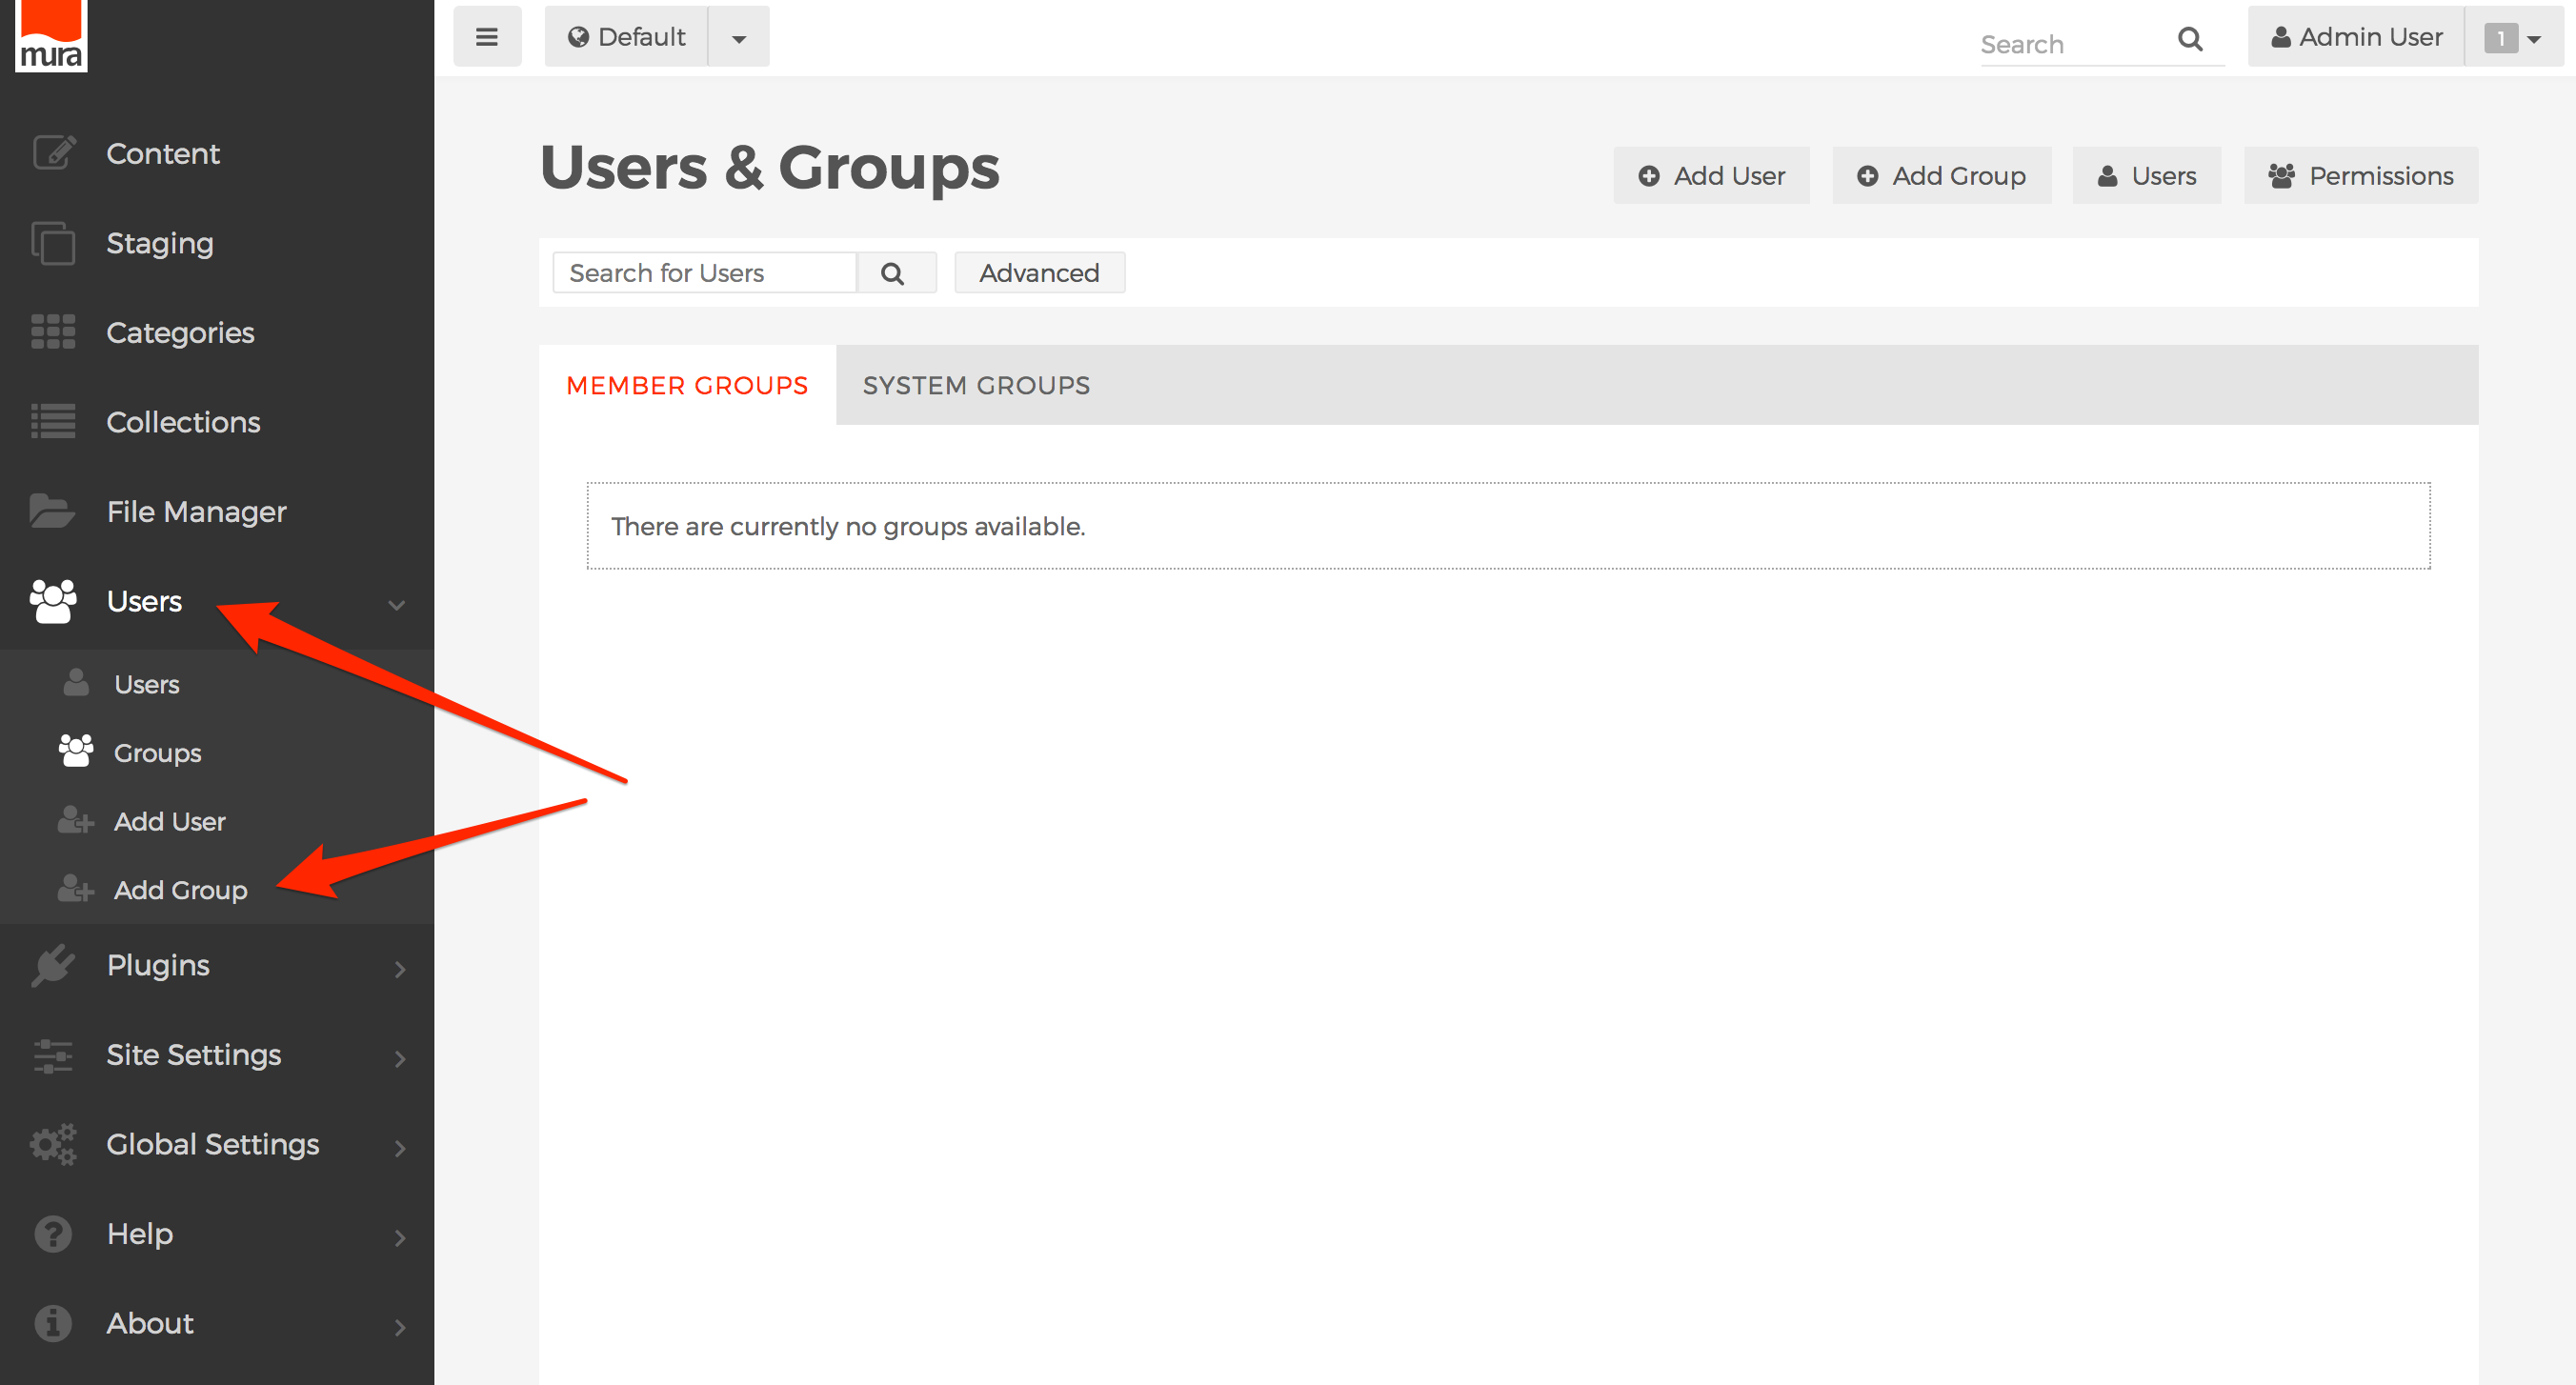
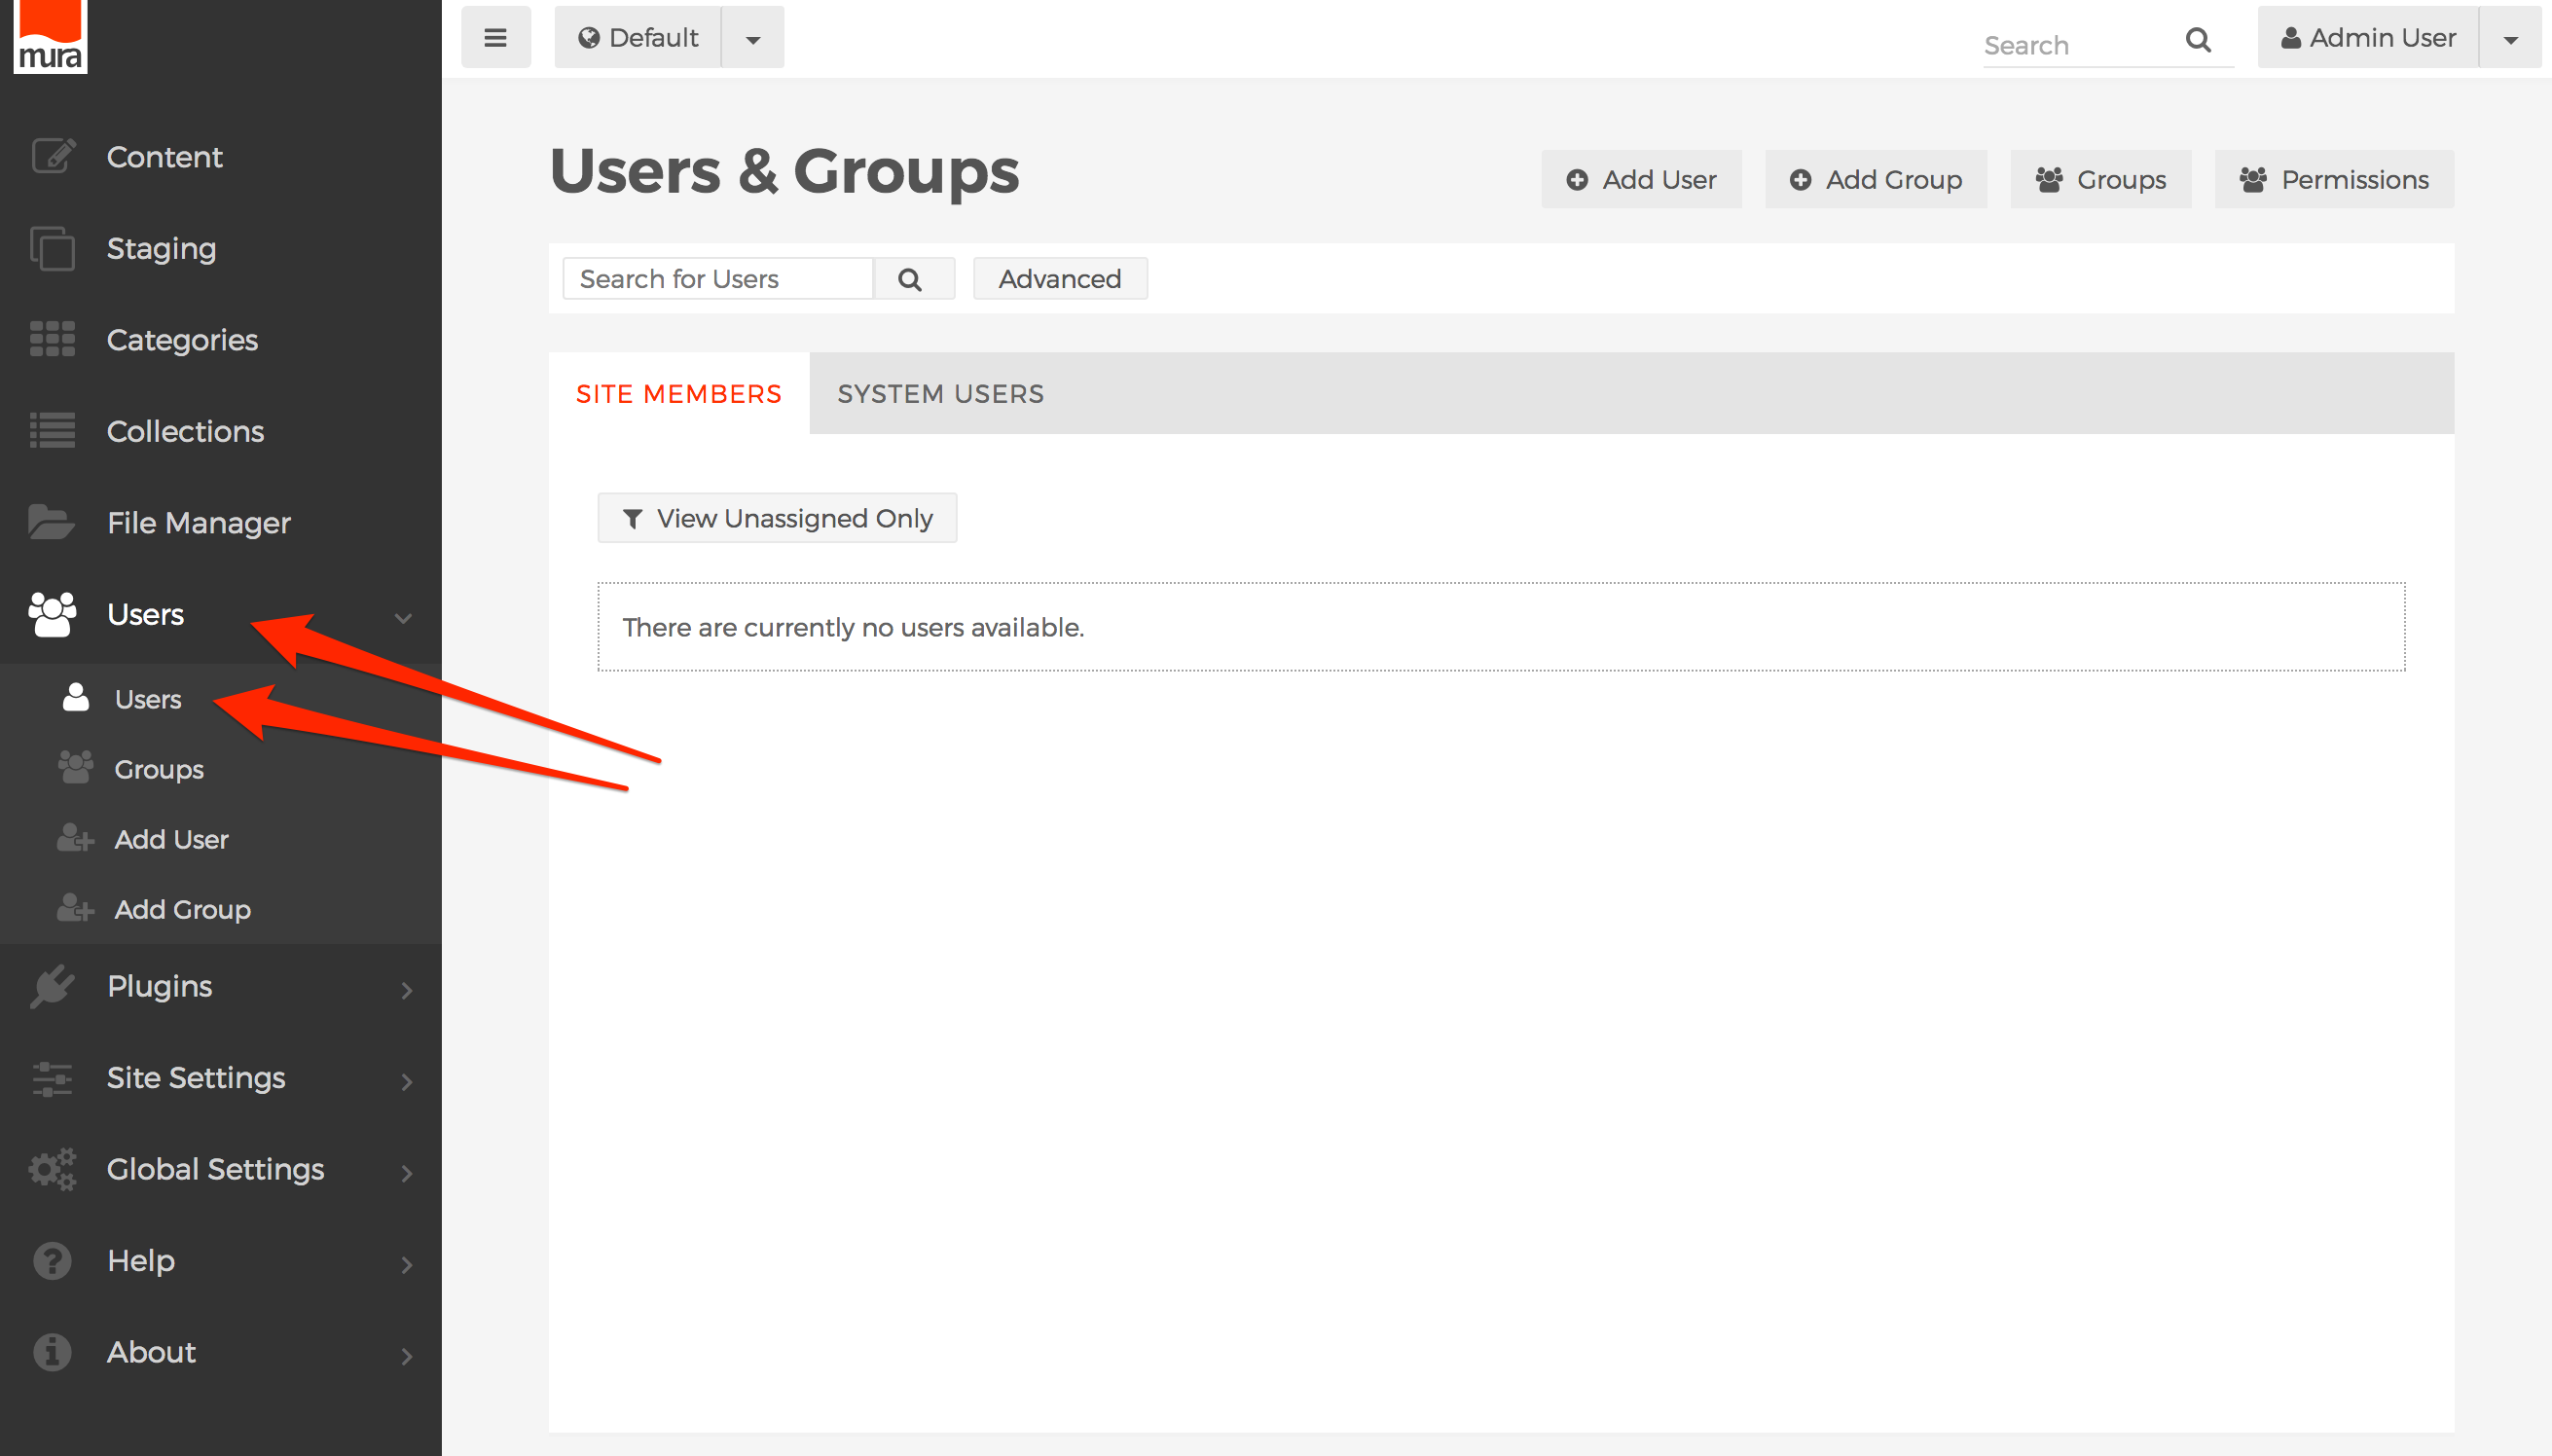
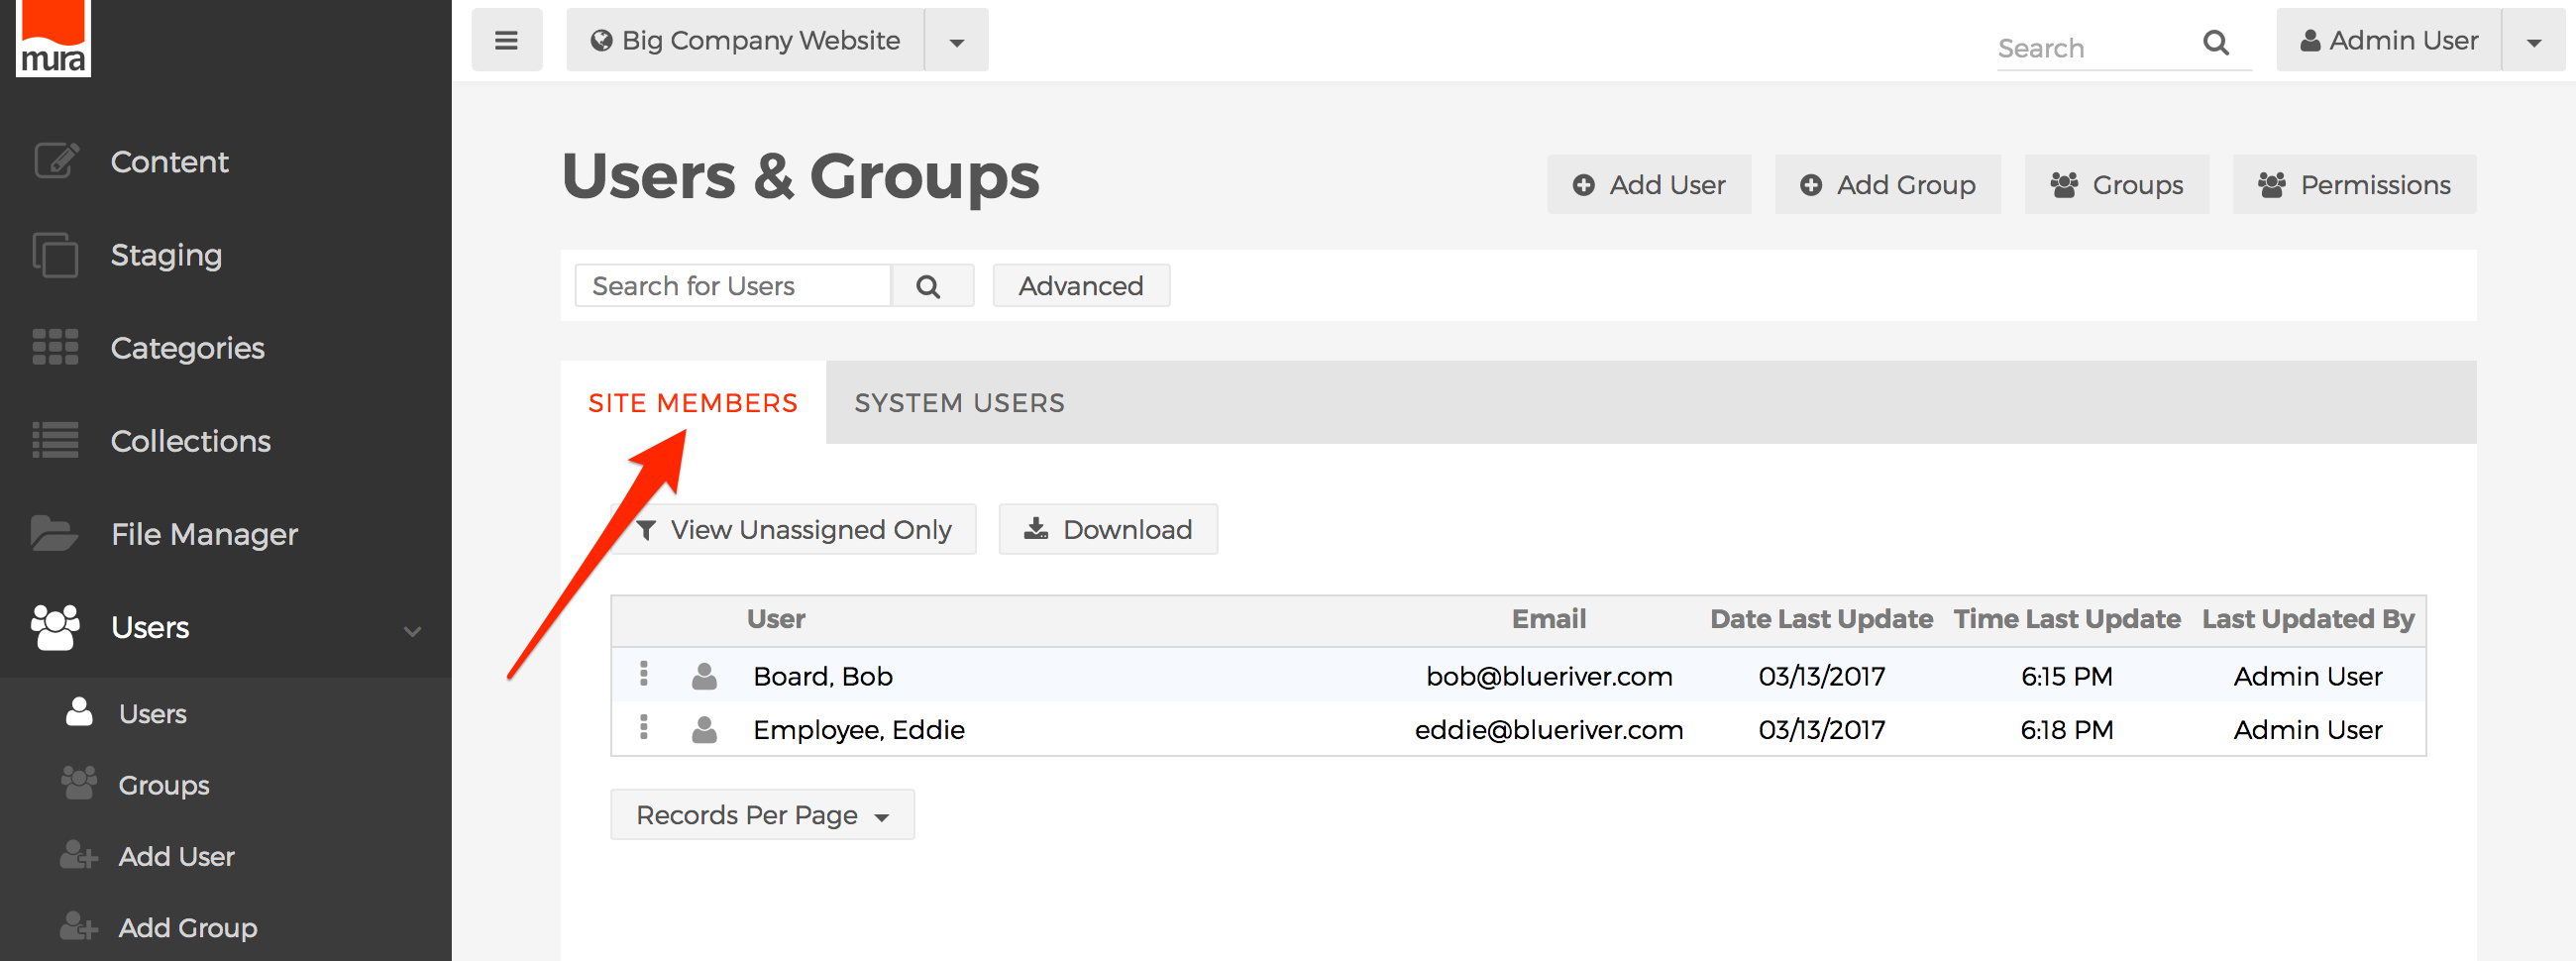
How to Access Users & Groups
- From the back-end administration area of Mura, click Users from the primary navigation to reveal an additional set of menu items.
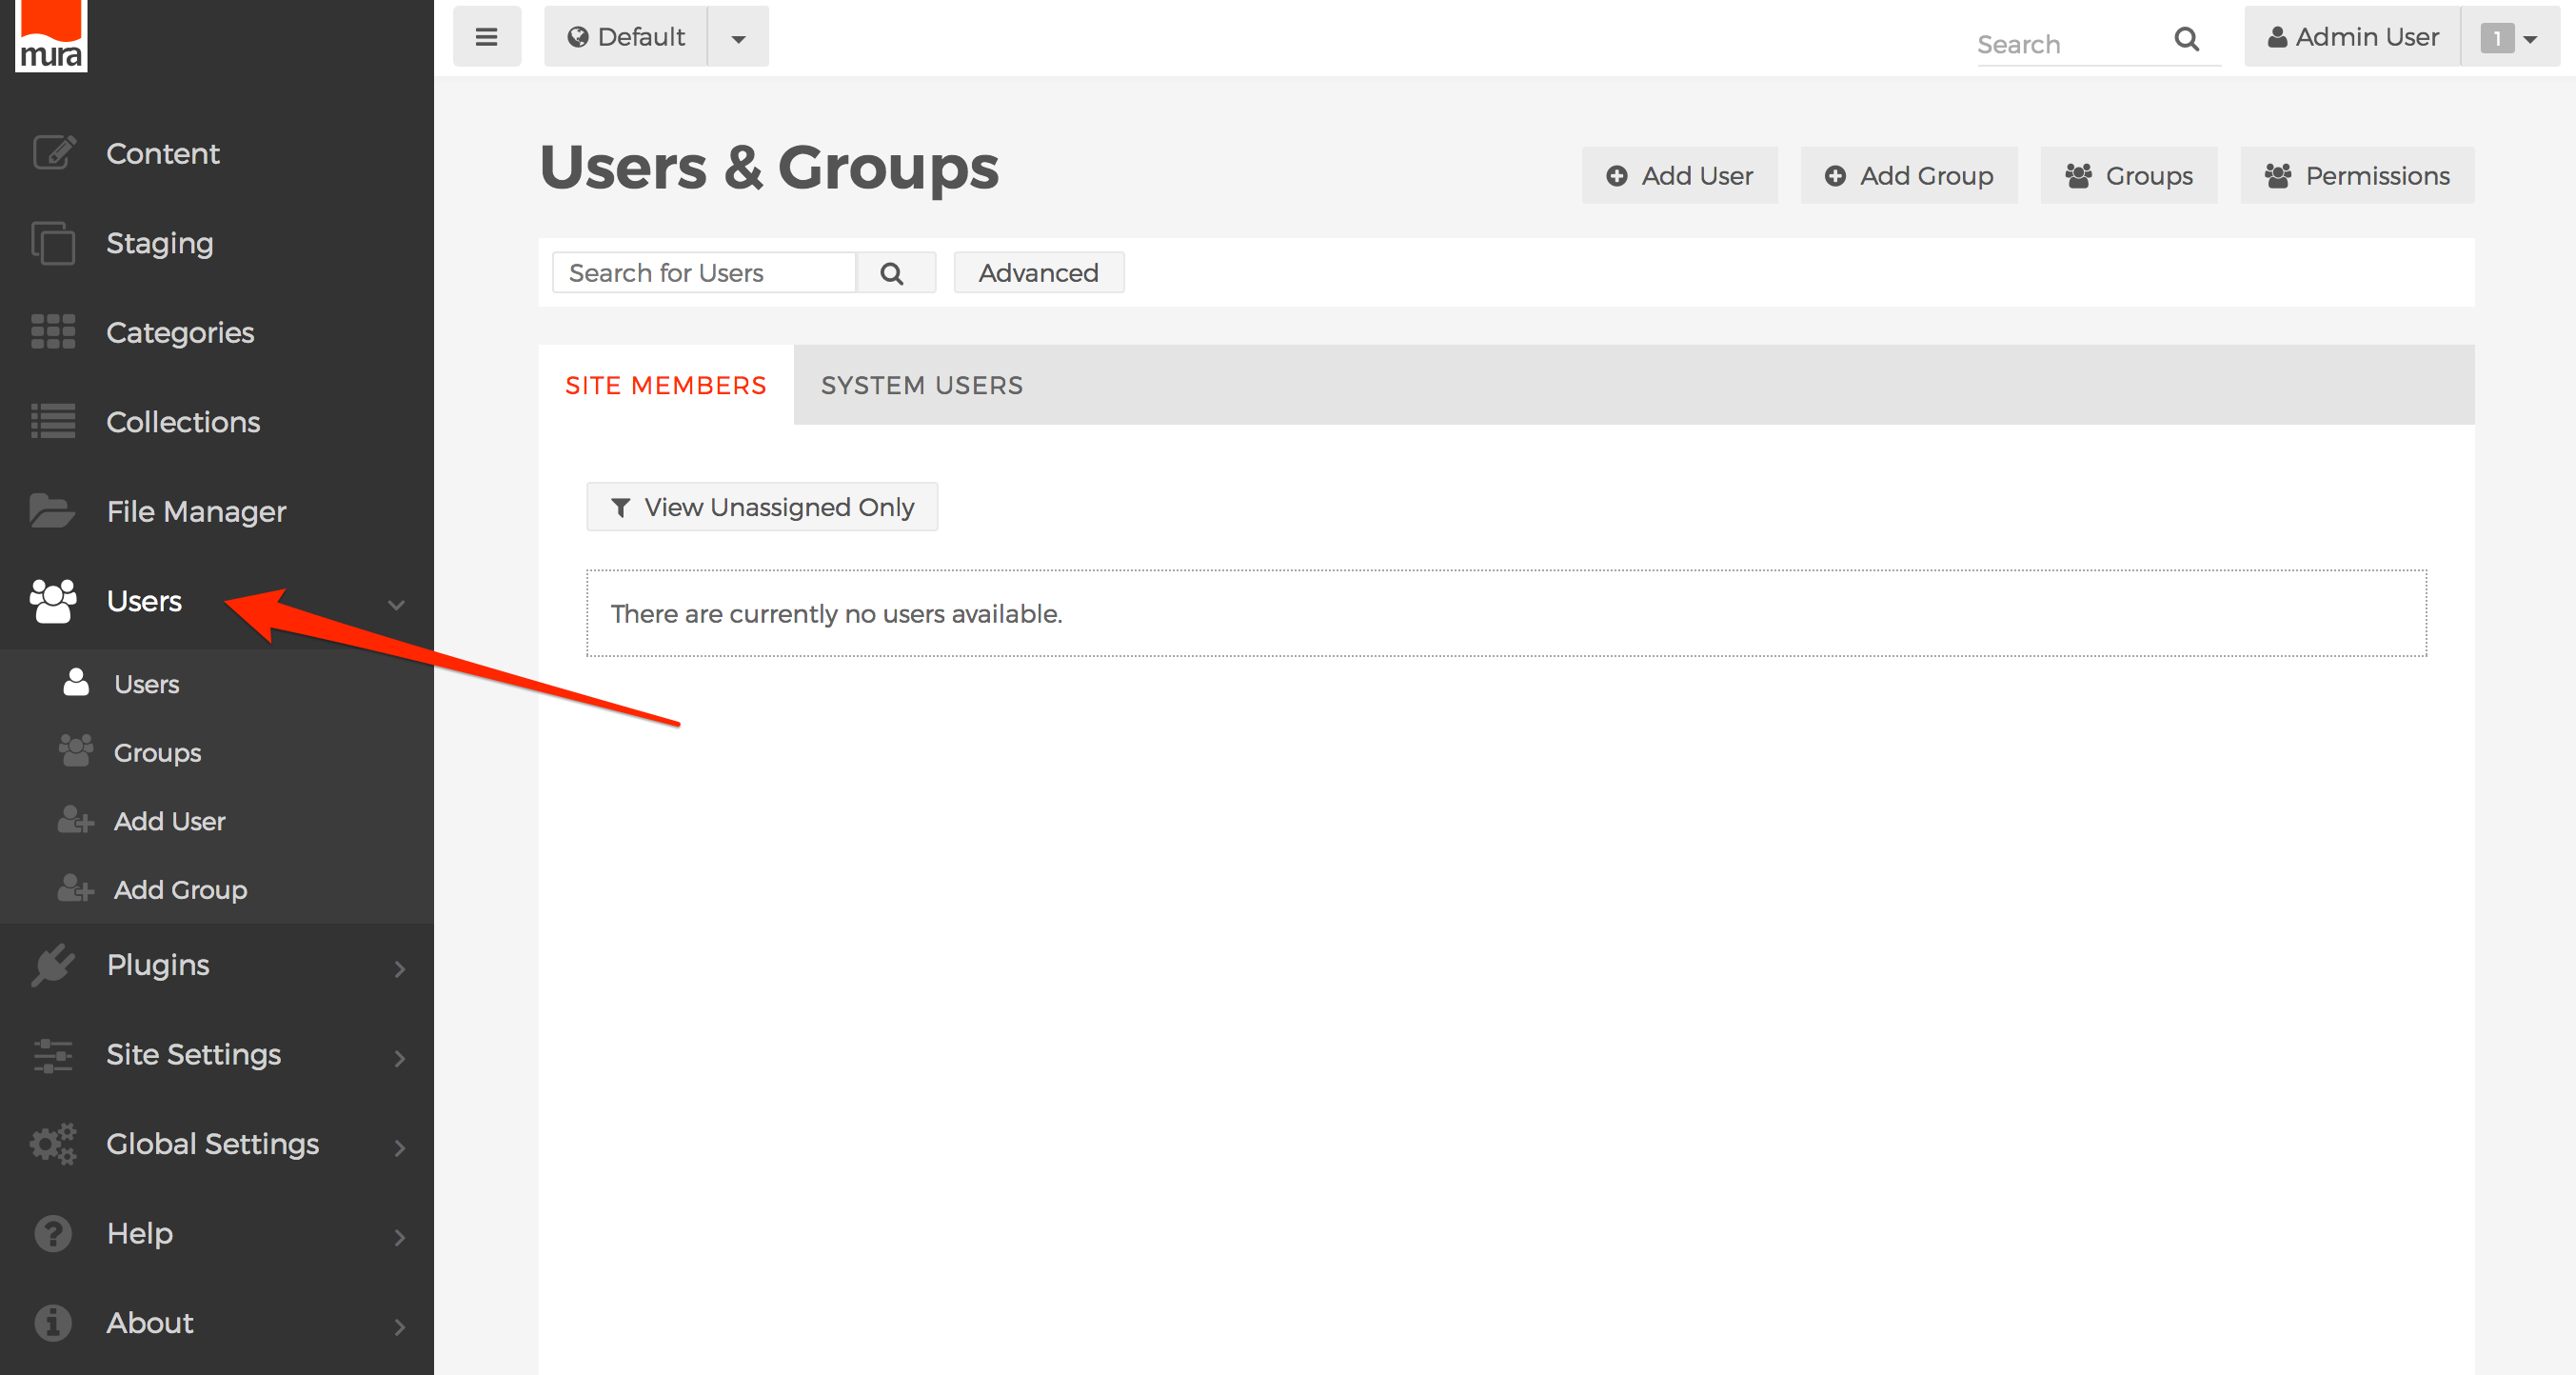
- To manage users, select Users.

- To manage groups, select Groups.

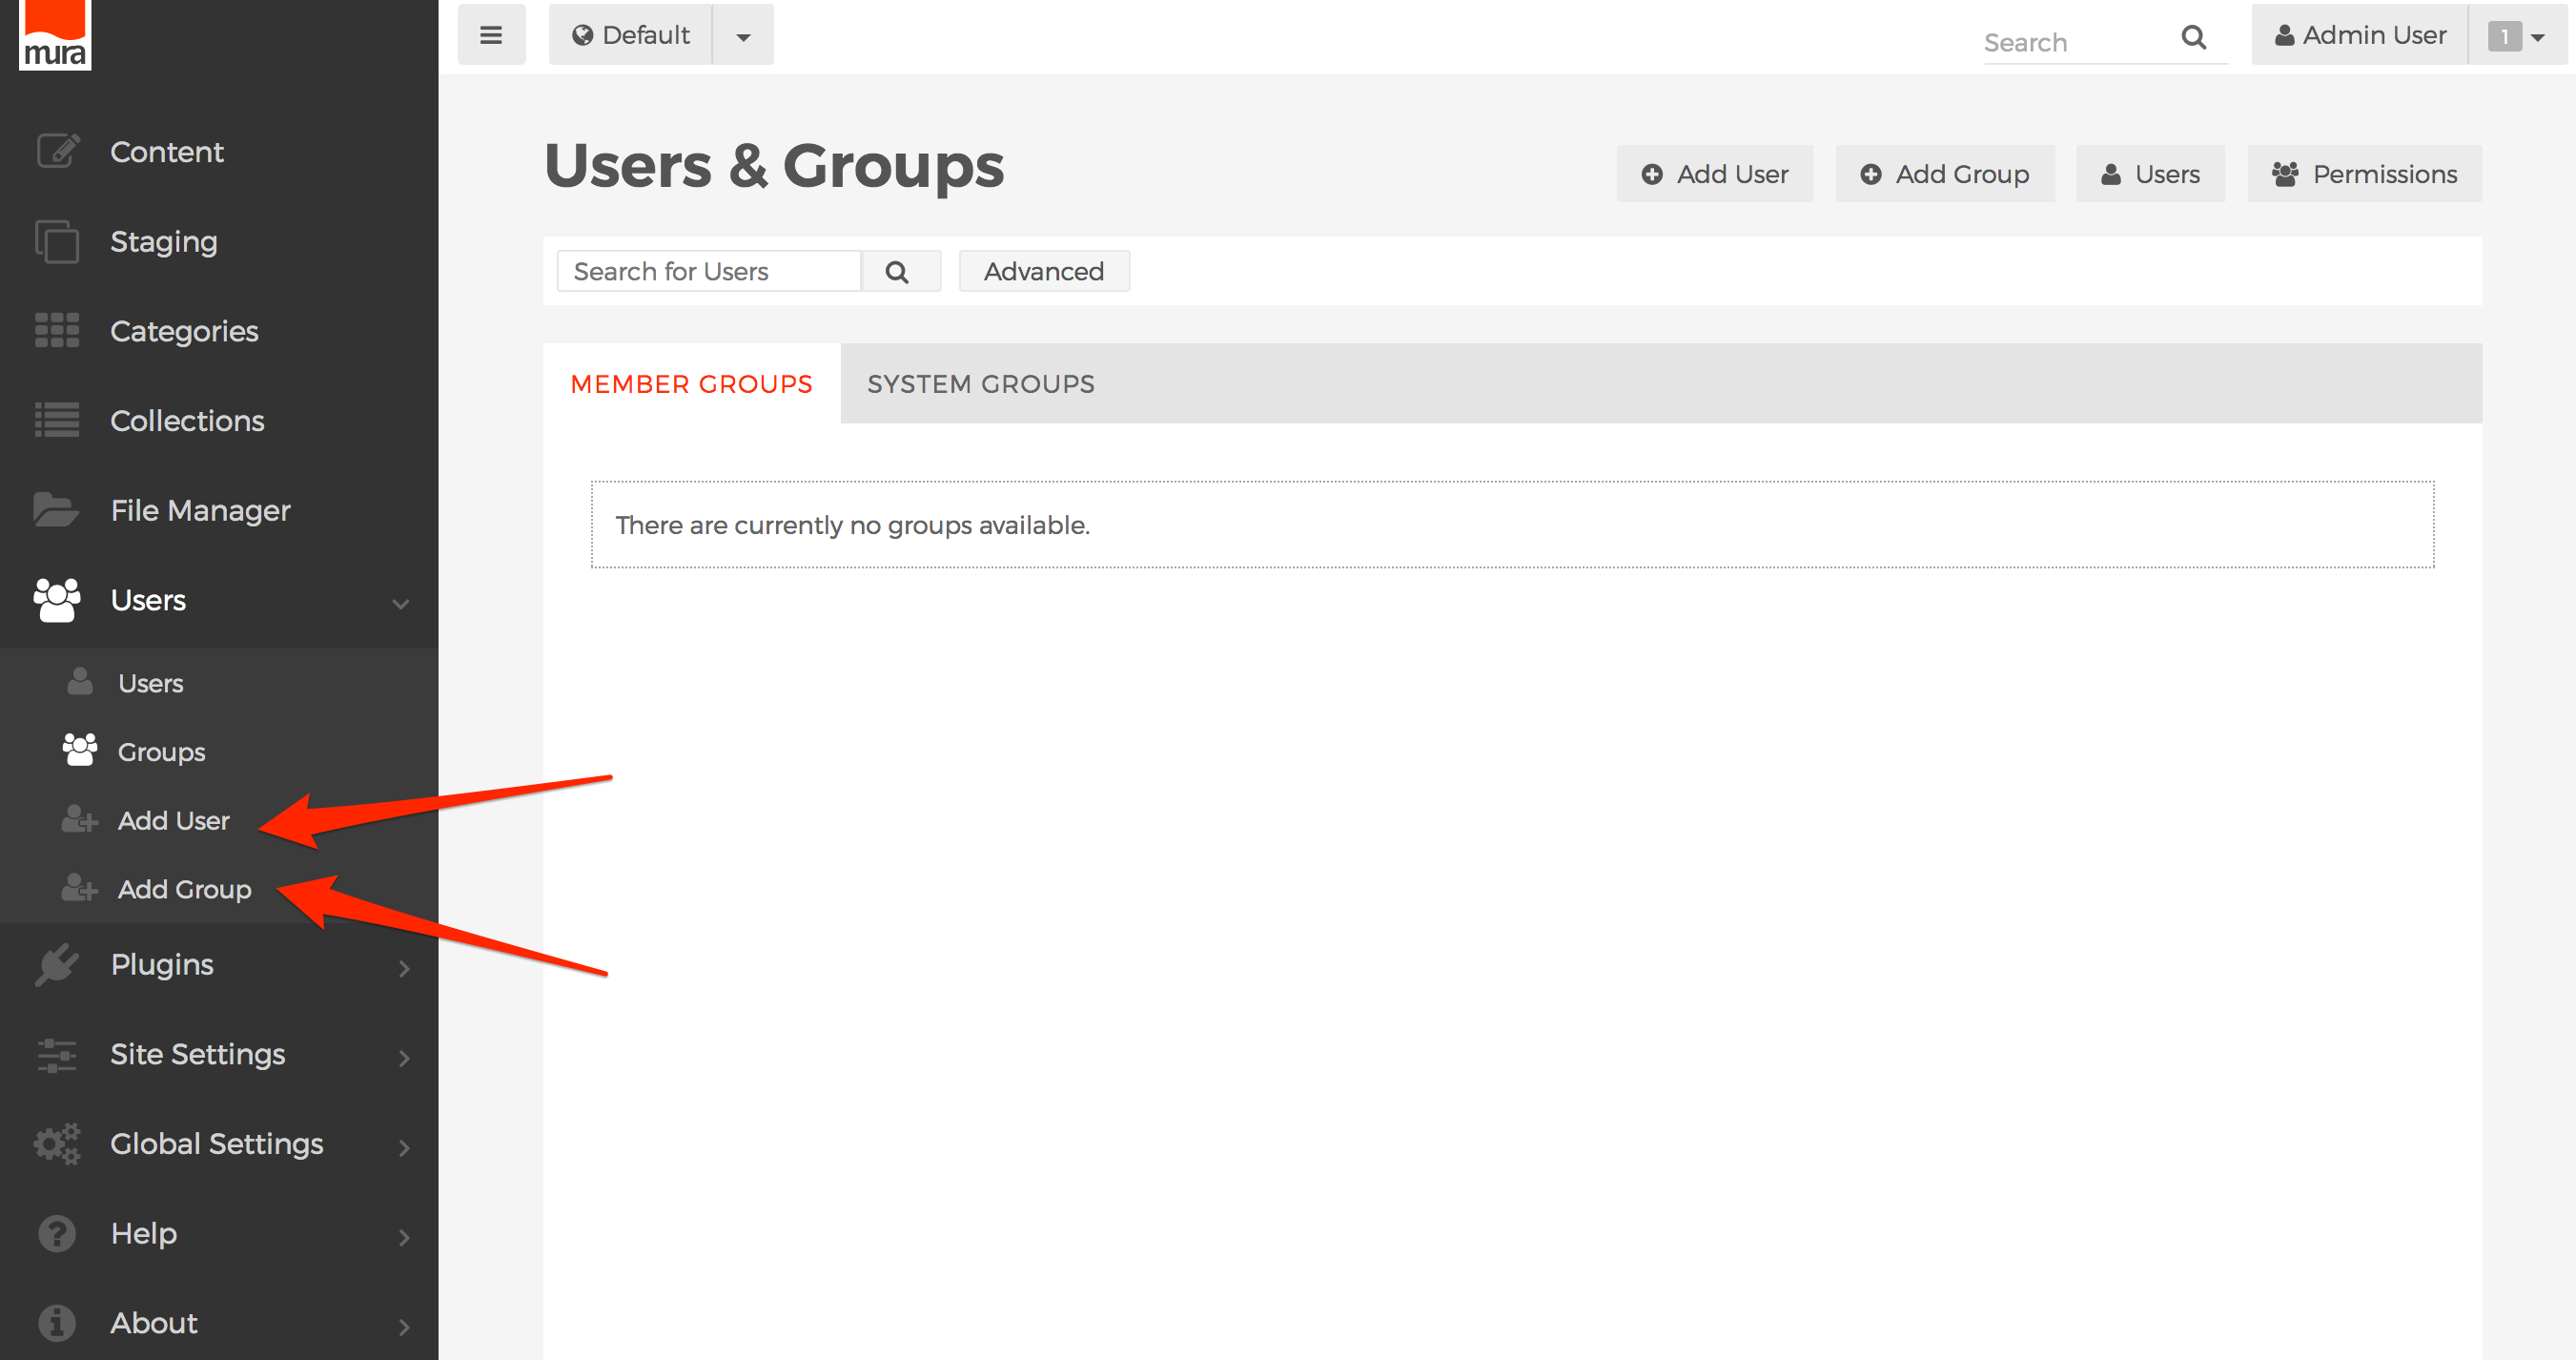
- You can also select Add User to add a new user, or Add Group, to add a new group.

- To delete a group, from the Users & Groups screen, select the three-dot menu on the row of the group you wish to delete, and click Delete.
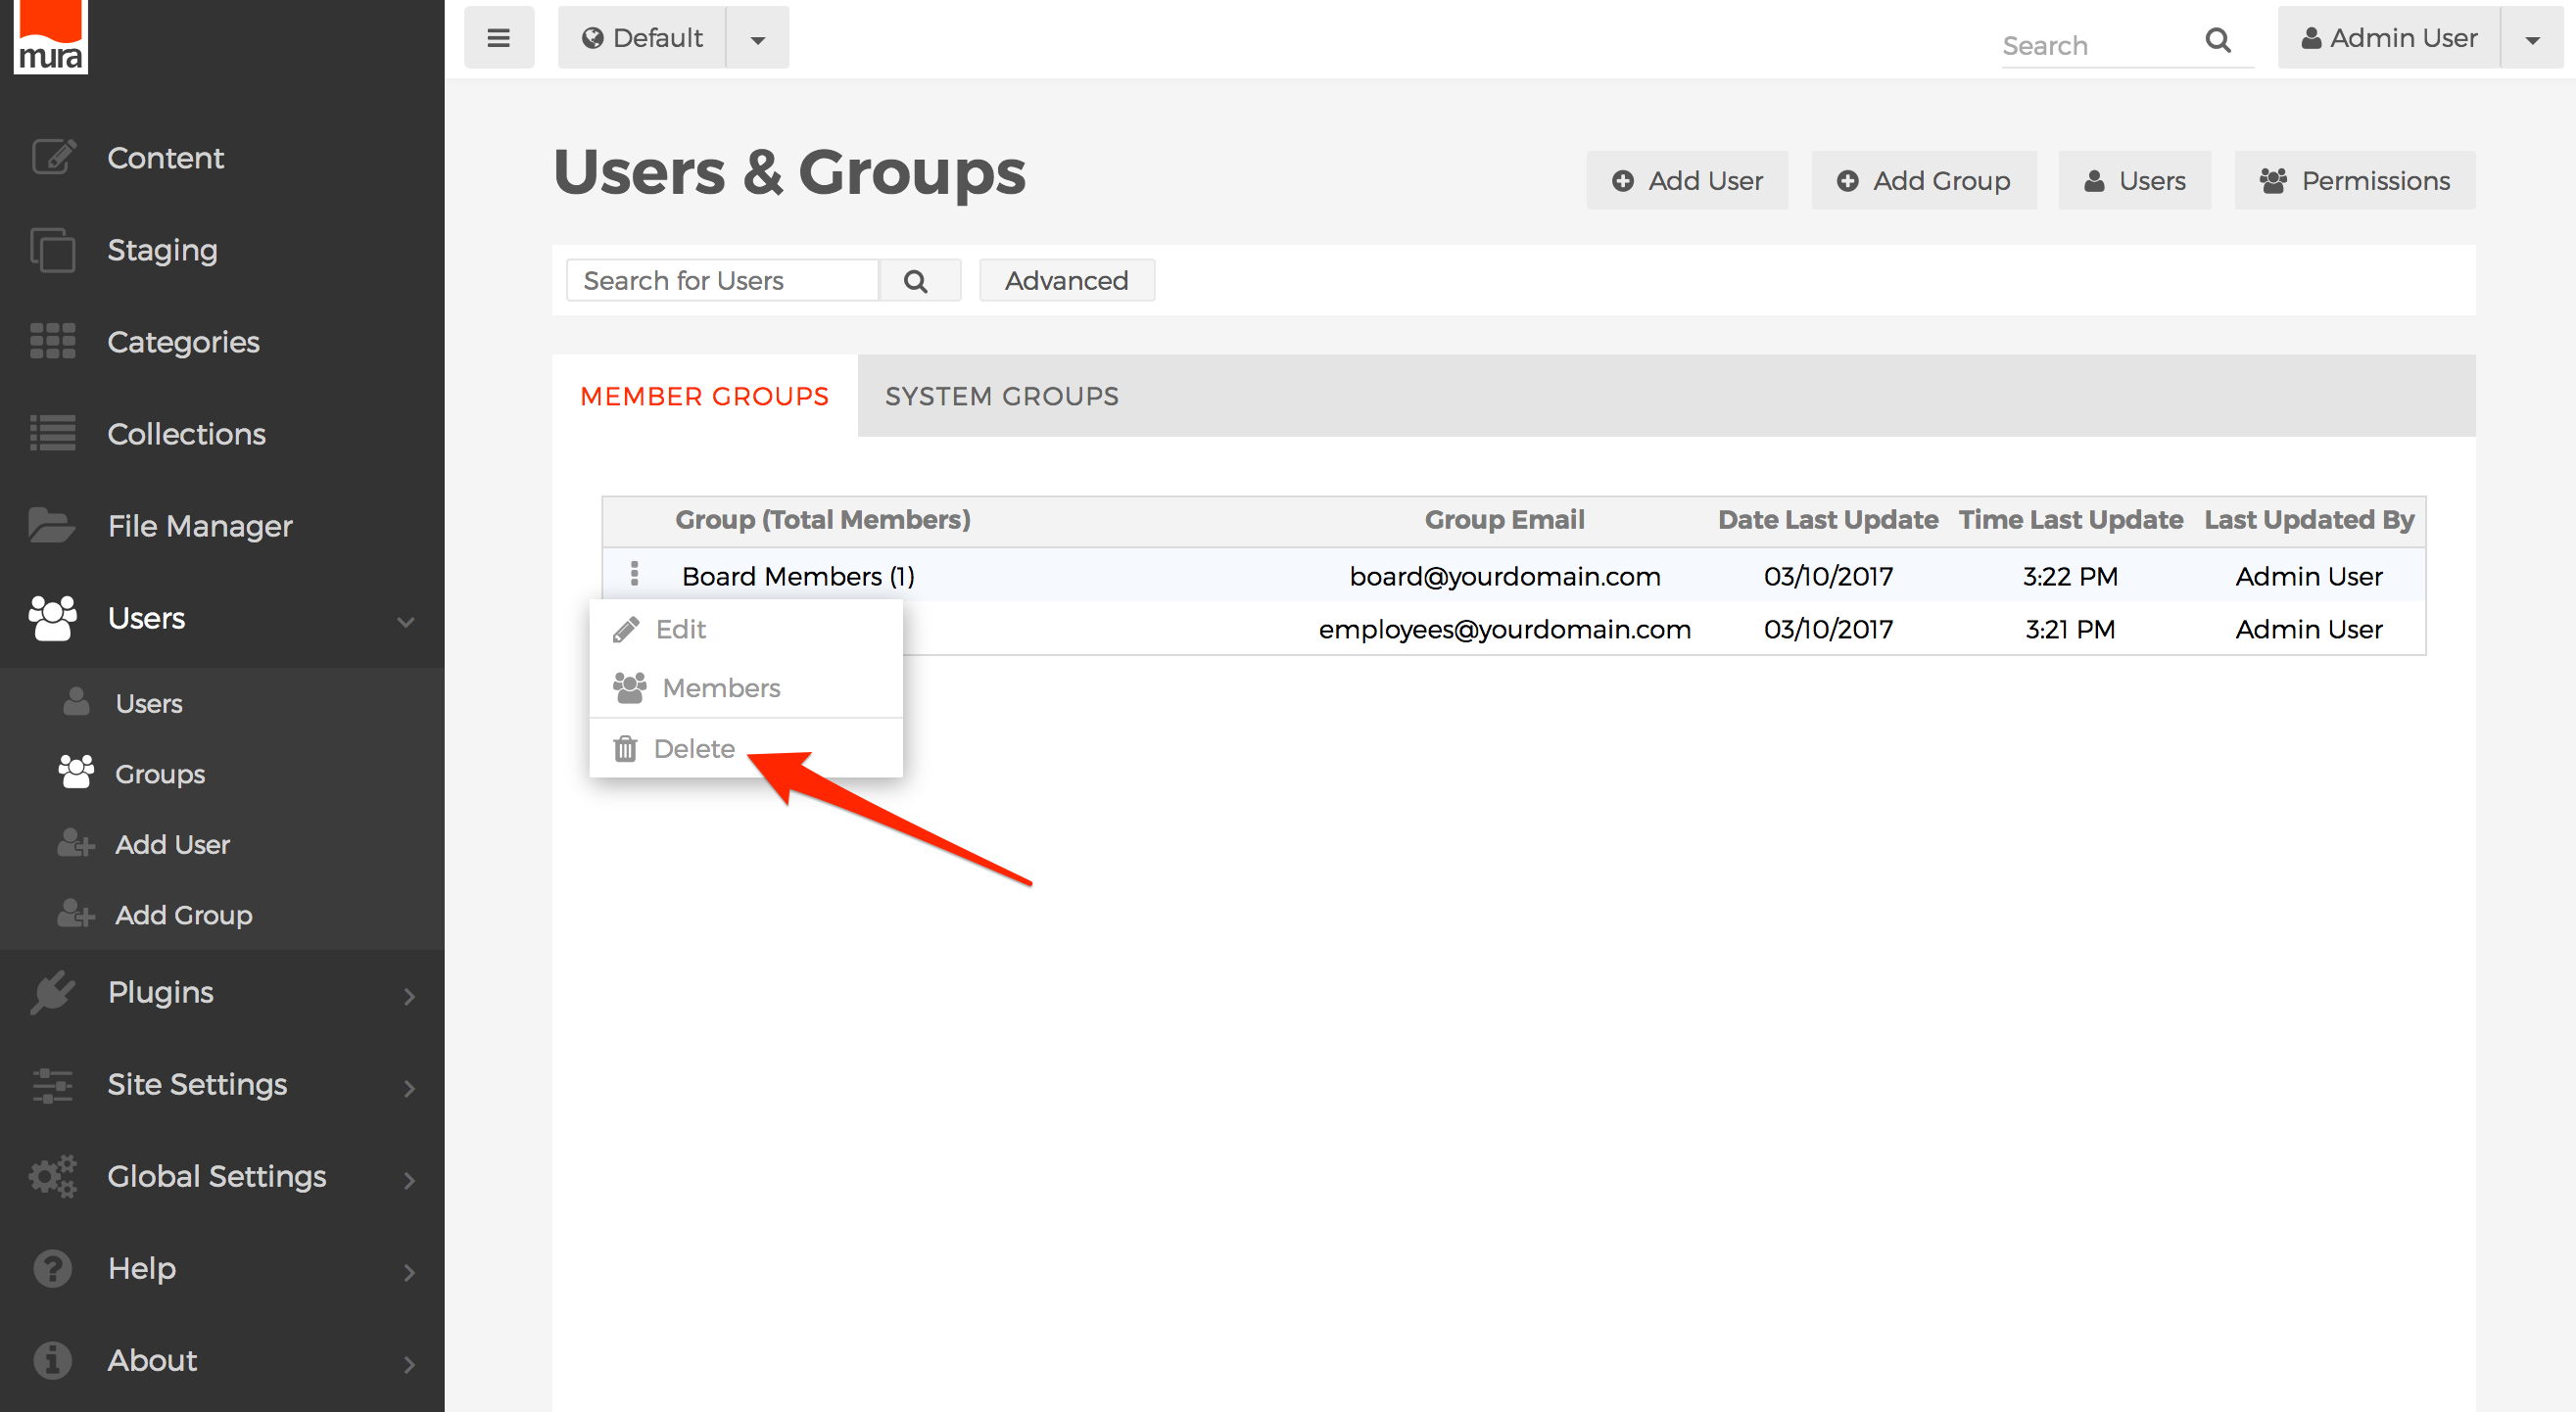
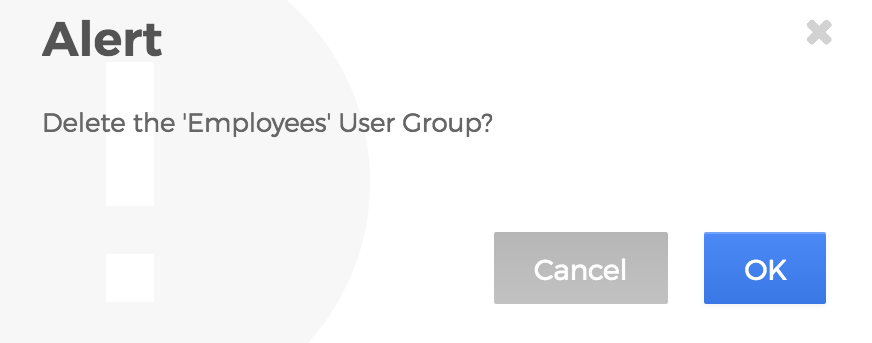
- You should be prompted with an Alert dialog box. To confirm, select OK. To cancel, click Cancel.


System Groups
All System Groups have access to the back-end administration area of Mura. So, if you need to allow a user access to the back-end administration area, they must be a member of a System Group.
How to Access System Groups
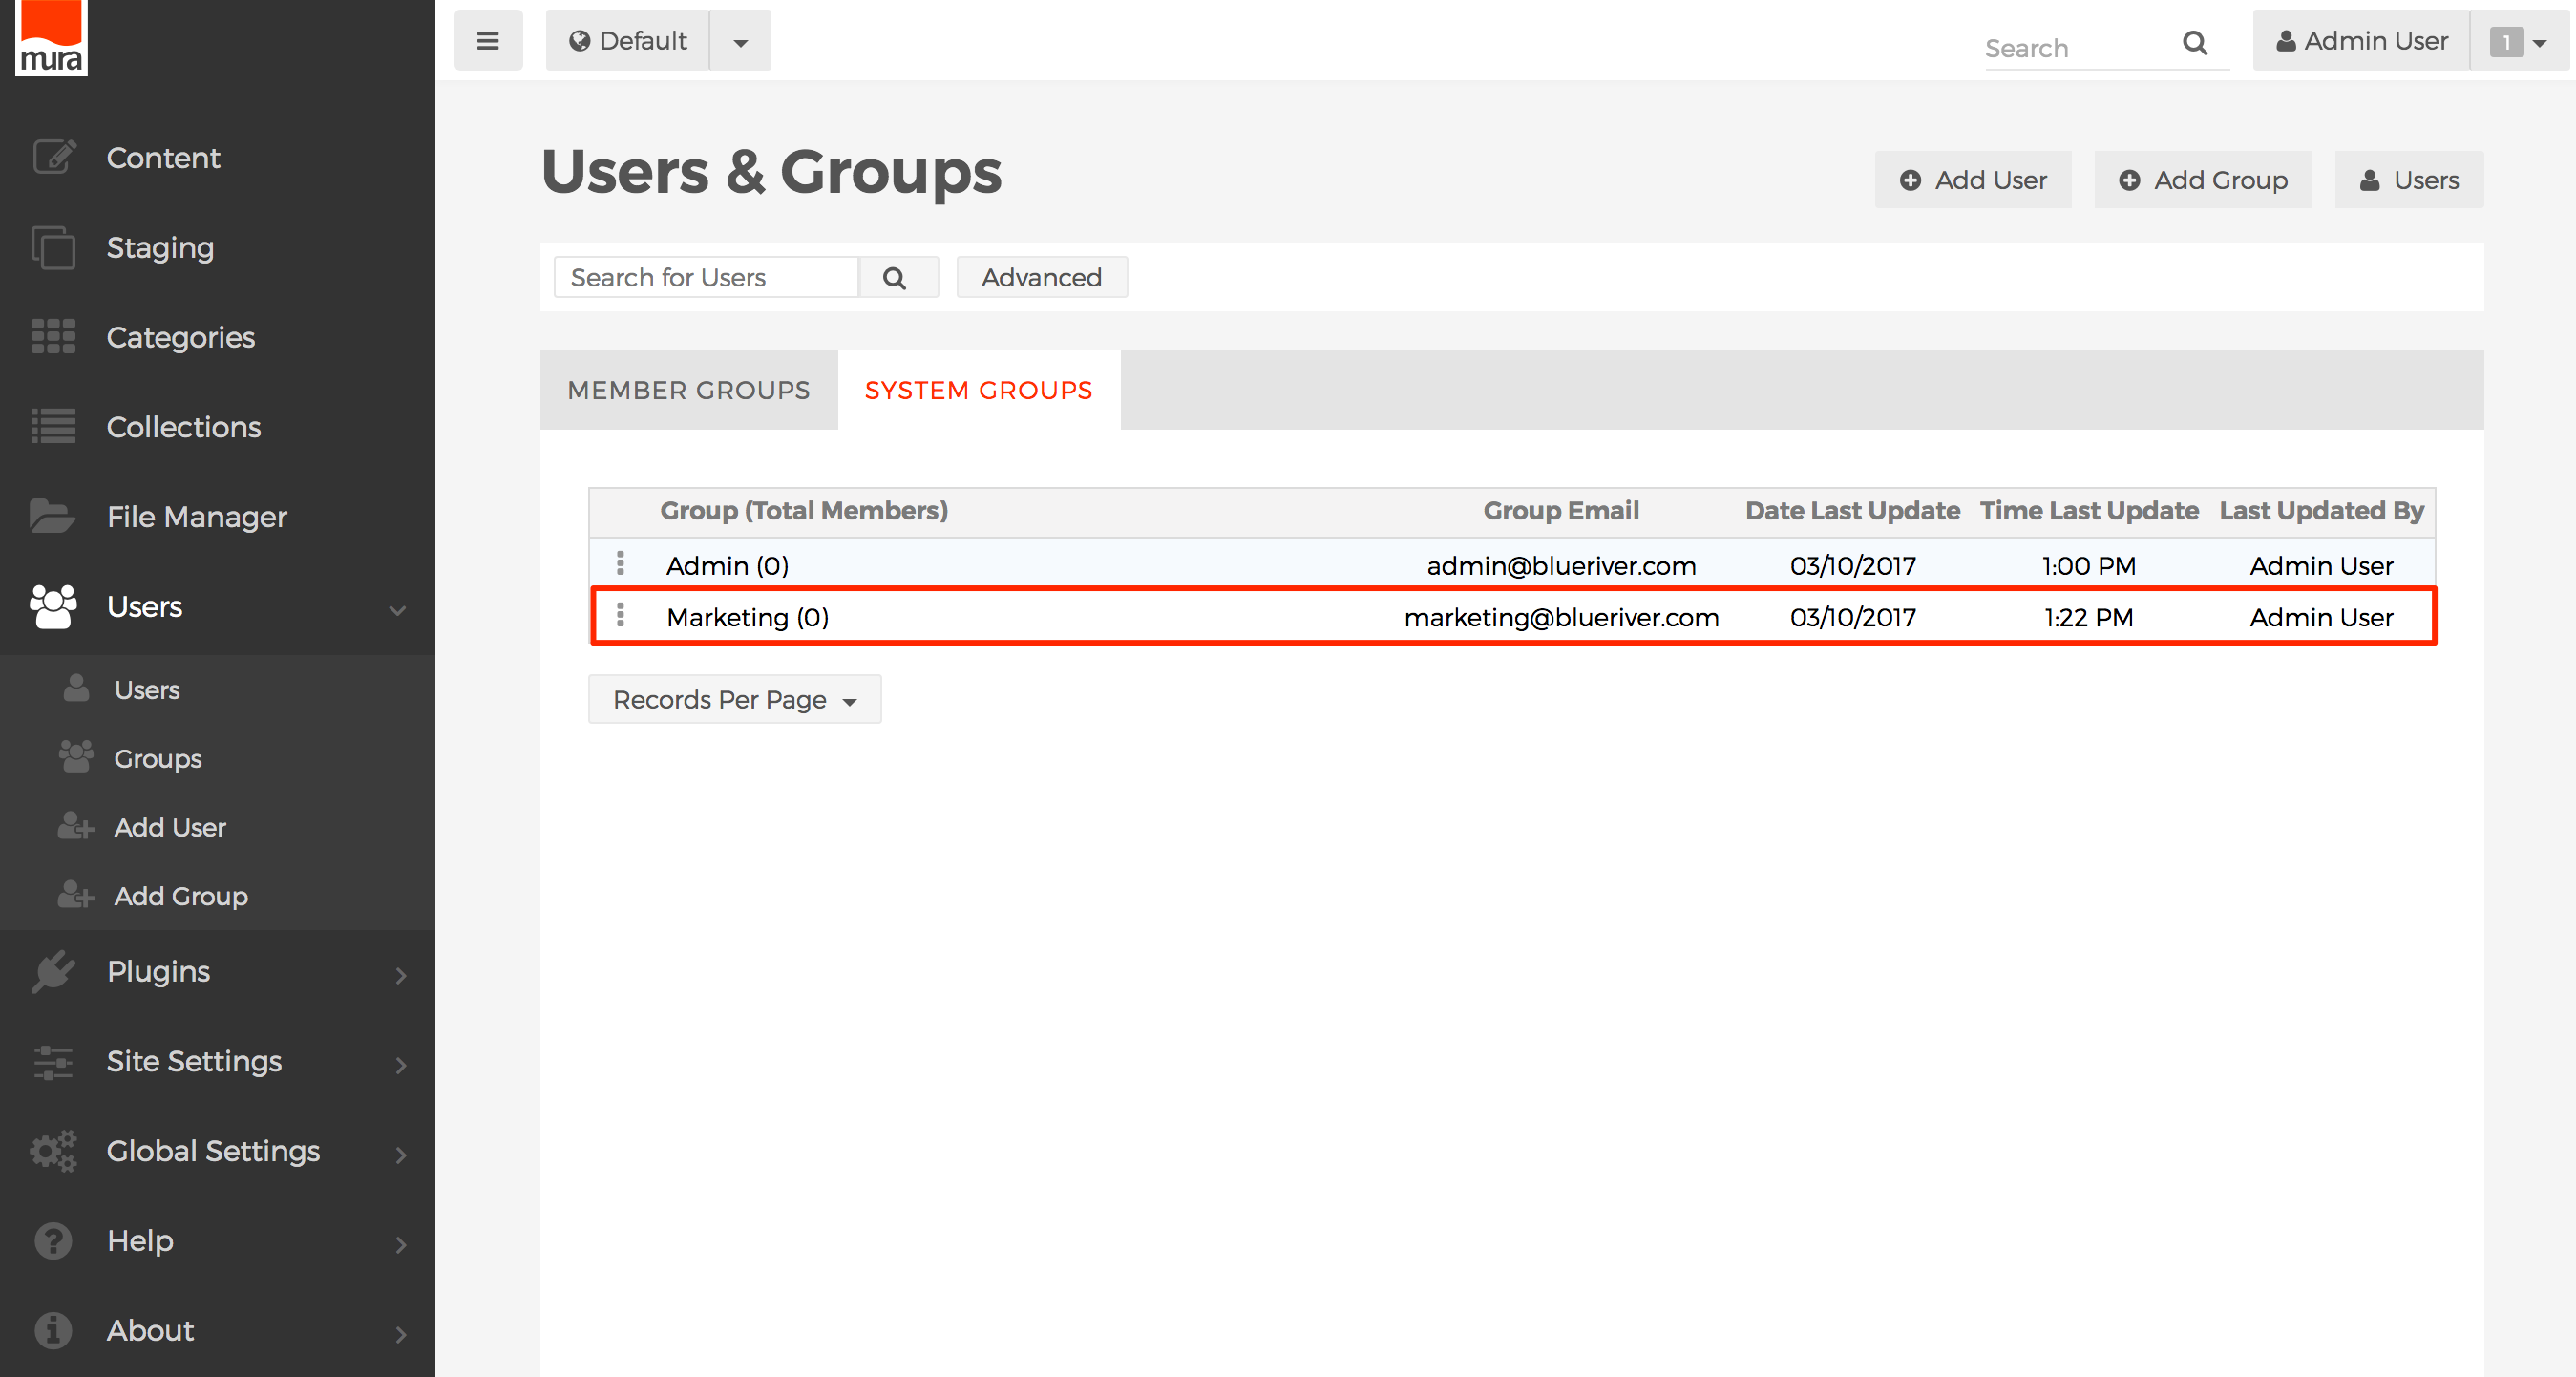
- From the back-end administration area of Mura, select Users from the main navigation, then Groups, and click the System Groups tab.
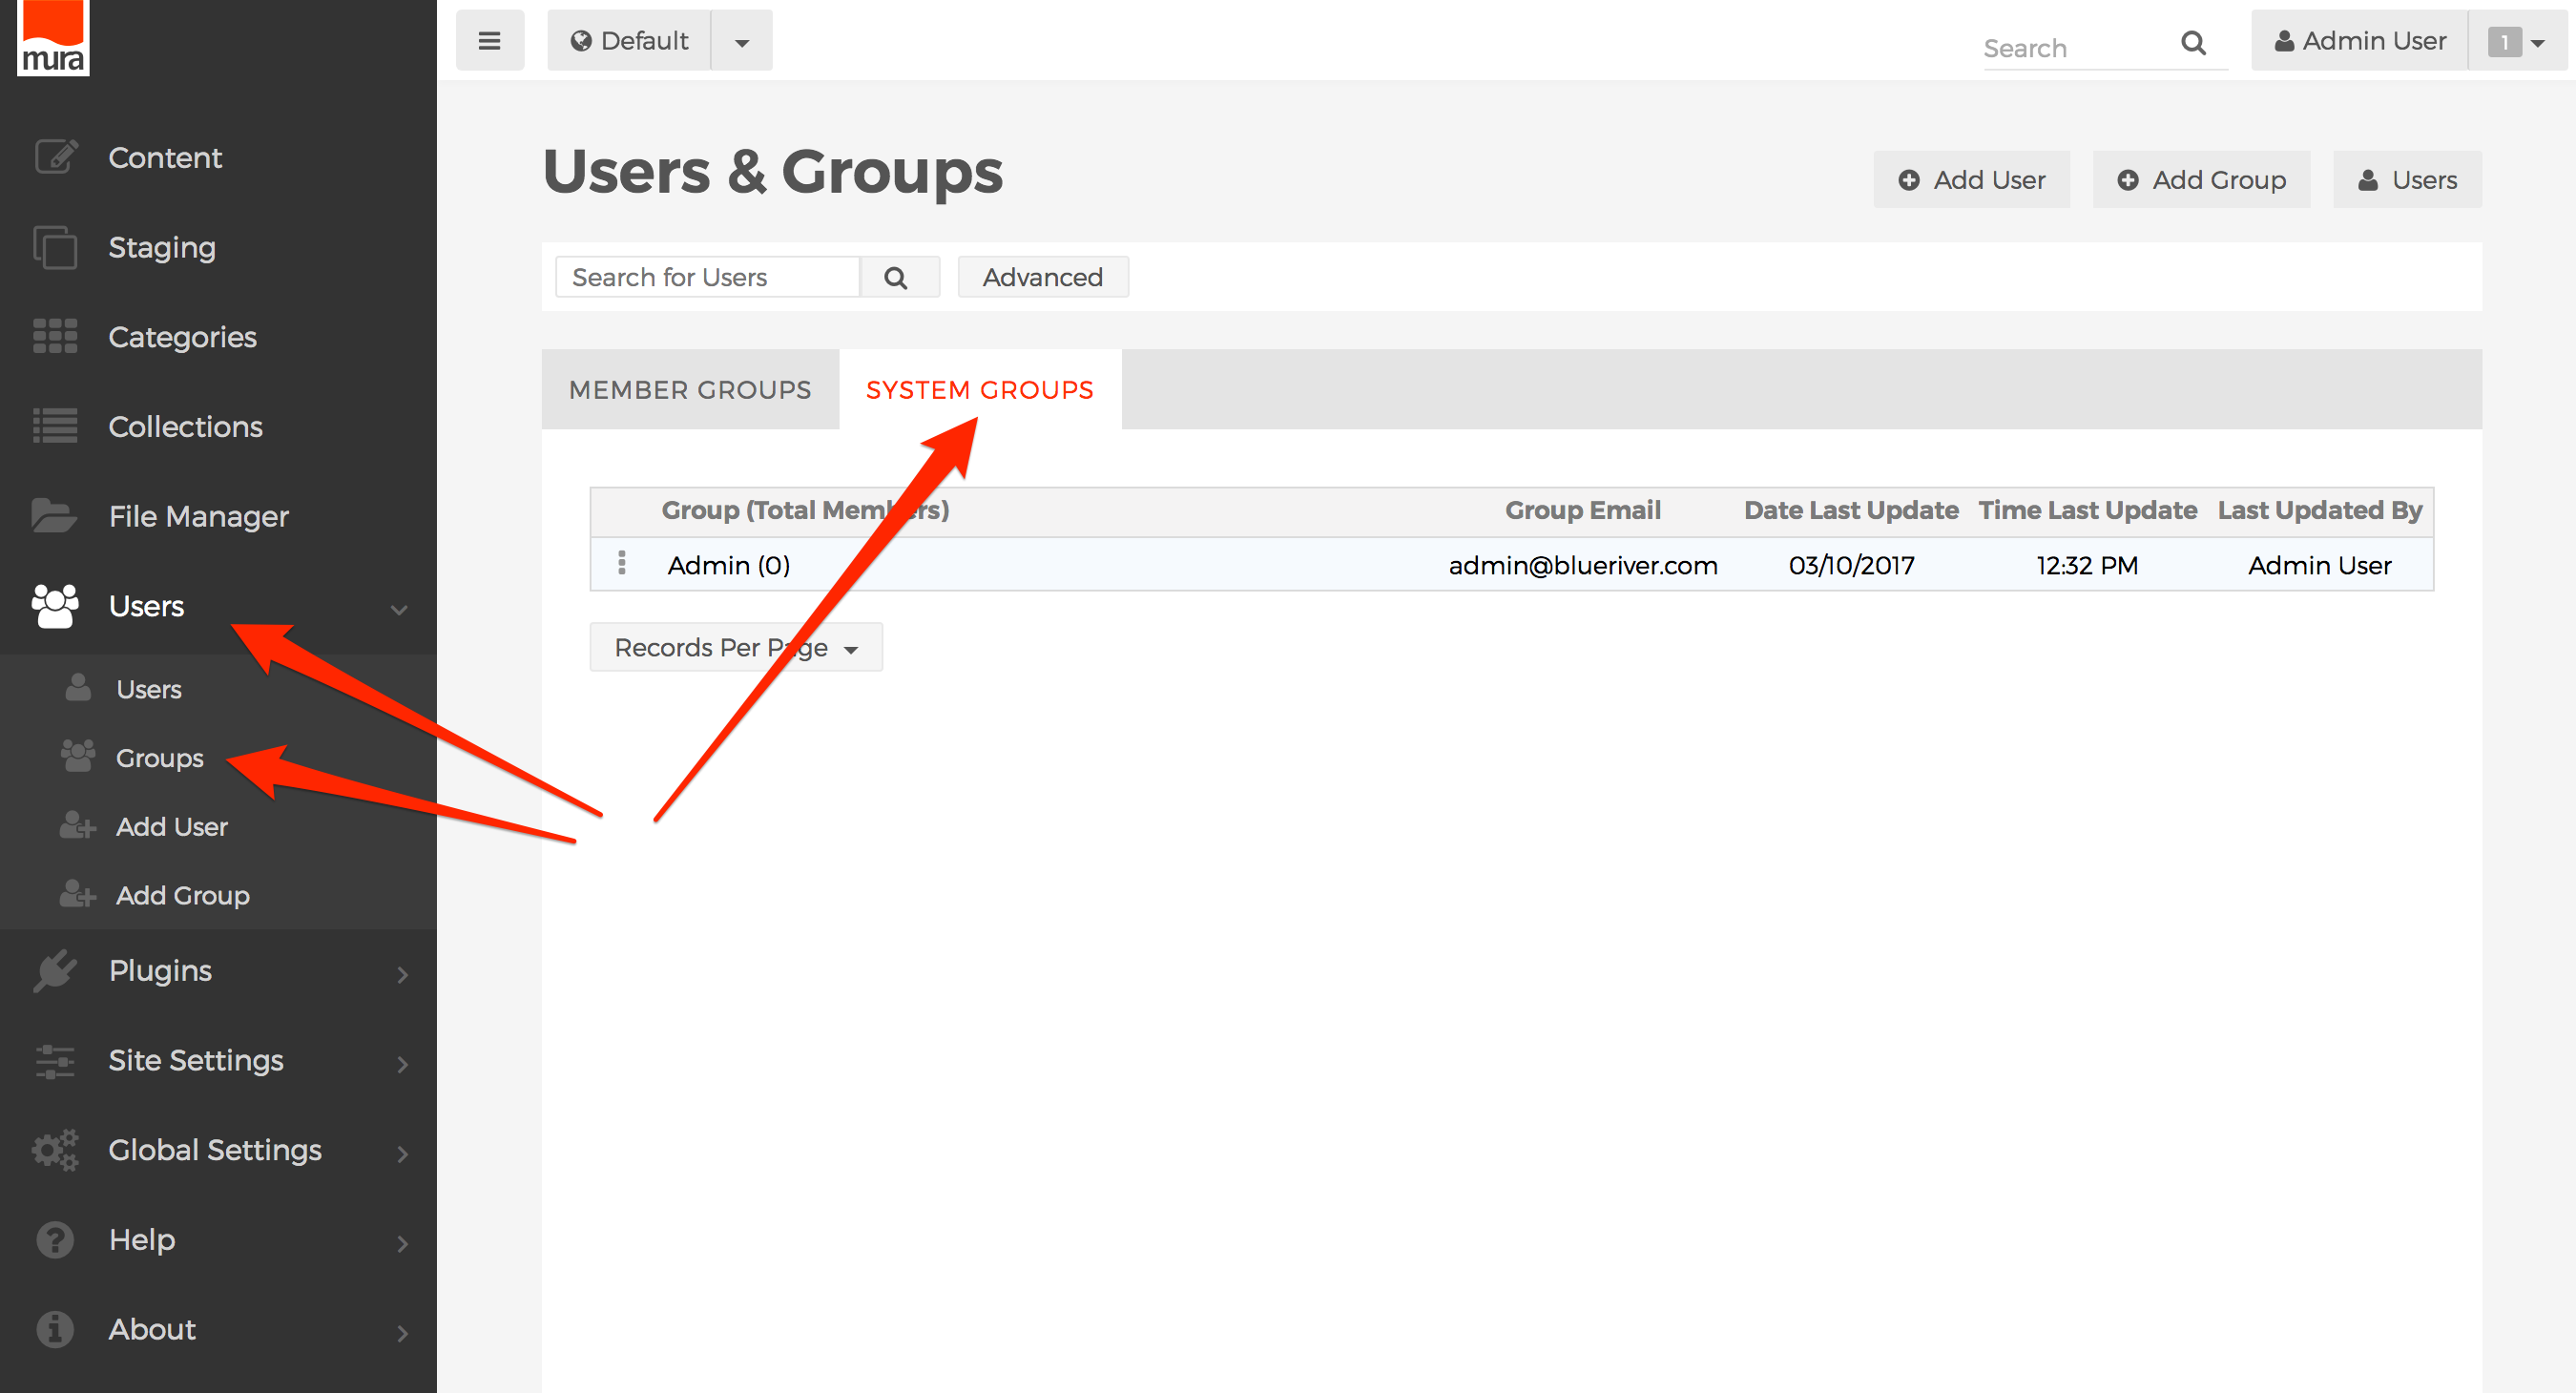
- By default, there is a single System Group labeled Admin. This group is required and cannot be deleted.
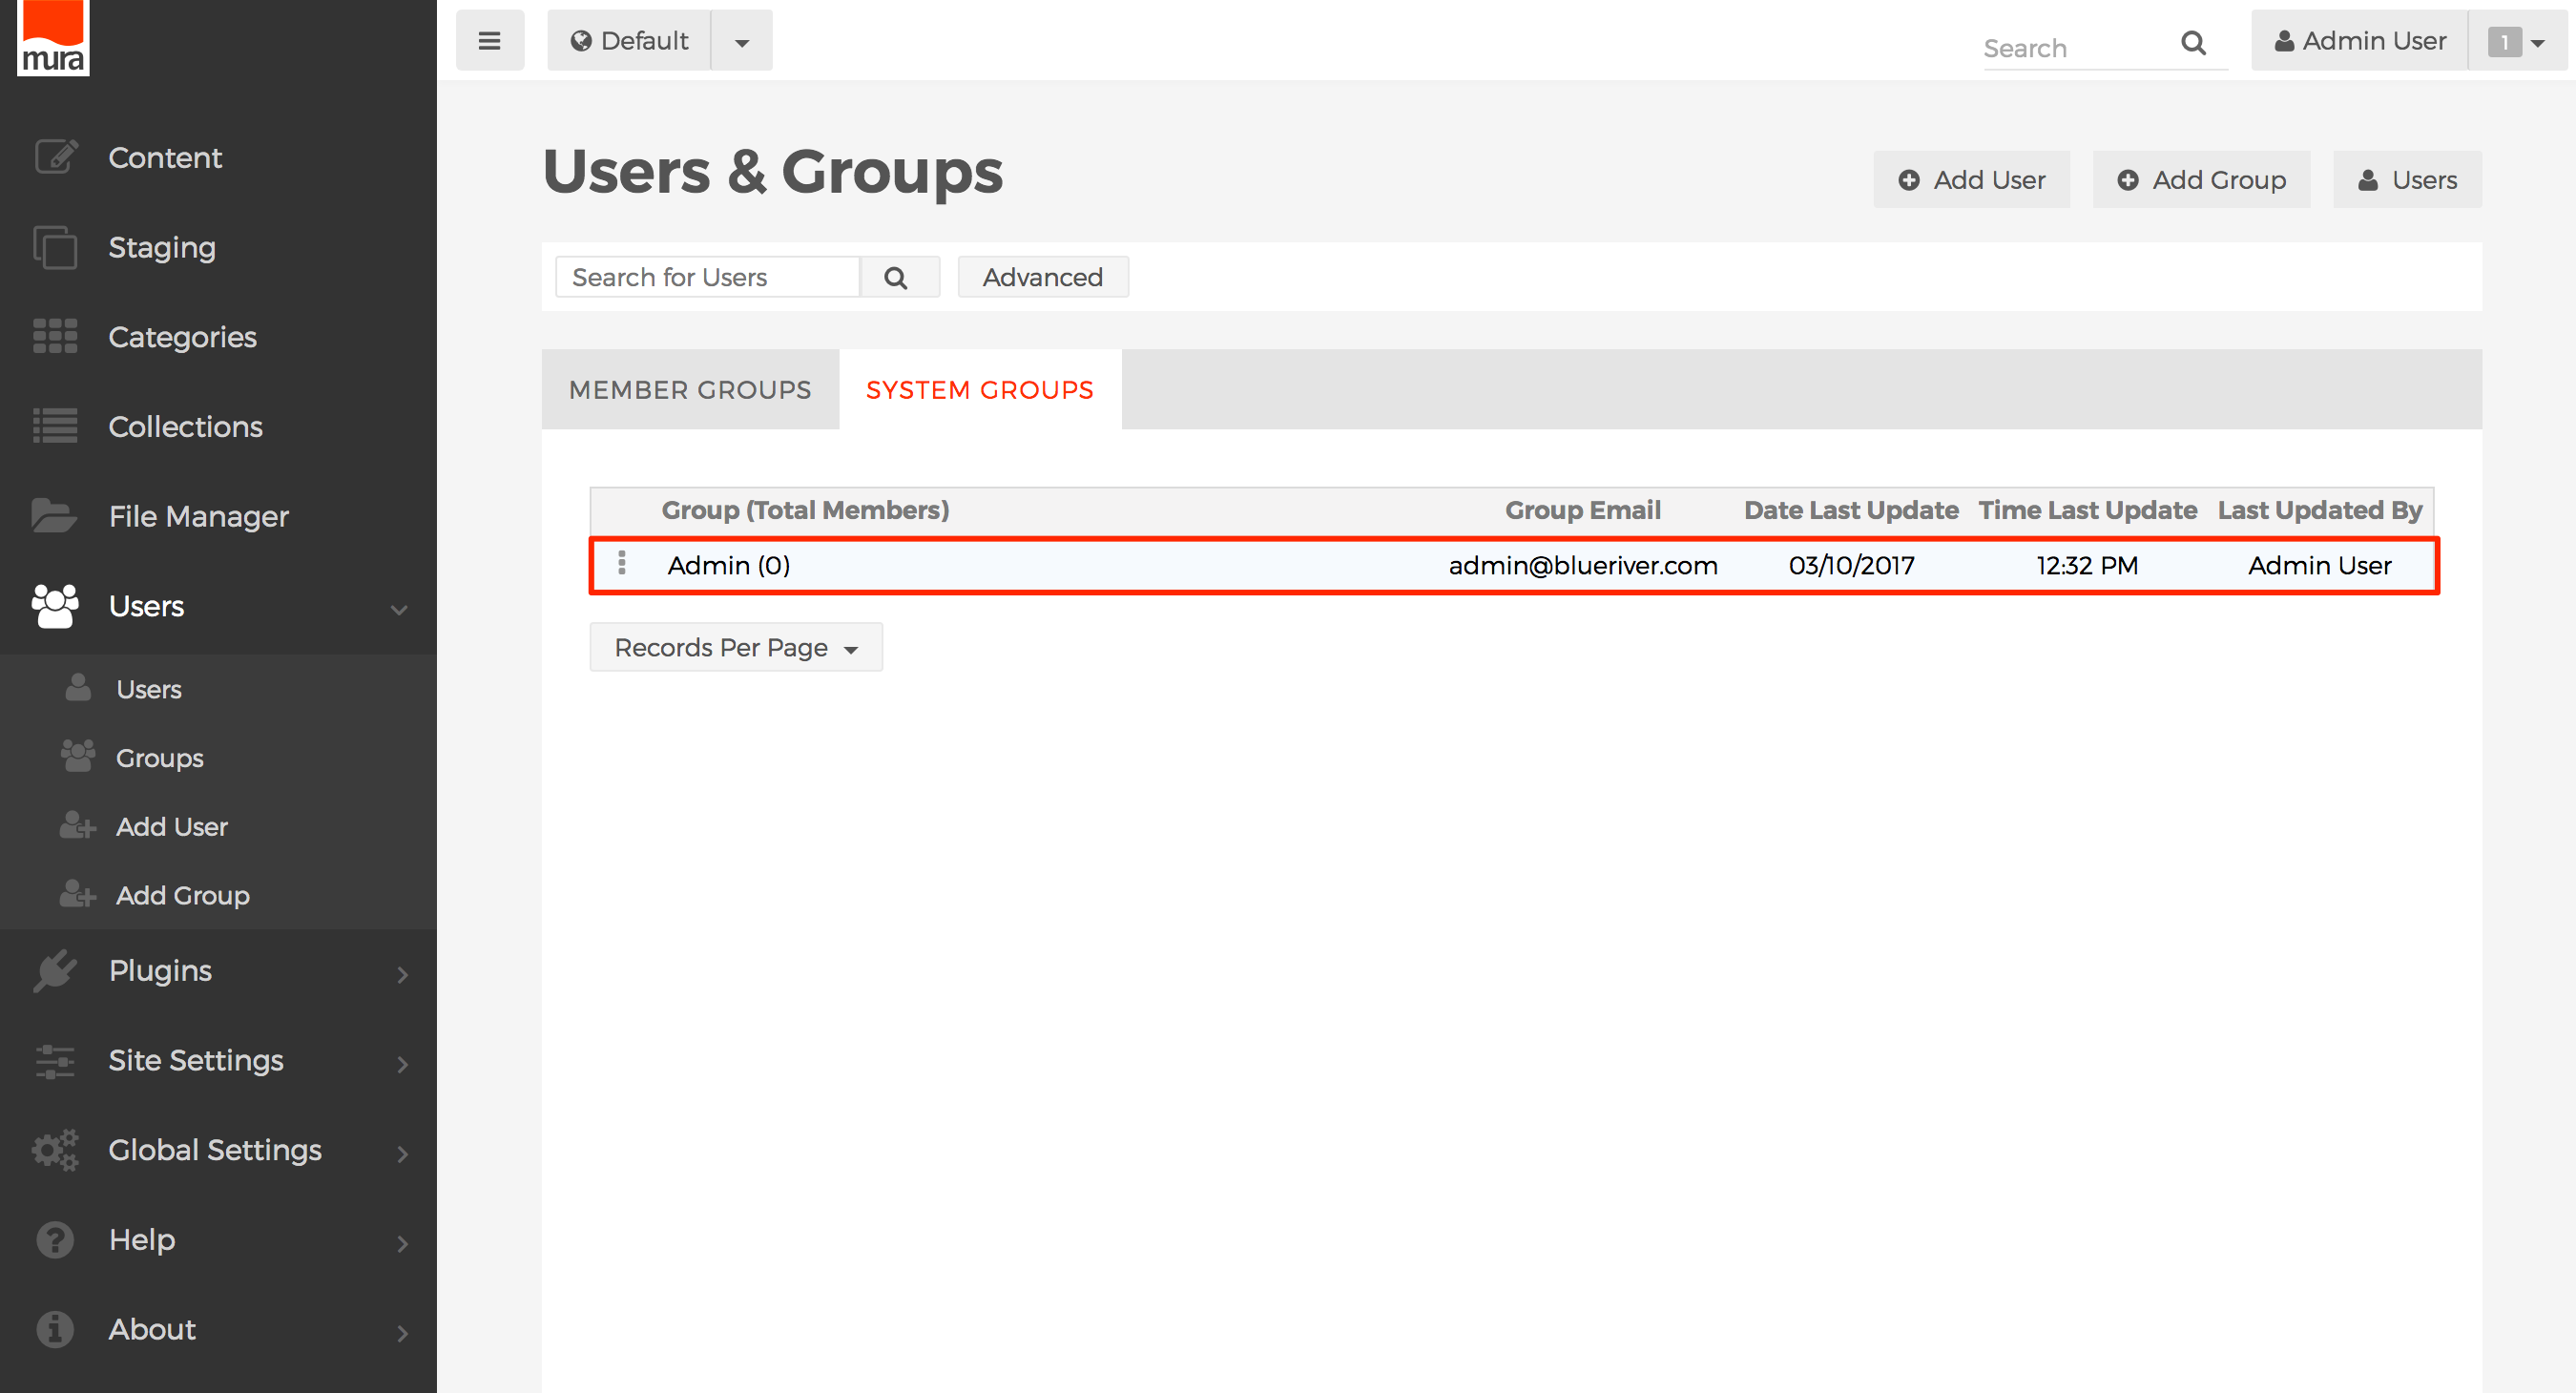


Admin System Group
The Admin System Group is created when Mura is first installed. You can't change the name, or delete it. Any users who are members of this group will automatically be granted the ability to:
- Create and Manage System Groups and Member Groups
- Create and Manage Users
- Manage Permissions
- Write and Publish Content
- Access most areas of the administrator within the site
- And more!
So, as you can see, members of the Admin System Group have quite a bit of access and privileges. Only users who have been granted "Super Admin User" privileges have more power than members of the Admin System Group. We'll discuss "Super Admin Users" in another section.
How to Create/Manage a System Group
You will most likely want to create a number of System Groups to accommodate your organization's desires for enabling and/or restricting access to specific sections of your site. Before creating any groups, it is a good idea of to have a clear picture of the sections and/or pages each group will be responsible for, and the permissions and roles you wish to grant them. Try not to think of the individual users themselves. Instead, think in terms of the group, even if the group may only contain one user.
Follow the steps below to create/manage a System Group.
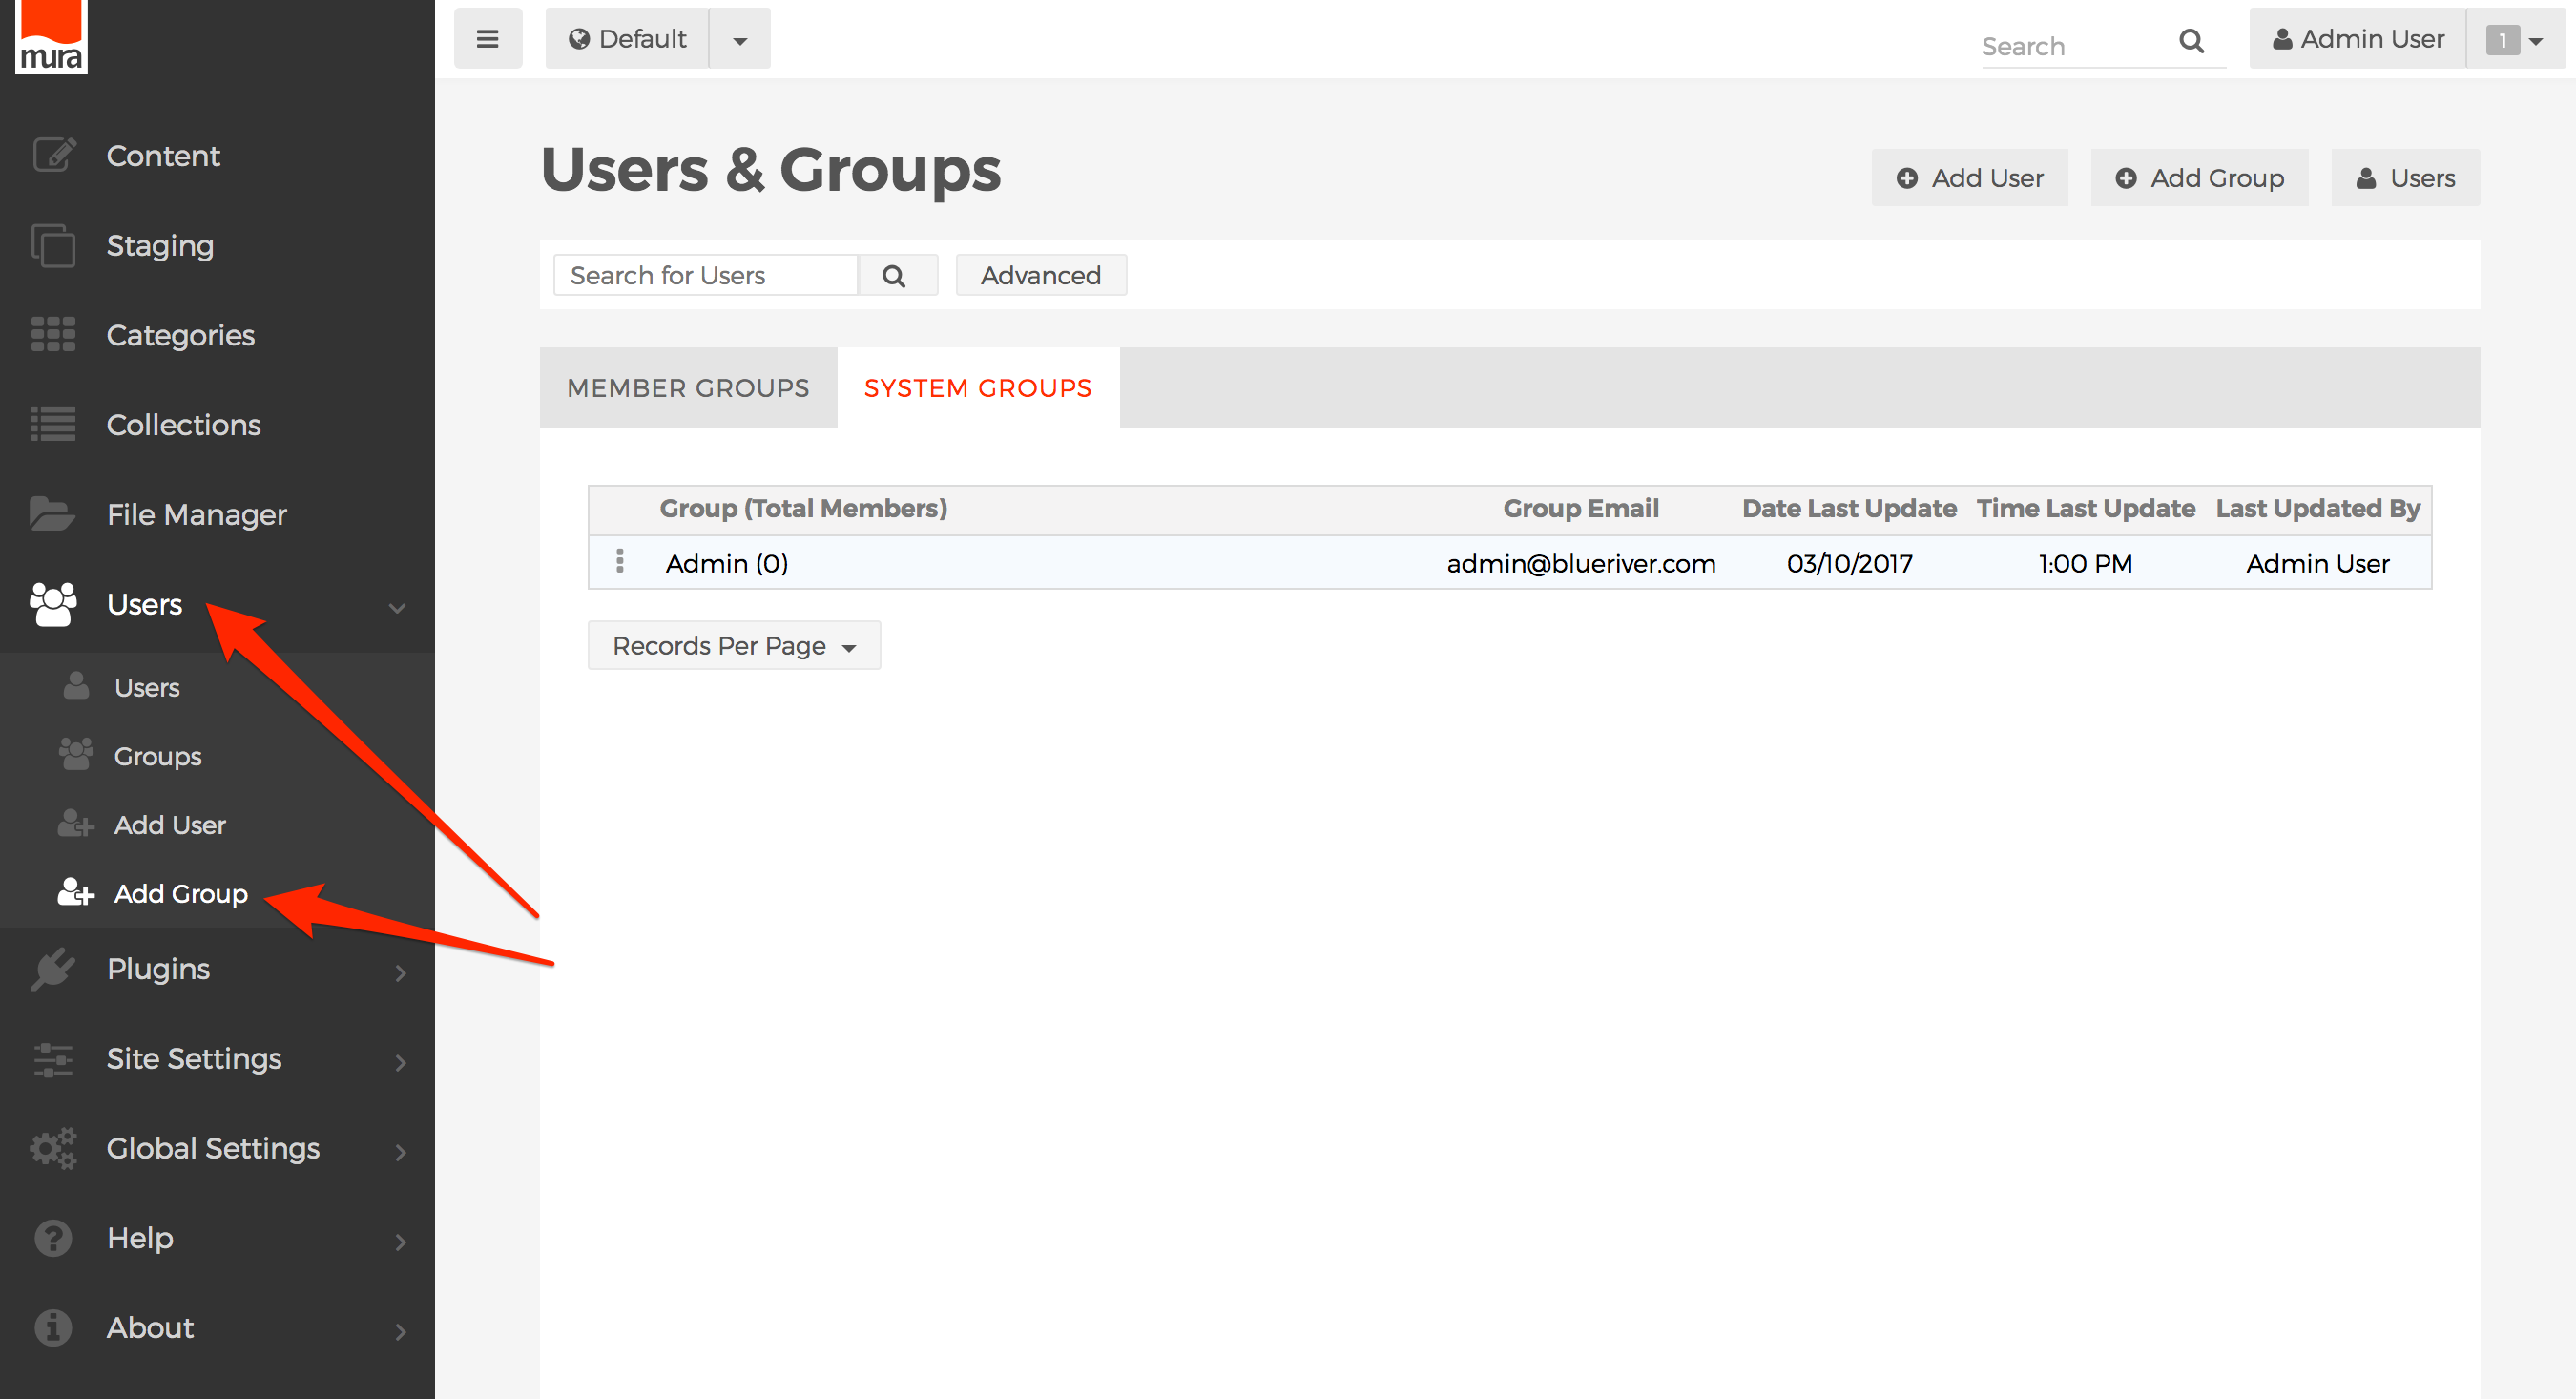
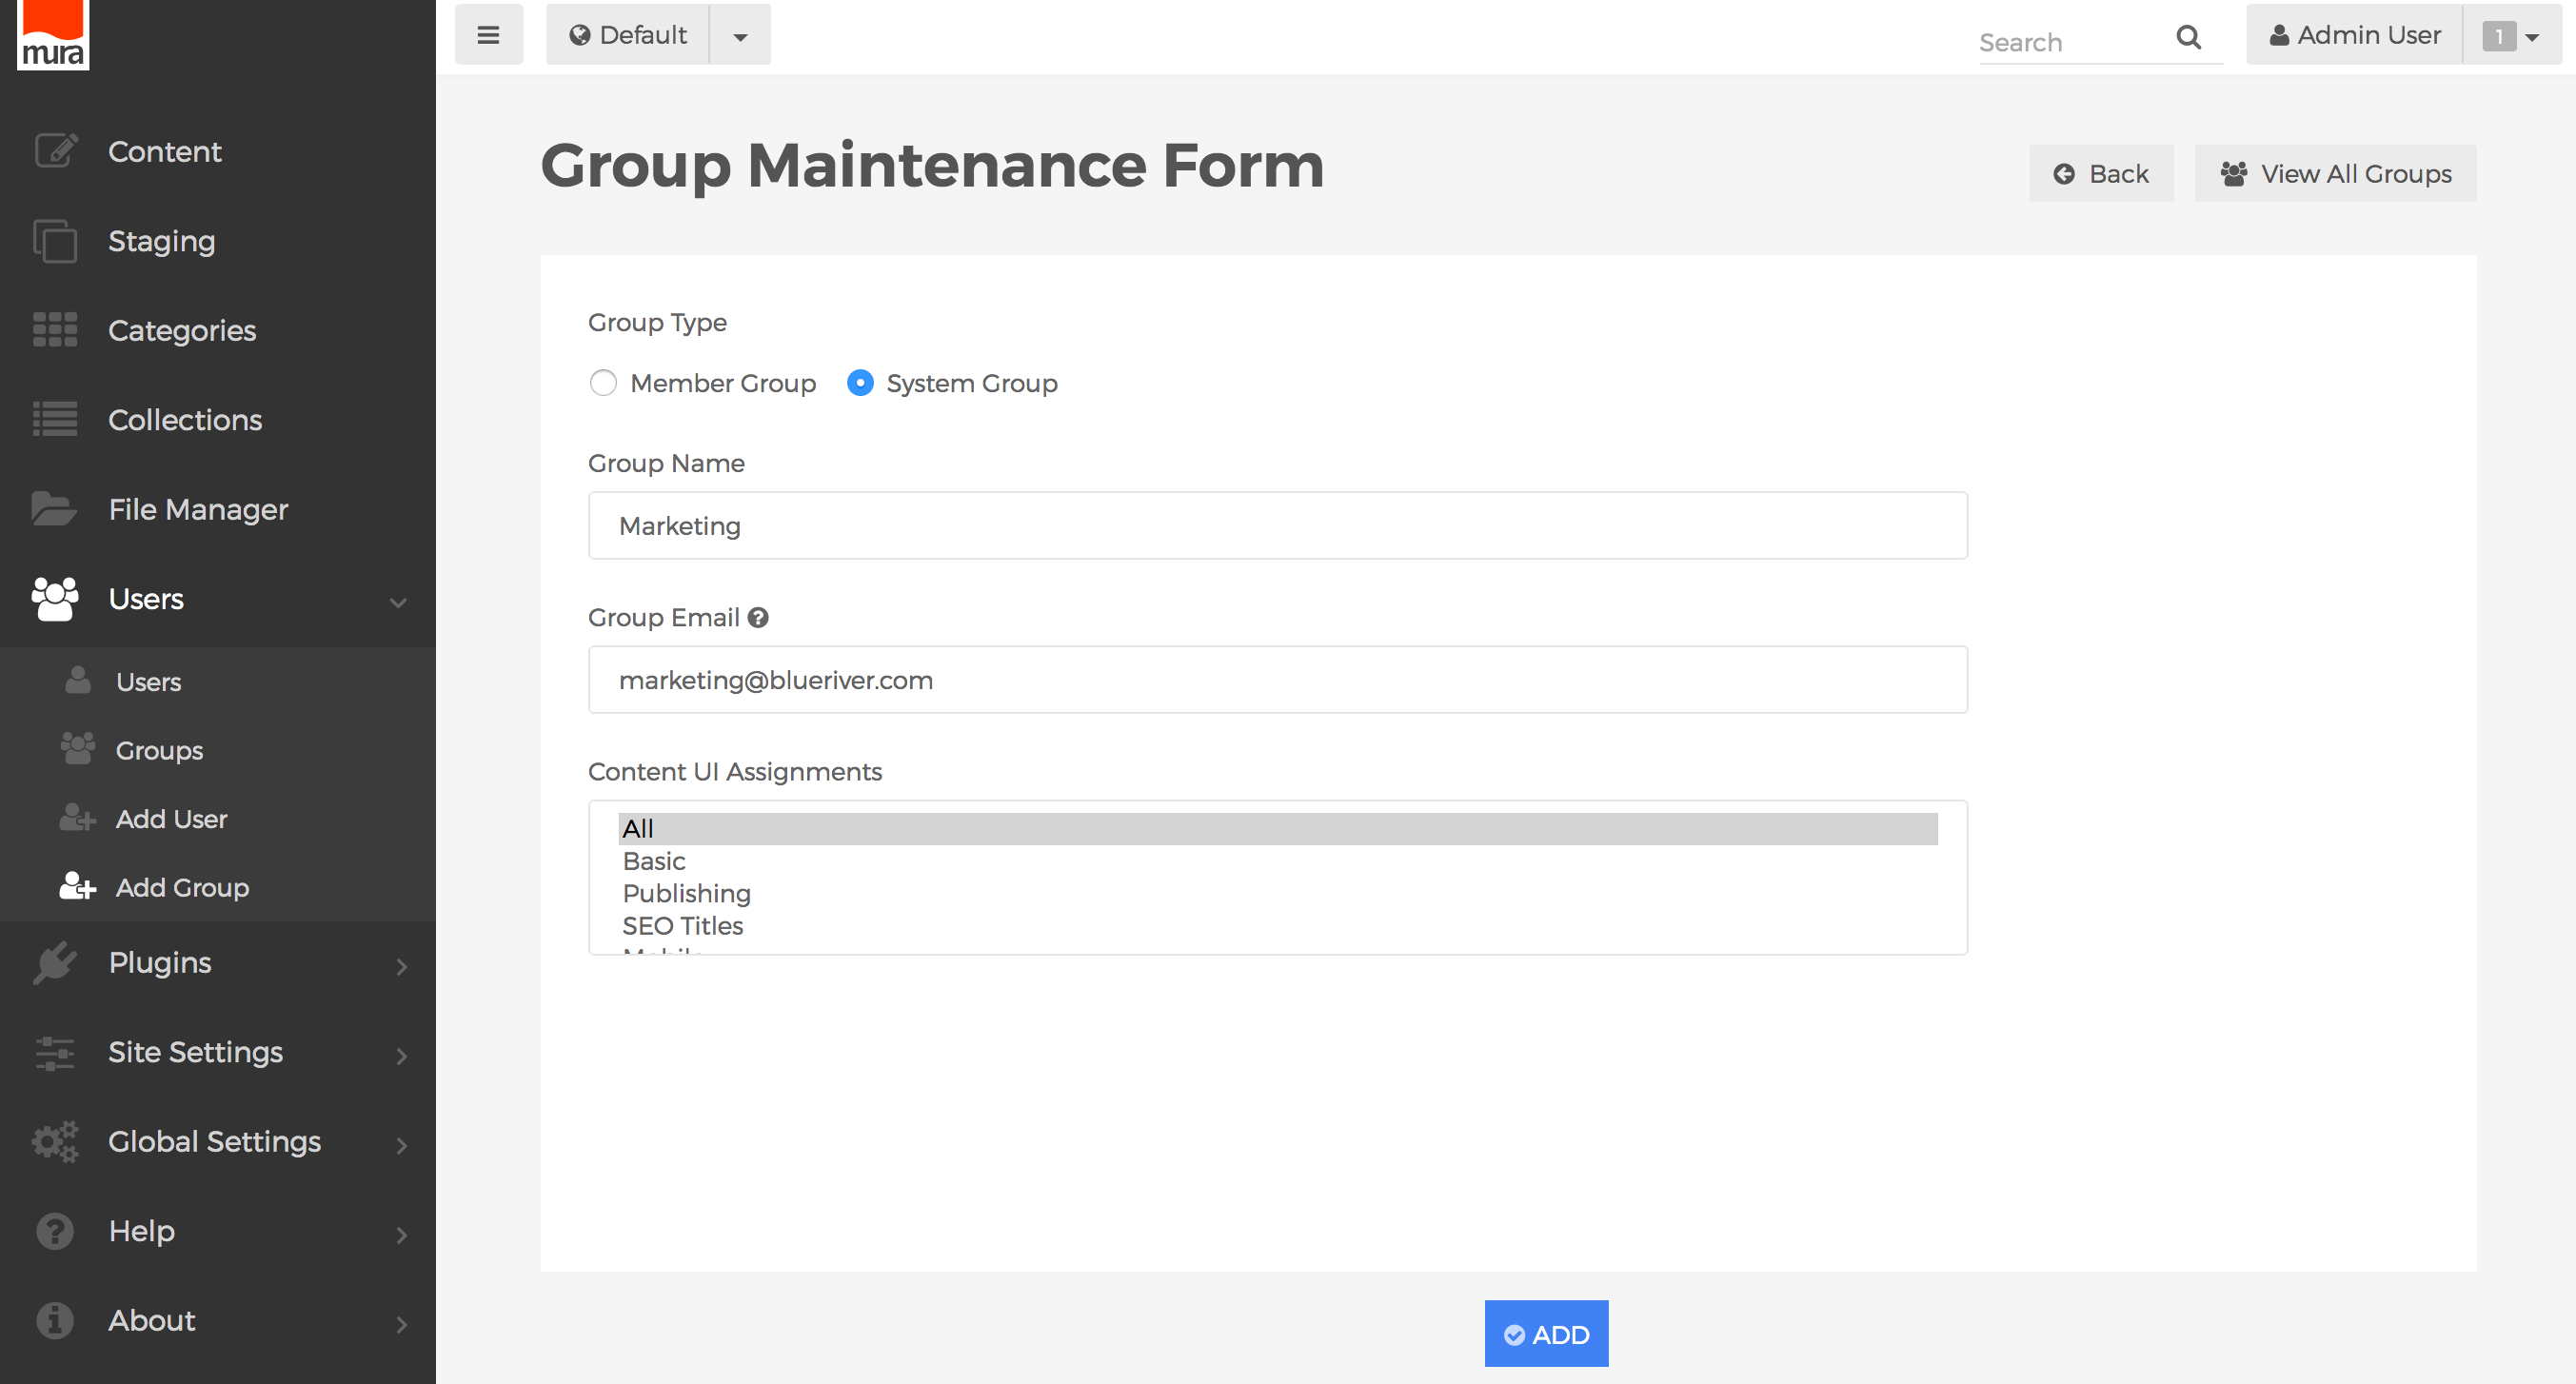
- From the back-end administration area of Mura, select Users from the main navigation, then click Add Group.

- Complete the information on the Group Maintenance Form:

- Group Type
- Select System Group
- Group Name
- Enter a name for the group. For example, "Marketing".
- Group Email
- If your organization has an email address that includes all users of the group, you may enter it here. For example, "marketing@yourdomain.com".
- Content UI Assignments
- You may optionally restrict which tab(s) the group has access to when editing content. To select more than one tab assignment, <CTRL> + Click on a PC, or <Command> + Click on a Mac.
- Group Type
- Click the Add or Update button when finished to save your changes.
- Your new/updated group should be visible in the listing of System Groups.
- Repeat these steps for each System Group you wish to add.

Member Groups
Member Groups do not have access to the back-end administration area of Mura. The primary use of Member Groups is to provide segmented access to specific areas of your site.
In addition to restricting access to specific areas of your site to certain Member Groups, you can also grant editing privileges to one or more Member Groups. This would allow those users the ability to only edit content from the front-end, public facing side of your site.
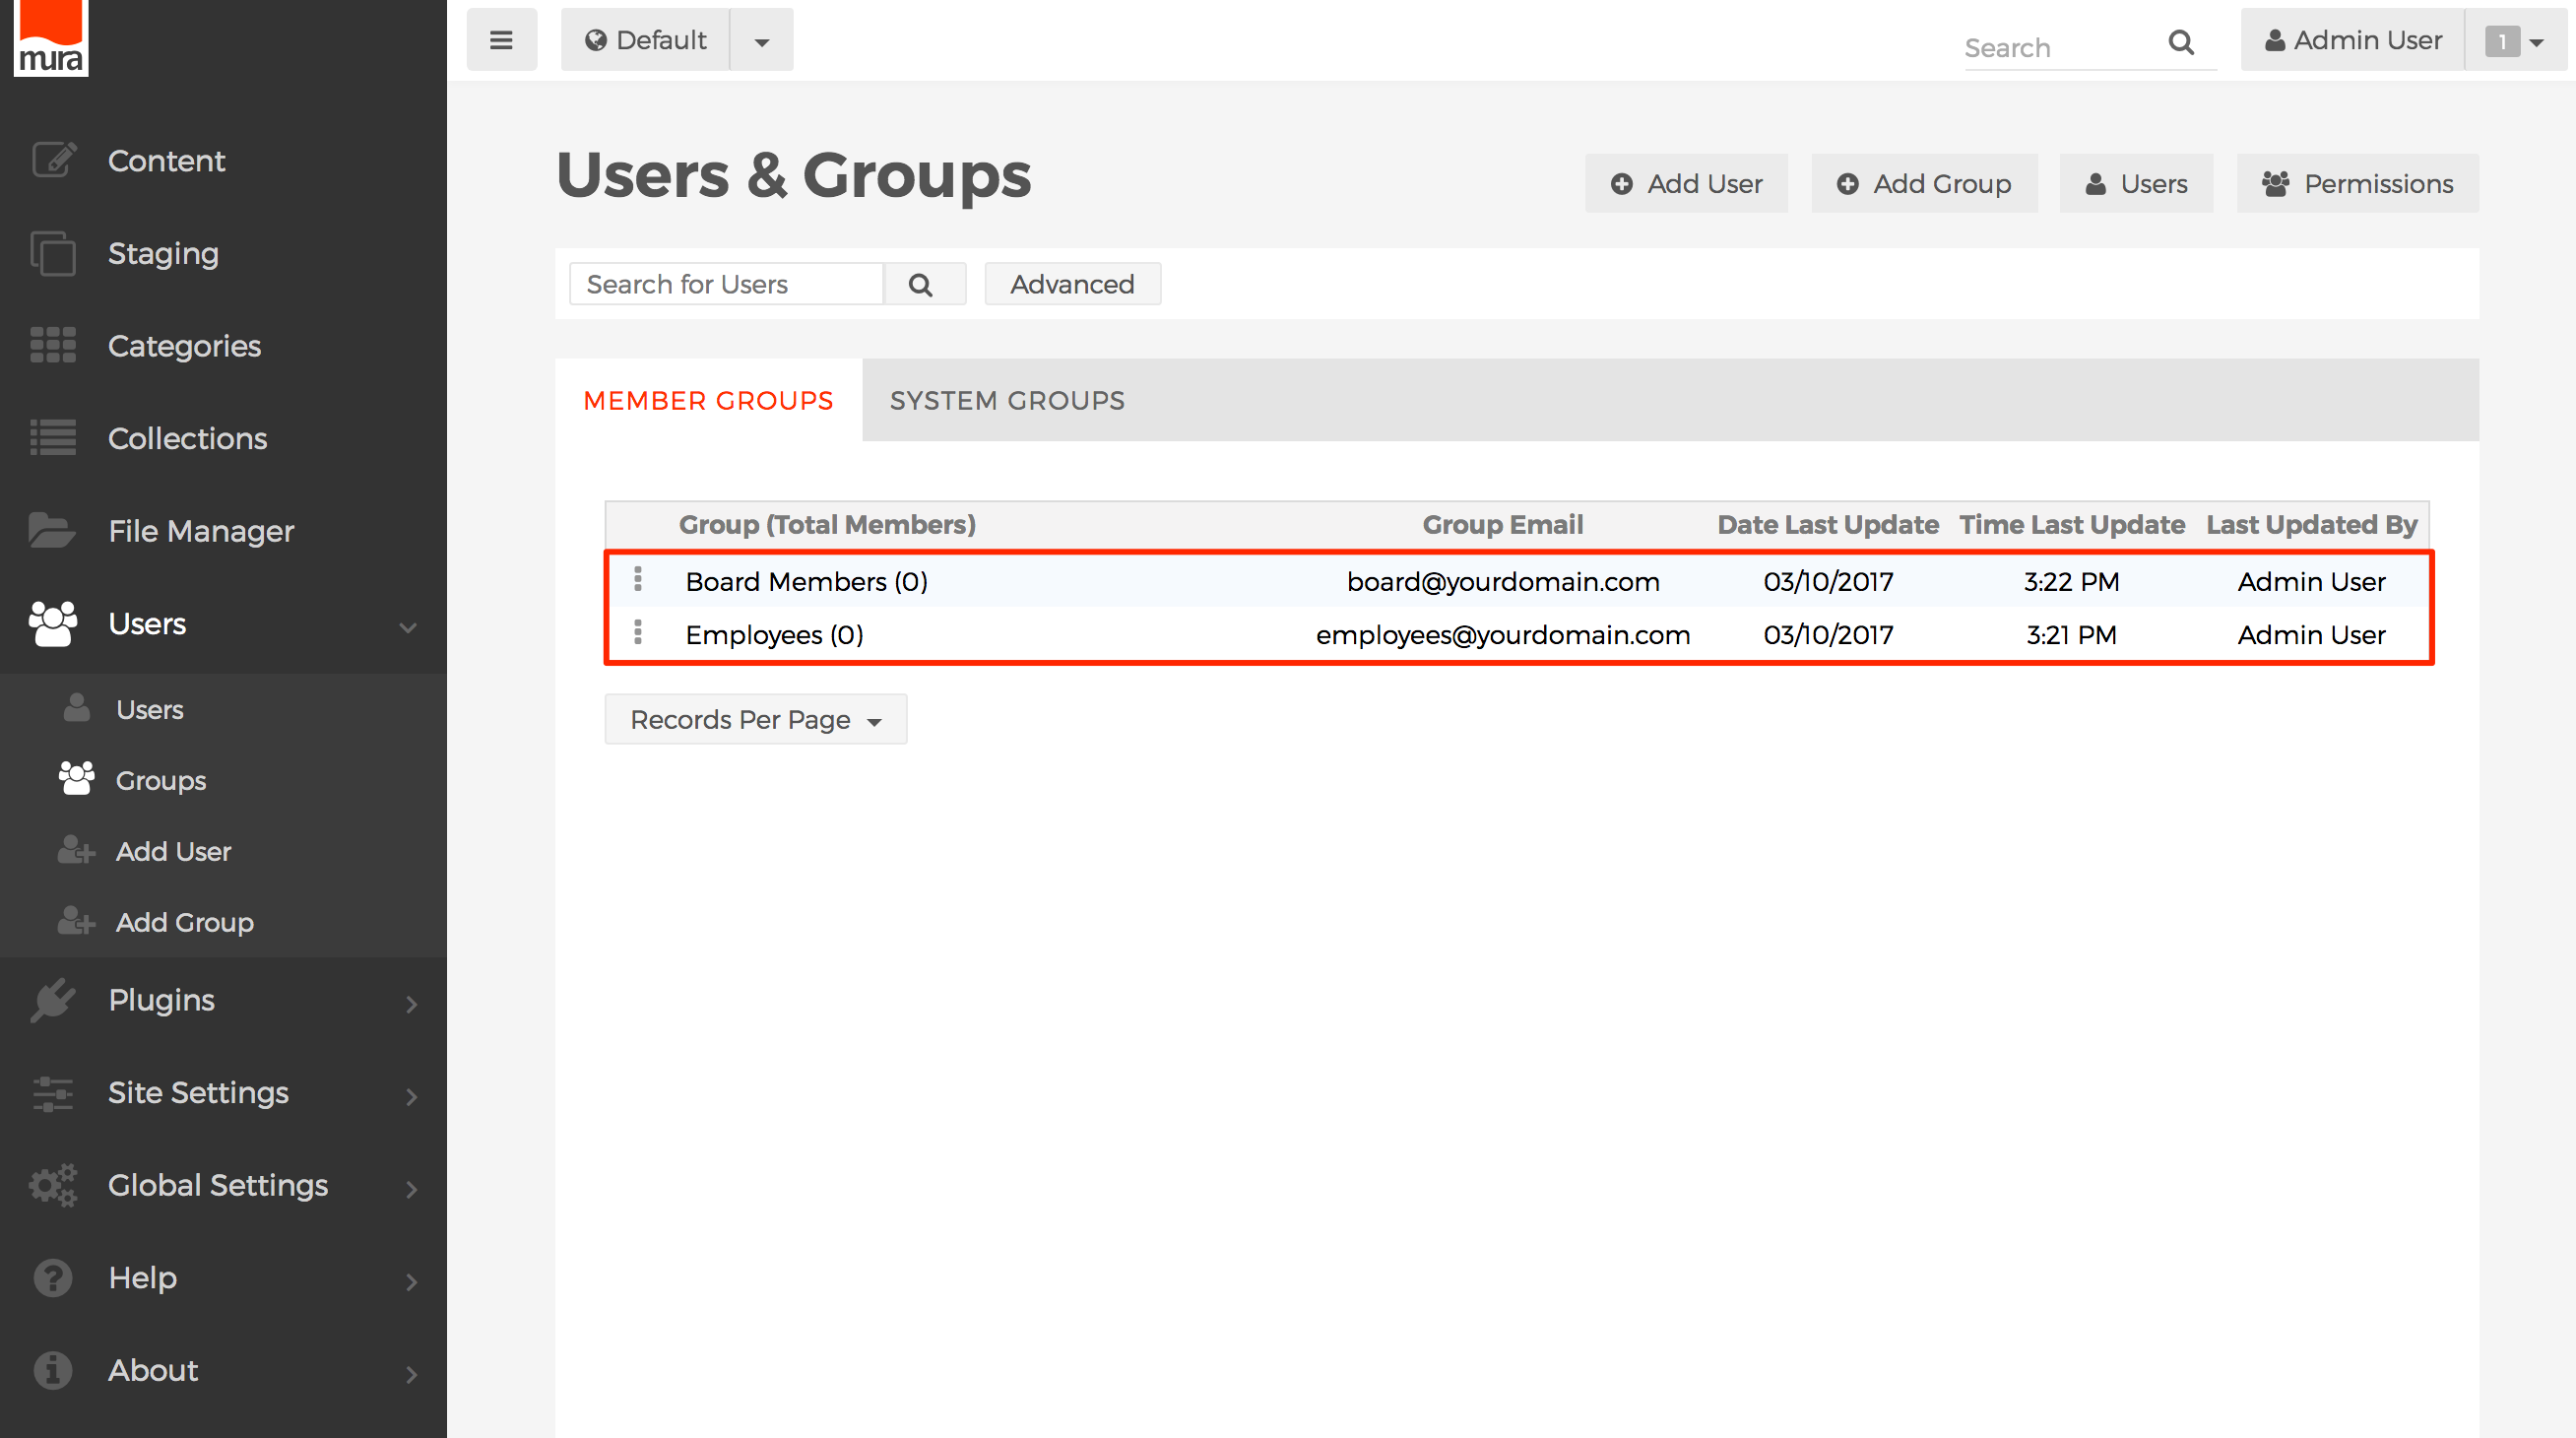
How to Access Member Groups
- From the back-end administration area of Mura, select Users from the main navigation, then Groups, and click the Member Groups tab.
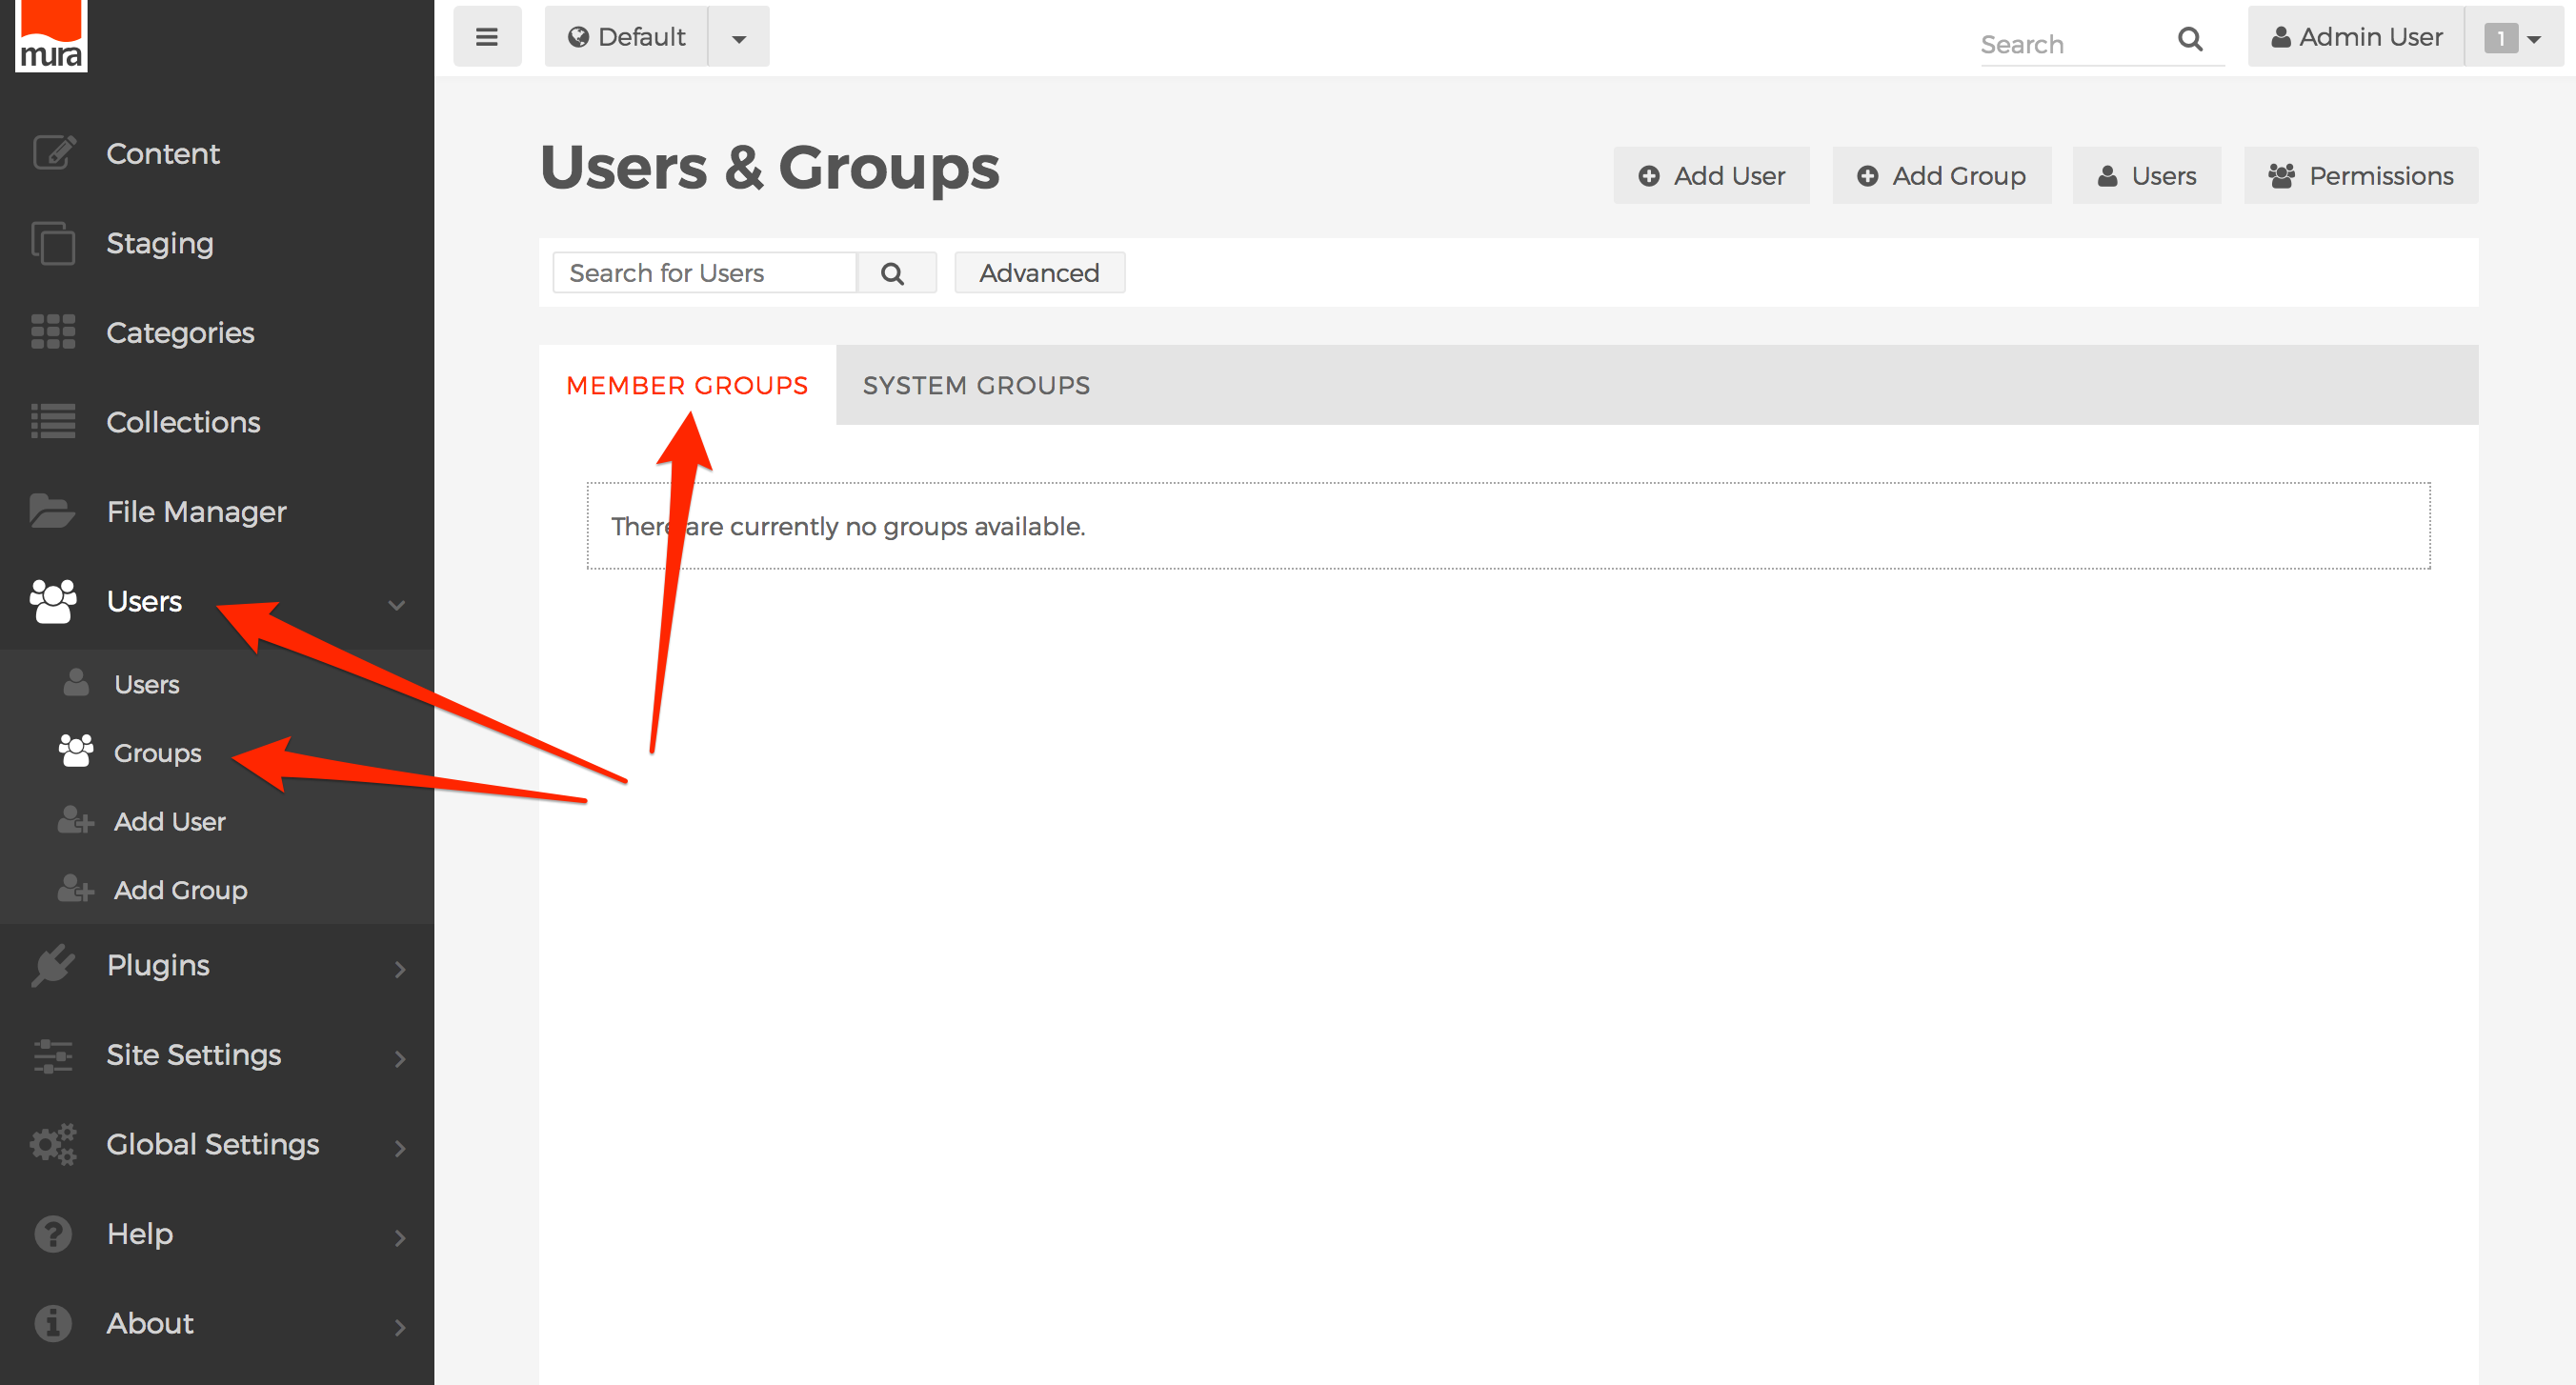
- There are no Member Groups created for you by default.

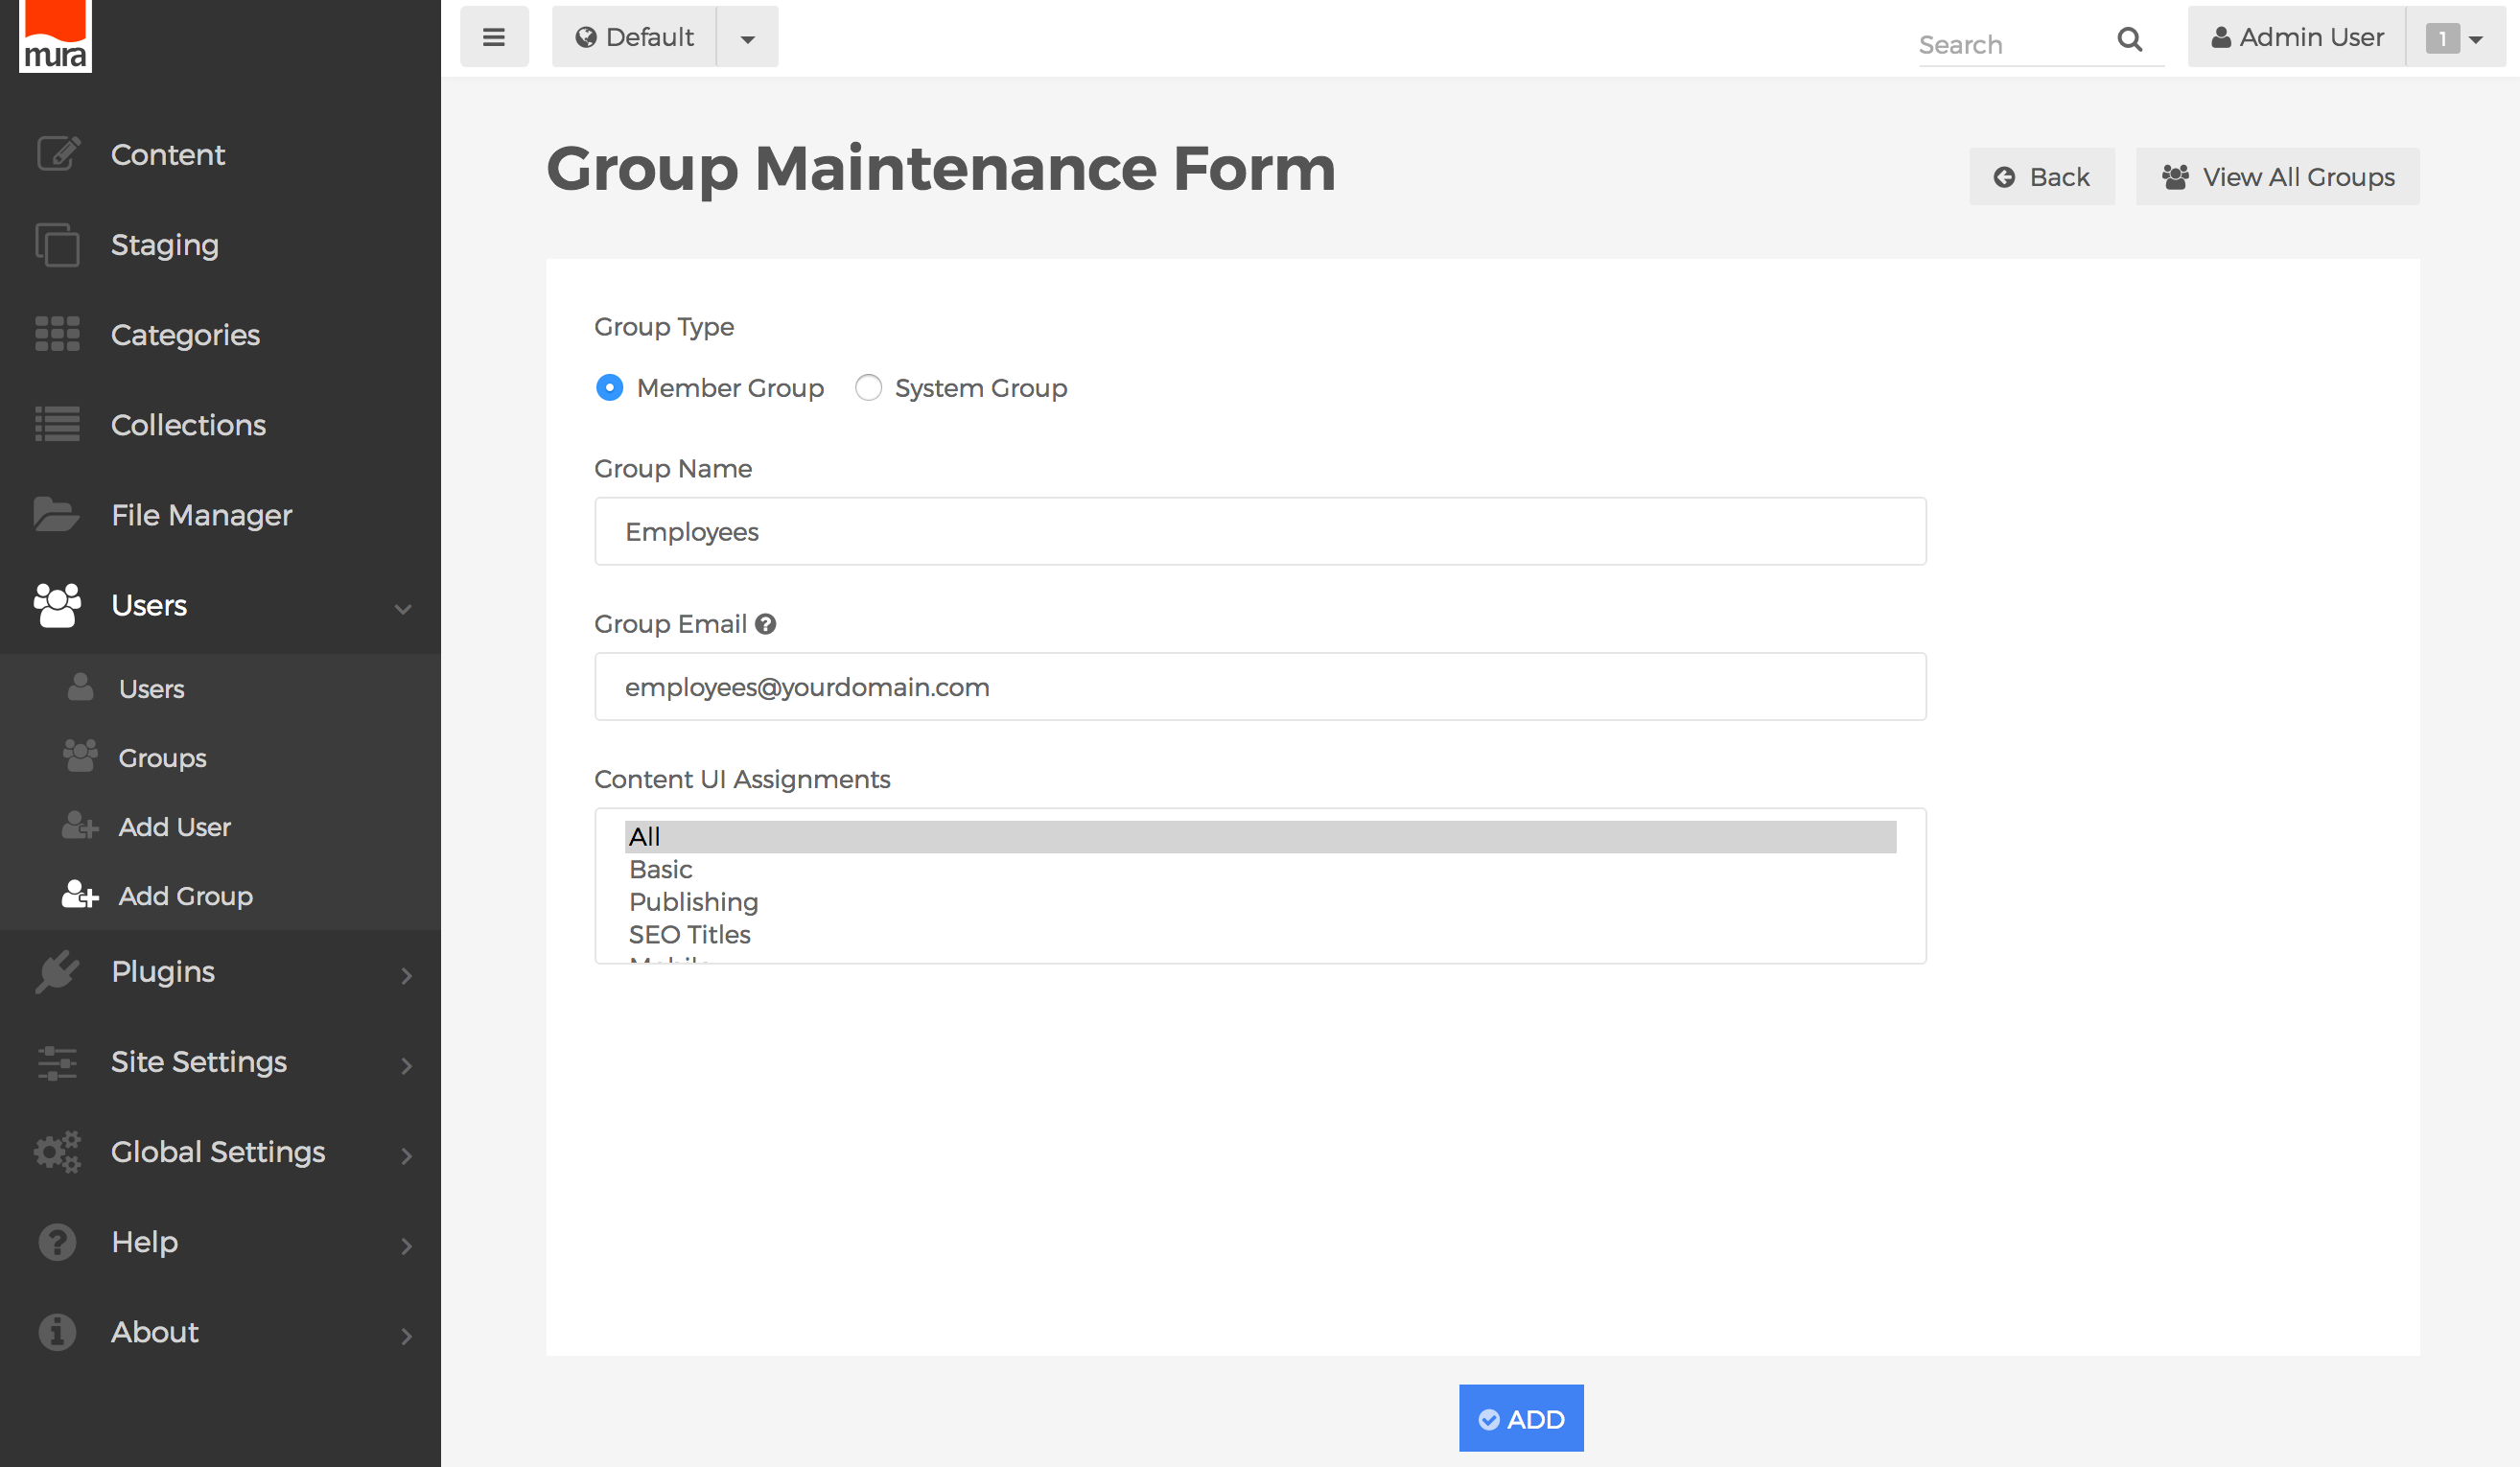
How to Create/Manage a Member Group
- From the back-end administration area of Mura, select Users from the main navigation, then click Add Group.

- Complete the information on the Group Maintenance Form:

- Group Type
- Select Member Group
- Group Name
- Enter a name for the group. For example, "Employees" or "Board Members".
- Group Email
- If your organization has an email address that includes all users of the group, you may enter it here. For example, "employees@yourdomain.com".
- Content UI Assignments
- You may optionally restrict which tab(s) the group would have access to, if you are going to allow the group editing permissions. To select more than one tab assignment, <CTRL> + Click on a PC, or <Command> + Click on a Mac.
- Group Type
- Click the Add or Update button when finished to save your changes.
- Your new/updated group should be visible in the listing of Member Groups.

- Repeat these steps for each Member Group you wish to add.
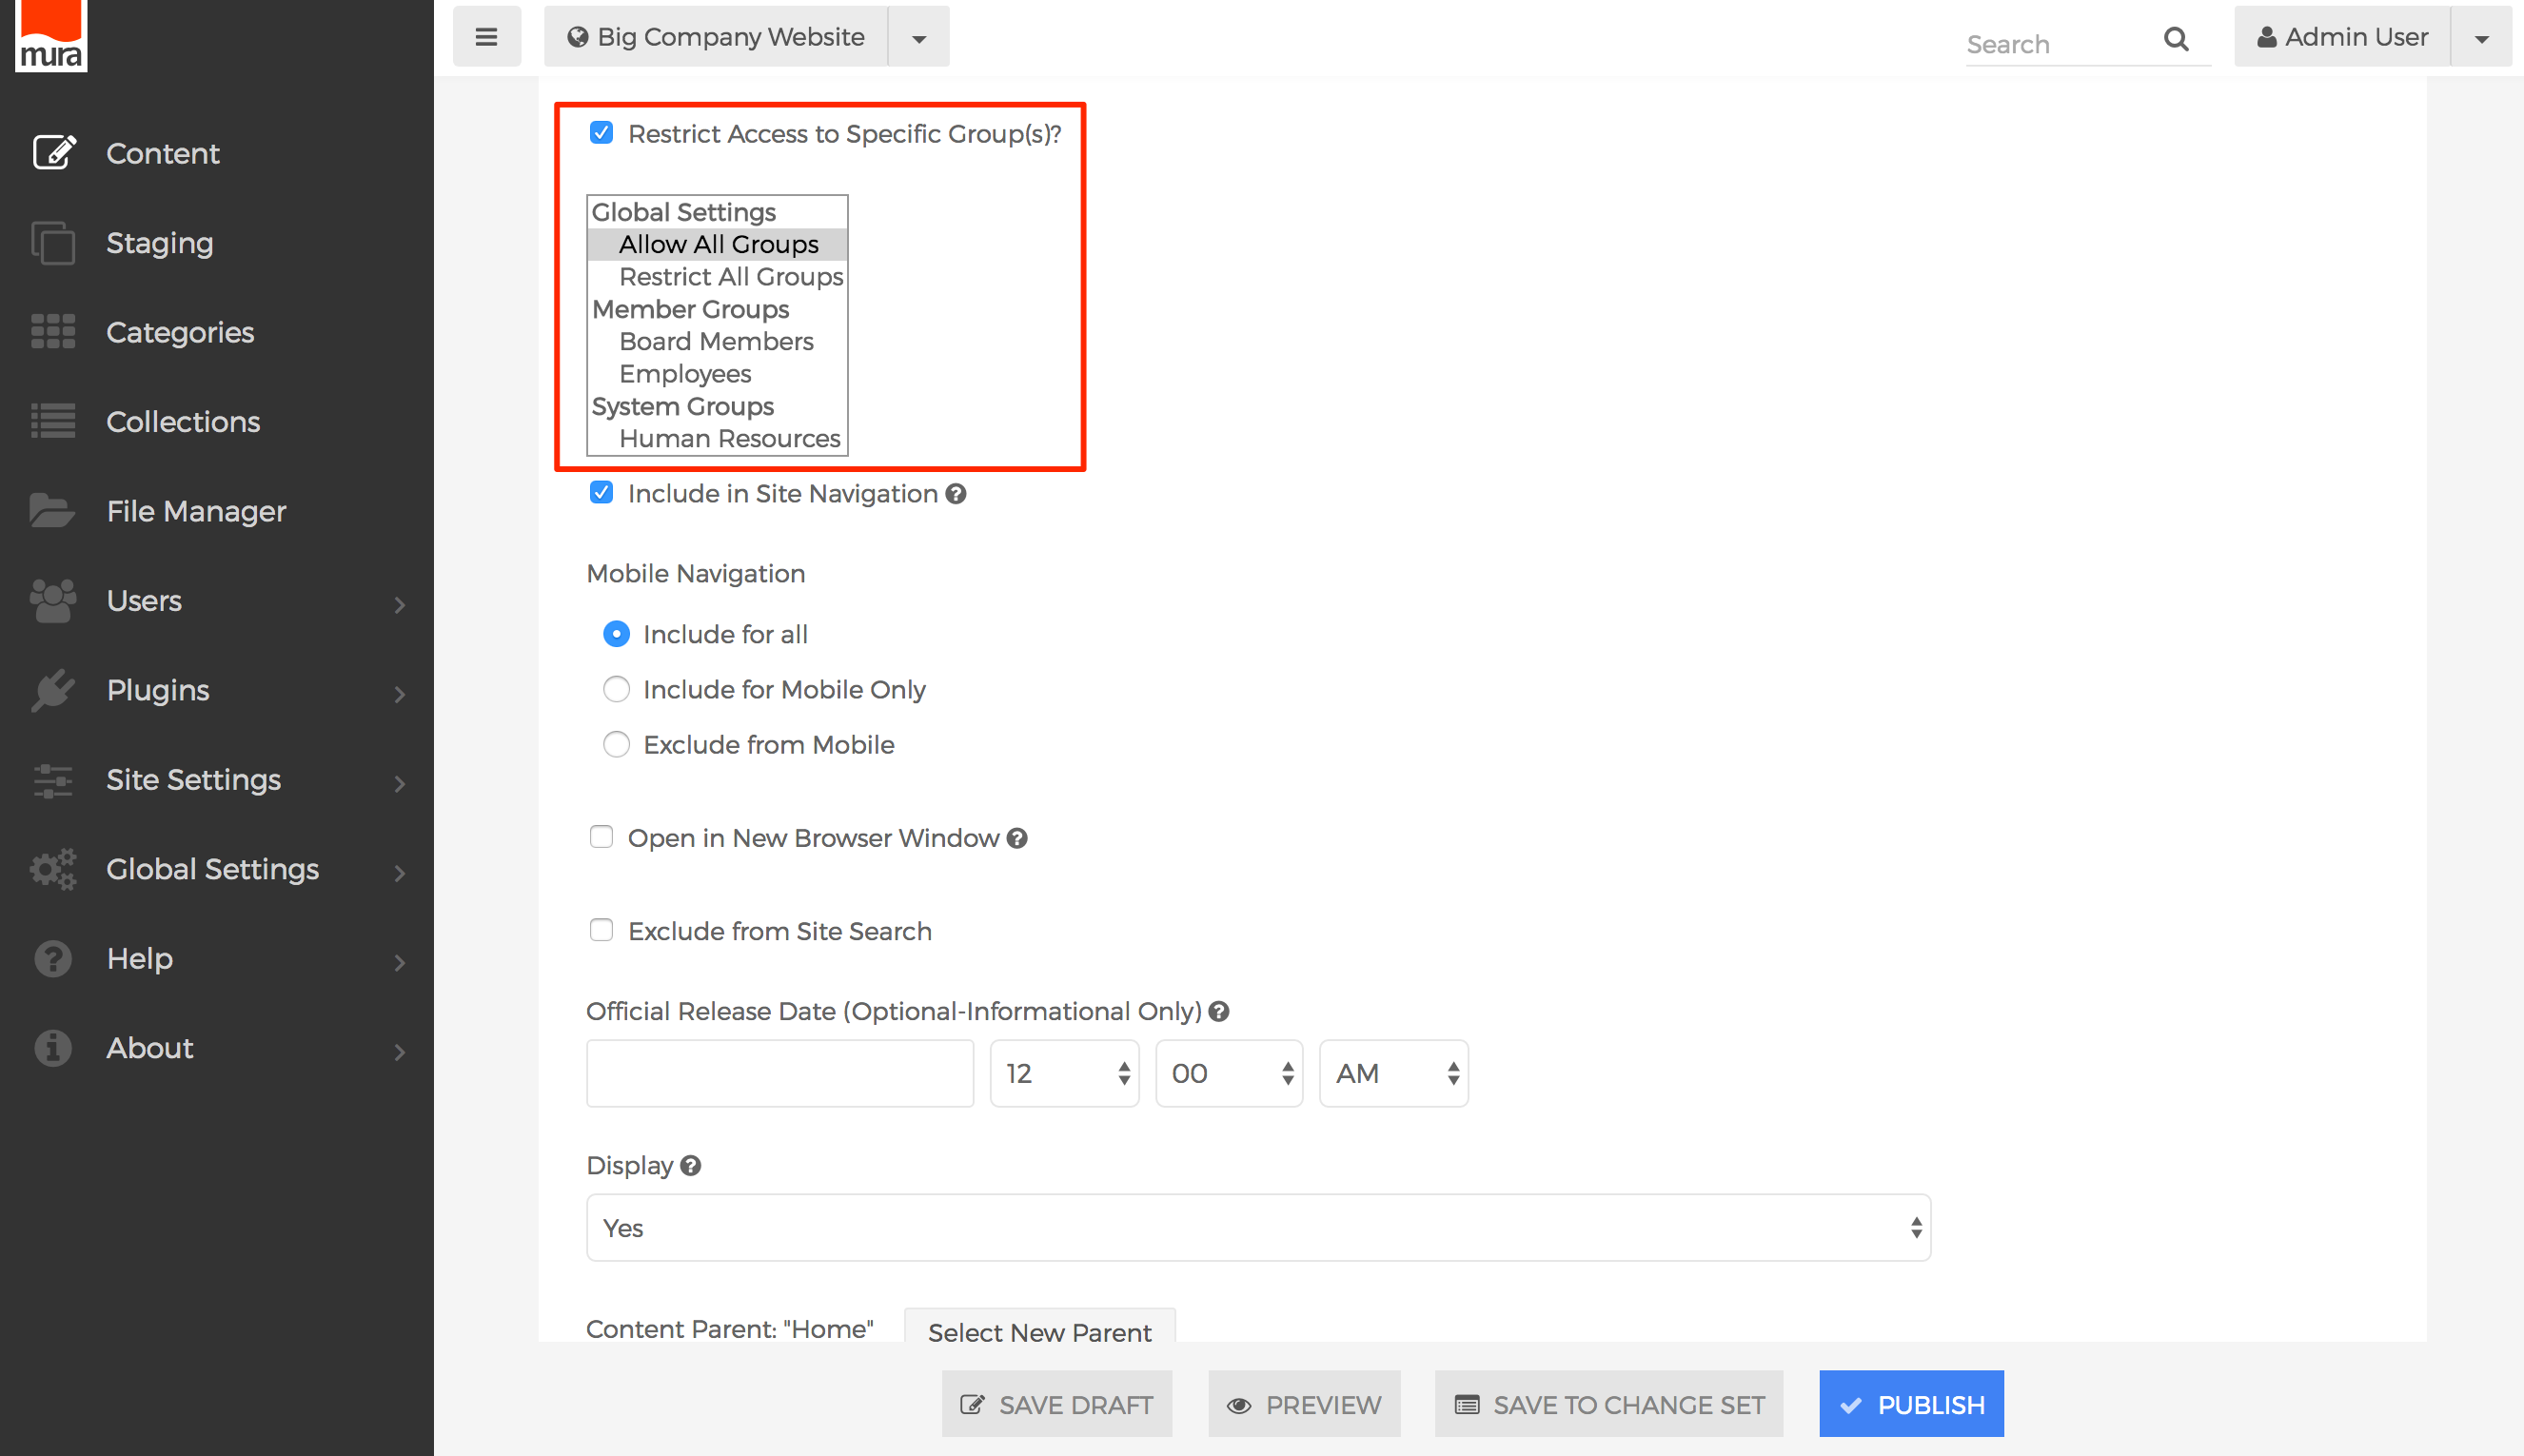
How to Restrict Access to Content
One of the primary uses of Member Groups is to have a way to restrict access to various sections of your site to specific groups. For example, you might have a "Members Only" section of your site, where all users are required to log in. Then, from there, you could have additional sections of the site restricted to very specific groups, such as an "intranet" area for employees, and a "board member" area for board members.
Restricting access to a page, or section of your site, only hides the "body" area of your page. If a user is not logged in, by default, Mura will display the "Summary" field and a login screen. Hence, we do not recommend entering any sensitive information in the "Summary" field, unless you have been instructed to do so due to modifications made to Mura by your development team.
To restrict access to your entire site, a content item, or a specific section of your site, and follow the steps below.
- Navigate to the page or section of your site where you wish to restrict access to, and edit it.
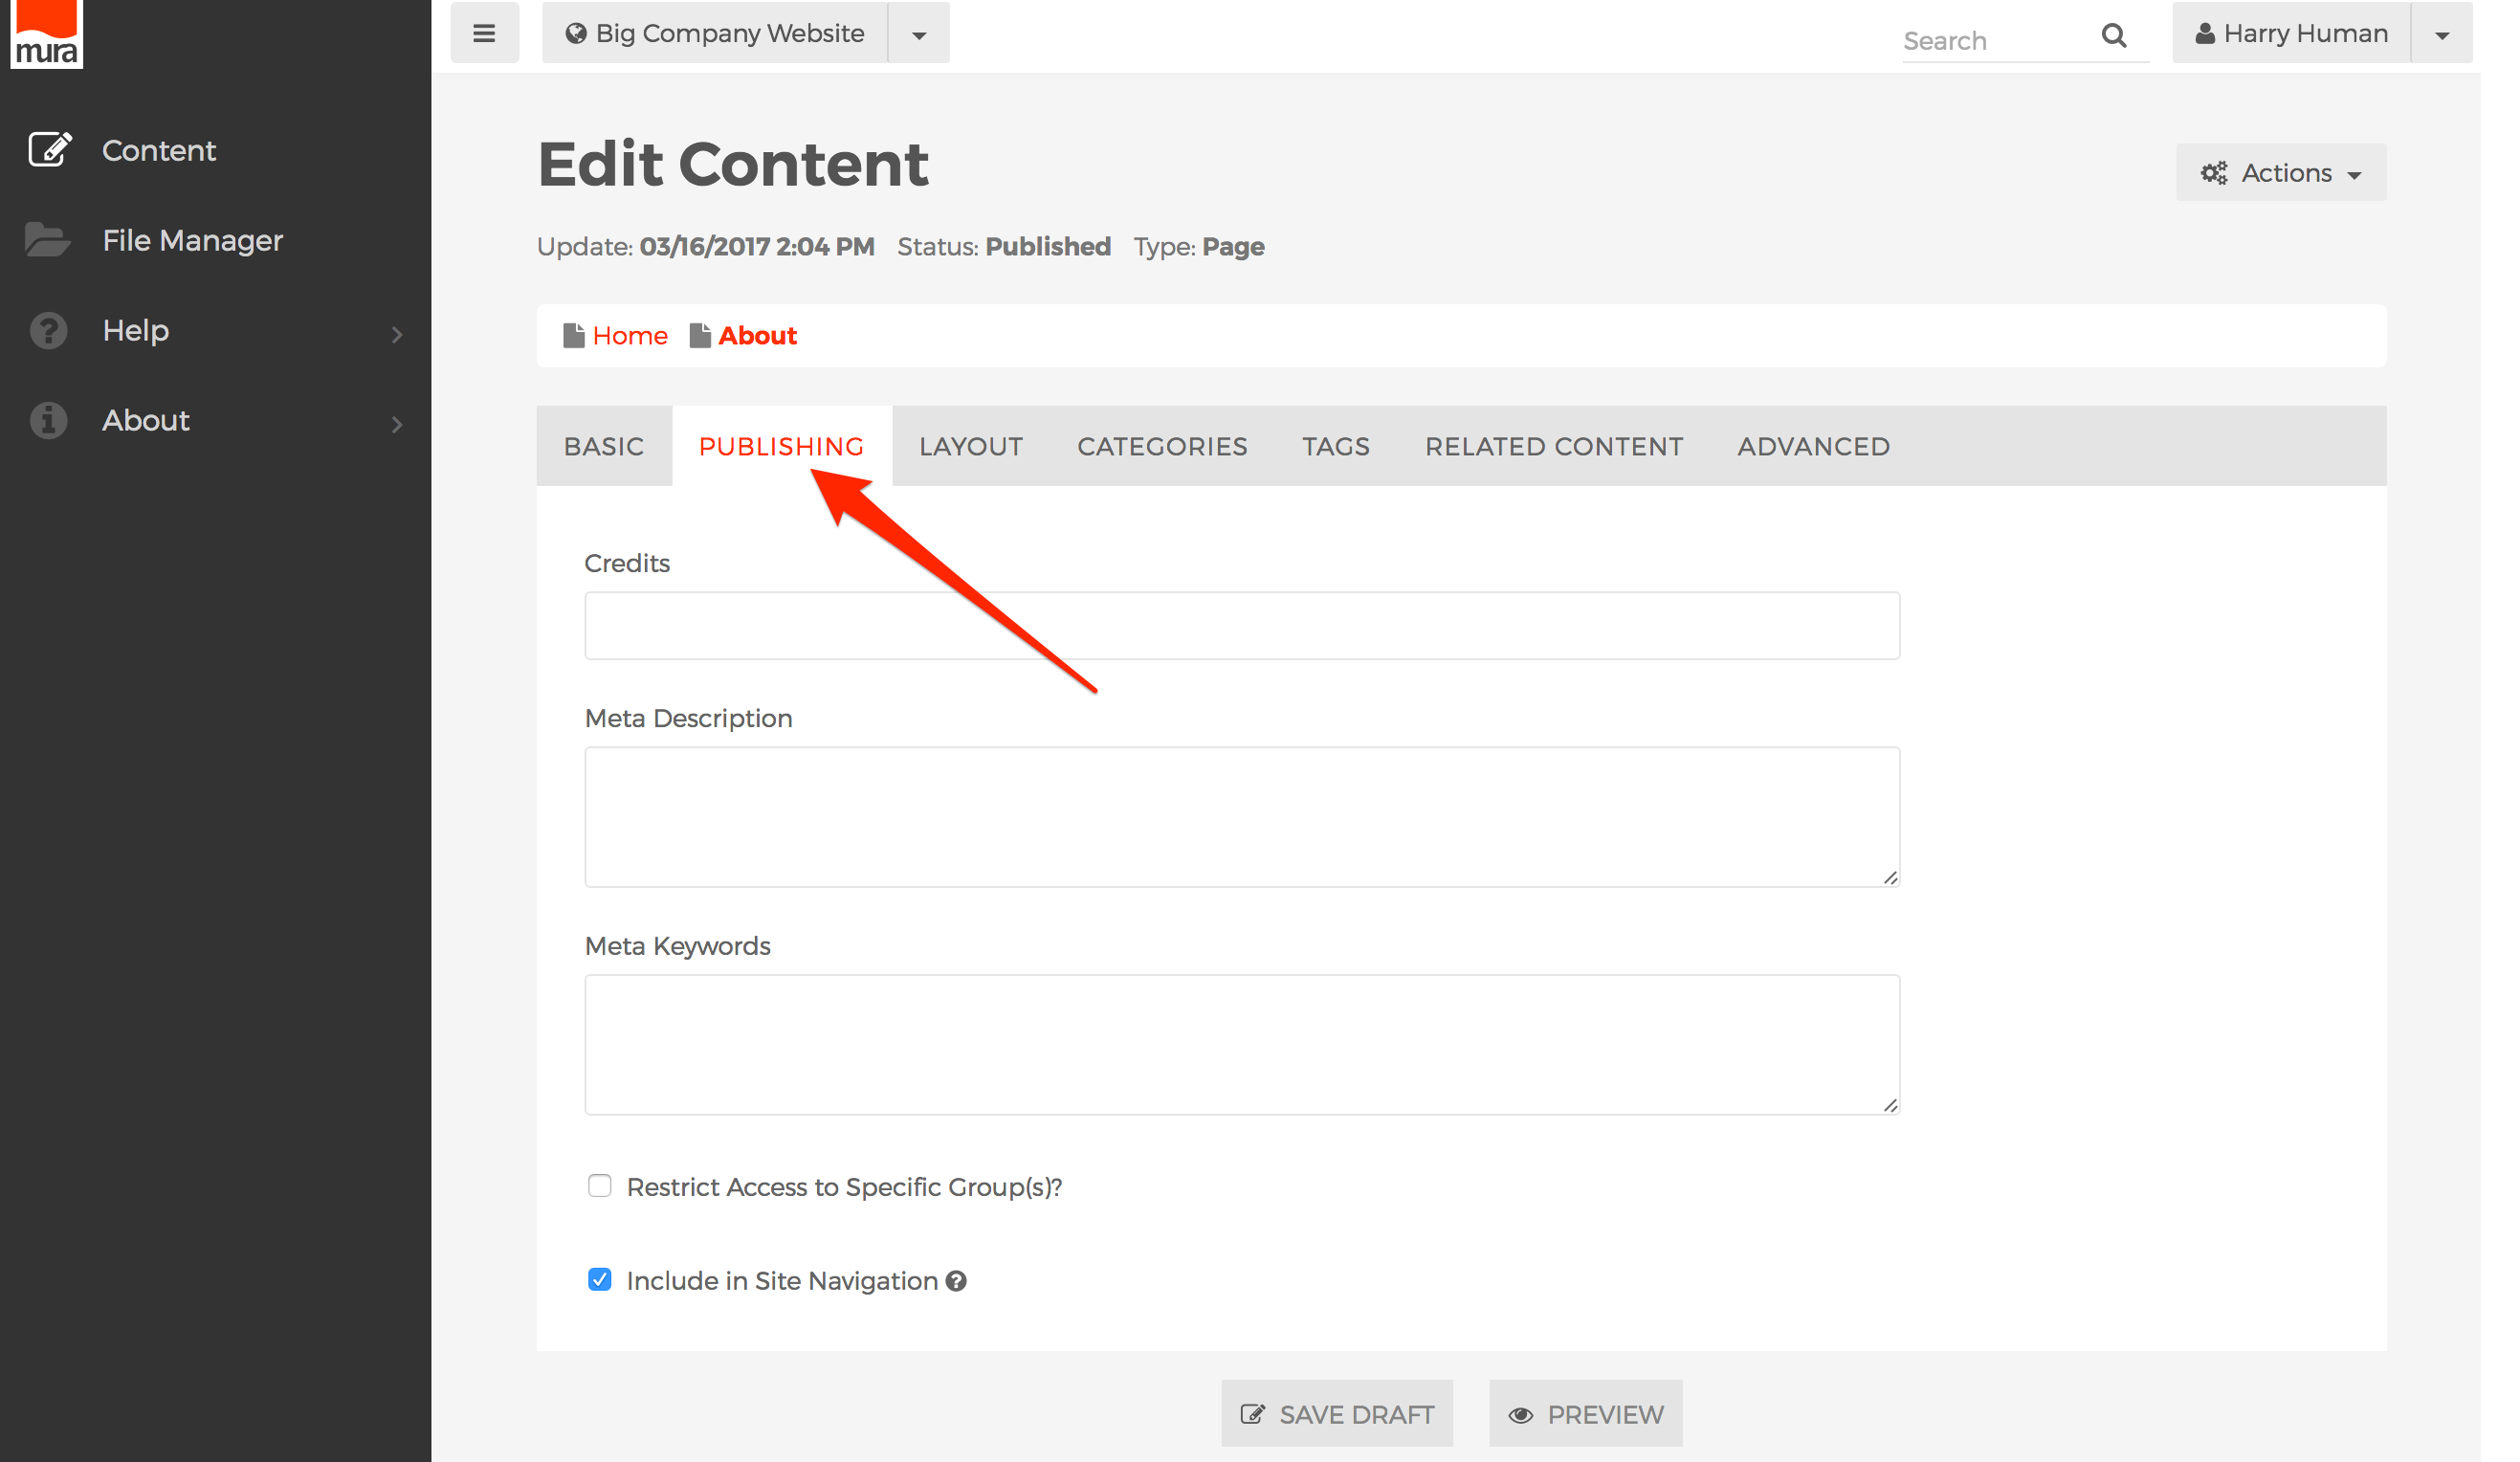
- Select the Publishing tab.
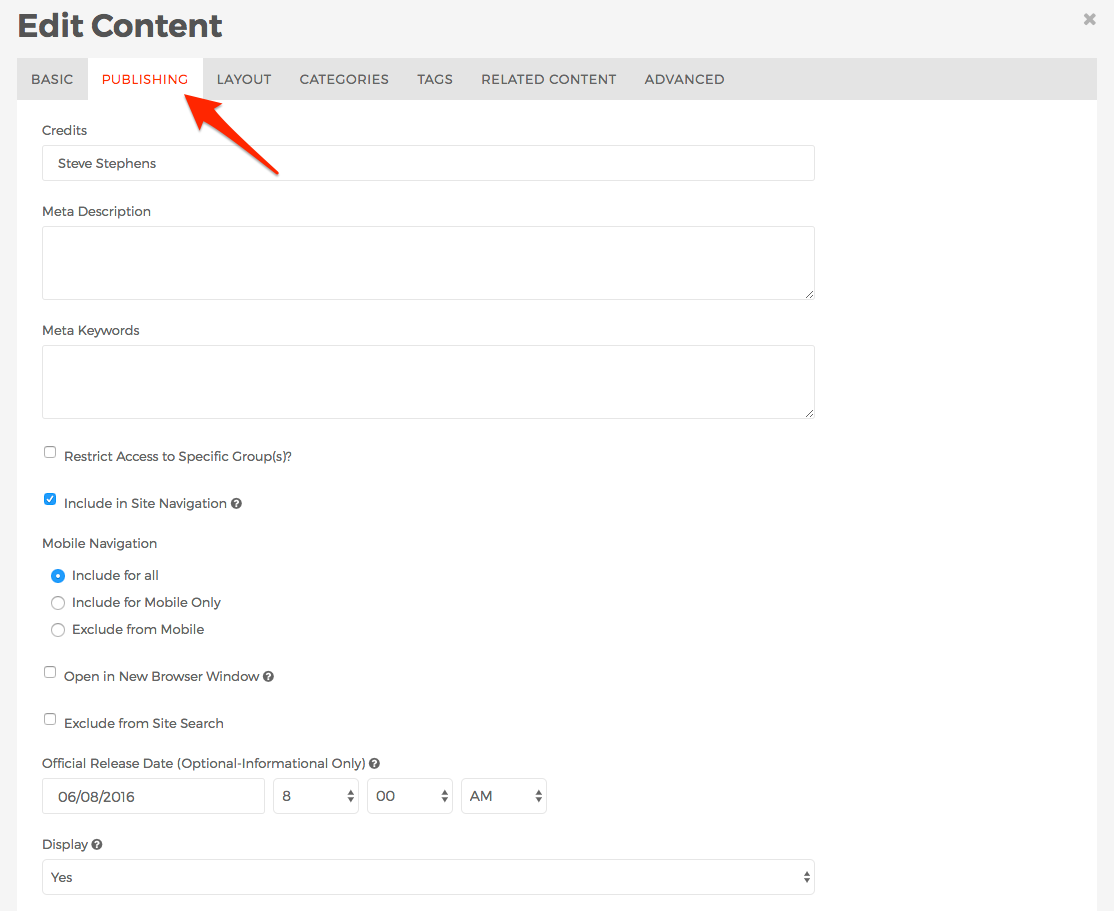
- Scroll to the field labeled "Restrict Access to Specific Group(s)?"

Note: This field will only appear if Extranet (Password Protection) is enabled via the Site Settings > Edit Settings > Modules tab. - You may <CTRL> + click (via PC) or <CMD> + click (via Mac) to select more than one group.

Note: A commonly asked question is whether or not it is possible to hide navigational links to "restricted" pages if a user is not logged in. The short answer is no. However, only the top-most link would be visible, and no links to child content would be generated. This is why we typically recommend creating a "Members Only" section of your site, and then enforcing more specific restrictions to content beneath that.
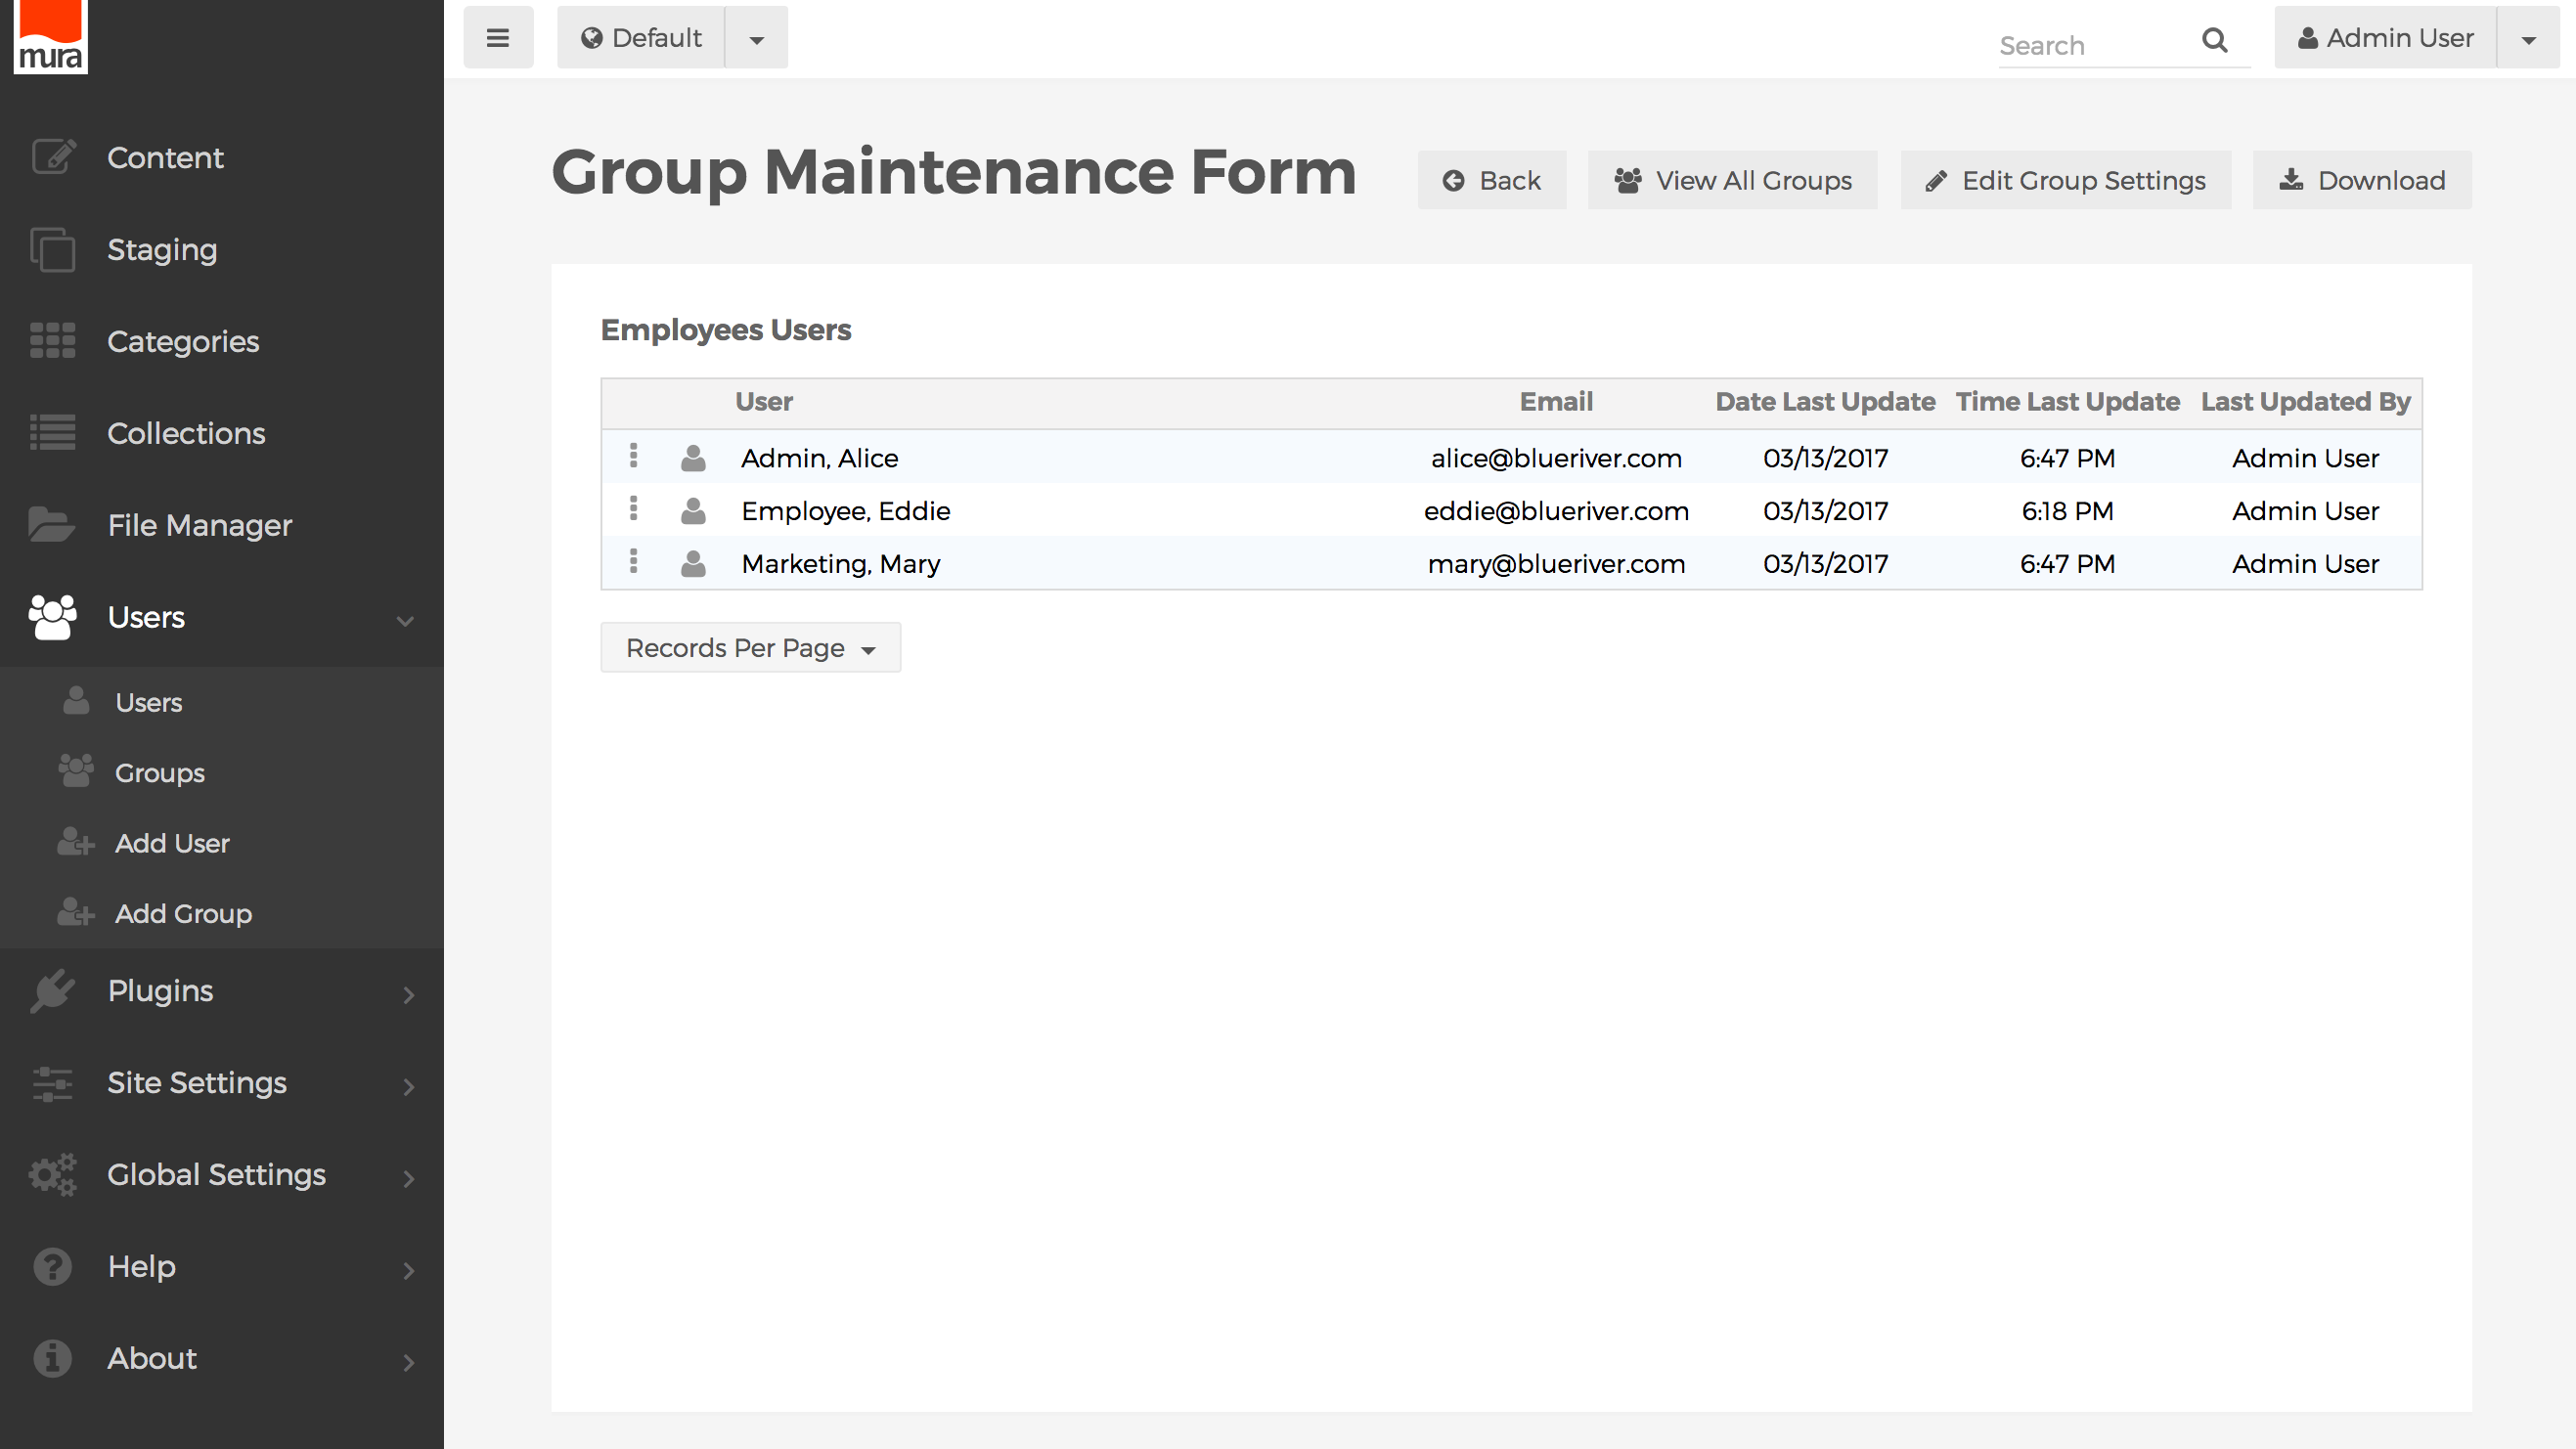
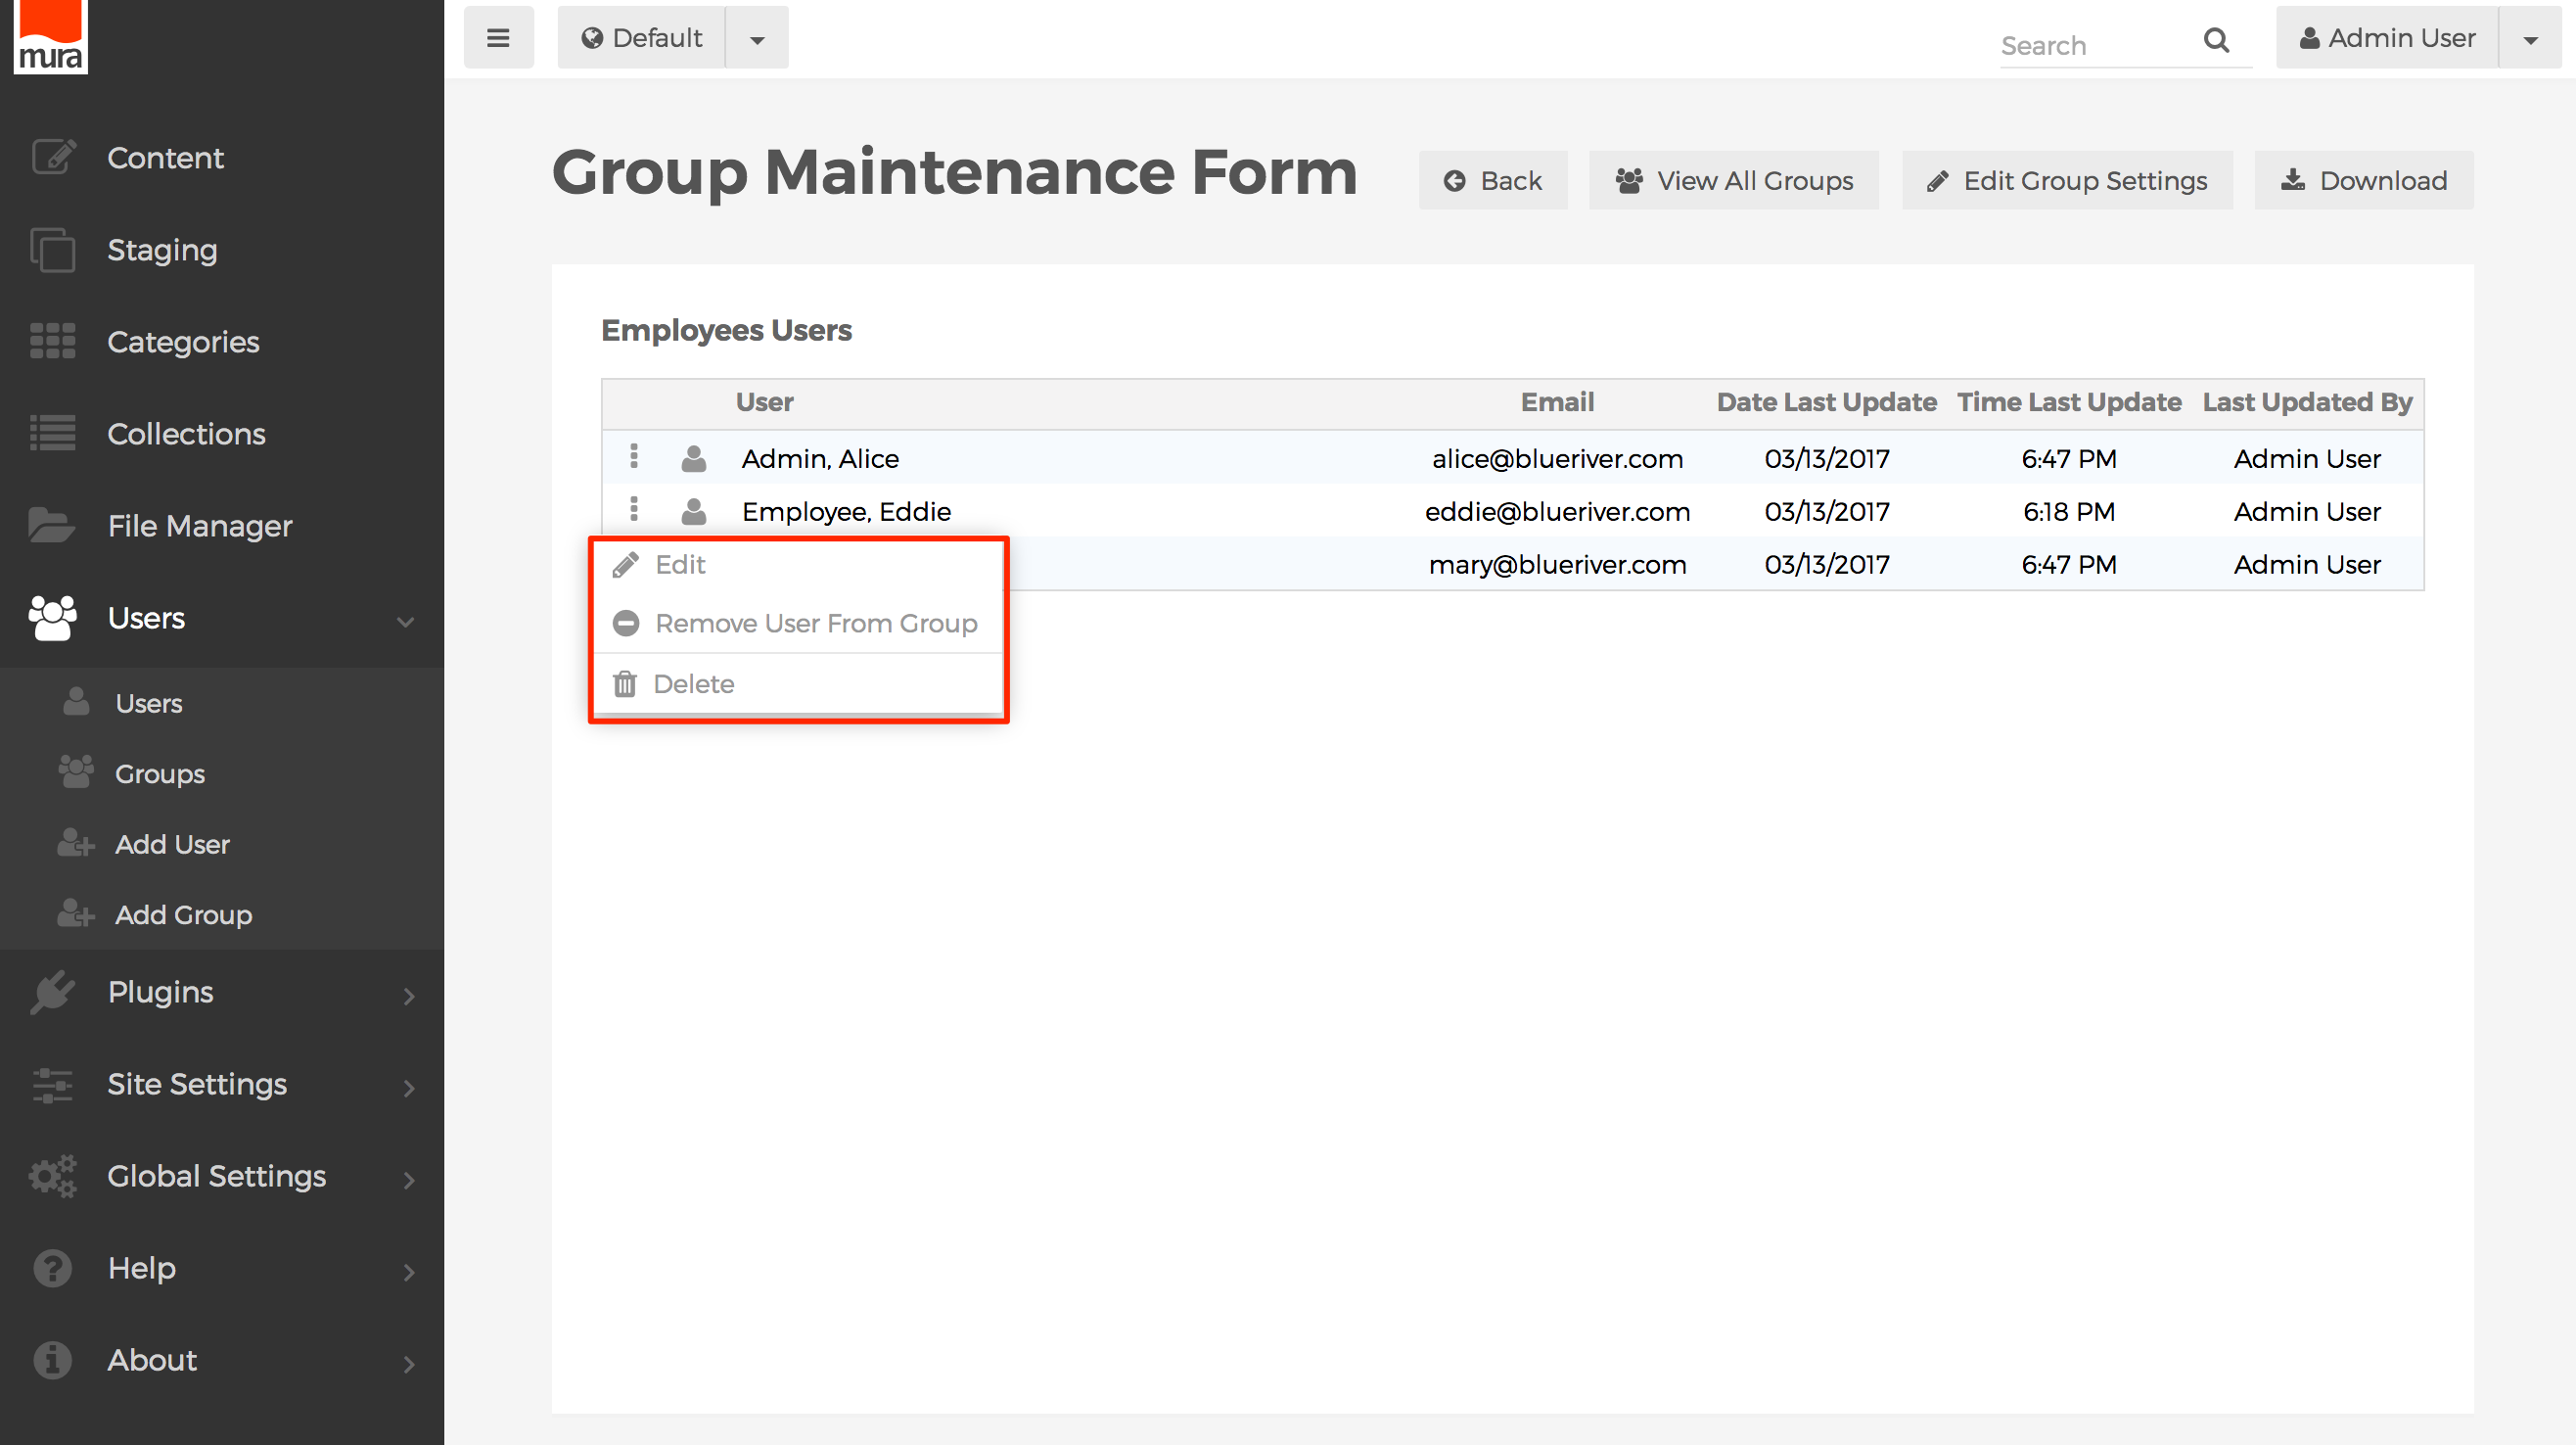
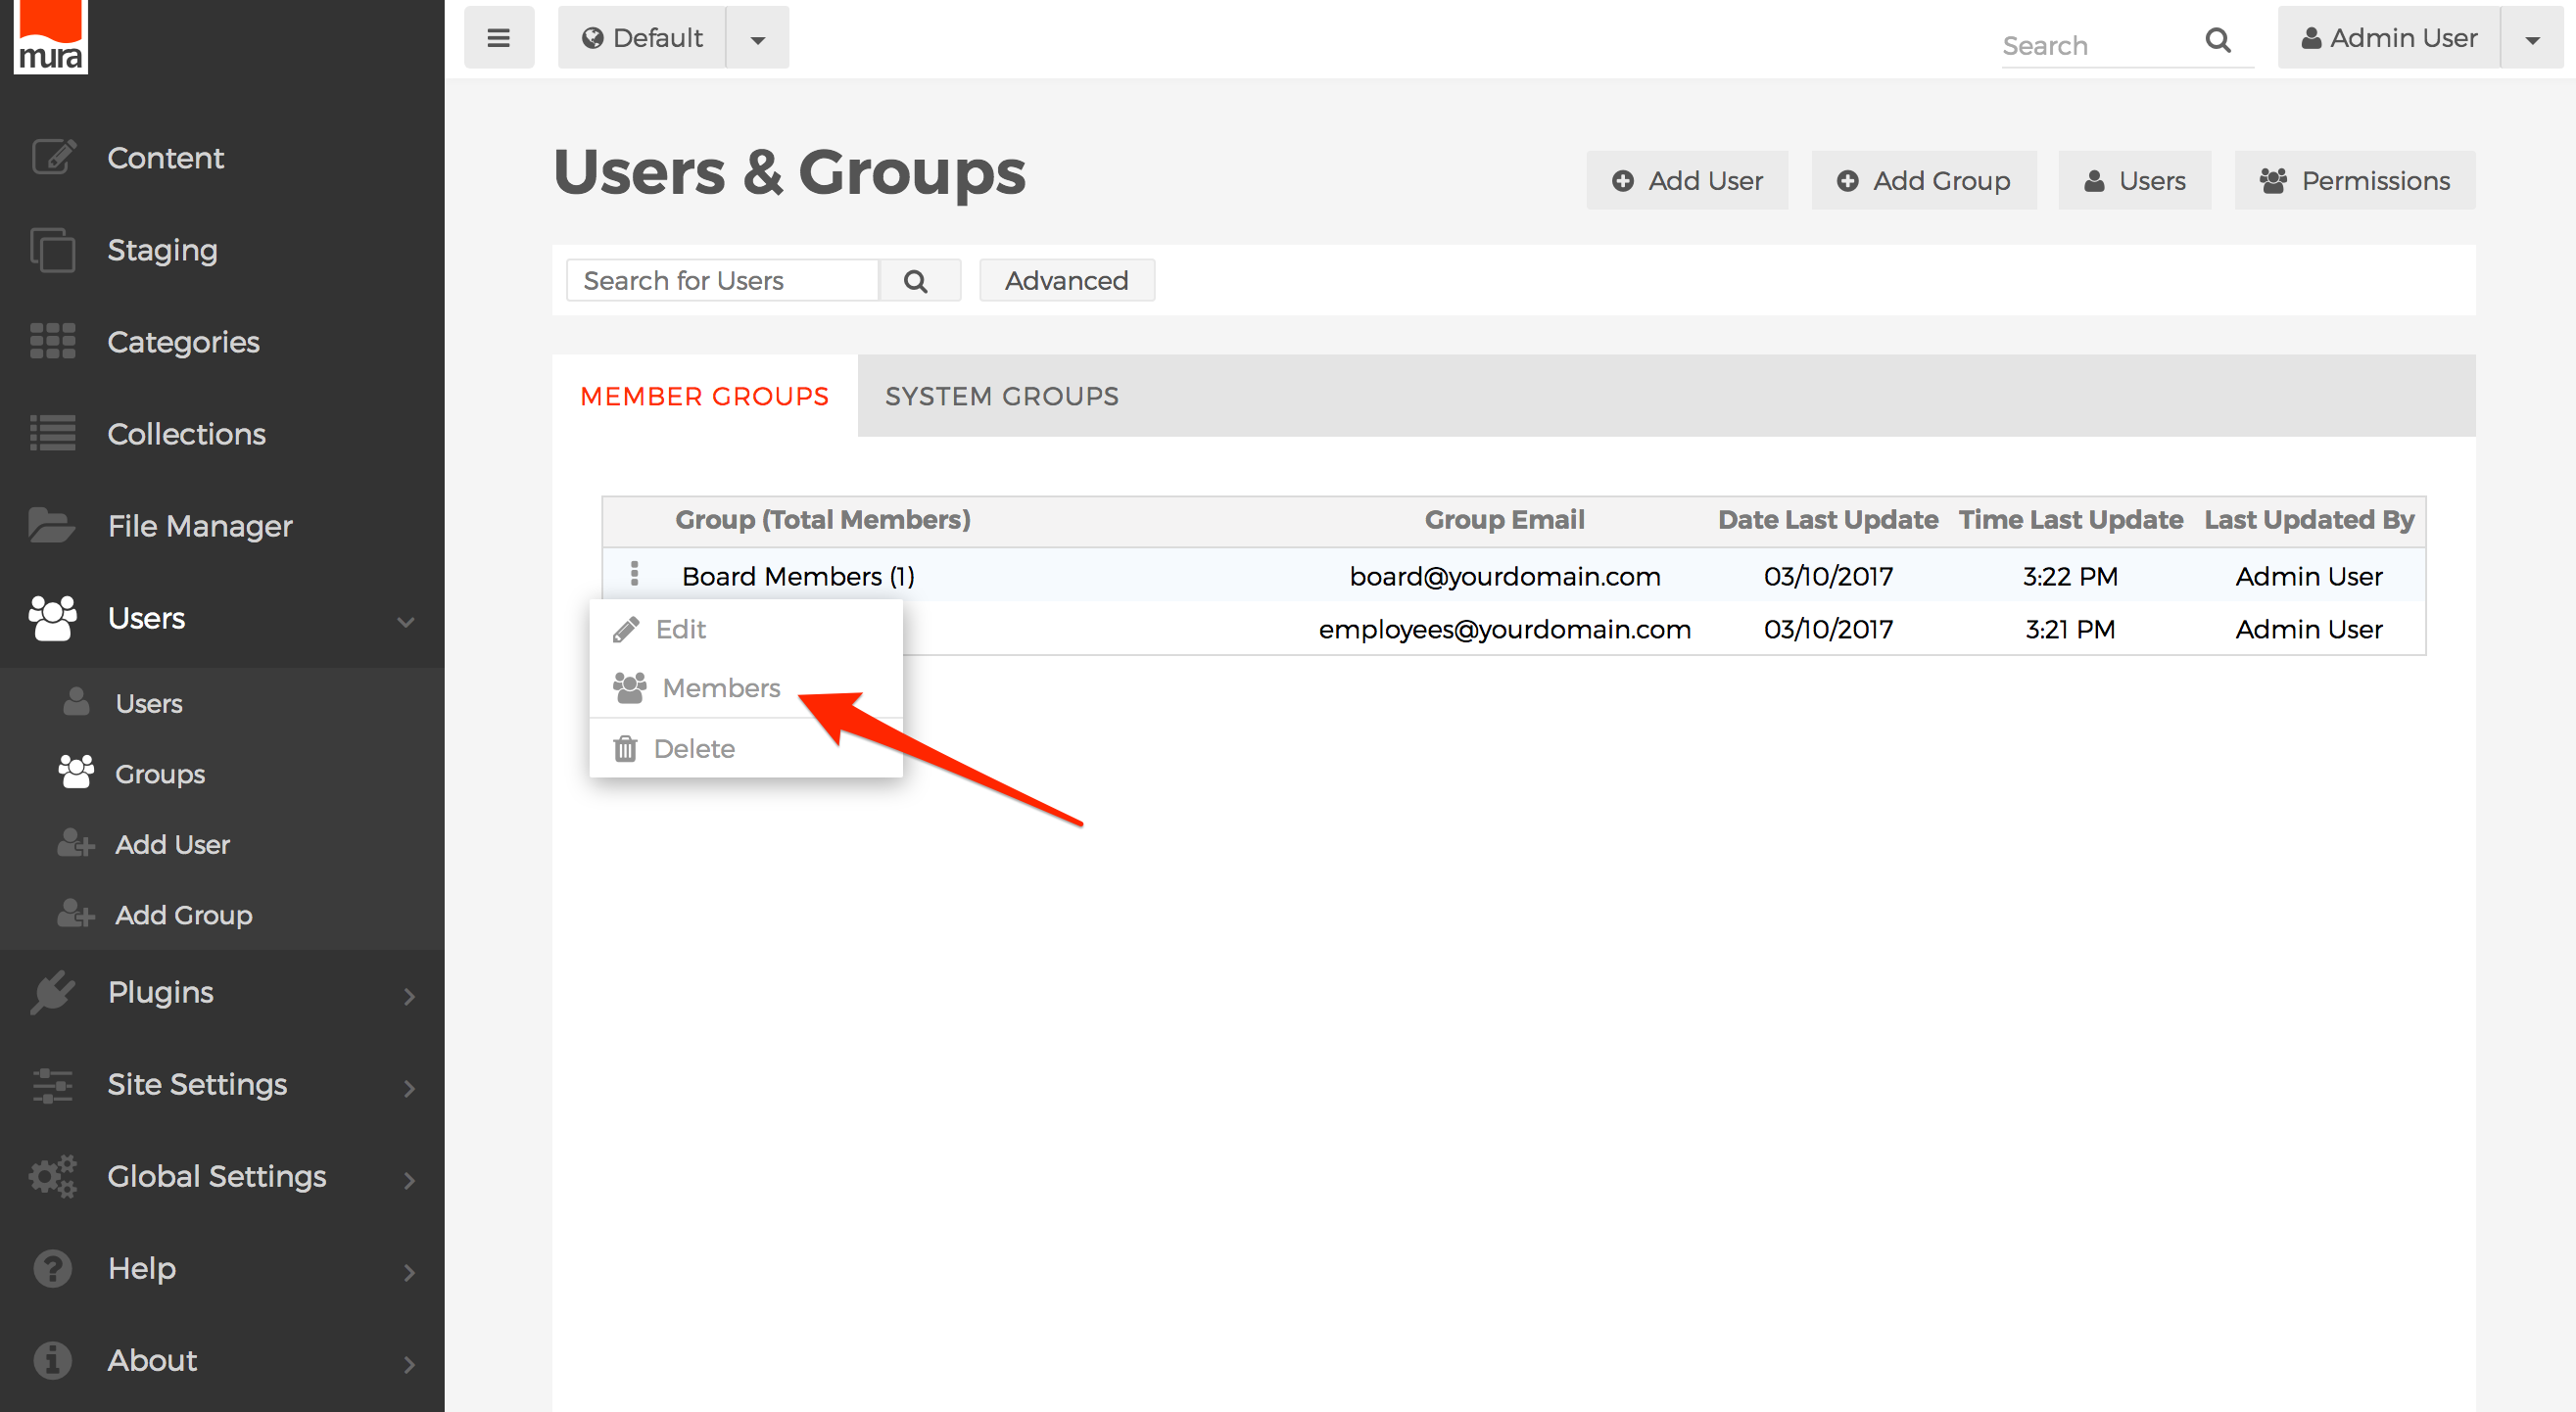
Managing Group Members
To manage a group's members, follow the steps below.
- From the back-end administration area of Mura, click Users from the primary navigation to reveal an additional set of menu items, then select Groups.

- From the Users & Groups screen, select the three-dot menu in the row of your desired group, and click Members.

- You should be taken to the Group Maintenance Form screen, and see a listing of the group's users/members.
- If you click the three-dot menu in the row of any user you wish to modify, you will be presented with a menu of options to Edit the user, Remove User From Group, or even Delete the user entirely.
- To assign a member to a group, see the Add/Edit a User section, and review the Group Memberships Tab information.


Creating & Managing Users
The first thing to keep in mind when working with users in Mura is all permissions in Mura are group-based. So, if you haven't already done so, please be sure to read the section on Creating & Managing Groups before continuing.
Once you've created your desired groups, you're ready to begin adding users and assigning them to the various groups you've established. Users may belong to as many groups as you wish, and may belong to both System Groups and Member Groups under the same user account. In other words, you shouldn't have to create multiple user accounts for the same individual.
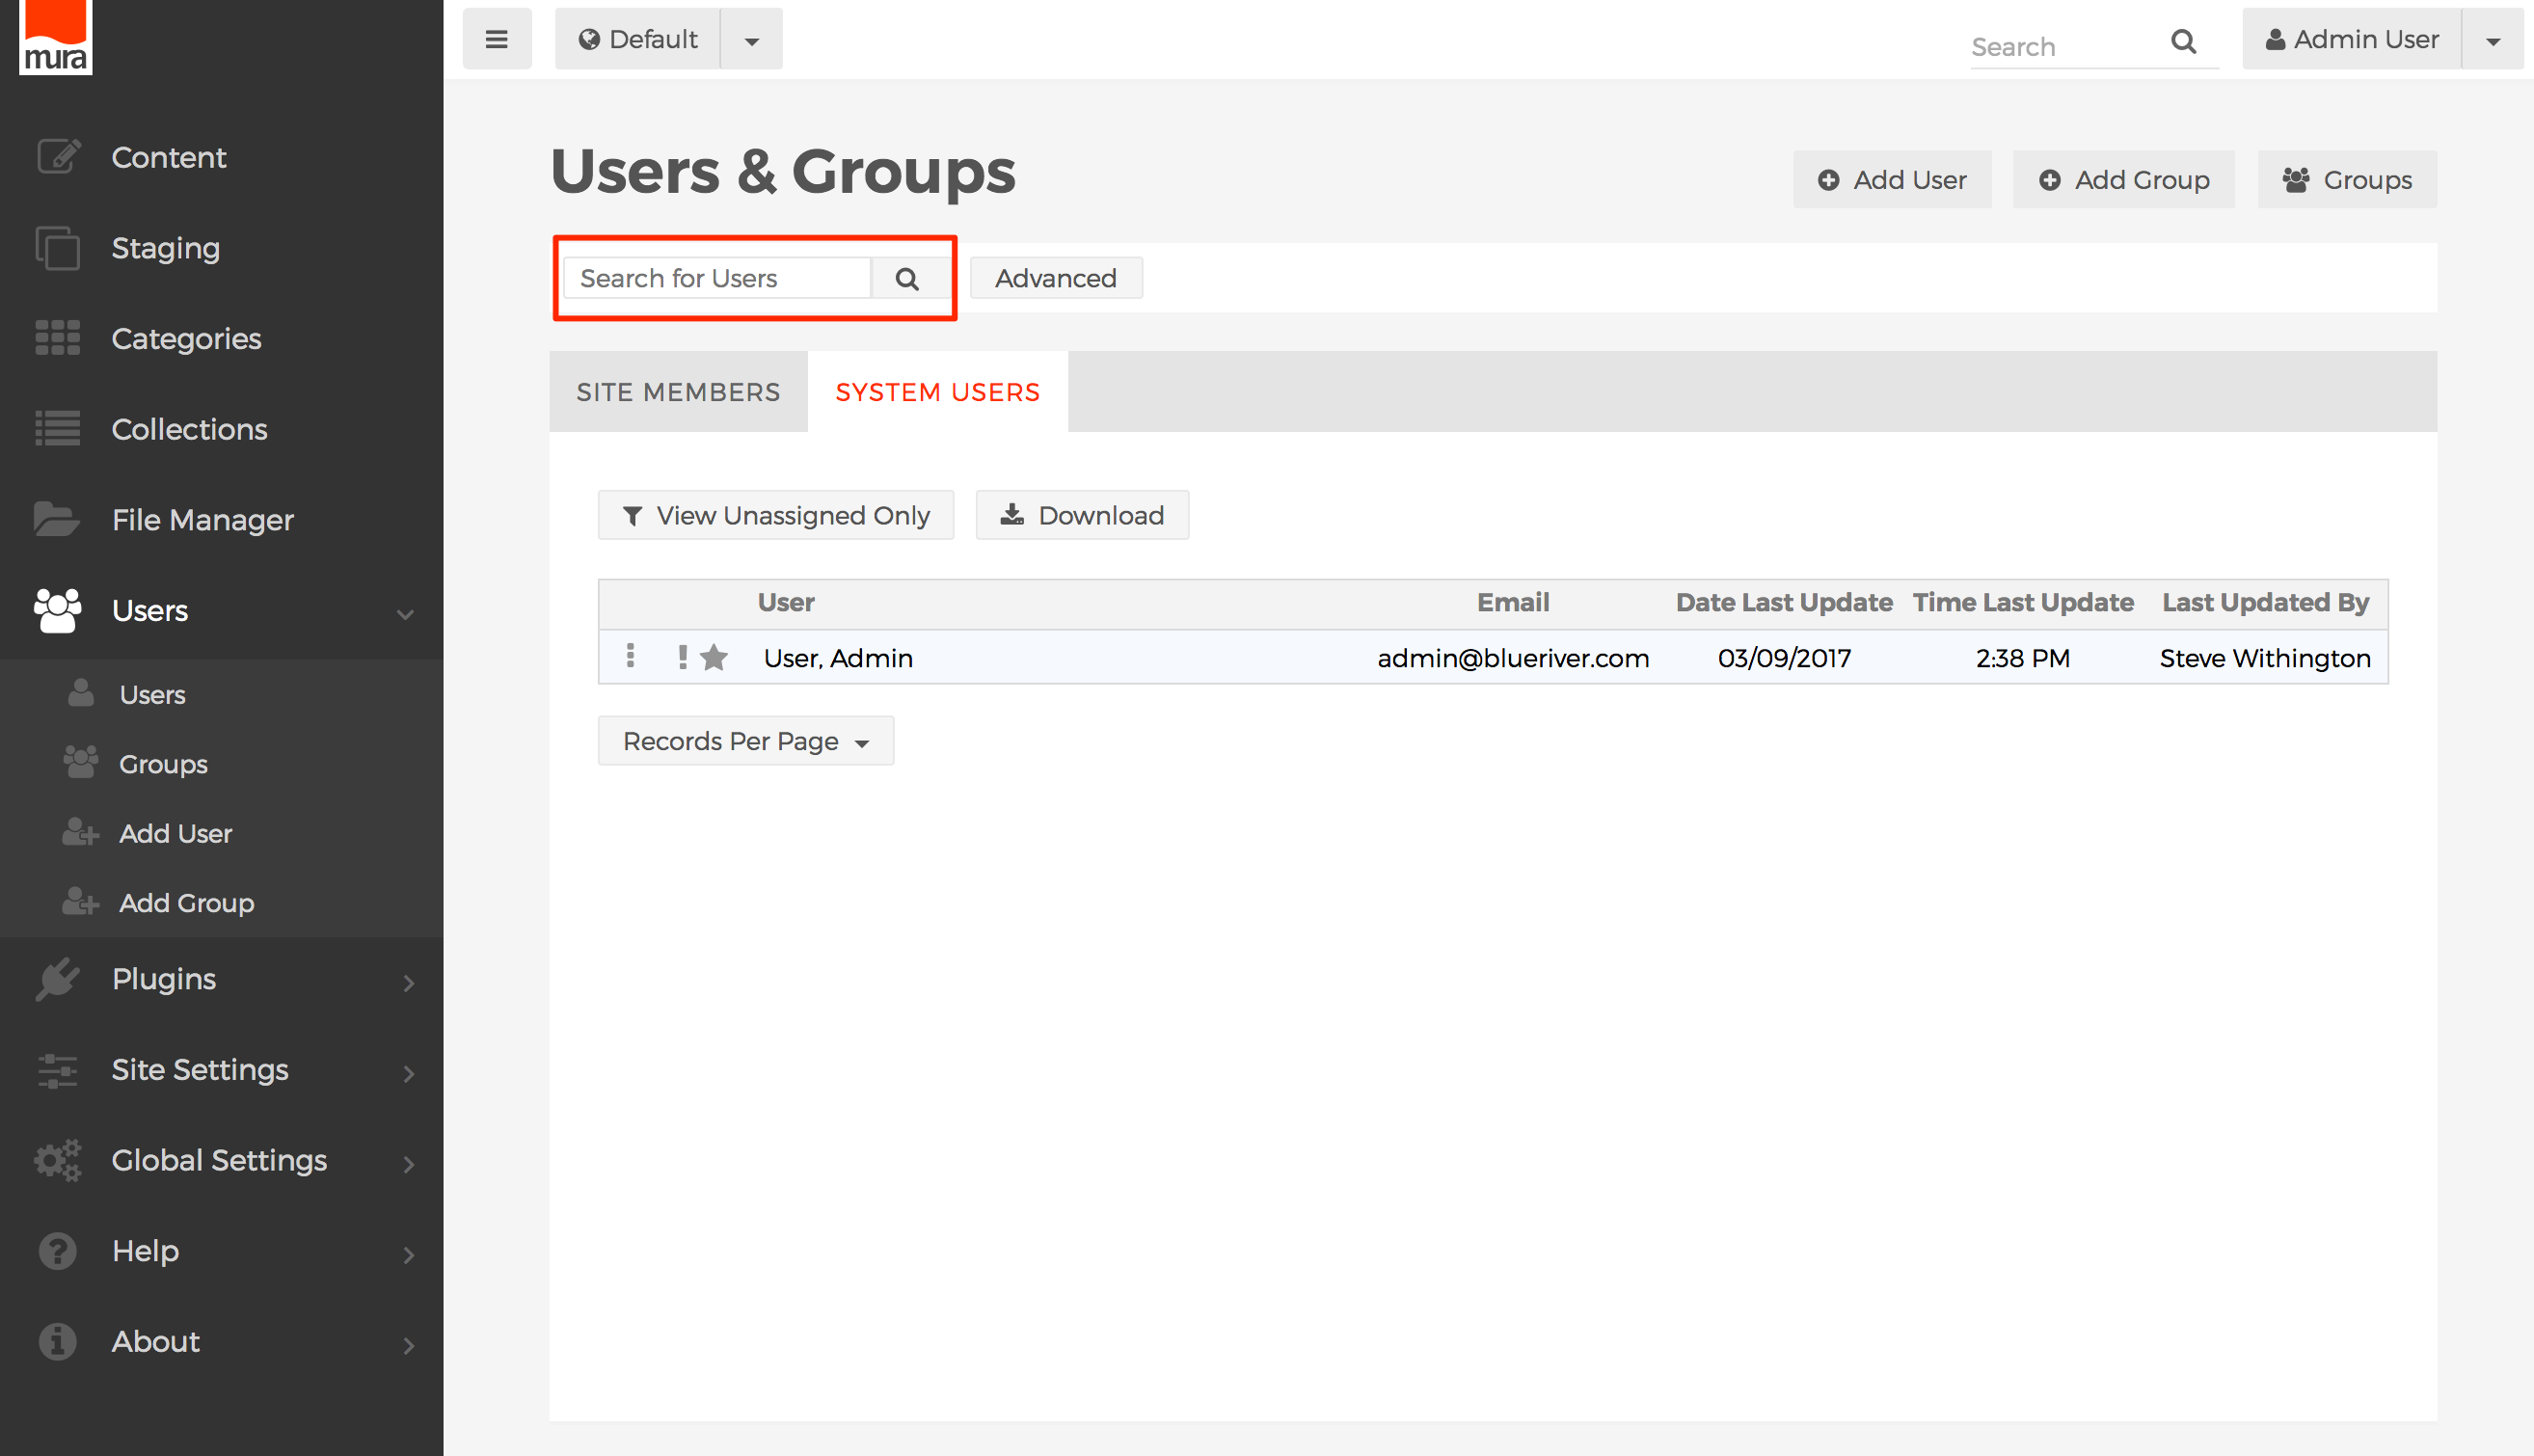
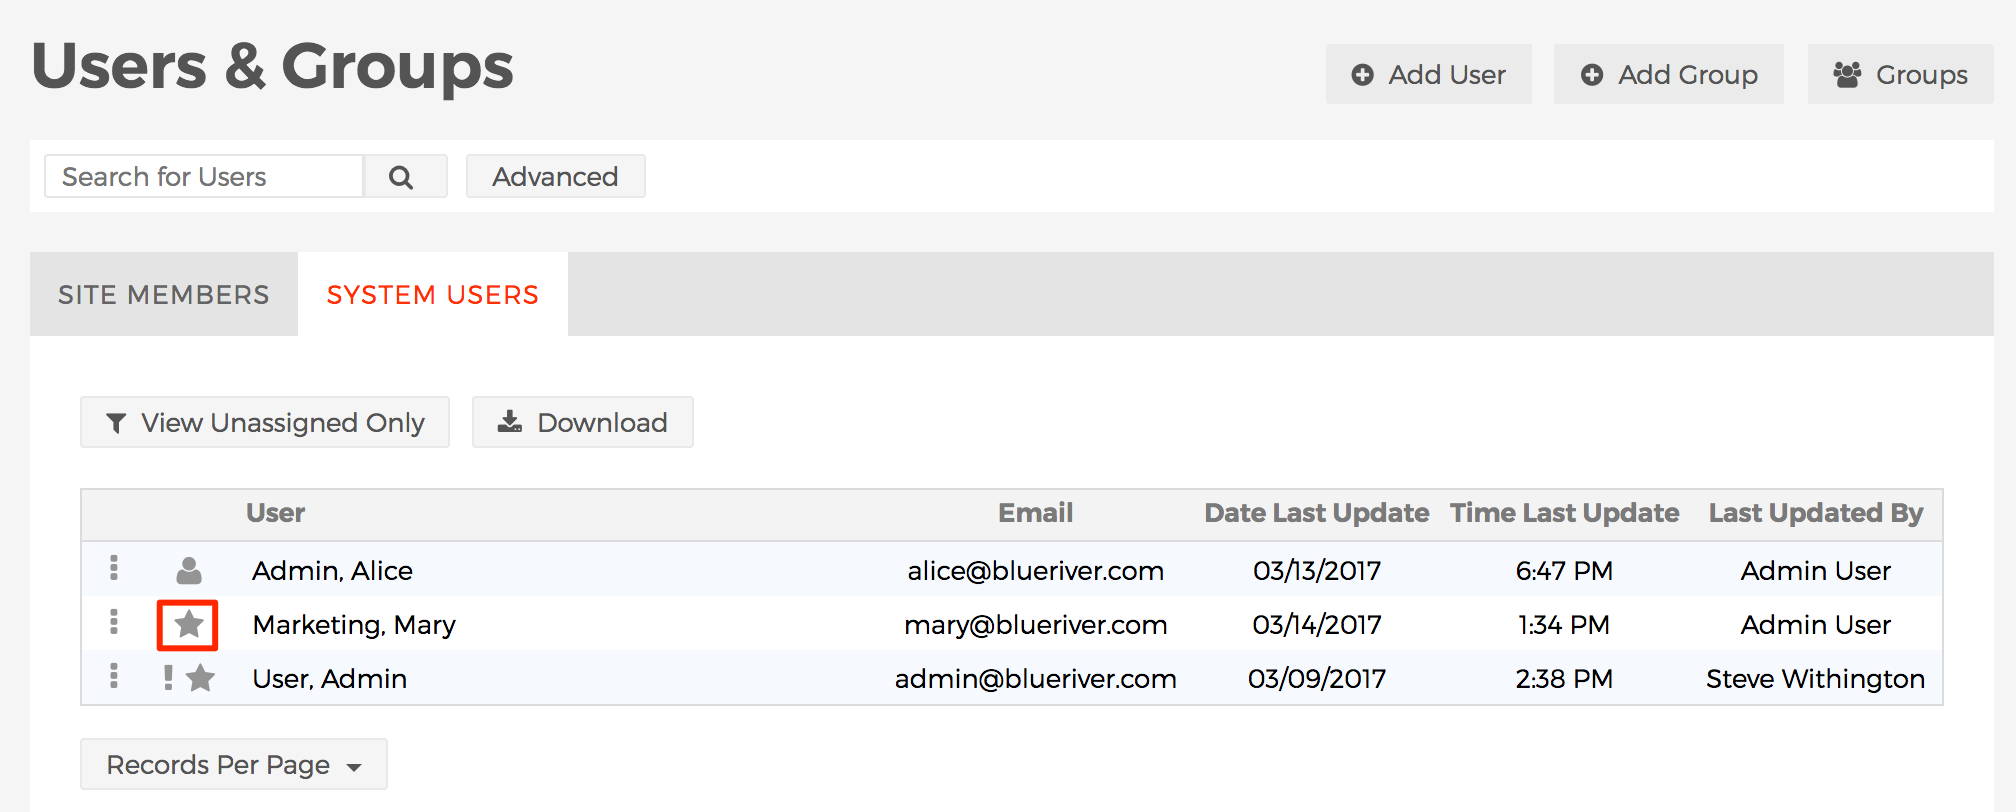
How to Access & Find Users
- From the back-end administration area of Mura, select Users from the main navigation, then Users.

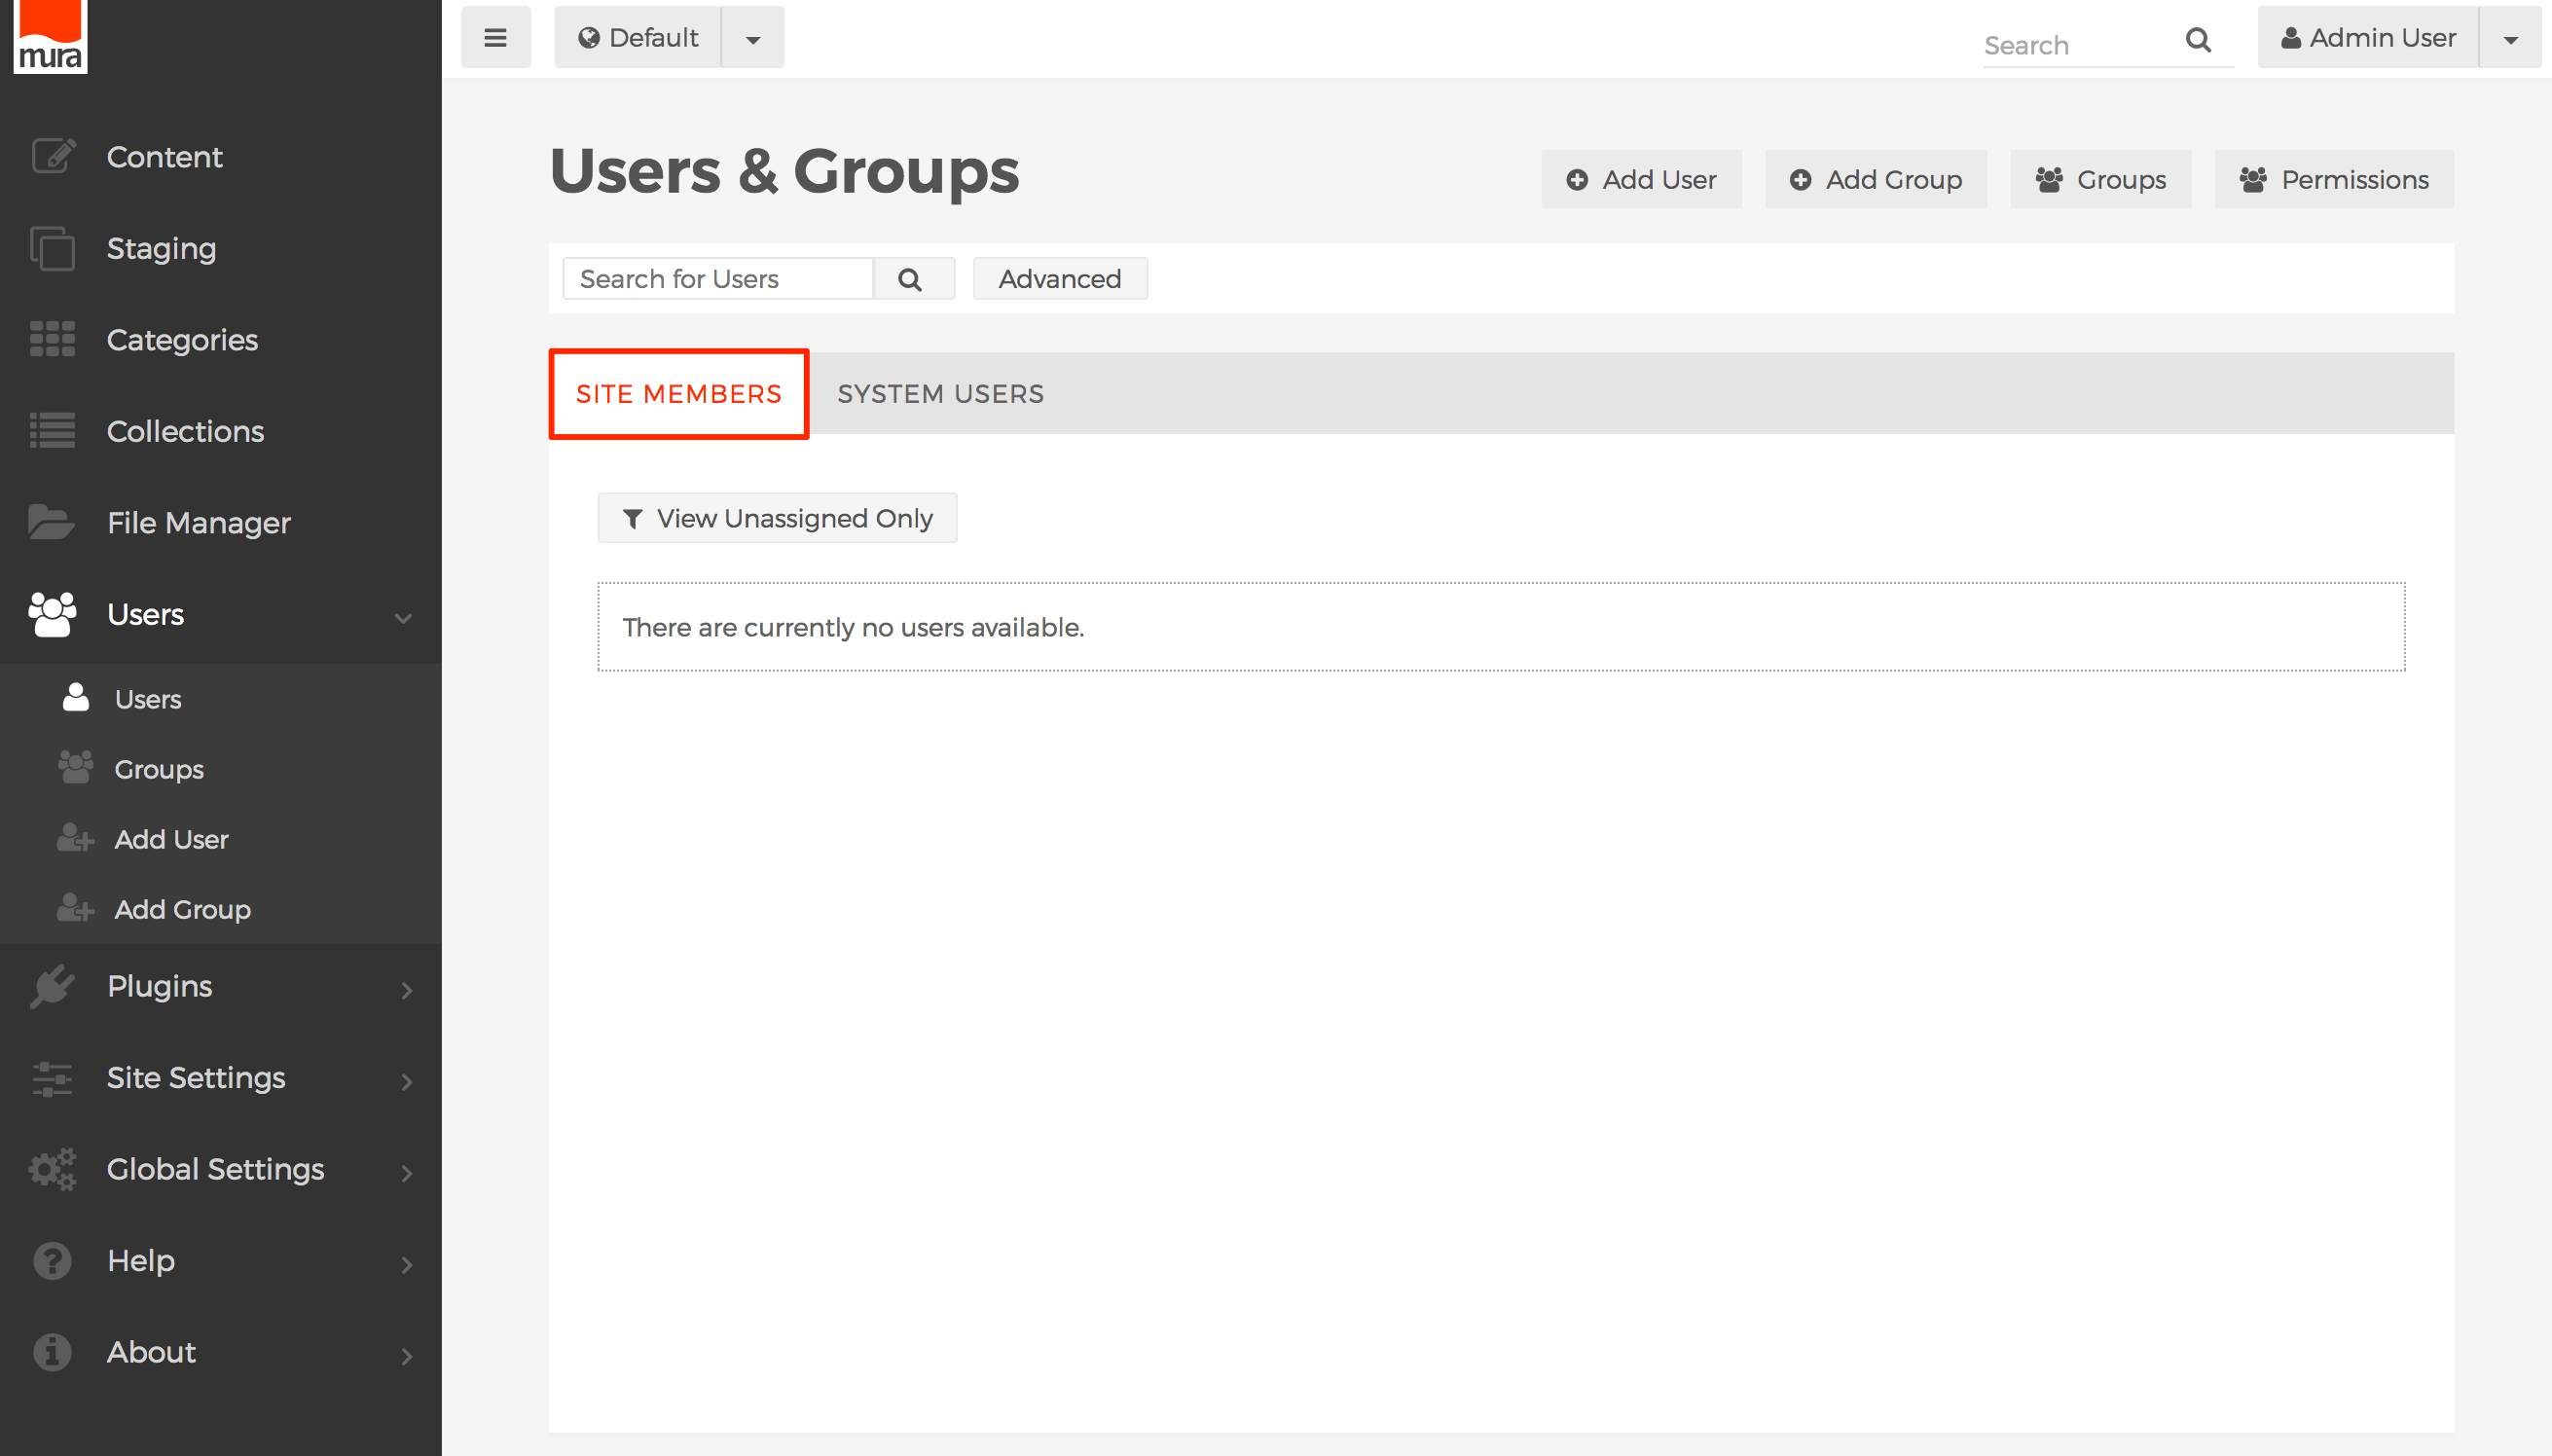
- The Site Members tab is enabled by default and lists users who belong to the Site Members pool of users. Site Members do not have access the back-end administration area of Mura.
- Click the System Users tab to view users who belong to the System Users pool of users.

- In a default installation of Mura, there is one user, created automatically, named "Admin User." However, during the installation process, the name and email address could have been changed to something else.
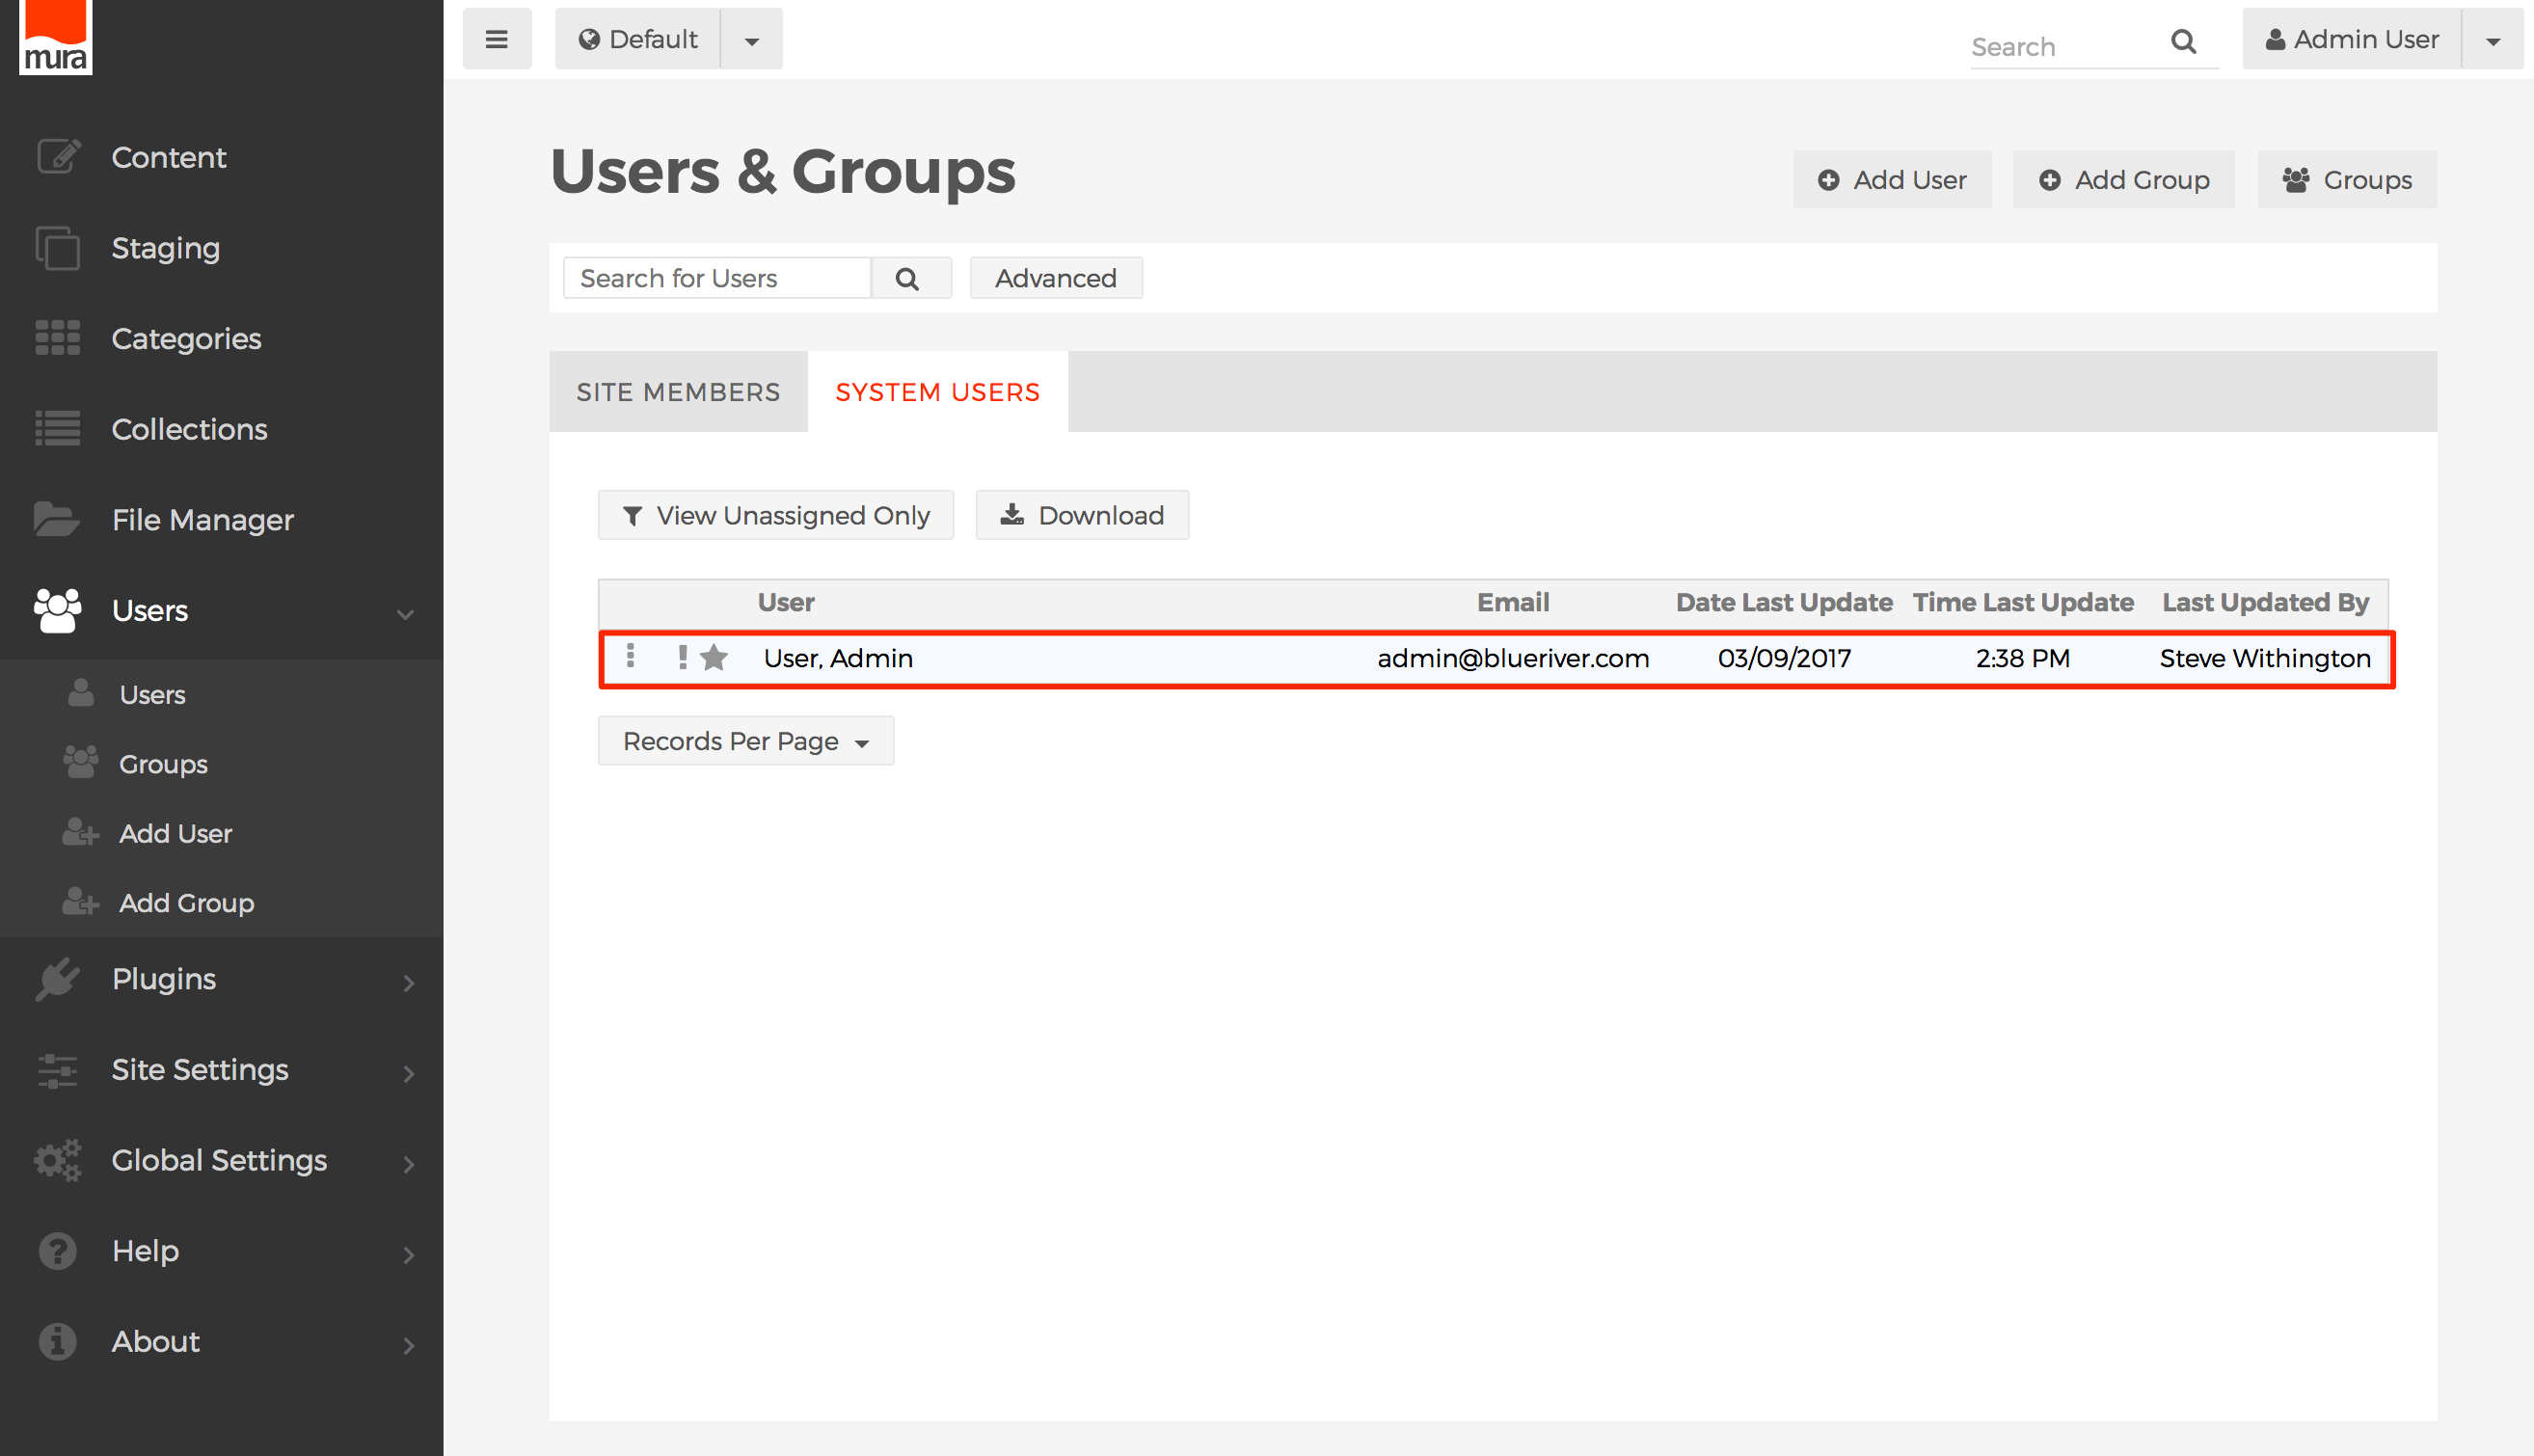
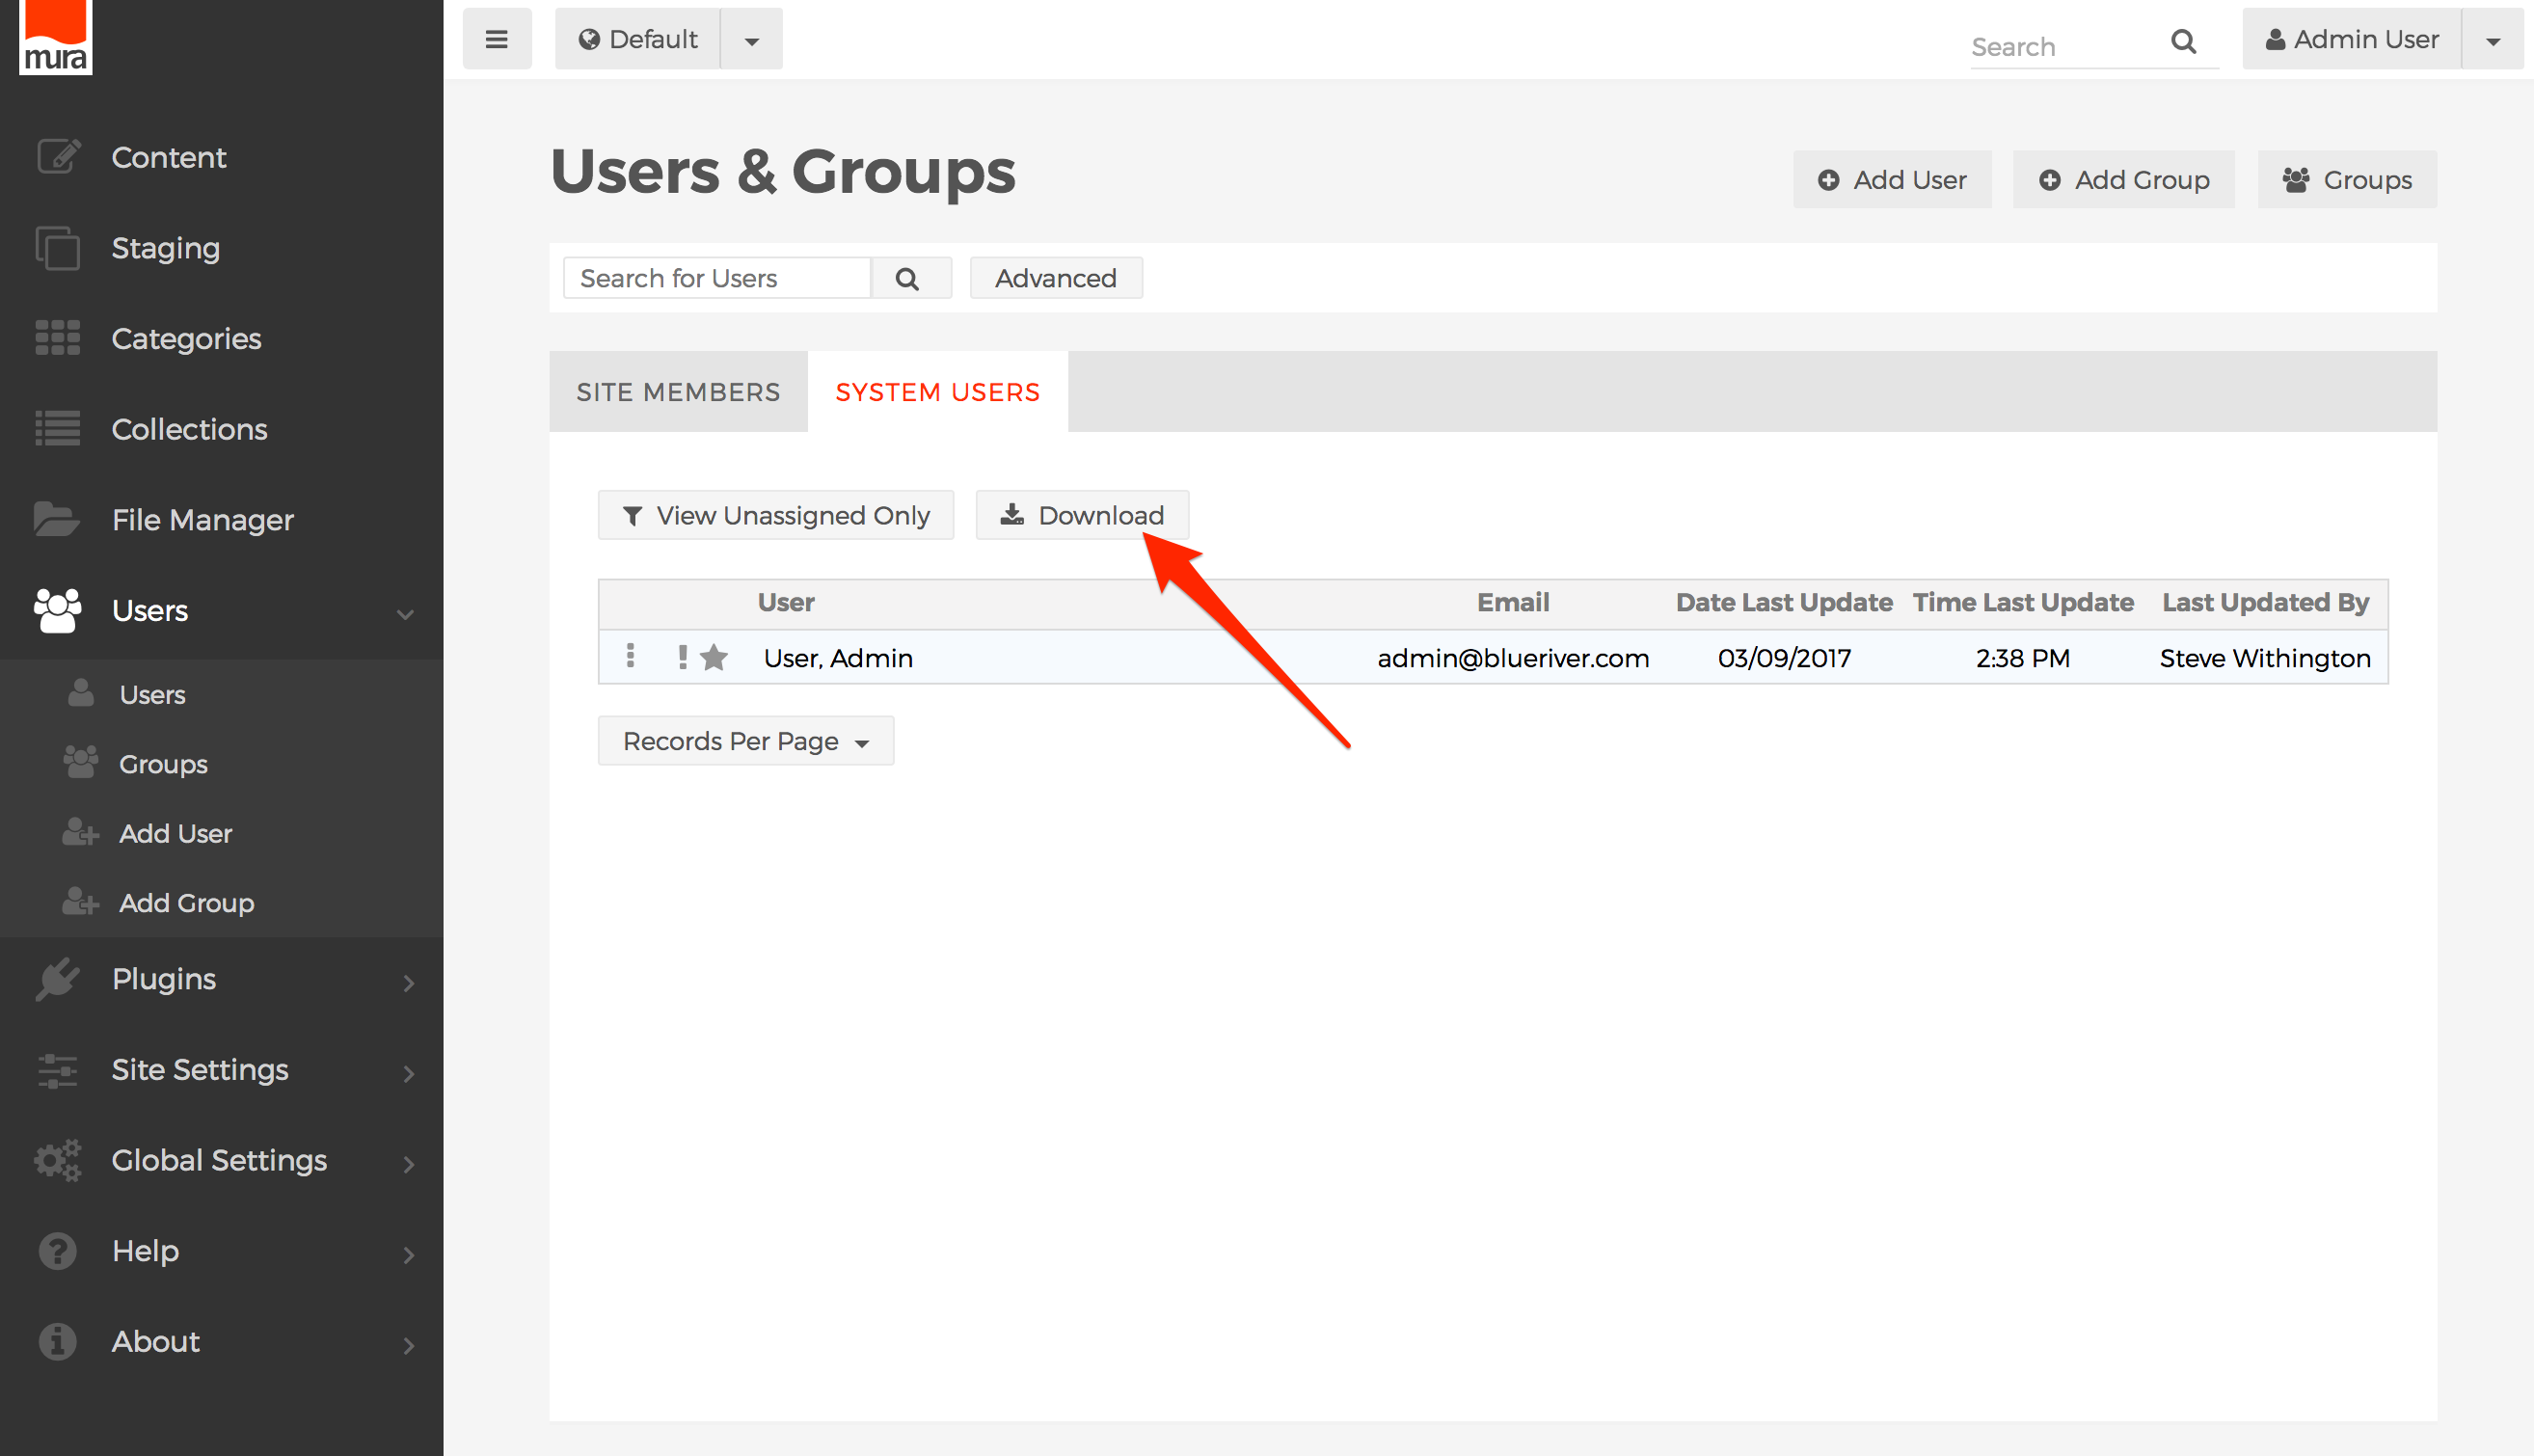
- From either tab, you have the ability to Download a list of users in .CSV format, by clicking the Download button above the listing of users.

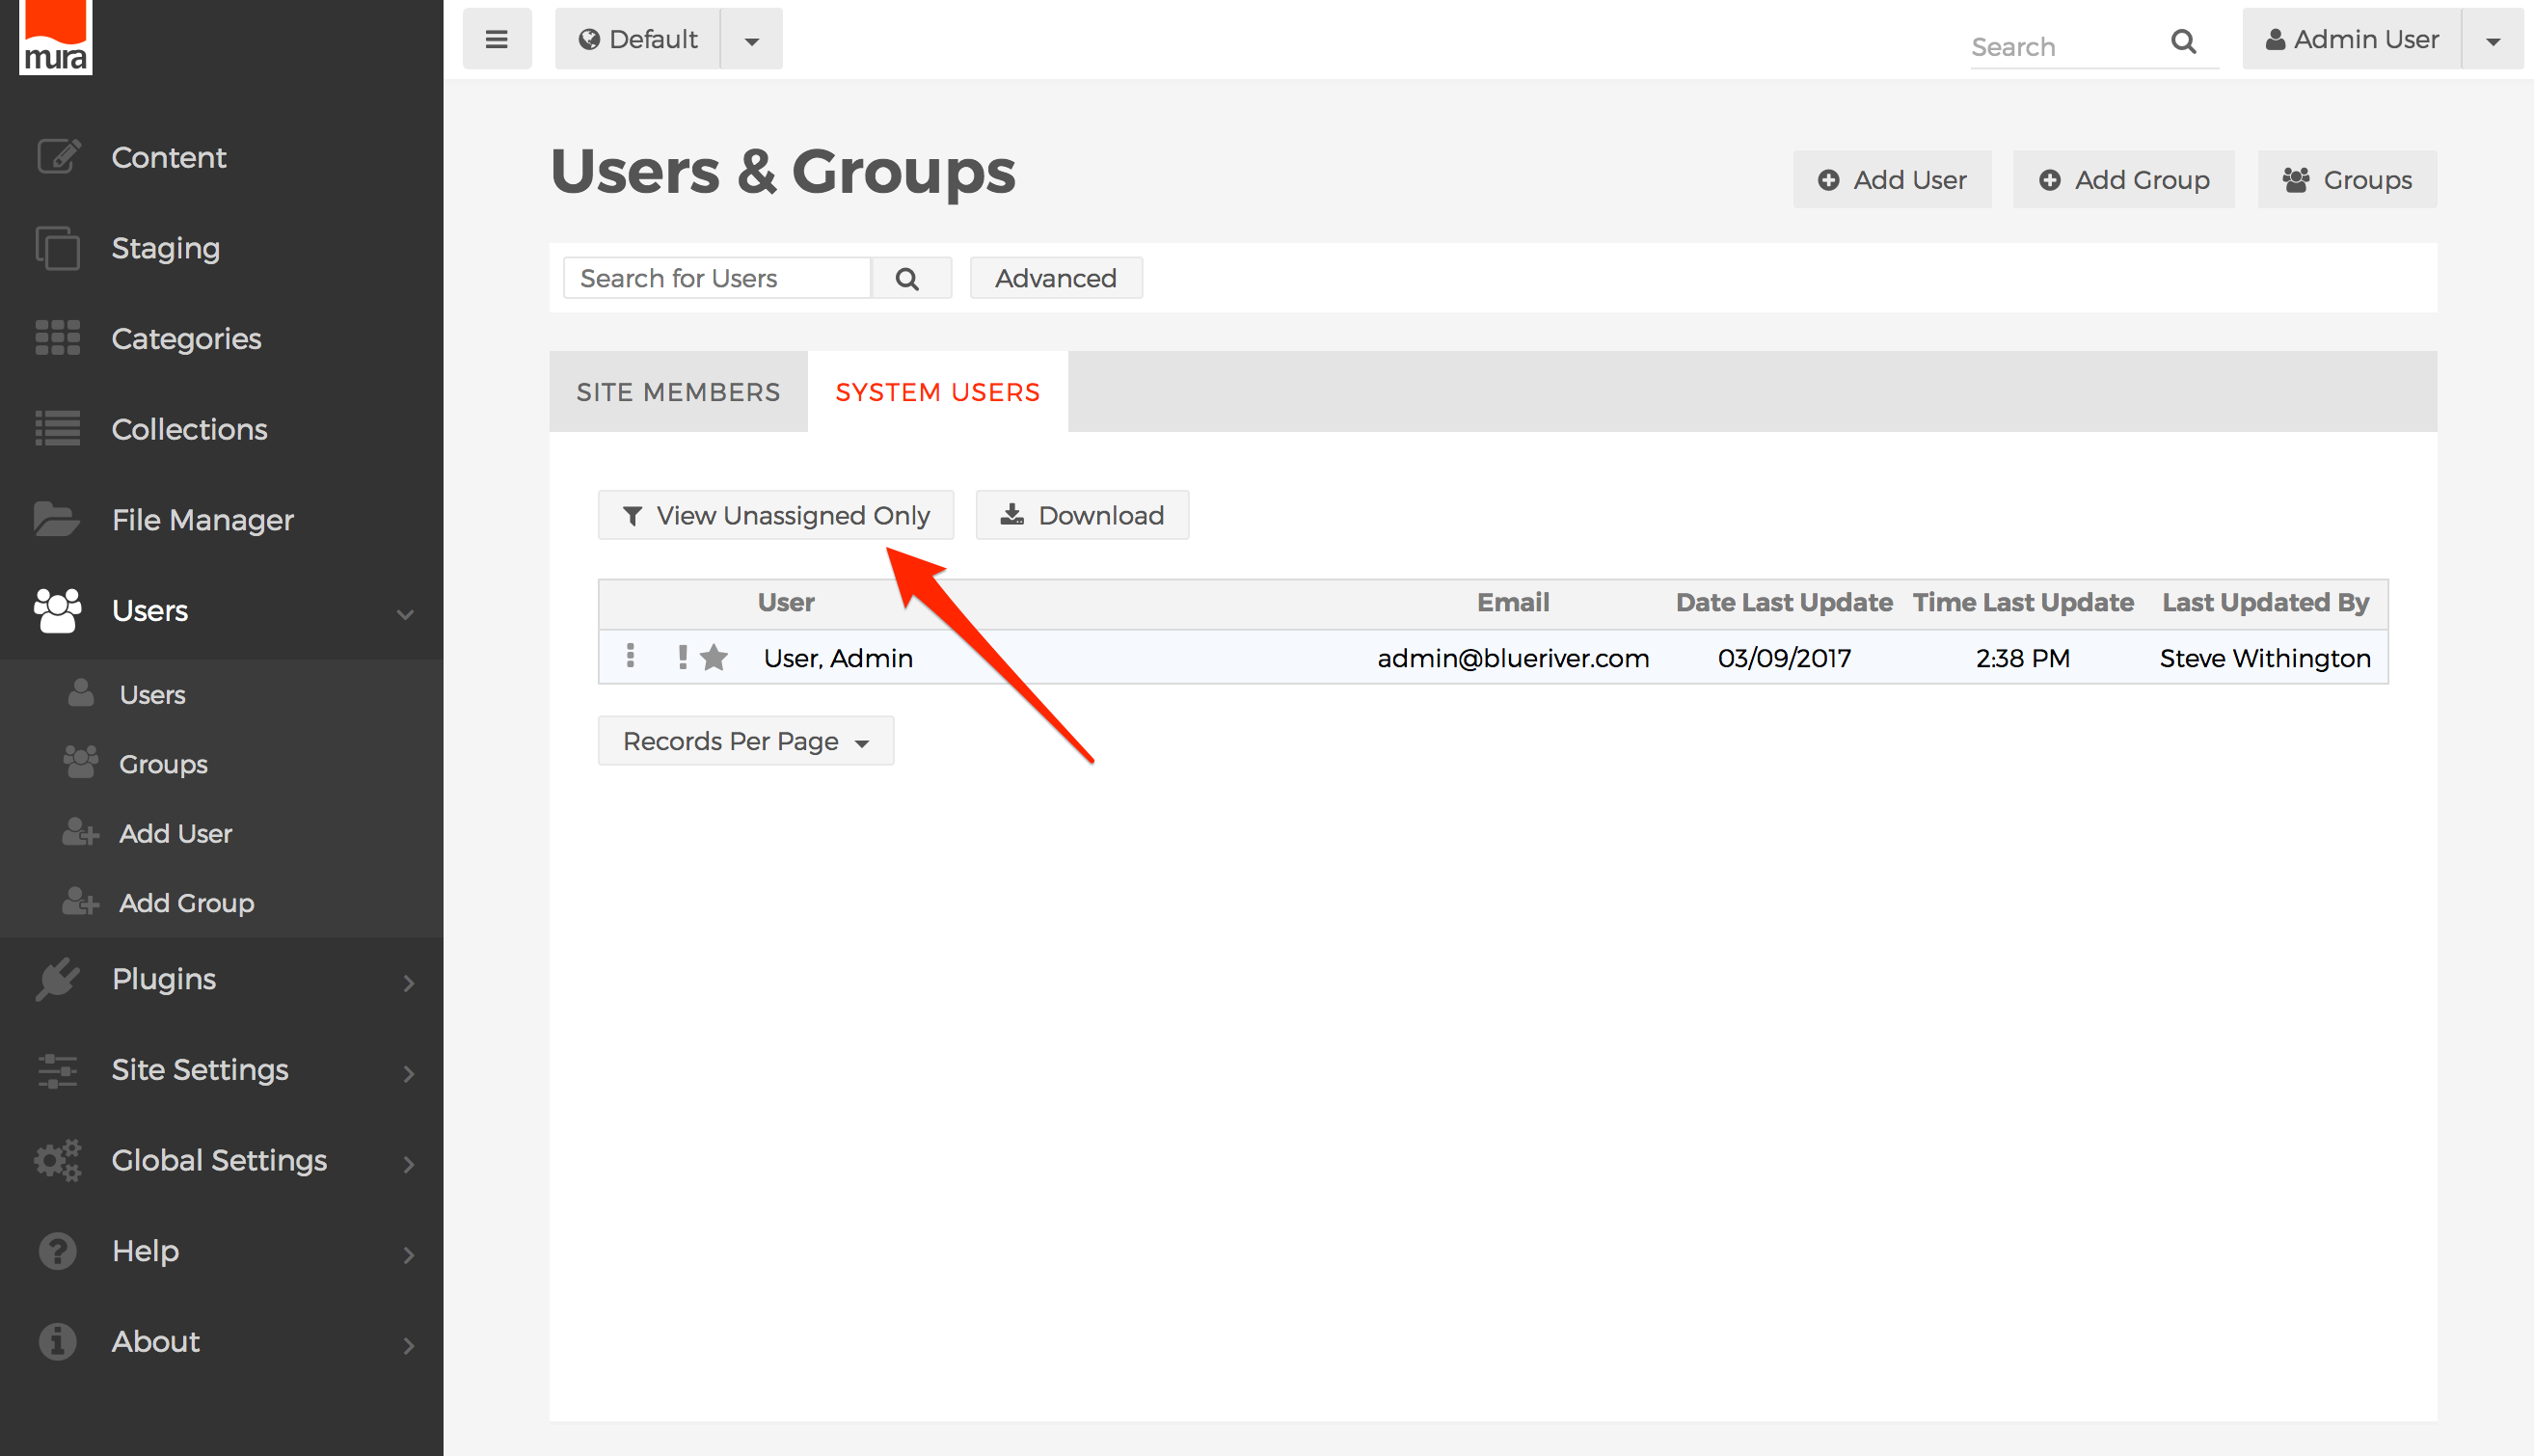
- From either tab, you also have the ability to view a listing of users who have not been assigned to any specific group, by clicking the View Unassigned Only button.
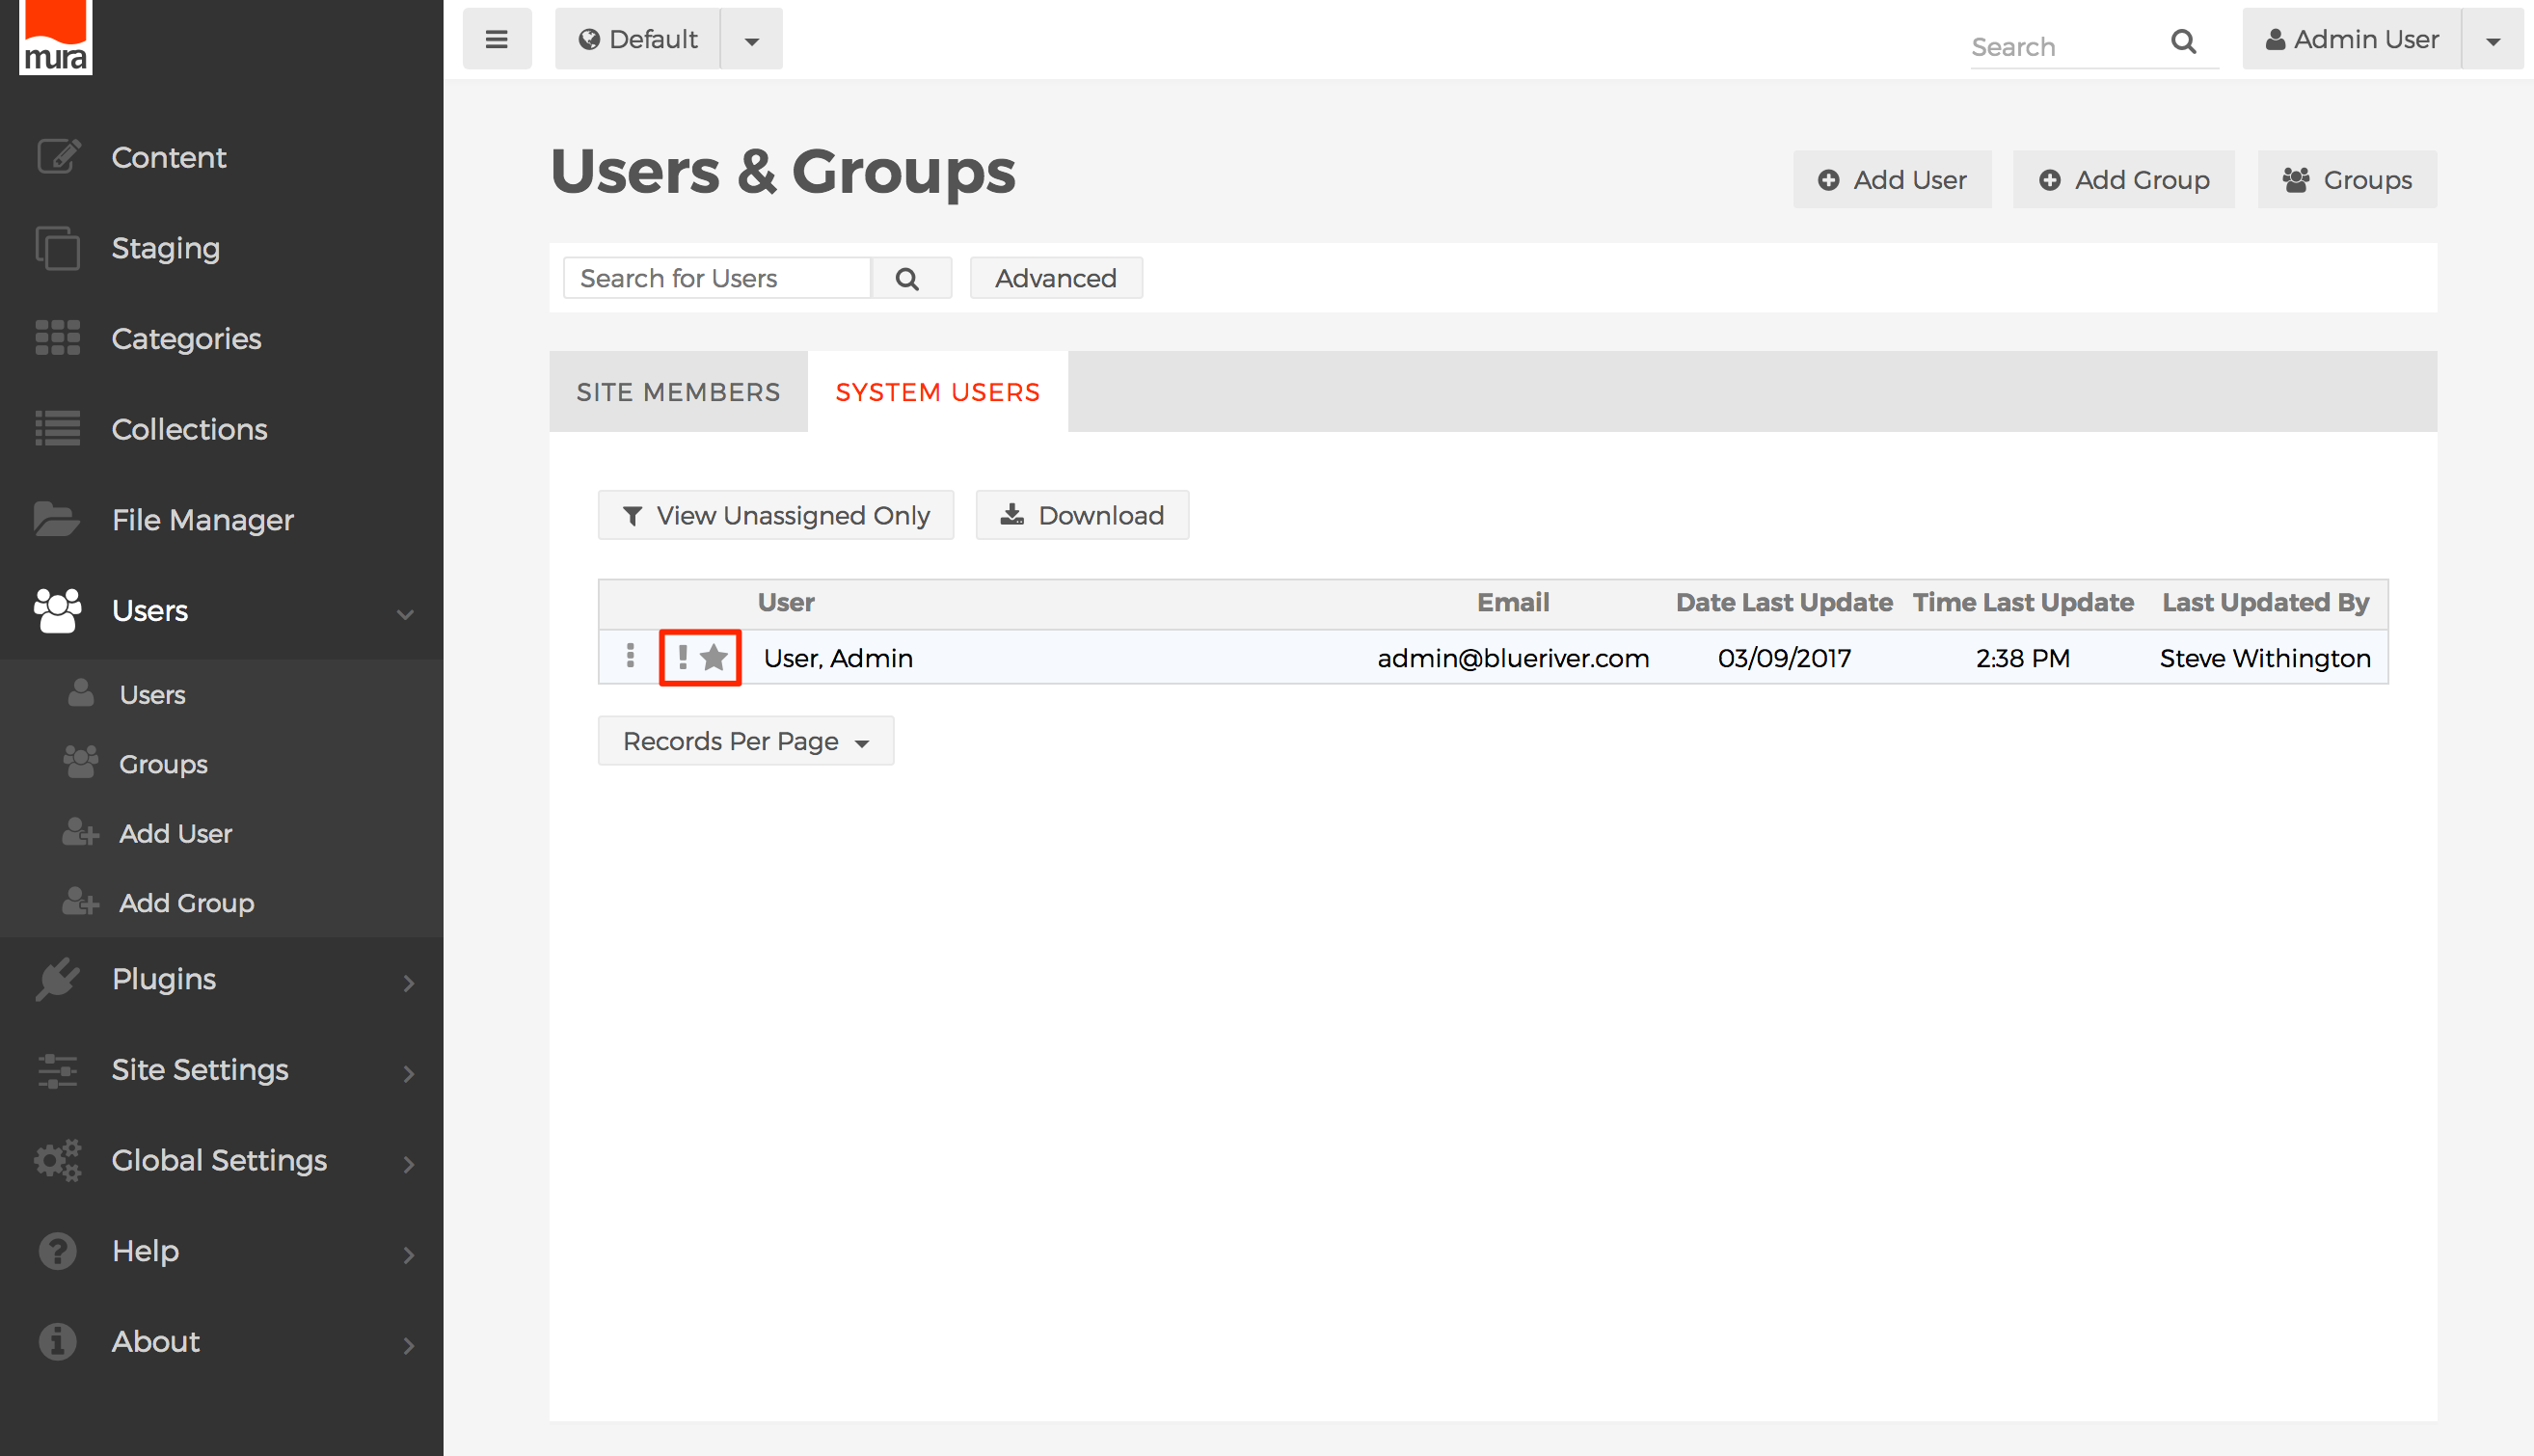
- You can also easily identify "unassigned users" by the exclamation mark ("!") located directly to the left of the user's name. A "star" next to a user's name indicates they are a Super User. See the Super User section for more information.
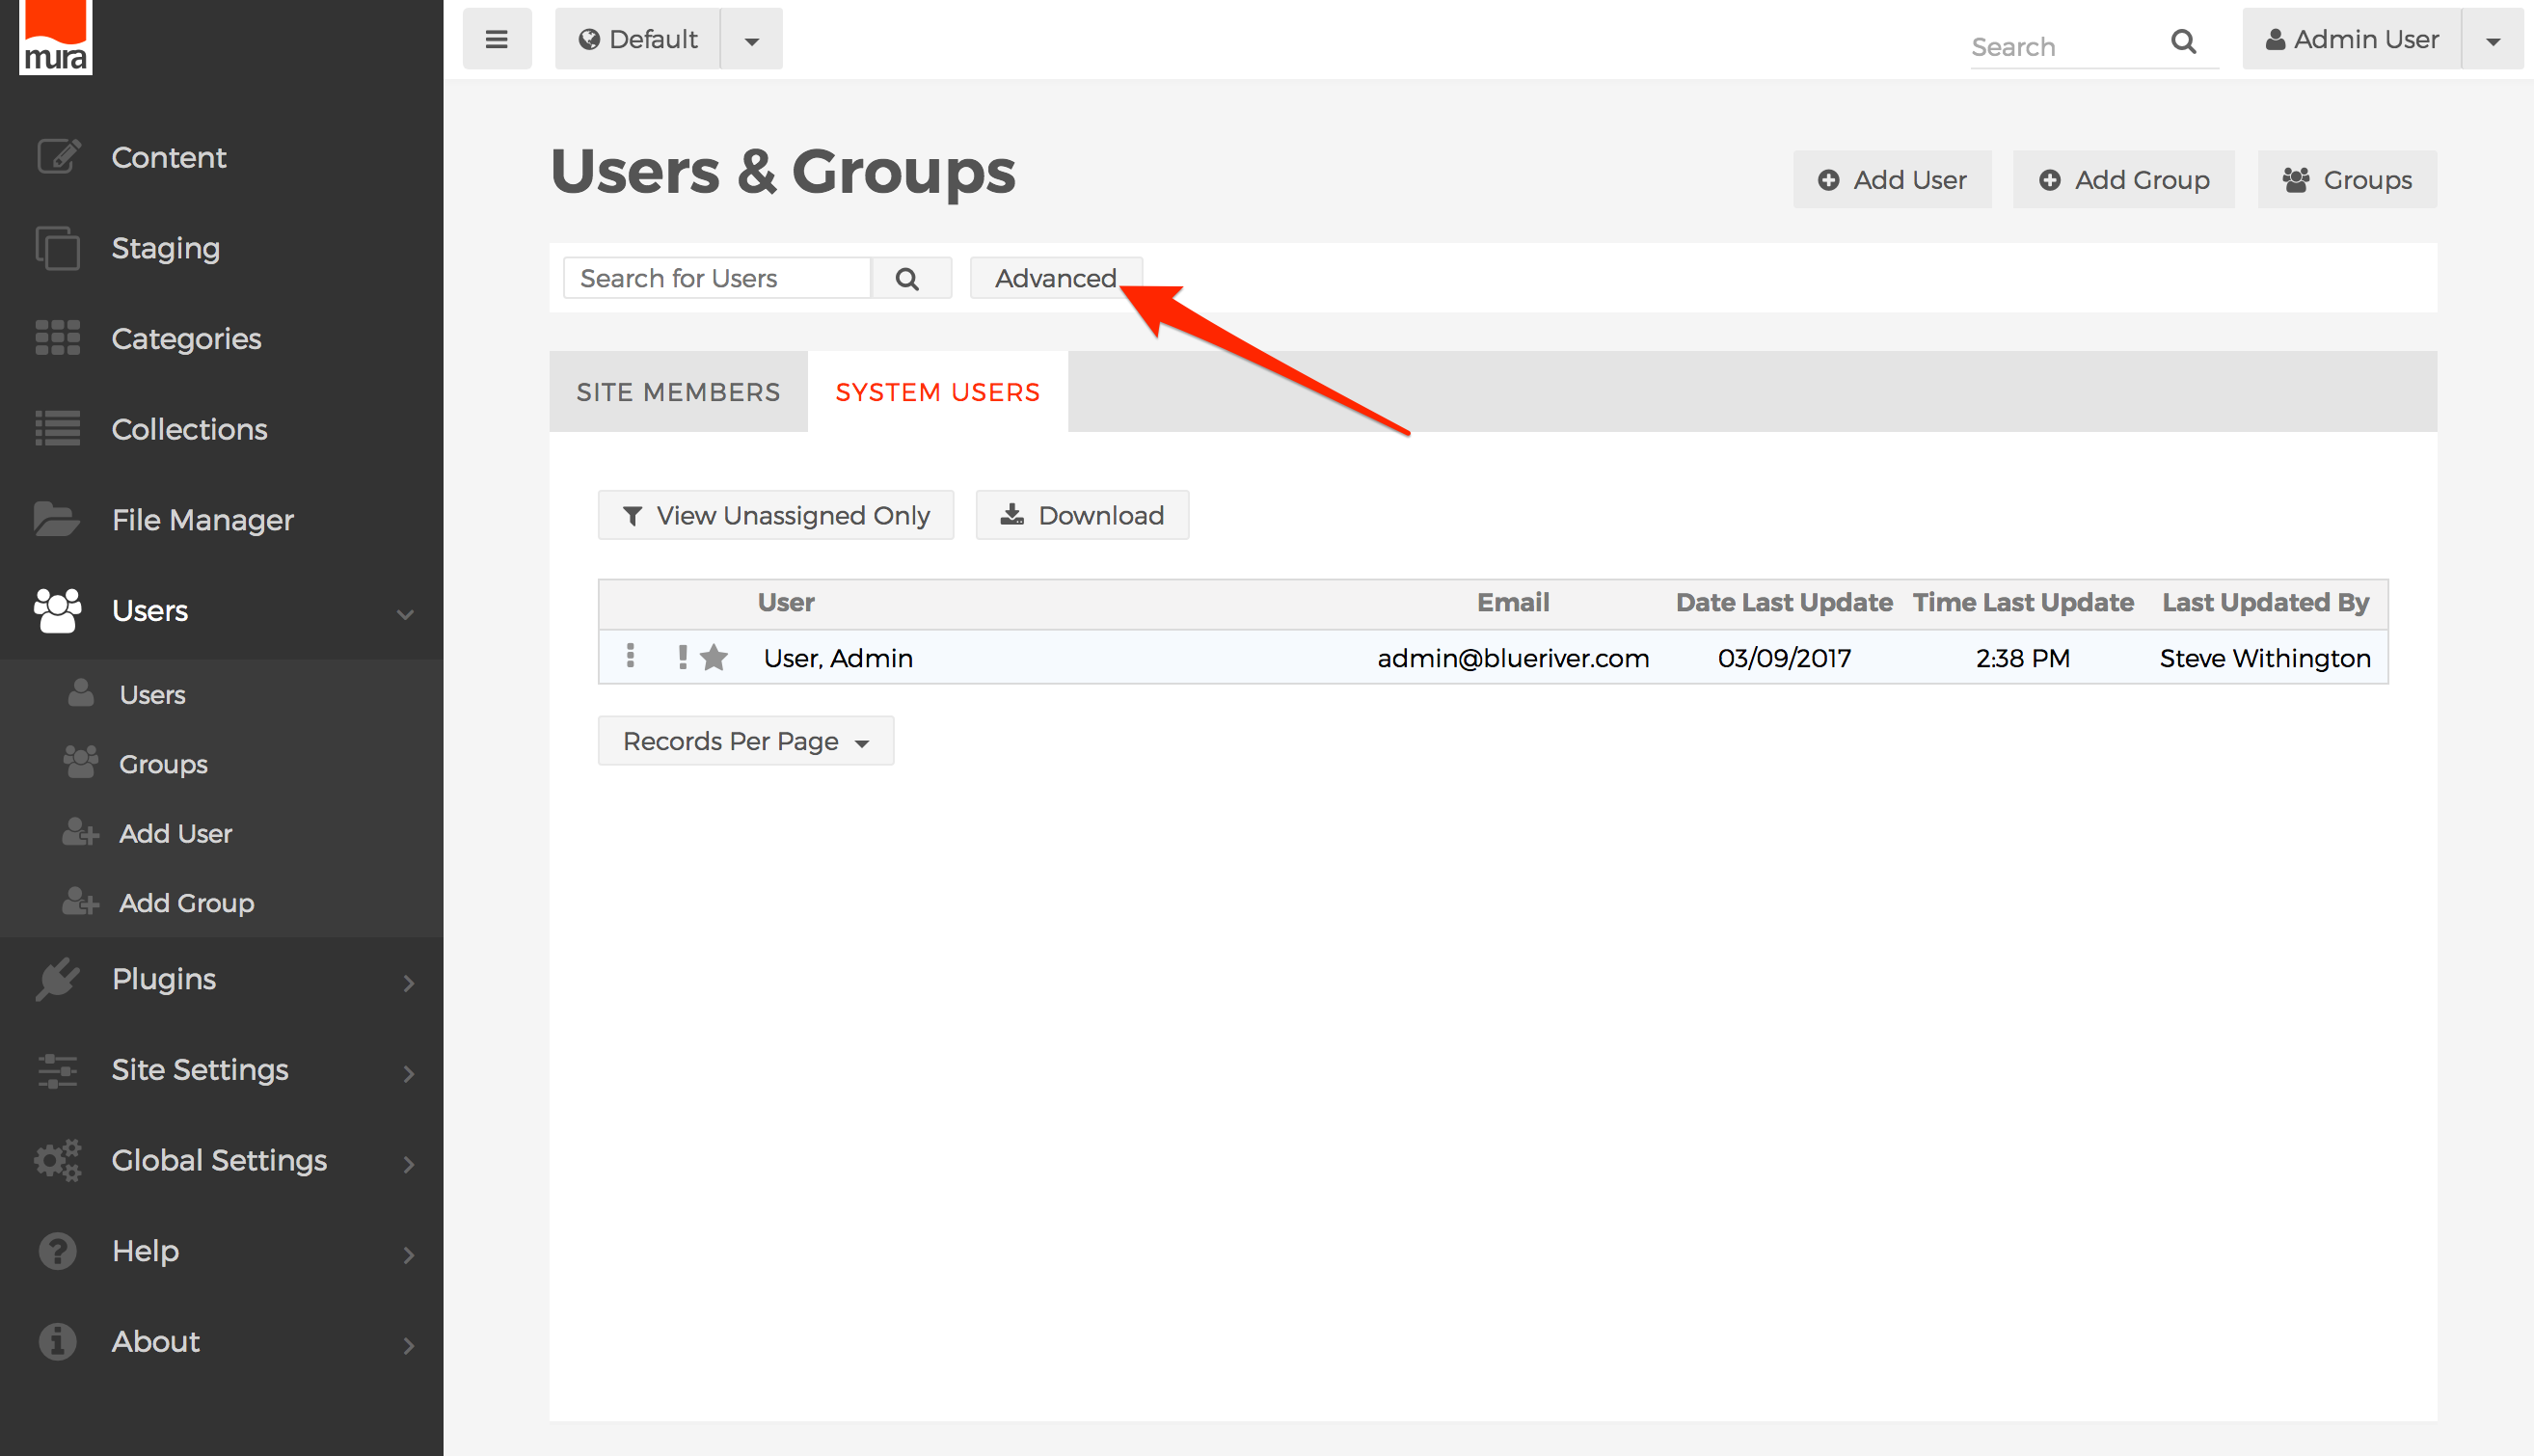
- Search for users using the search box, located above the tabbed menu.
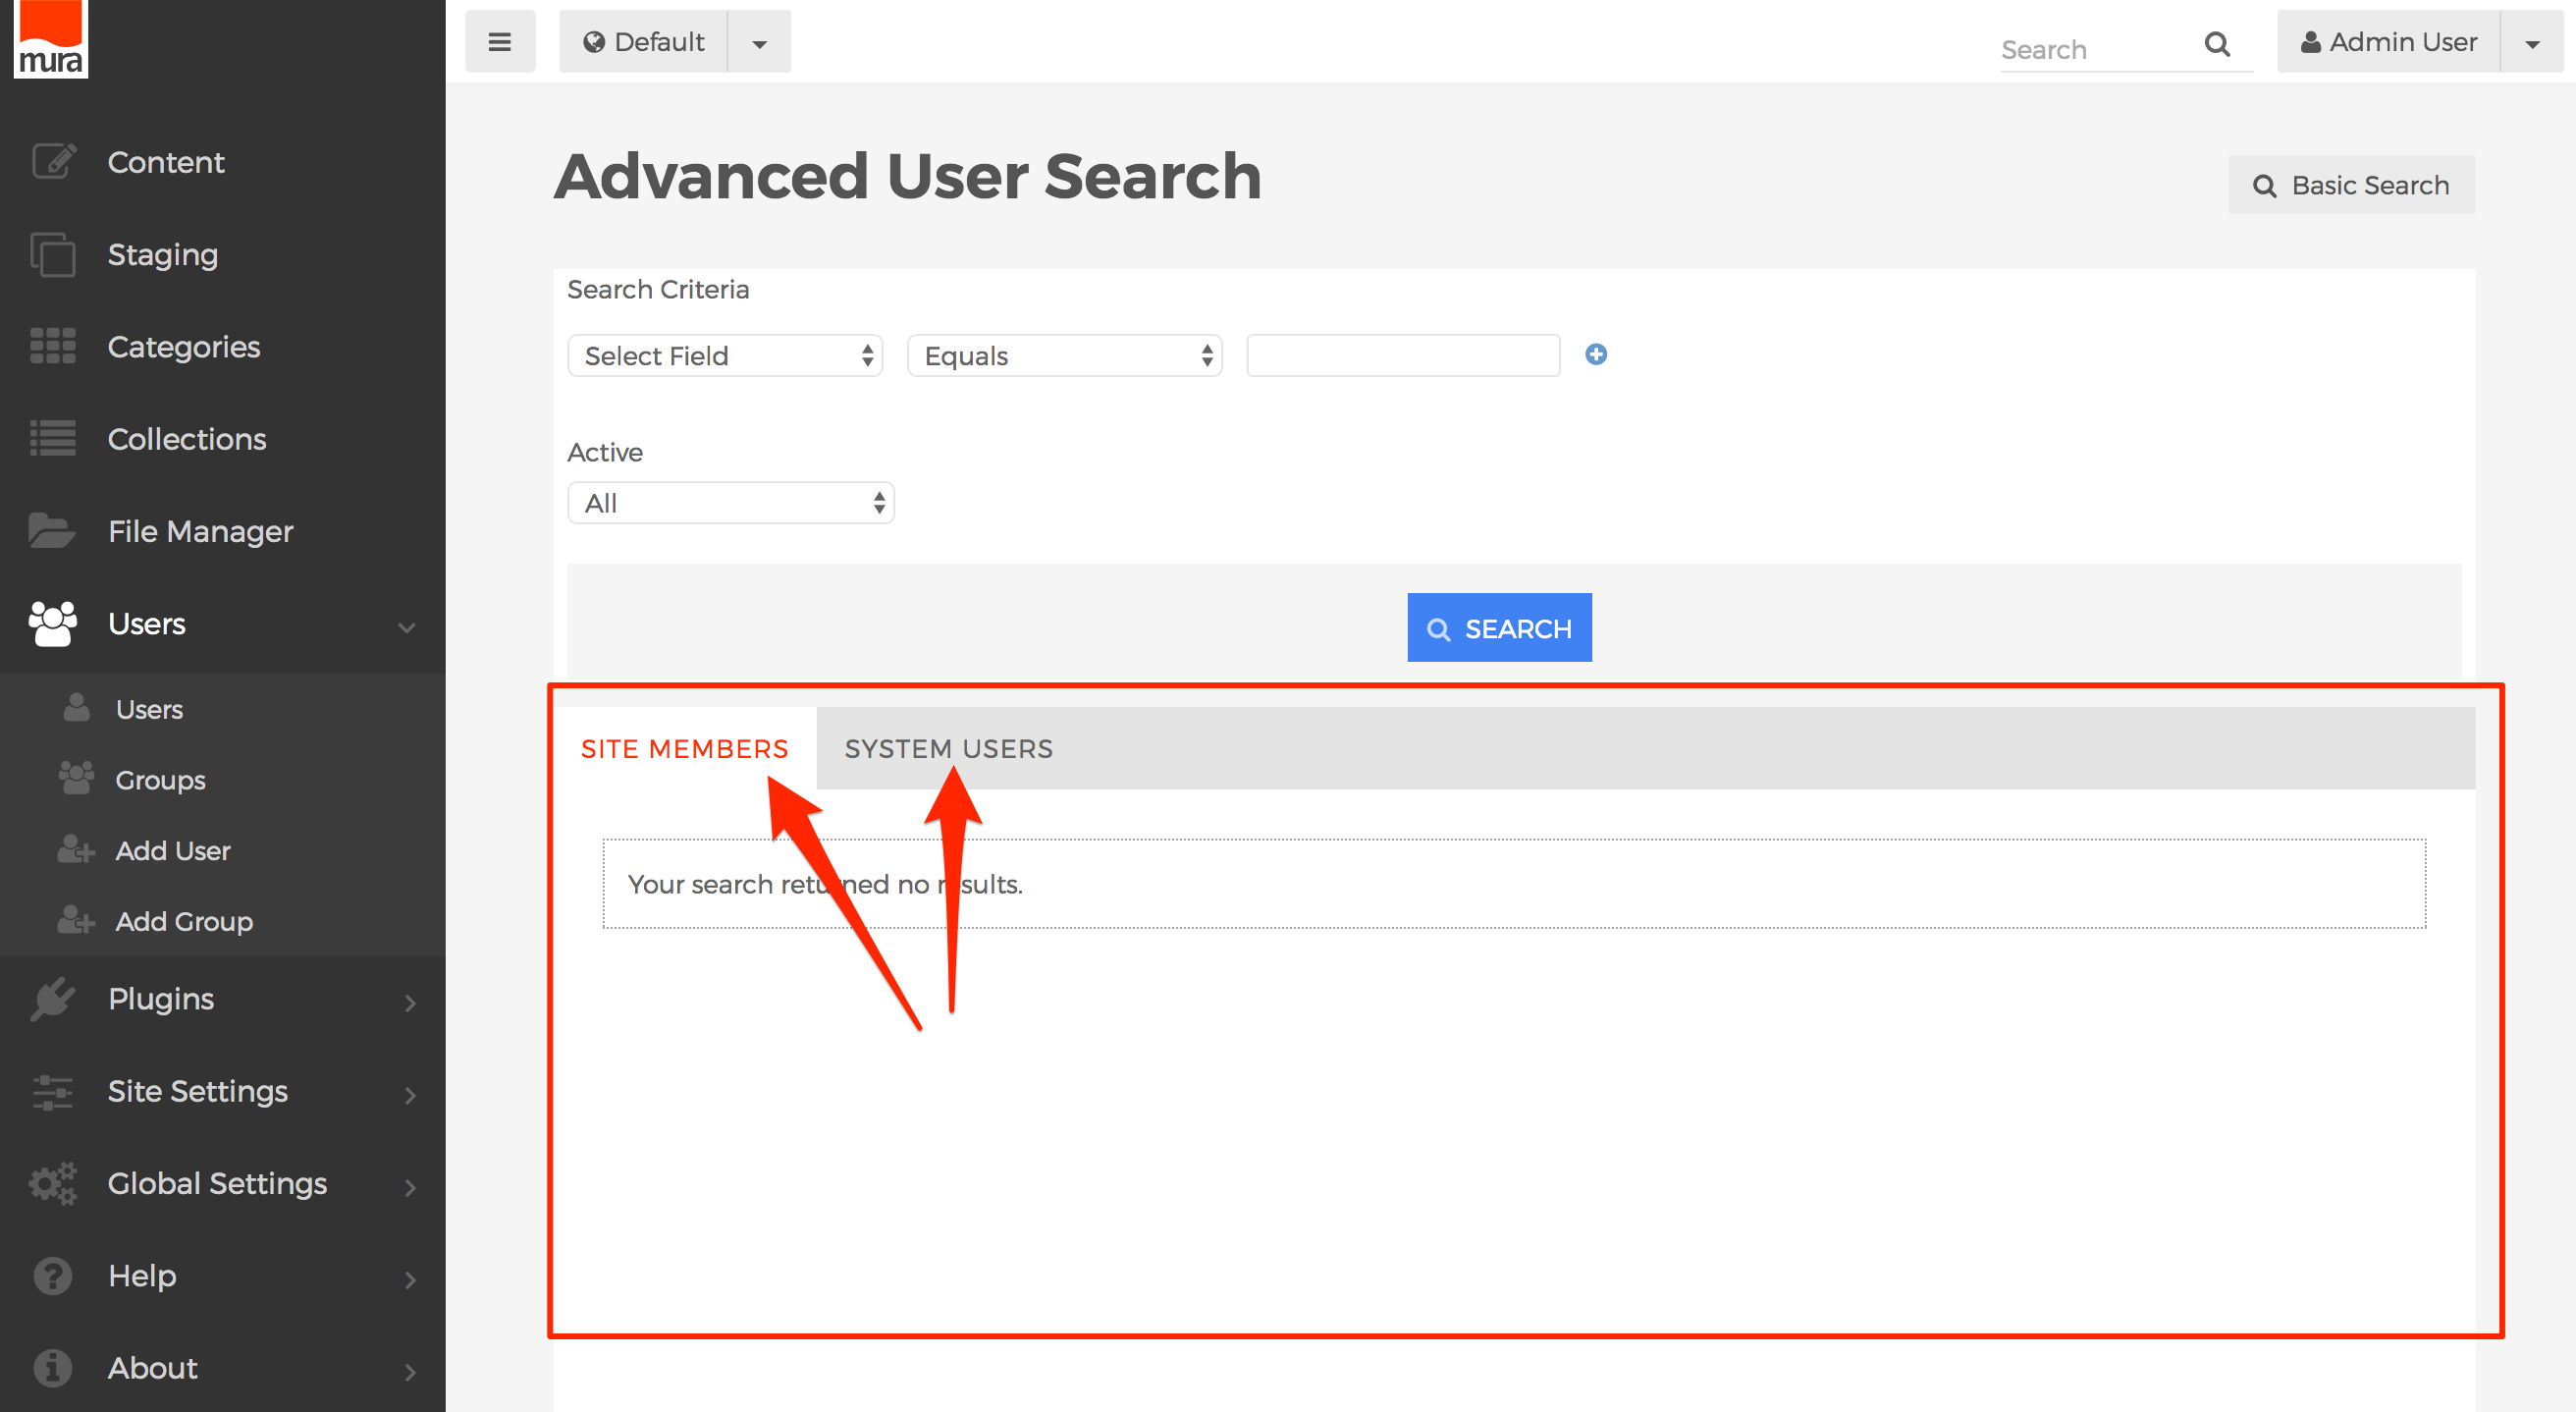
- Click the Advanced button, located next to the search box, to view the Advanced User Search screen.
- On the Advanced User Search screen, you can narrow your search by applying additional filters such as selecting a specific field, and desired criteria, then clicking the Search button.
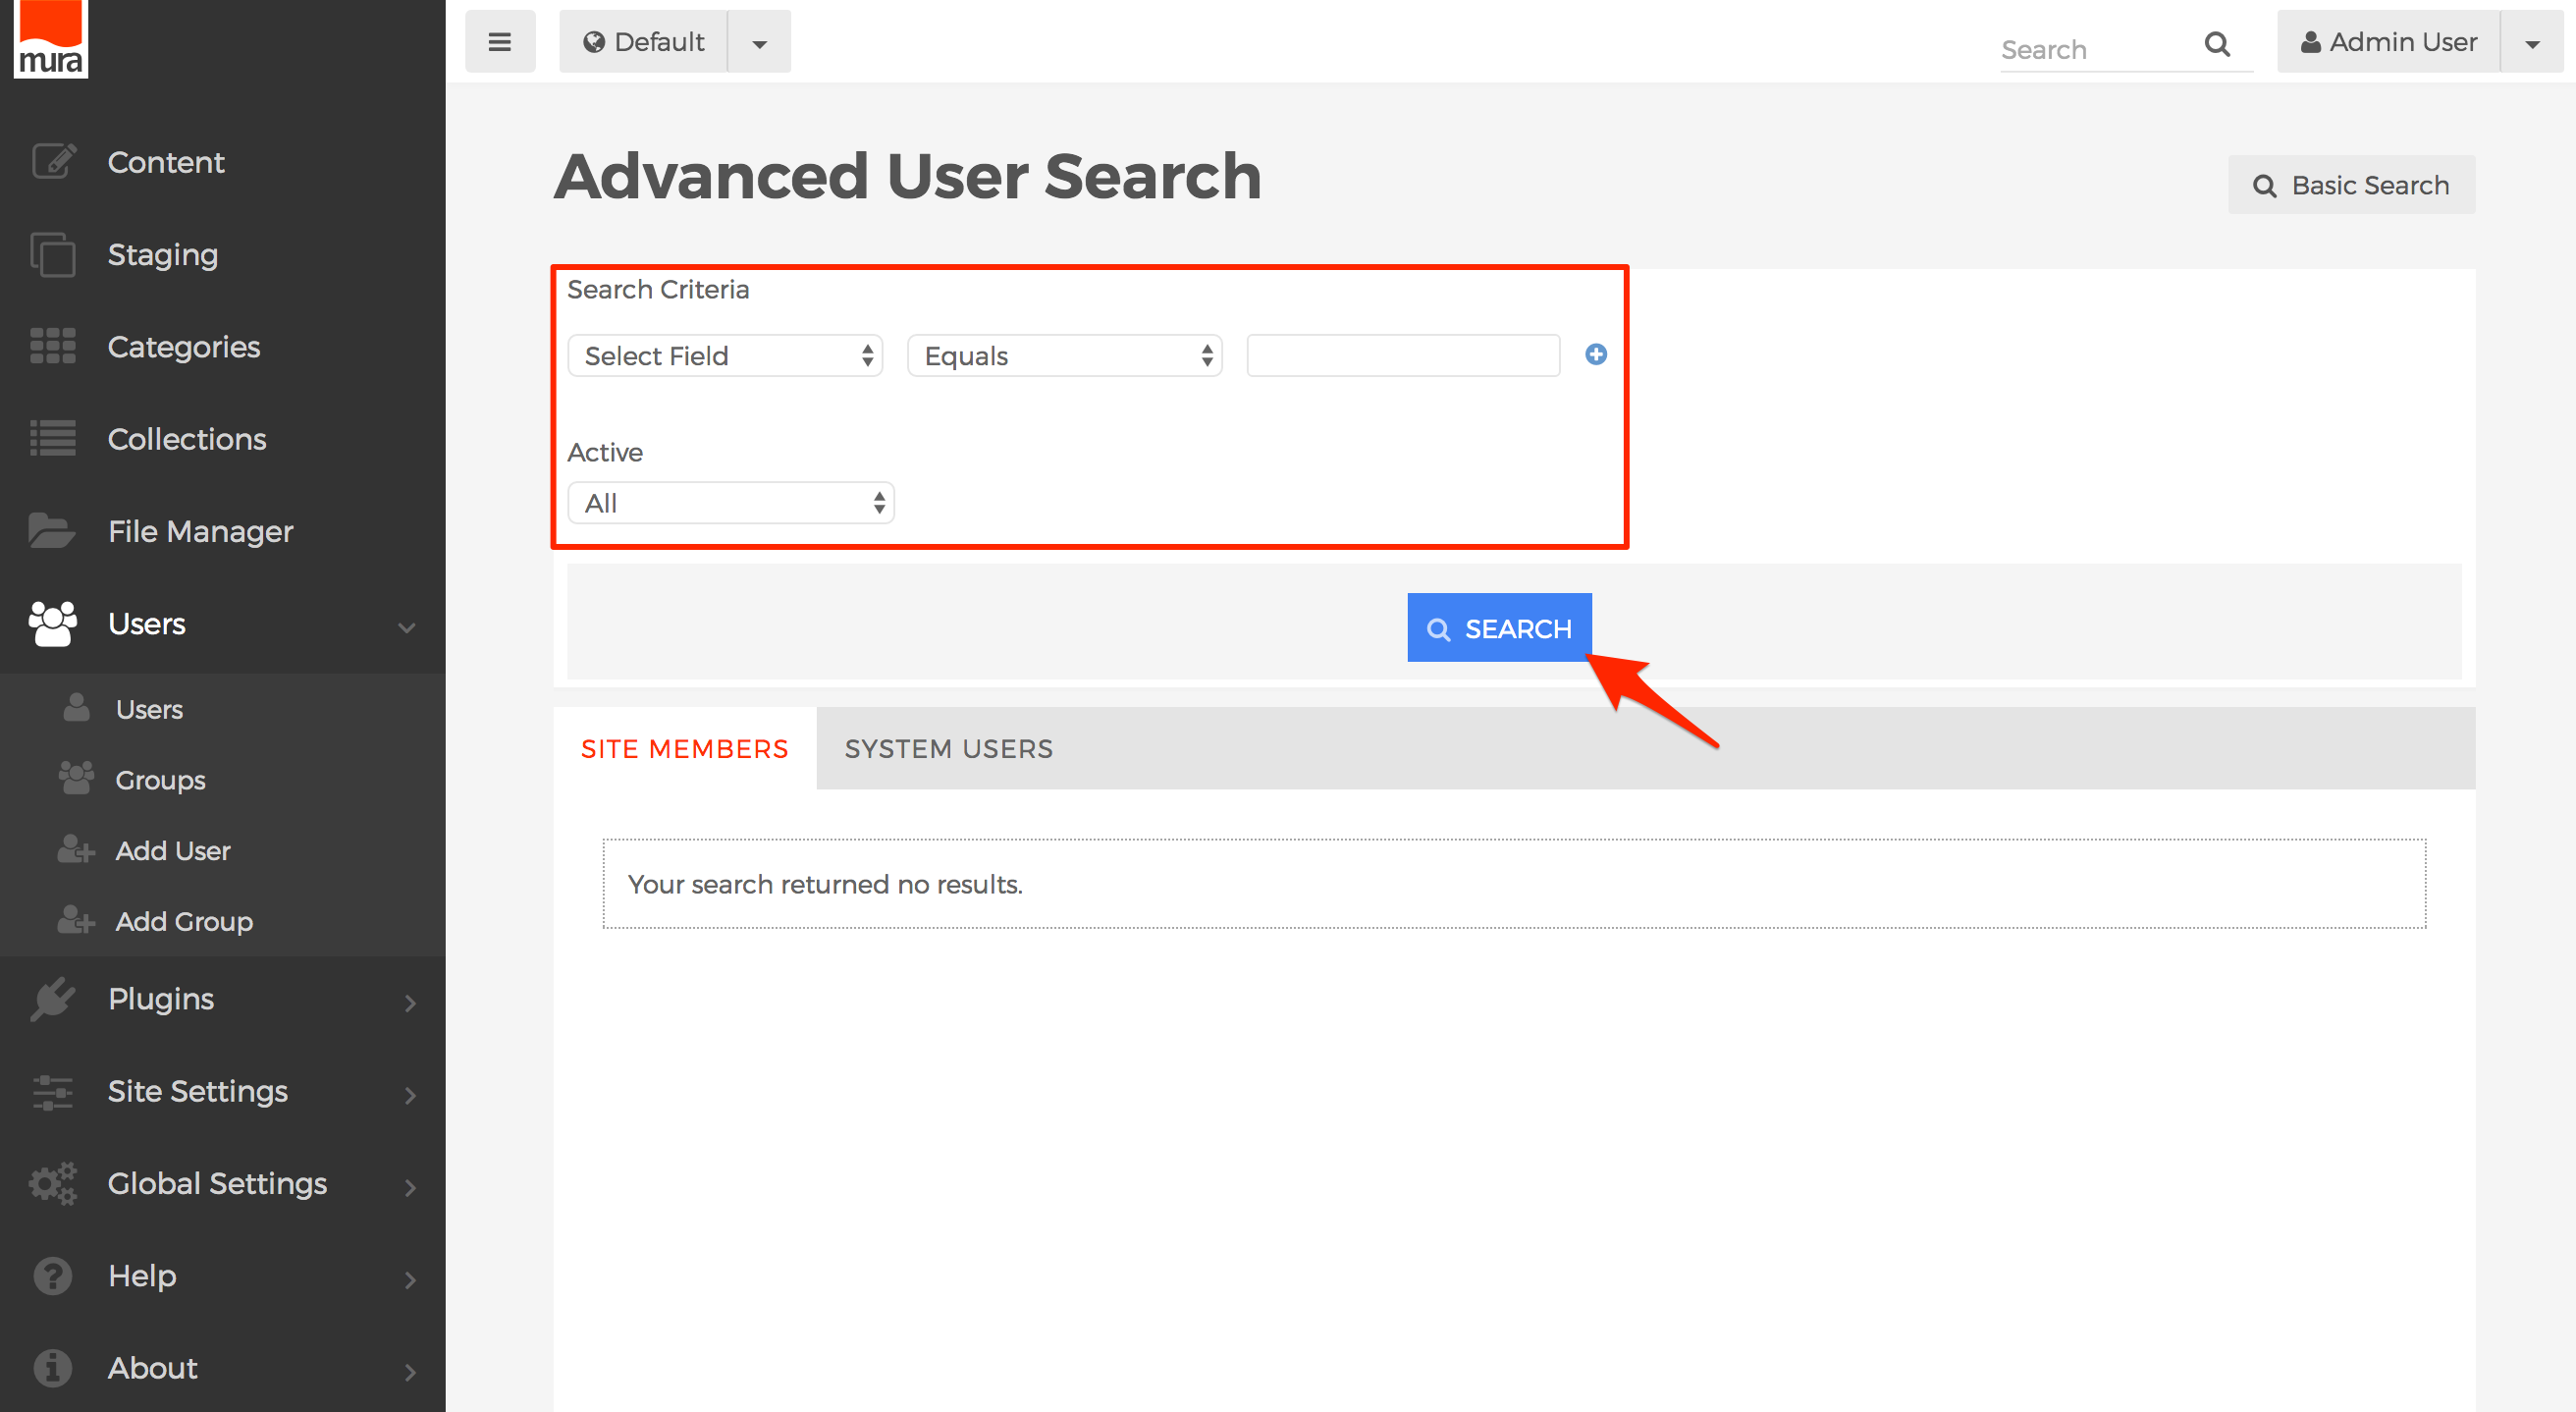
- Results appear below the form, and are tabbed so you can locate both Site Members and System Users who match your desired search criteria.


Add/Edit a User
Follow the steps below to add/edit a User in Mura.
- From the back-end administration area of Mura, select Users, then Add User. Or, select an existing user from your list of users to edit.
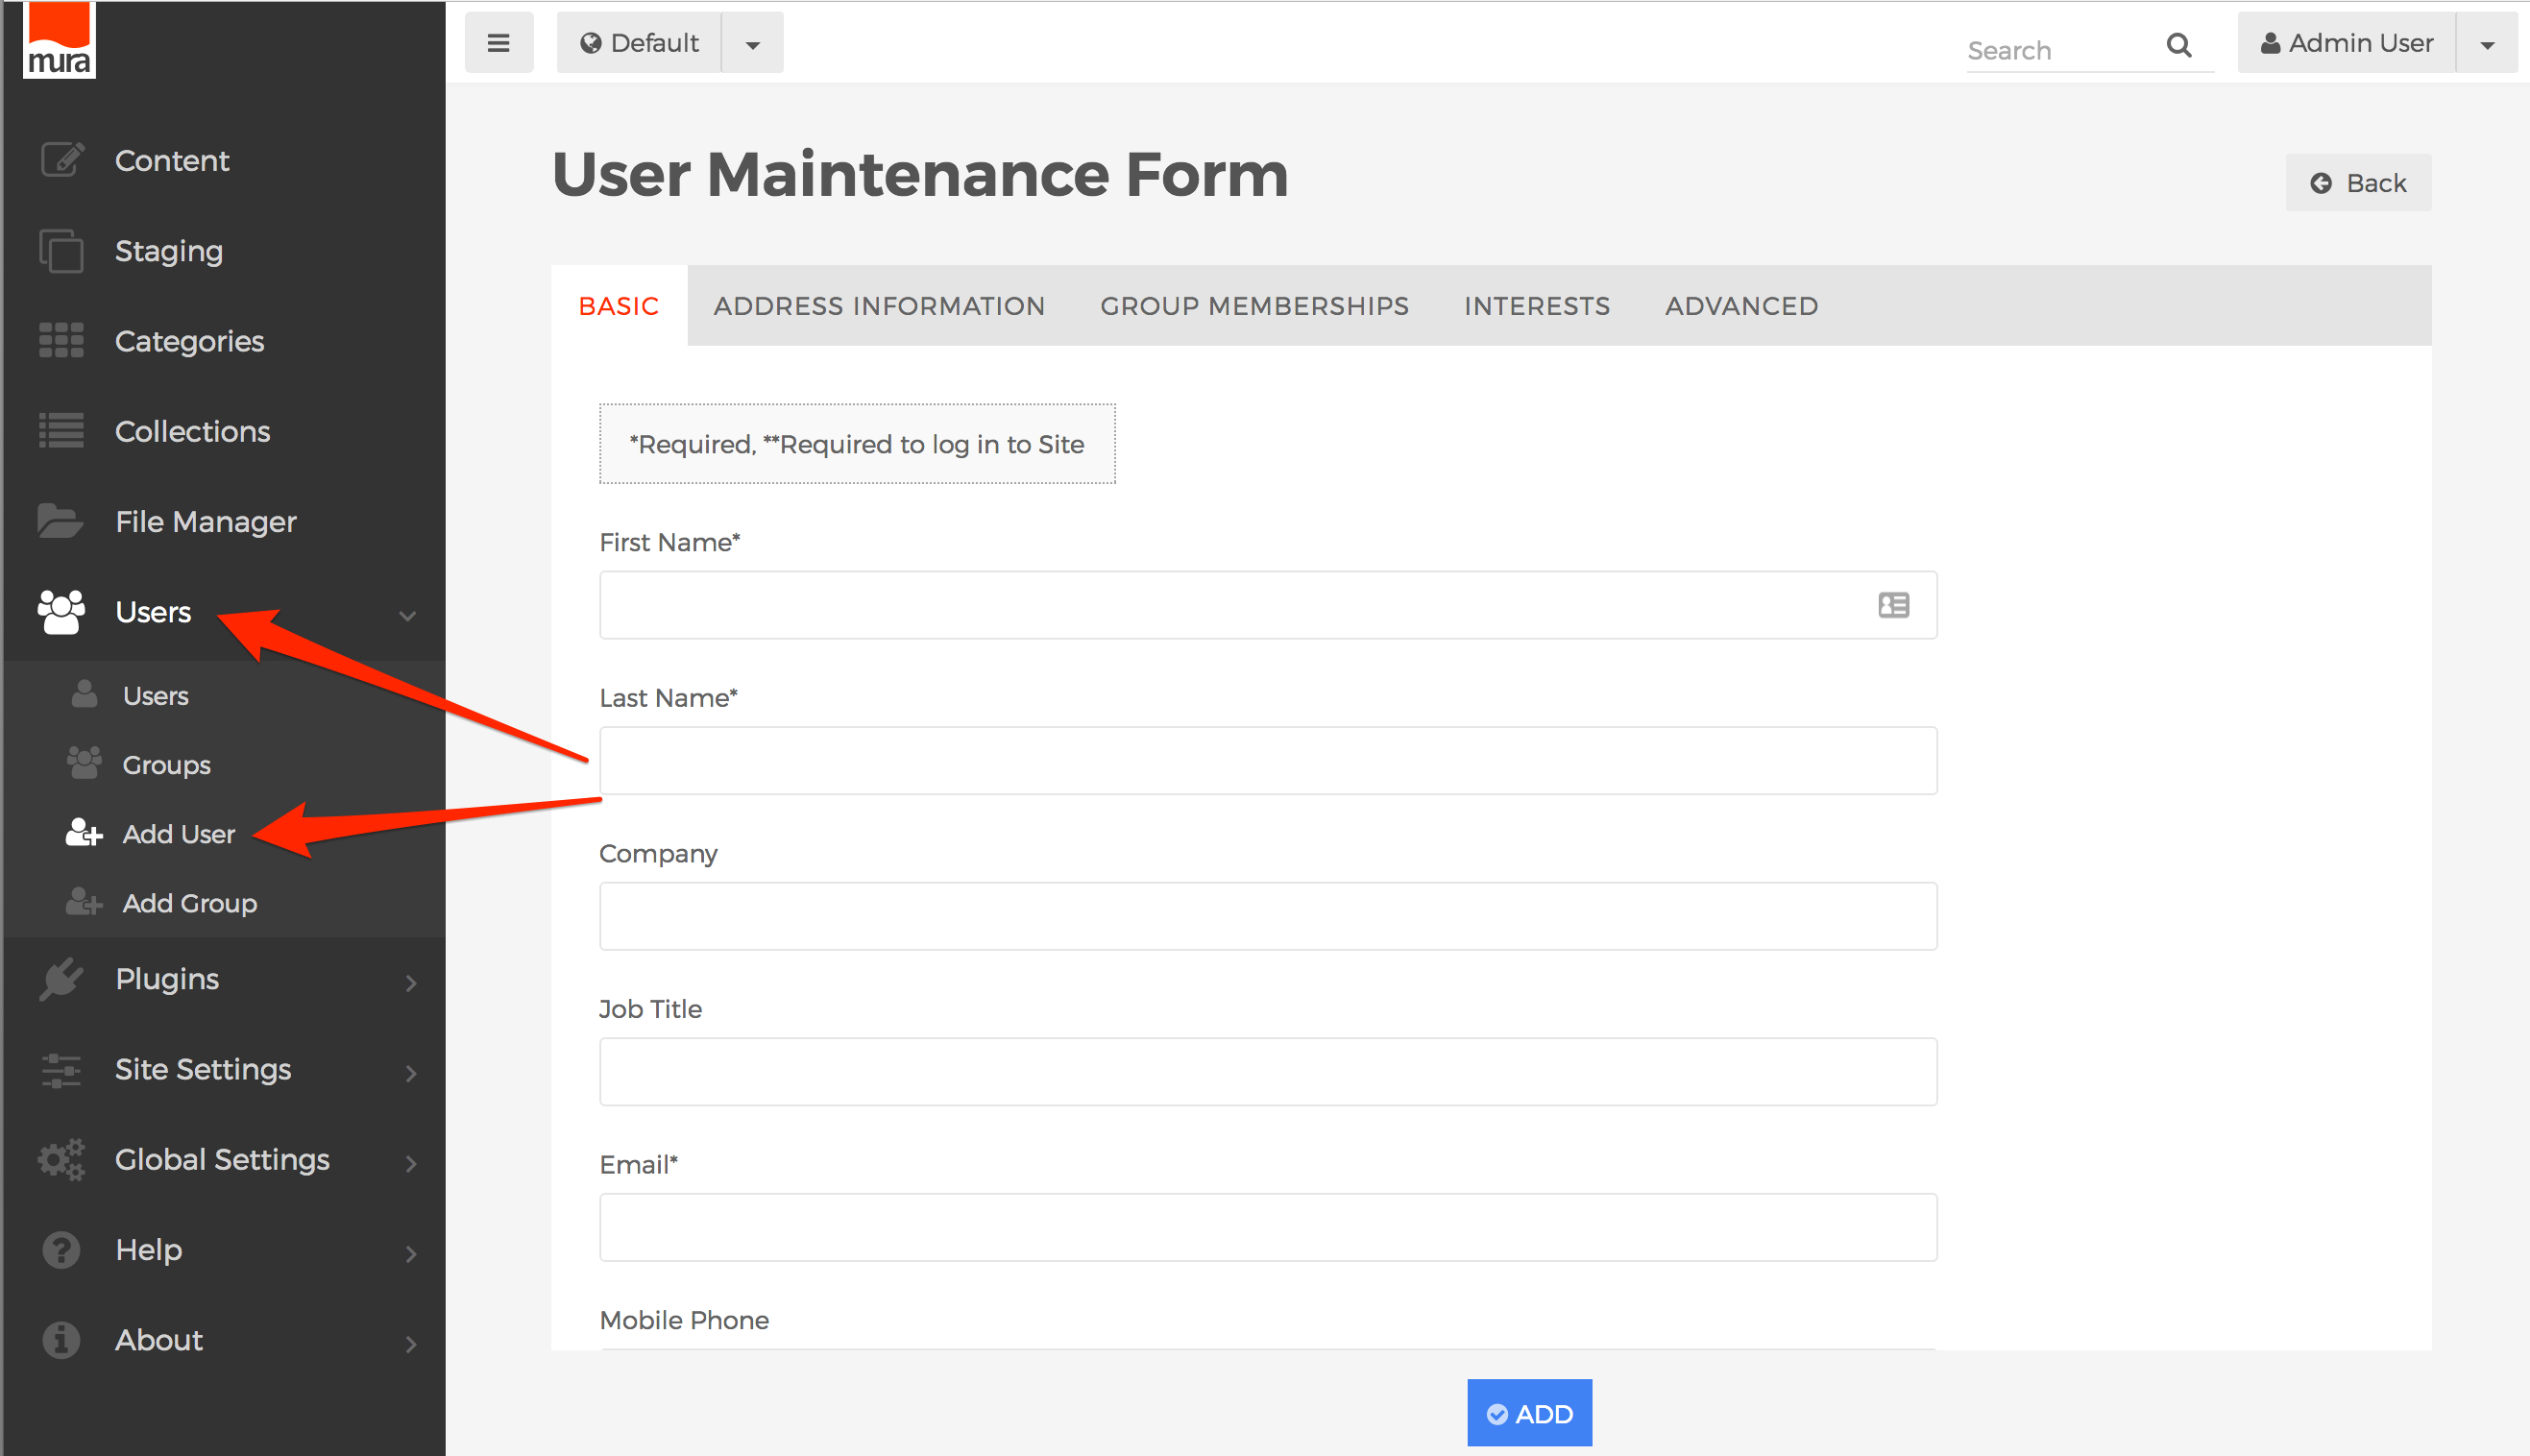
- You should be taken to the User Maintenance Form.

- Basic Tab
- First Name (required)
- Enter the user's First Name.
- Last Name (required)
- Enter the user's Last Name
- Company
- Enter the user's Company
- Job Title
- Enter the user's Job Title
- Email (required)
- Enter the user's Email address
- Mobile Phone
- Enter the user's Mobile Phone number
- Username (required)
- Enter a Username for the user to use when they log into Mura
- Password (required)
- Enter a Password for the user to use when they log into Mura. They will be able to change it after they log in.
- Confirm Password (required)
- Re-enter the Password entered in the previous form field
- Profile Image
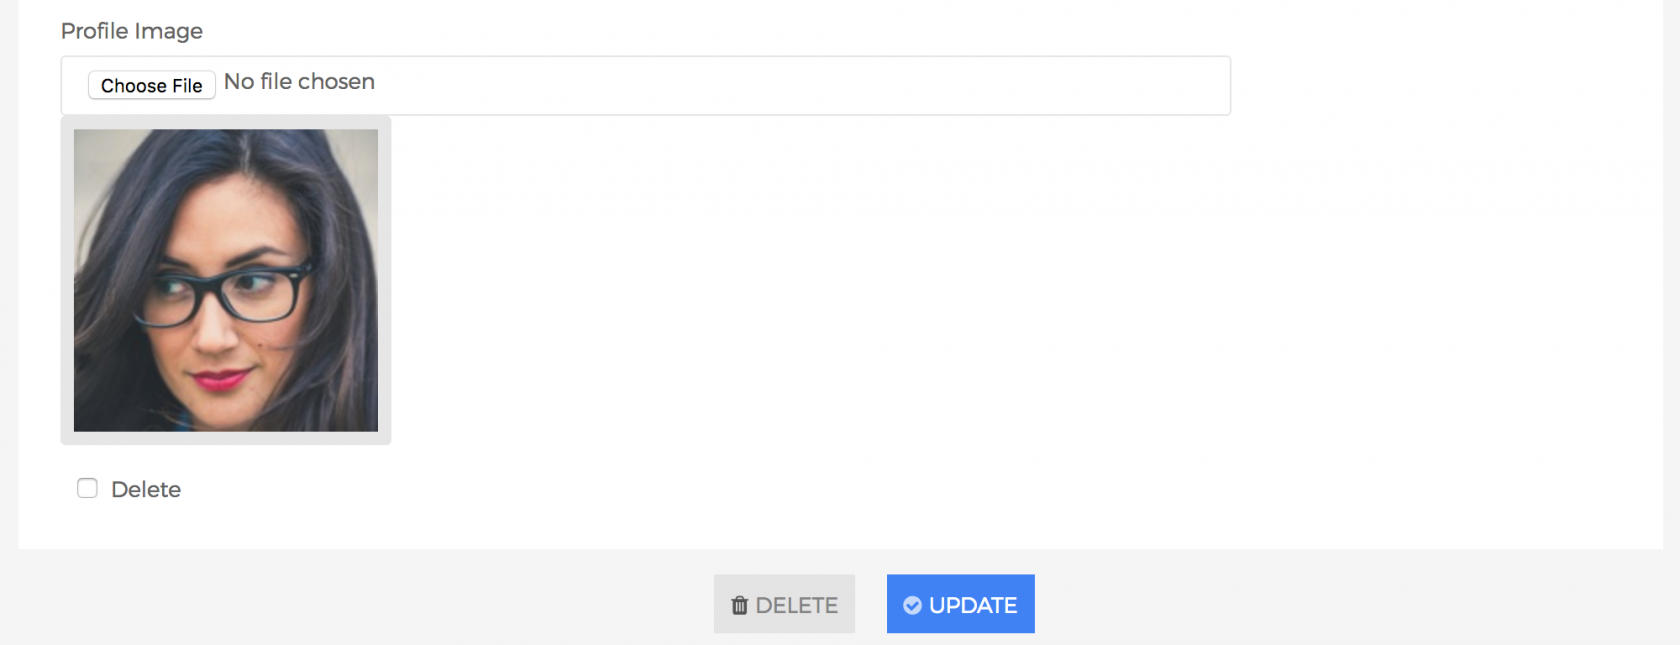
- You may optionally upload a profile photo to use for the user.
- If you wish to delete a Profile Image (if one exists), select the Delete checkbox, then click Update.
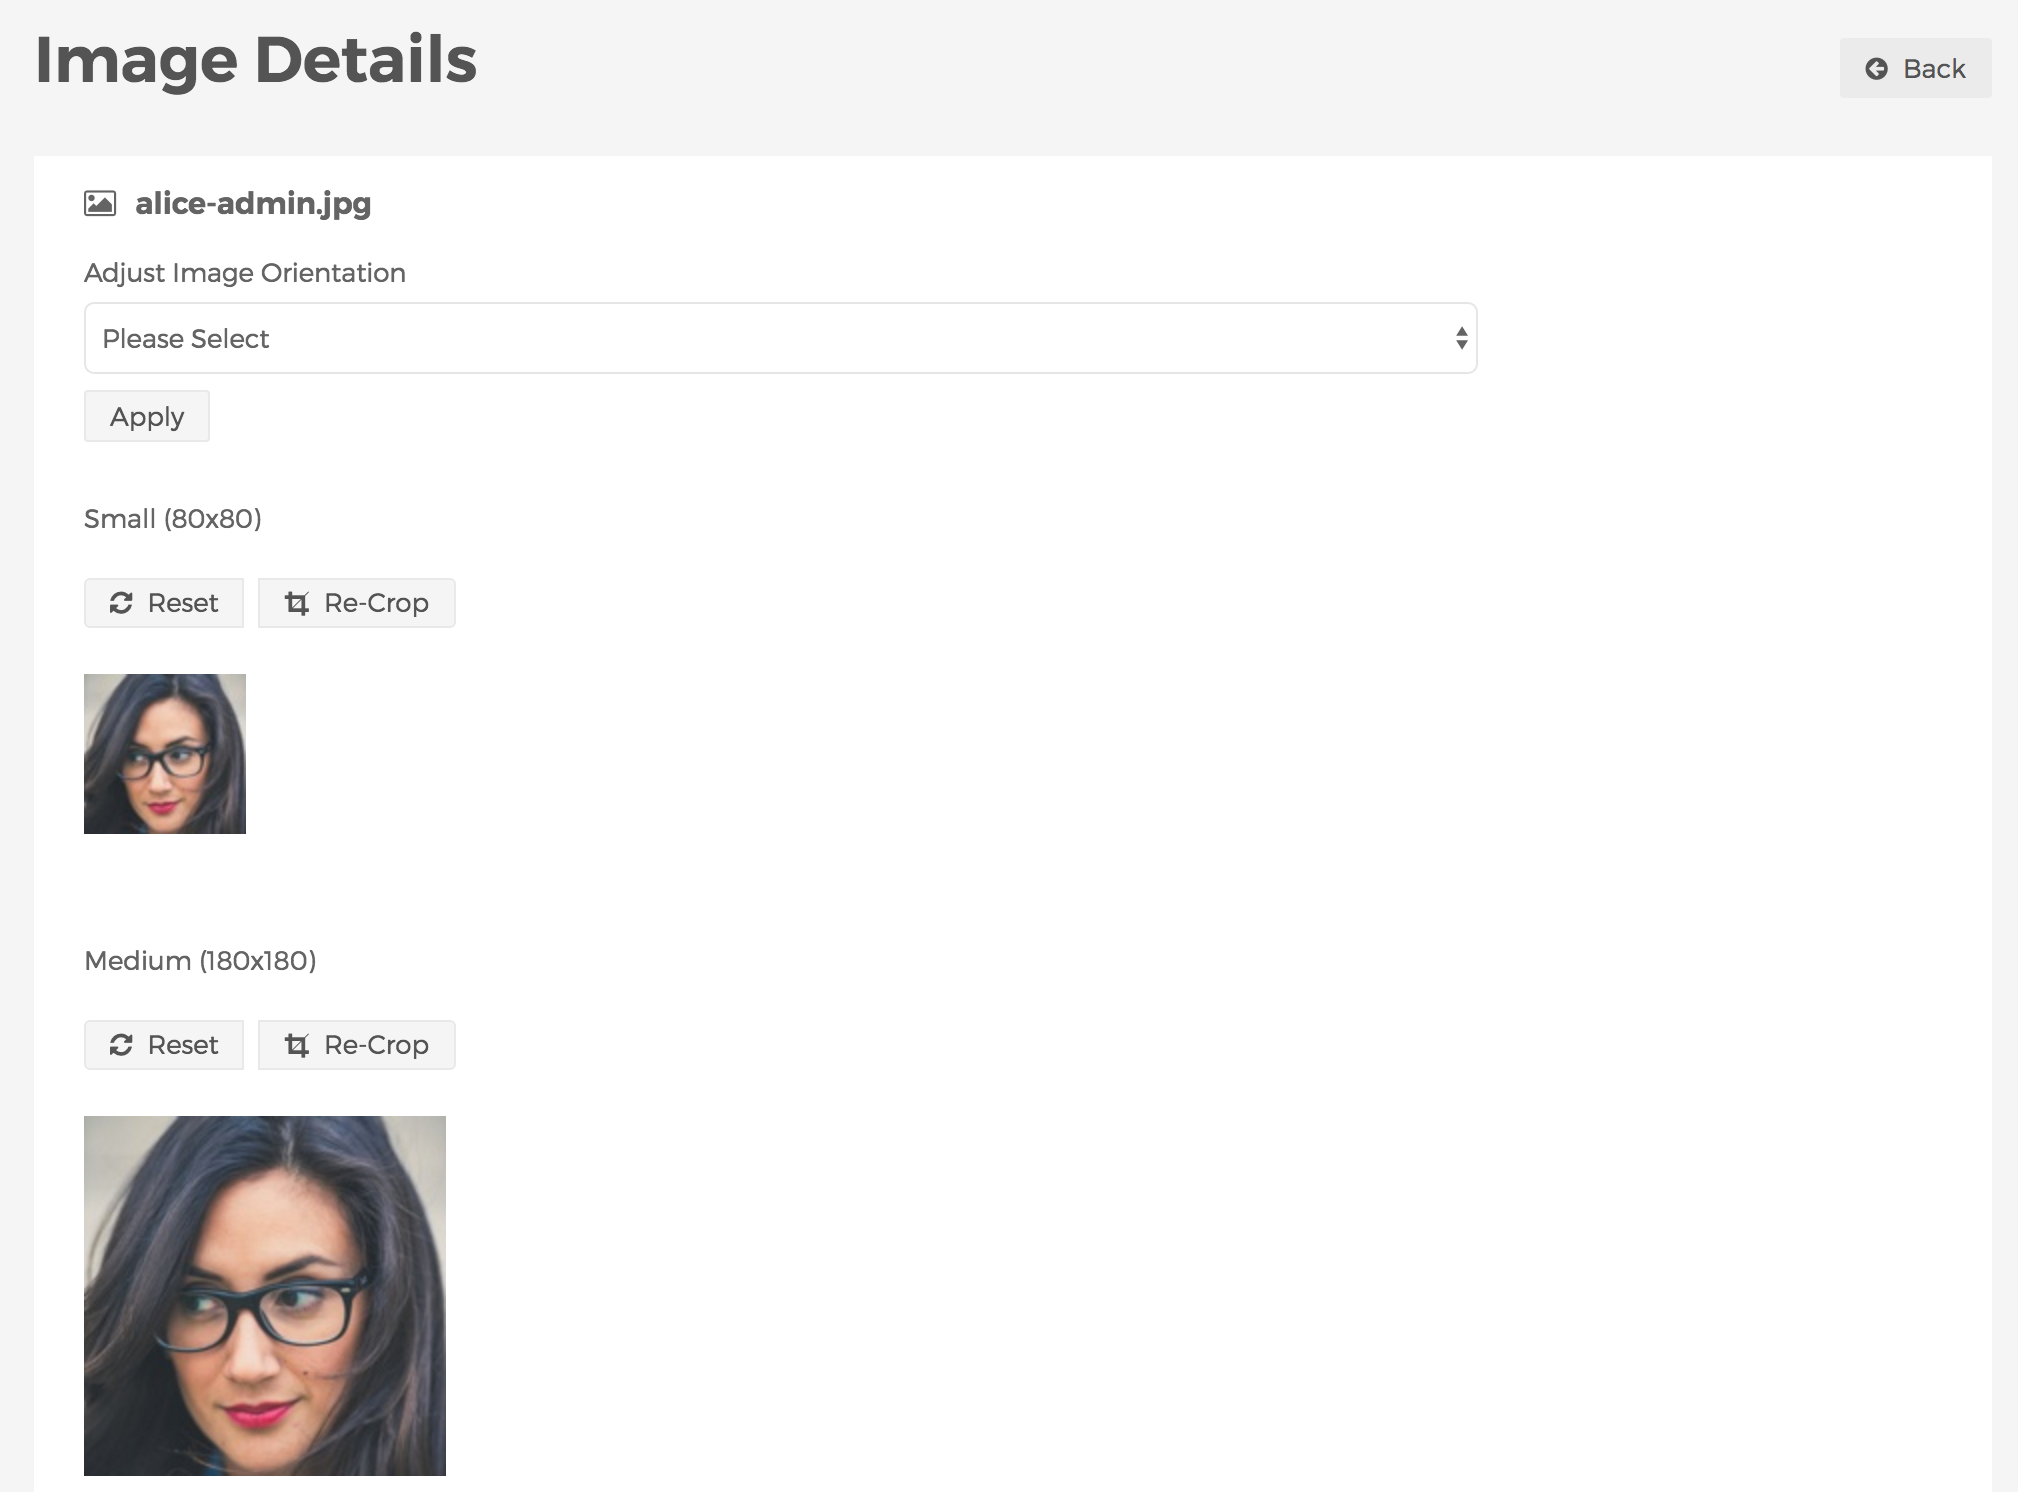
- Click the image (if one exists), and you will be taken to the Image Details screen where you can Adjust Image Orientation, and adjust the crop areas of any predefined image sizes.
- First Name (required)
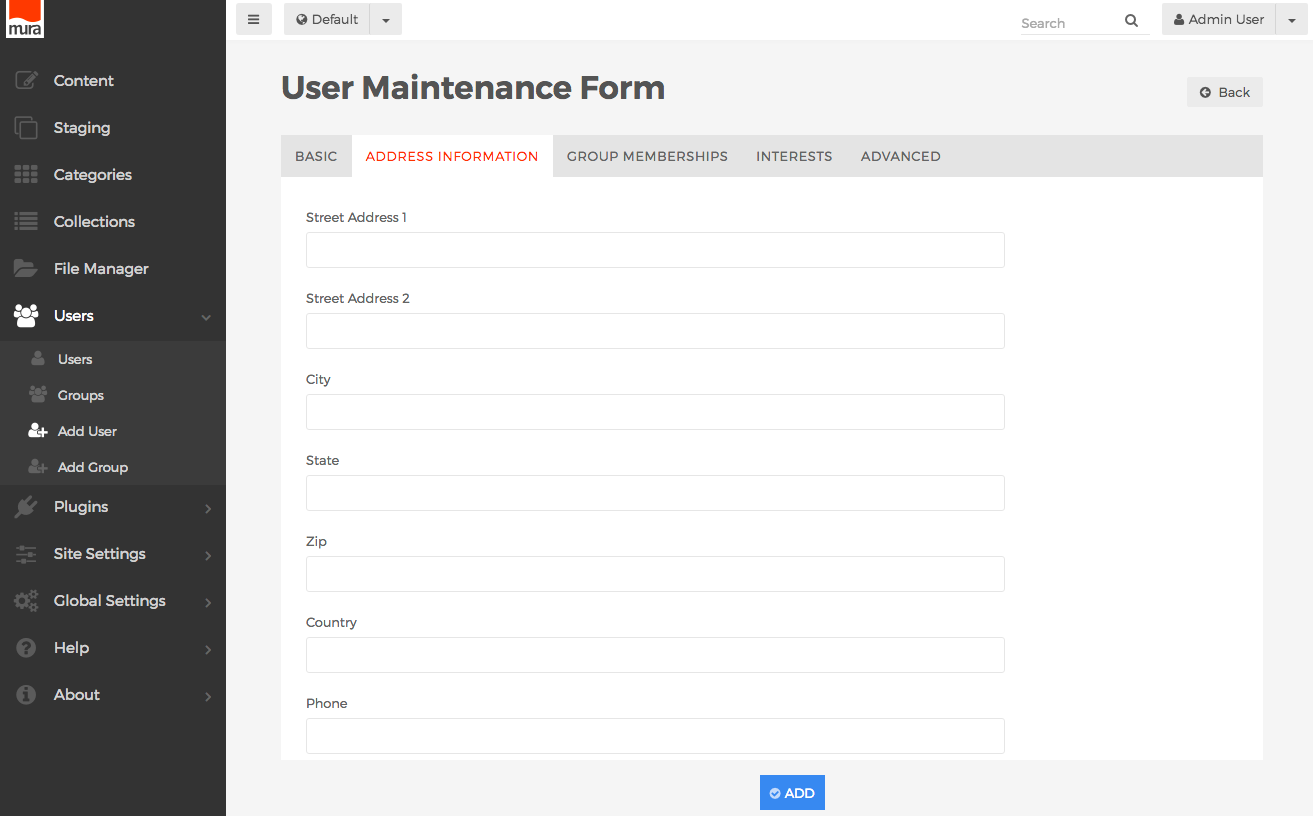
- Address Information Tab

- Street Address 1
- You may enter a Street Address for the location
- Street Address 2
- Some addresses require a second line, and if so, you may enter that information here
- City
- You may enter a City for the location
- State
- You may enter a State for the location
- Zip
- You may enter a Zip Code for the location
- Country
- You may enter a Country for the location
- Phone
- You may enter a Phone number for the location
- Fax
- You may enter a Fax number for the location
- Website (Including HTTP://)
- You may enter a URL for the location
- Email
- You may enter a valid Email address for the location
- Hours
- You may enter the hours for the location
- If editing an existing User, you may edit any existing address(es), or add additional addresses.

- Street Address 1
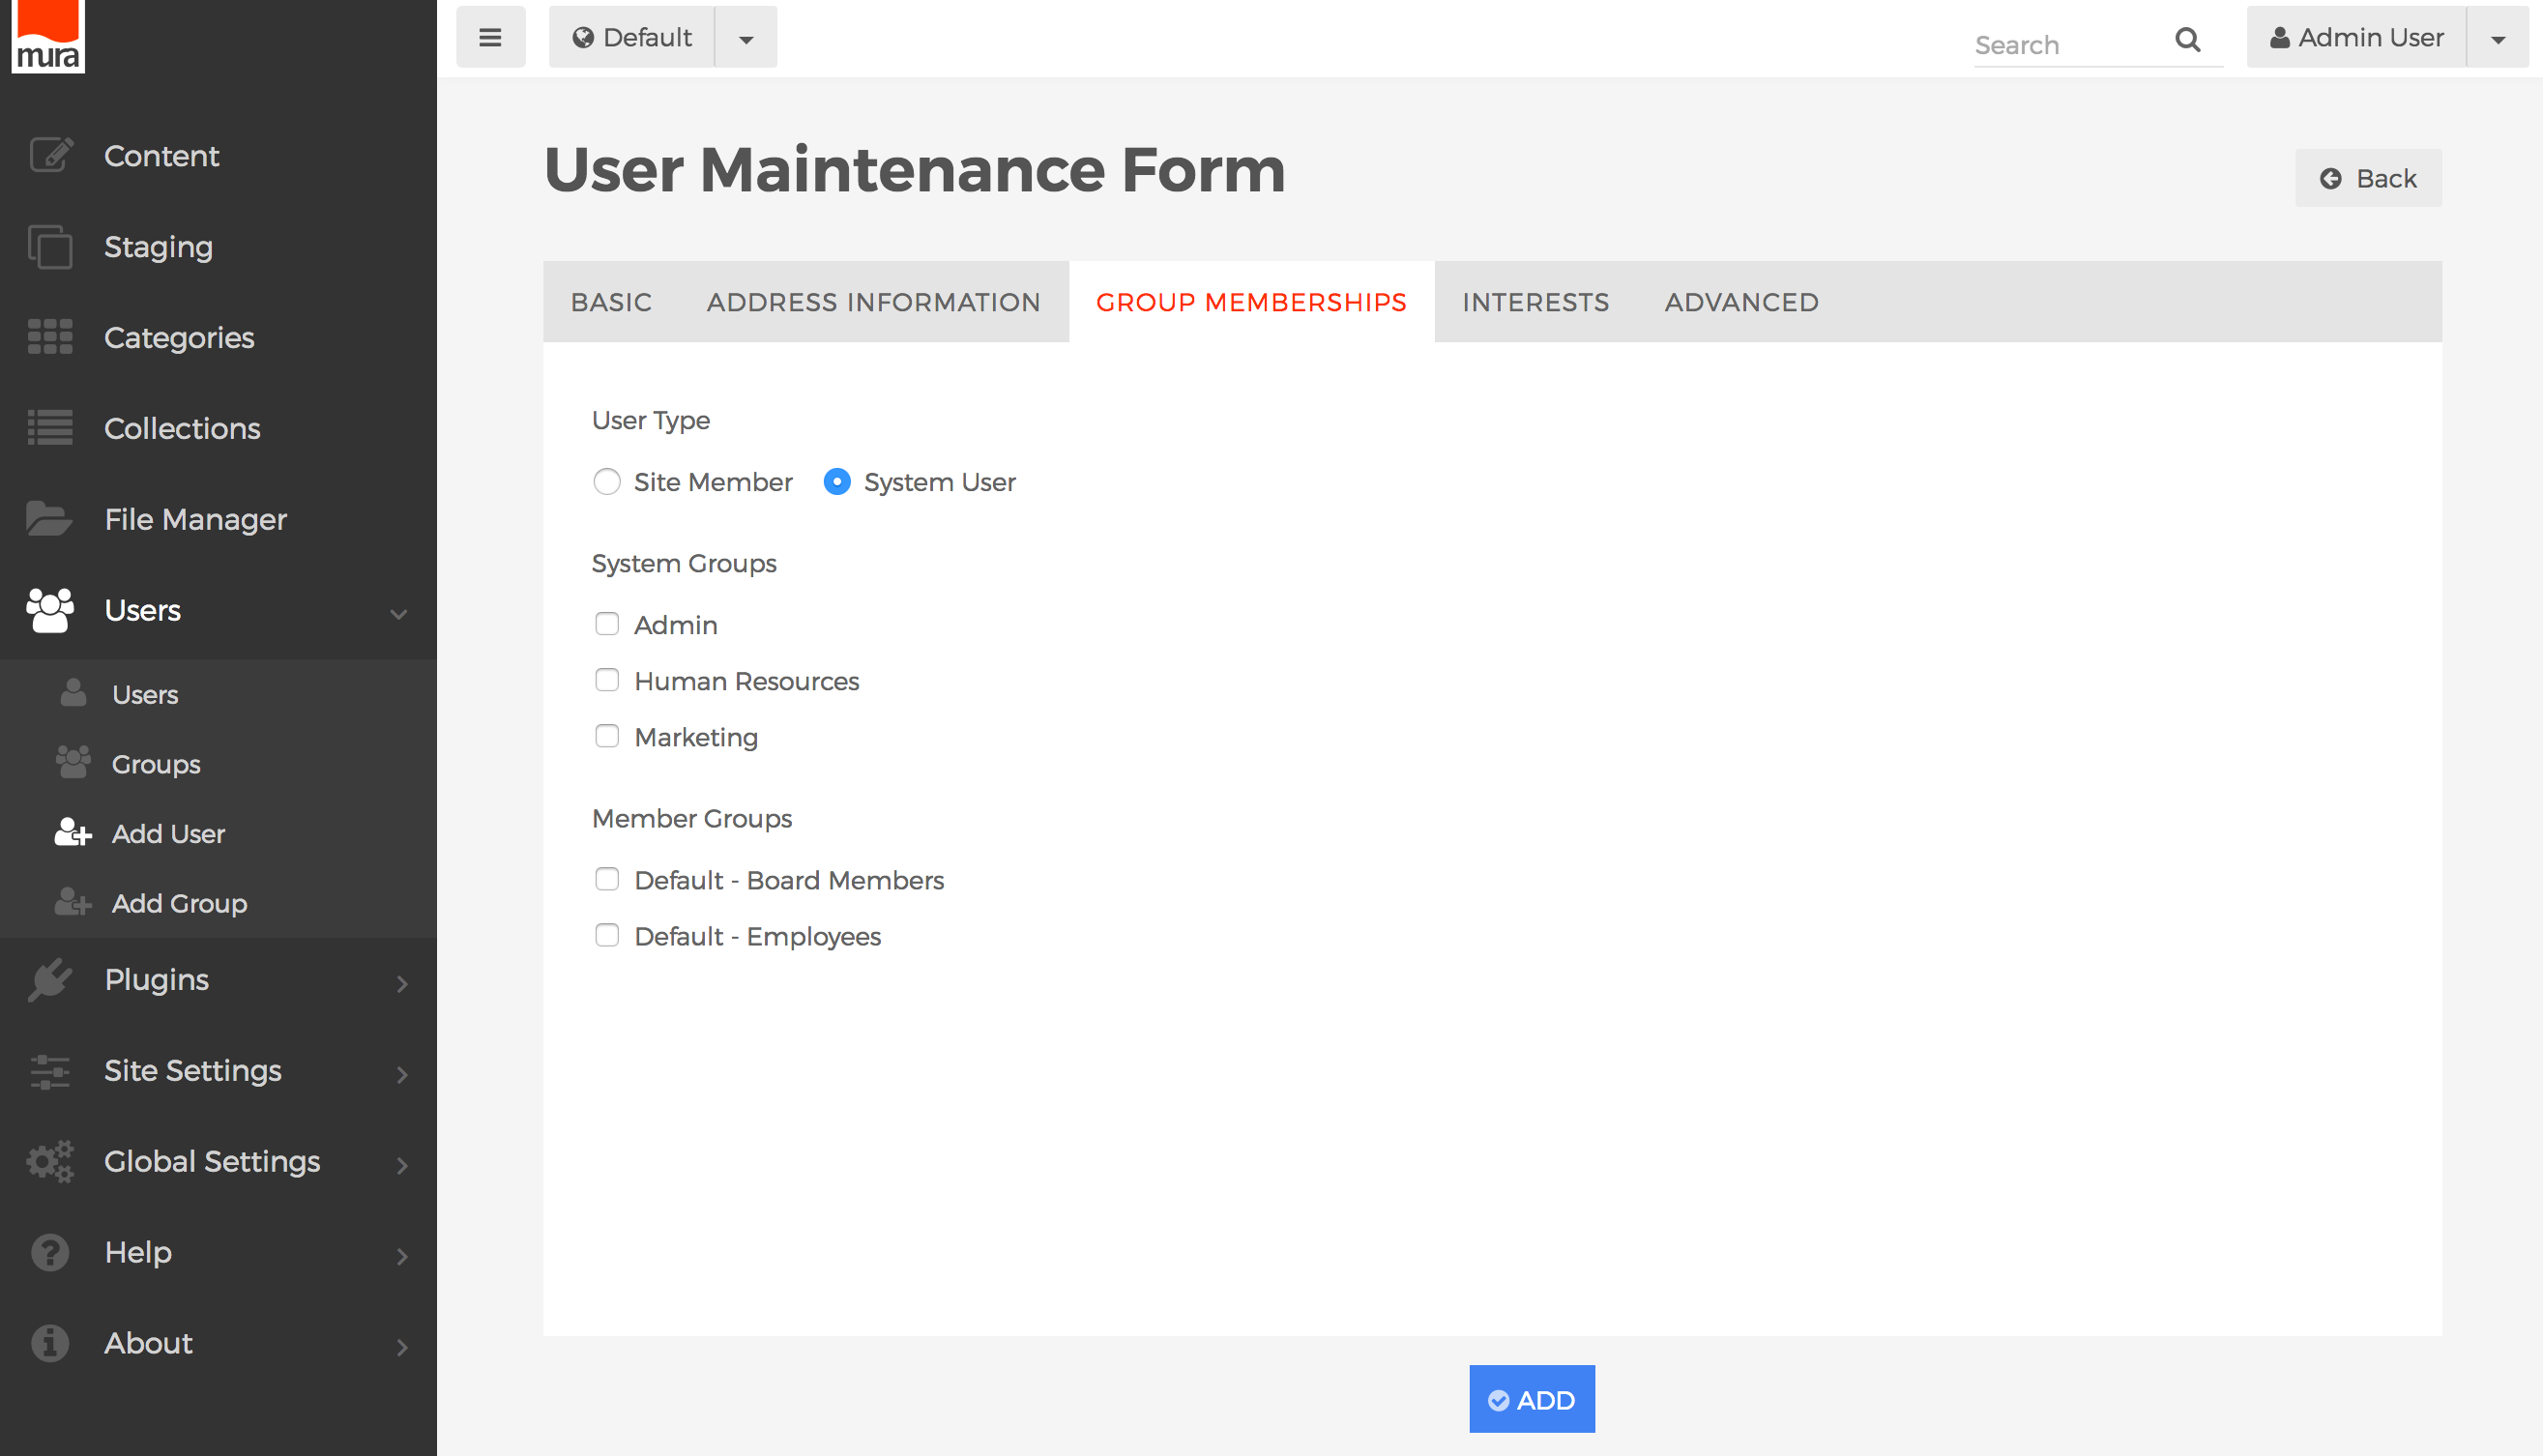
- Group Memberships Tab

- User Type
- Site Member
- If Site Member is selected, the User will not be able to log in to the back-end administration area of Mura. Site Members may only belong to "Member Groups."
- System User
- If System User is selected, the User will be able to log in to the back-end administration area of Mura. System Users may belong to both "Member Groups" and "System Groups."
- Site Member
- System Groups
- If User Type is set to System User, a listing of available System Groups will appear. You may assign the User to your desired groups here.
- Member Groups
- This section contains a listing of available Member Groups. You may assign the User to any desired groups here.
- User Type
- Interests Tab
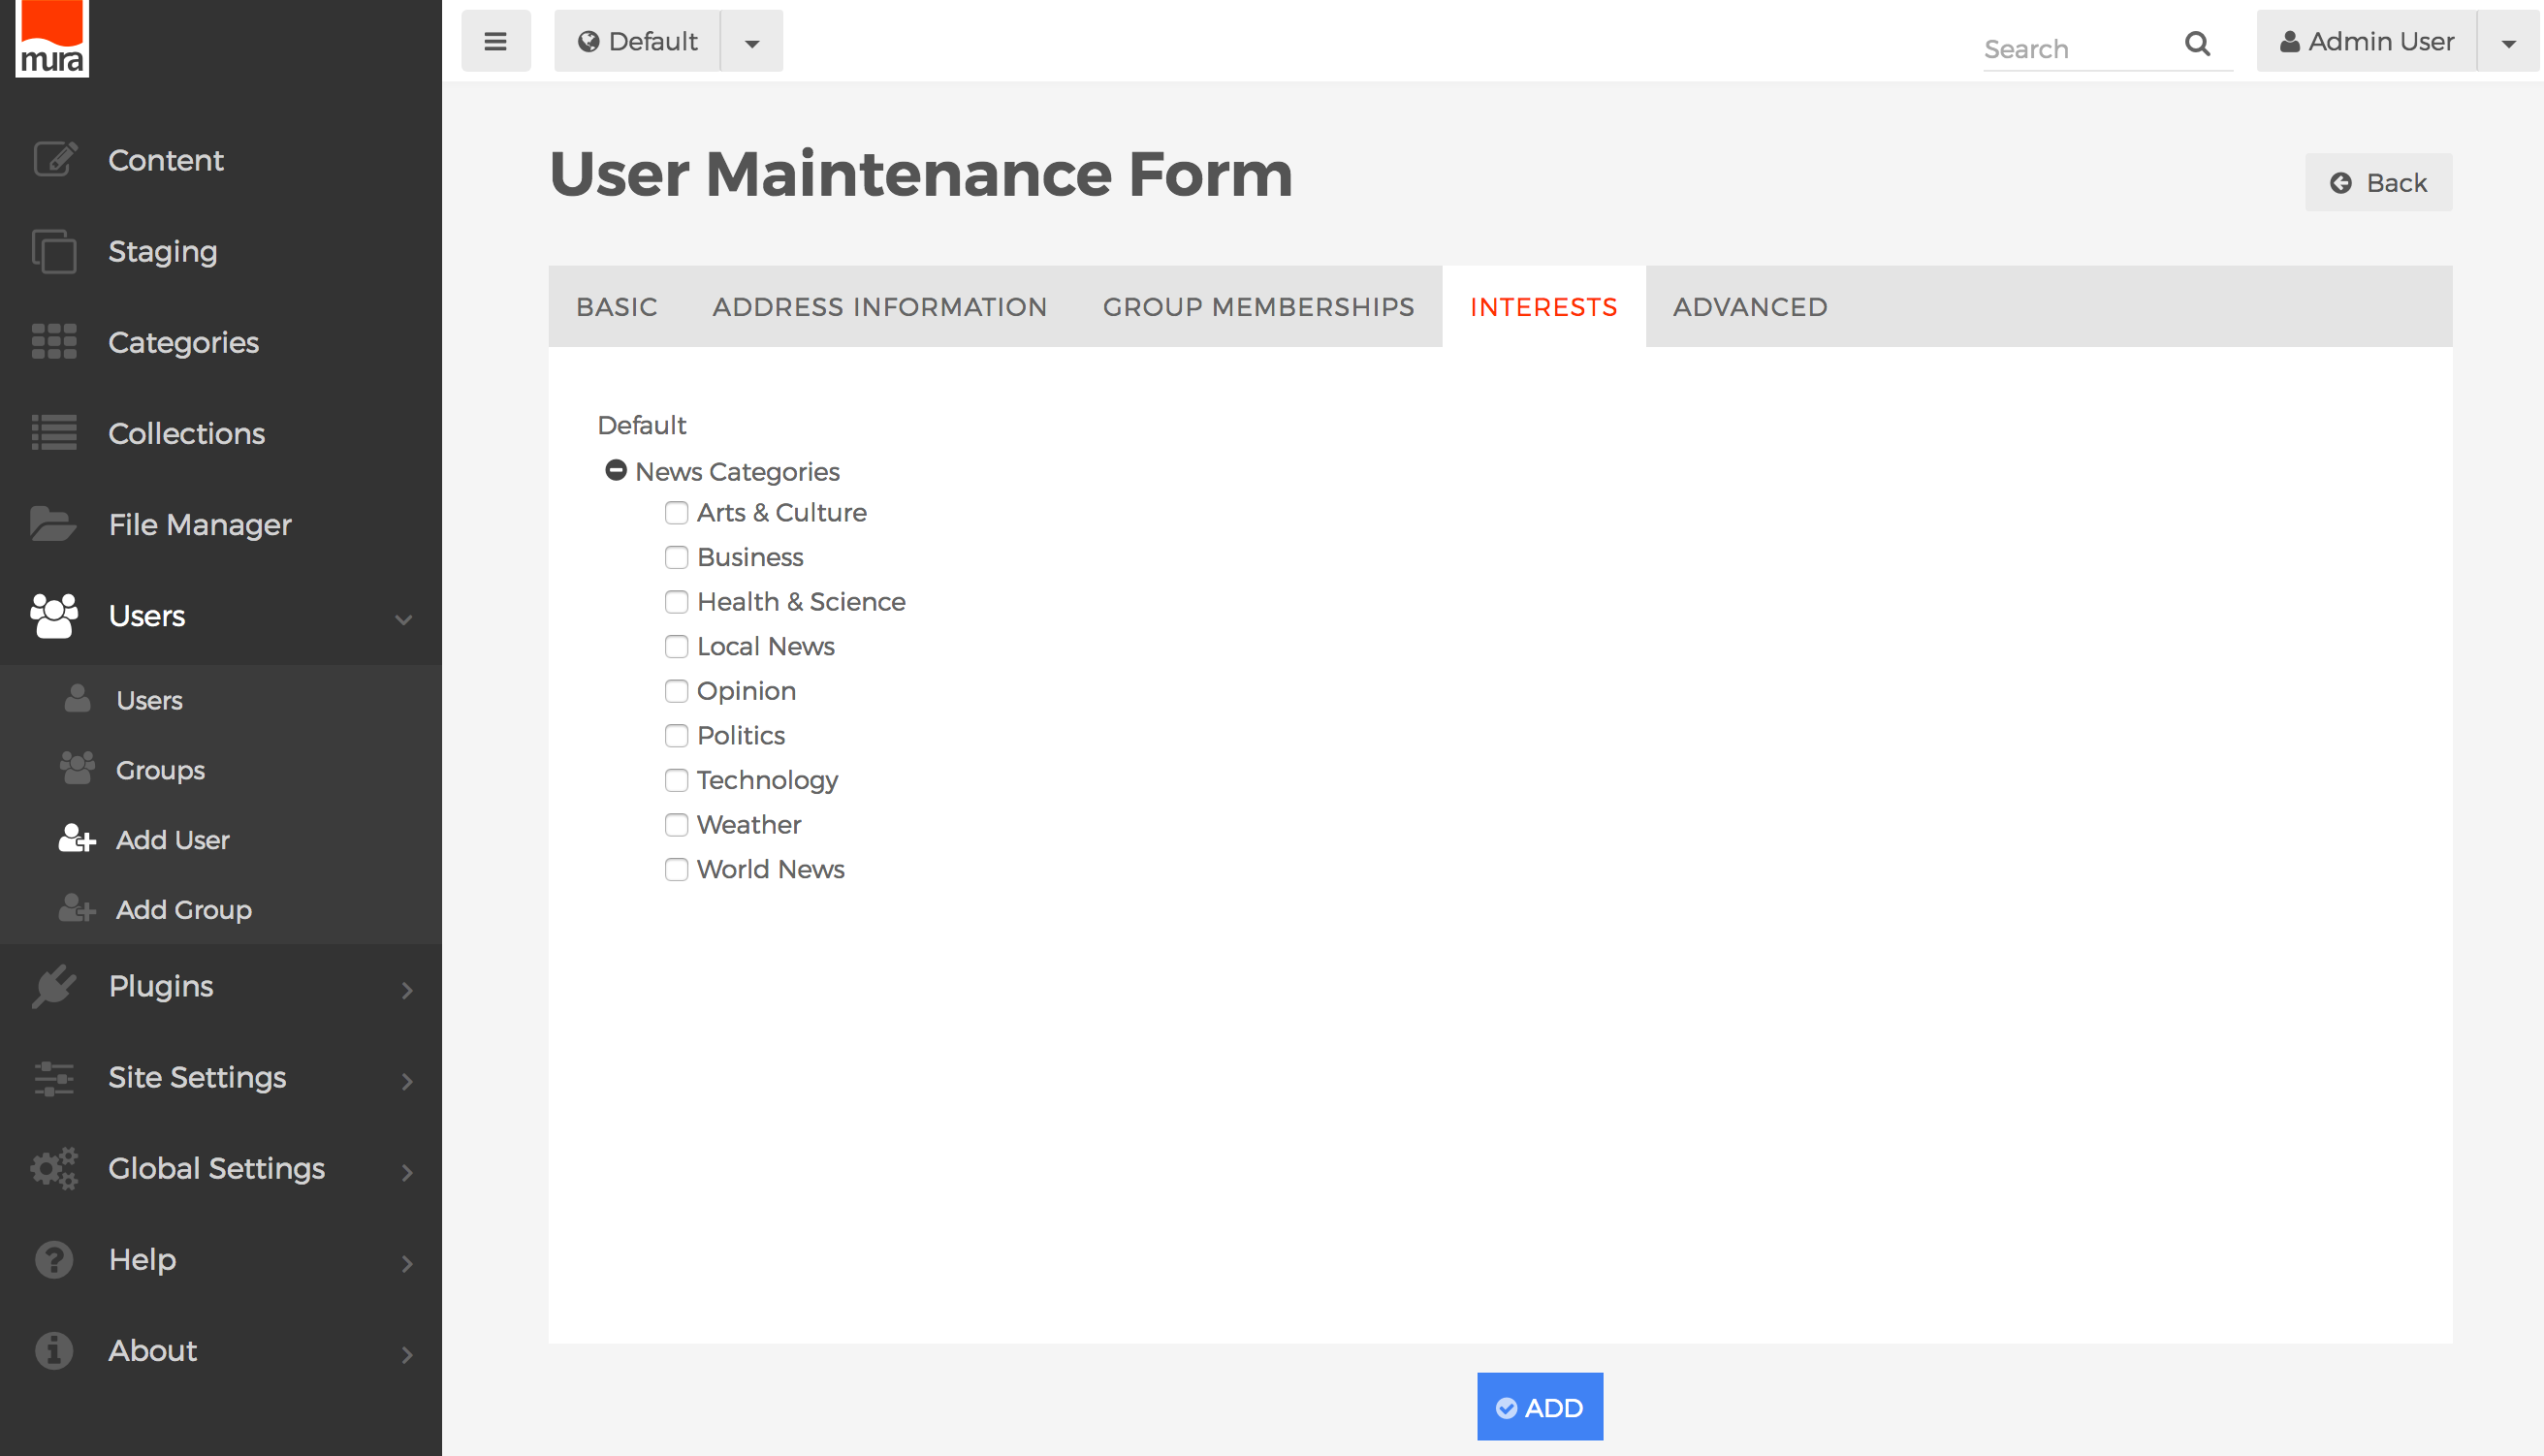
- You may optionally select any Categories that have been enabled for Interest Groups.
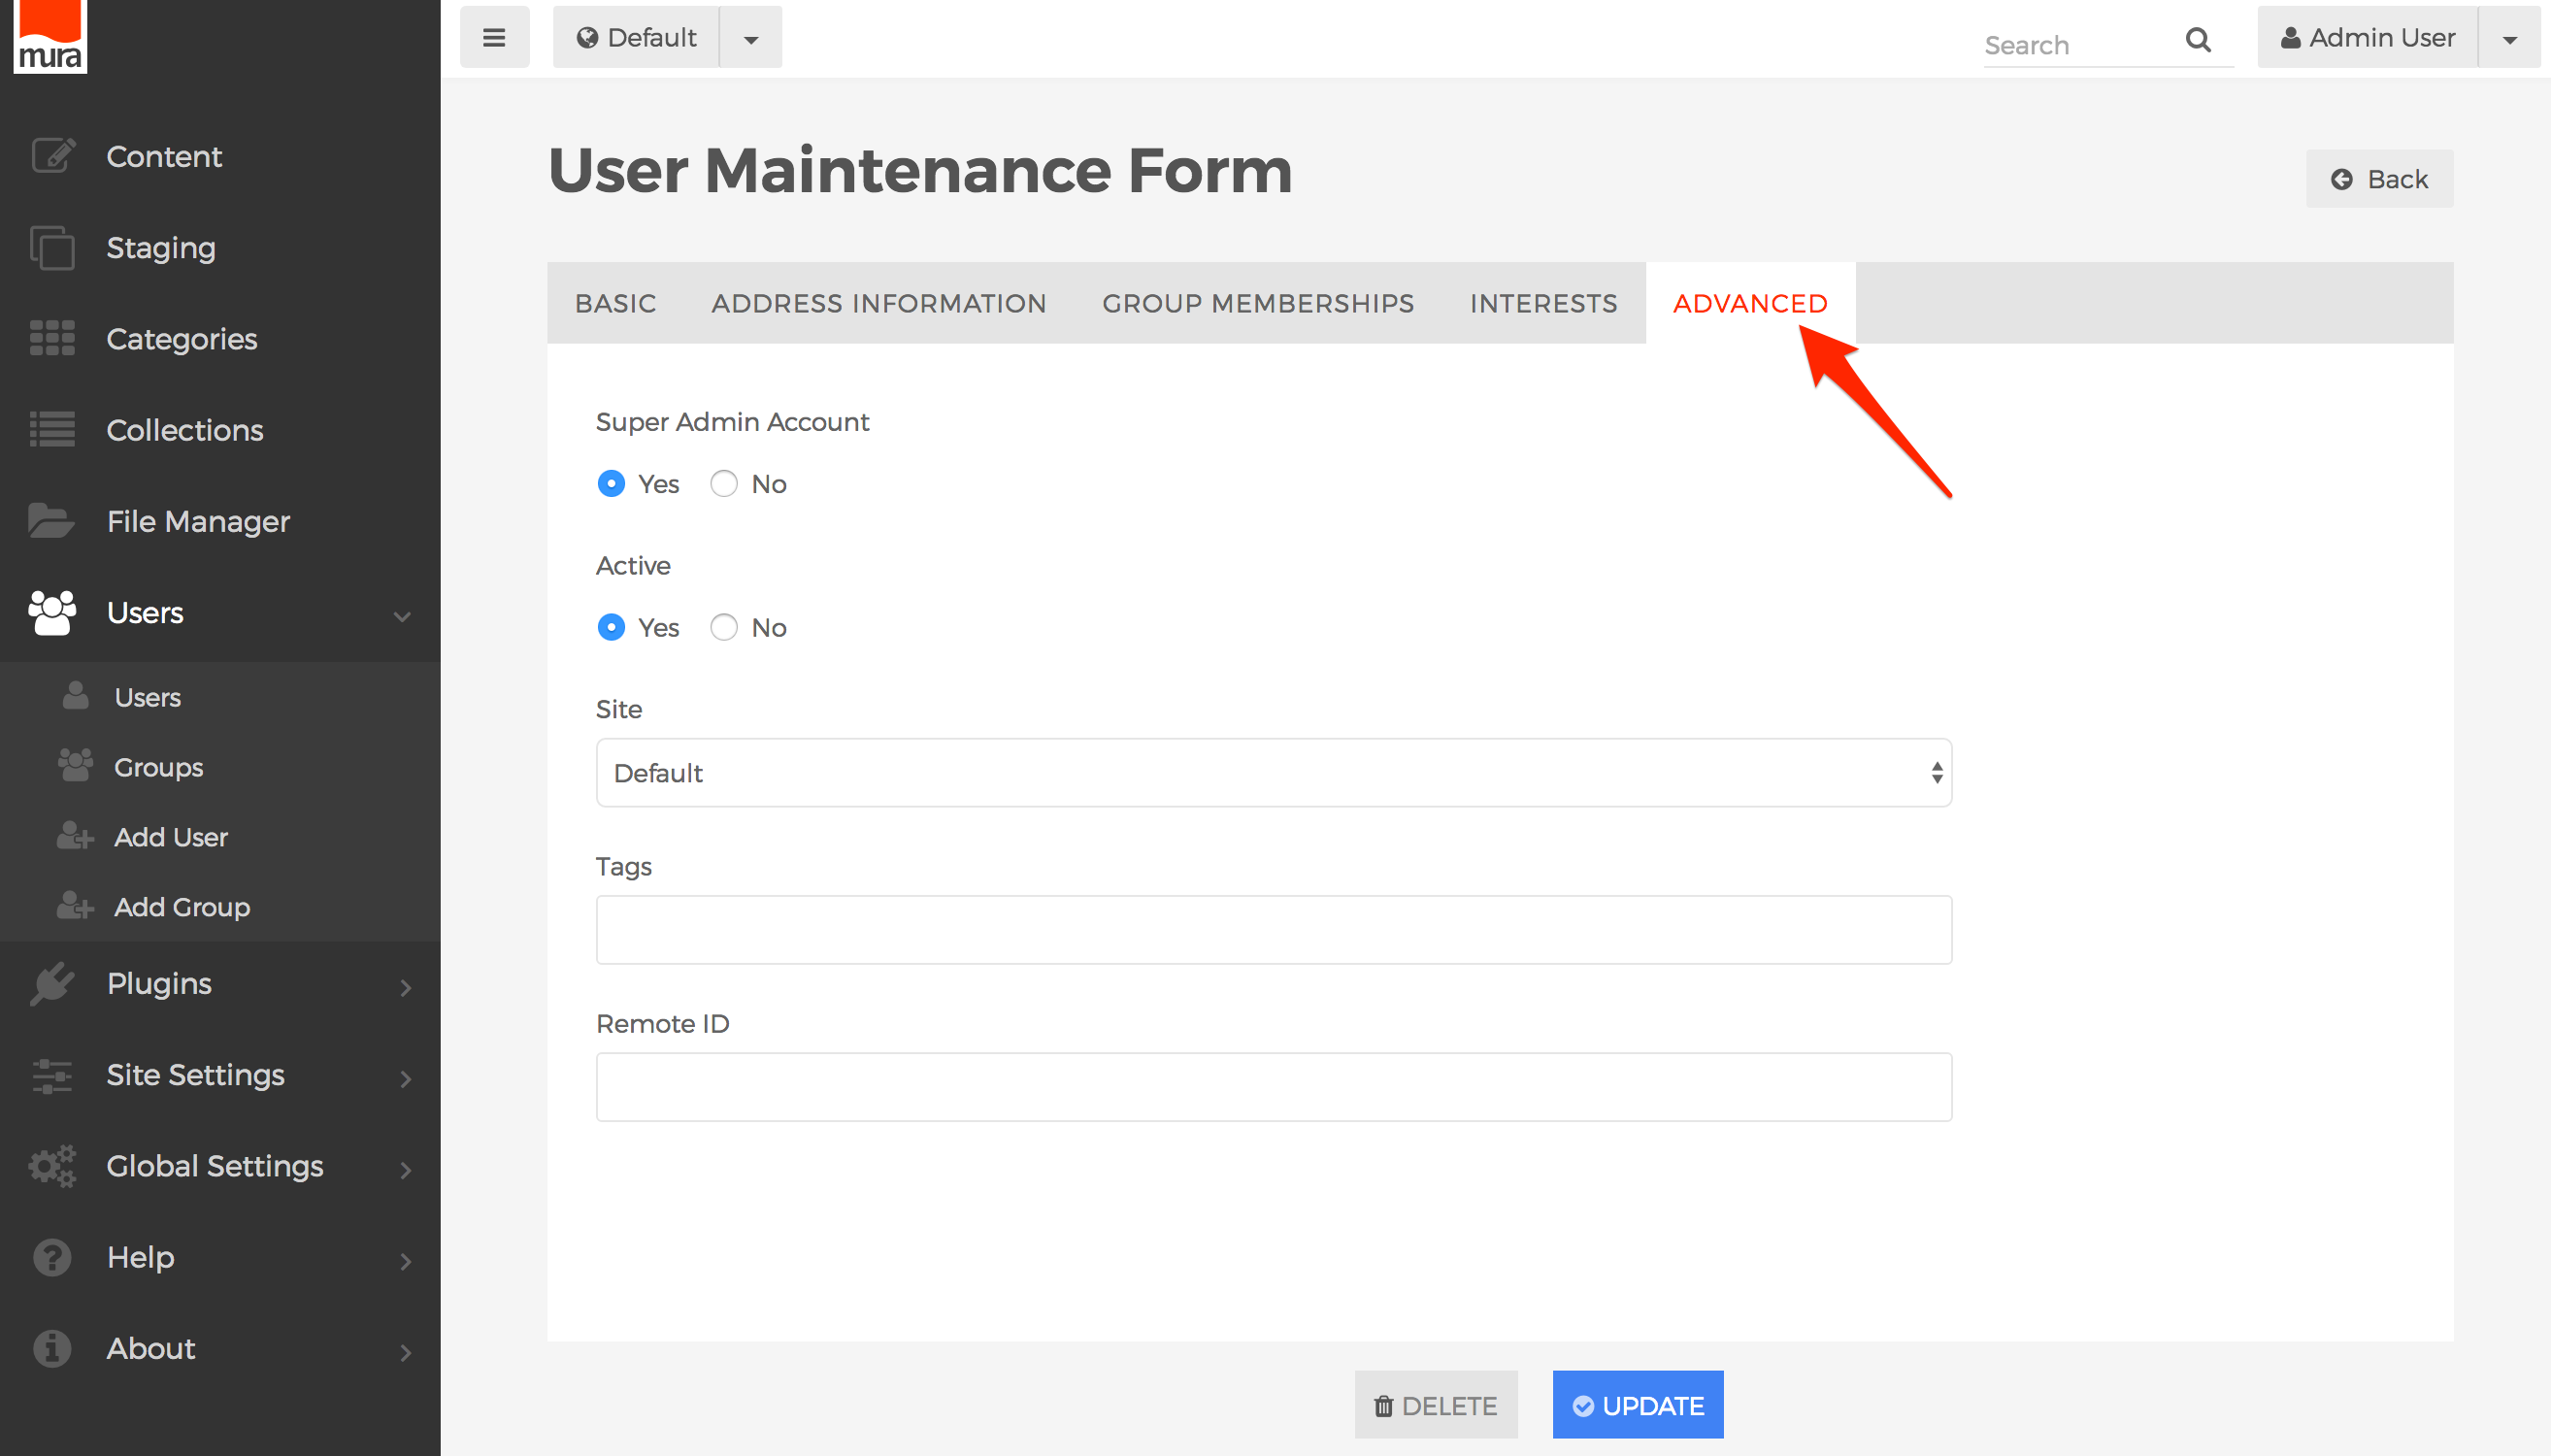
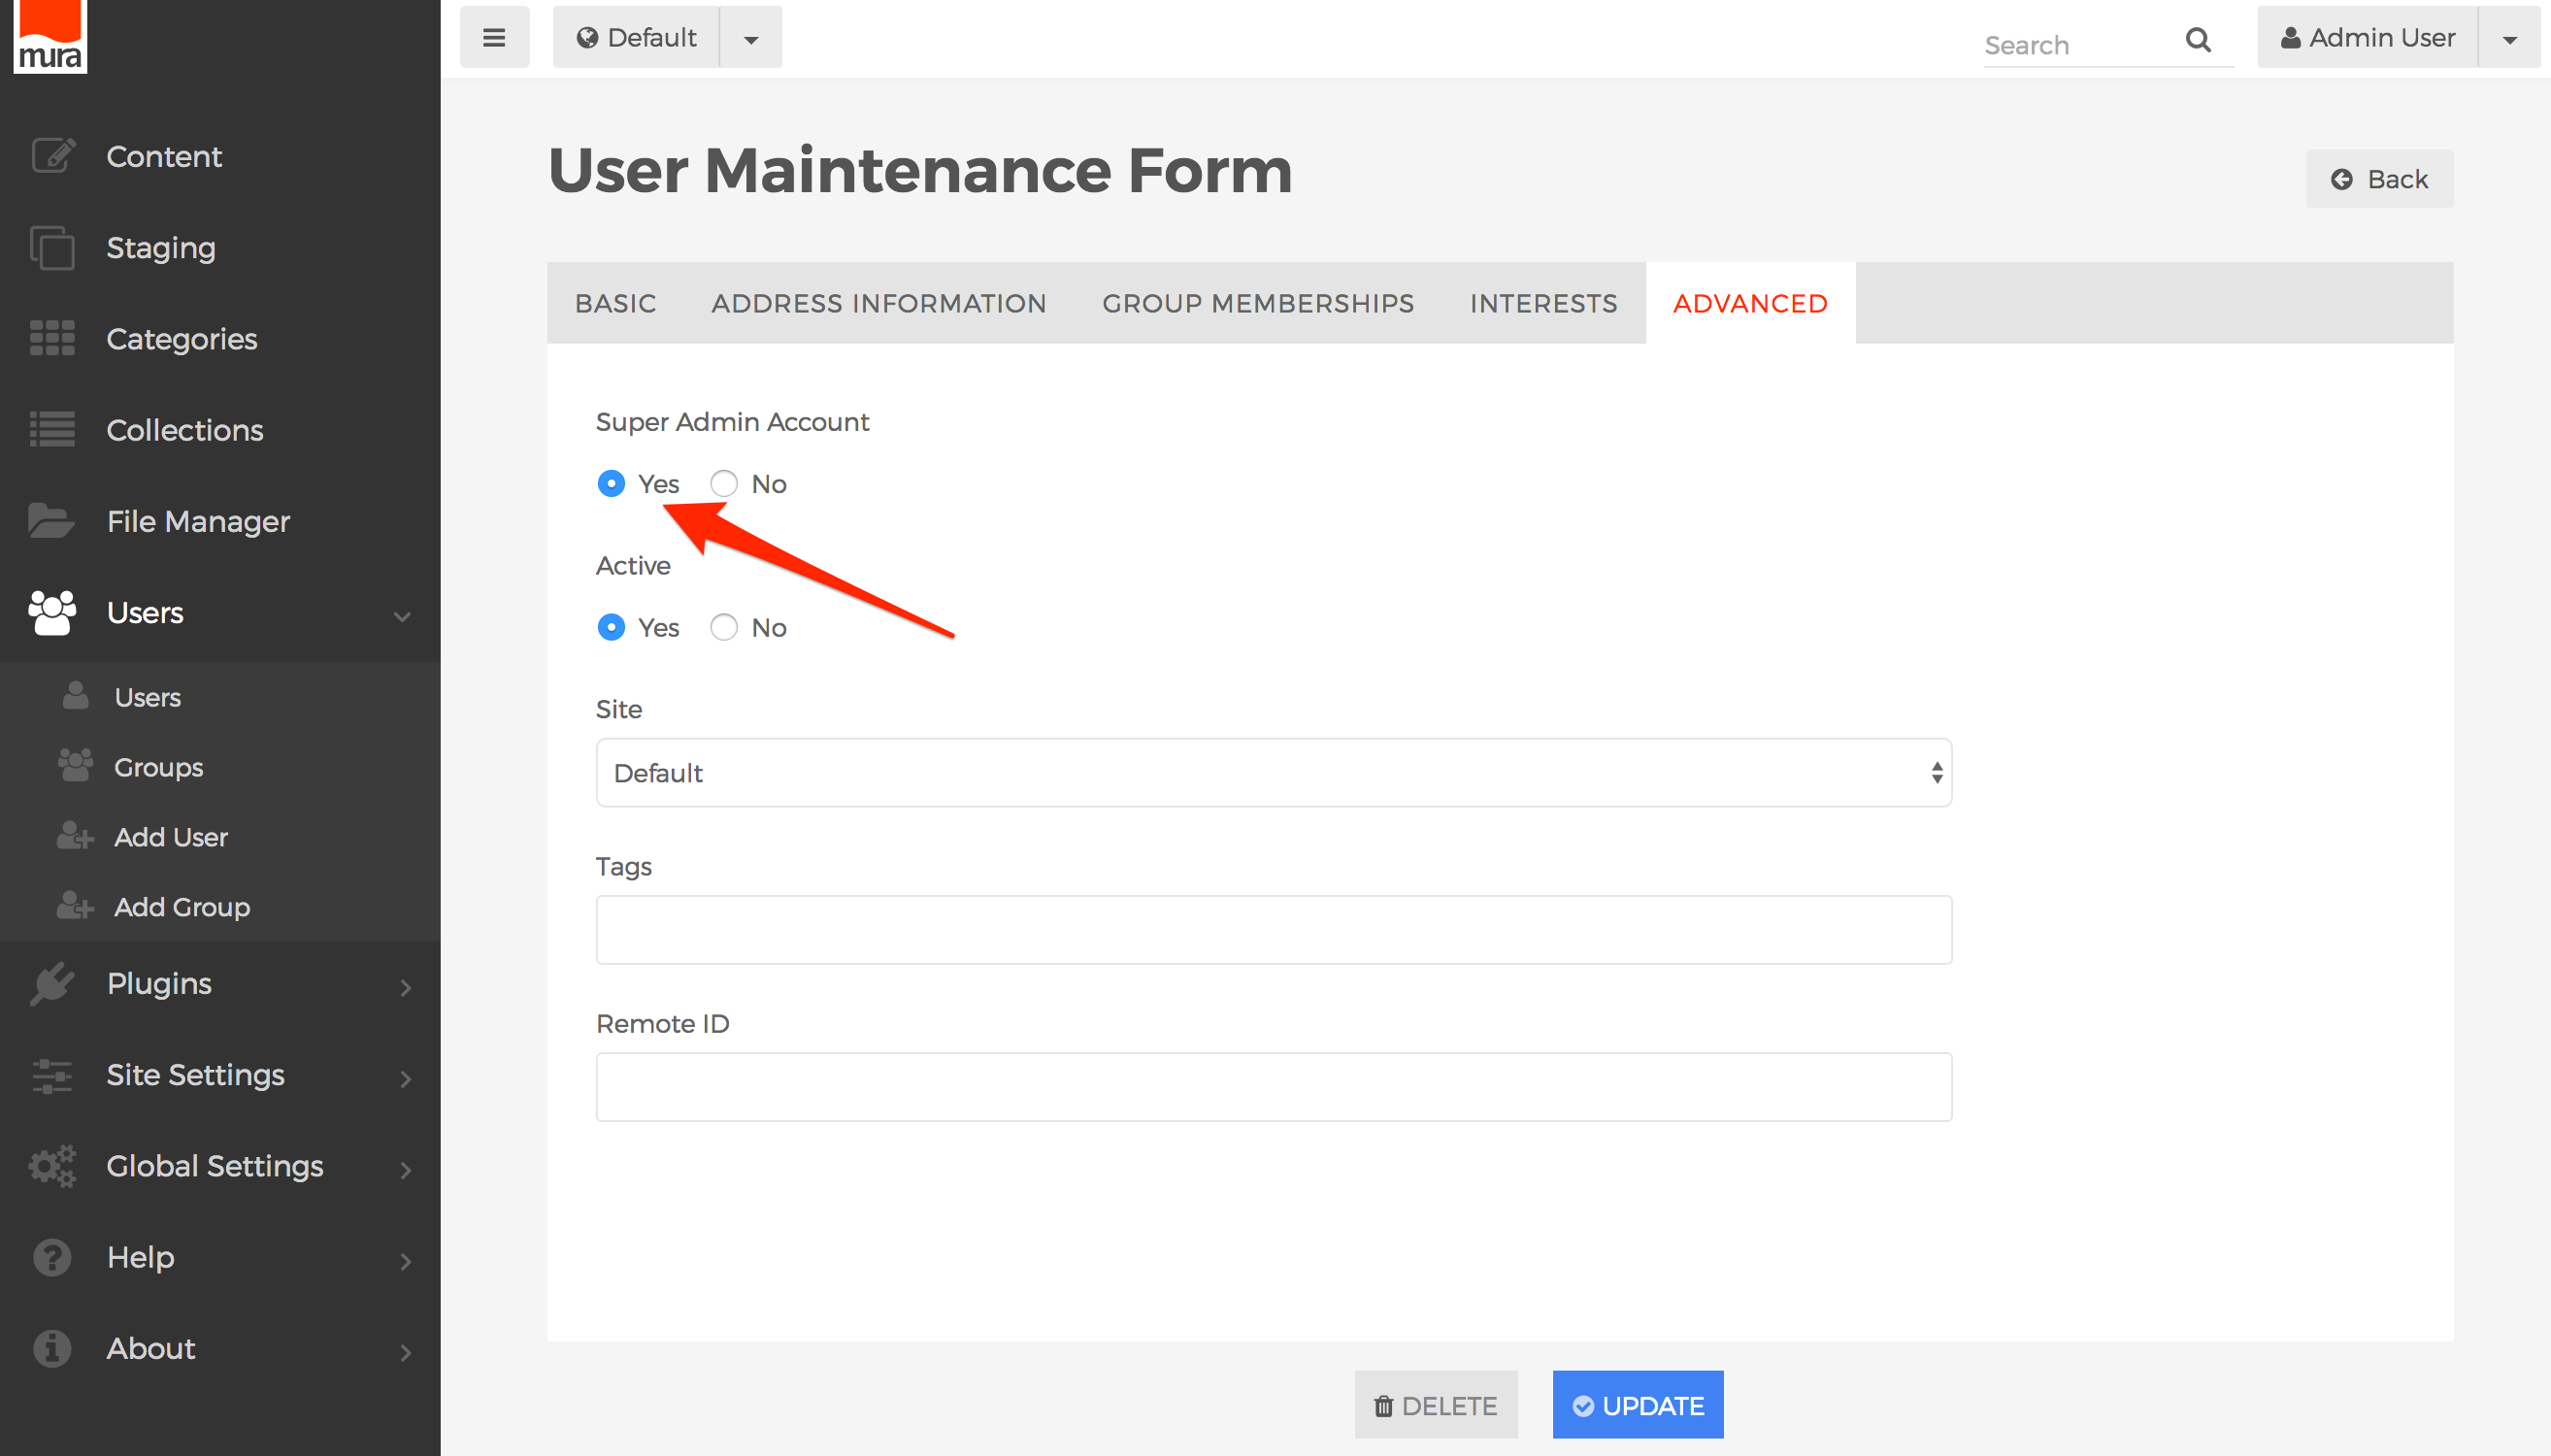
- Advanced Tab
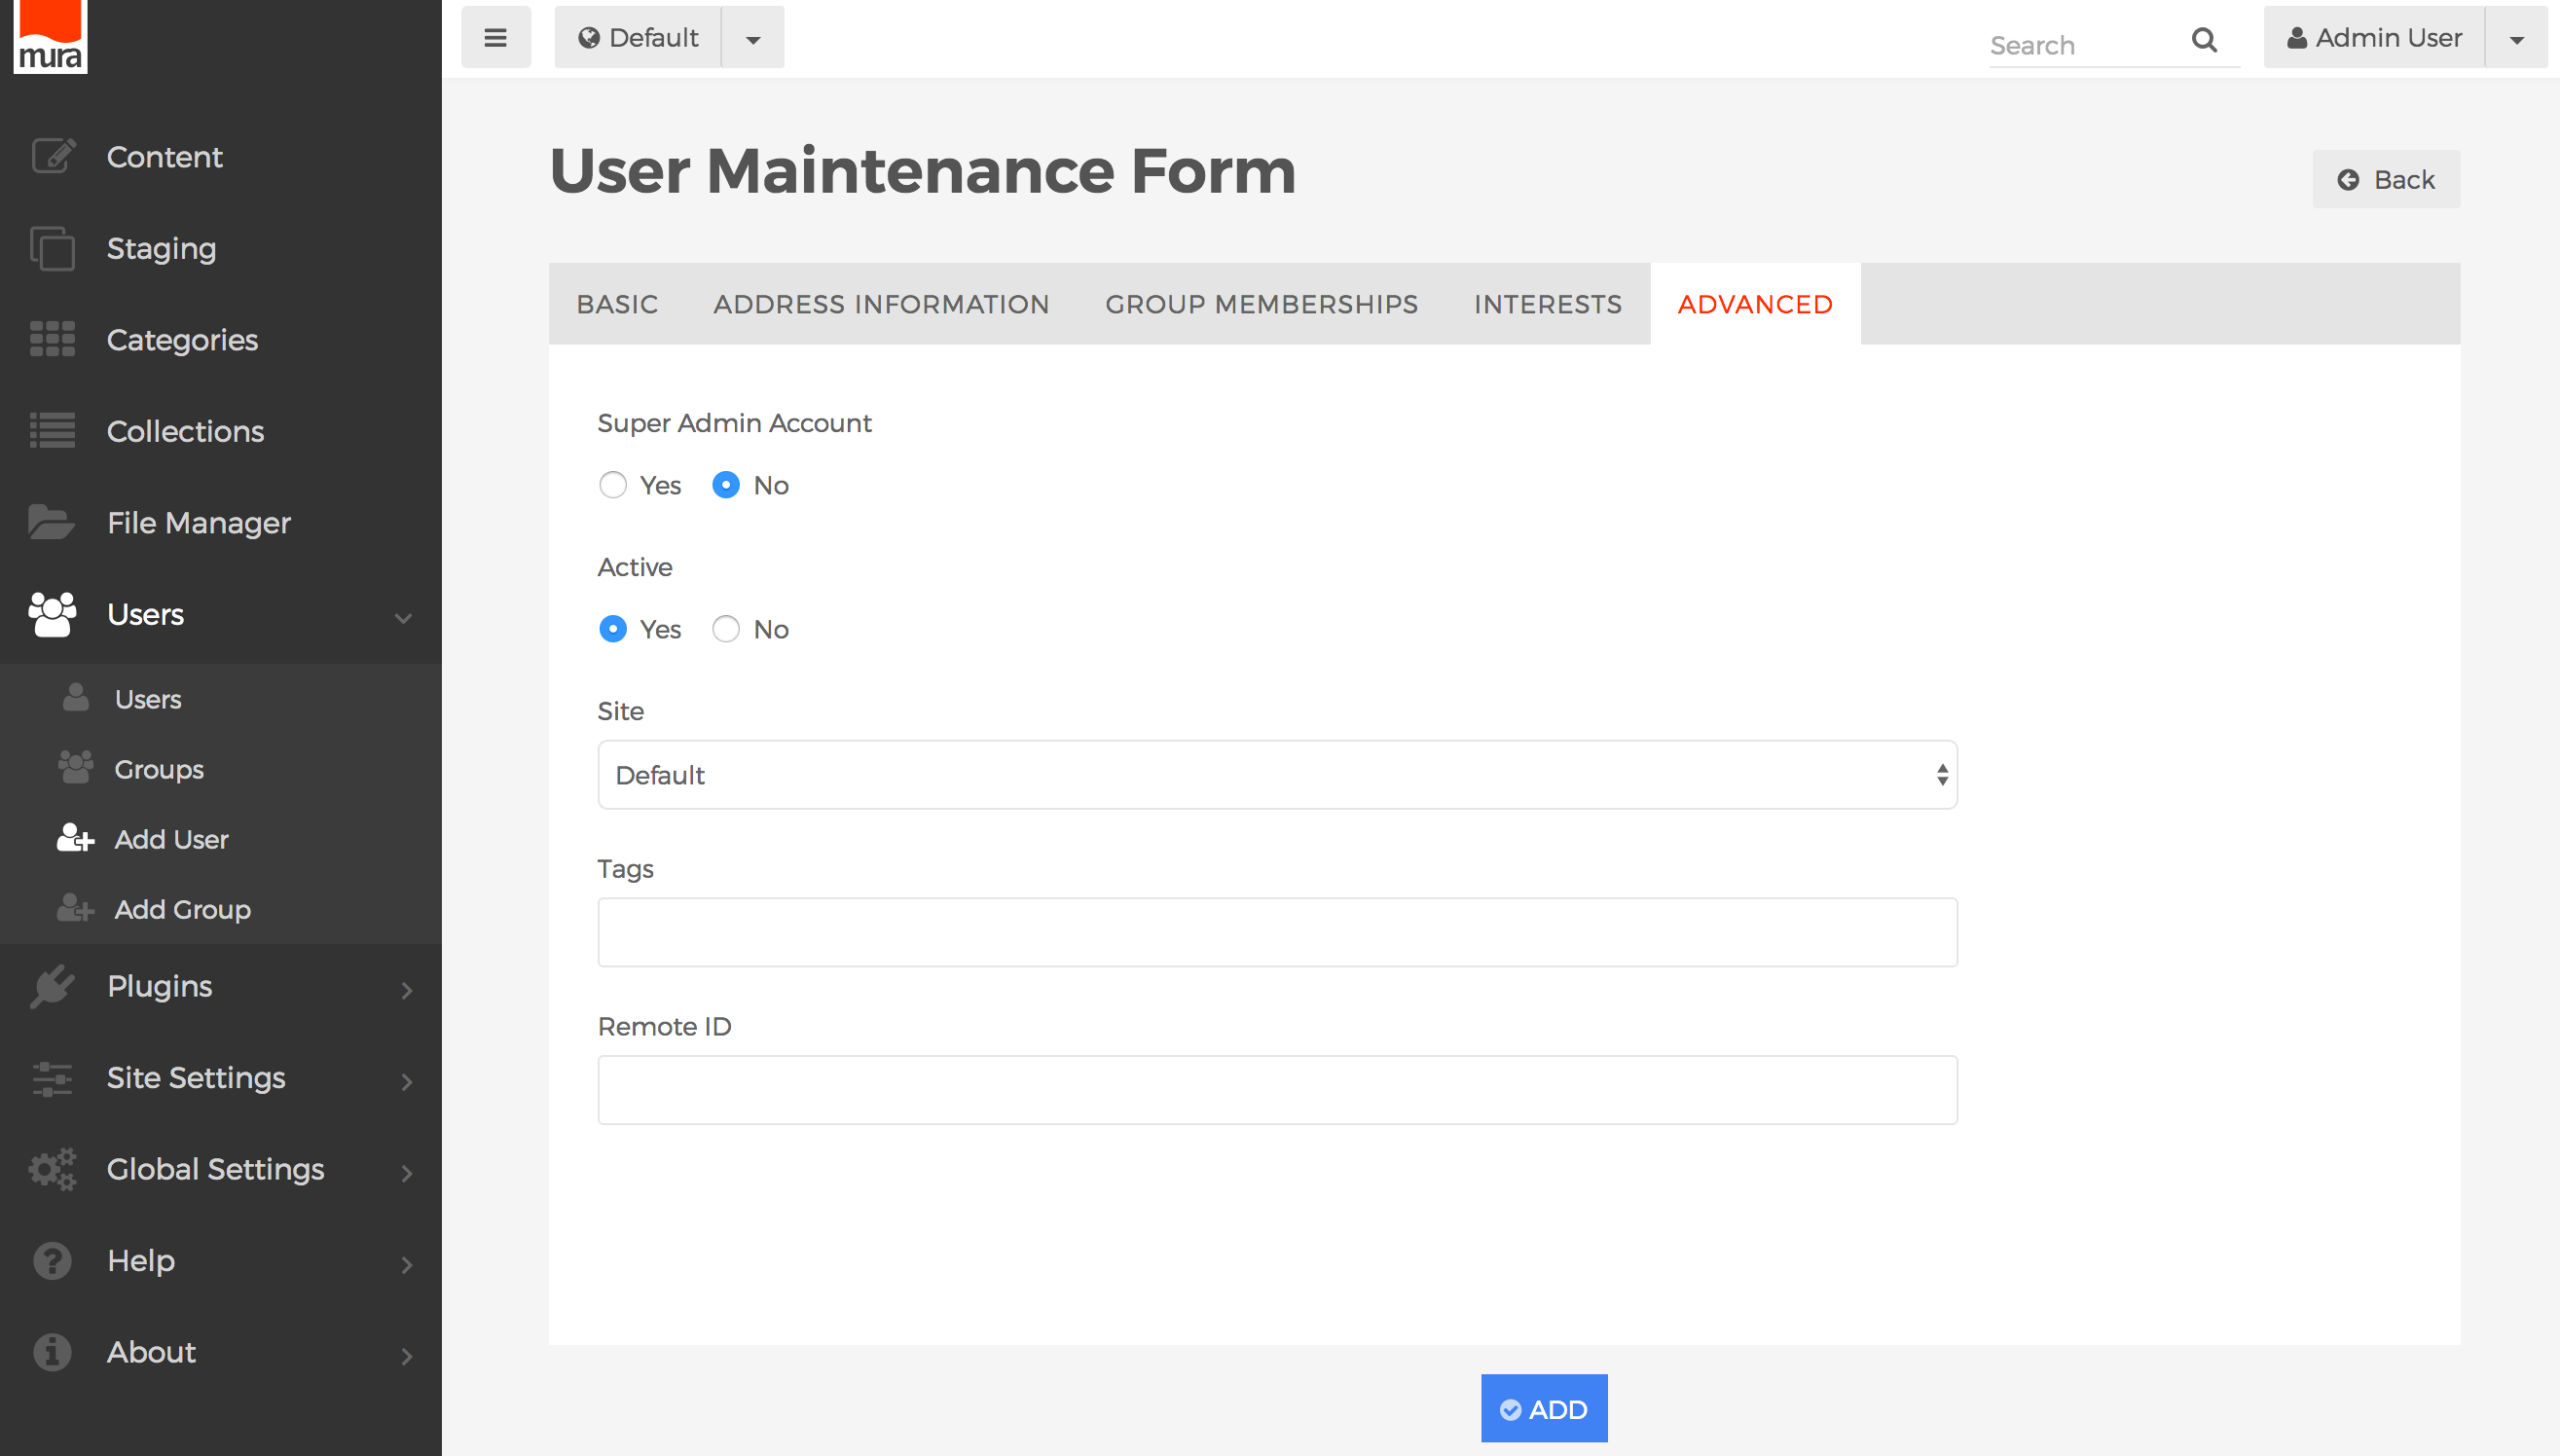
- Super Admin Account
- If Yes, the User will have all of the rights and privileges of a Super User.
- If No, the User will not be a Super User.
- See the Super User section for more information on Super Users.
- Active
- If Yes, the User will be able to log in, and use Mura within the permissions established.
- If No, the User will be unable to log in, and is unable to use Mura.
- Site
- You may reassign a User to a different Site Pool here.
- Tags
- You may enter a comma-delimited list of Tags here. This meta-data is useful for grouping users.
- Remote ID
- This field is primarily used by developers and is typically tied to a primary identifying field on a third-party system.
- Super Admin Account
- Basic Tab
- When finished, click the Add or Update button to save your changes.


The Super Admin User Account
Users designated as a "Super Admin Account" have the highest authority, rights, and control in Mura. These "Super Admin Users" can:
- Create more Super Admin Users
- Create & manage System Groups and Member Groups for any site
- Create & manage System Users and Site Members for any site
- Add new sites
- Update the Site Settings of existing sites
- Access and use features included under Global Settings
- Full access to the File Manager
- Ability to install, manage, and delete plugins
- Create, publish, and modify content for any site
- And much more!
In short, Super Admin Users can do pretty much anything and everything Mura offers. As noted in the first bullet, only Super Admin Users have the ability to designate other Super Admin Users. Also, Super Admin Users may, but don't necessarily have to, belong to any user group(s).
Yes, Super Admin Users have great power, and as the old saying goes, "With great power, comes great responsibility." Obviously, anyone you choose to designate as a Super Admin User must be someone you can trust.
How to Designate a Super Admin User Account
First and foremost, only Super Admin Users have the ability to designate other Super Admin Users. So, you must be logged in under a Super Admin User Account to perform these steps.
- From the back-end administration area of Mura, select Users from the main navigation, then Users.

- Locate and select the user you wish to designate under either the Site Members tab, or the System Users tab.
- From the User Maintenance Form, select the Advanced tab.
- Under Super Admin Account, select the Yes radio button.

- Click Update to save the change.
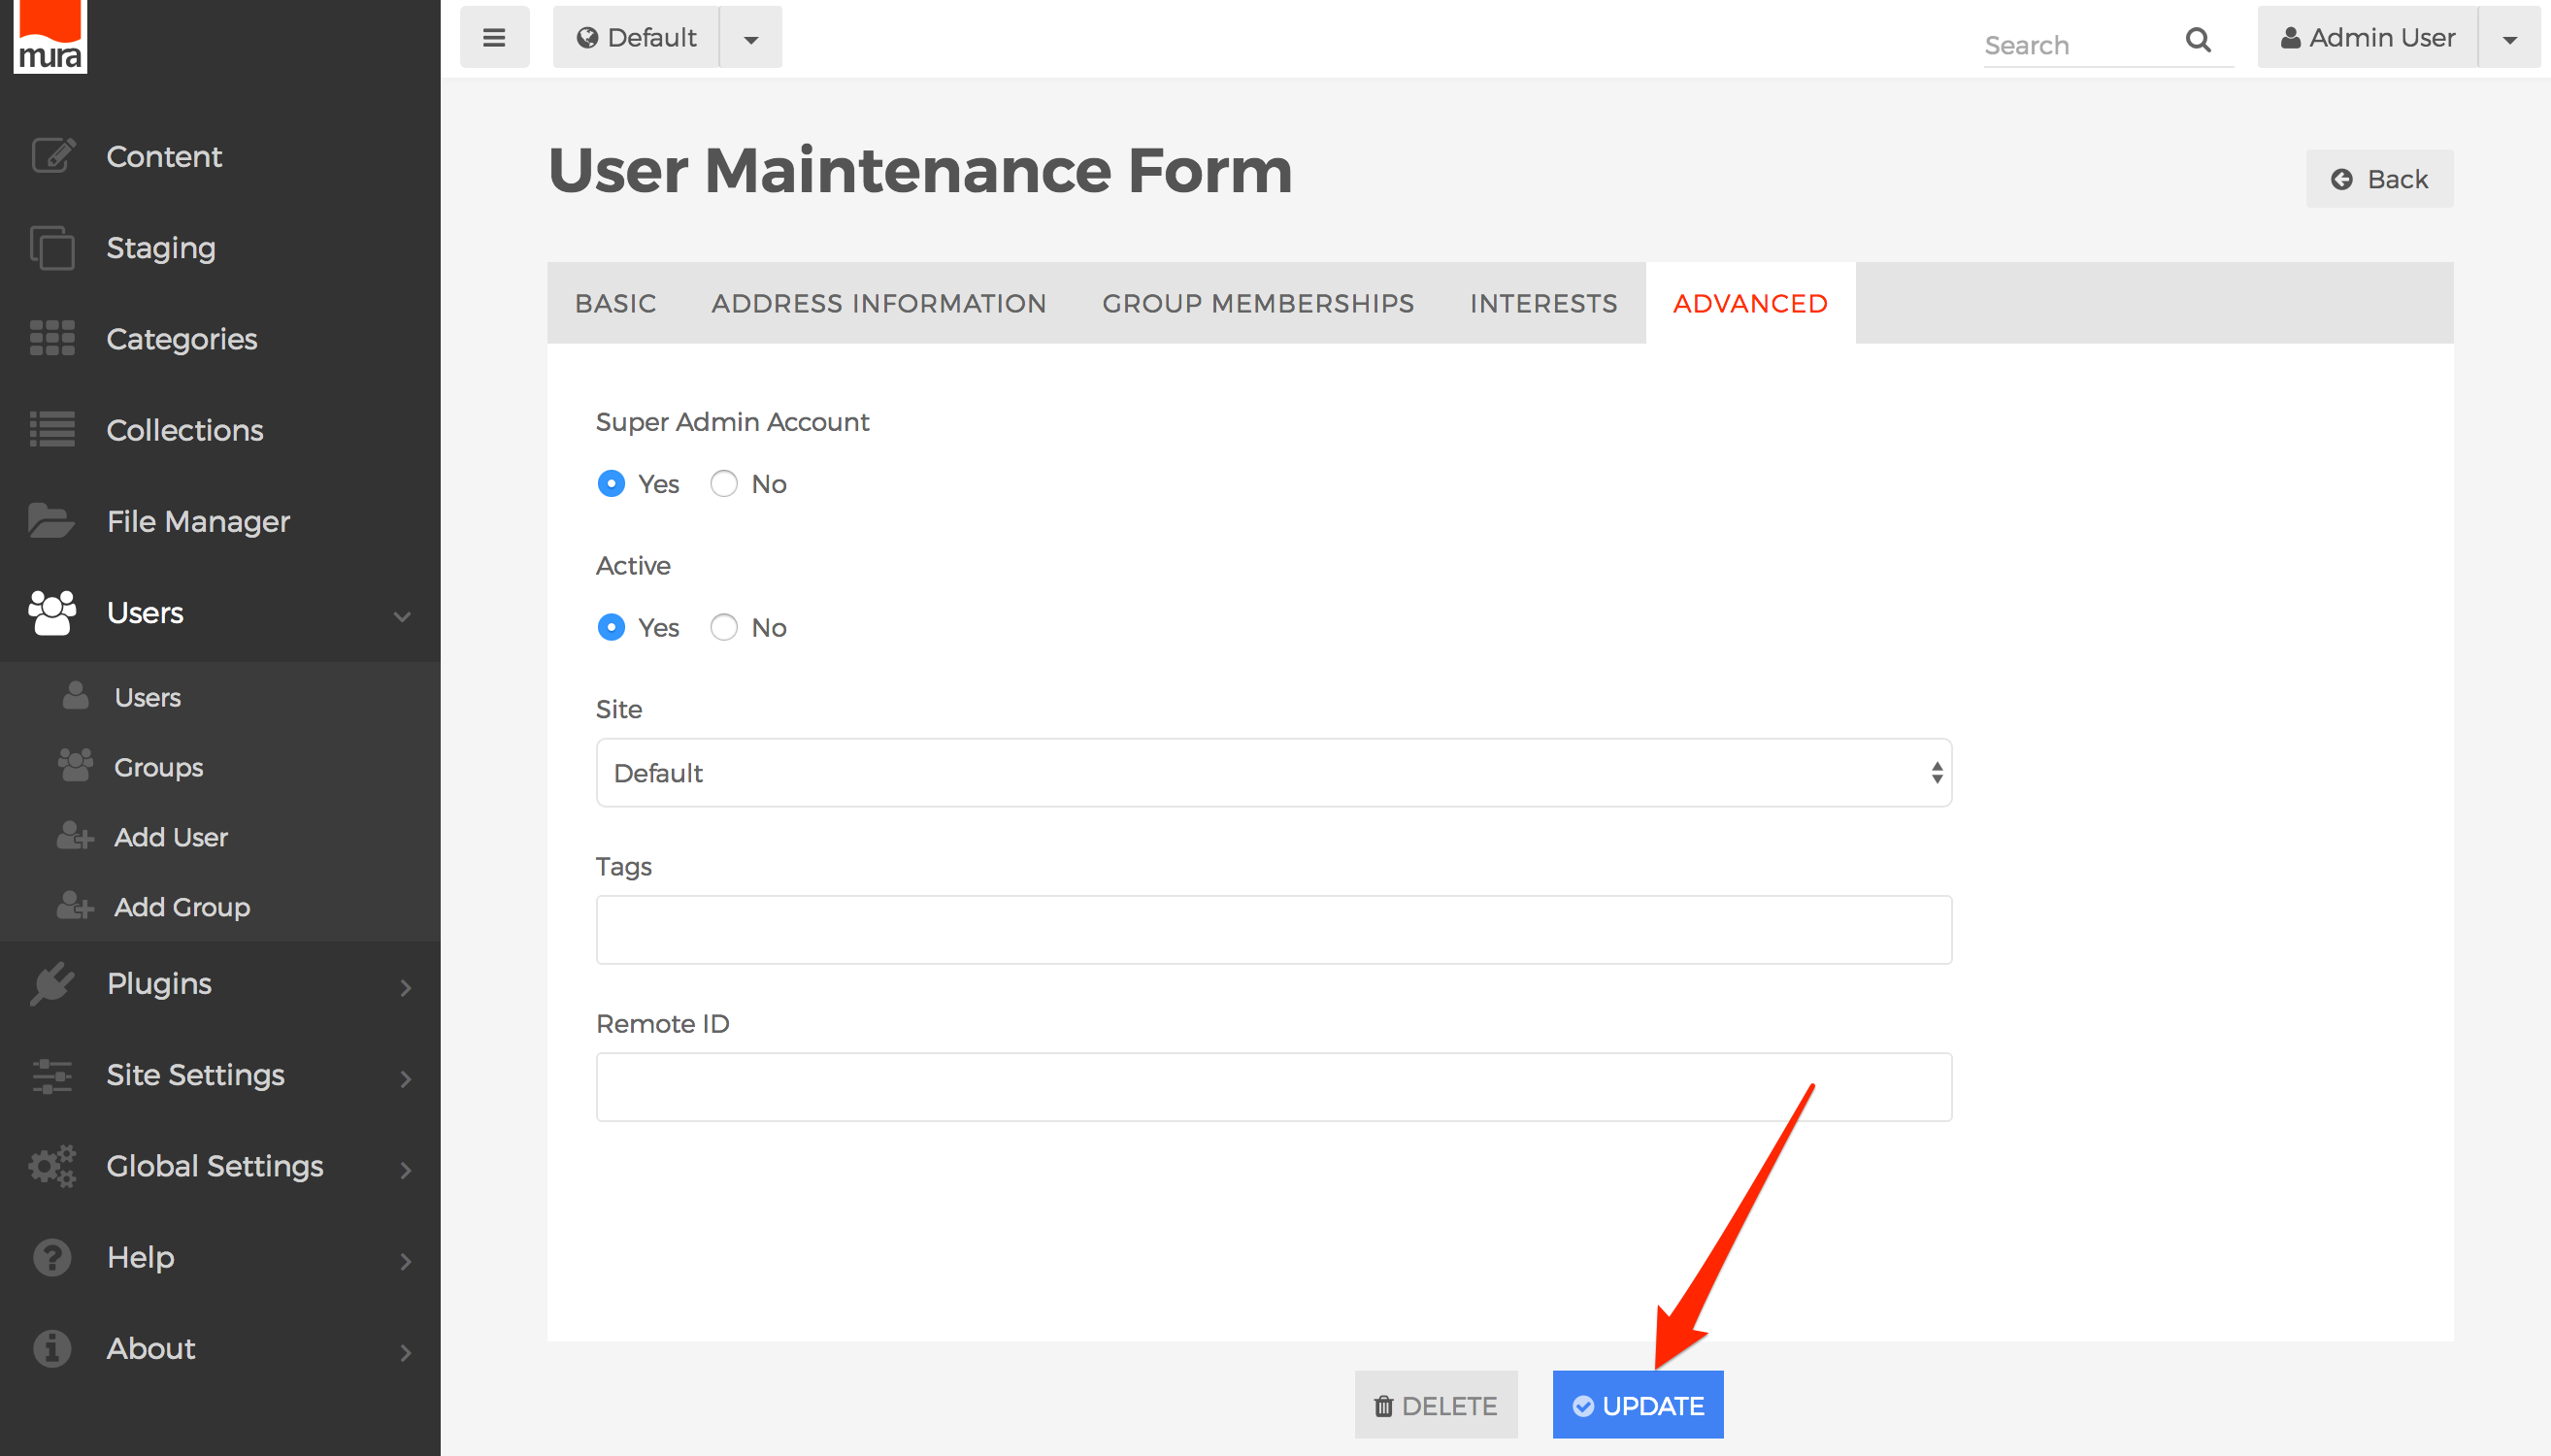
- The user account is now a Super Admin User. The user should now have a star icon next to their name in the System Users listing.


Managing Permissions
Before you begin the process of setting up permissions, you need to ensure you have created the groups you will be working with in Mura. If you haven't already done so, please visit the Creating and Managing Groups section before proceeding.
Once you have established the groups your organization desires, you can begin the process of enabling and/or restricting permissions for each group, throughout the various content sections of your site. You will also want to determine which group(s) have access, or do not have access, to various modules within Mura such as the Content Staging area, Categories, Collections, and so forth.
Here are the general steps in setting up permissions in Mura:
- Create Groups
- Create Users and assign them to groups
- Optionally share User Pools across various sites
- Let Mura know which group(s) are allowed to access to each specific site
- Let Mura know the roles/permissions each group has for Content, Components, Categories, Users, and Plugins
- Let Mura know the roles/permissions each group has for various Modules (e.g., Staging, Collections, Comments, and Forms)
User Pools
Mura allows for the possibility of having multiple websites under the same installation. In other words, out of the box, Mura is "multi-sited." Each website could have its own, unique domain name, subdomain name, or any combinations of unique domains and subdomains. Because of this, Mura allows you to share resources, including Member User Pools and System User Pools.
This is important to understand, because you could theoretically have all of your User Pools under one site, and share them across some, or even all, of the websites managed by Mura. Another reason this is important is, due to the "multi-sited" aspect of Mura, you will need to explicitly set the Permissions for each group on each site.
Because each organization has its own use cases and needs, there's not one, singular "best practice" to promote when it comes to User Pools.
That said, a common scenario might be where an organization is hosting both their public-facing website for their customers, as well as a completely separate intranet, designed specifically for the employees. In this scenario, you might want to be able to share the user groups for both sites, so those users will not have to maintain two separate login accounts. If so, you could easily share the "User Pools" of one site, with the other.
Note: When sharing System User Pools, all users in the "Admin" group will have full administrator privileges on each site that is using its pool of System Users.
How to Share User Pools
To share User Pools, follow the steps below:
- From the back-end administration area of Mura, go to the site you wish to change the User Pool for.

- Select Site Settings from the main navigation, and then click Edit Settings.
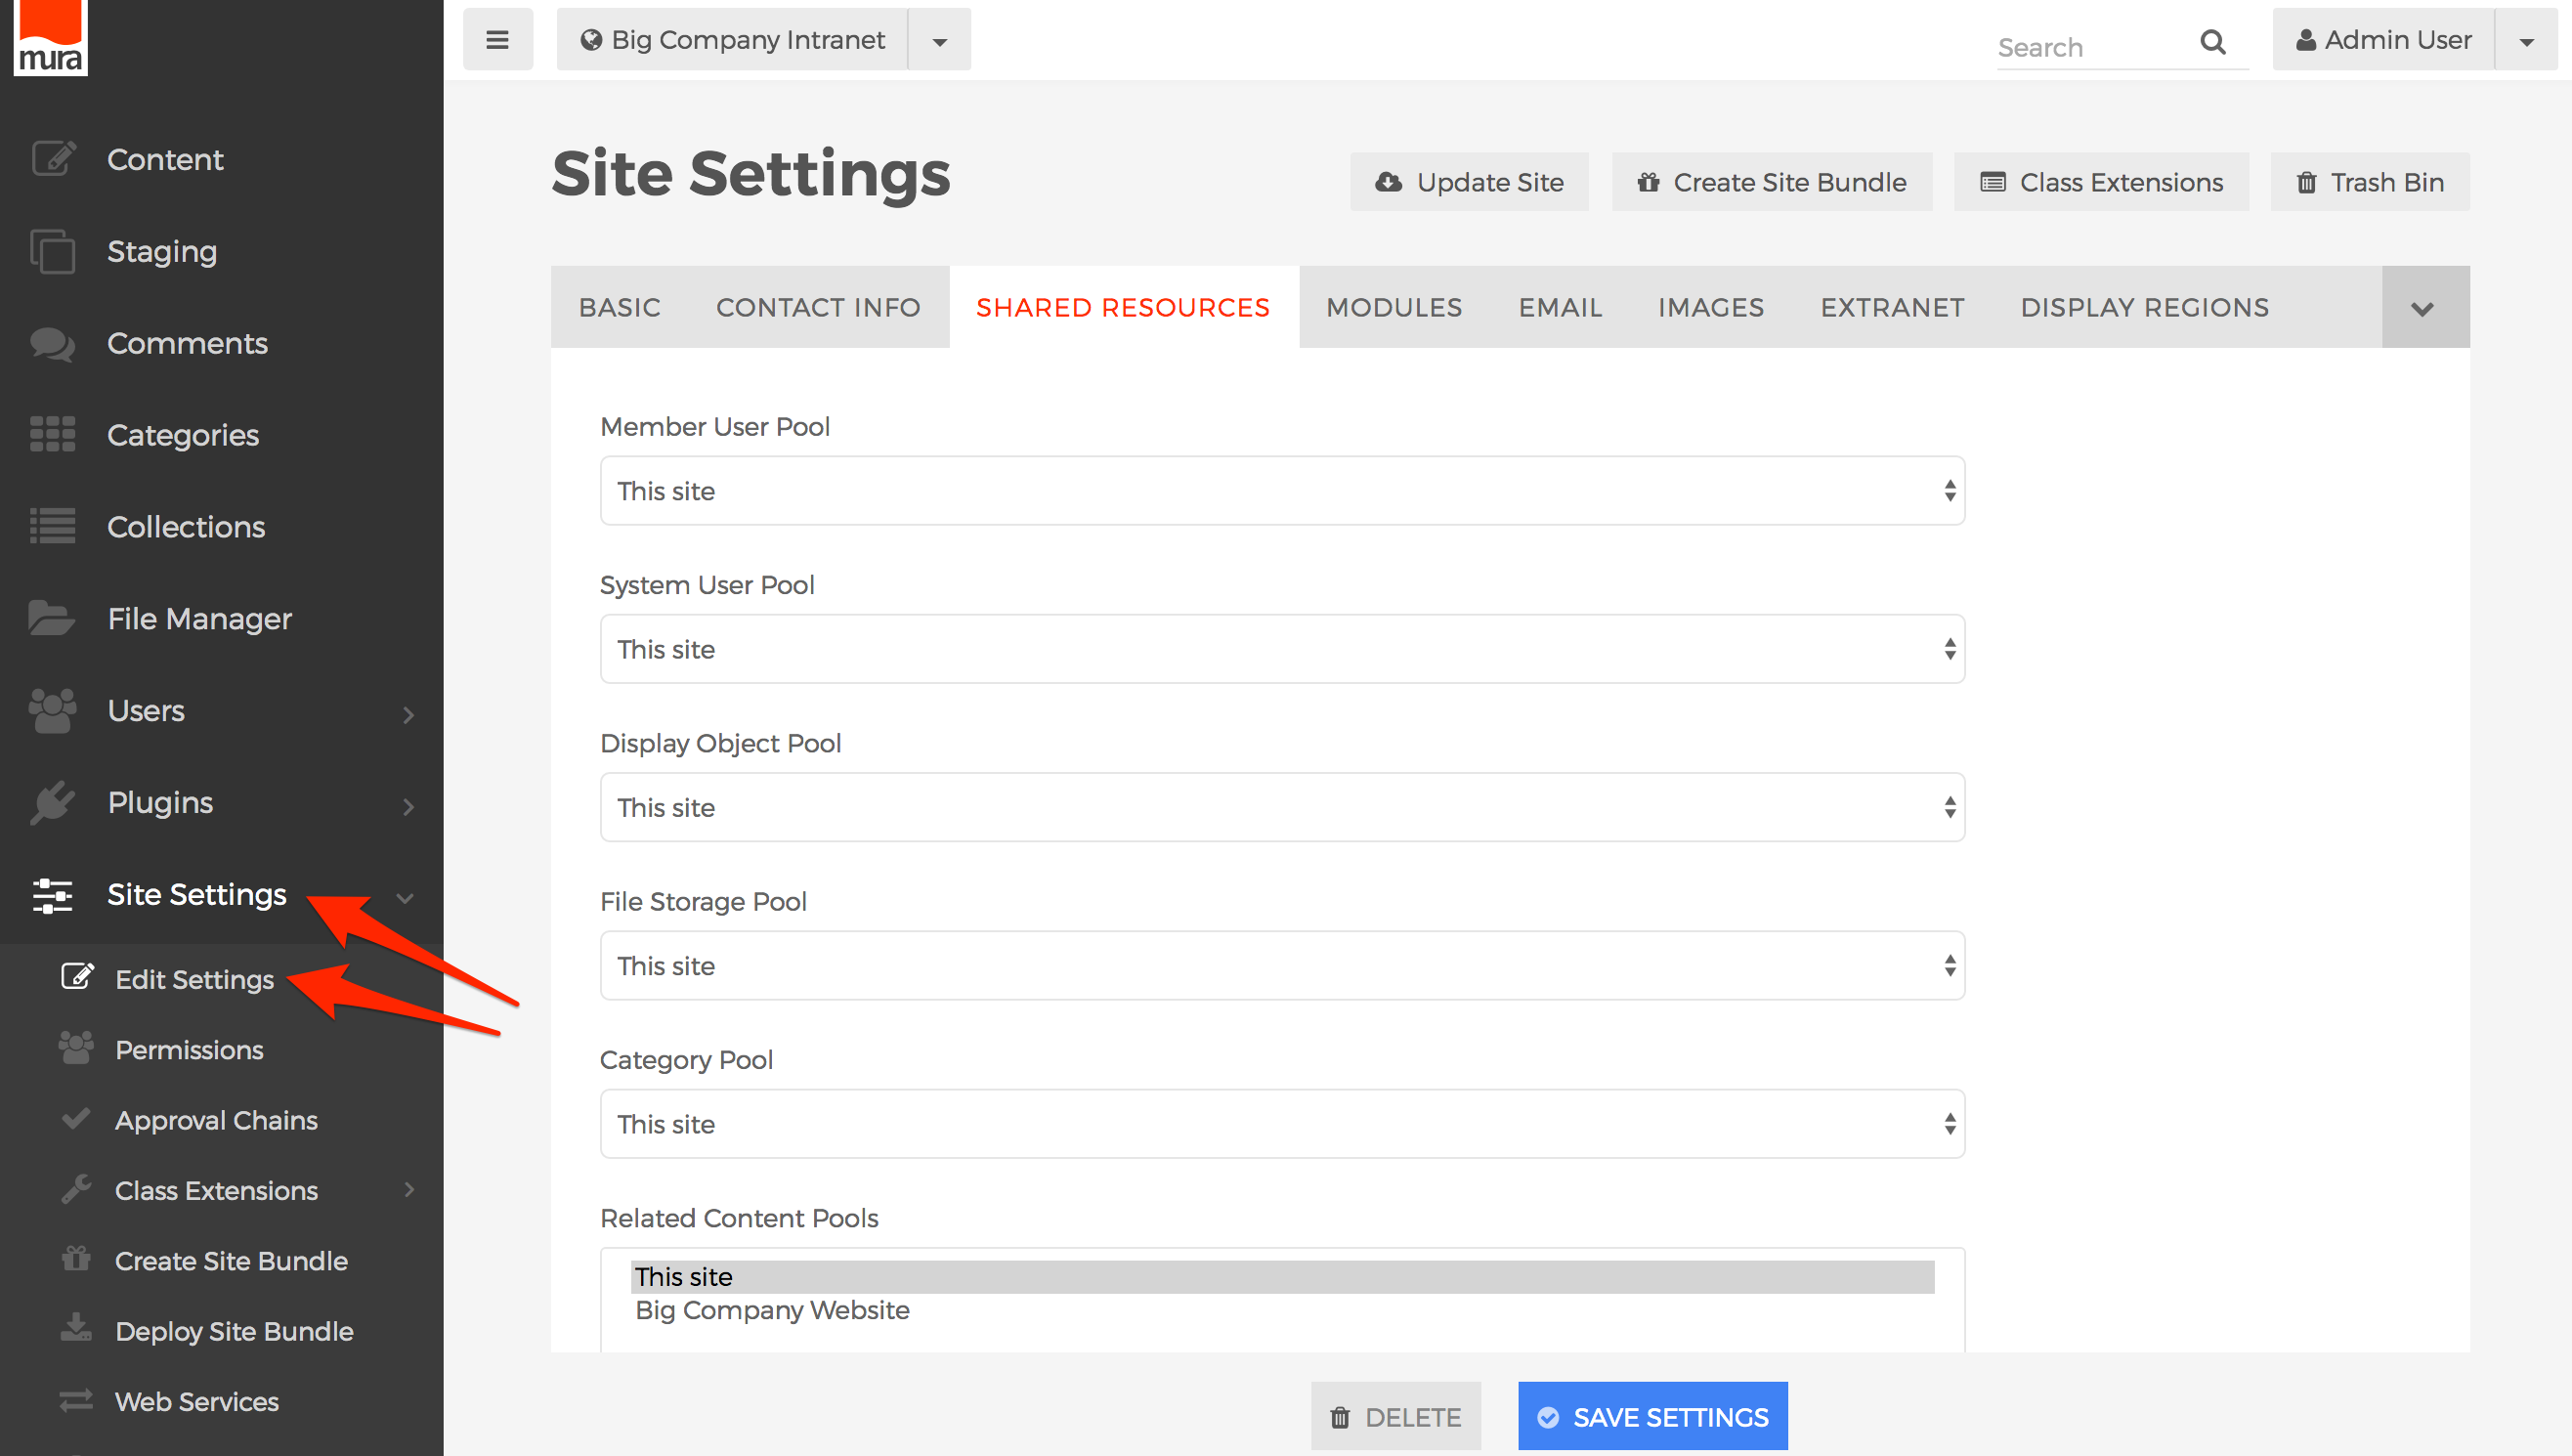
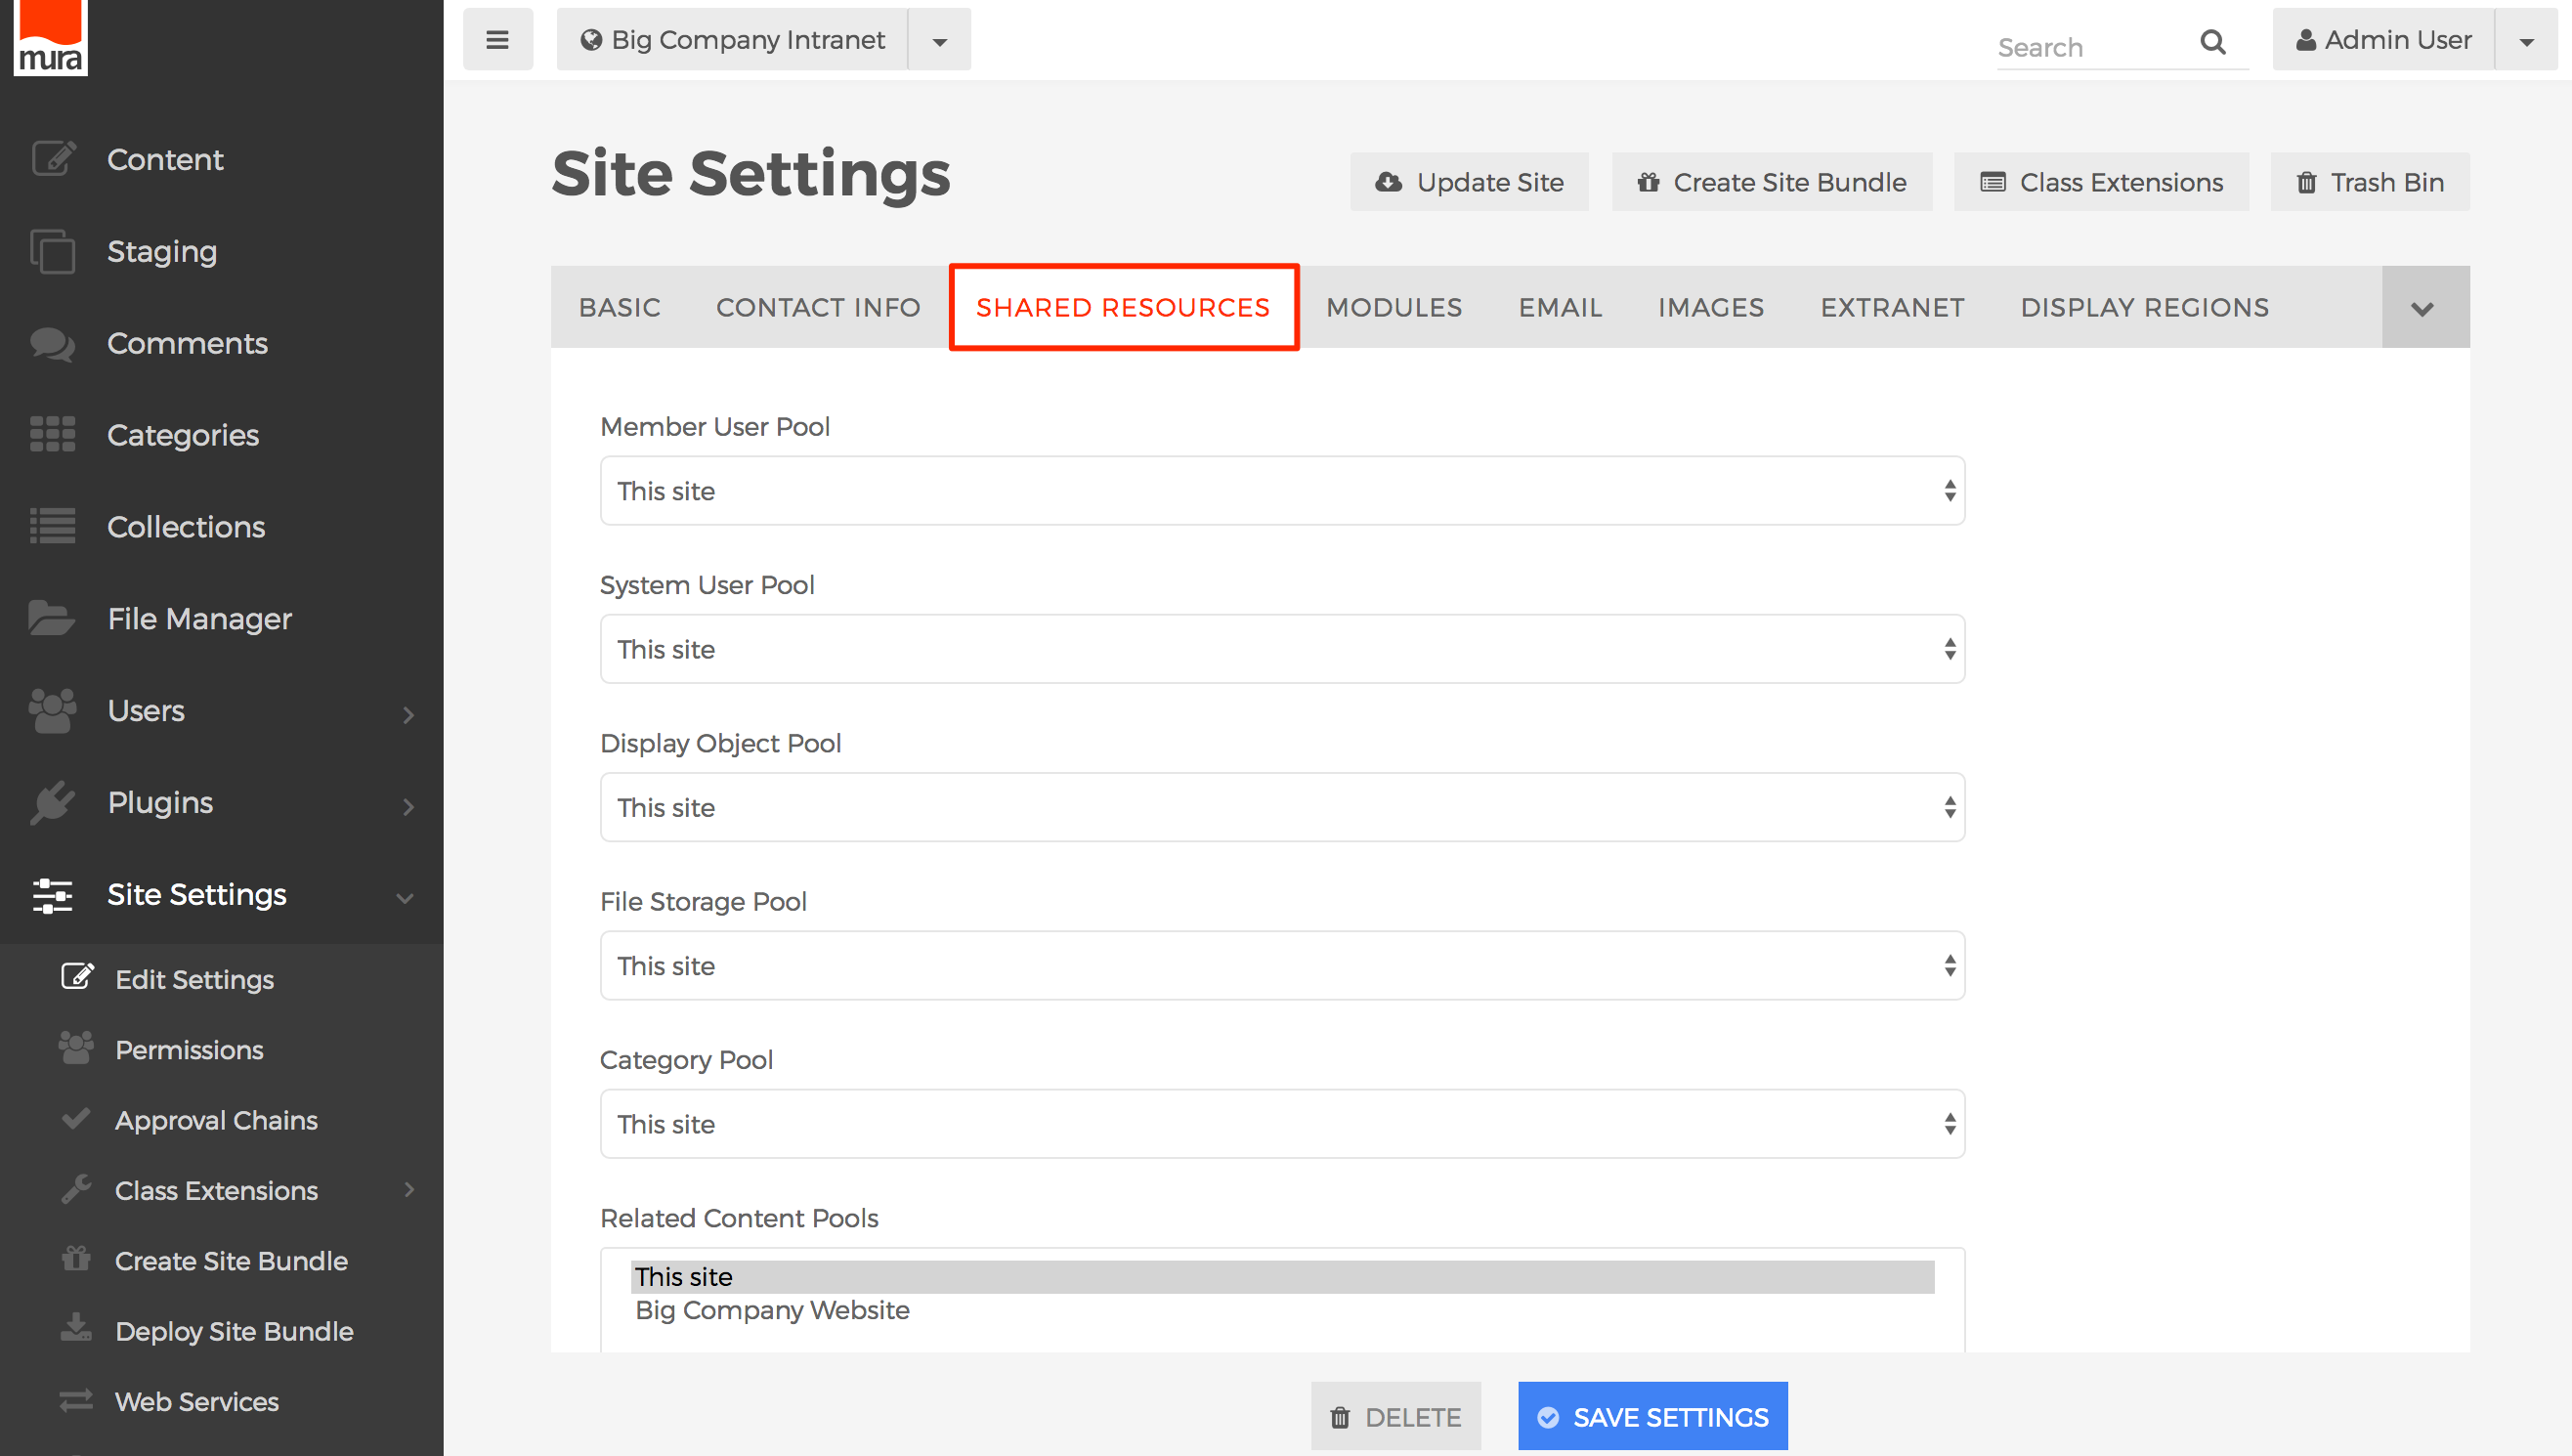
- Click the Shared Resources tab to reveal all of the available "pools" you can share.

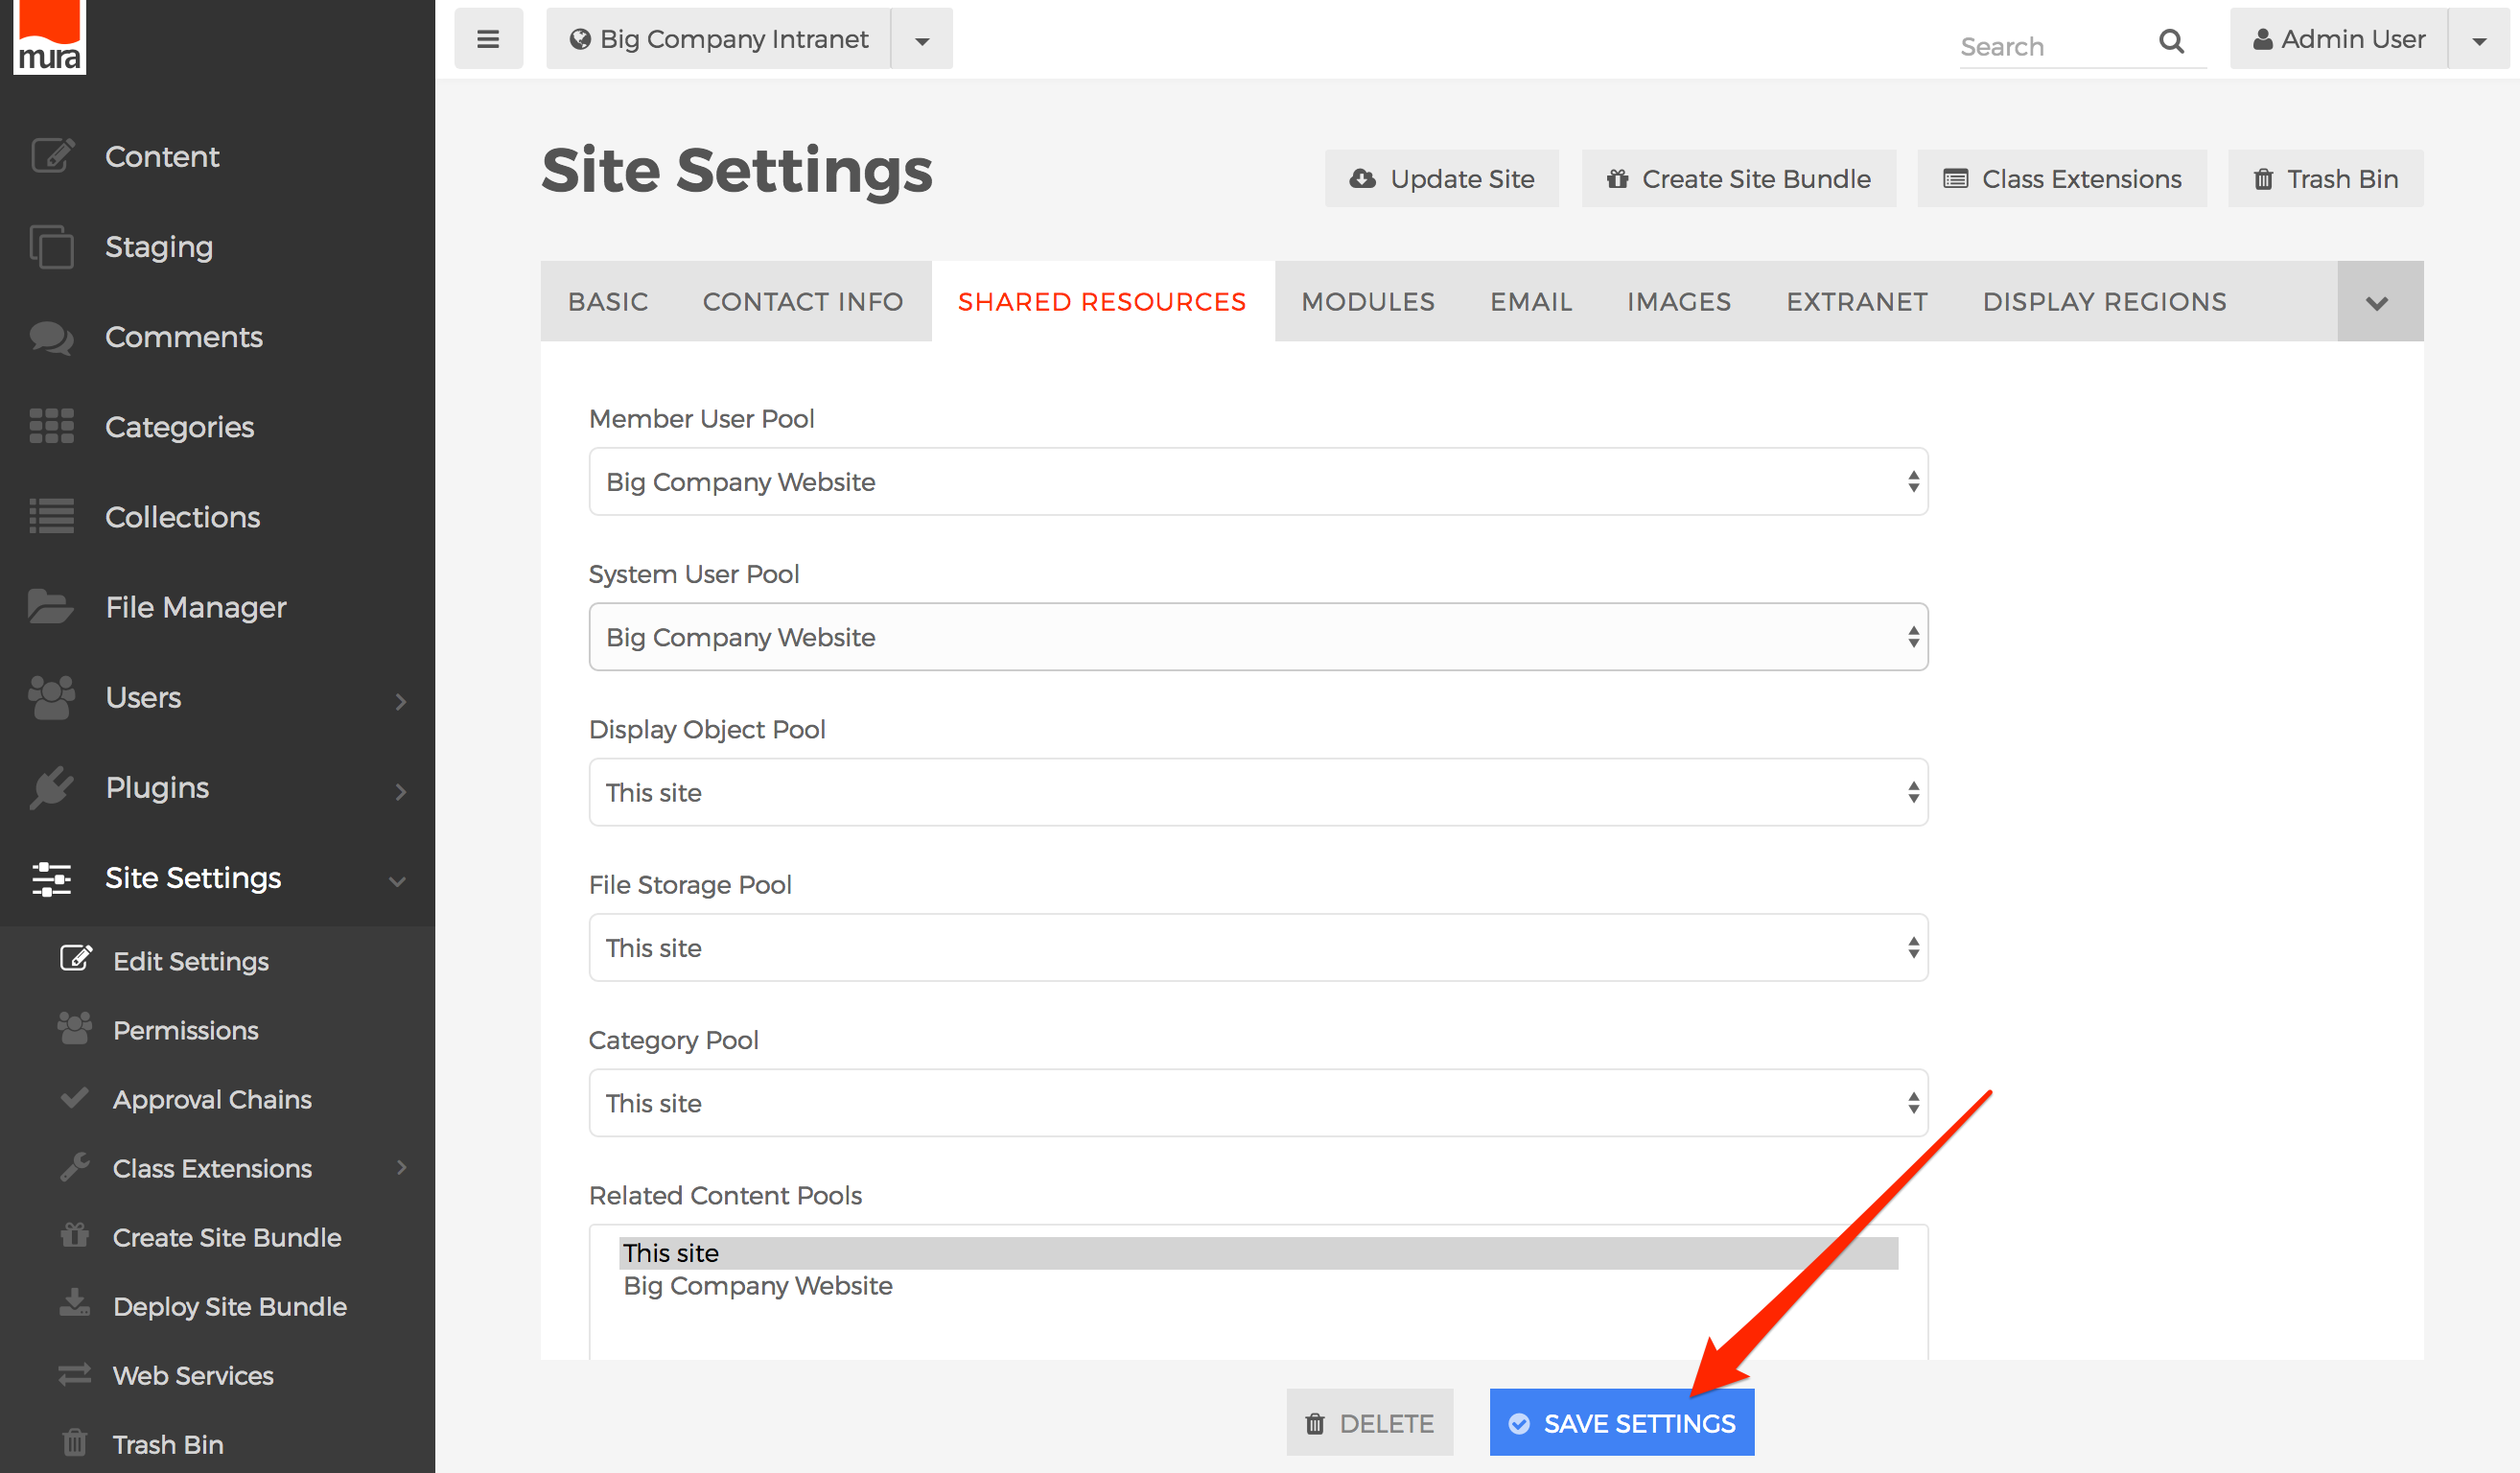
- If you would like to use the Member User Pool of another site, select it from the dropdown menu.
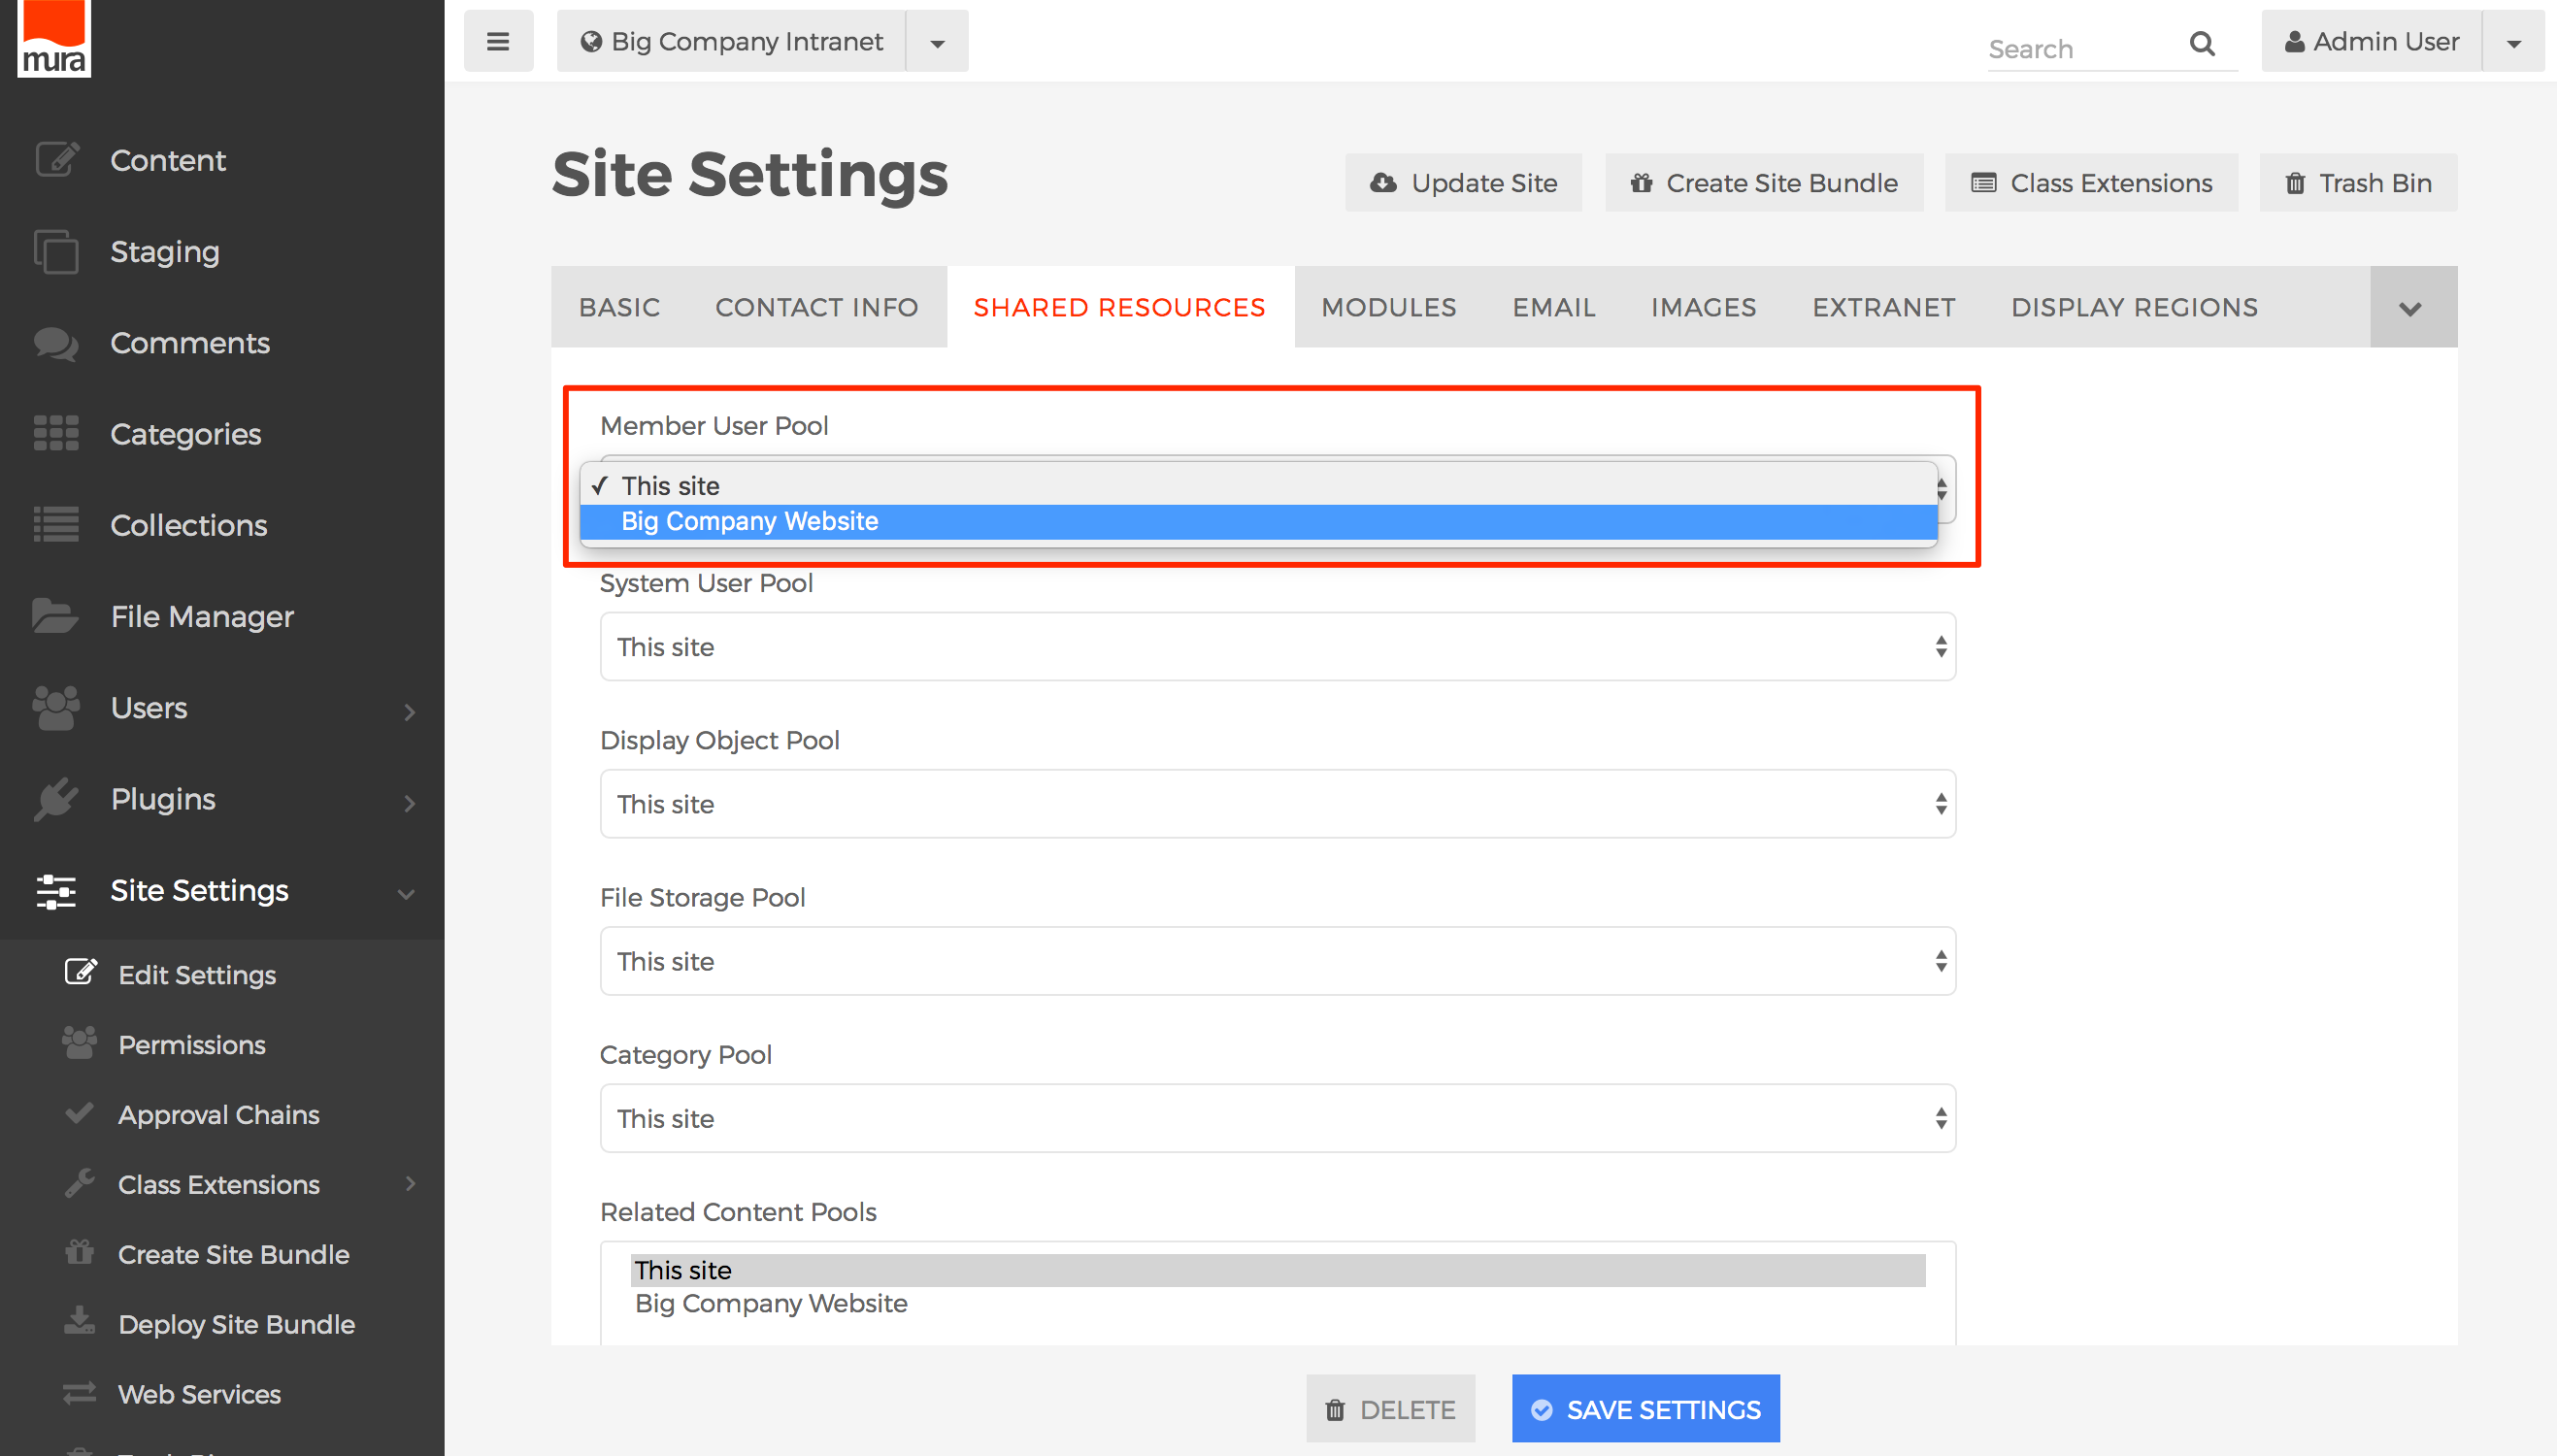
- If you would like to use the System User Pool of another site, select the desired site from the dropdown menu.
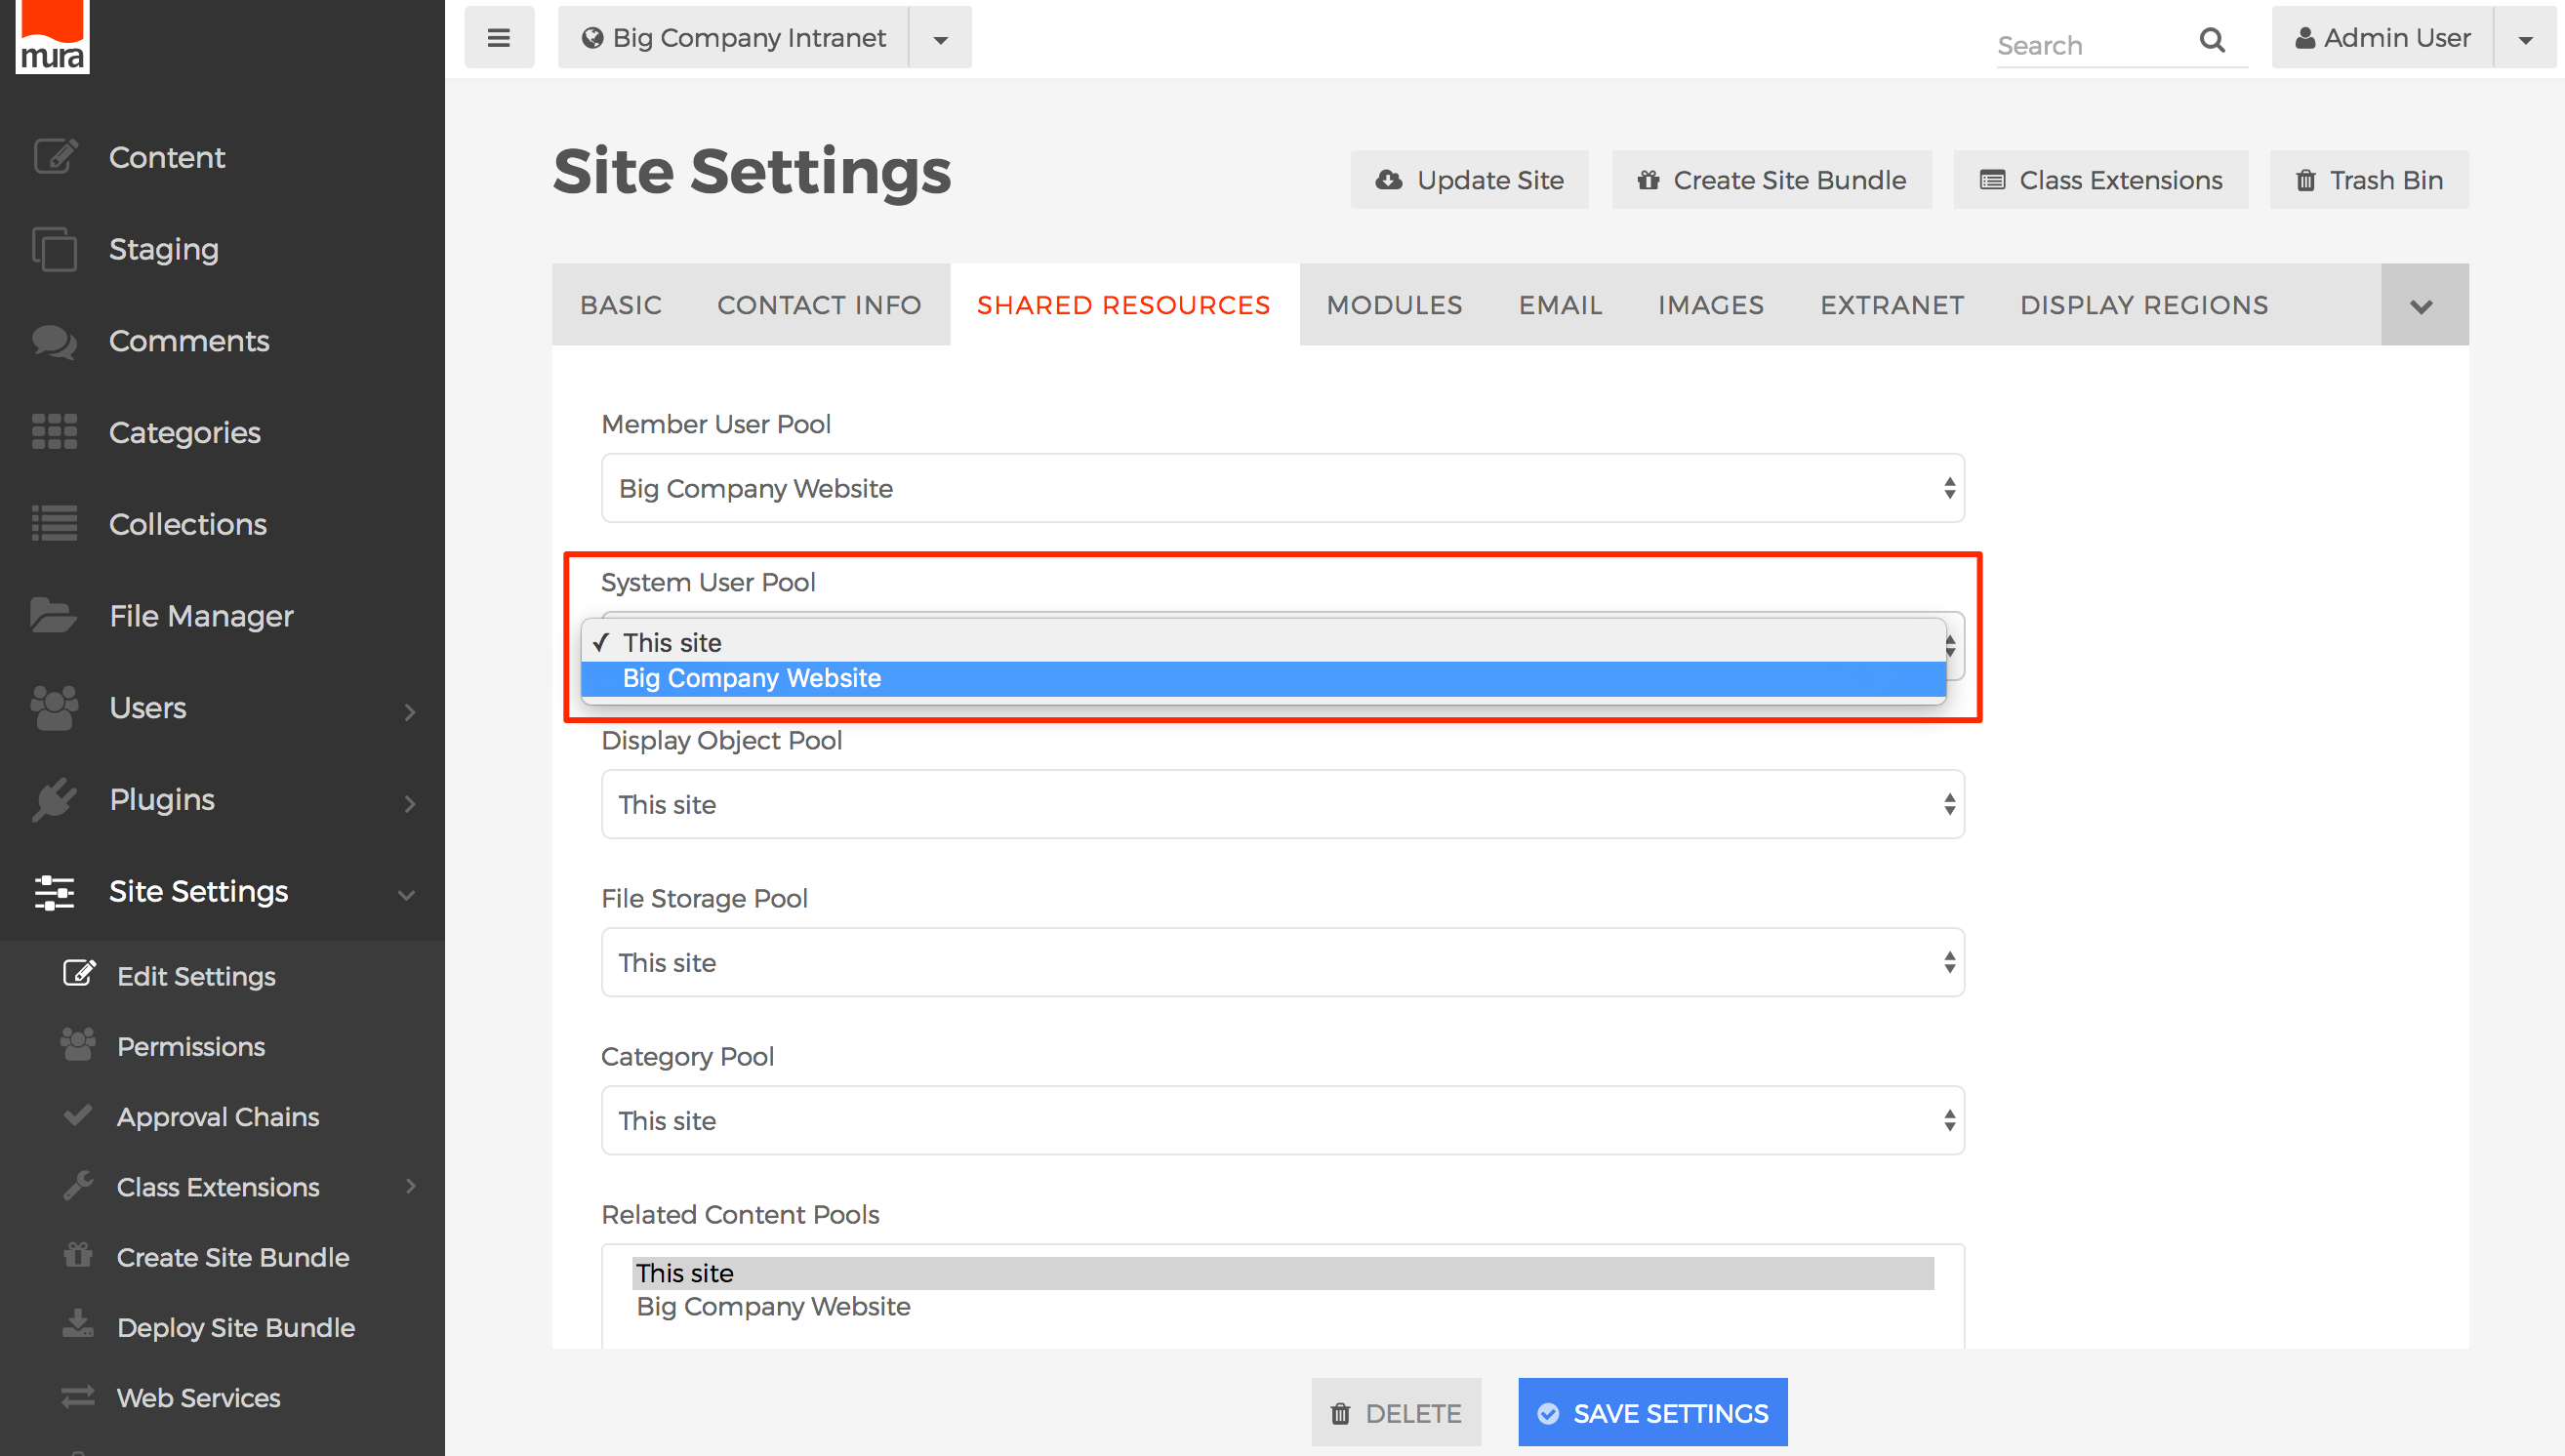
- Click the Save Settings button to save your changes.

- Next, you will need to establish the permissions for each group.


Site Permissions
Once you've established your user groups, created users and assigned them to those groups, and chosen whether or not to share User Pools across your various sites, you need to let Mura know which group(s) will be able to access each, specific site managed under the same installation of Mura. The only exception to this step is the default "Admin" group, which automatically has access and full editing privileges throughout their specific site.
Allowing access to each specific site merely means that users assigned to the group will be able to log in to the site. It will be up to you to establish the roles and privileges each group has throughout the various sections of your site. Also keep in mind, System Groups will be able to access the back-end administration area of Mura, and Member Groups will not be able to. This means users assigned to a "Member Group" will only be able to access the front-end editing features of a site, assuming you've granted them access to the site, and given them the appropriate permissions to do so.
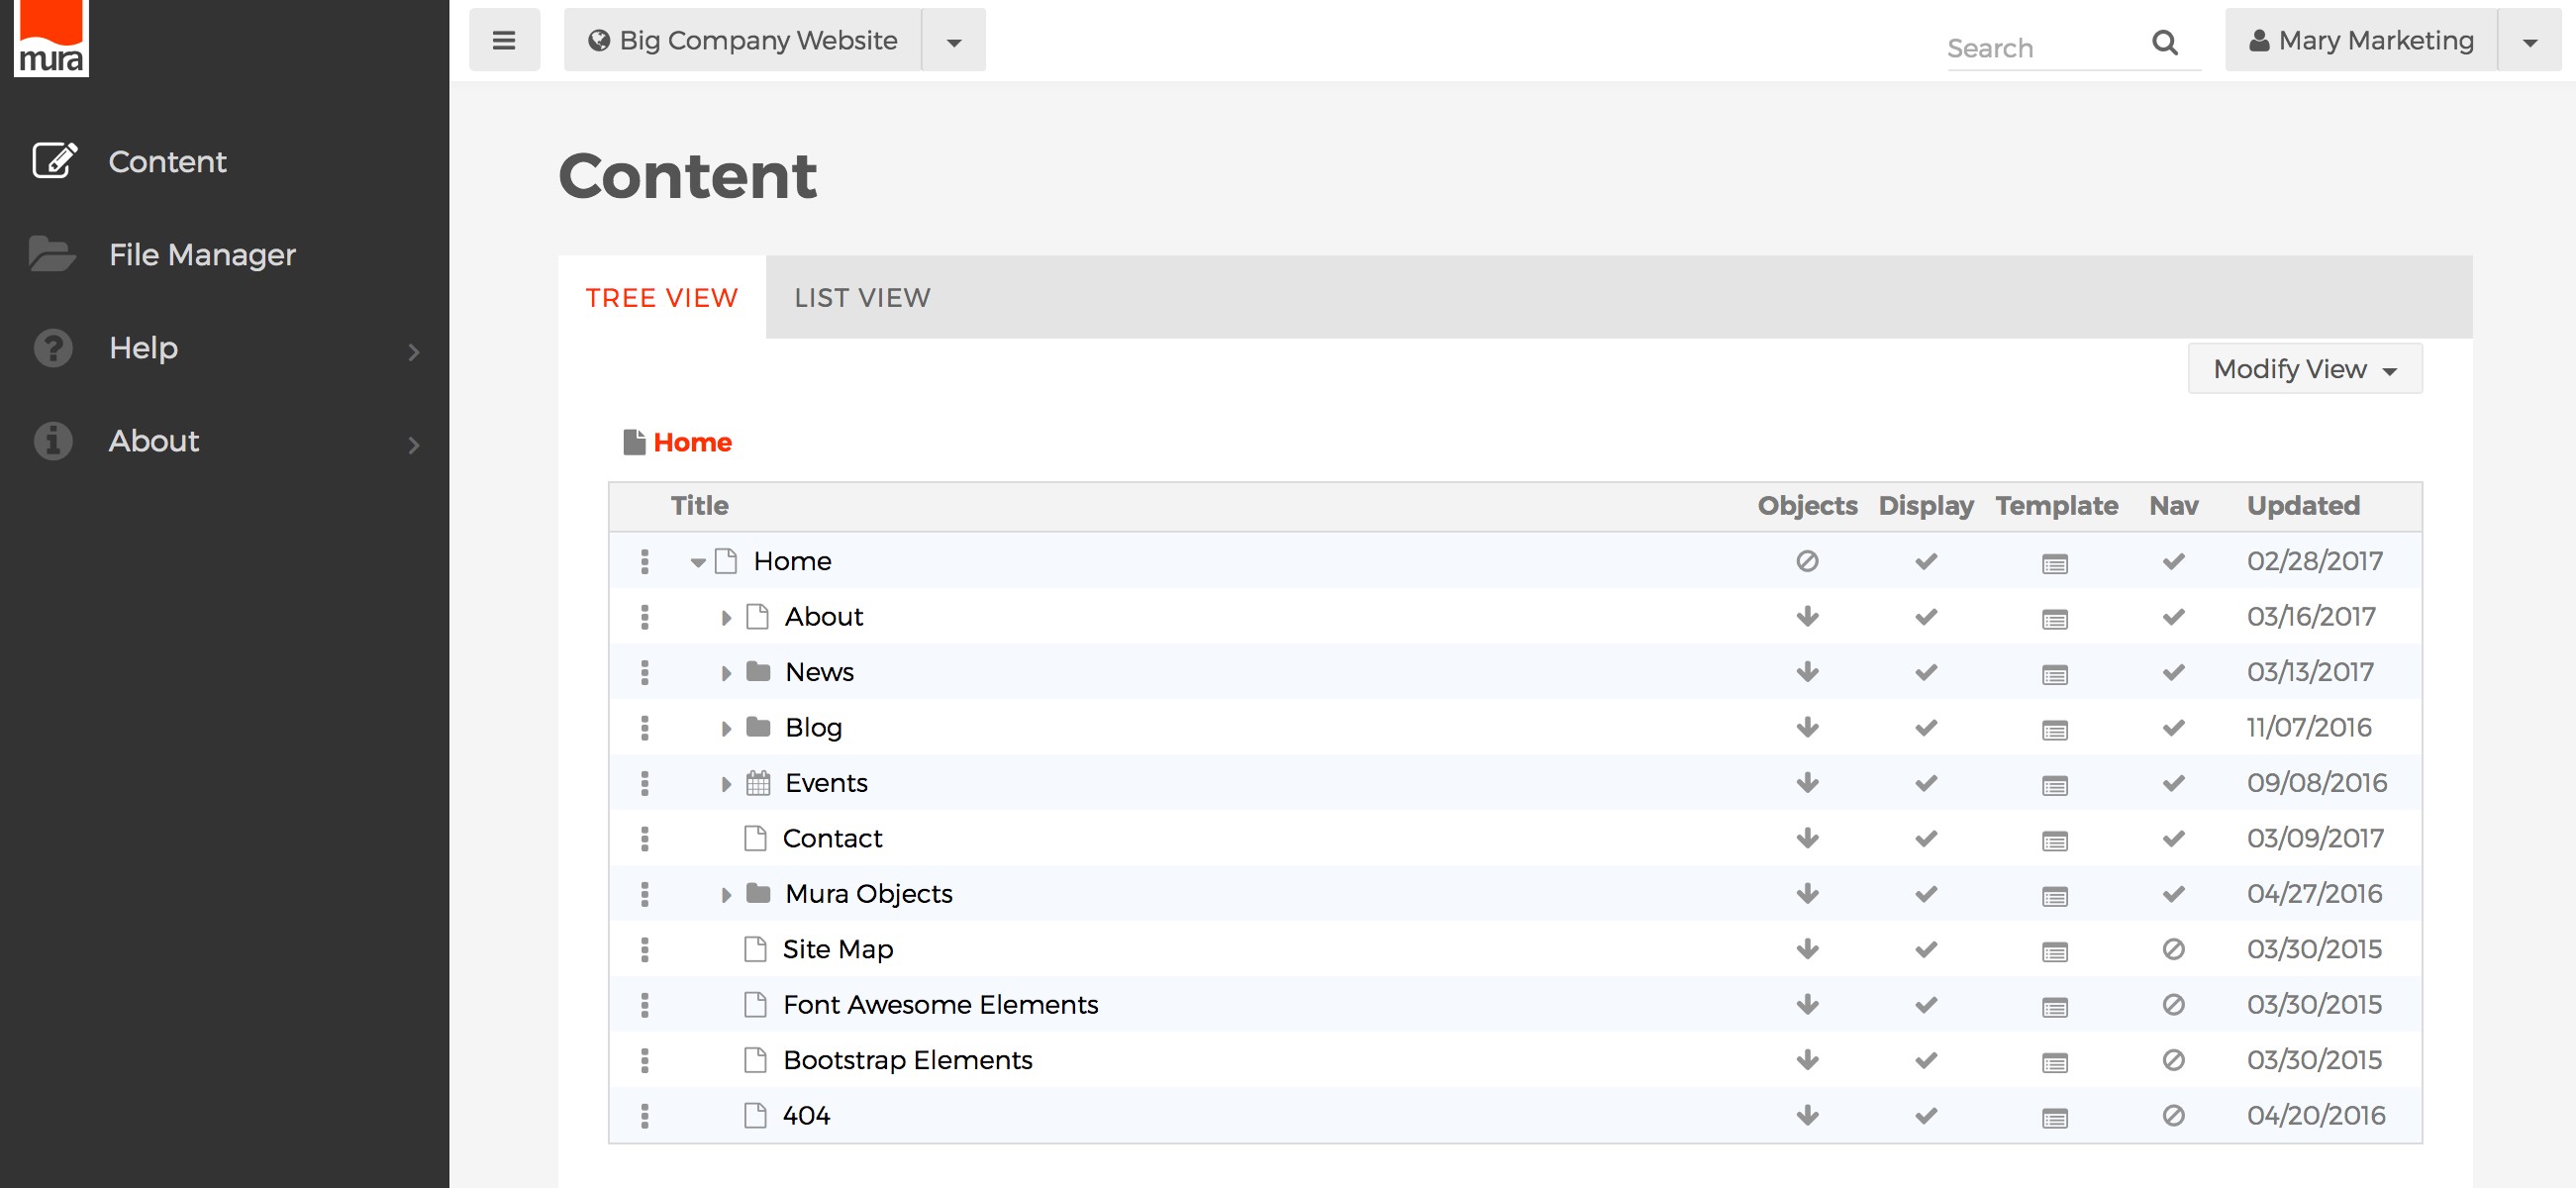
If you skip this step, or forget to allow any groups access to the site, only users who belong to the "Admin" group will be able to access anything. For example, if a user named Mary Marketing were assigned to the System Group labeled "Marketing" and attempted to log in to the back-end administration area, she would see the following "Access Denied" screen, if her group were not granted access to the site.

So, if a user informs you they see the "Access Denied" screen, you should check to make sure the user has been assigned to the proper group(s) and verify whether or not you need to grant their group(s) access to the site.
How to Allow Groups Access
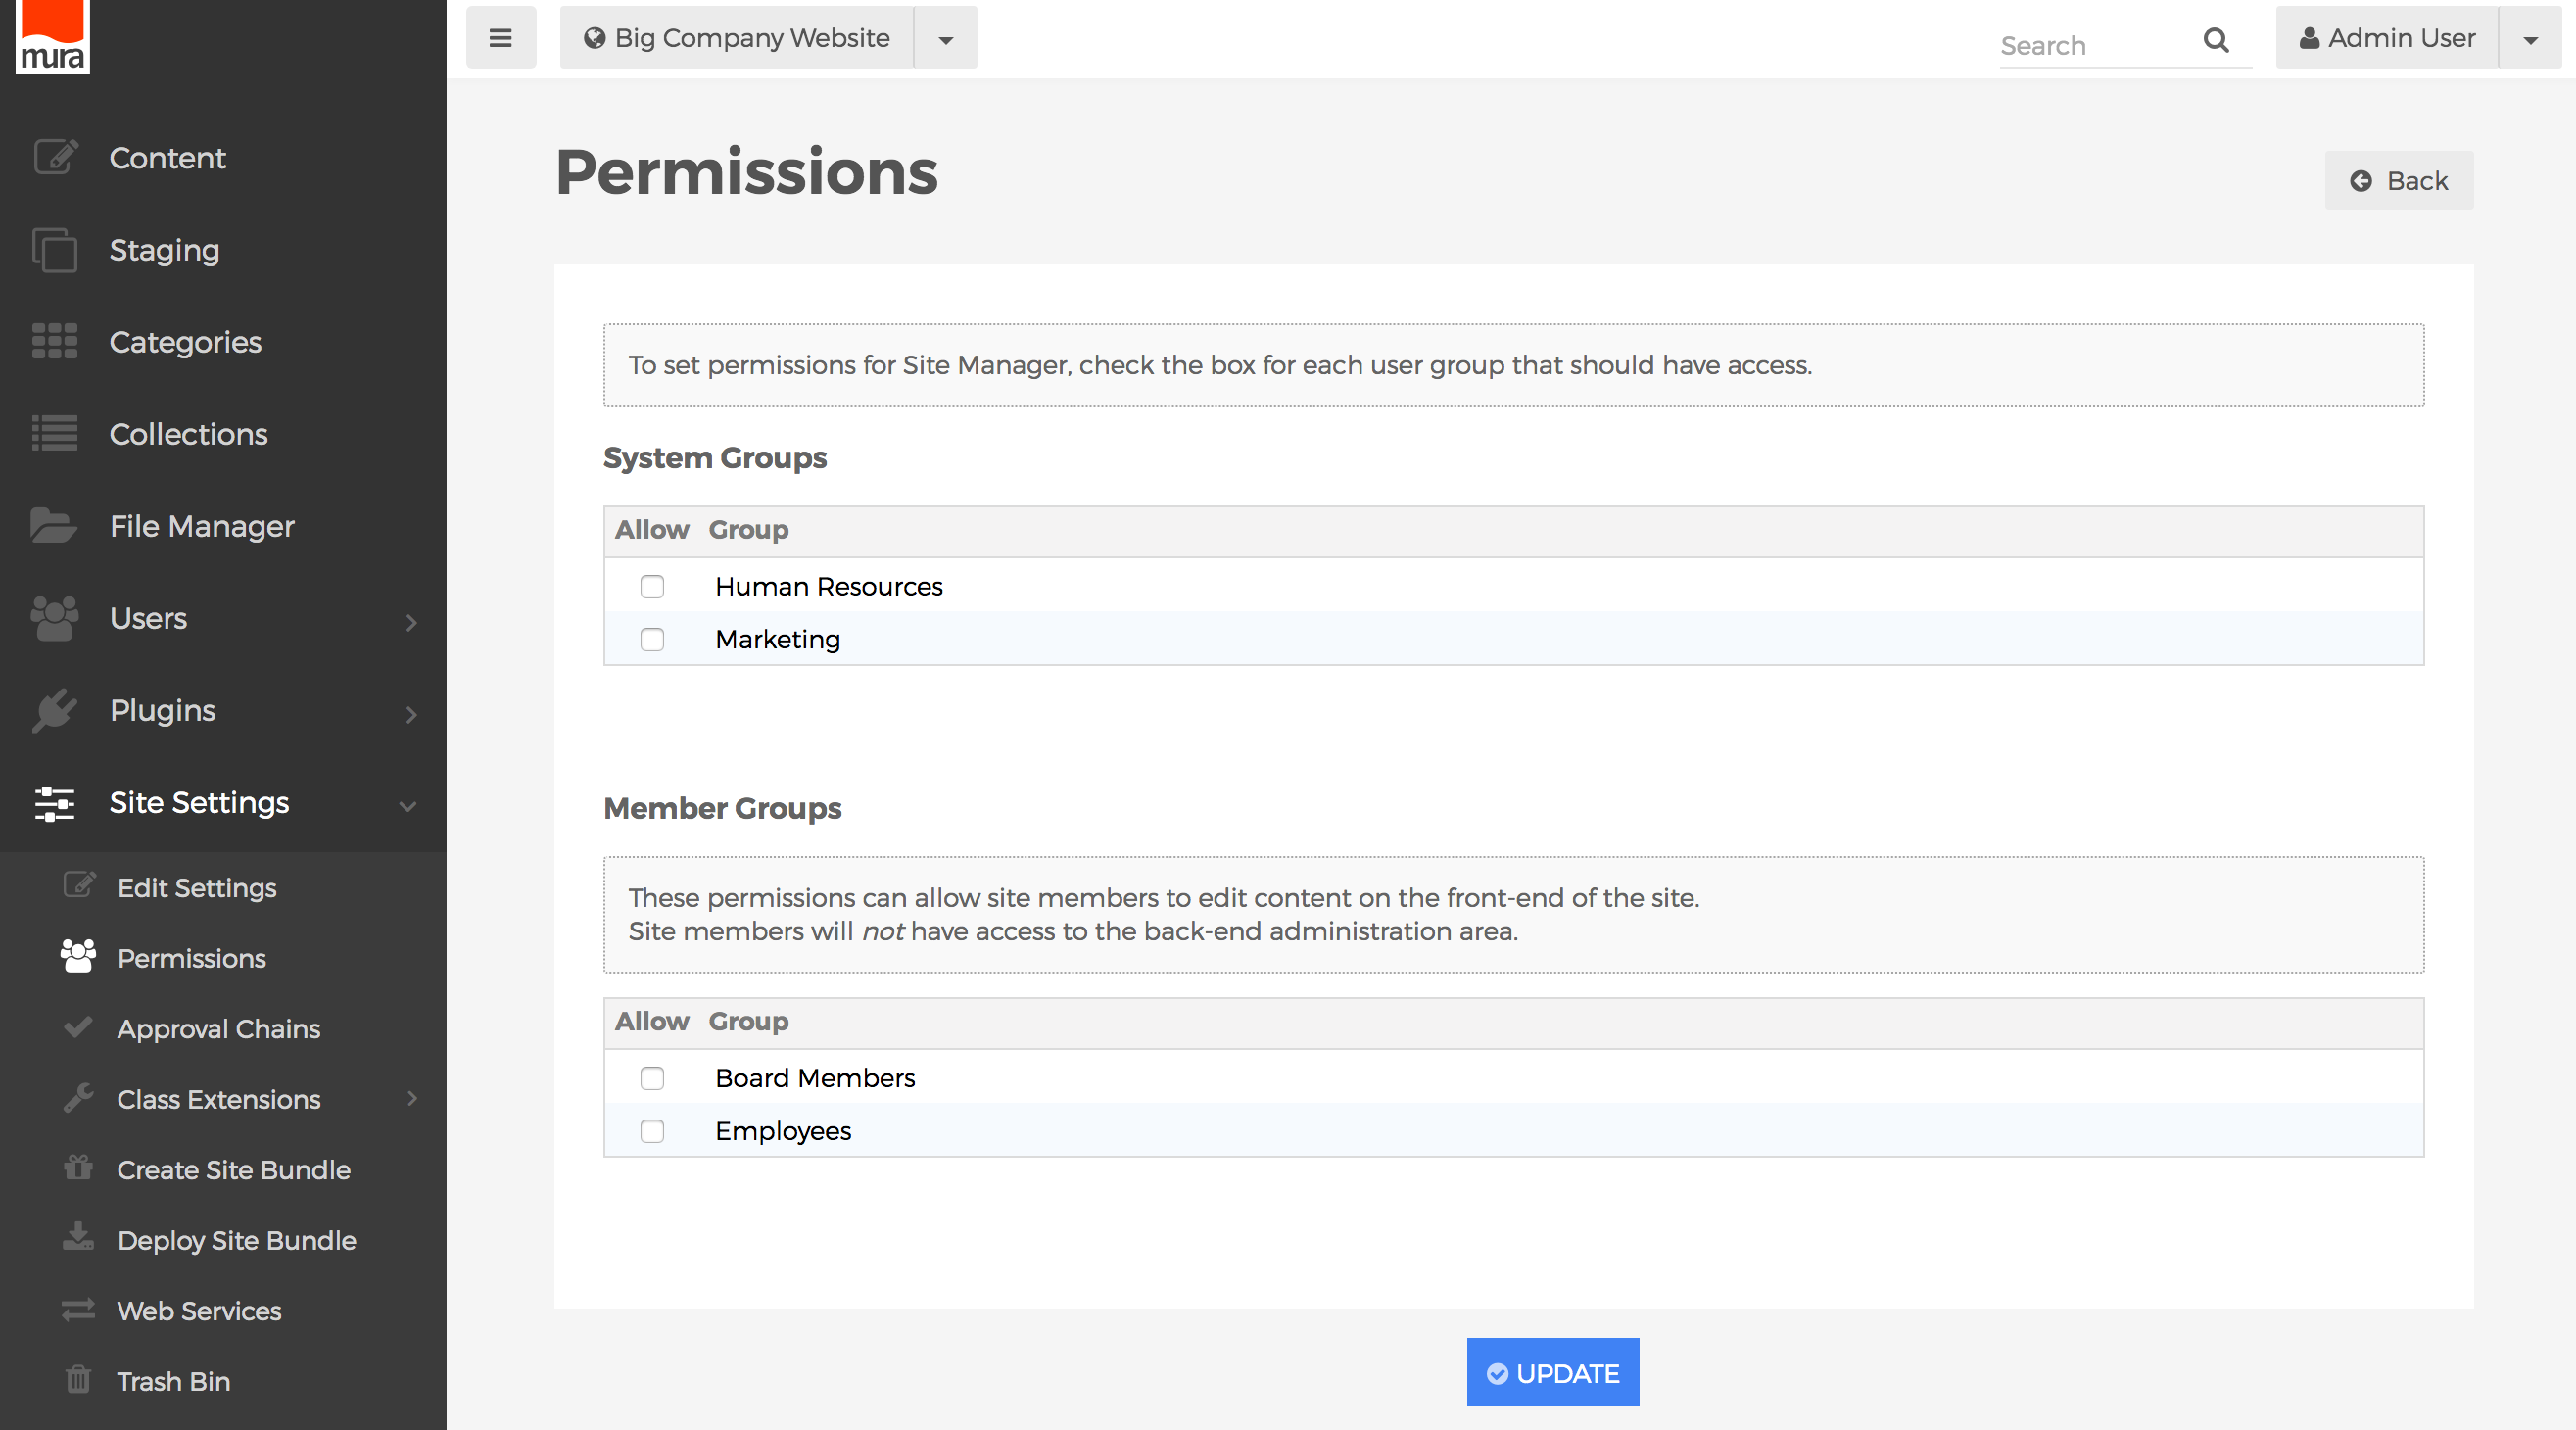
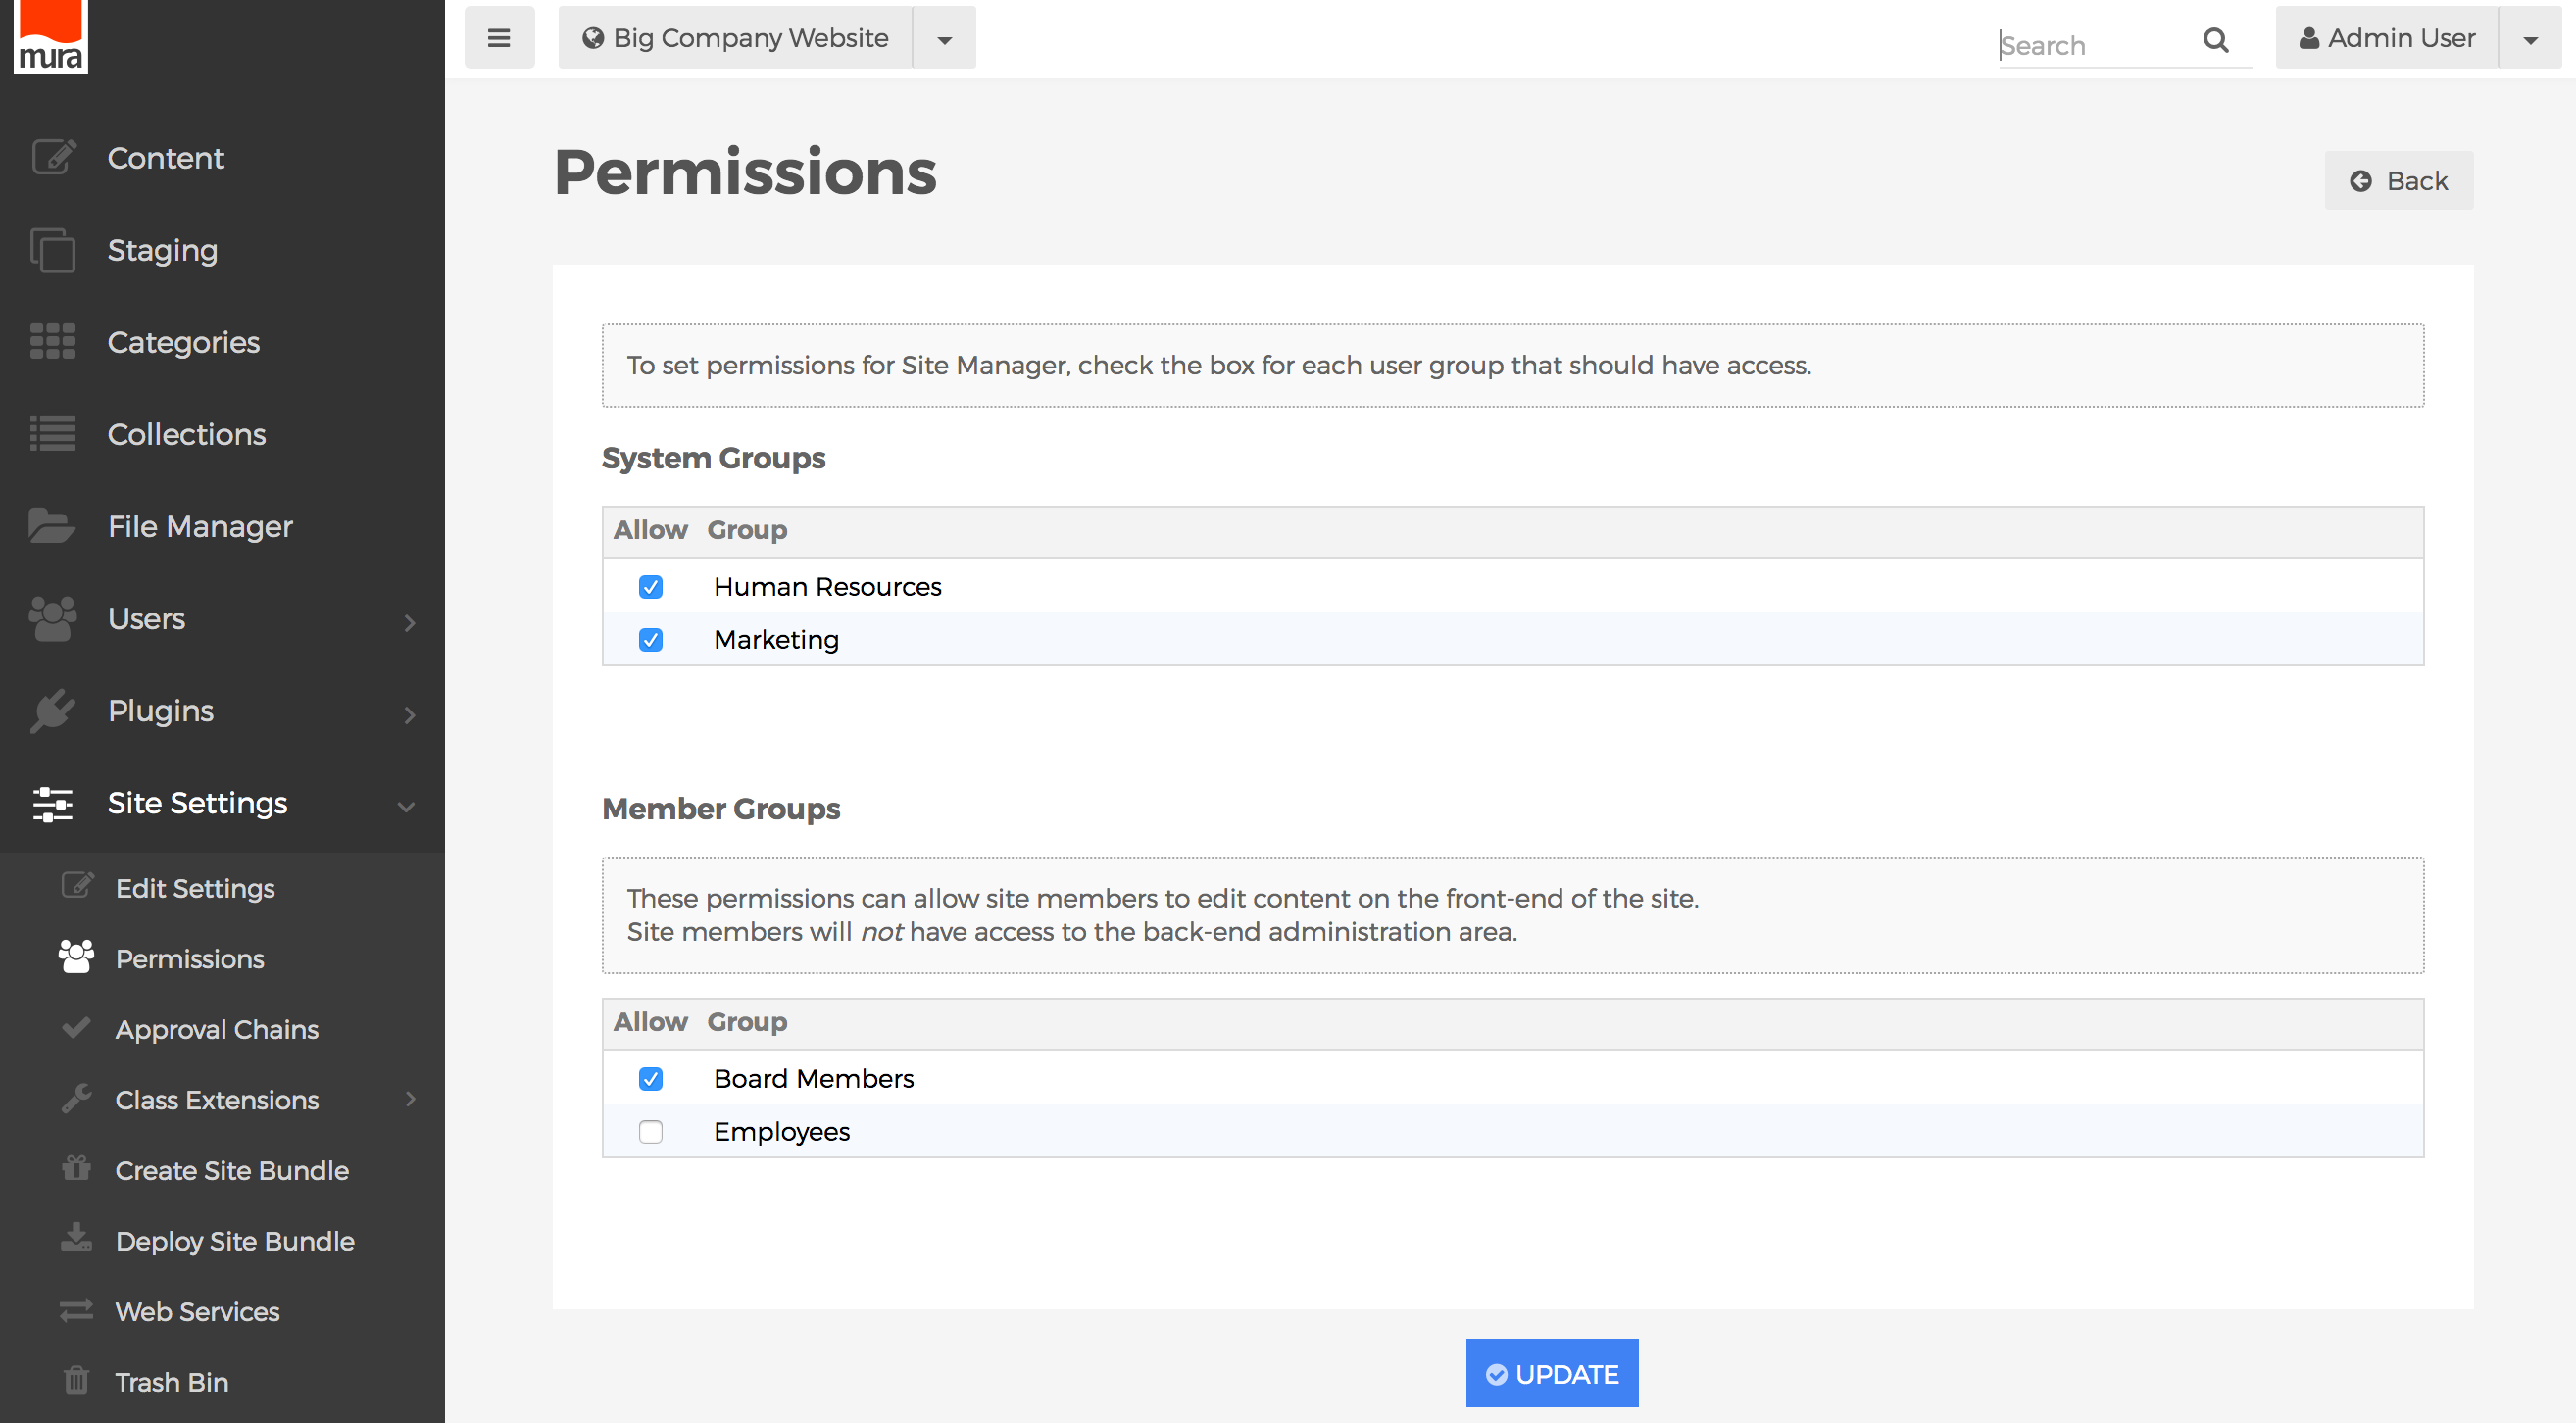
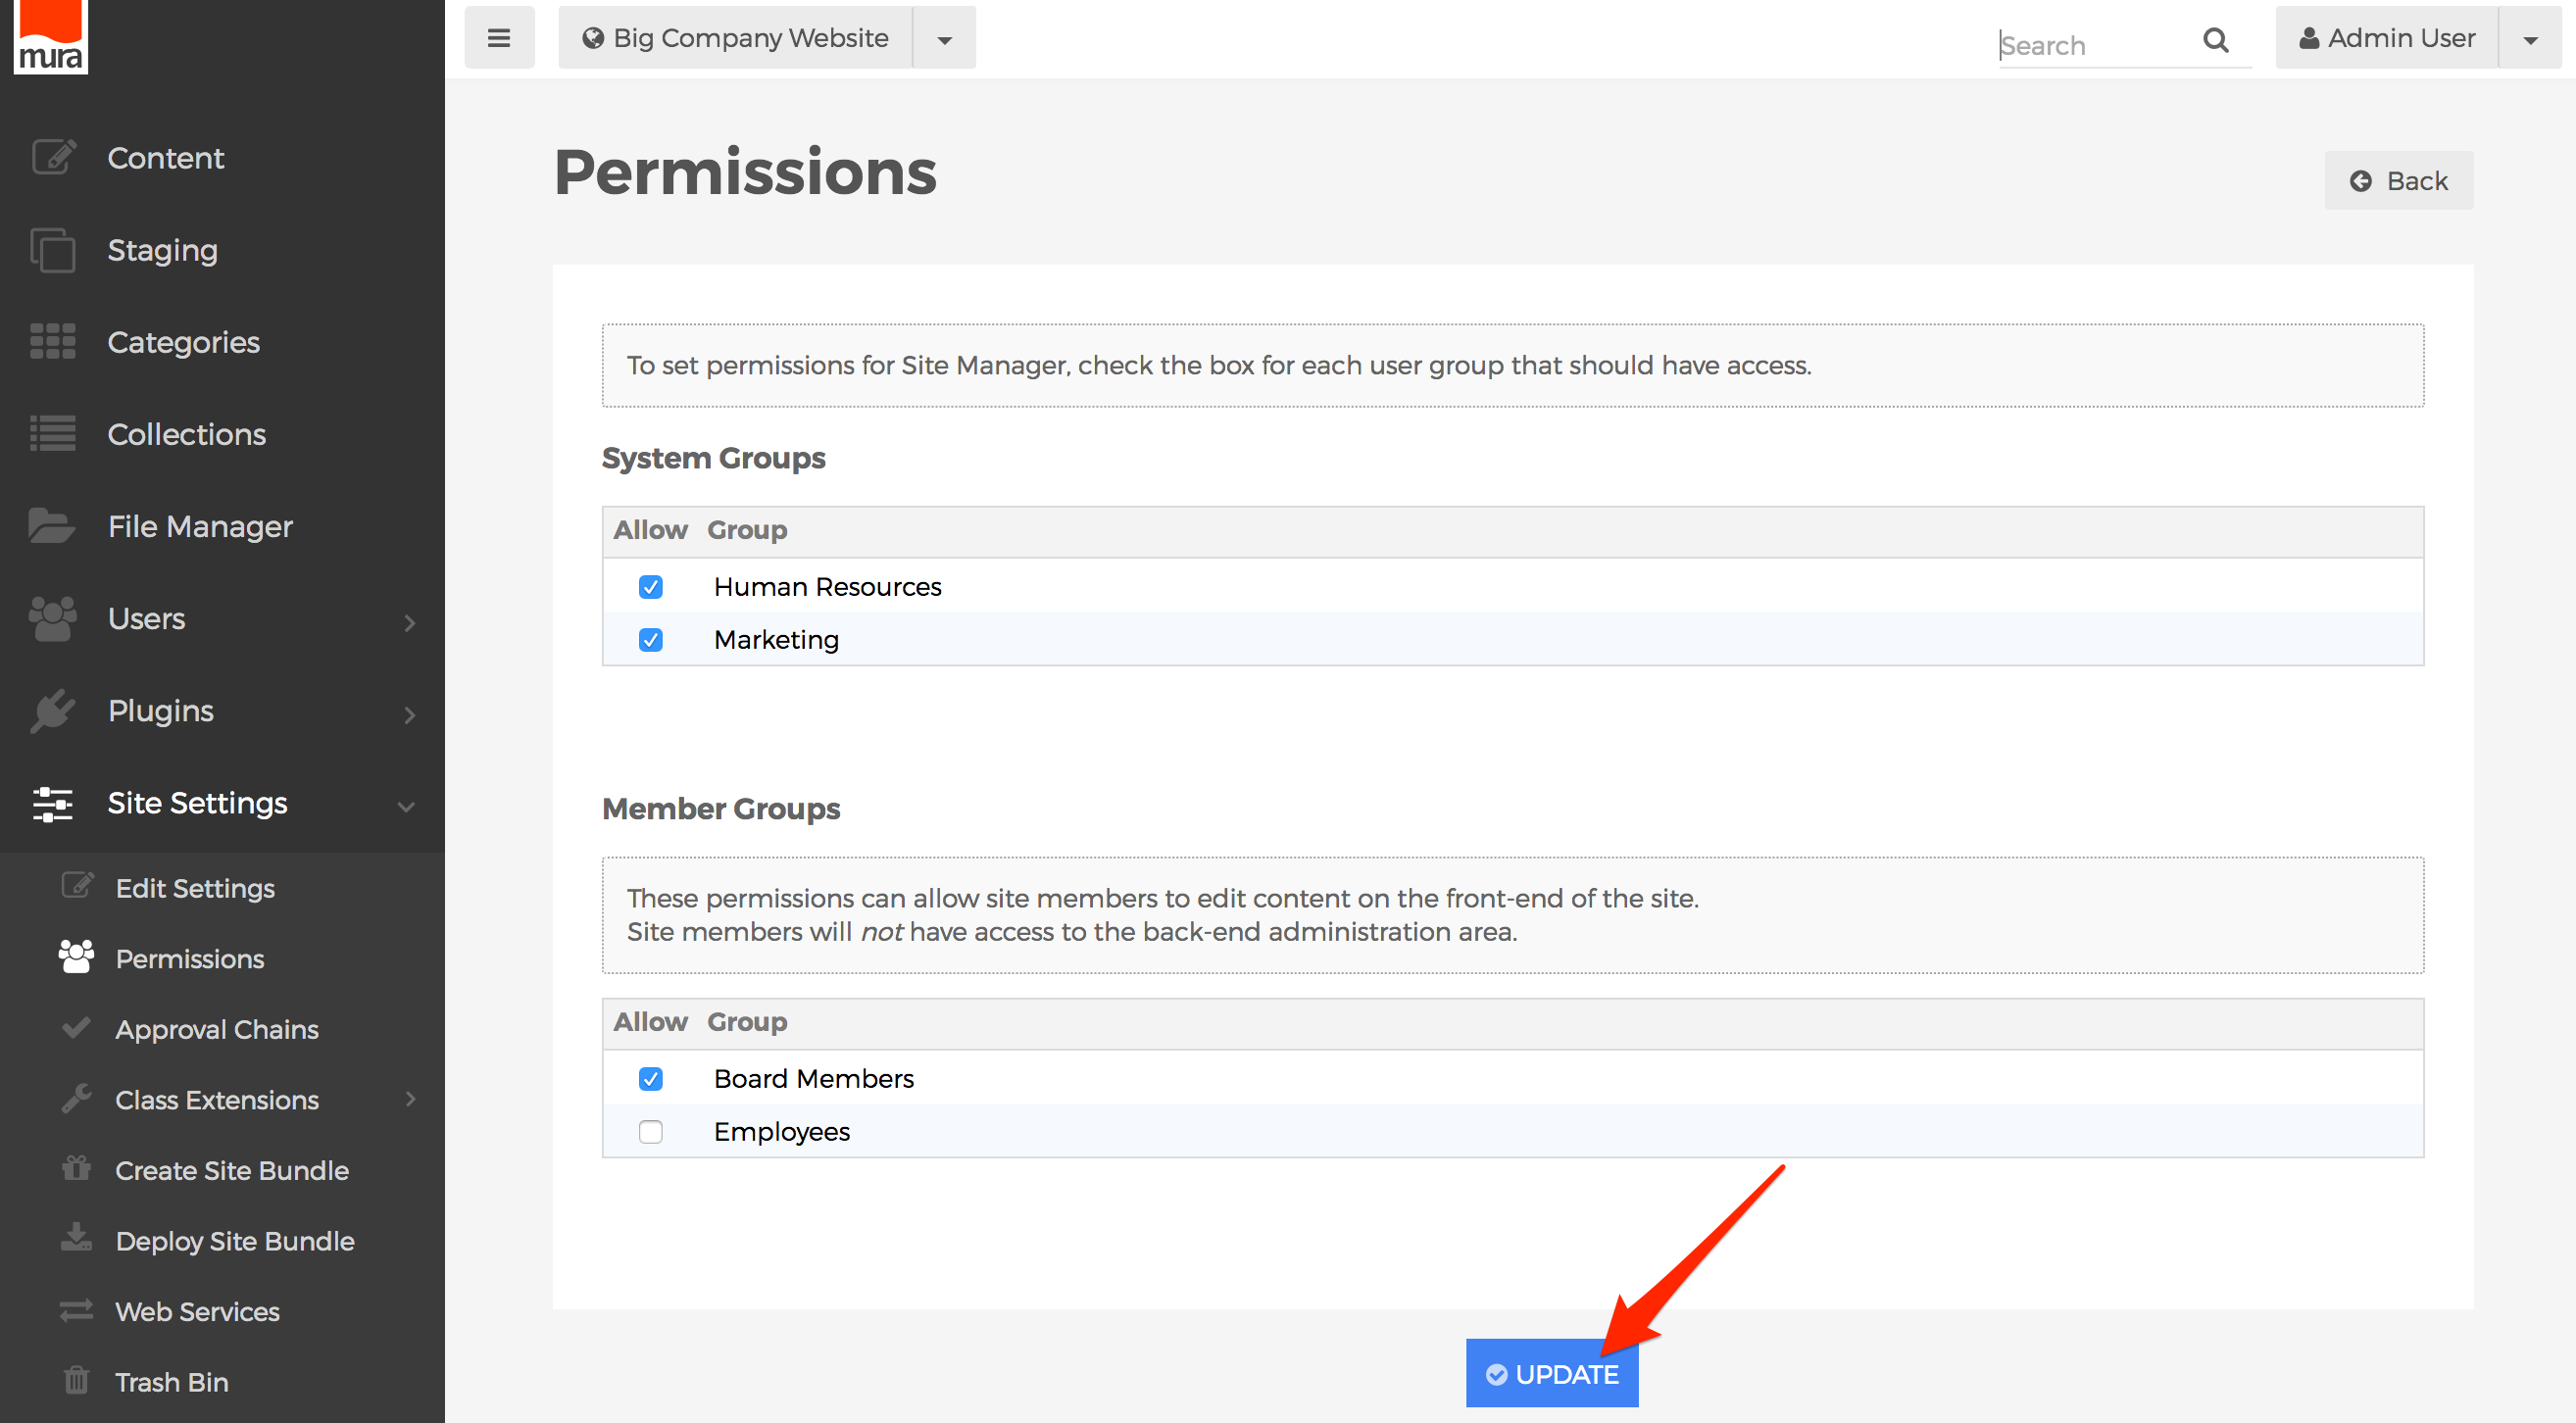
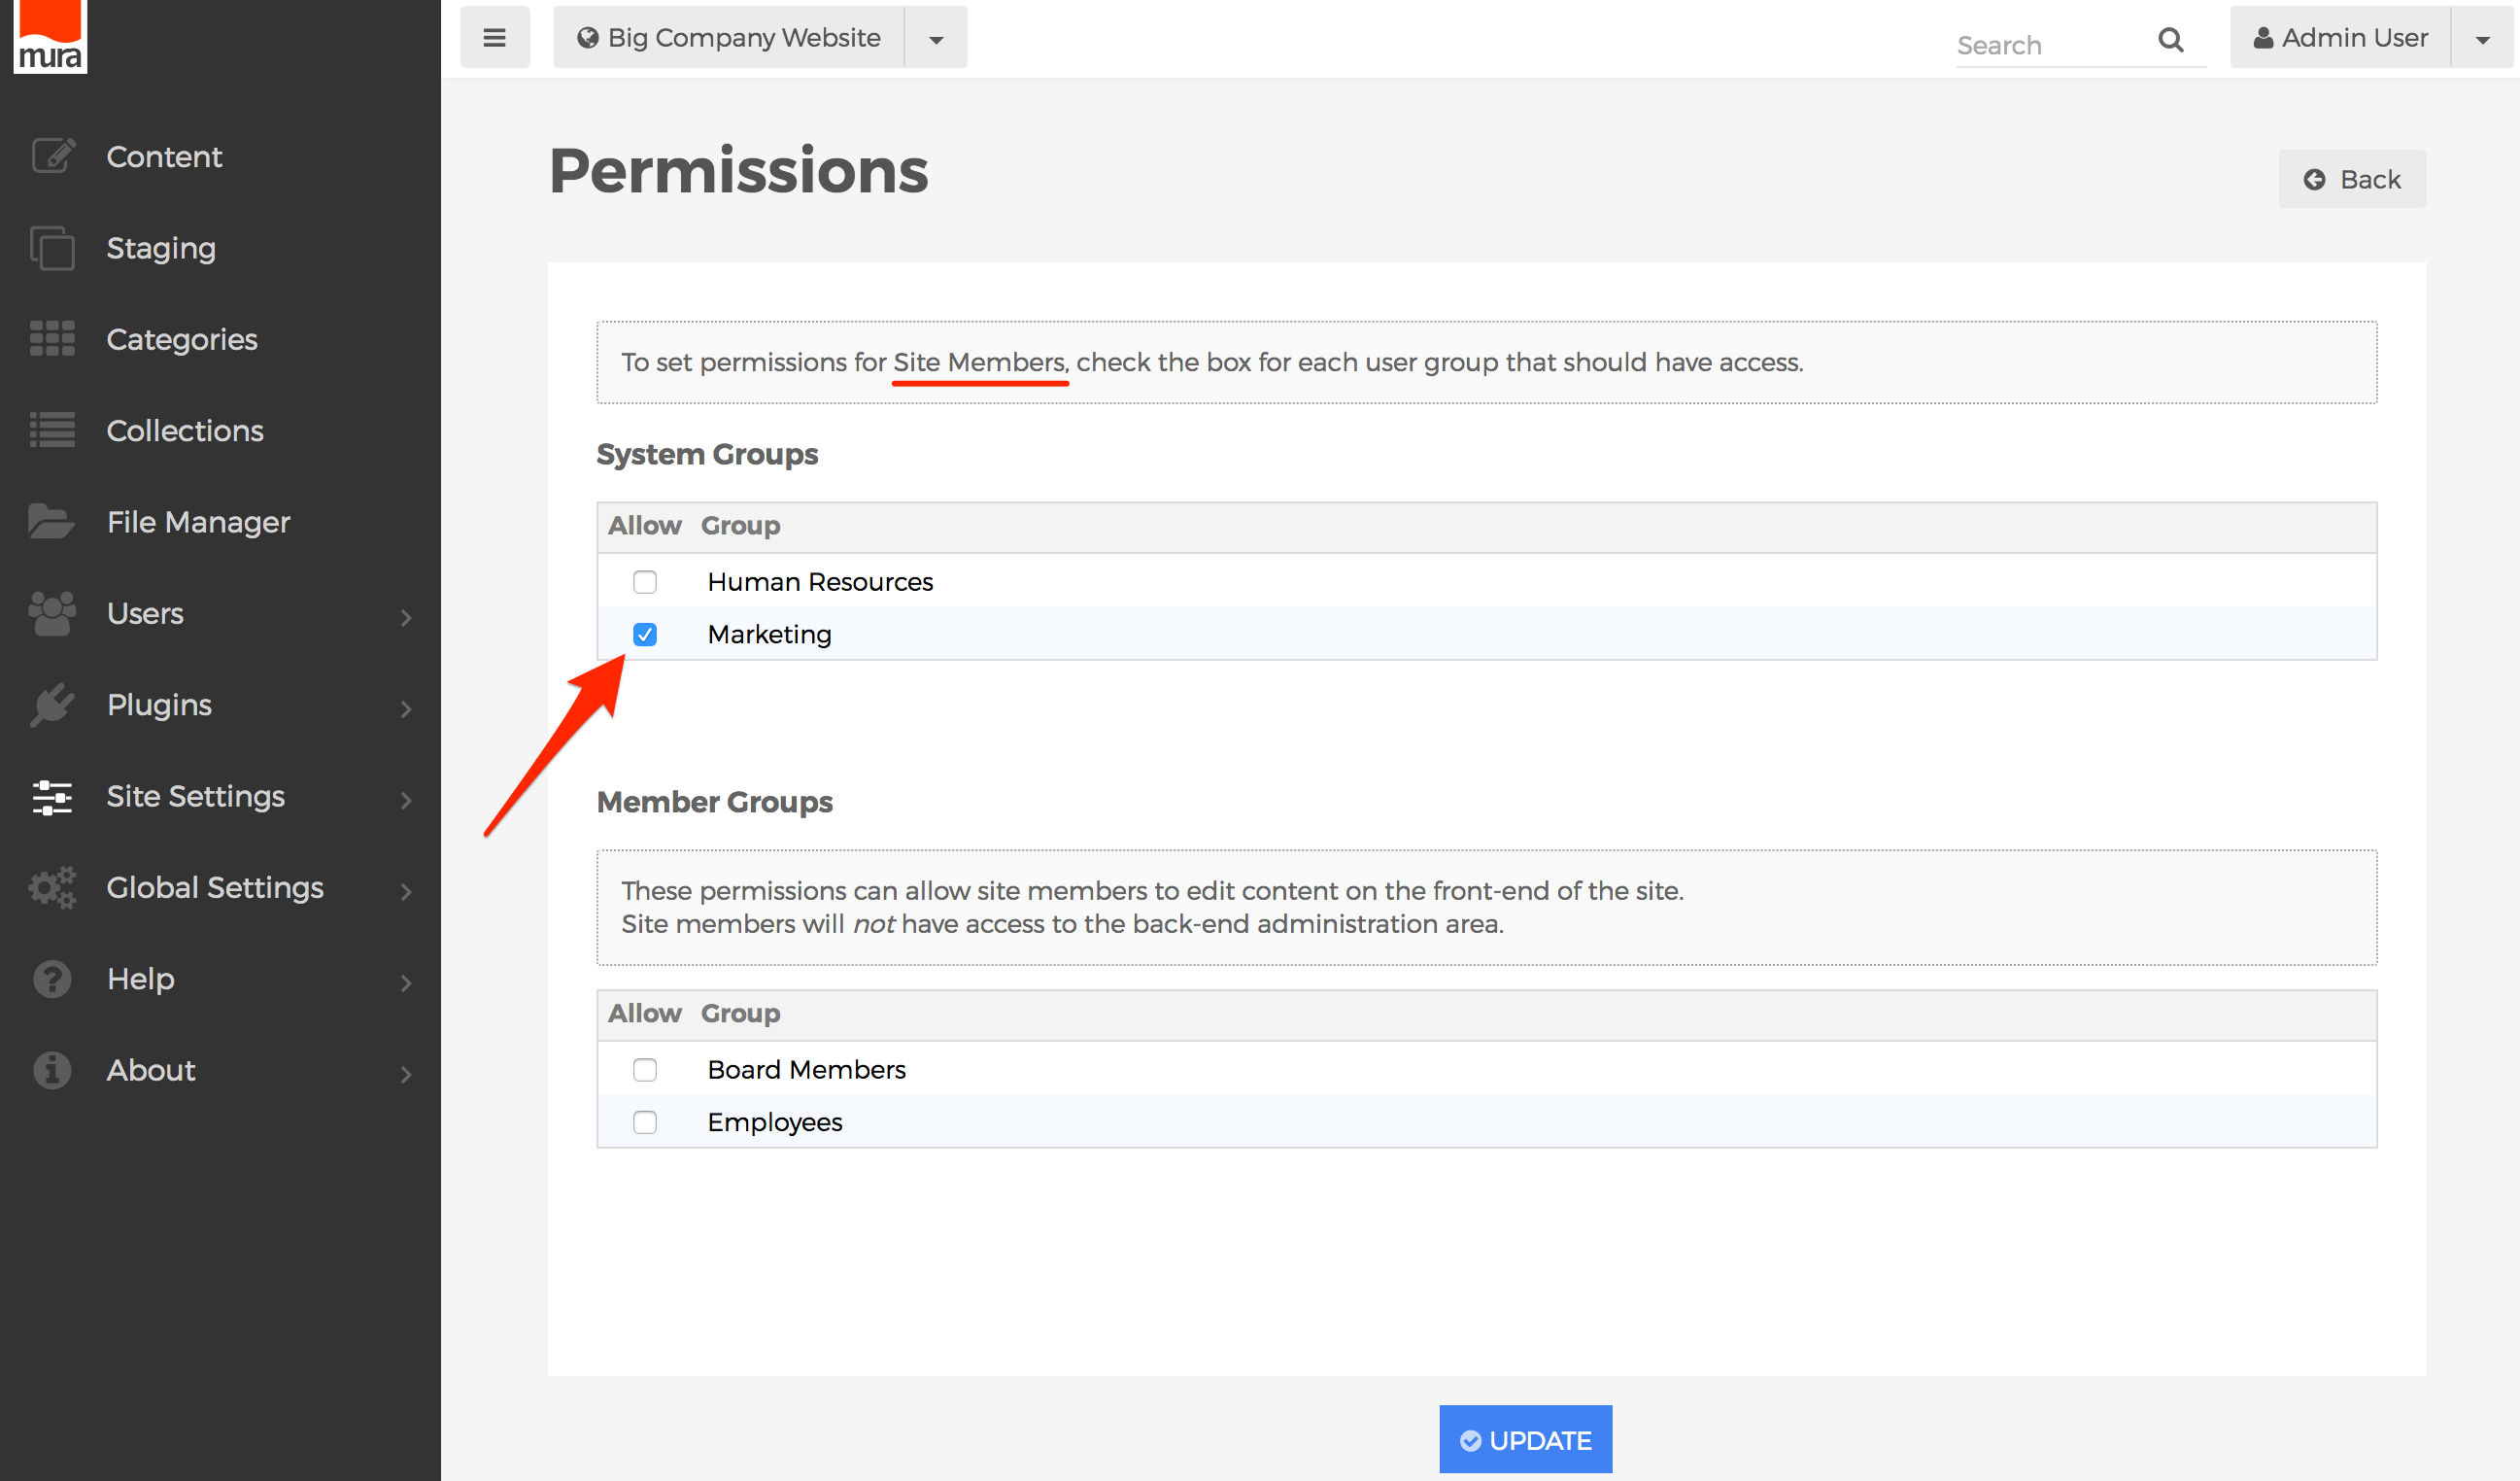
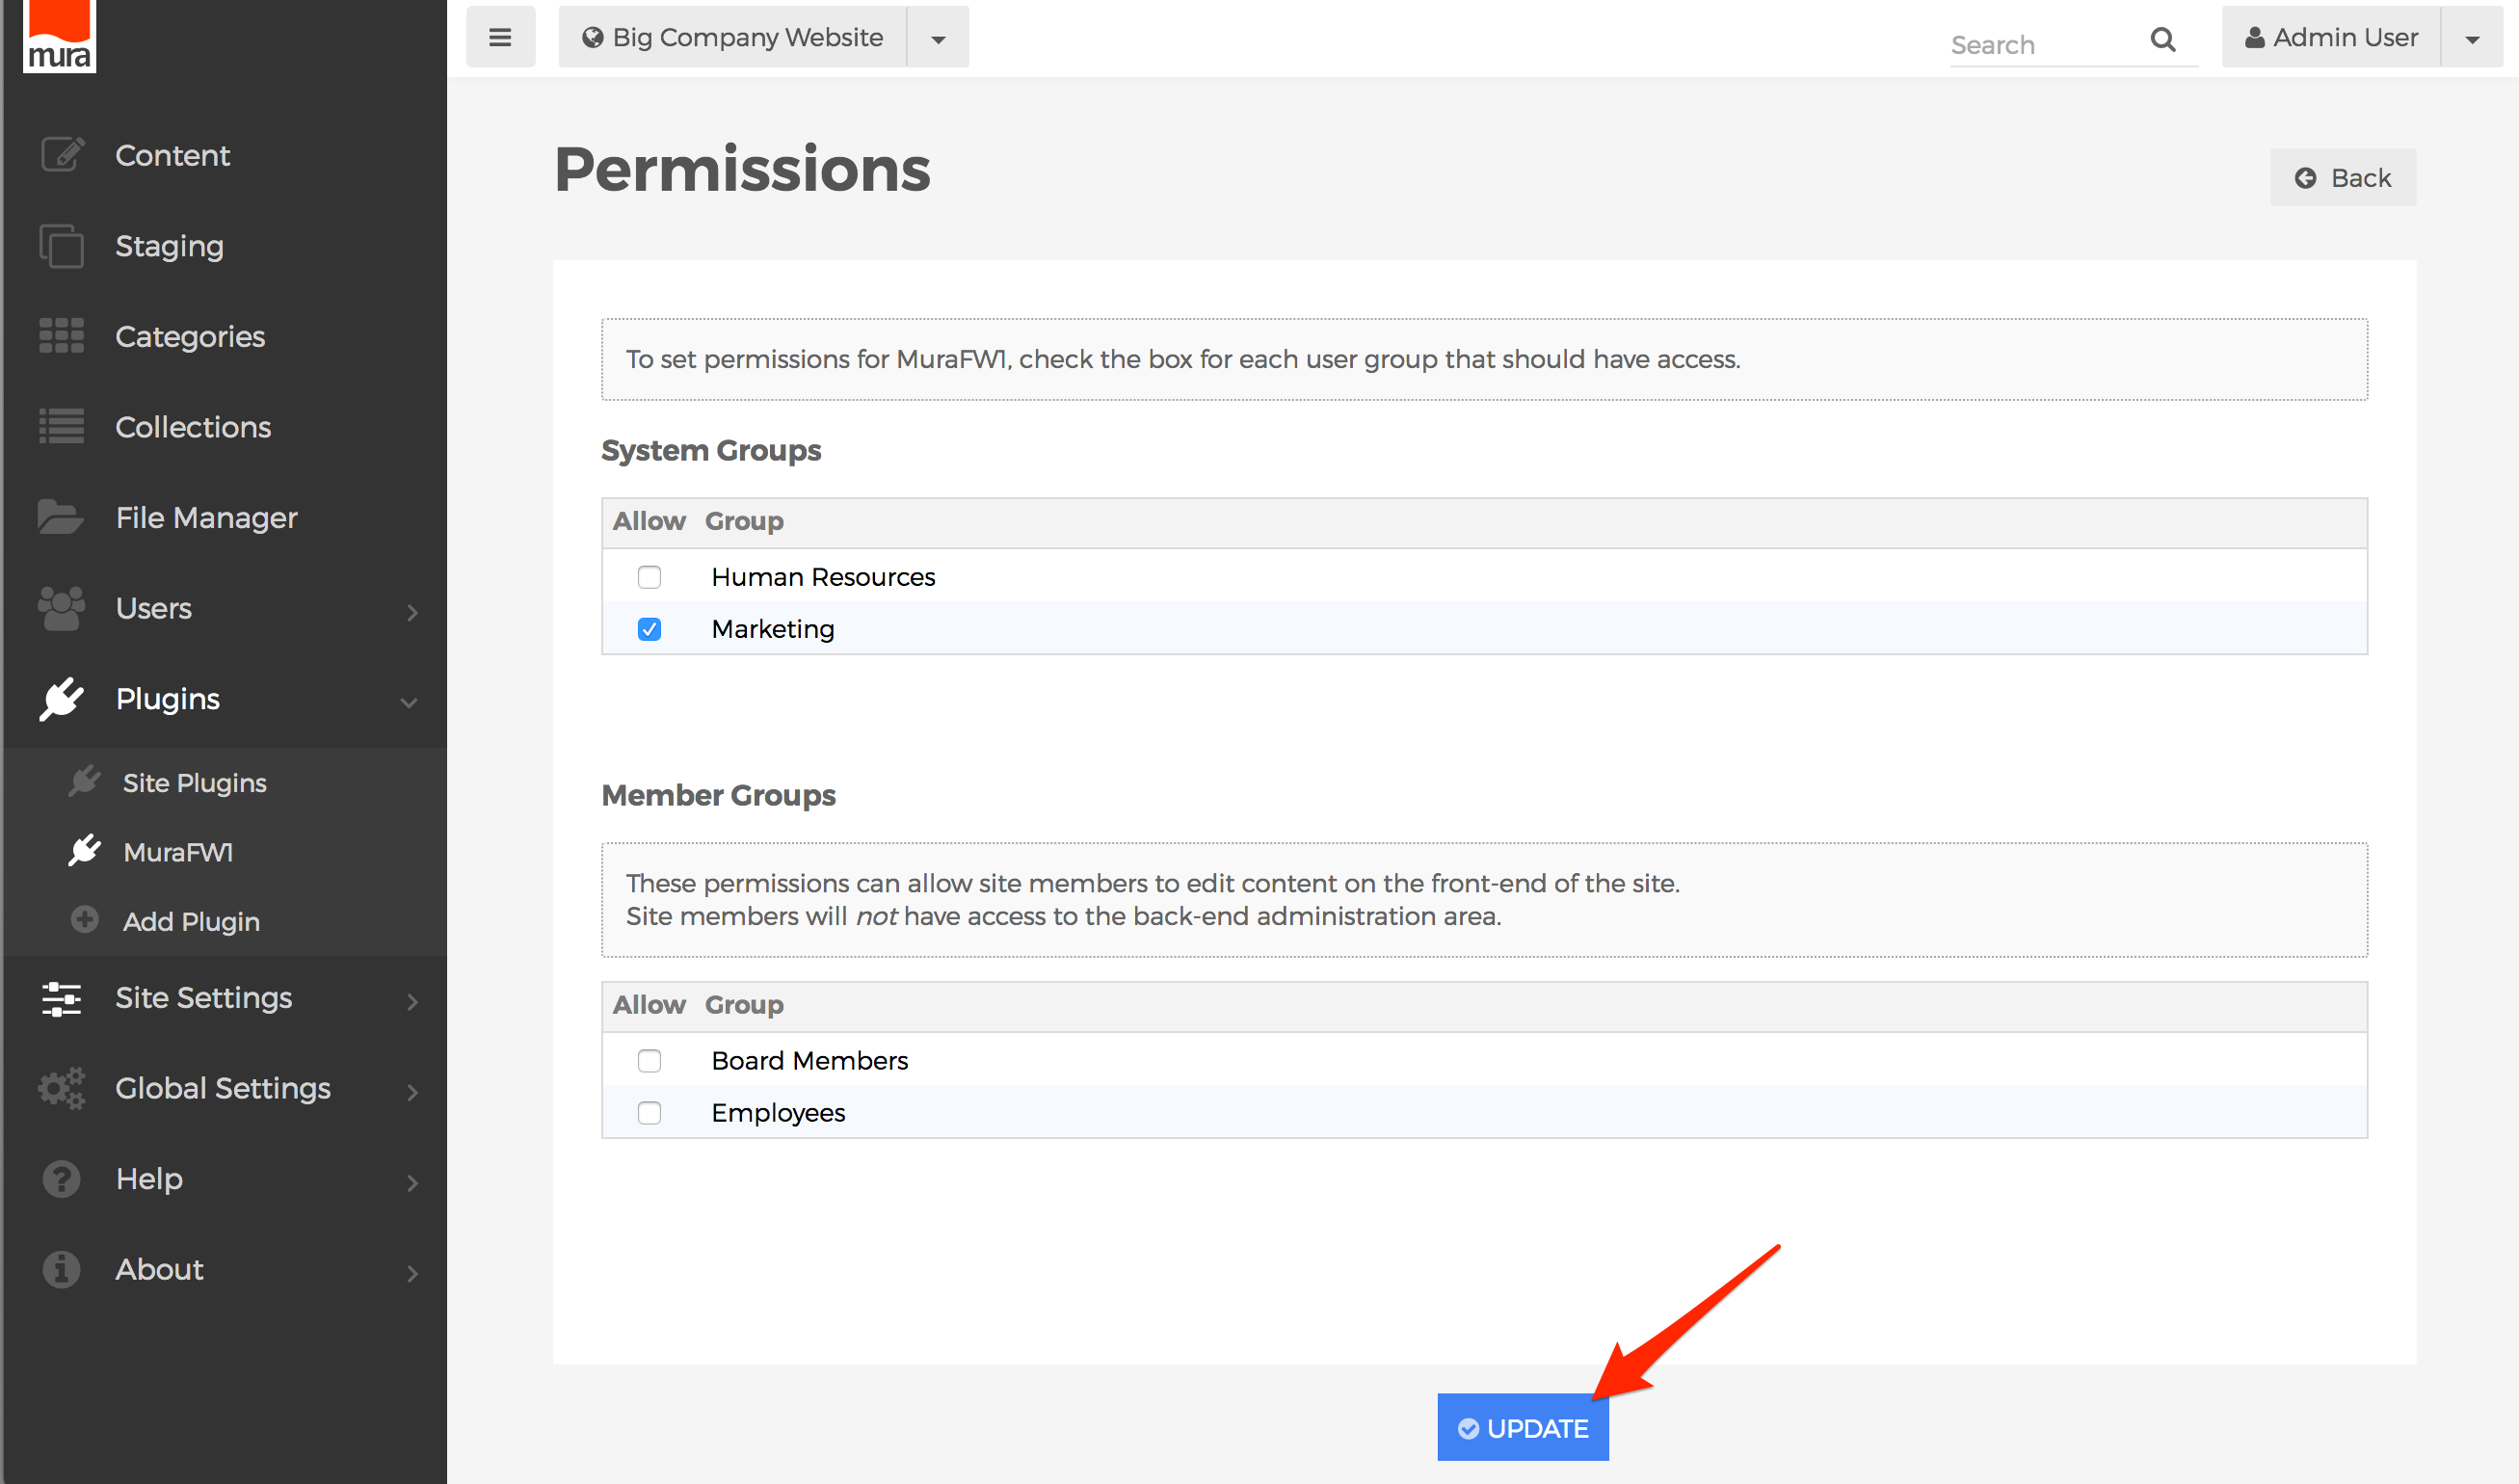
- From the back-end administration area of Mura, click Site Settings on the main navigation, and select Permissions.
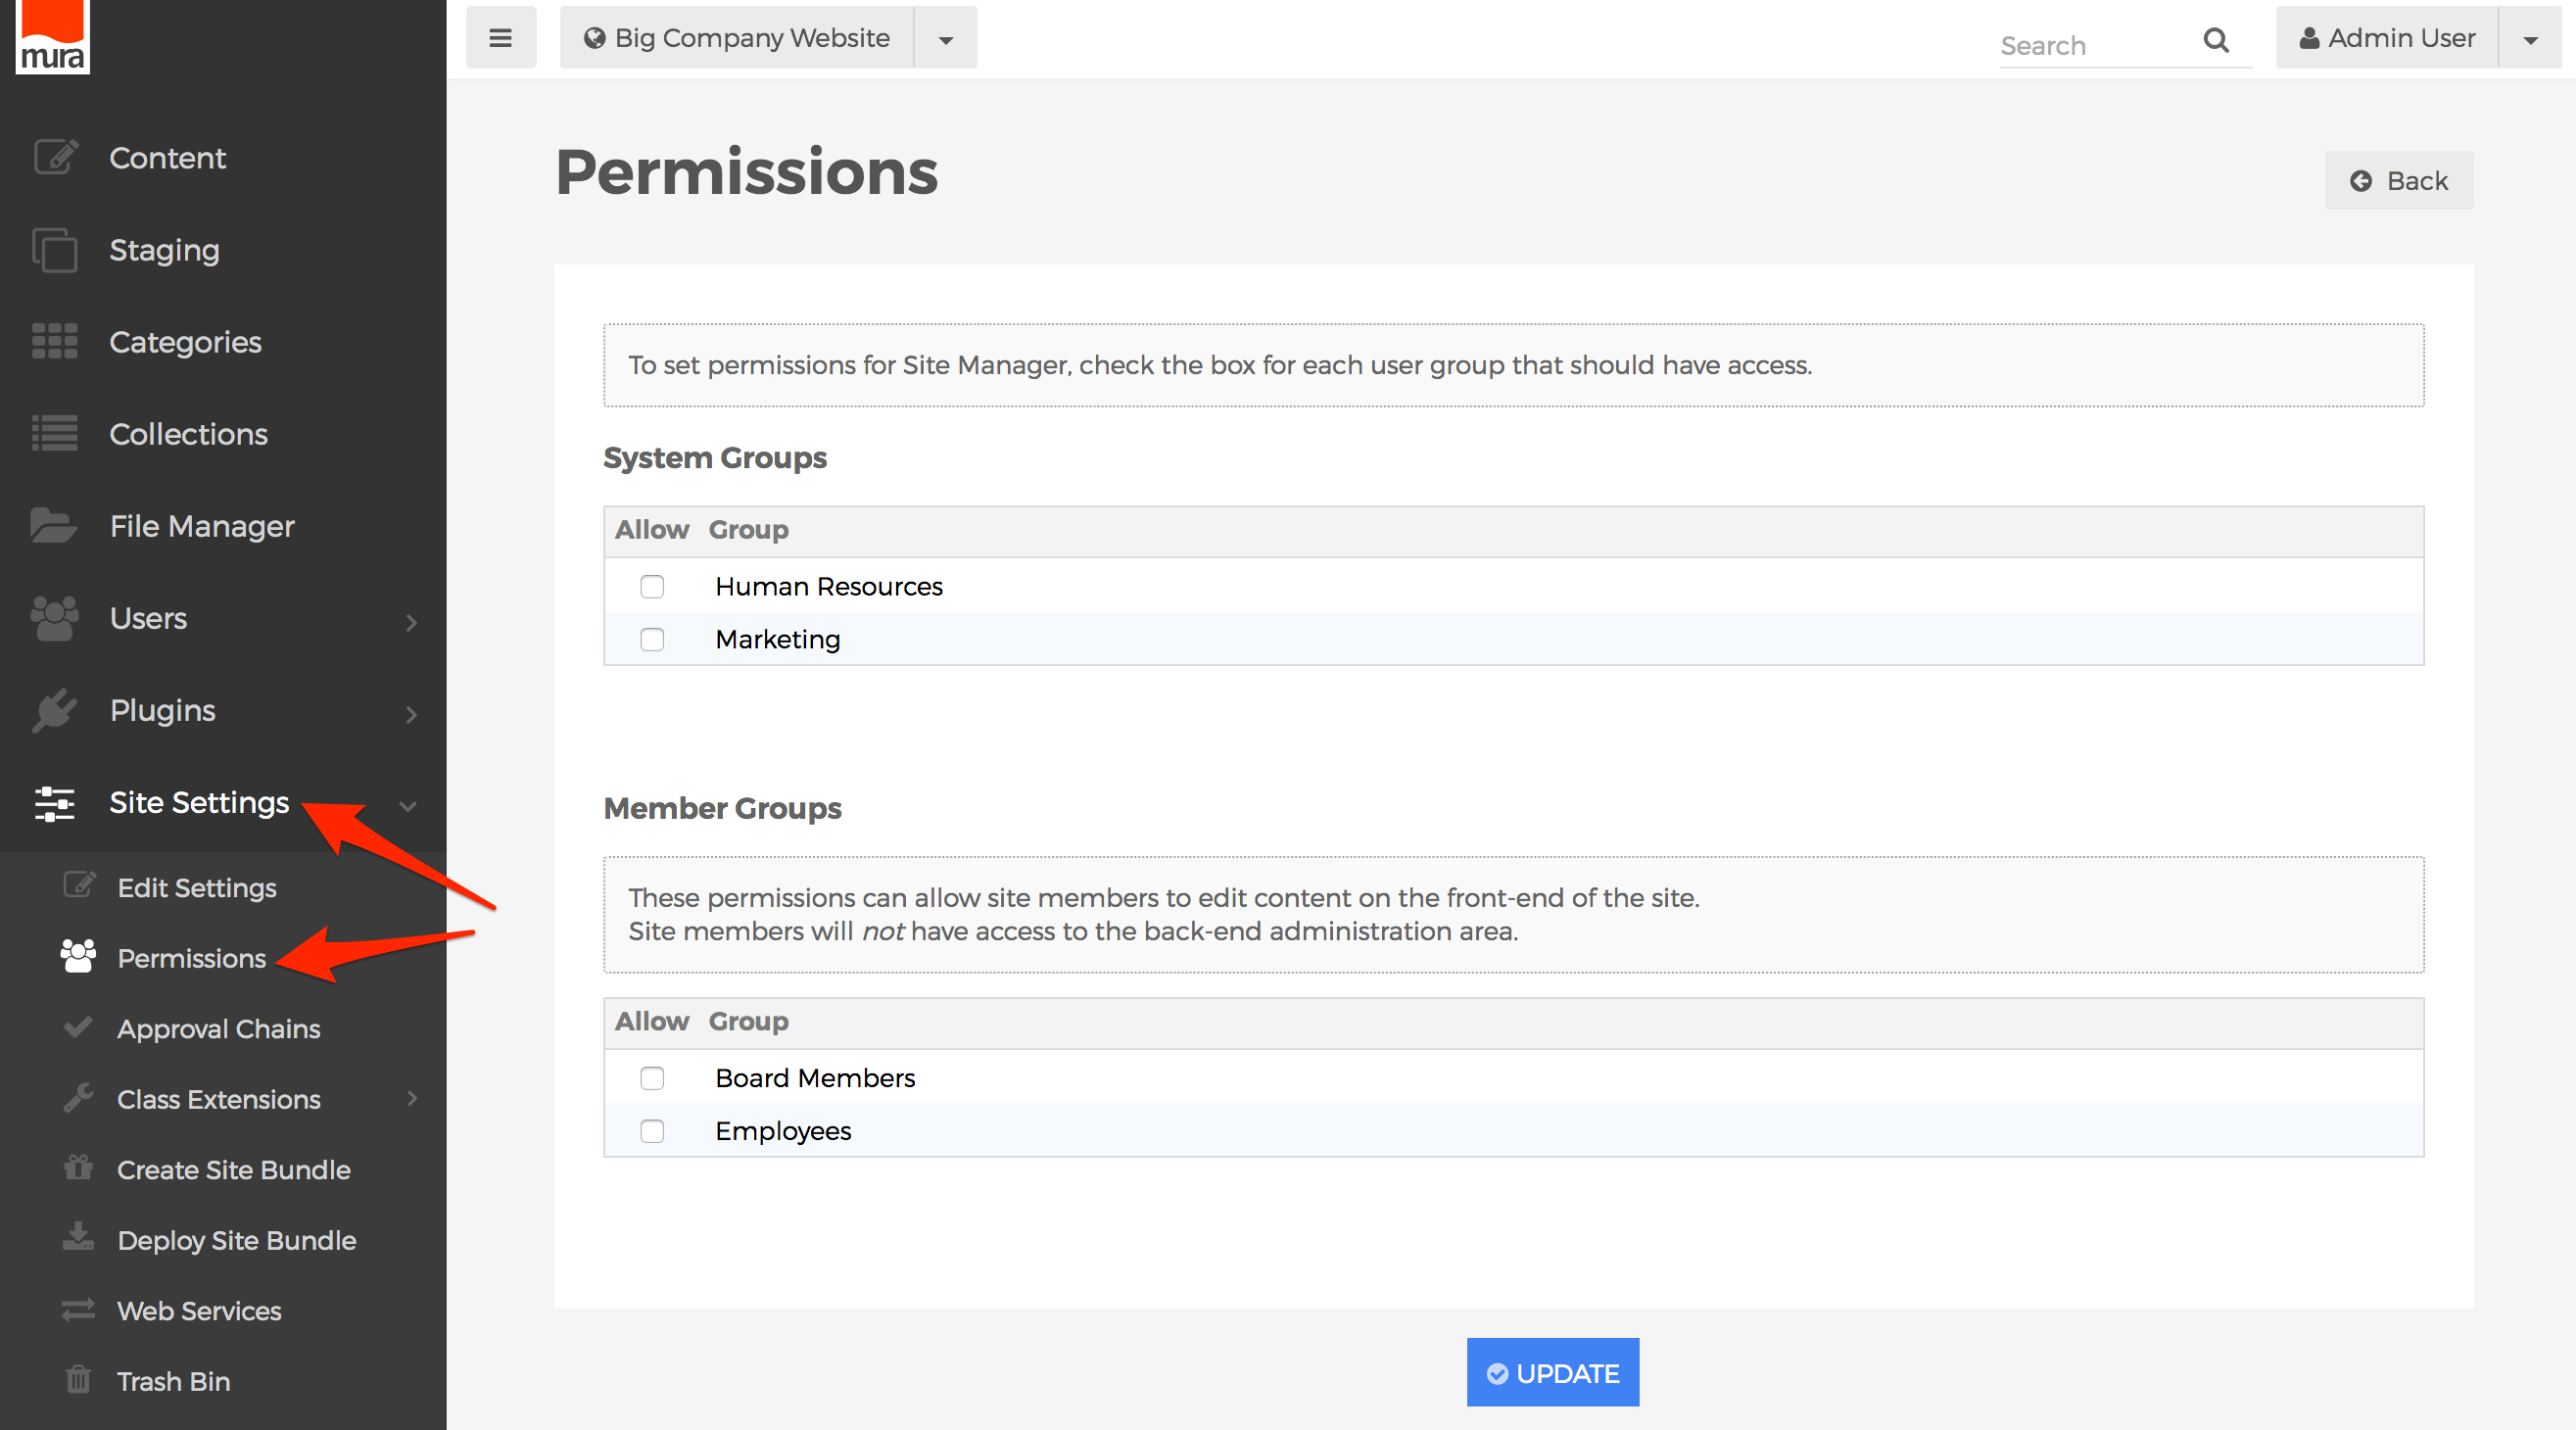
- You should be taken to the Permissions screen.

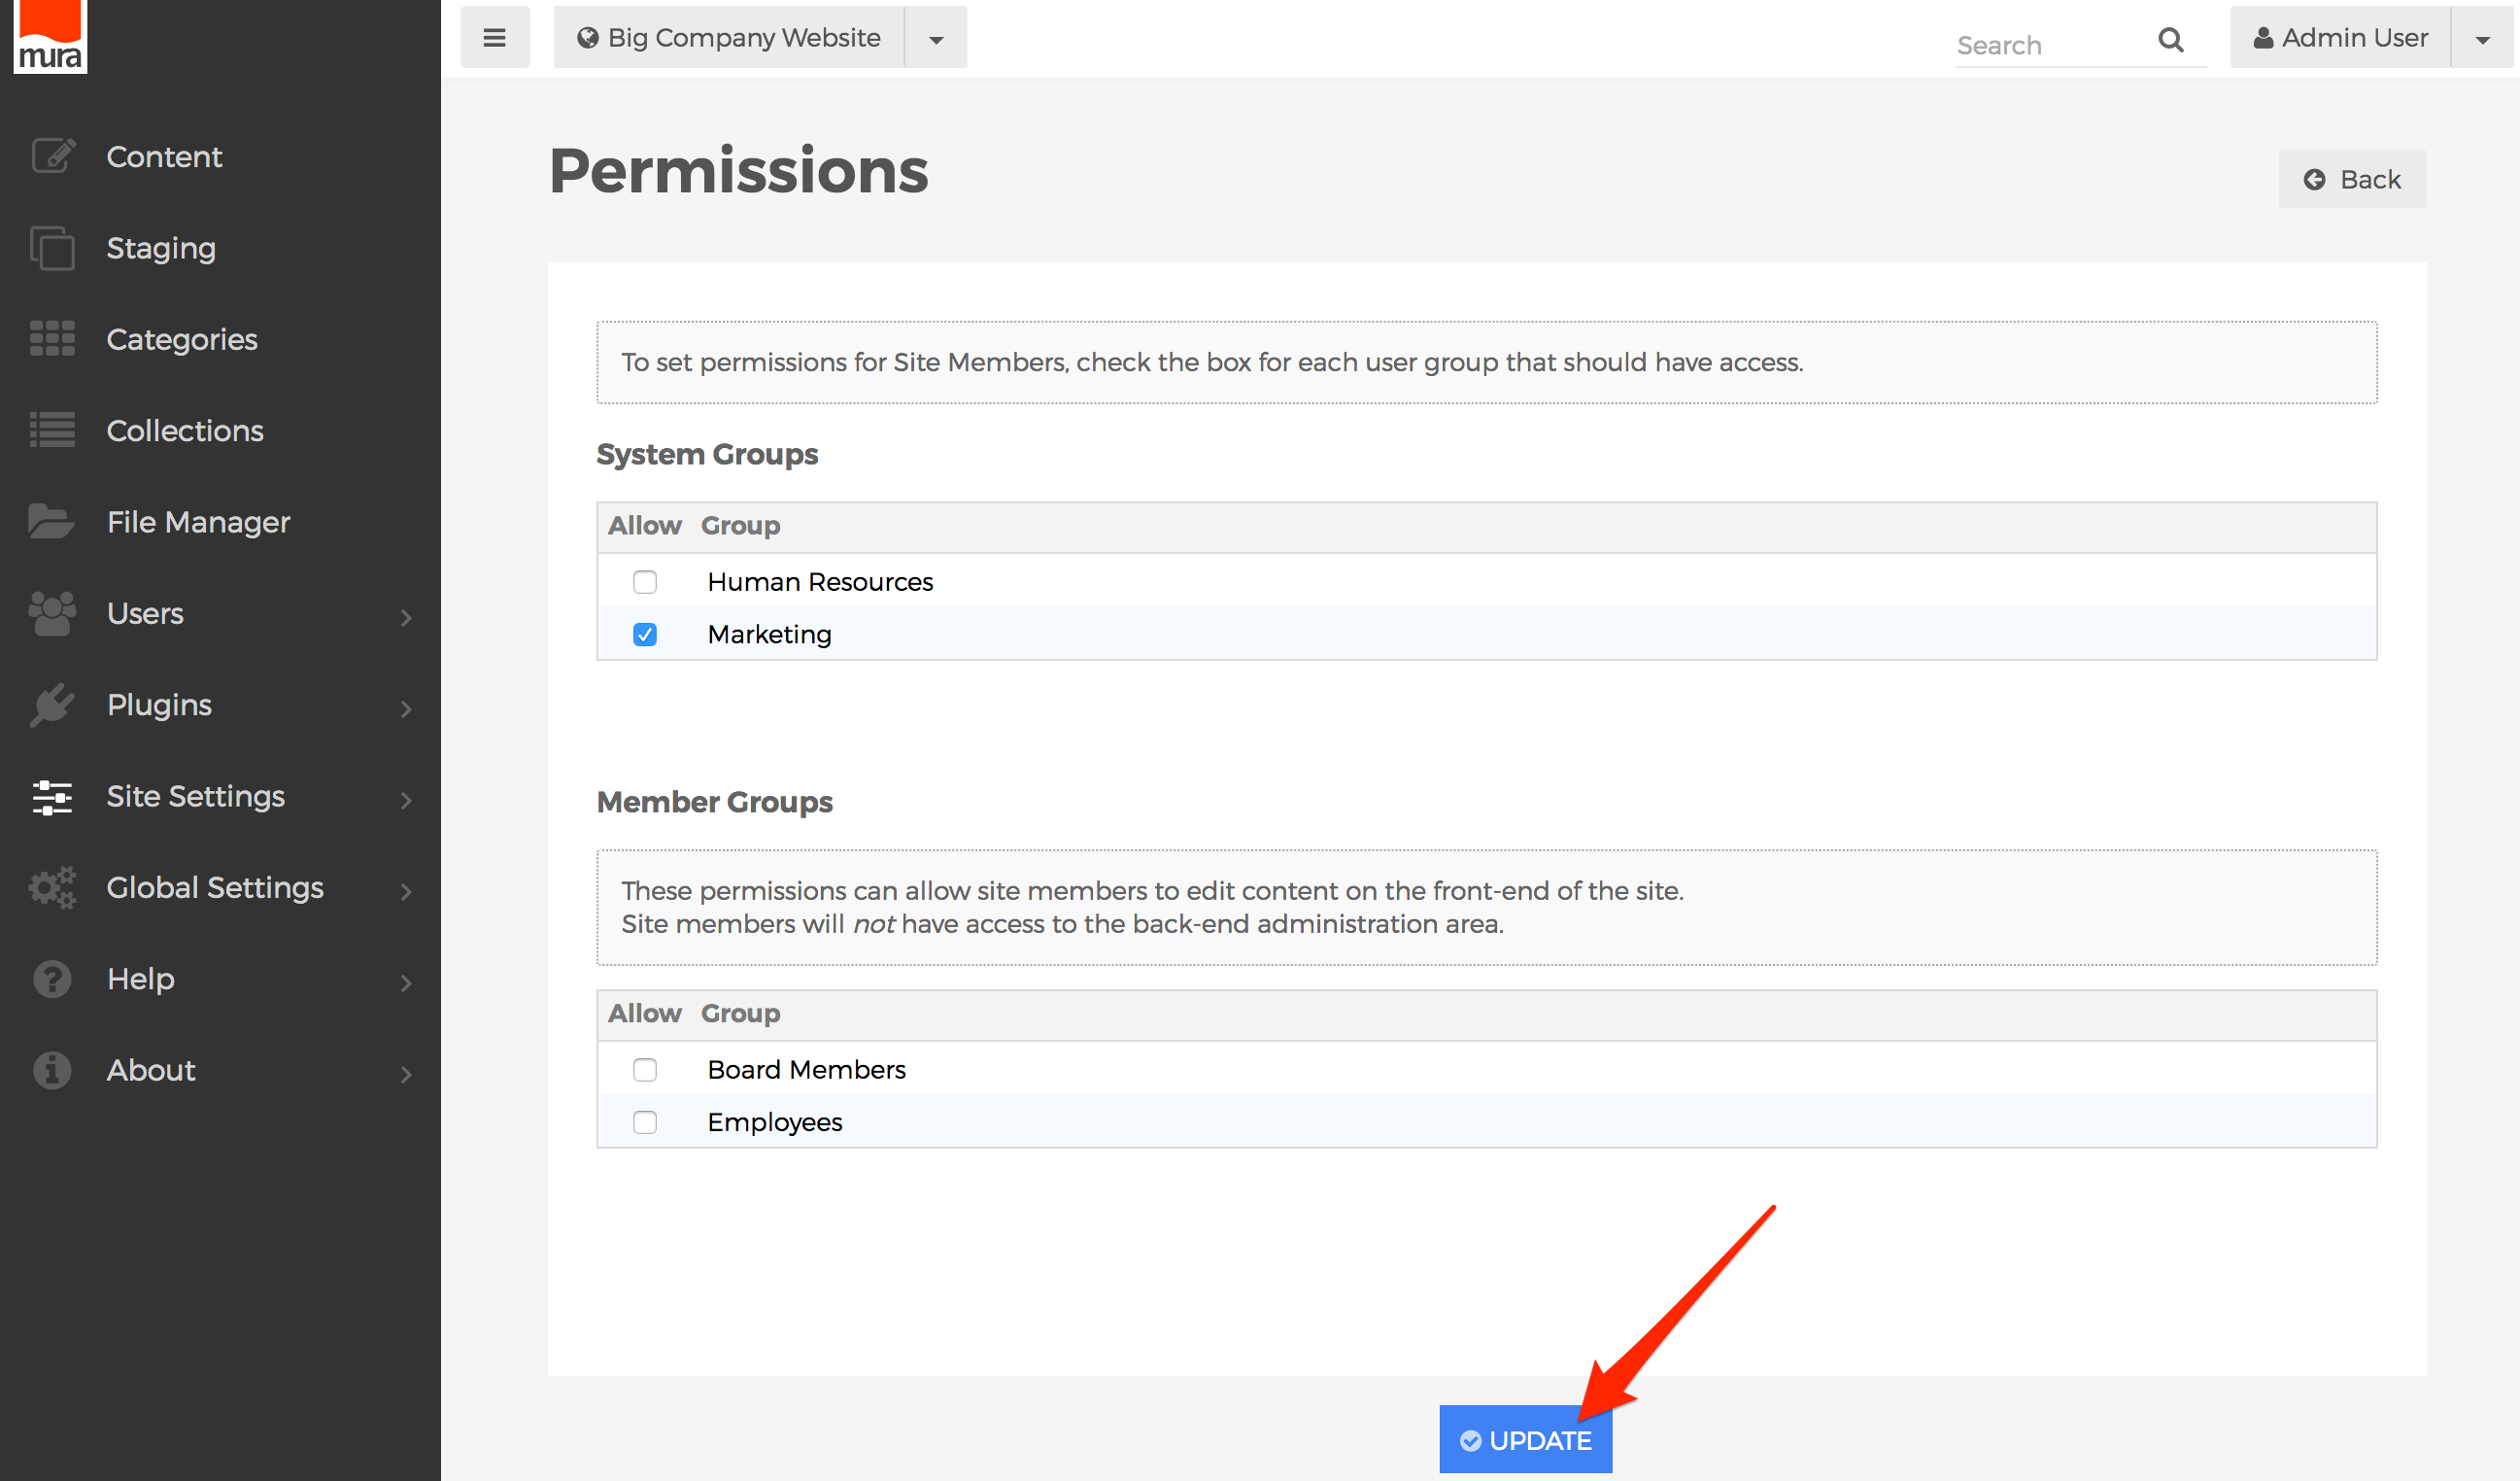
- Simply select the checkbox for each group you wish to allow access to.

- Click Update, to save your changes.

- Next, you will need to specify the roles and privileges each group has throughout the various sections of your site.

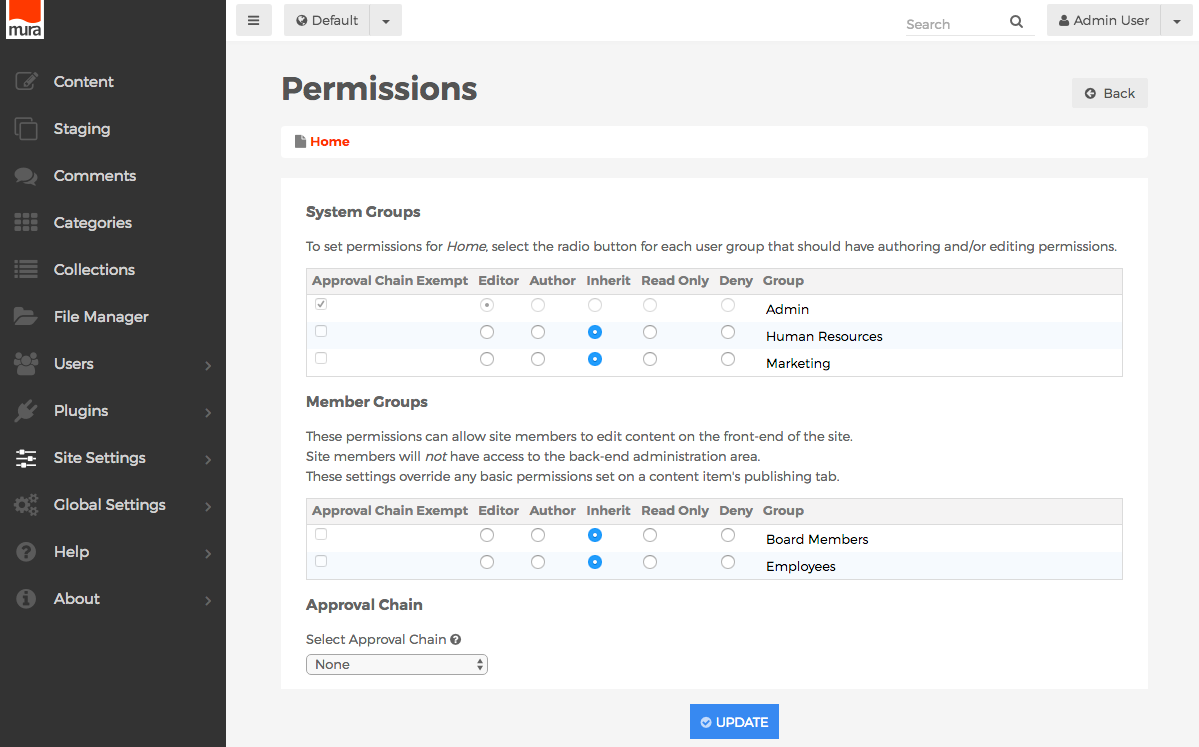
Content Permissions
Before you begin granting or restricting editing privileges for content, ensure you have completed the first four steps outlined on the Managing Permissions page. You may also want to review the Author vs. Editor Roles section, before continuing.
Permissions cascade from the top-most content item, down through its children, grandchildren, and beyond. By default, all groups granted access to edit the site begin with "Deny" privileges, except for the "Admin" group. The Admin group automatically has full editing privileges throughout Mura.
How to Apply Permissions to Content
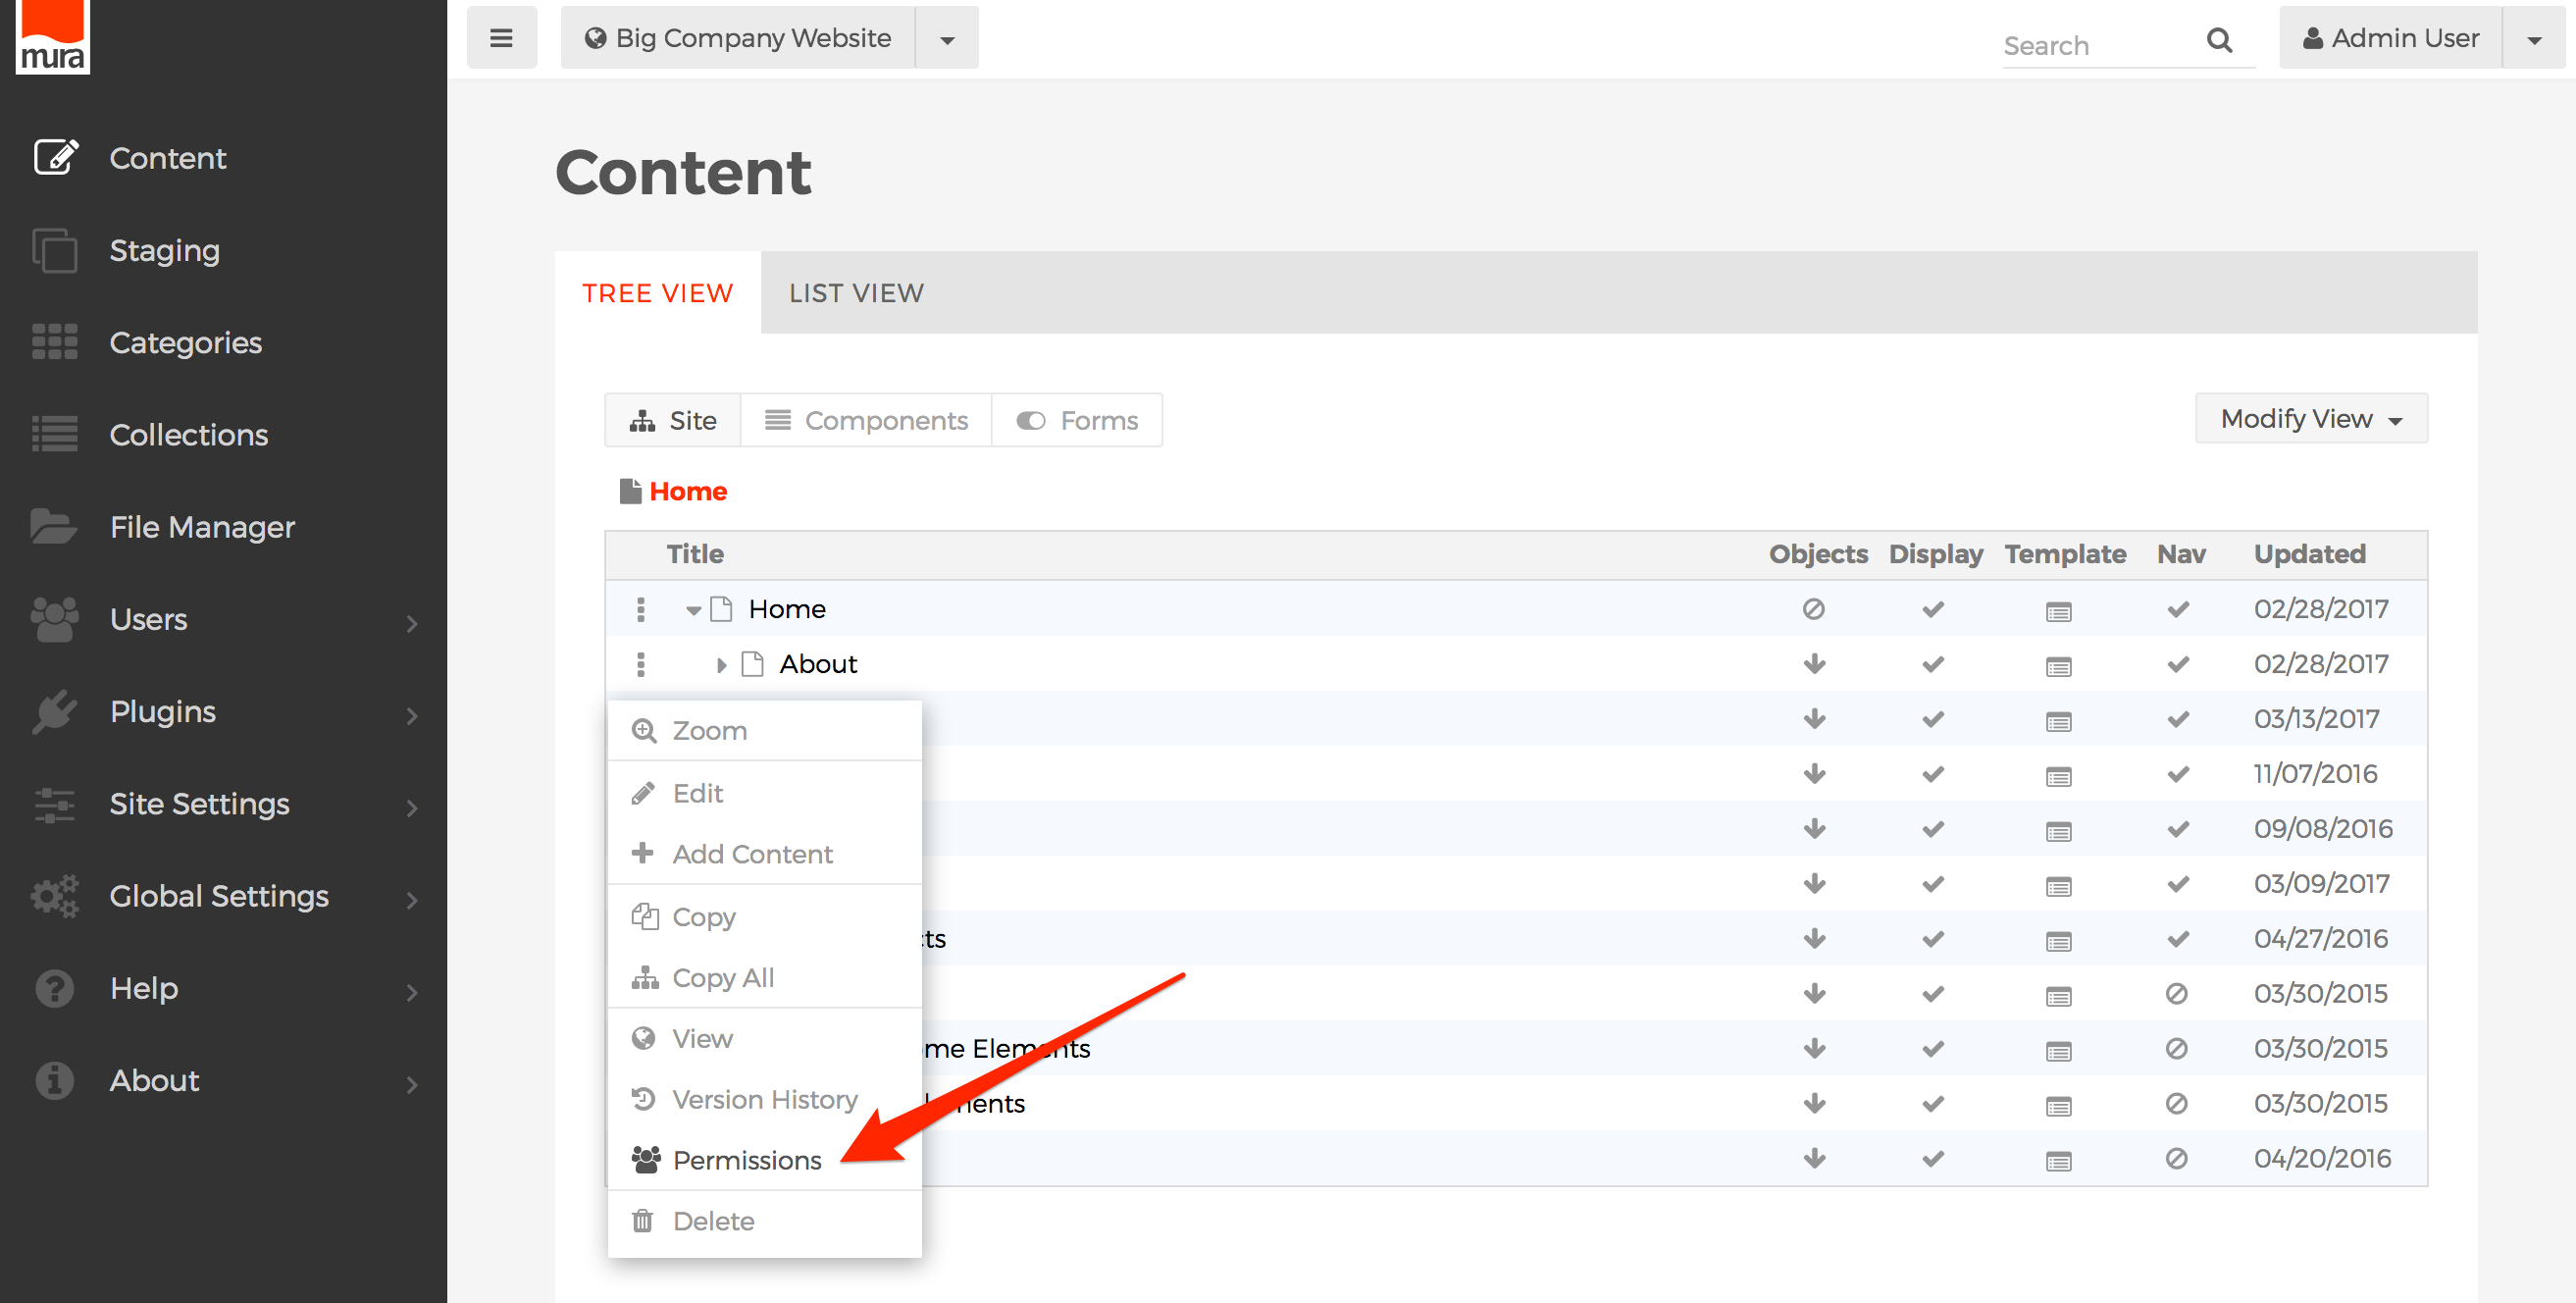
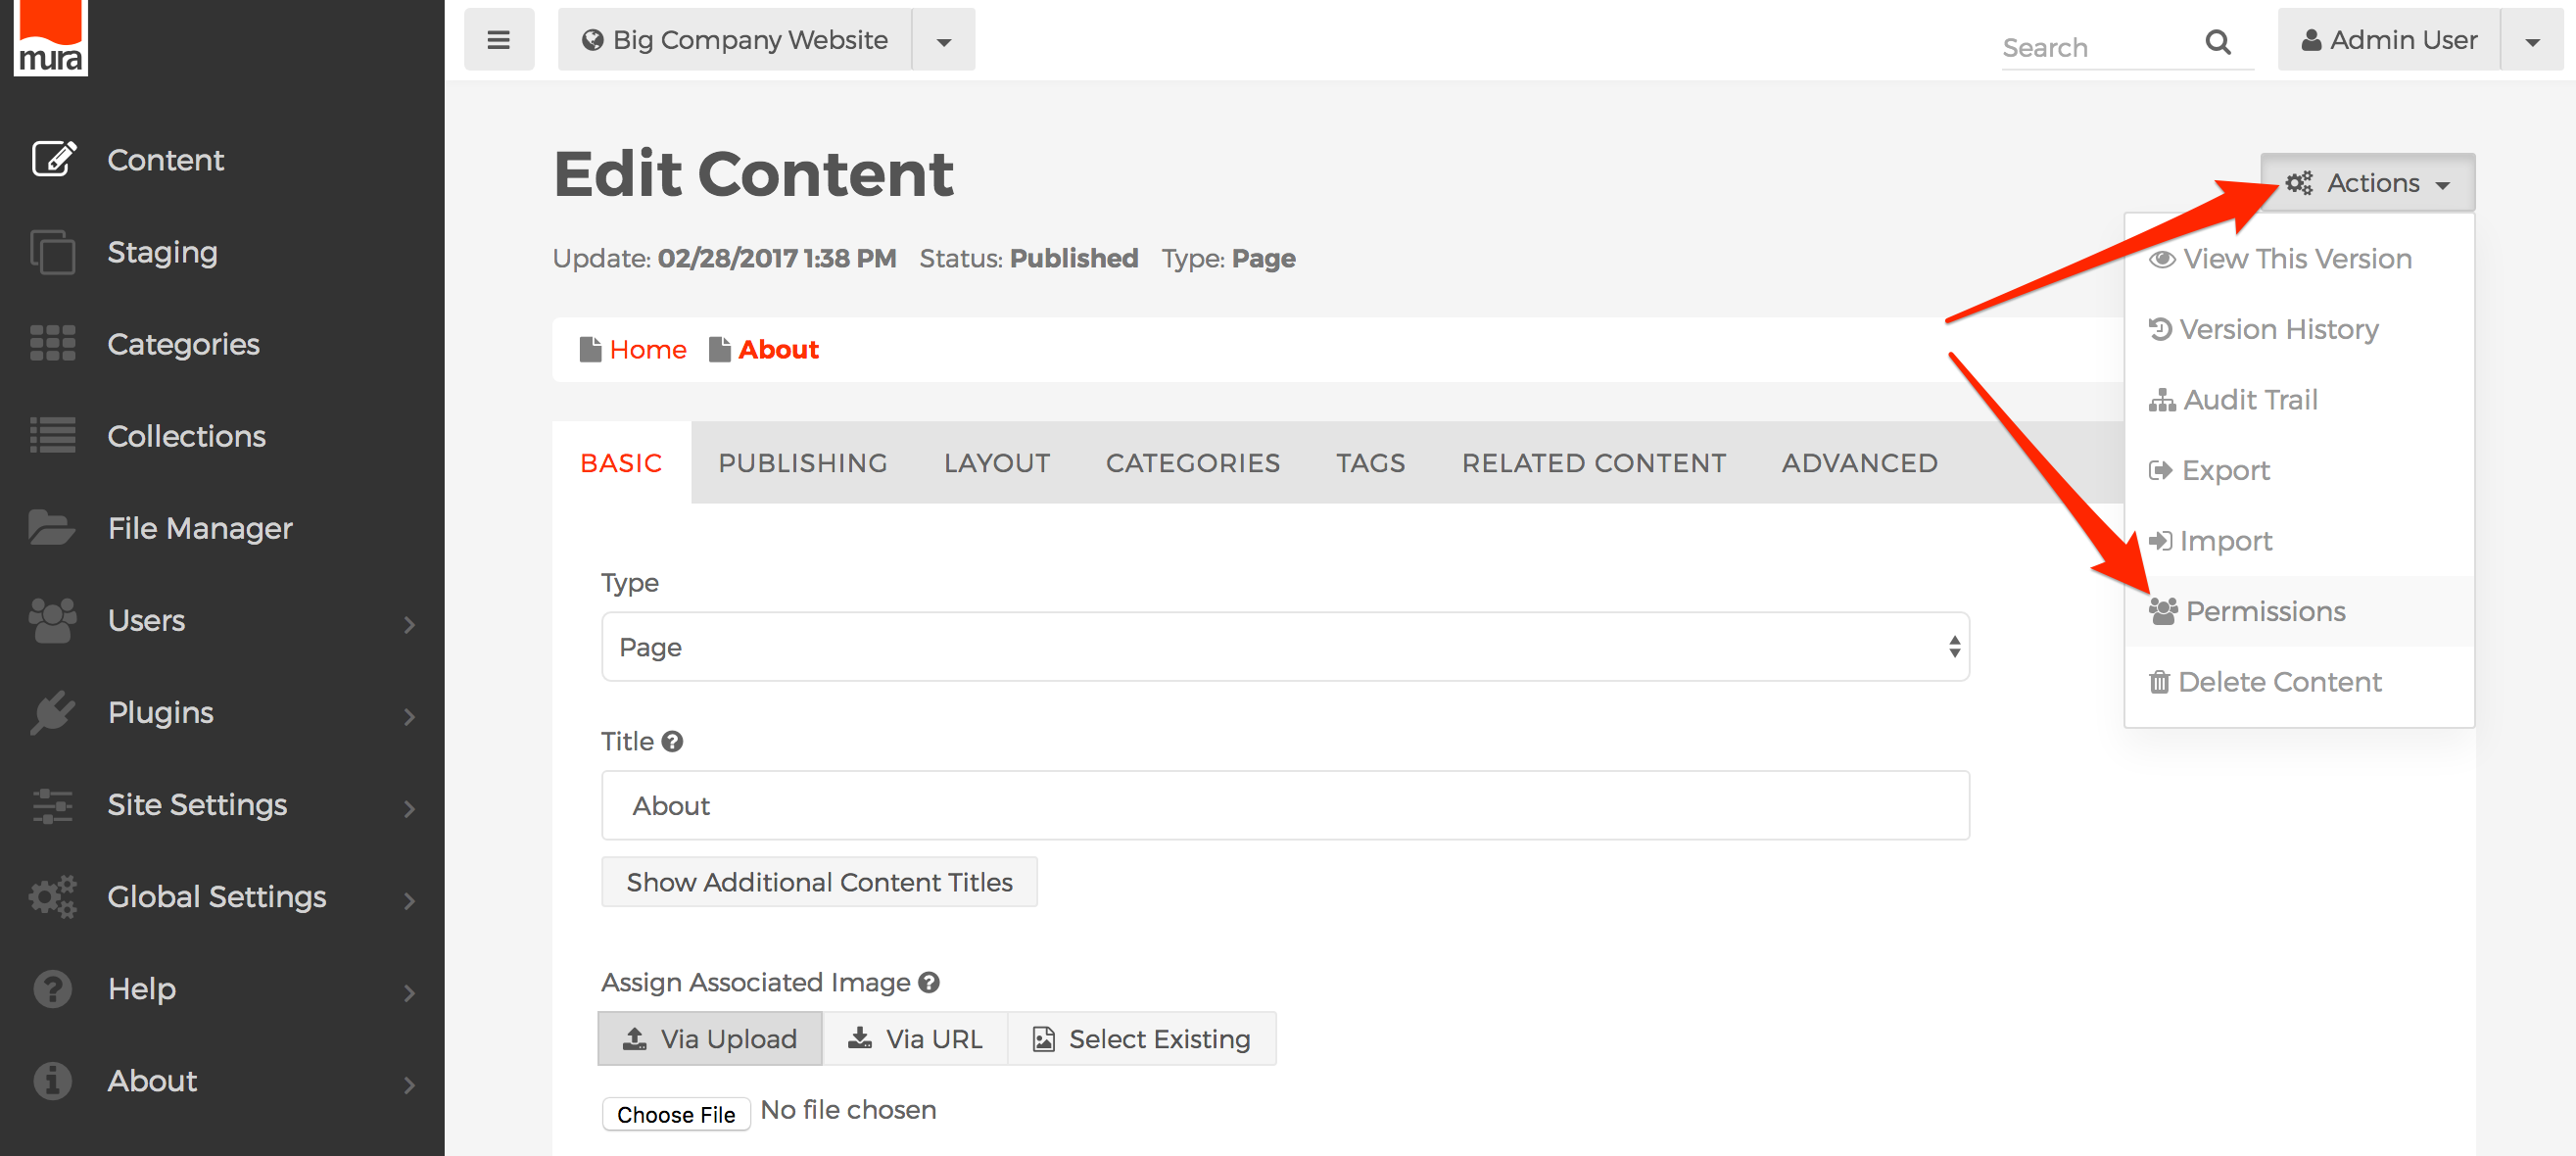
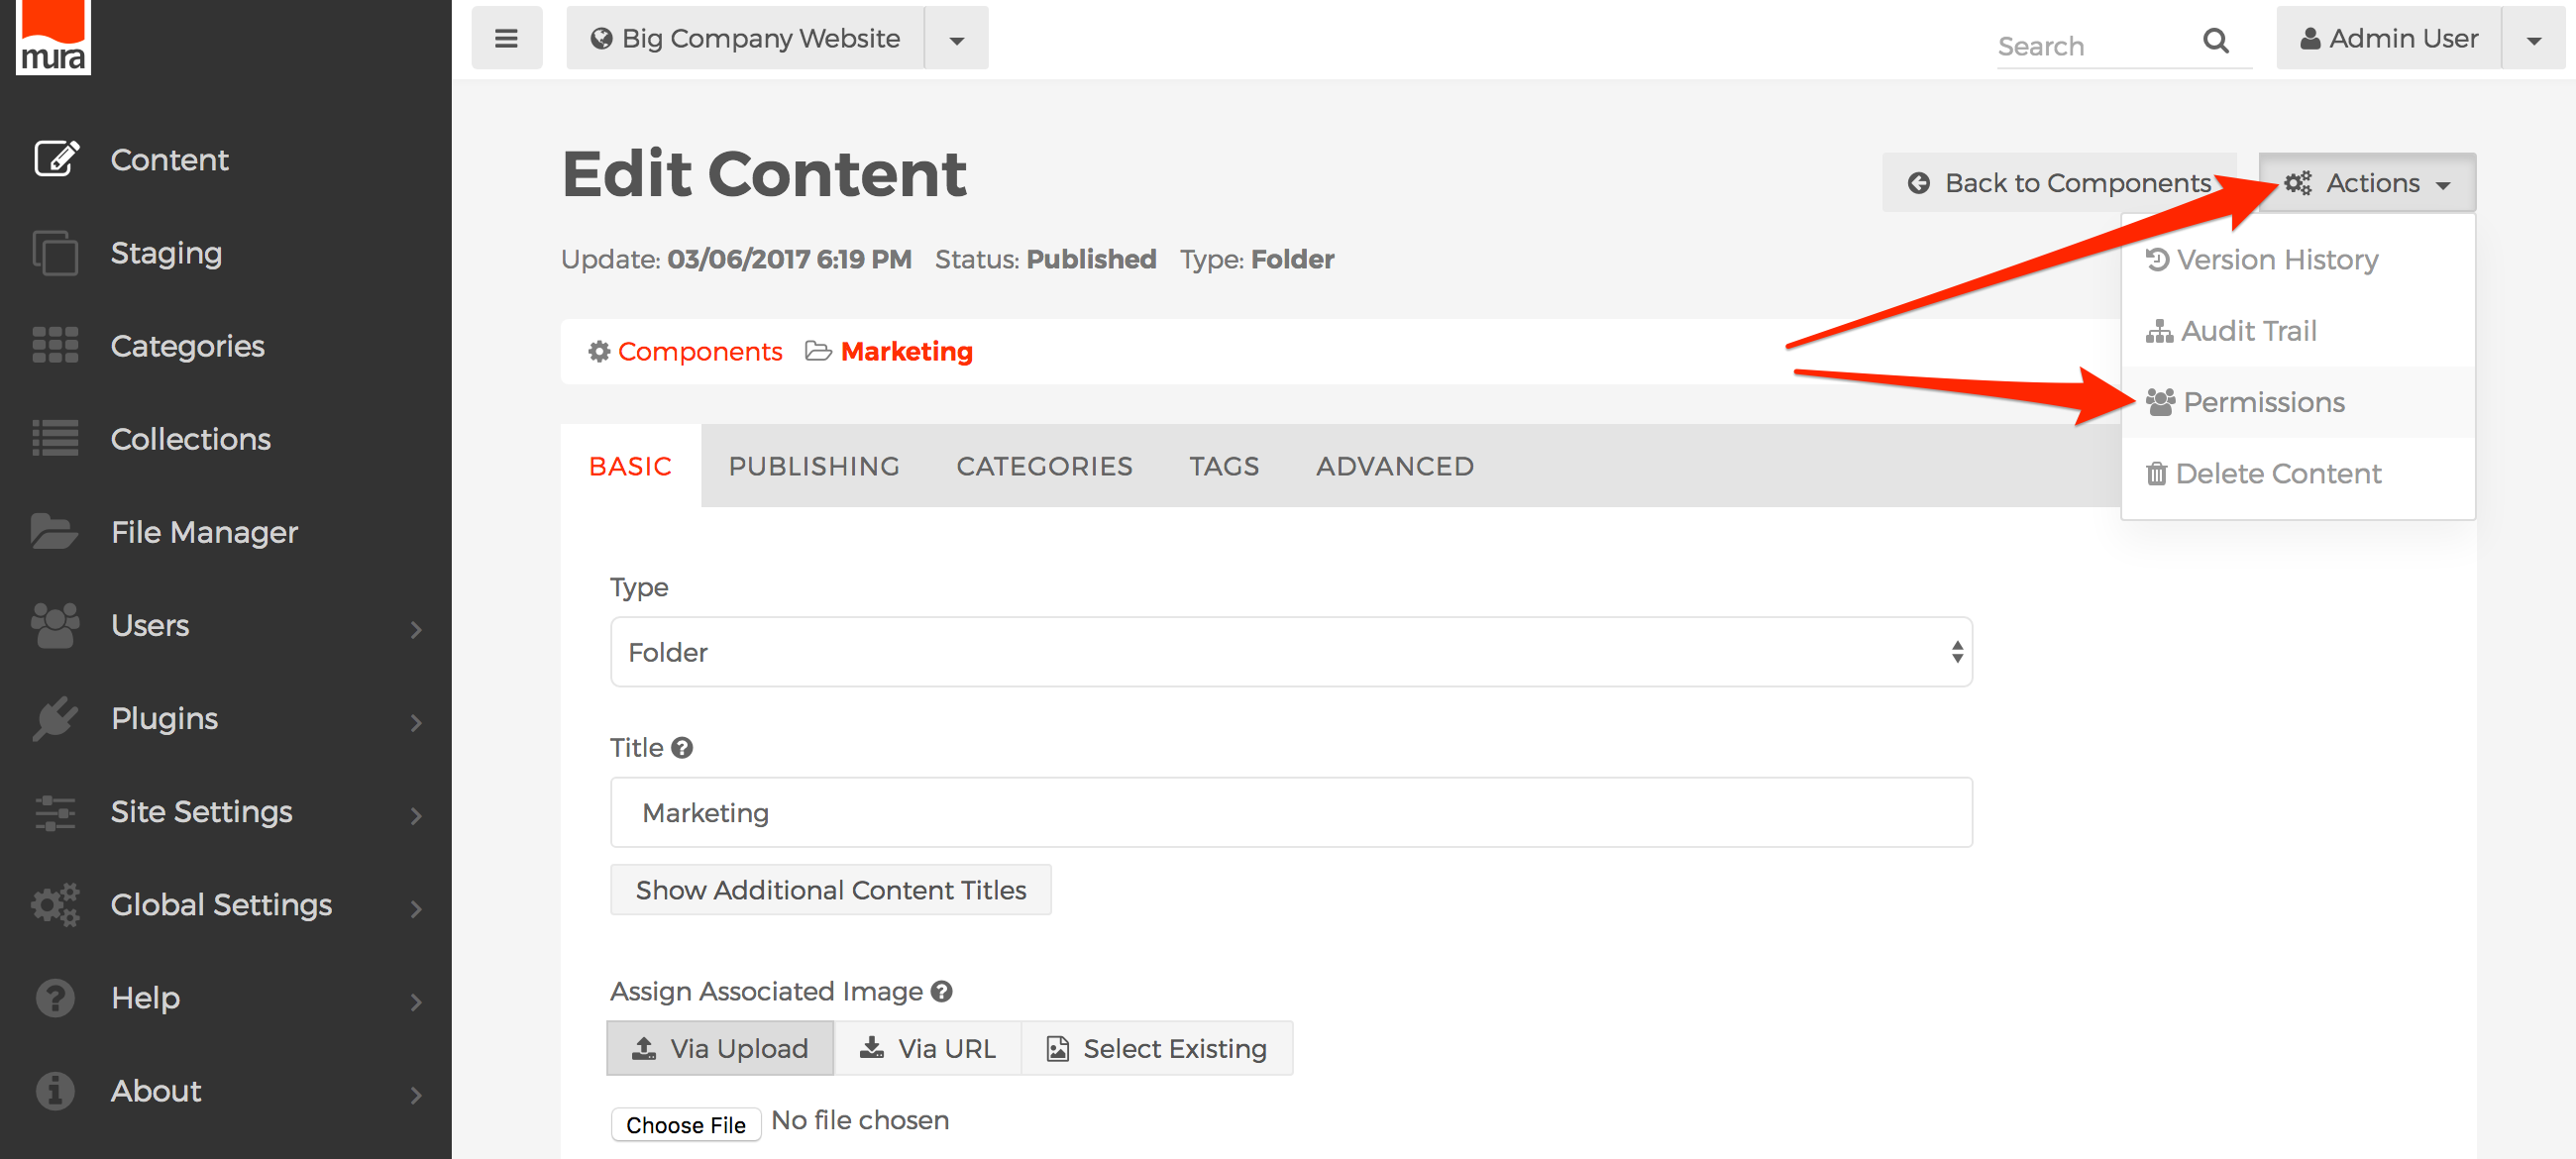
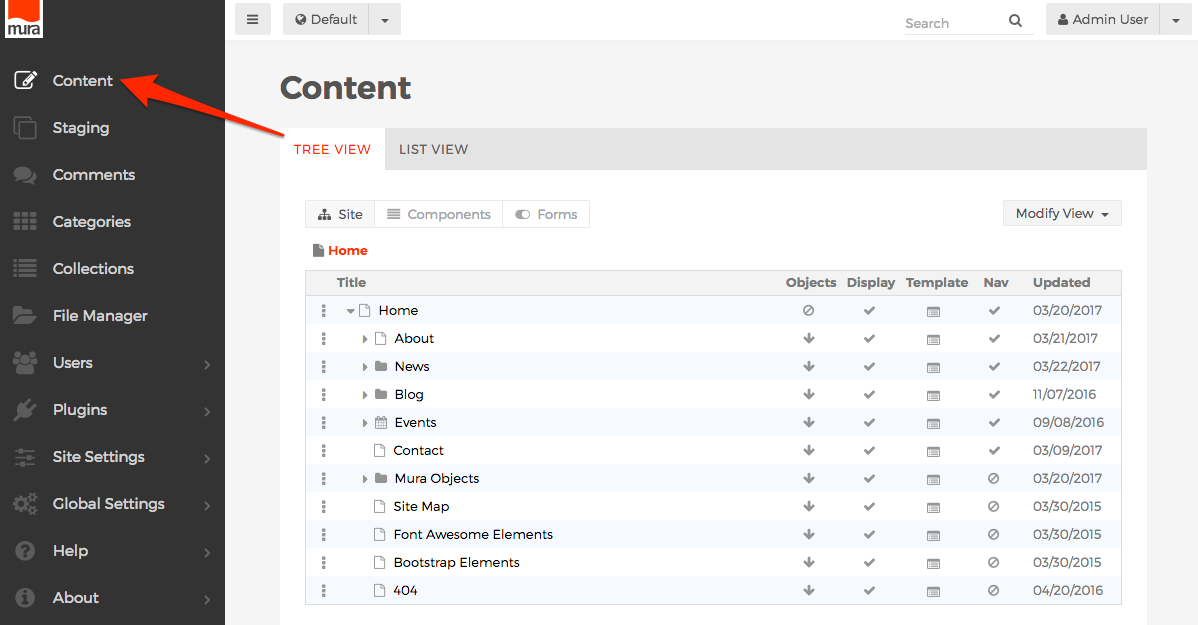
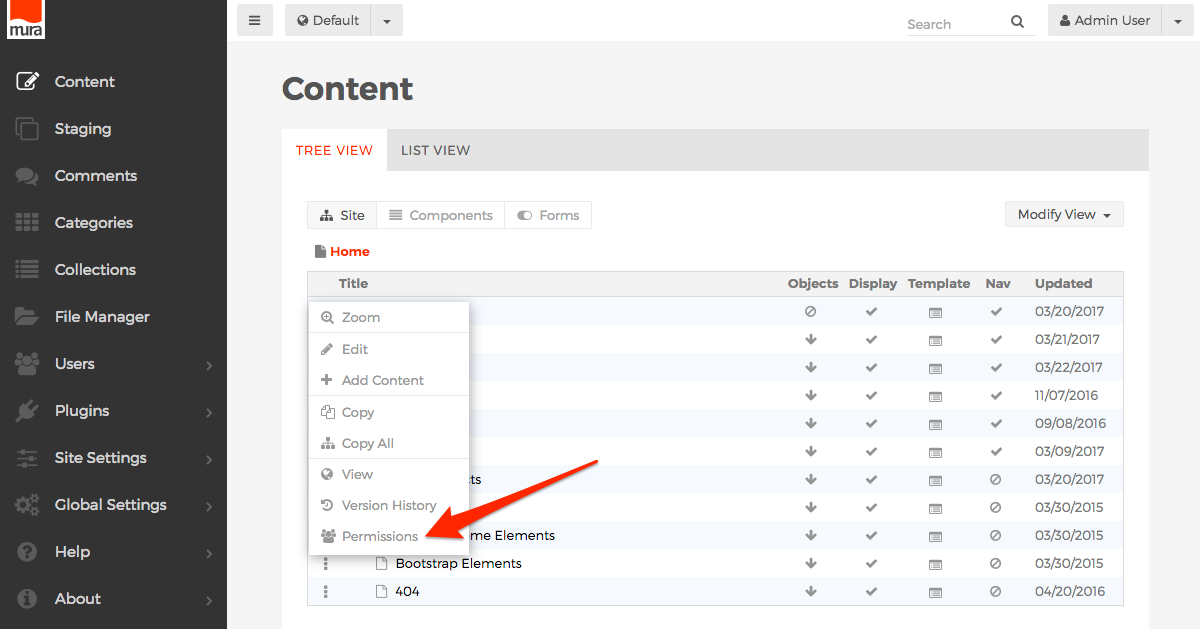
- From the Content screen, click the three-dot menu of the content item you wish to manage permissions for, and select Permissions.

- Or, if editing a content item, click the Actions button, and select Permissions.

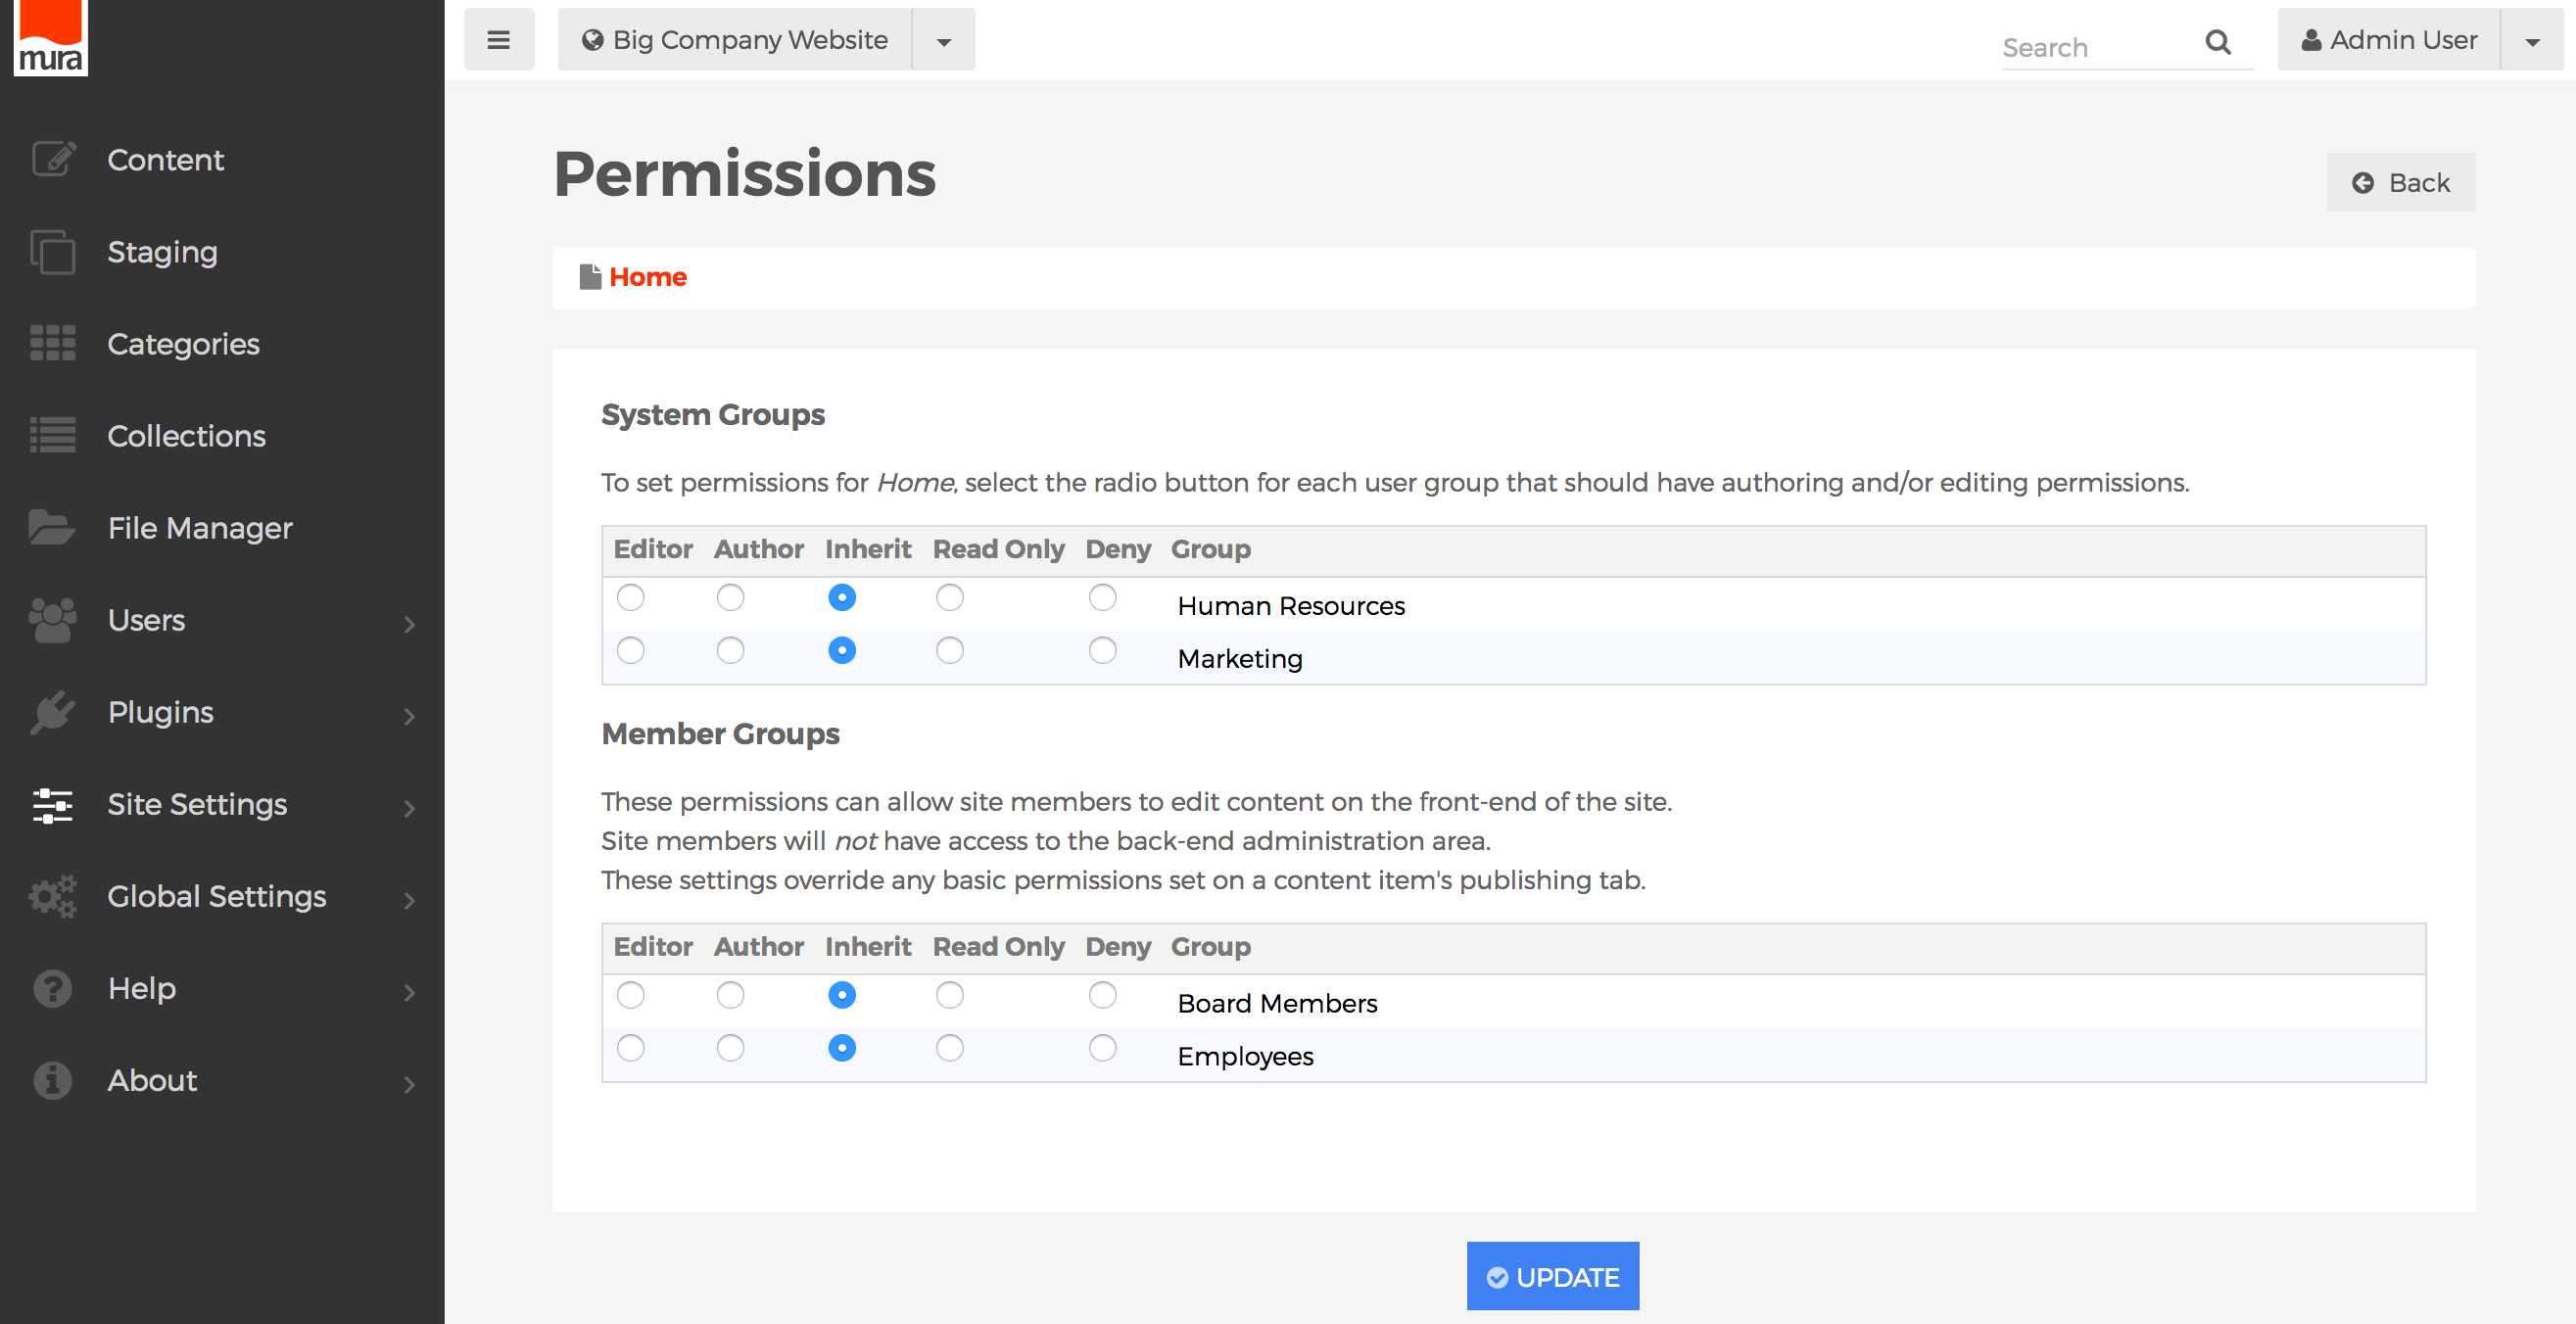
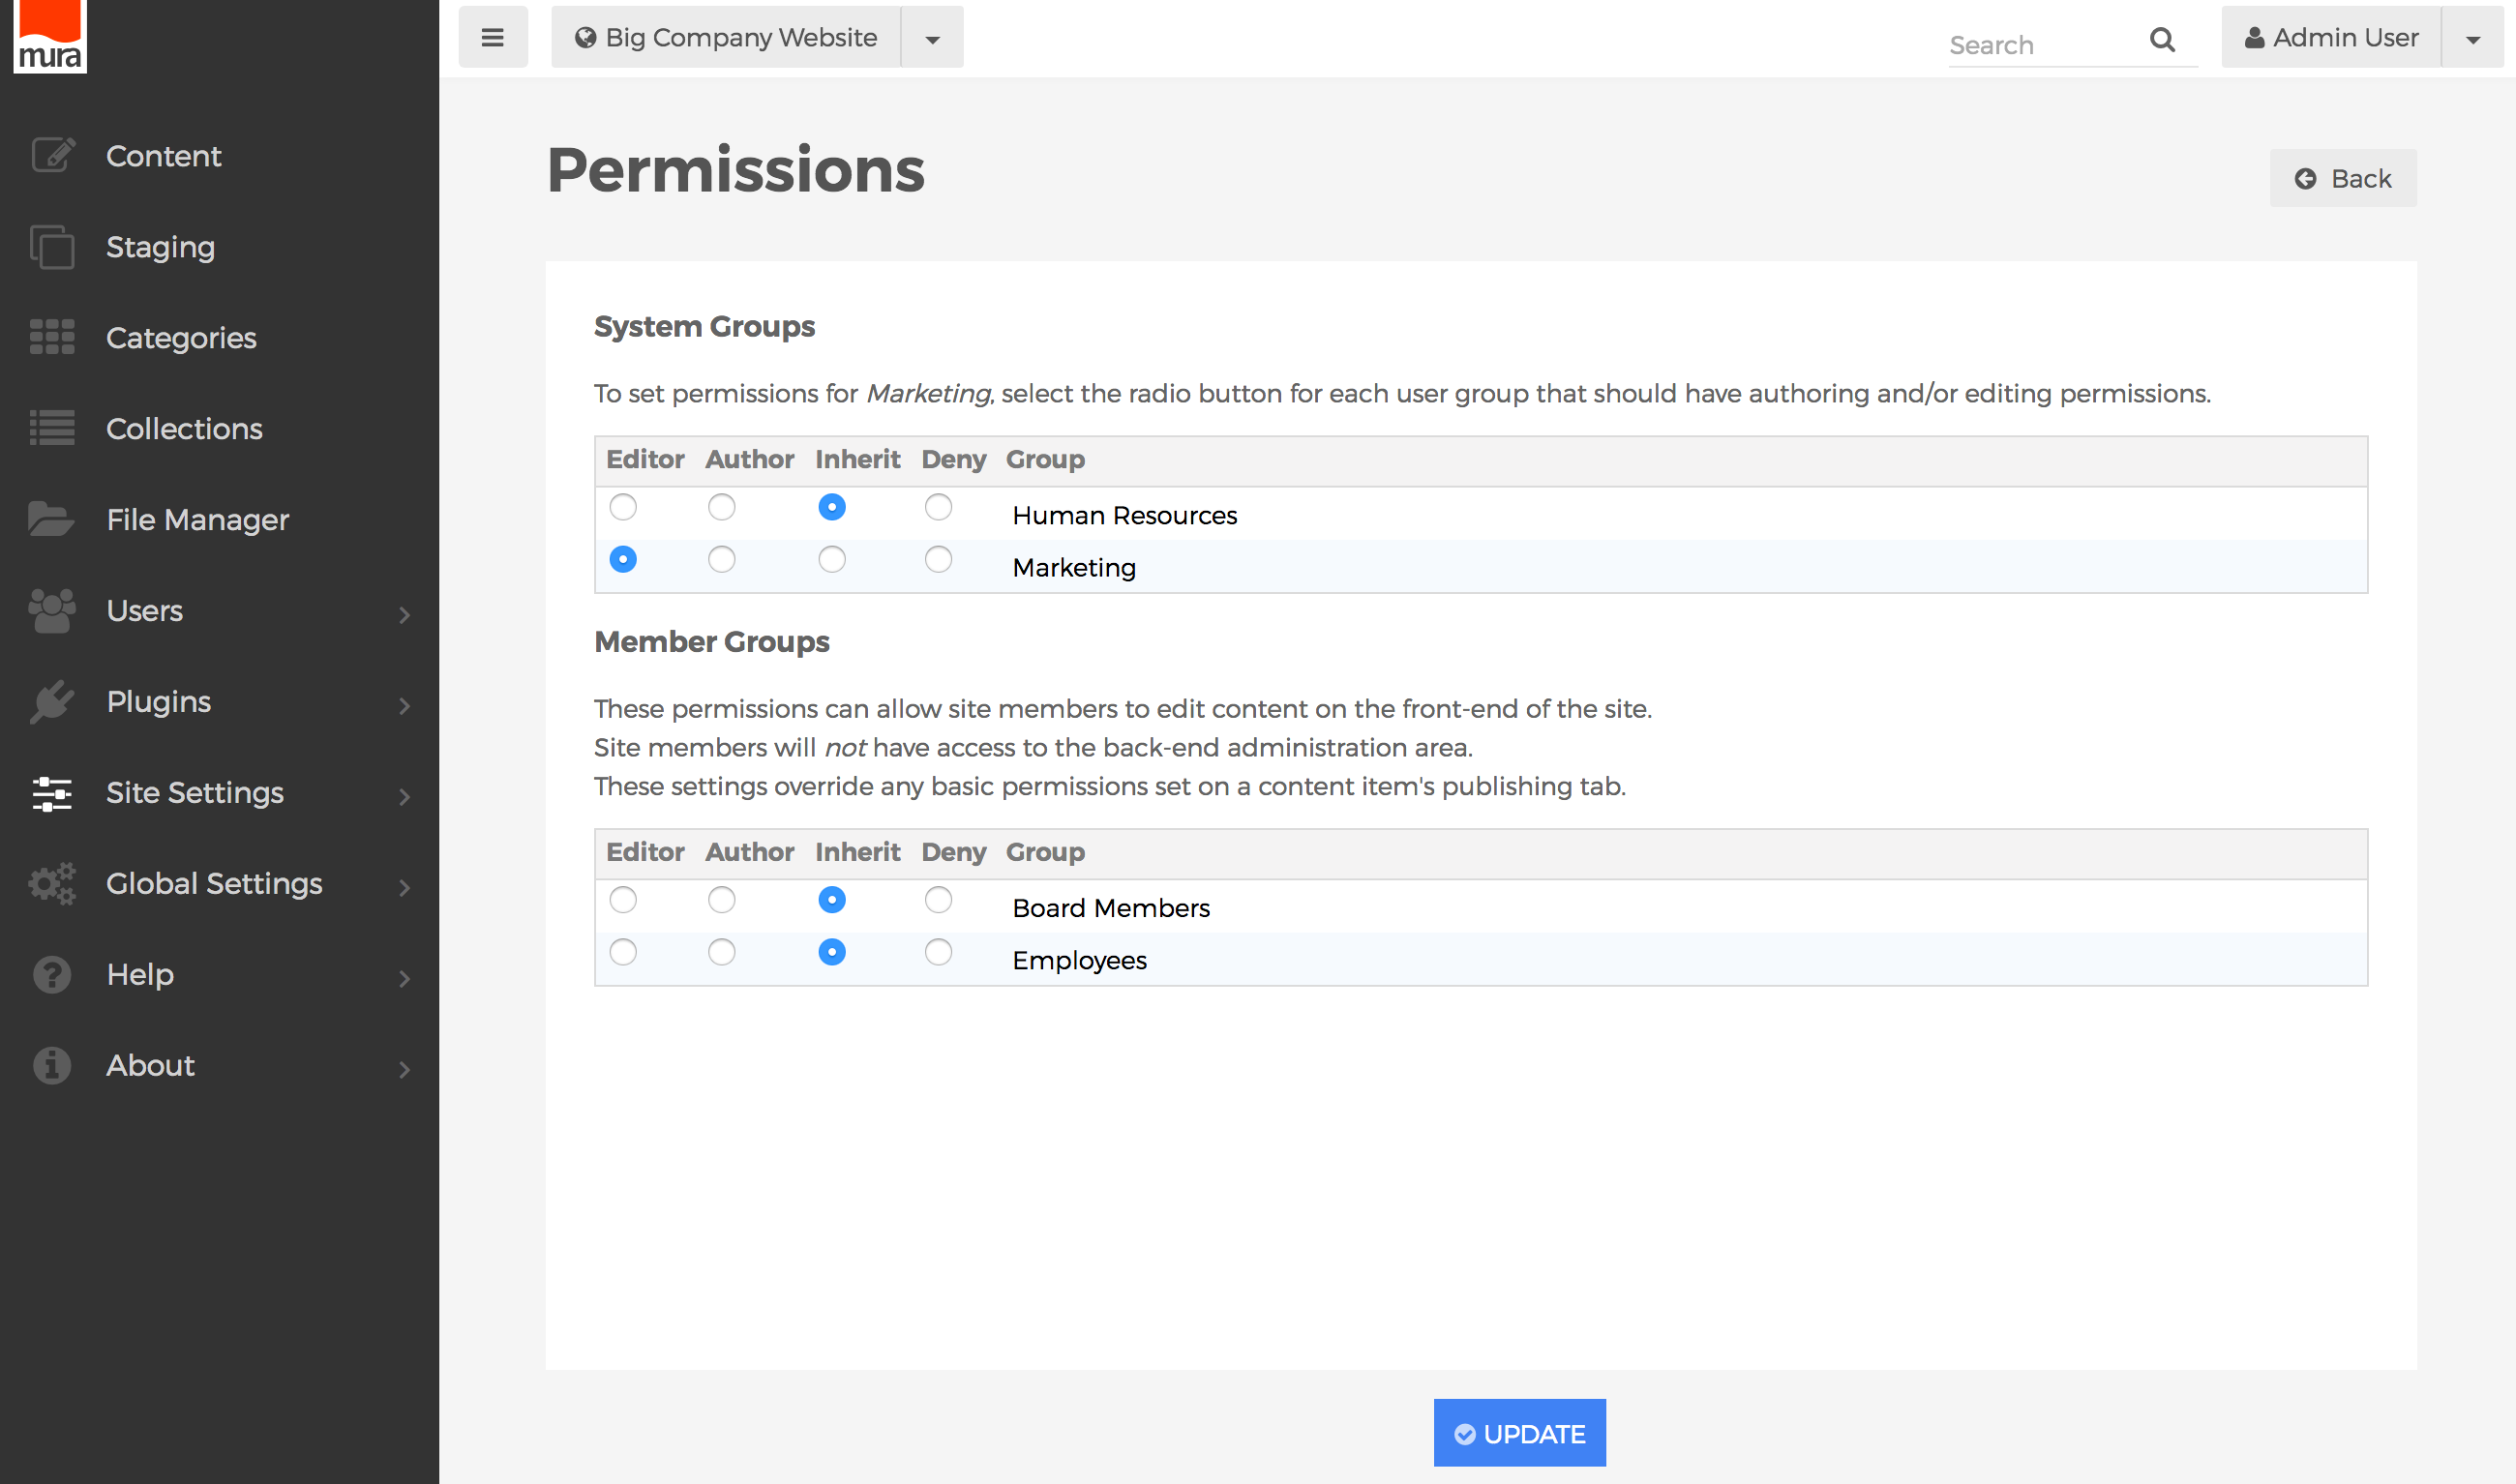
- From the Permissions screen, select your desired options for each group.

- Editor
- Groups granted "Editor" permissions are able to "write" content, as well as "publish" content. This means they can create new content items, update existing content items, delete content items, and even publish content items (or, make them "live"), but only within the section(s) of the site where they have been granted these privileges. The "Admin" group automatically has Editor privileges throughout Mura.
- Author
- Groups granted "Author" permissions can only "write" content. This means they can create new content items, and update existing content items. However, they are unable to publish or delete content items.
- Inherit
- If selected, permissions applied to the content item's parent will be used. If the parent also has "Inherit" selected, then Mura will traverse up the tree until it finds an explicit setting. If it reaches the "Home" content item, and "Inherit" is selected, the permissions fall back to "Deny."
- Read Only
- If selected, users of the group will not be able to edit the content item, or any of its children, unless explicitly overridden with a different setting down the tree. This is very similar to the "Deny" setting, except clicking the three-dot menu of a content item will reveal "Copy" and "Copy All" options. That said, if they choose to Copy a content item with "Read Only" privileges, if the user chooses to "Paste" the content item in an area they have Author or Editor rights to, the content will retain its "Read Only" privileges.
- Deny
- This is the default setting for all groups, except the "Admin" group. If selected, users of the specified group will only be able to see the Title, and tree structure of the content. They will not be able to edit the content item, or any of its children, unless explicitly overridden with a different setting down the tree.
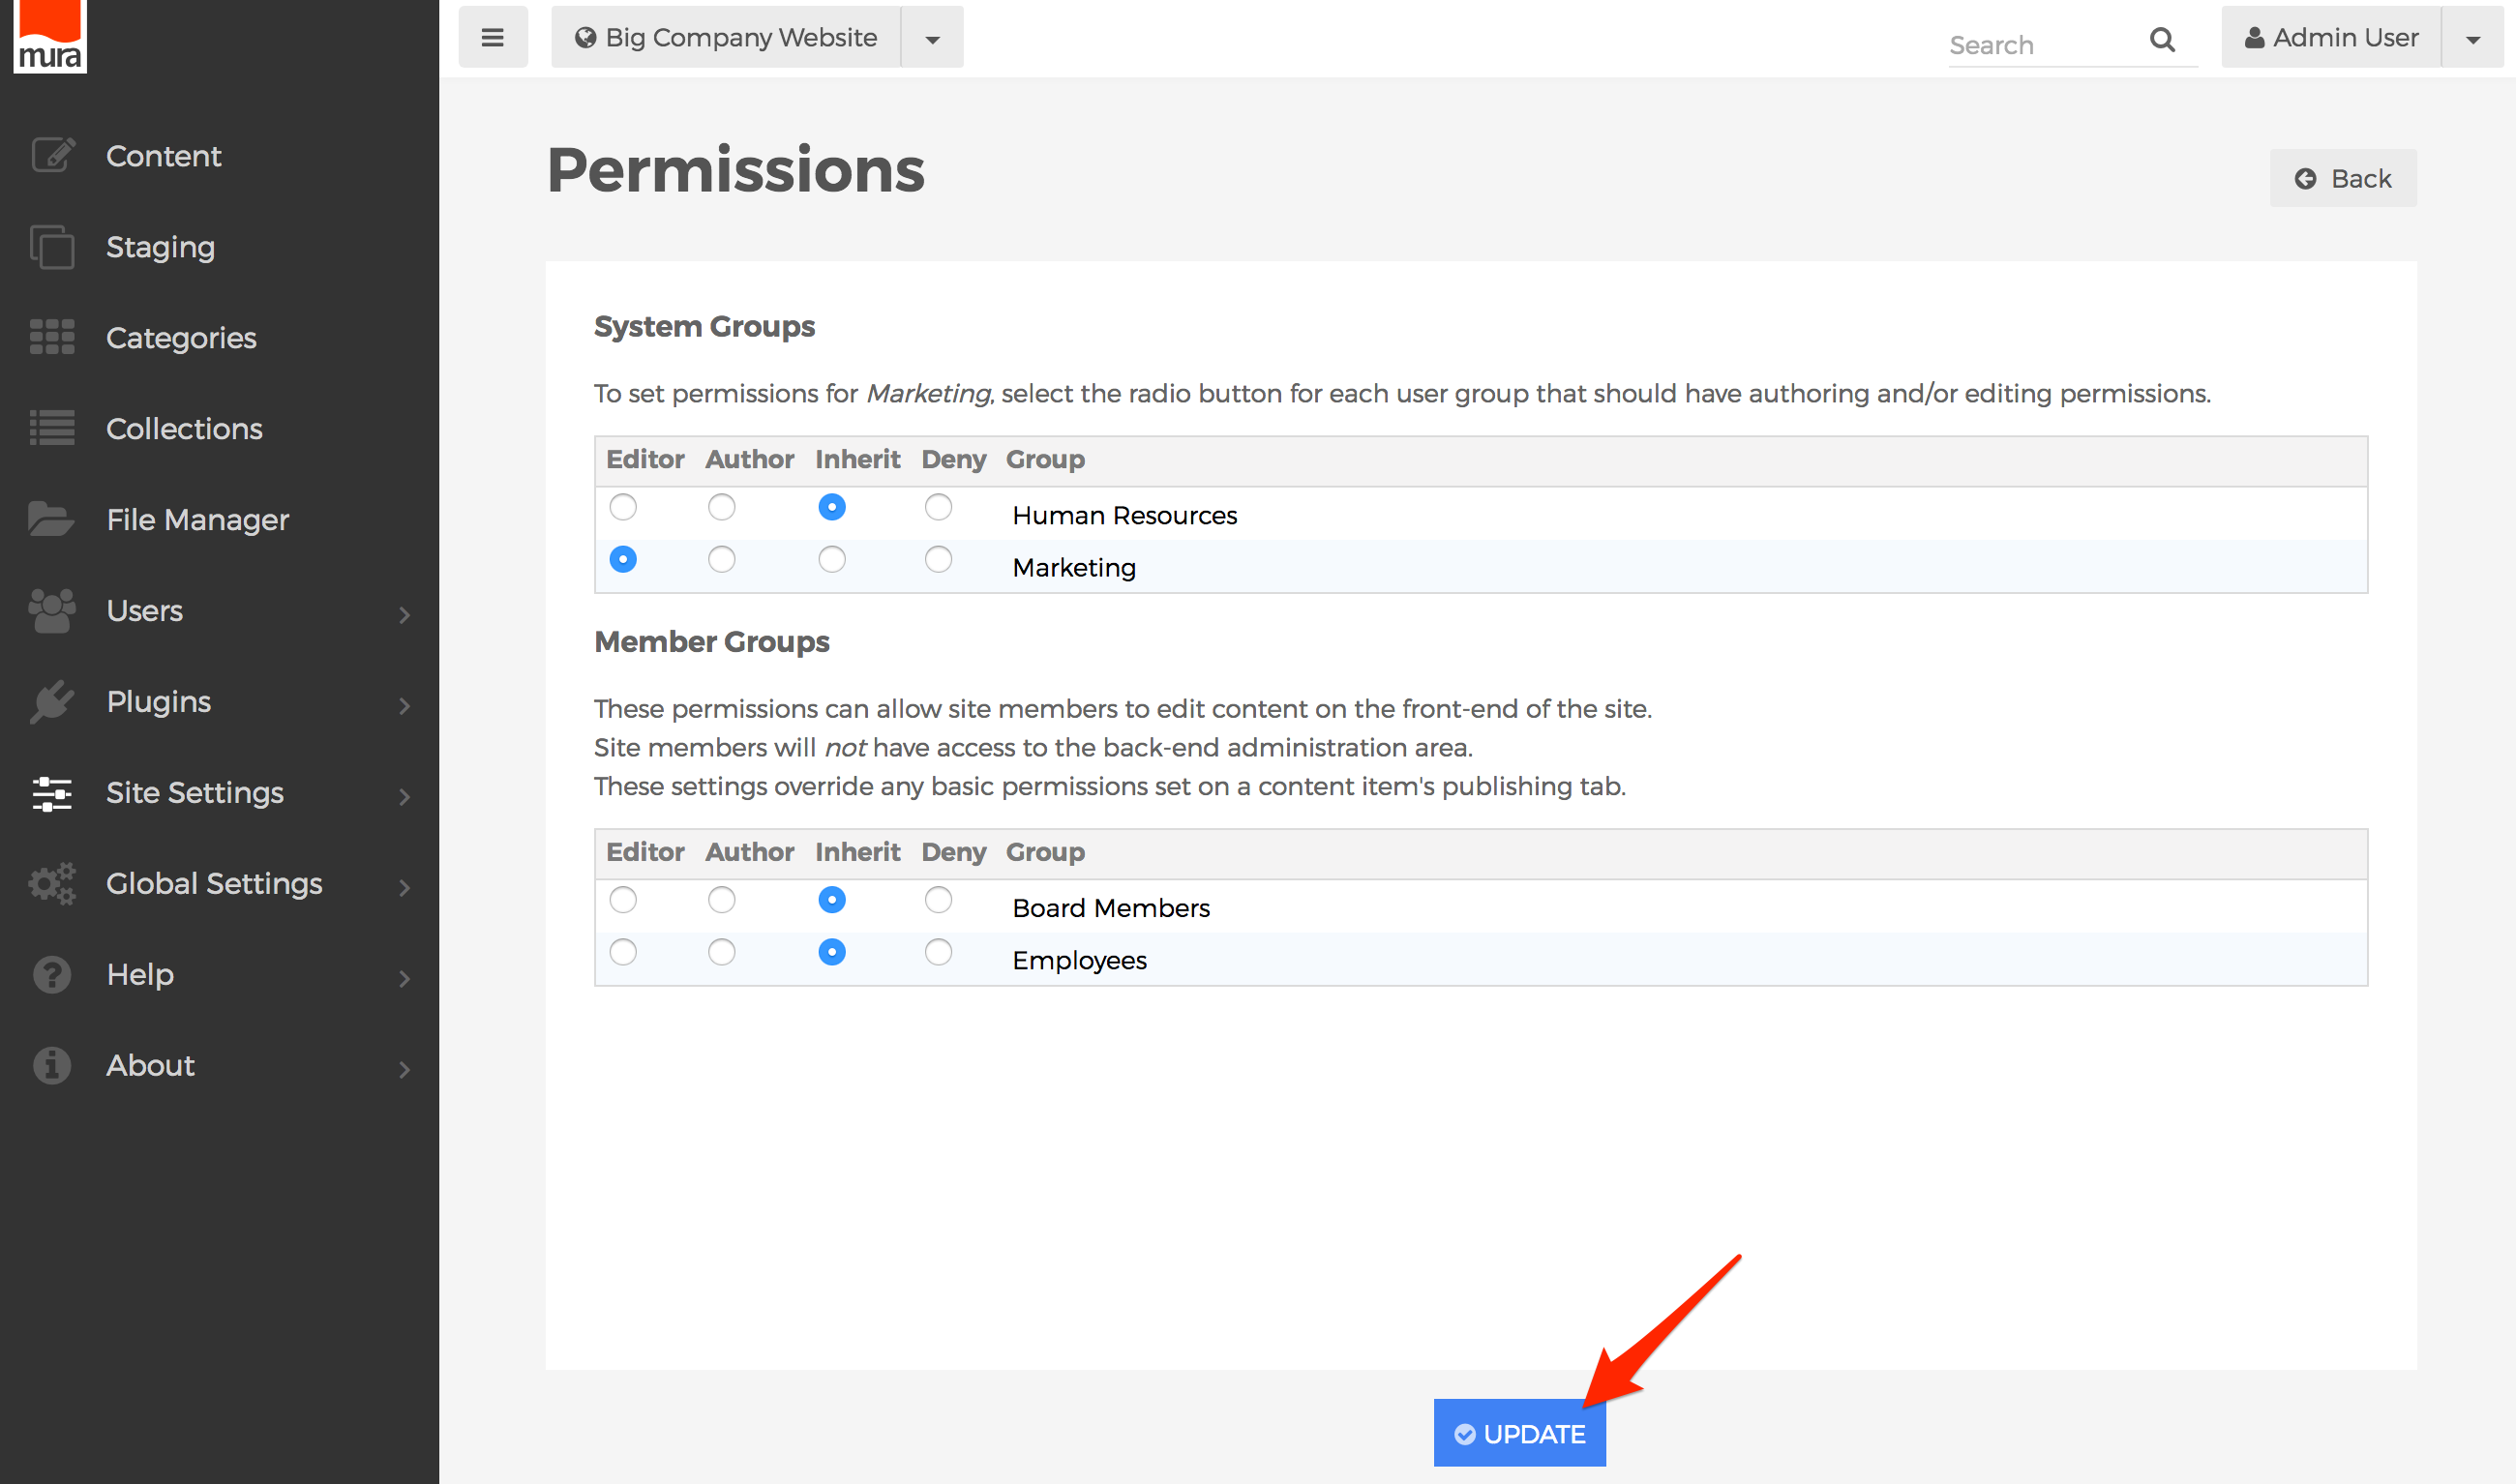
- Editor
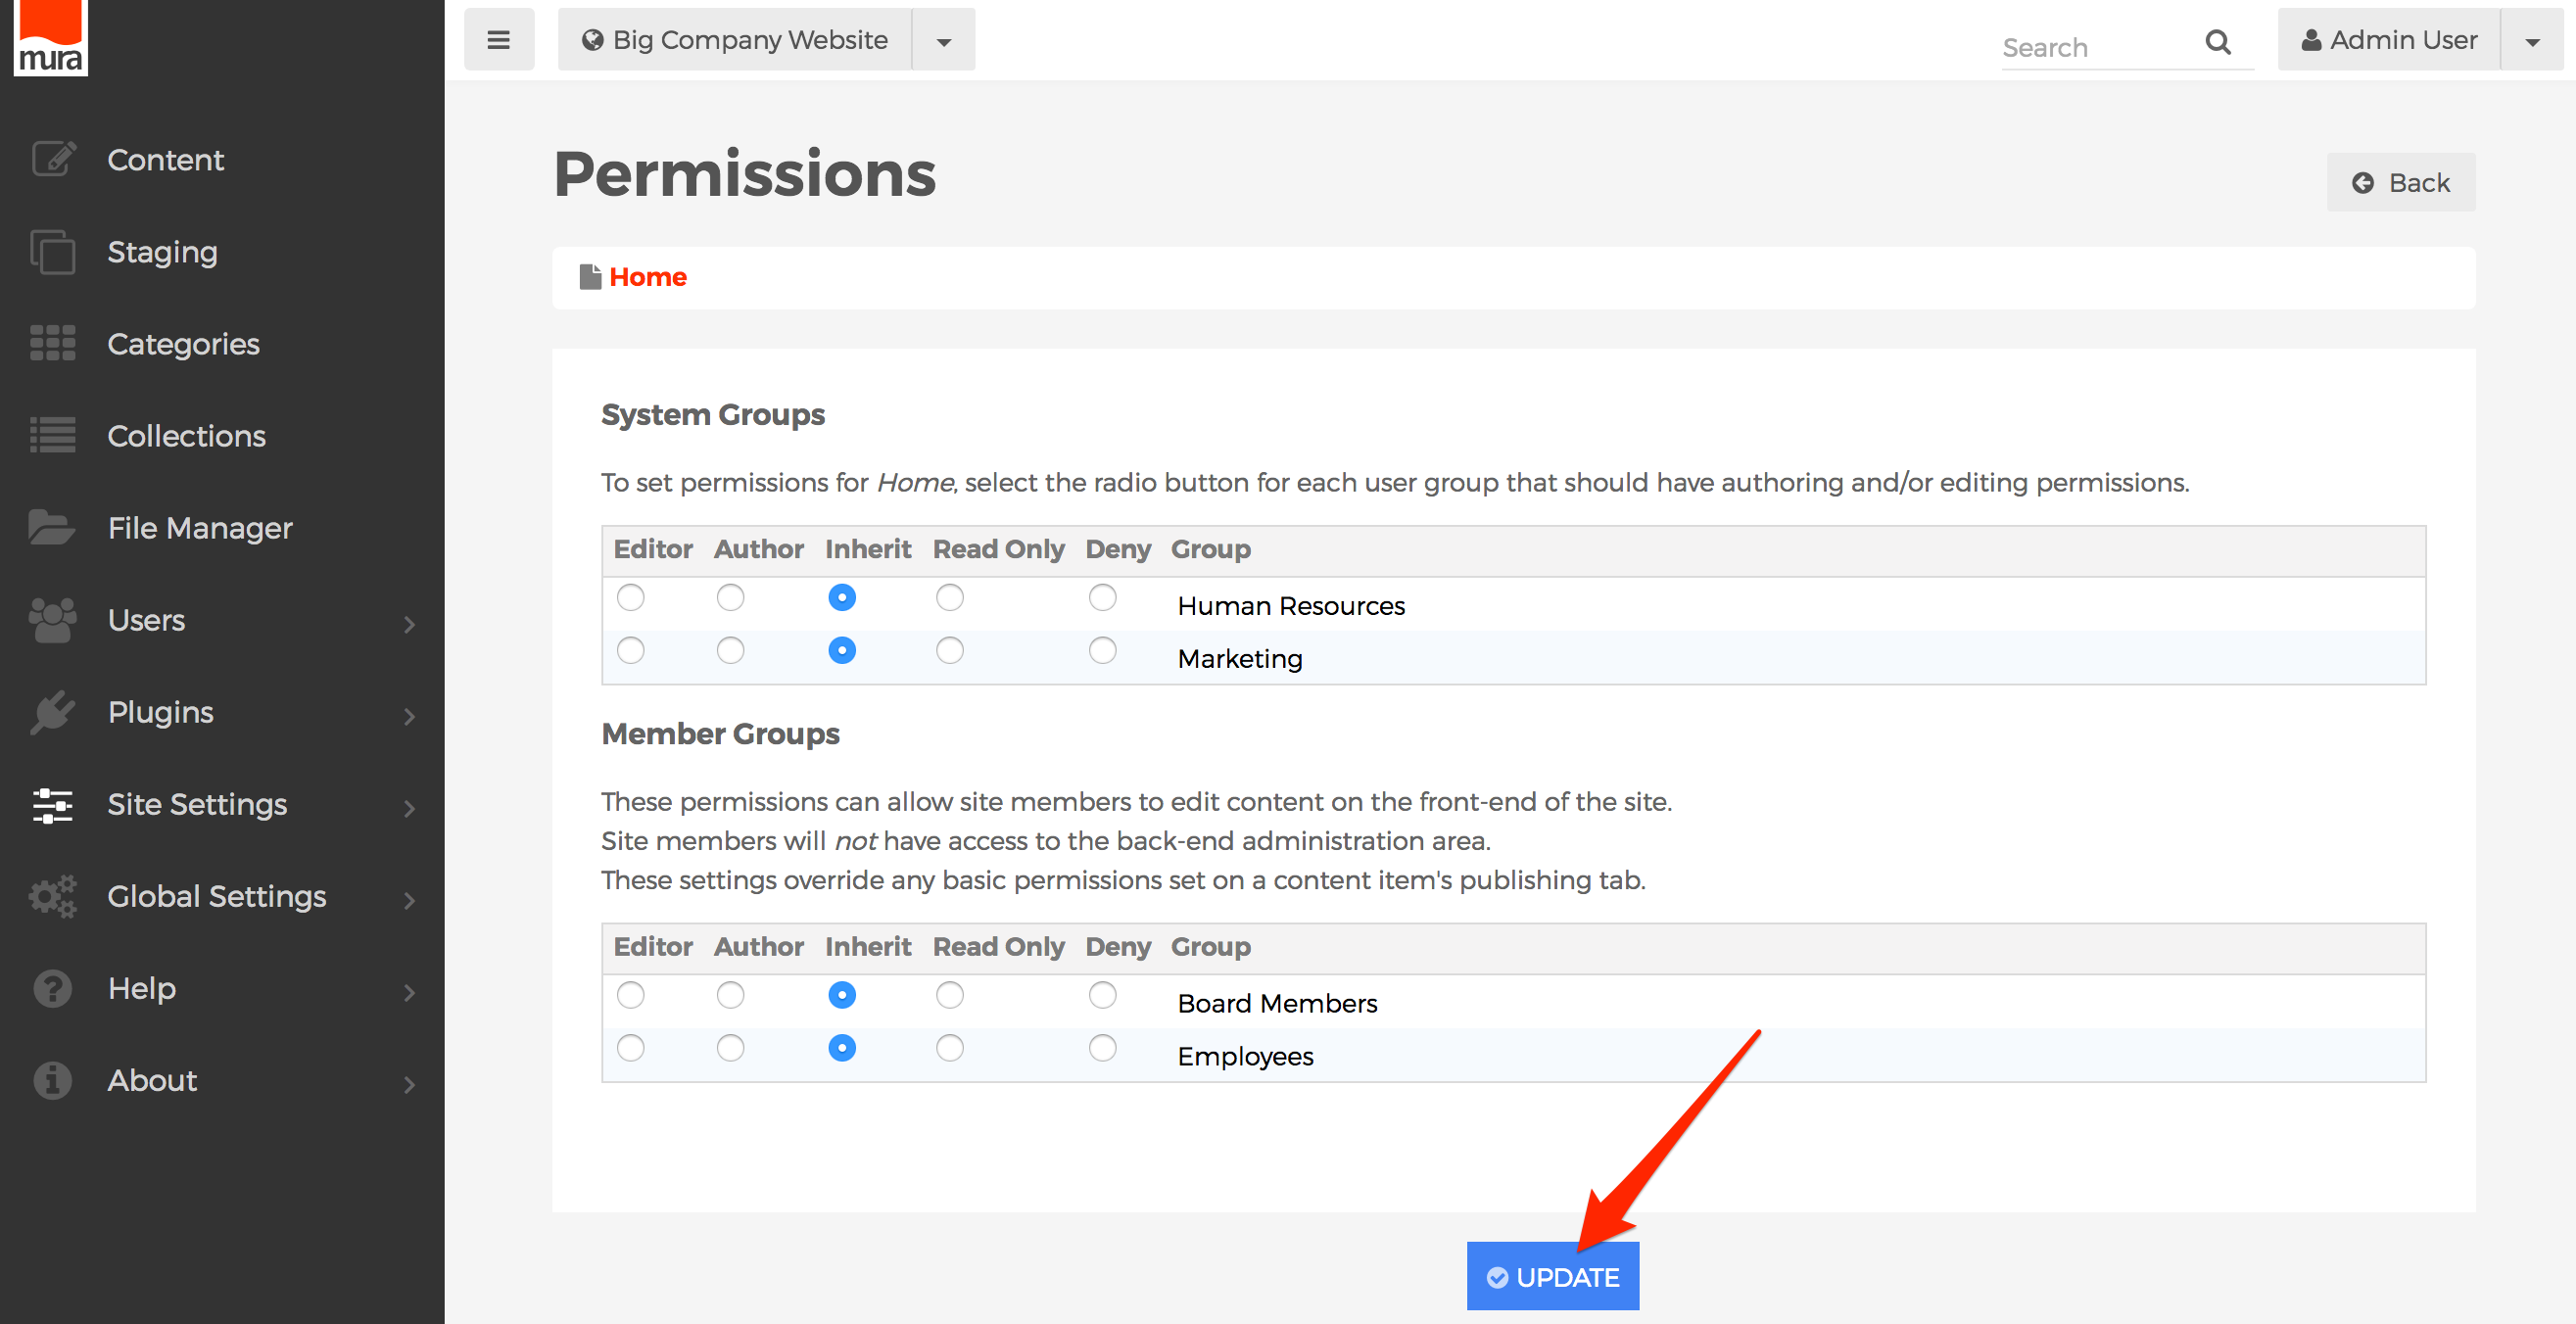
- Click Update, to save your changes.

- Users will obtain the new roles/privileges on their next successful login. So, if a user is logged in when the permissions were updated, they will have to log out, and then log back in, to see the changes.
Note: A commonly asked question is whether or not there is a way to "hide" content, or sections of a site, from certain groups in the back-end administration area of Mura. While there's always a way to do something programmatically, the short answer is no. The primary reason is twofold: just because a group may not be able to edit a top-level section, the group may actually be granted editing privileges to its children or grandchildren, and secondly Mura offers a way to allow for front-end editing only by assigning a user to a Member Group with editing privileges, instead of a System group.
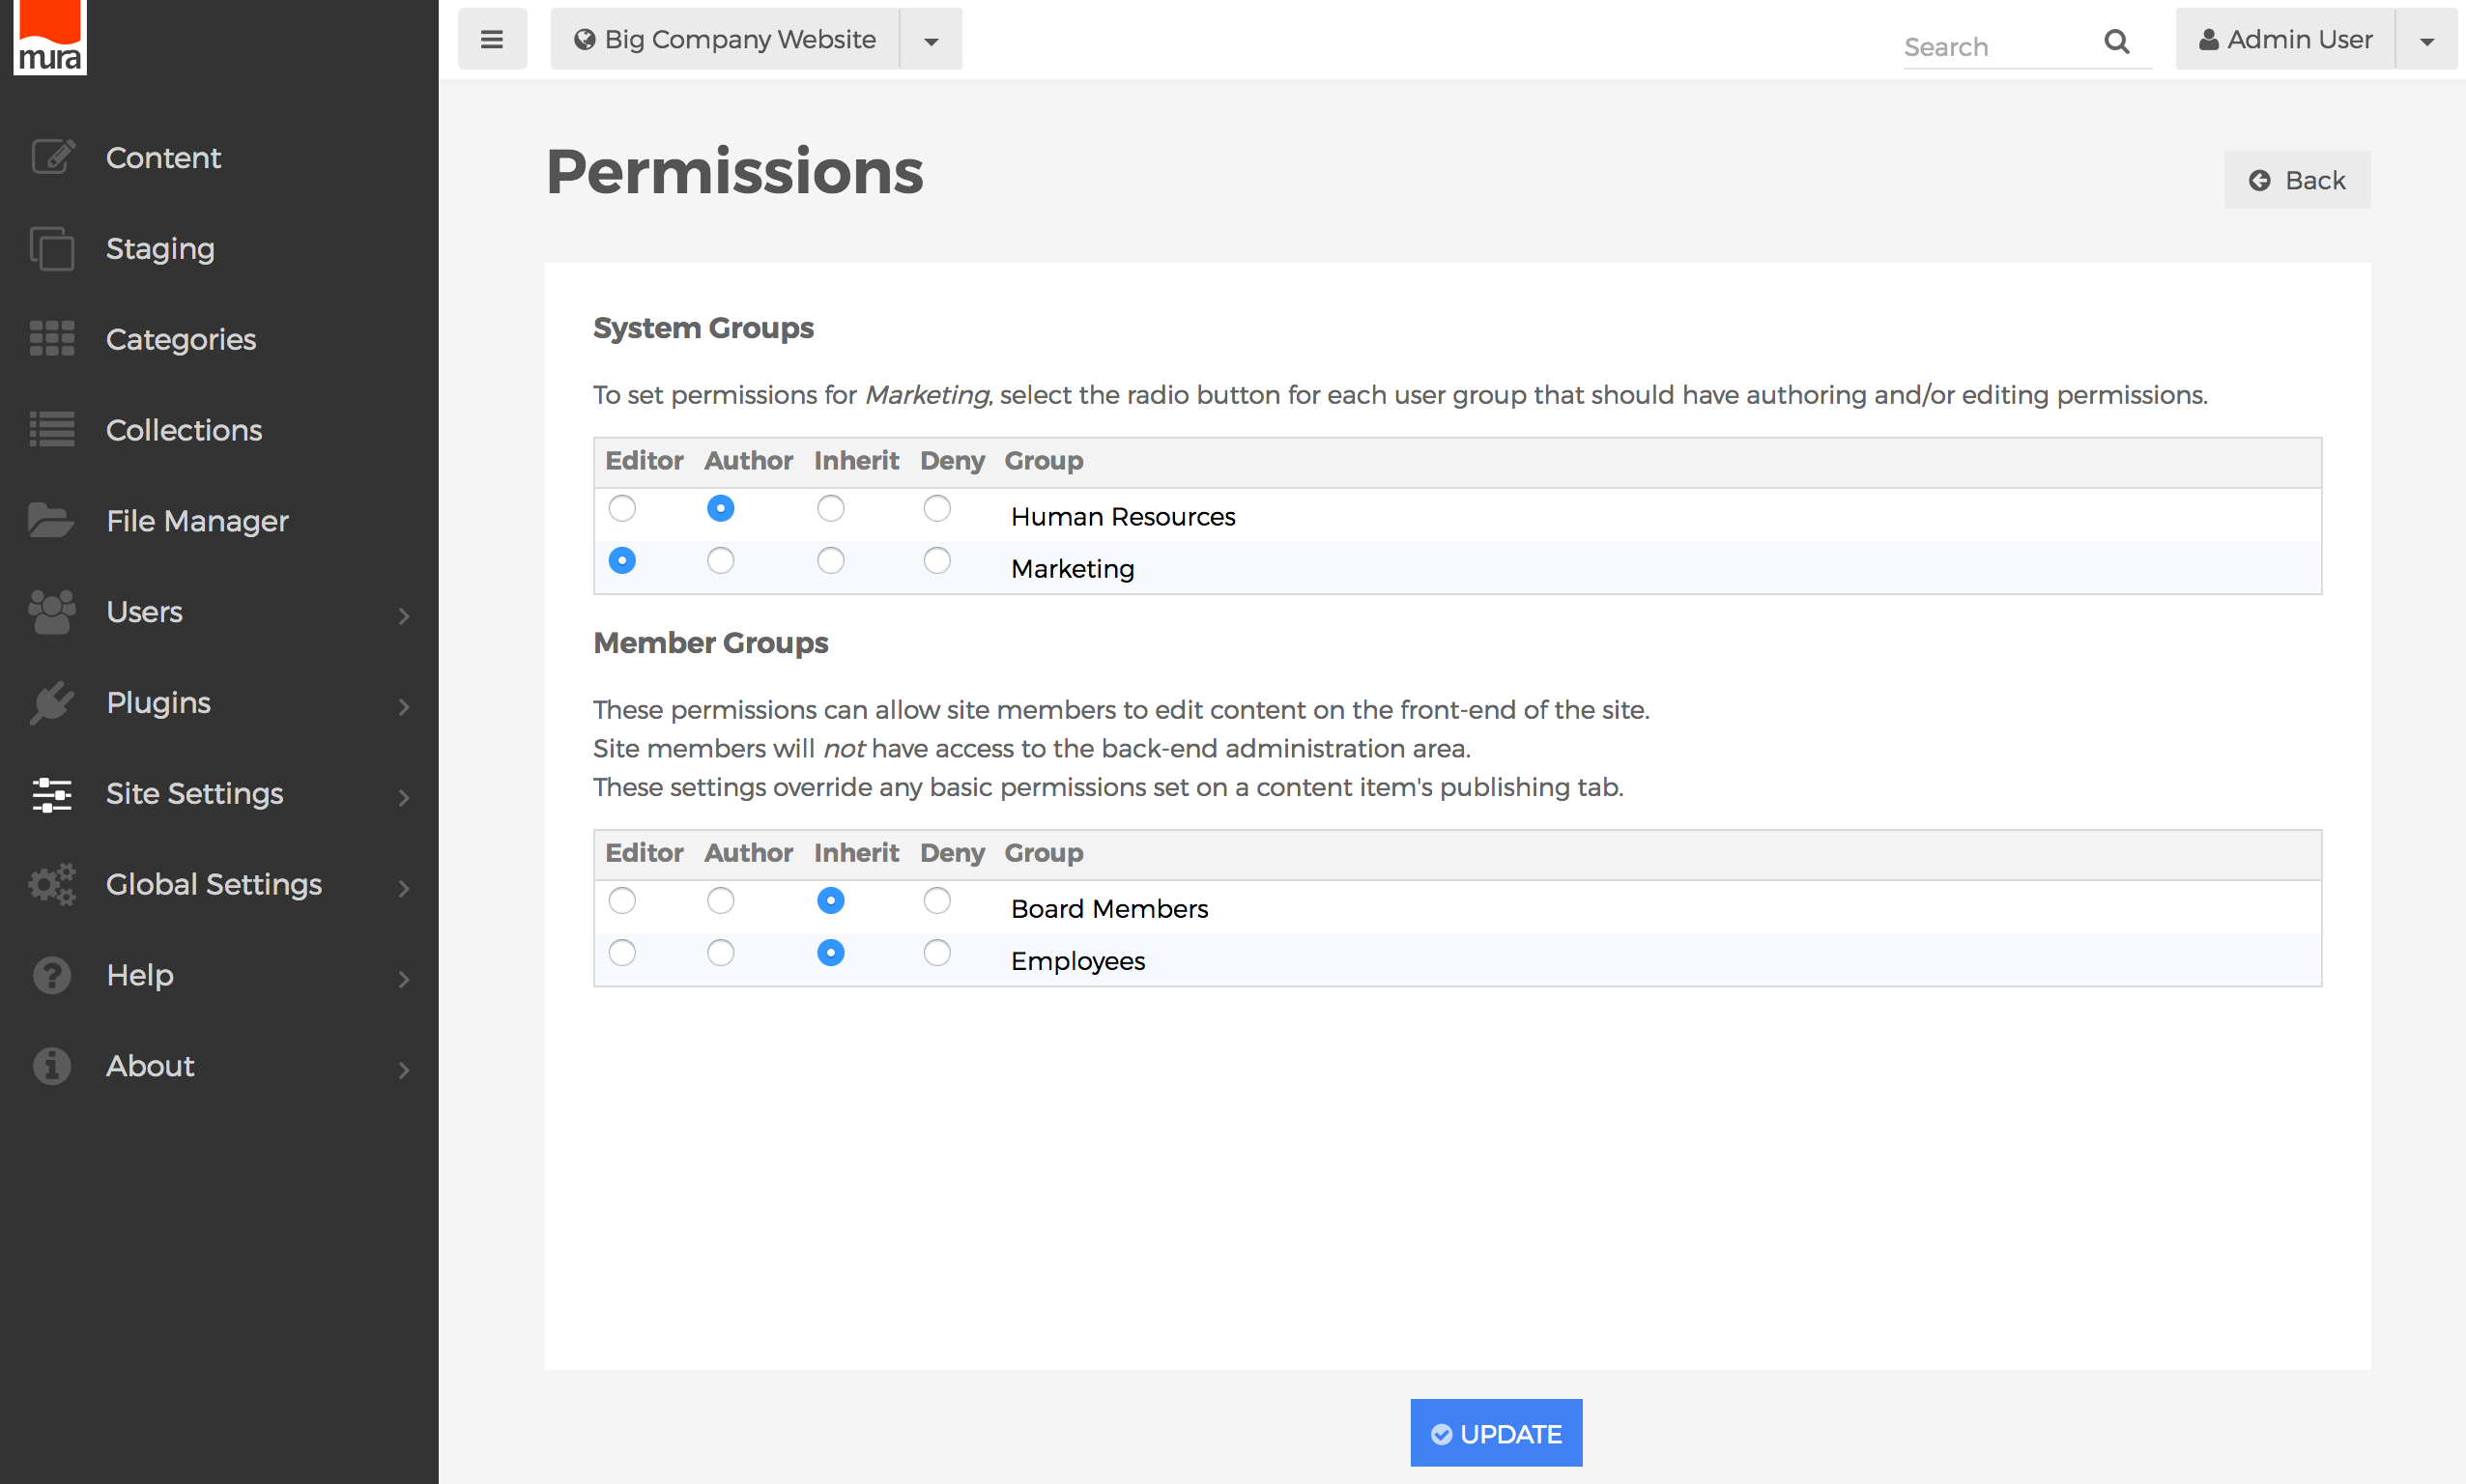
Component Permissions
Managing permissions for components is very similar to managing content permissions, because components can be grouped together in a hierarchy, just like content. As you've seen in the Components section, you can nest a component, or a group of components together under a Folder, or other components. Not only does this make it easy from an organizational point of view, it really simplifies things from the viewpoint of enabling or restricting editing permissions as well.
As you've already learned, permissions cascade from the top-most item, down through its children, grandchildren, and beyond. By default, all groups granted access to edit the site begin with "Inherit" privileges, except for the "Admin" group. The Admin group automatically has full editing privileges throughout Mura.
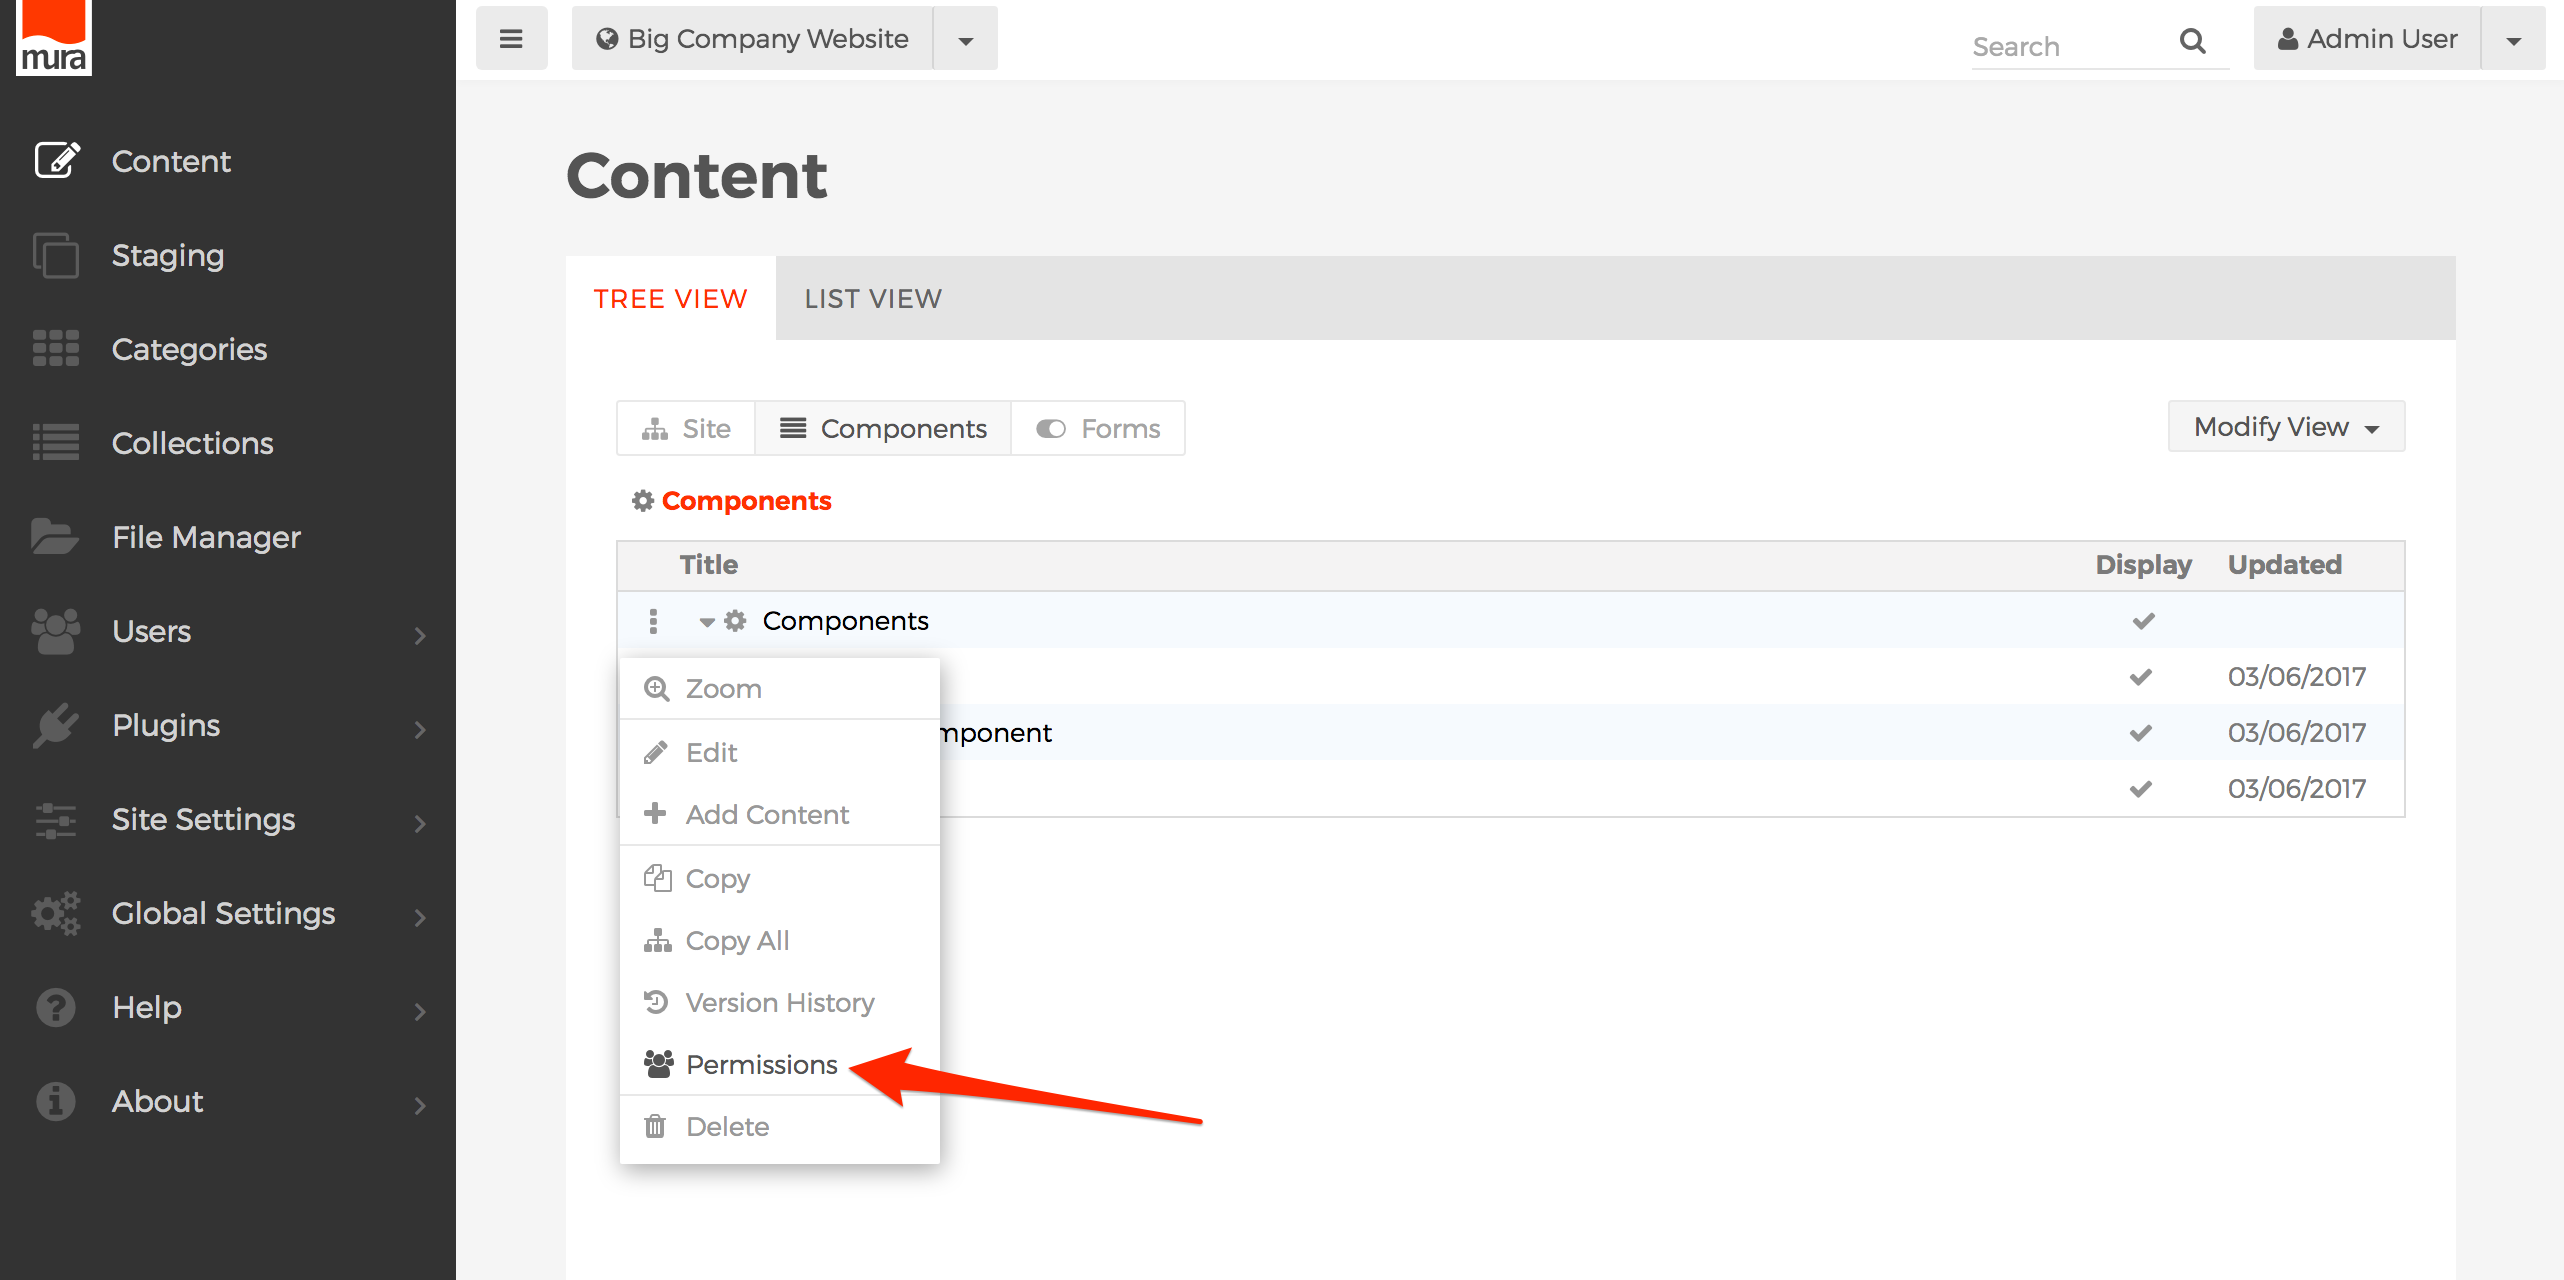
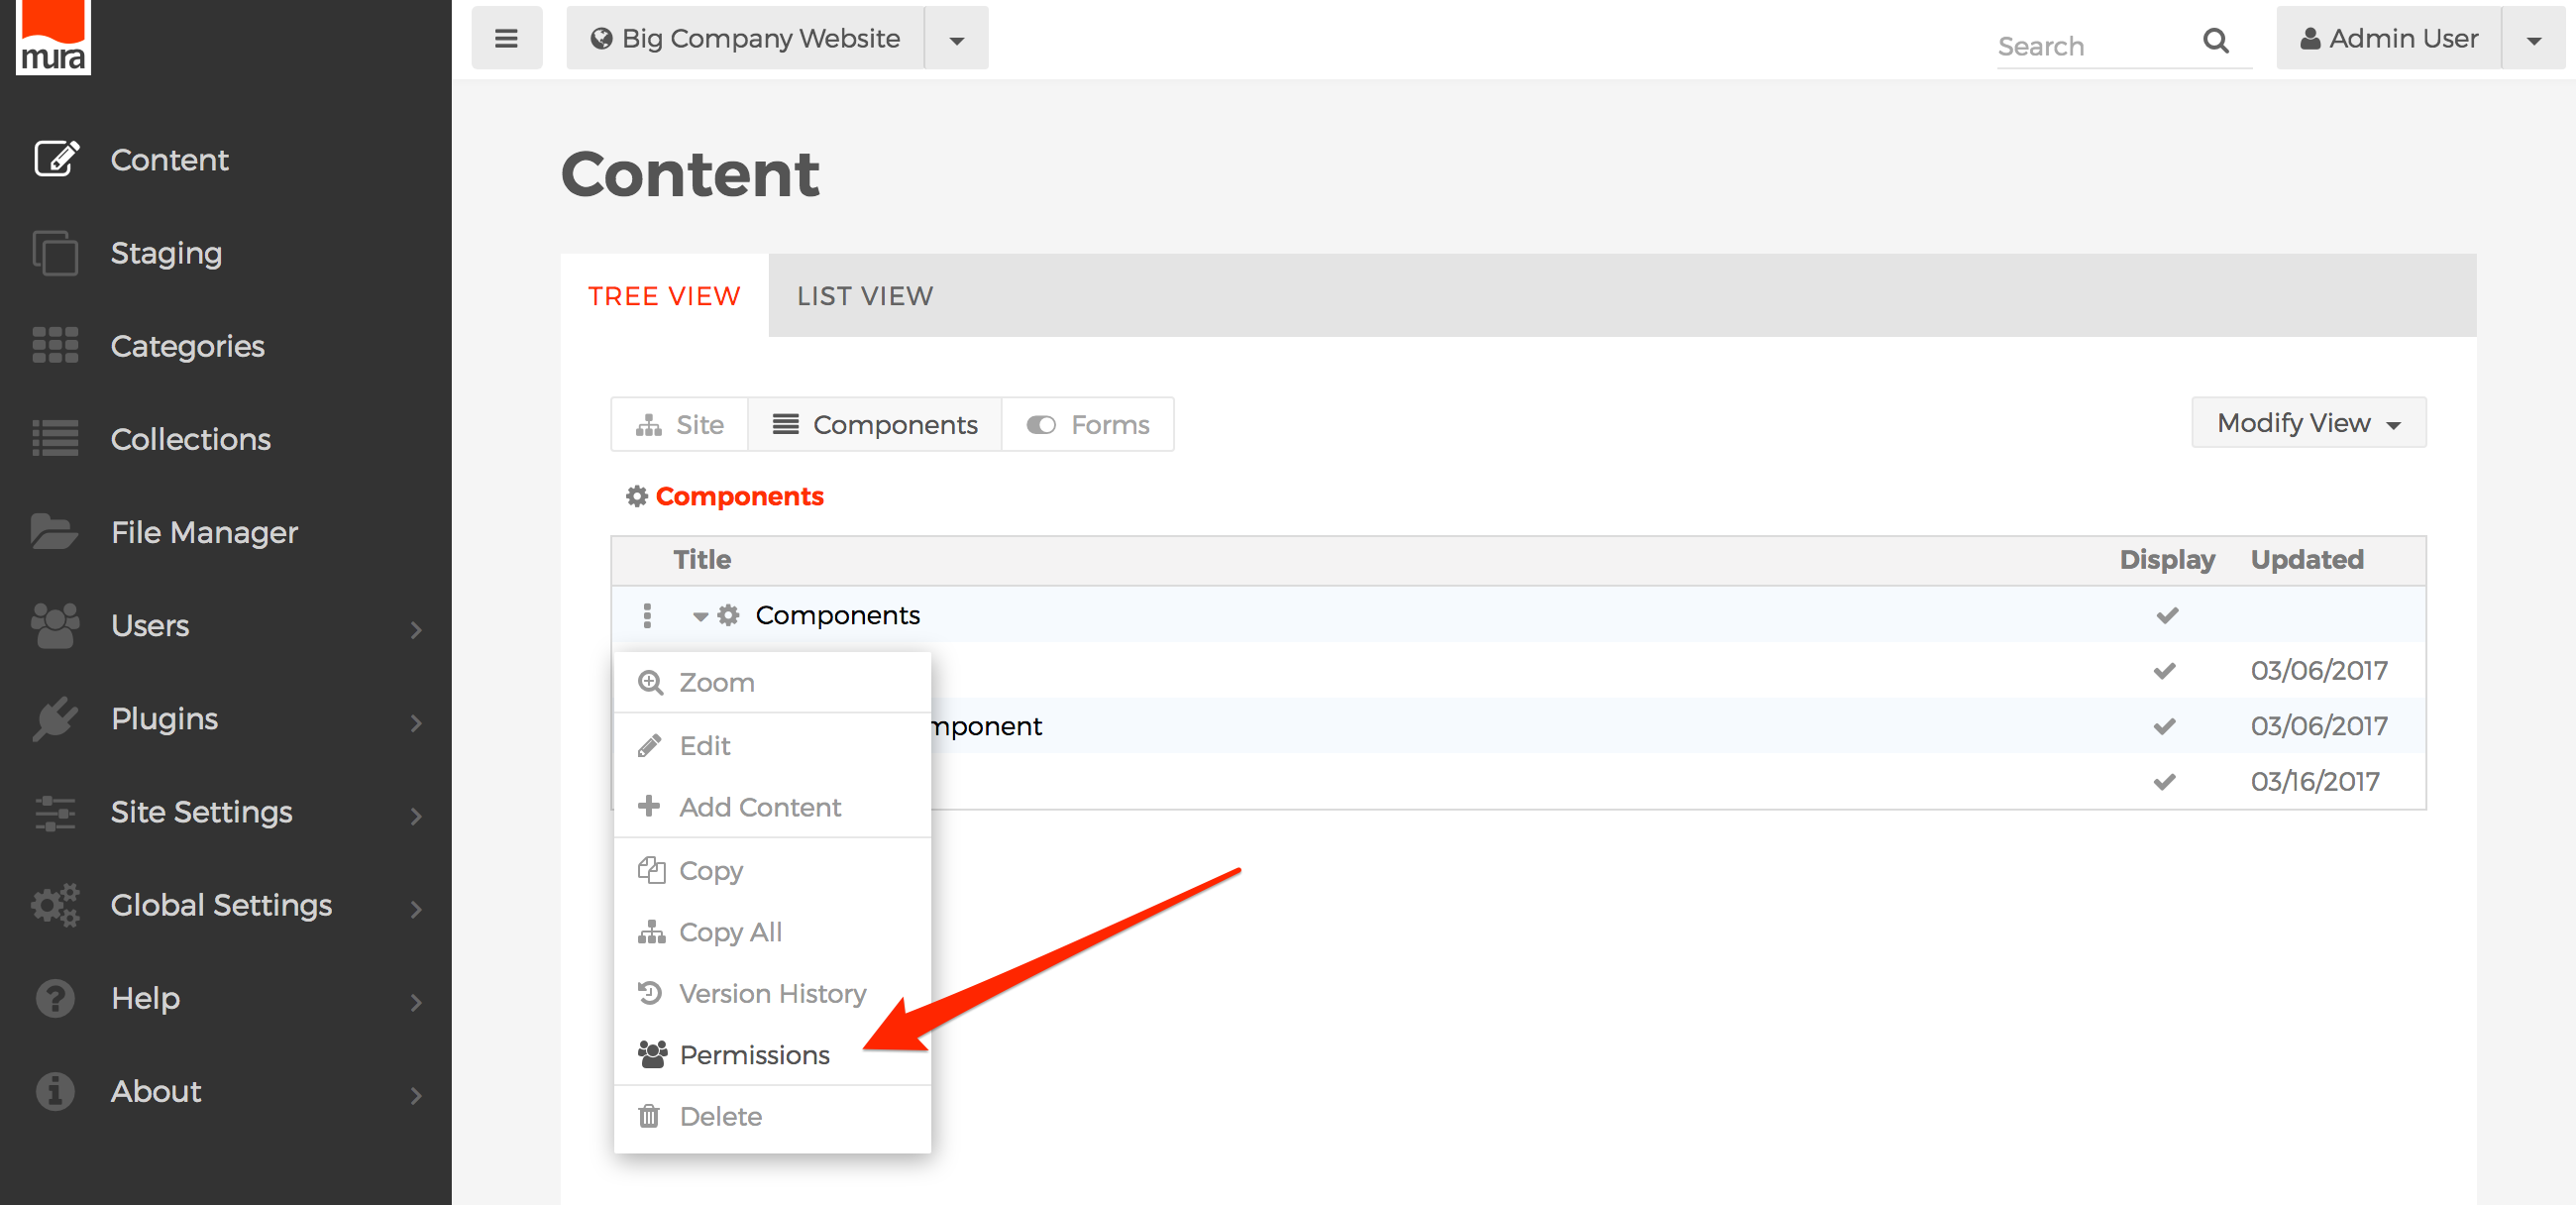
How to Apply Permissions to Components
- From the Content screen, on the Tree View tab, click the Components button.
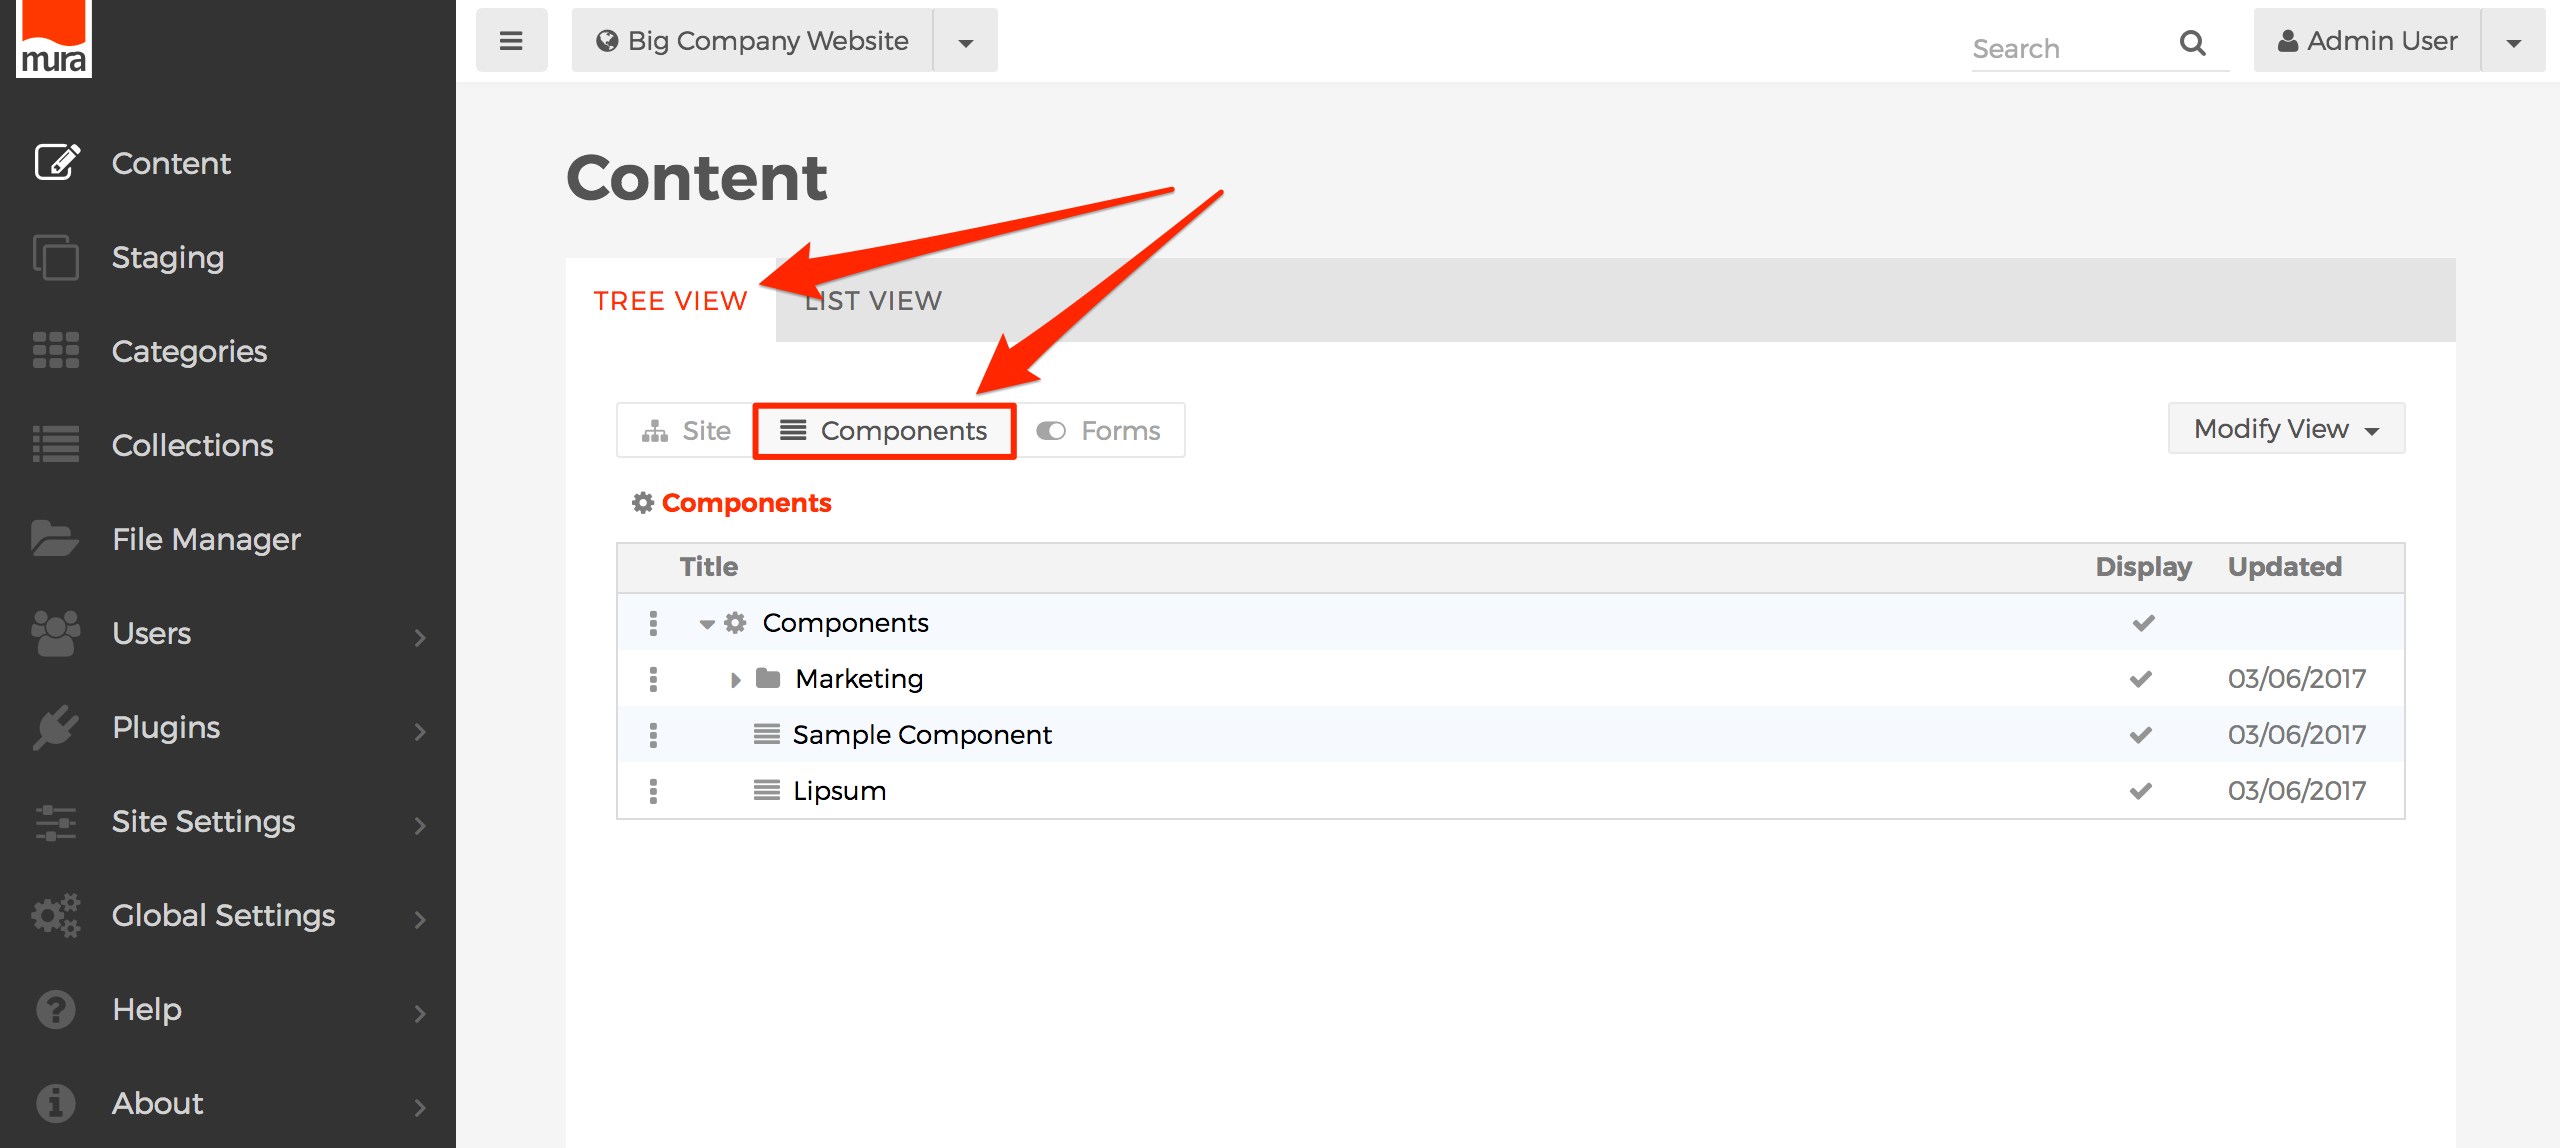
- Since all non-Admin groups begin with "Inherit" privileges, they will not be able to see the "Components" button on the Content > Tree View tab. For example, the following screen is what a "Marketing Group" user would initially see before permissions for components have been explicitly set. As you'll notice, this user is unable to see a "Components" button at all.

- The first thing you'll want to decide on is whether or not you want the group to be able to edit components by default. Then, you'll set permissions on the top-level "Components" item itself, and those permissions will cascade down through the rest of the components. So, if you explicitly set the group's permissions on the top-level Components item to "Deny," the group will be able to see the "Components" button on the Content > Tree View screen, and by default, they won't be able to actually edit anything, unless you explicitly set the group's role to "Editor" or "Author" by following the rest of the steps below. Conversely, if you set the group's permissions on the top-level Components item to "Editor" or "Author," the group will inherit those rights throughout the Components area, unless explicitly overridden somewhere down the tree. Follow the steps below for editing the permissions of the top-level Components item itself.
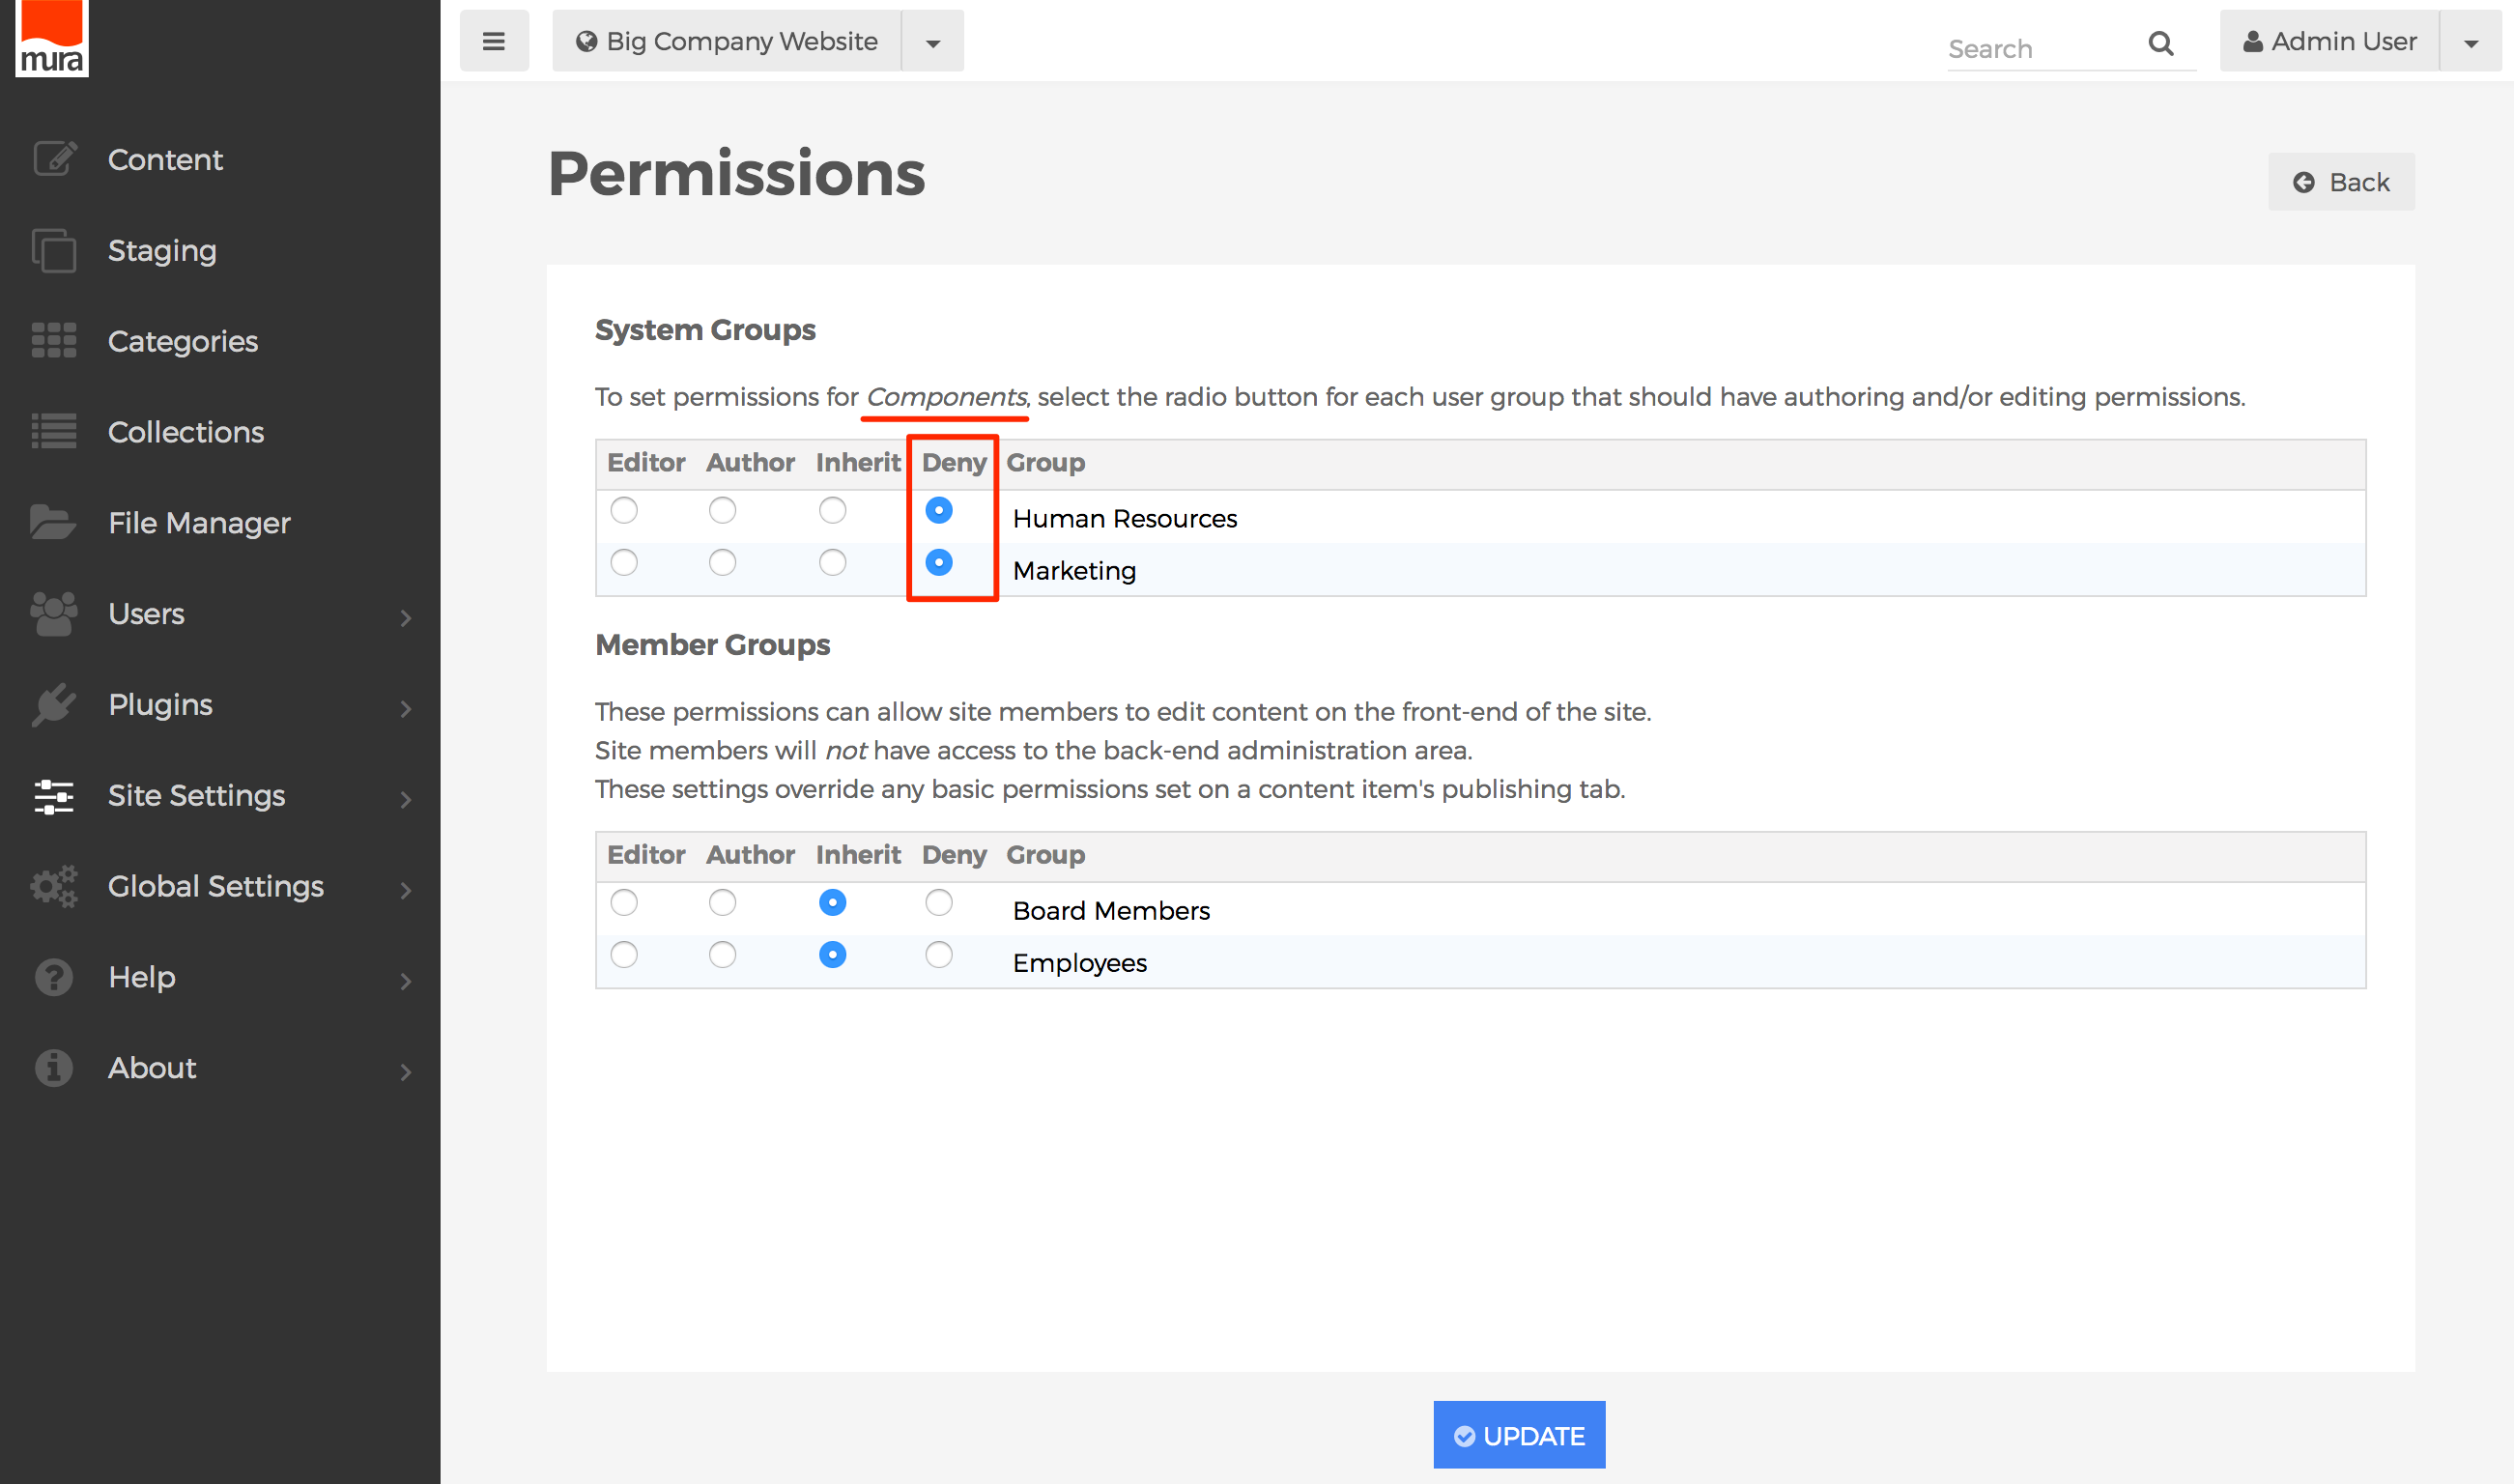
- Editor
- Groups granted "Editor" permissions are able to "write" components, as well as "publish" components. This means they can create new components, update existing components, delete components, and even publish components (or, make them "live"), but only within the section(s) of the site where they have been granted these privileges. The "Admin" group automatically has Editor privileges throughout Mura.
- Author
- Groups granted "Author" permissions can only "write" components. This means they can create new components, and update existing components. However, they are unable to publish or delete components.
- Inherit
- If selected, permissions applied to the component's parent will be used. If the parent also has "Inherit" selected, then Mura will traverse up the tree until it finds an explicit setting. If Mura reaches the topmost component, and "Inherit" is selected, the permissions fall back to "Deny."
- Deny
- This is the default setting for all groups, except the "Admin" group. If selected, users of the specified group will only be able to see the Title, and tree structure of the components. They will not be able to edit the component, or any of its children, unless explicitly overridden with a different setting down the tree.
- Editor
- Click the three-dot menu of the component you wish to manage permissions for, and select Permissions.

- Or, if editing a component, click the Actions button, and select Permissions.

- From the Permissions screen, select your desired setting for each group.

- Click Update, to save your changes.
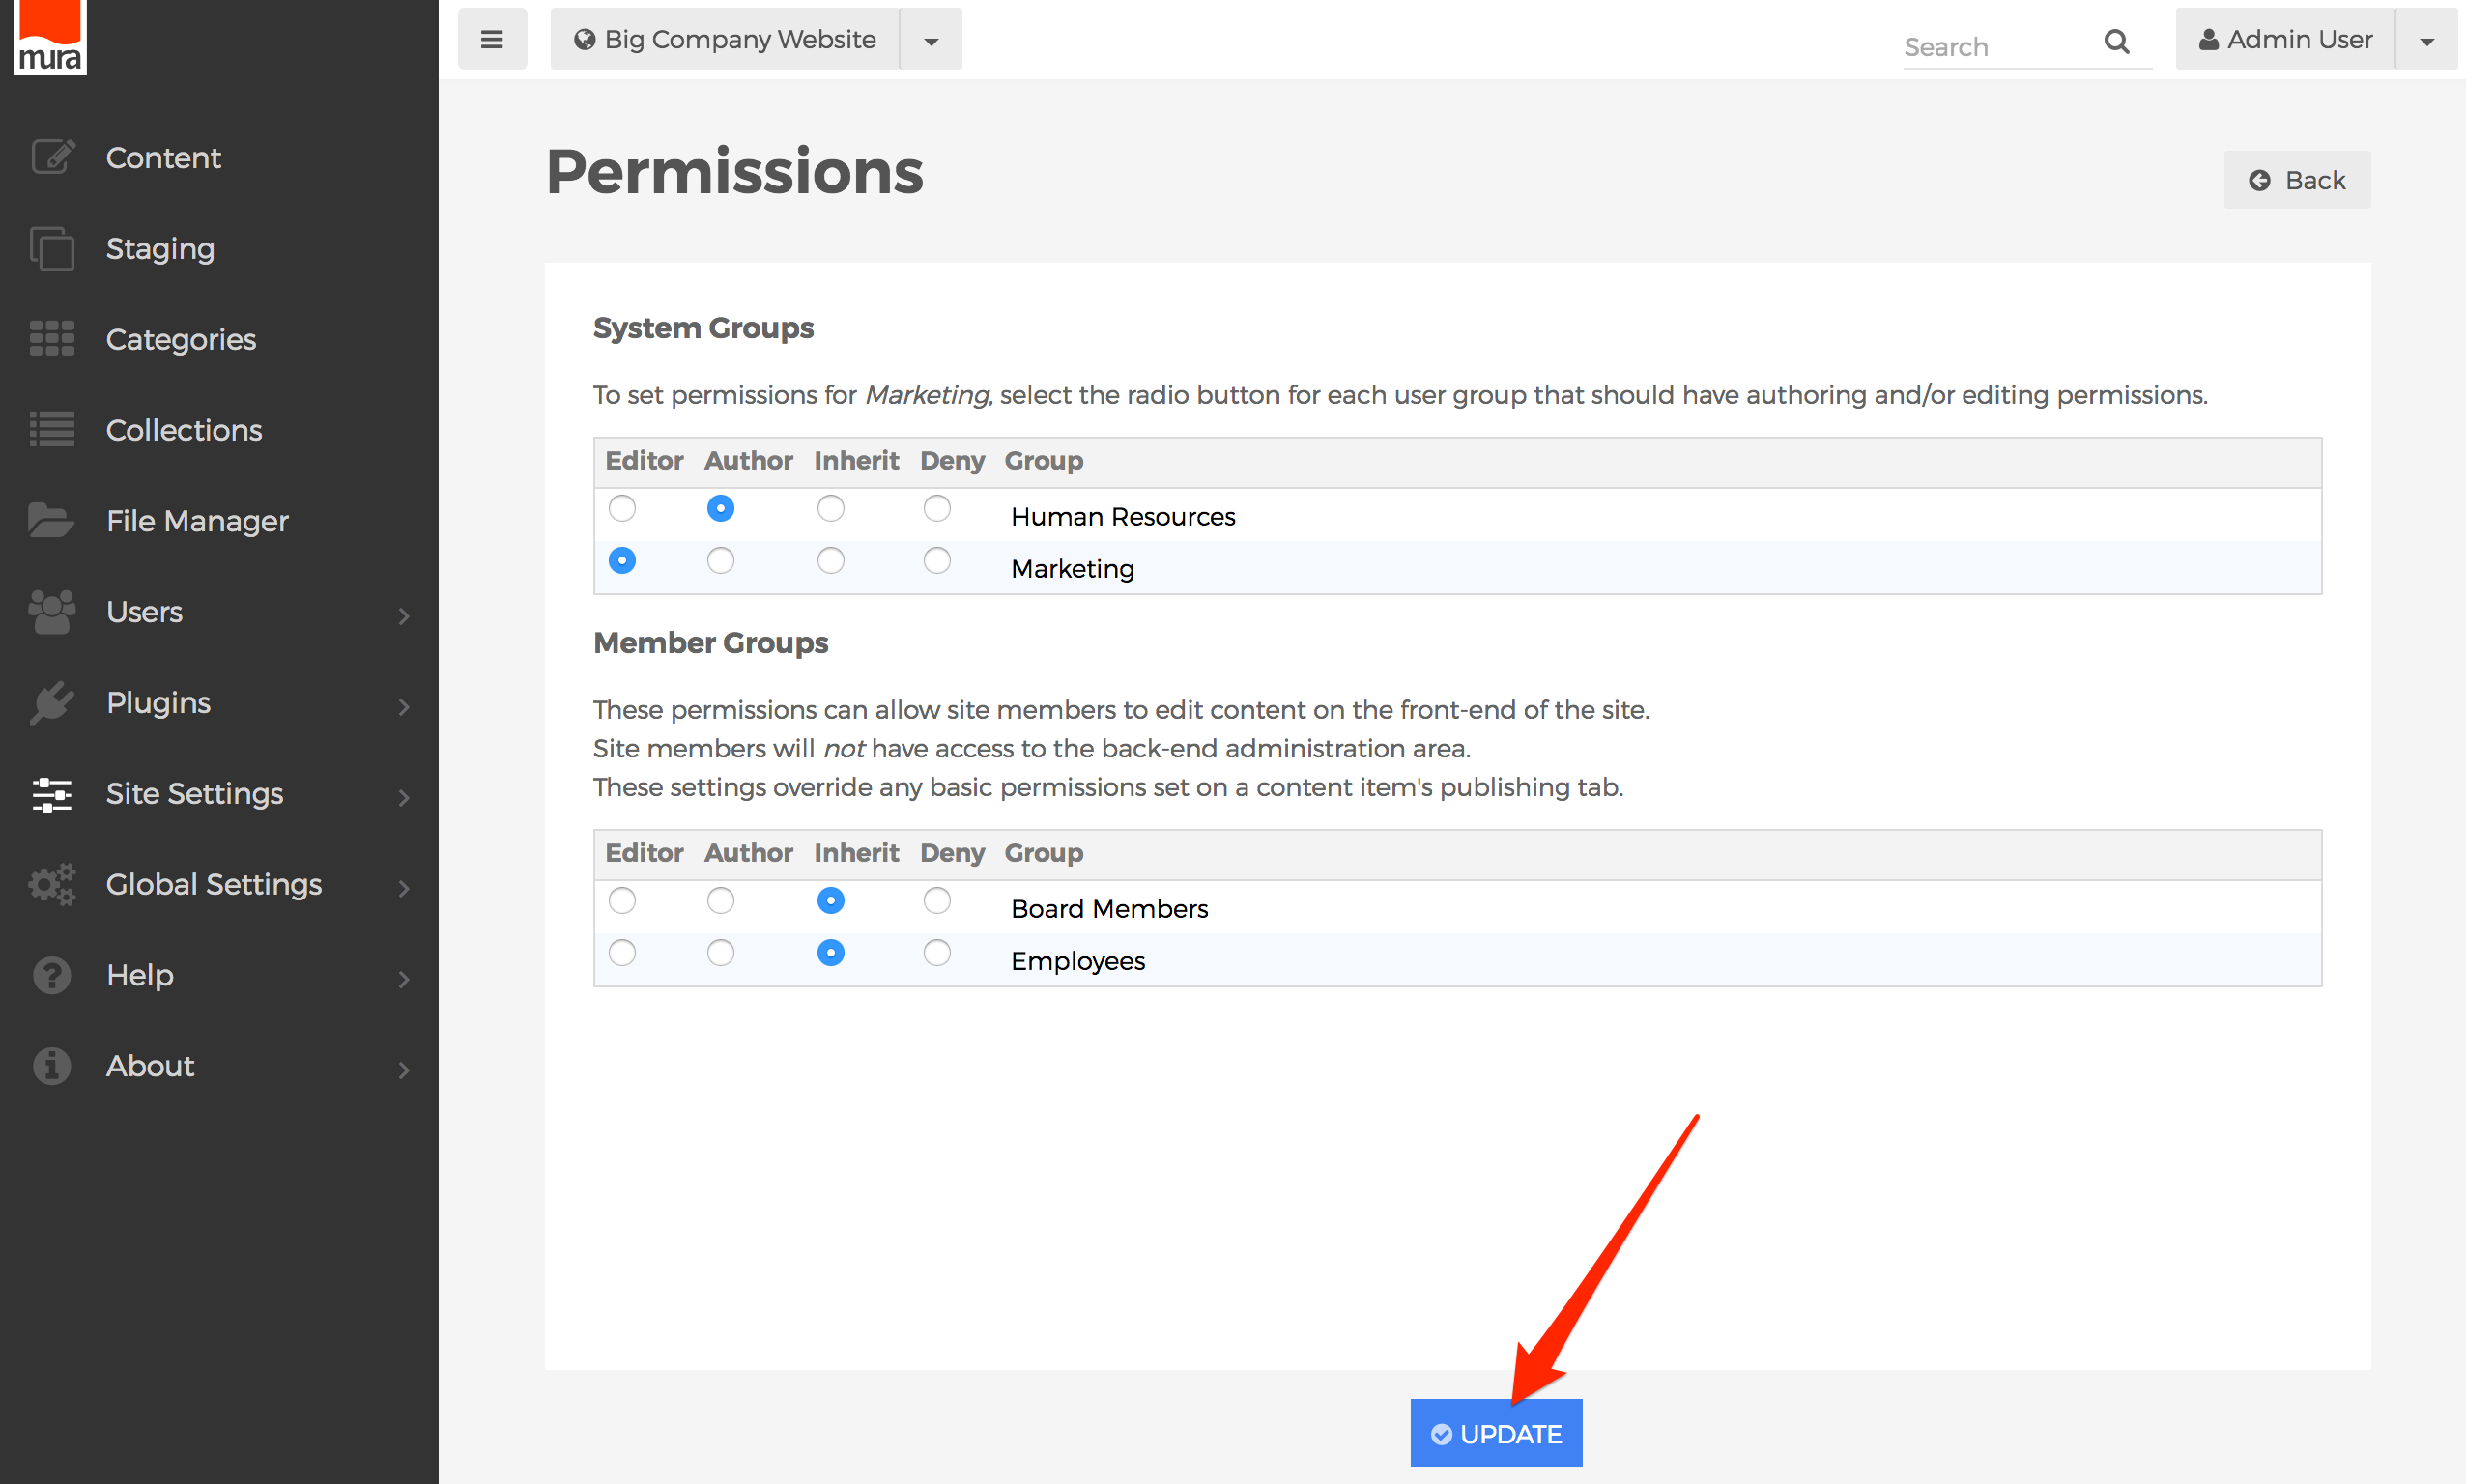
- Users will obtain the new roles/privileges on their next successful login. So, if a users is logged in when the permissions were updated, they will have to log out, and then log back in, to see the changes.


Categories Permissions
While Content Managers can easily categorize content, only the Admin group is able to manage Categories by default. Allowing a group to manage Categories is an "all or nothing" thing. In other words, if a group has access to manage Categories, they can create, edit, and or delete all categories.
How to Apply Permissions to Categories
To allow groups the ability to create, edit, and or delete categories, follow the steps outlined below.
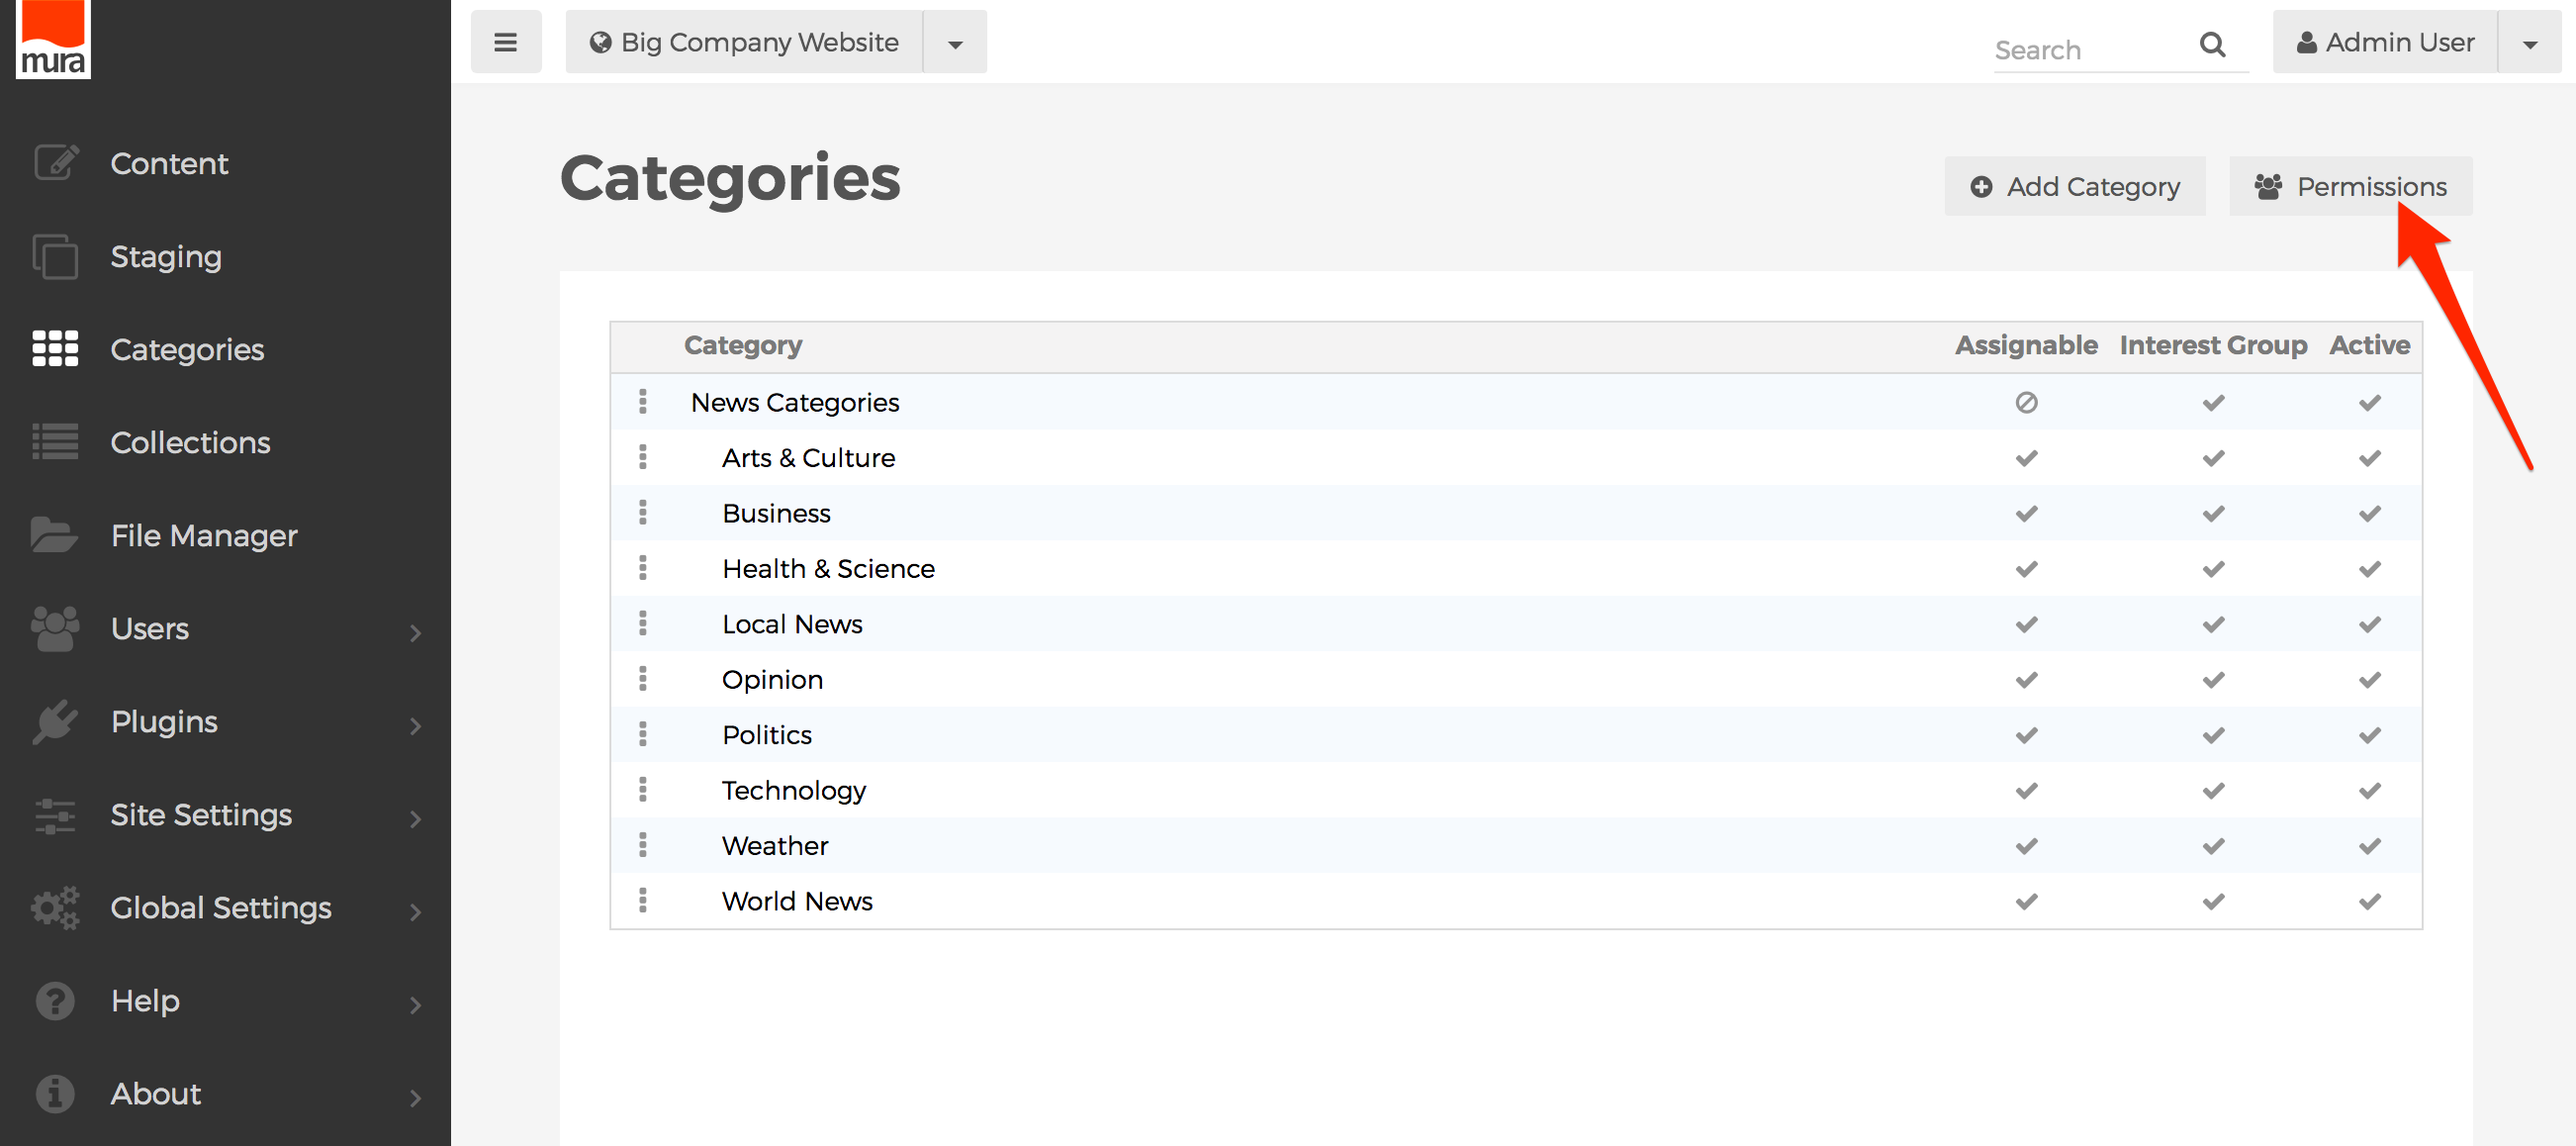
- From the back-end administration area of Mura, select Categories from the main navigation.

- On the Categories screen, click the Permissions button.

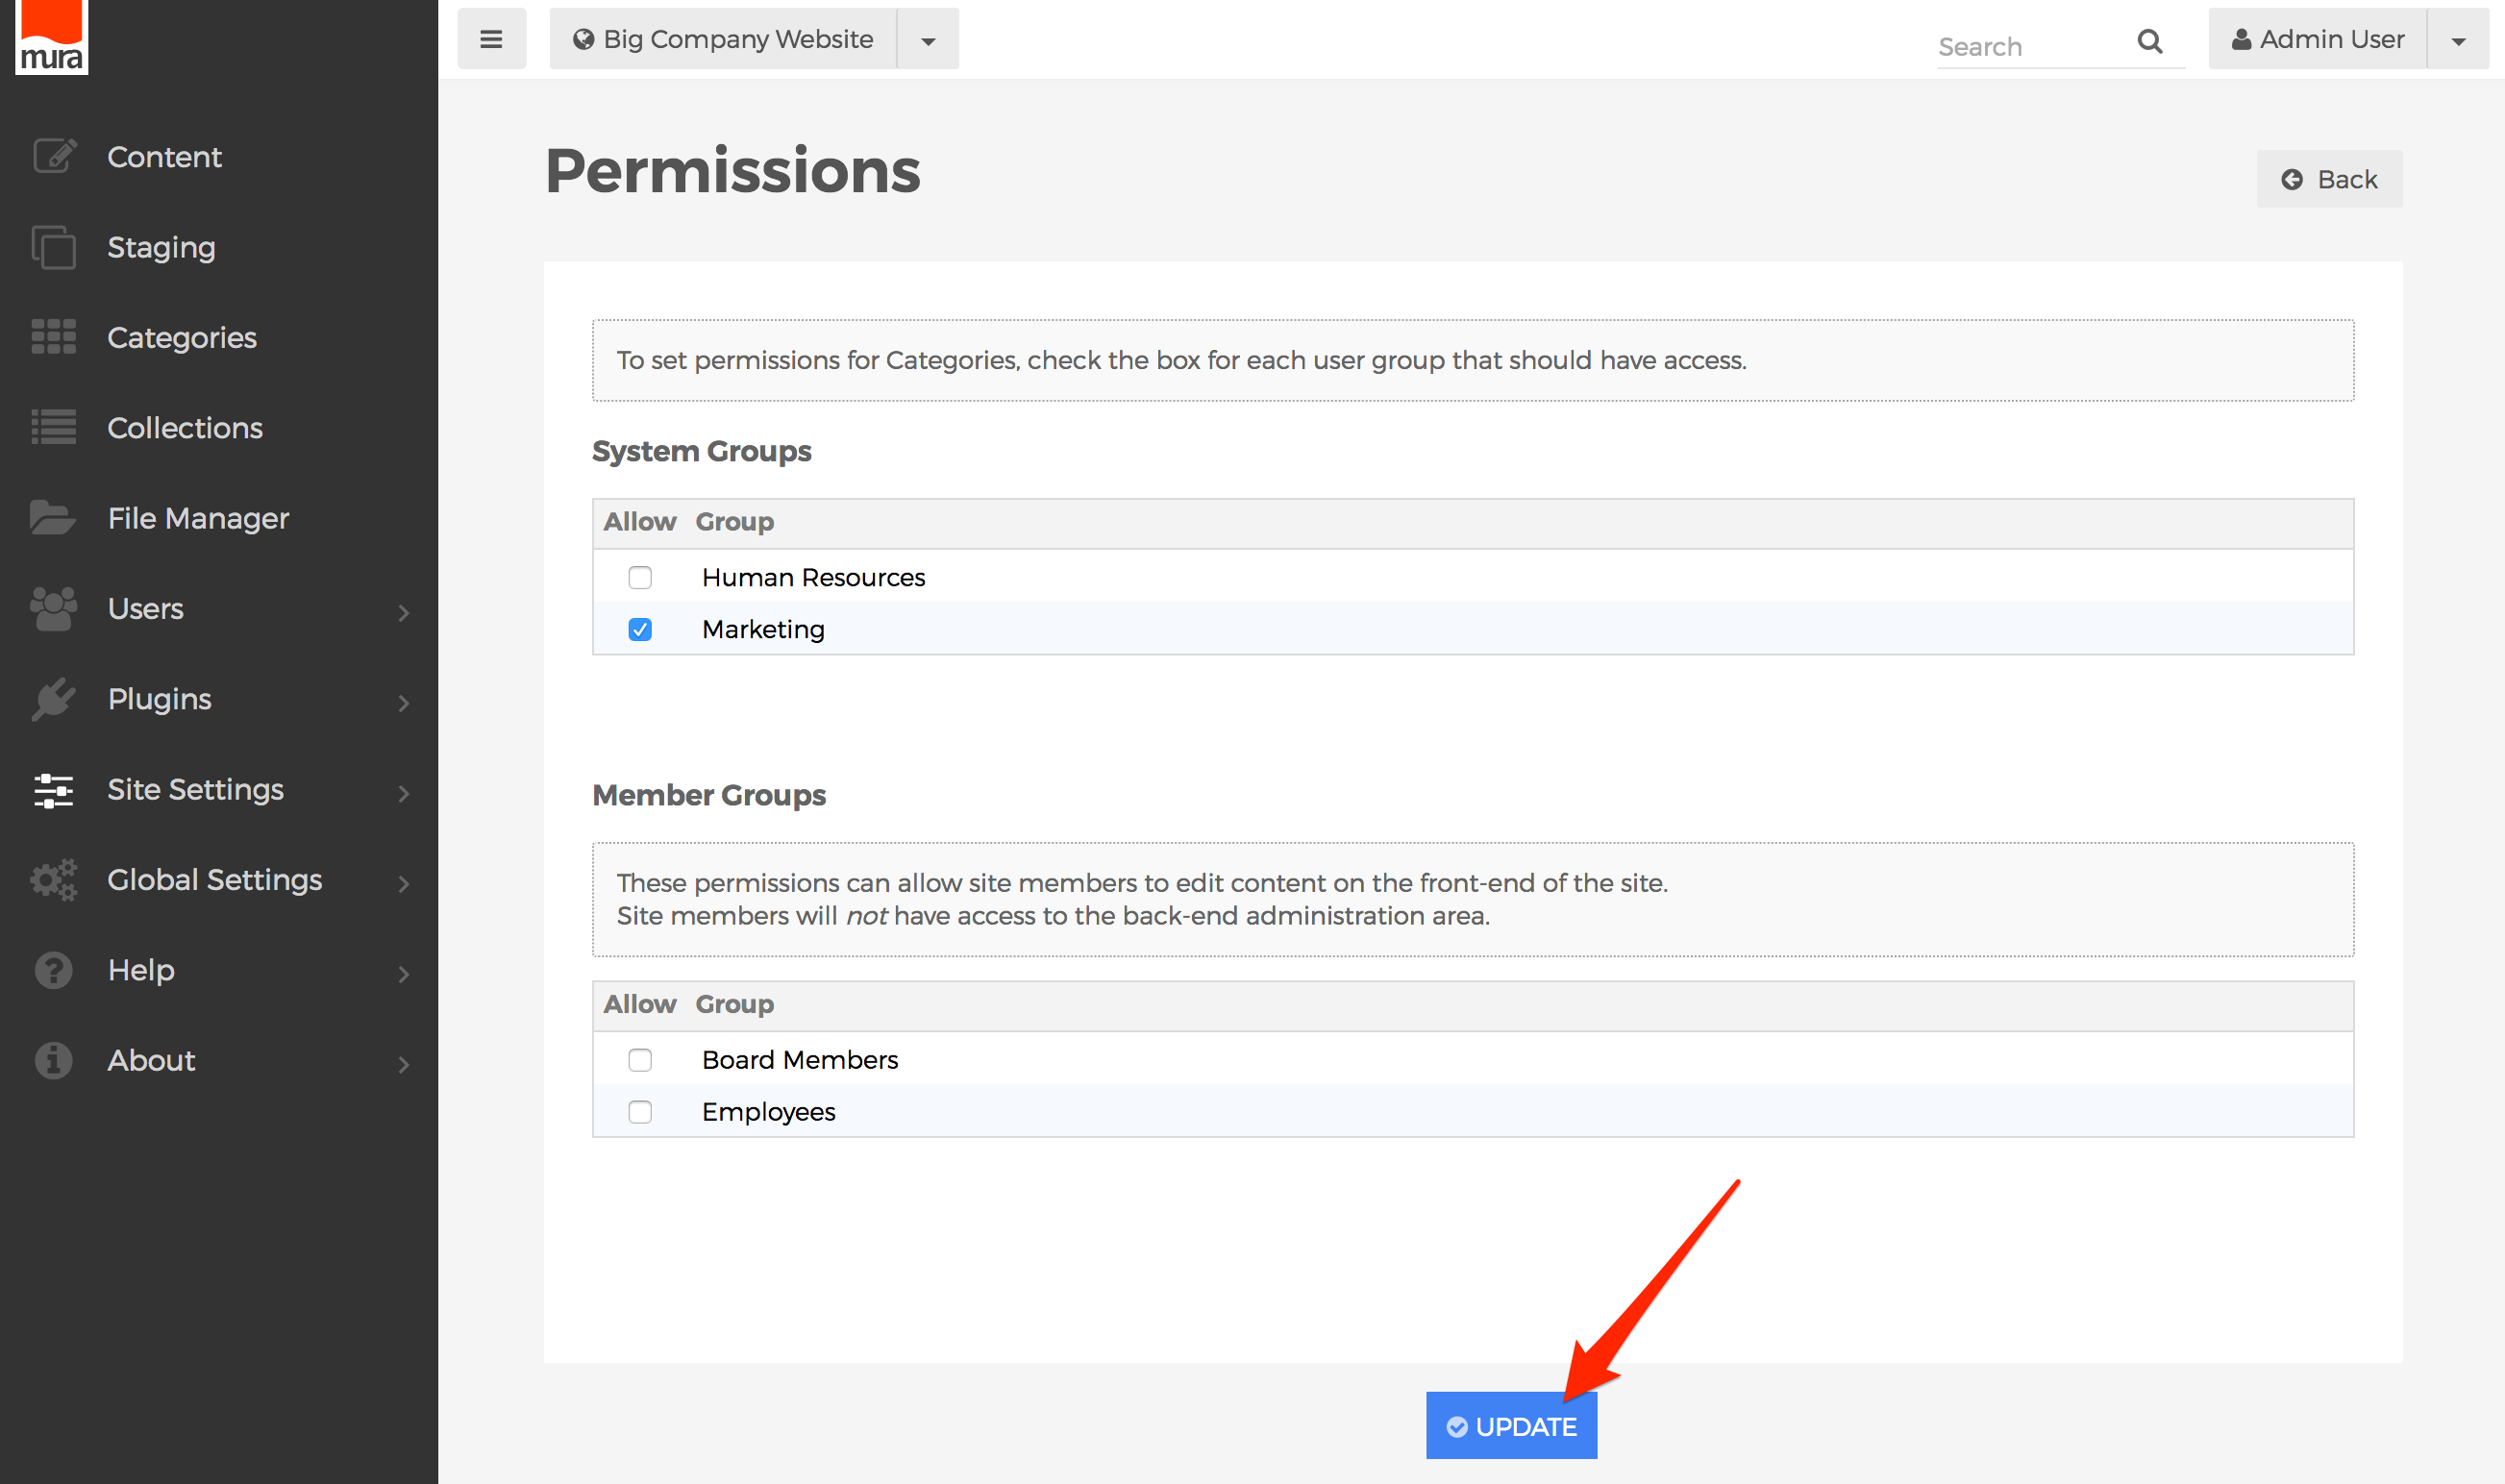
- Select the checkbox under "Allow" for each group you wish to enable access for.
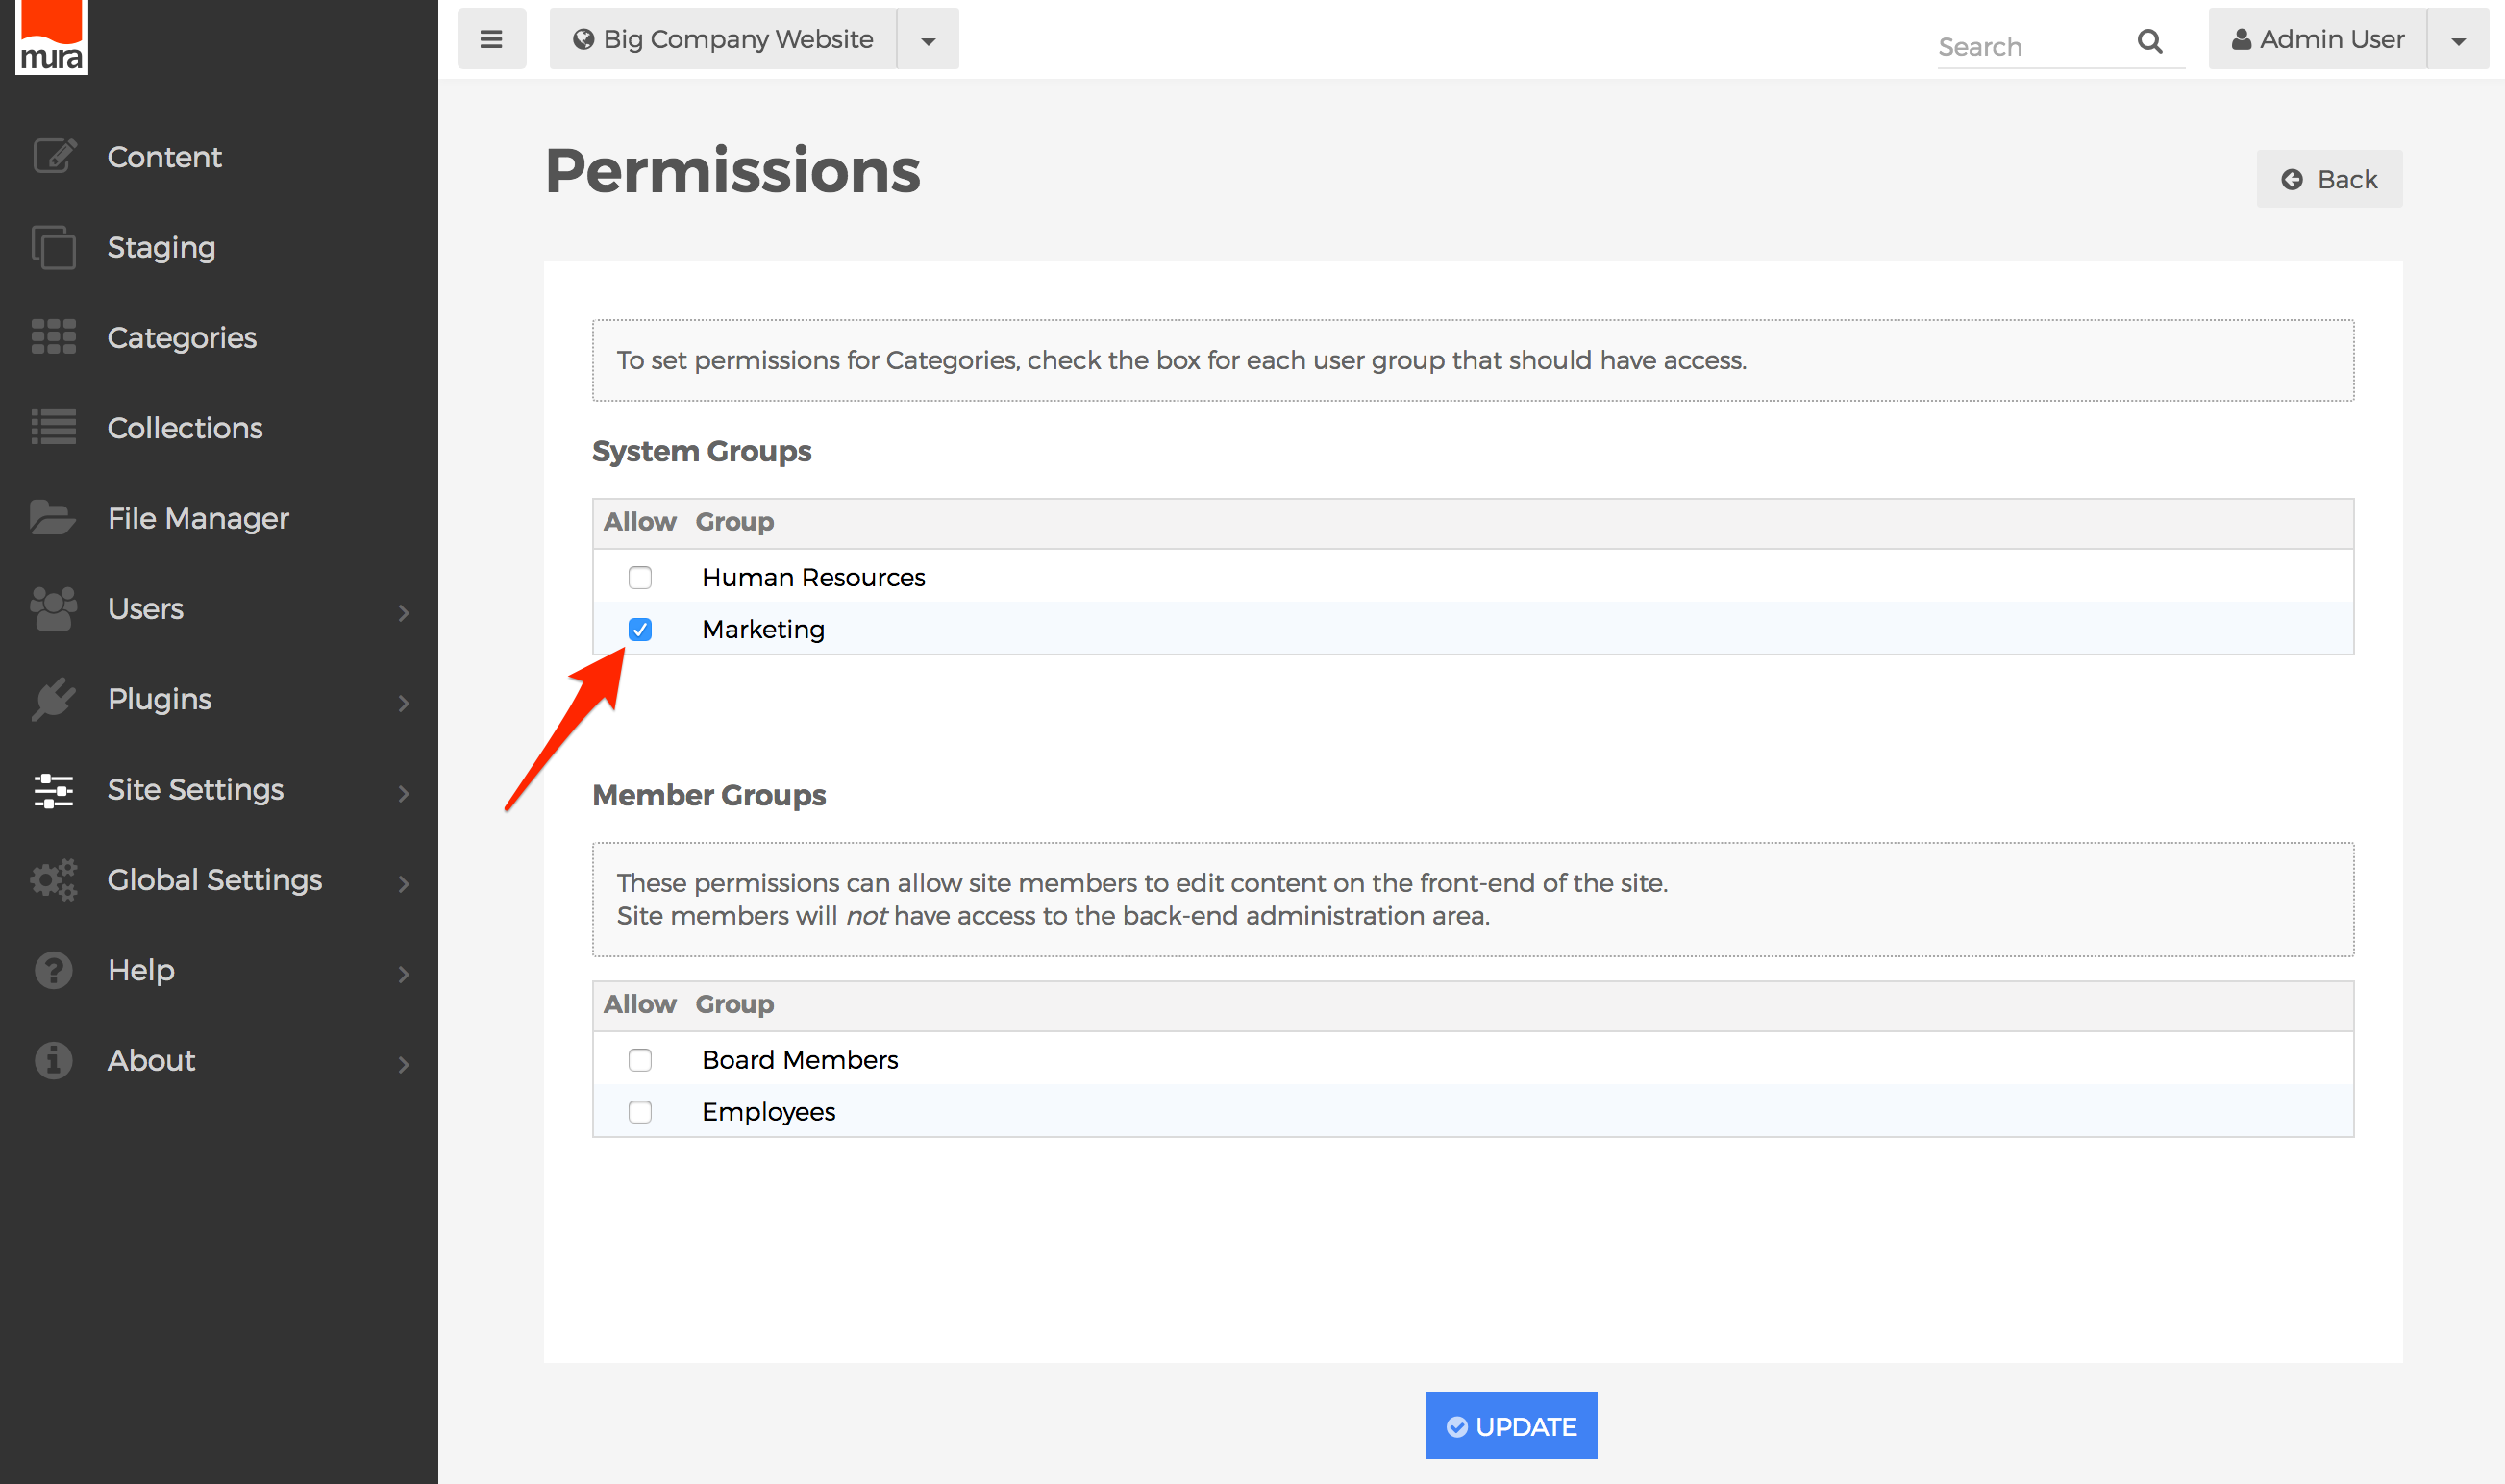
- Click Update, to save your changes.

- Users will obtain the new roles/privileges on their next successful login. So, if a user is logged in when the permissions were updated, they will have to log out, and then log back in, to see the changes.


Users Permissions
Users who belong to the Admin group are automatically able to manage groups and users for both System Groups, and Member Groups. Mura also allows for the ability to delegate managing Member Groups and Site Member users to other groups. The important thing to keep in mind here is that you cannot delegate another group to manage System Groups and System Users. Only members of the Admin System Group and Super Admin Users are able to manage System Groups and System Users.
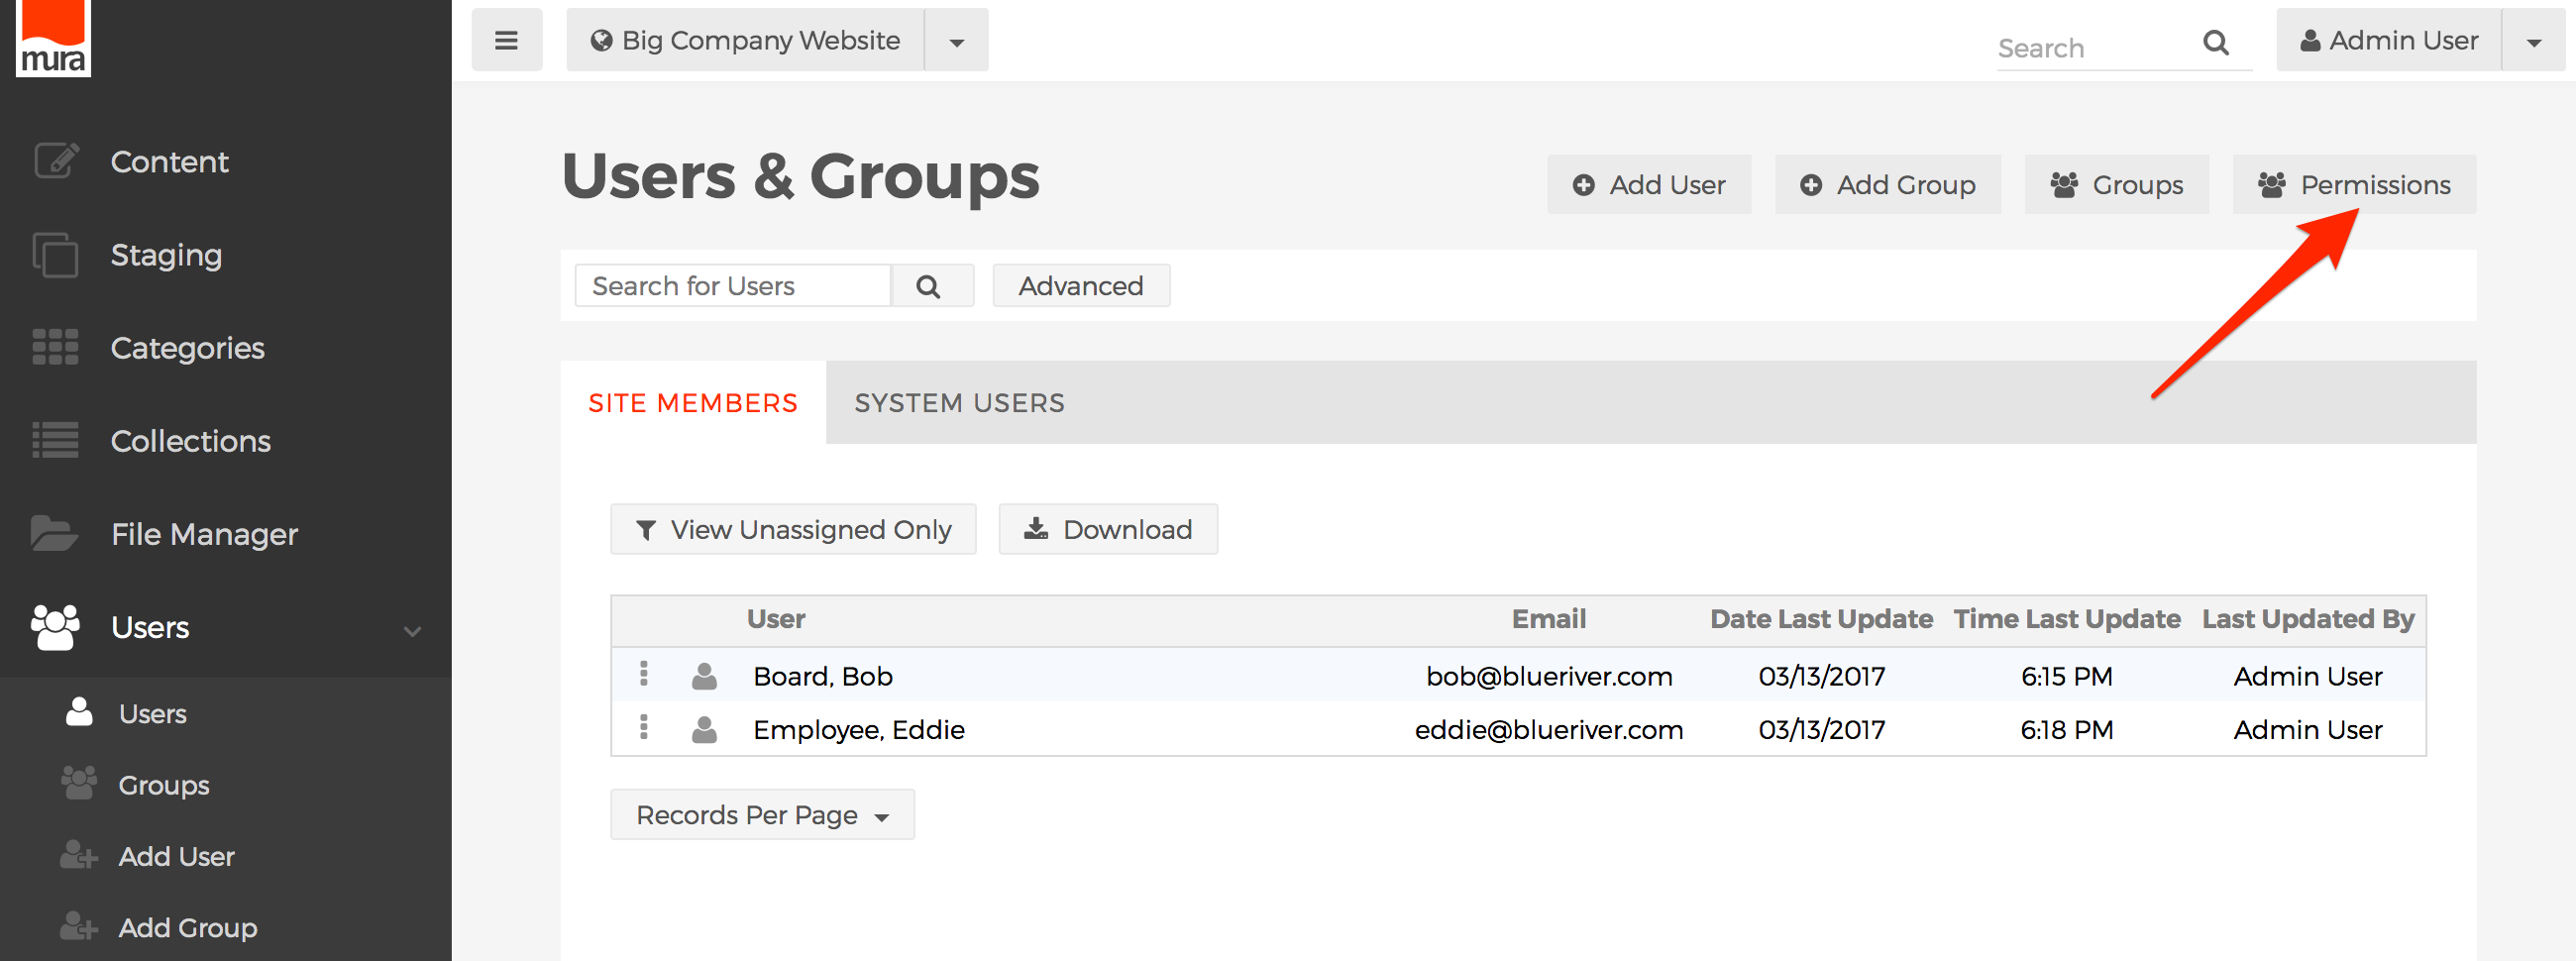
How to Apply Permissions to Users
- From the back-end administration area of Mura, select Users, and click Users.
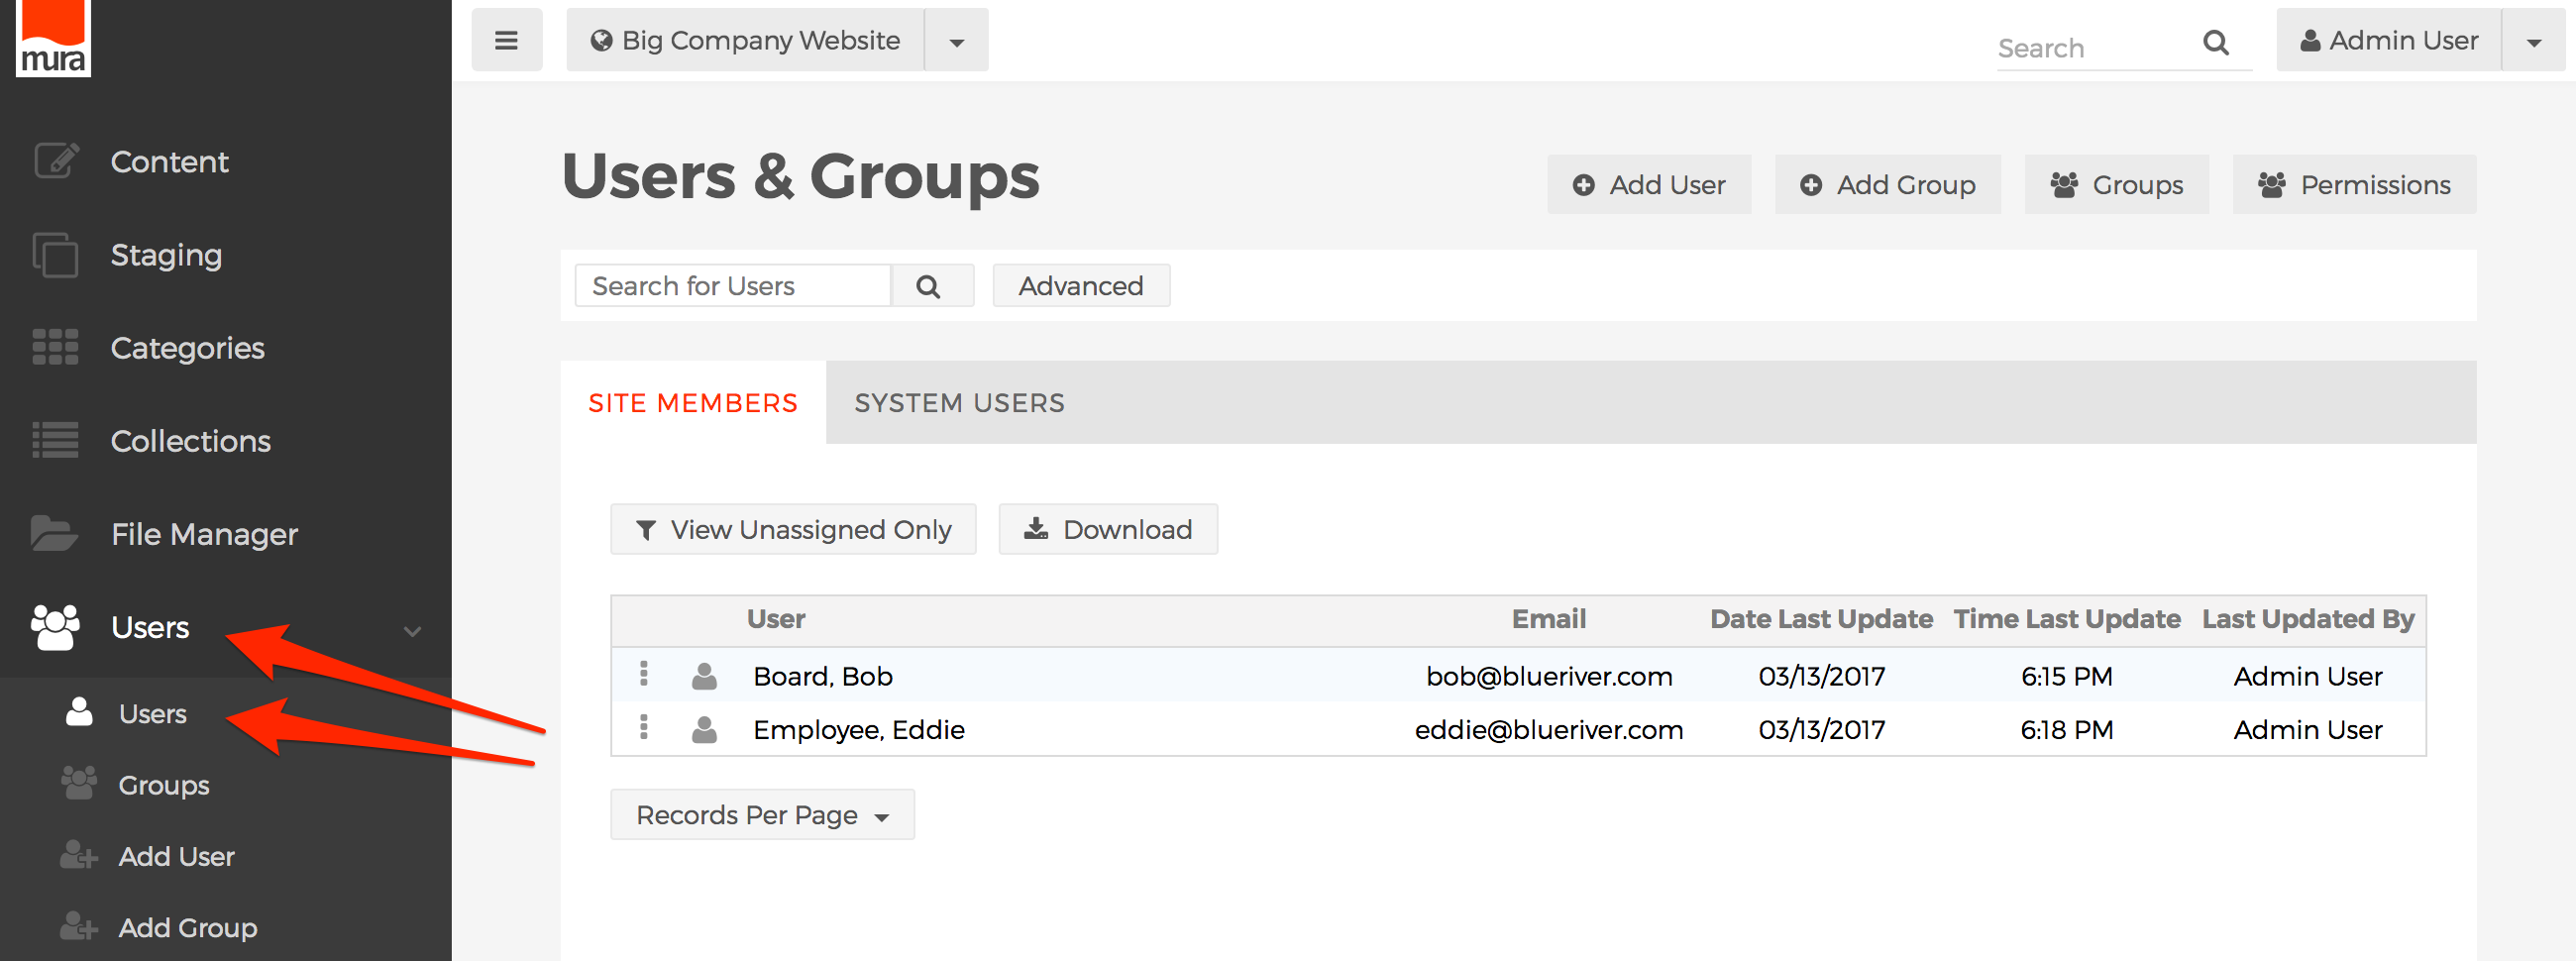
- On the Users & Groups screen, select the Site Members tab, if it's not already selected.
- Click the Permissions button.

- Select the checkbox under "Allow" for each group you wish to enable access for.
- Click Update, to save your changes.

- Users will obtain the new roles/privileges on their next successful login. So, if a user is logged in when the permissions were updated, they will have to log out, and then log back in, to see the changes.


Plugins Permissions
Although Mura is extremely powerful and has a multitude of useful features off-the-shelf, we recognize your organization may also require some custom functionality and/or applications to meet your organization's needs. Plugins allows developers to do just that. Often times, plugins have their own, custom administrative user interface, and while it's up to your developers to write the code to prevent unauthorized access, Mura allows for a way to collect data on which group(s) you wish to enable access for.
How to Apply Permissions to Plugins
It is extremely important to understand the steps outlined below merely collect the information on which group(s) you wish to enable access for to a particular plugin. Following the steps below will not, in and of themselves, prevent unauthorized access to the plugin. The developer(s) responsible for creating and/or maintaining the plugin are responsible for ultimately writing the proper code to obtain this data, and ultimately prevent and/or allow access to the specified group(s).
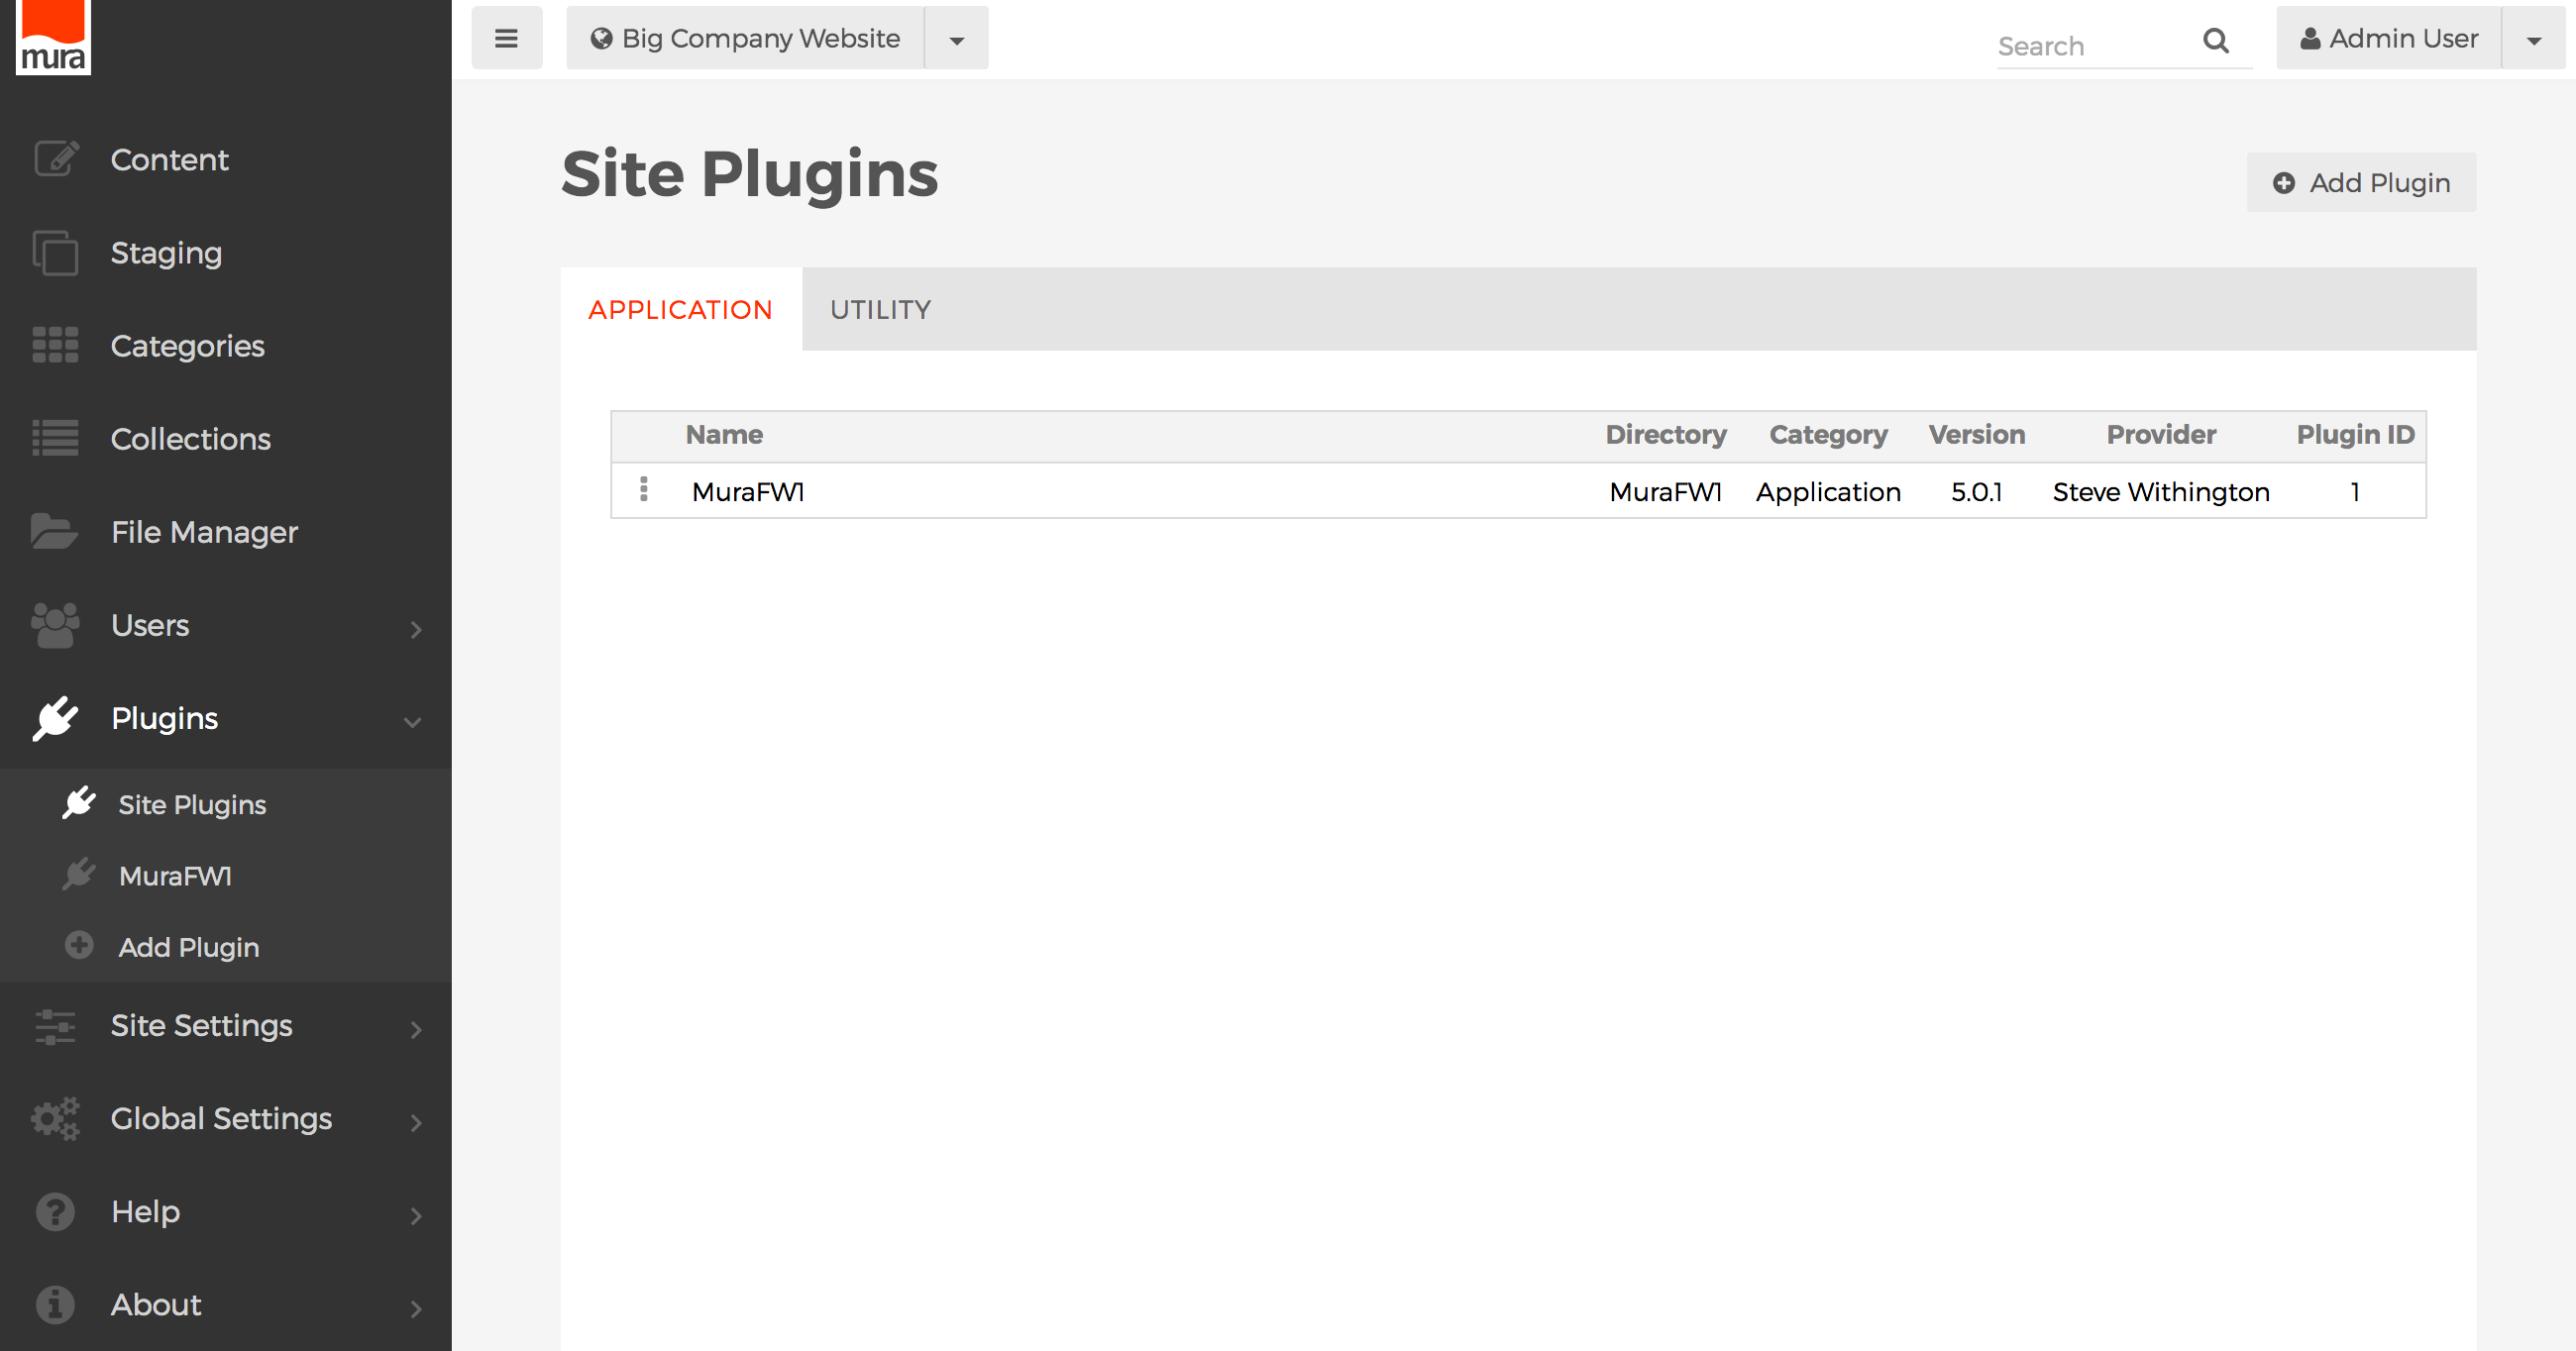
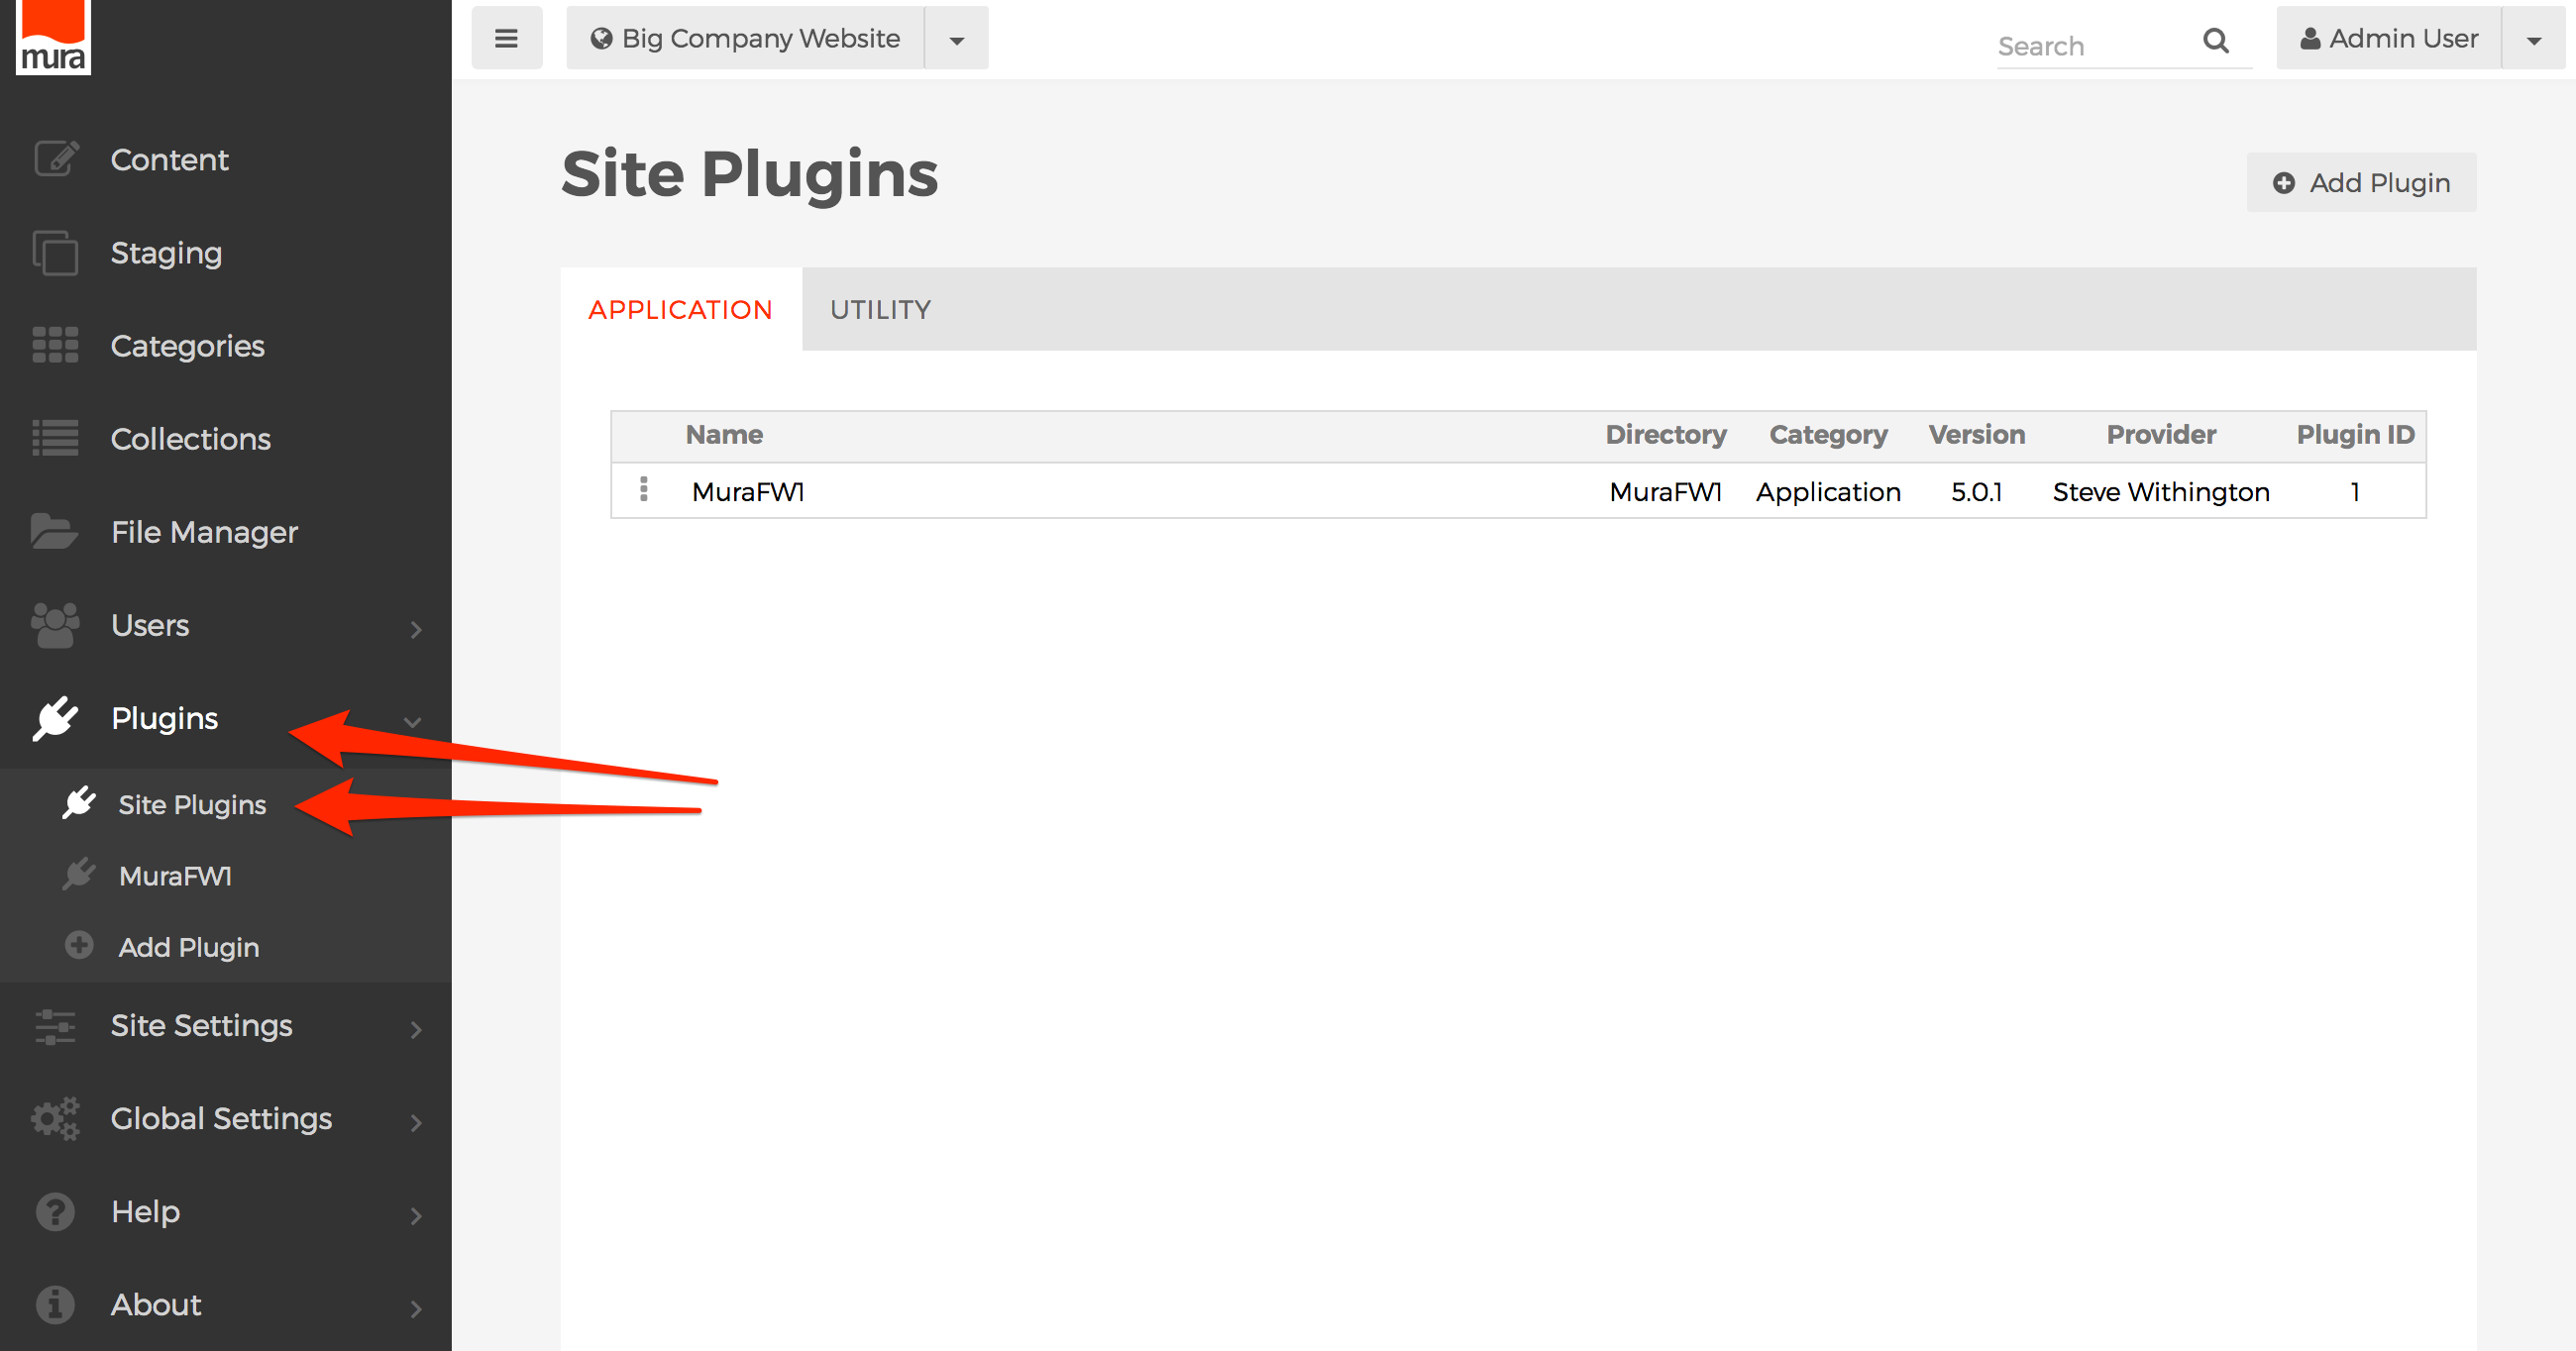
- From the back-end administration area of Mura, select Plugins from the main navigation, then click Site Plugins.

- You should see the Site Plugins screen, and a listing of any plugins which have been enabled for the specific site you are currently working with.
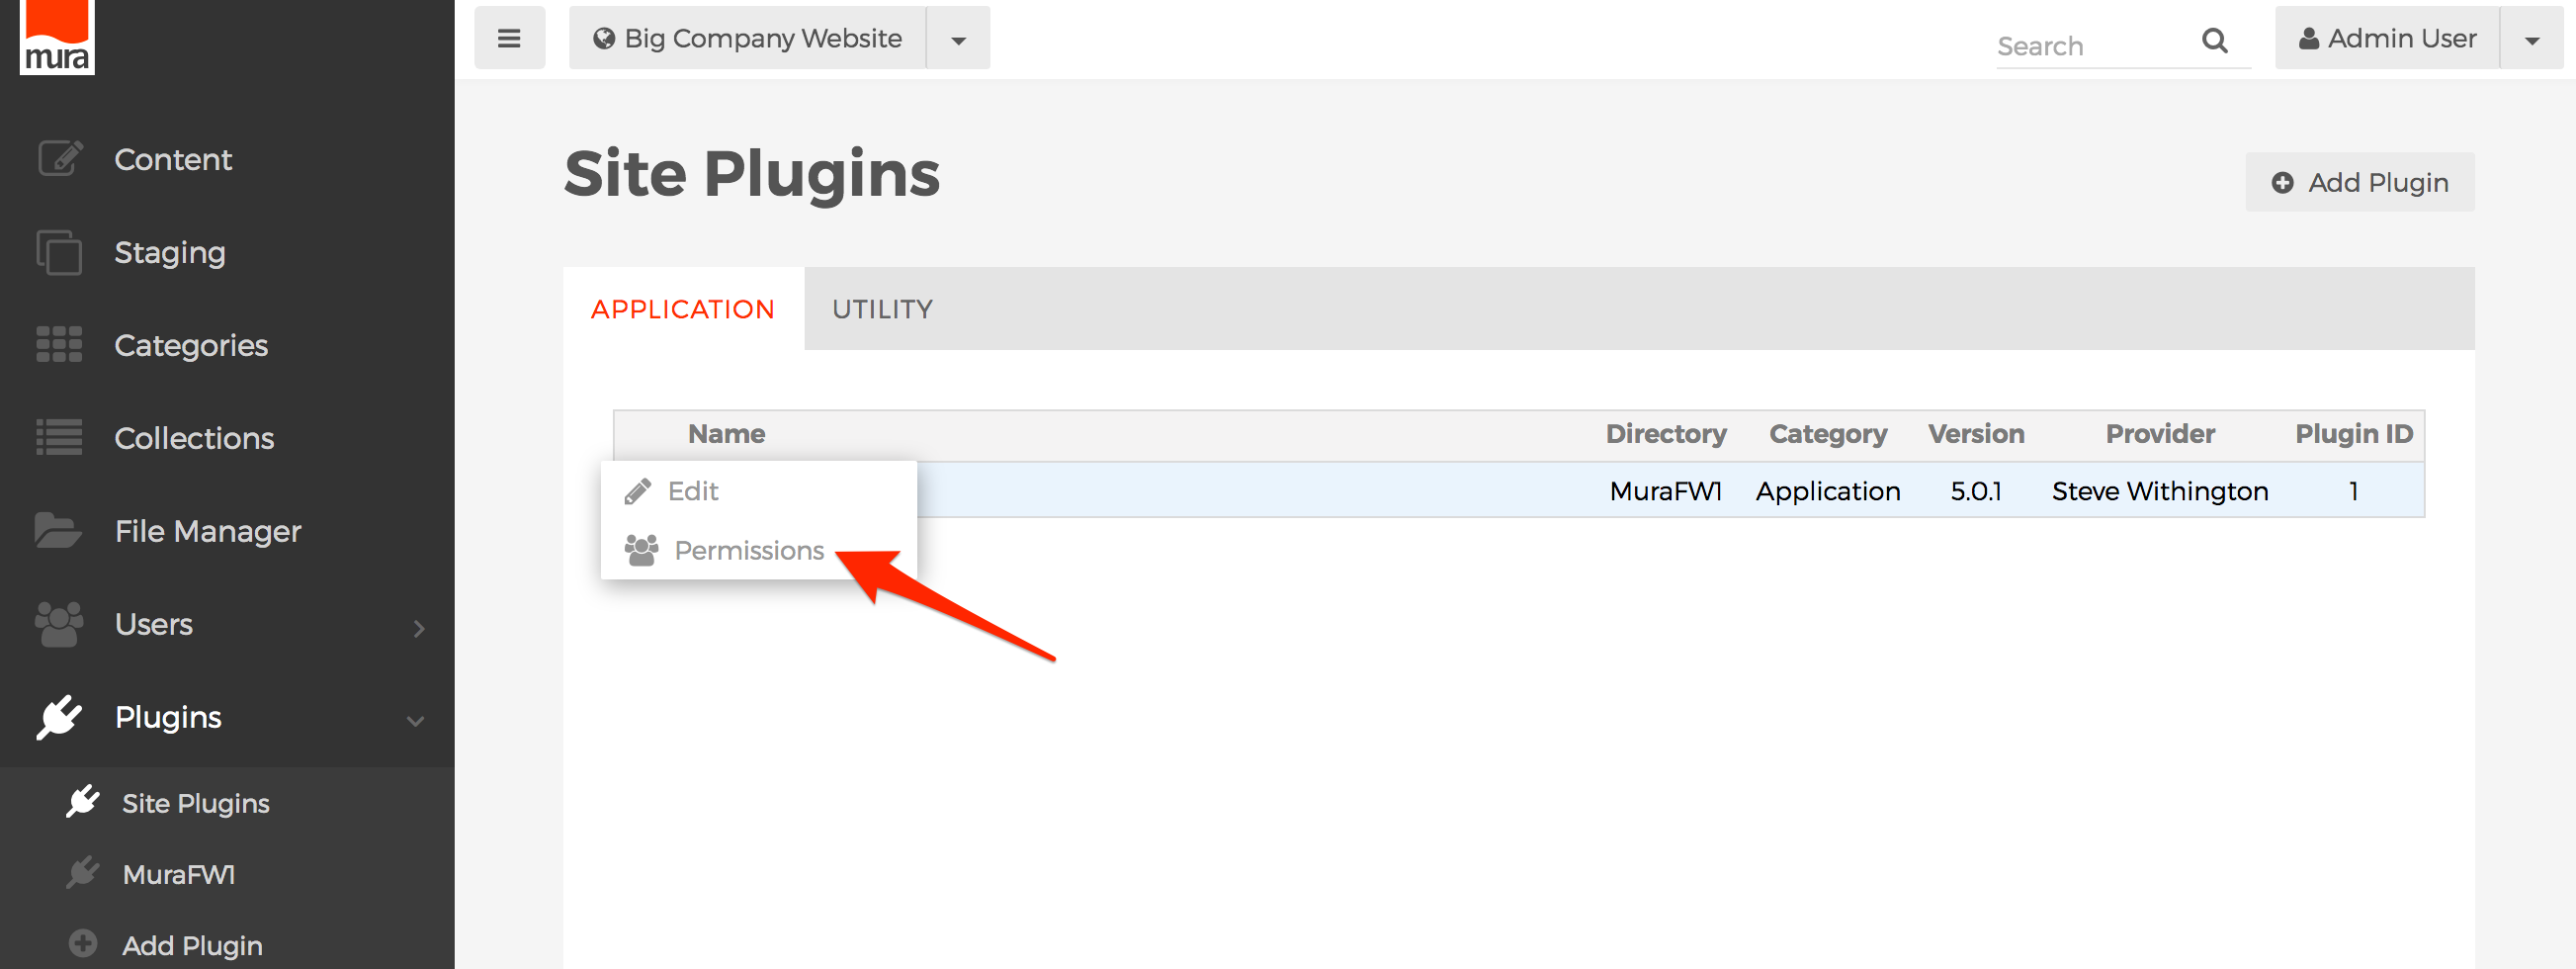
- Click the three-dot menu to the desired plugin, and select Permissions.
- Select the checkbox under "Allow" for each group you wish to enable access for.
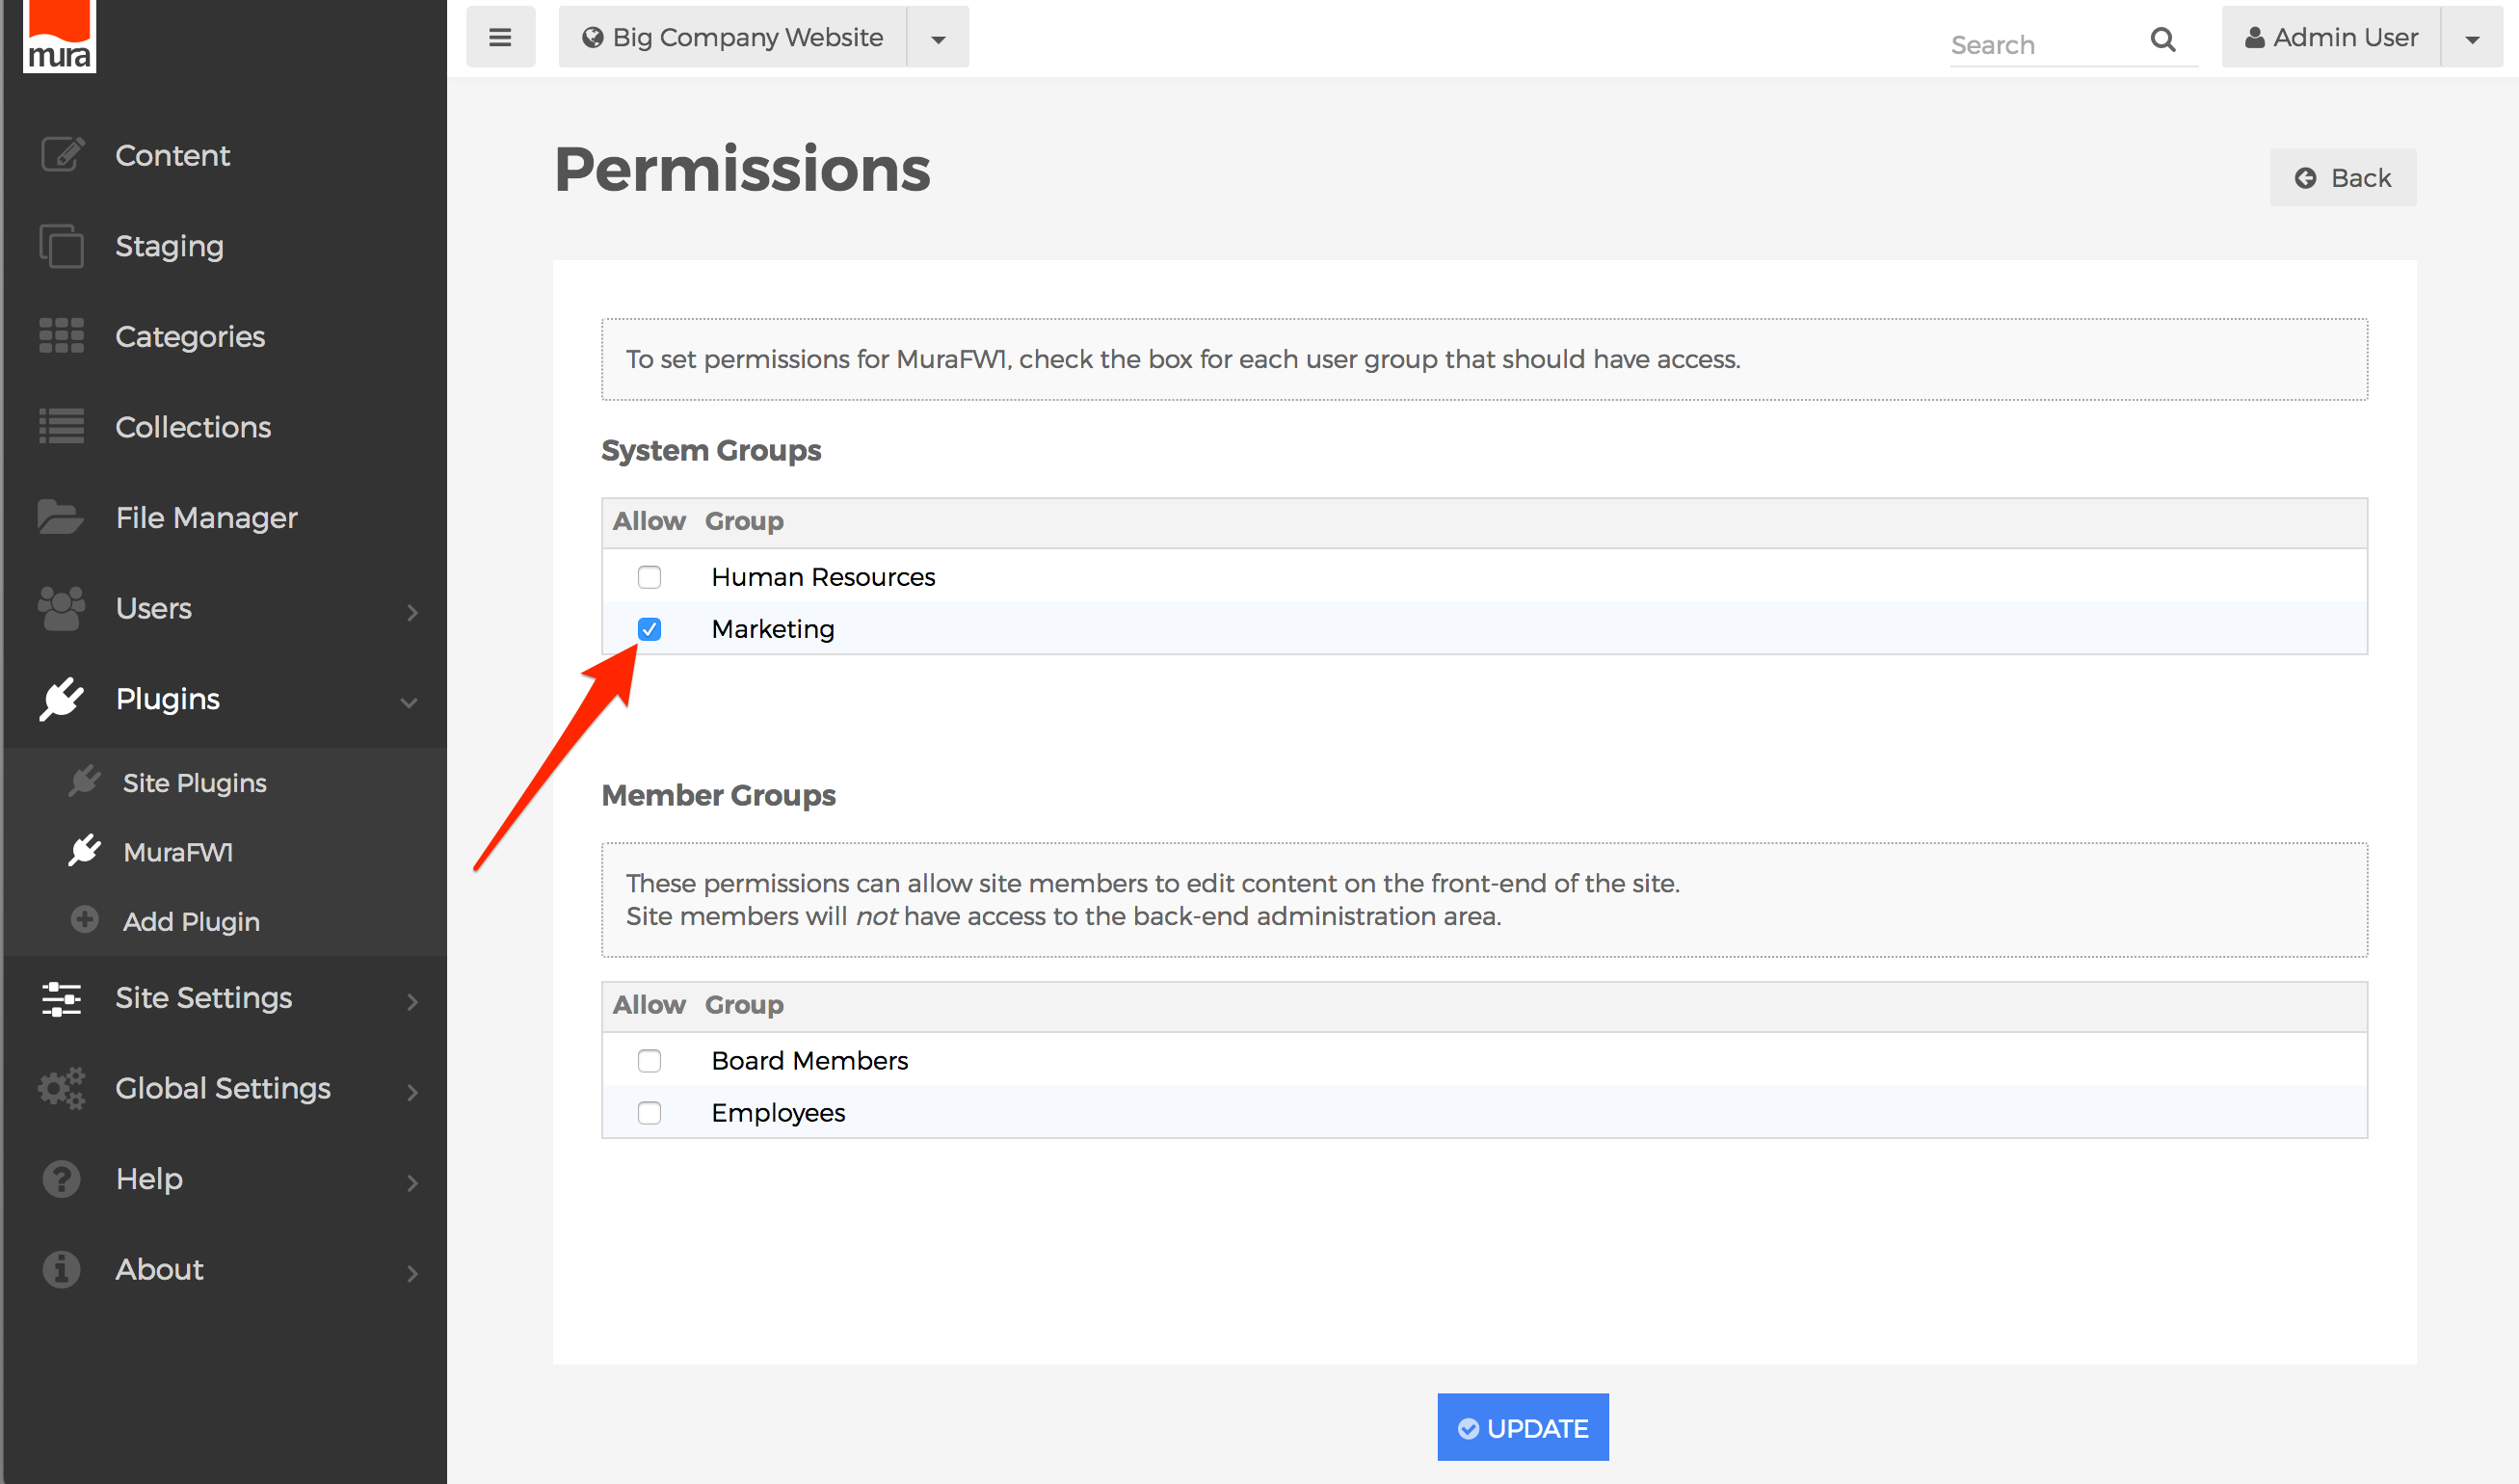
- Click Update, to save your changes.

- Users will obtain the new roles/privileges on their next successful login. So, if a user is logged in when the permissions were updated, they will have to log out, and then log back in, to see the changes.
- You will have to perform these steps for each site you wish to enable and/or restrict access for.


Form Permissions
Managing permissions for forms is very similar to managing content permissions, because forms can be grouped together in a hierarchy, just like content. As you've seen in the Forms section, you can nest a form, or a group of forms together under a Folder, or other forms. Not only does this make it easy from an organizational point of view, it really simplifies things from the viewpoint of enabling or restricting editing permissions as well.
As you've already learned, permissions cascade from the top-most item, down through its children, grandchildren, and beyond. By default, all groups granted access to edit the site begin with "Deny" privileges, except for the "Admin" group. The Admin group automatically has full editing privileges throughout Mura.
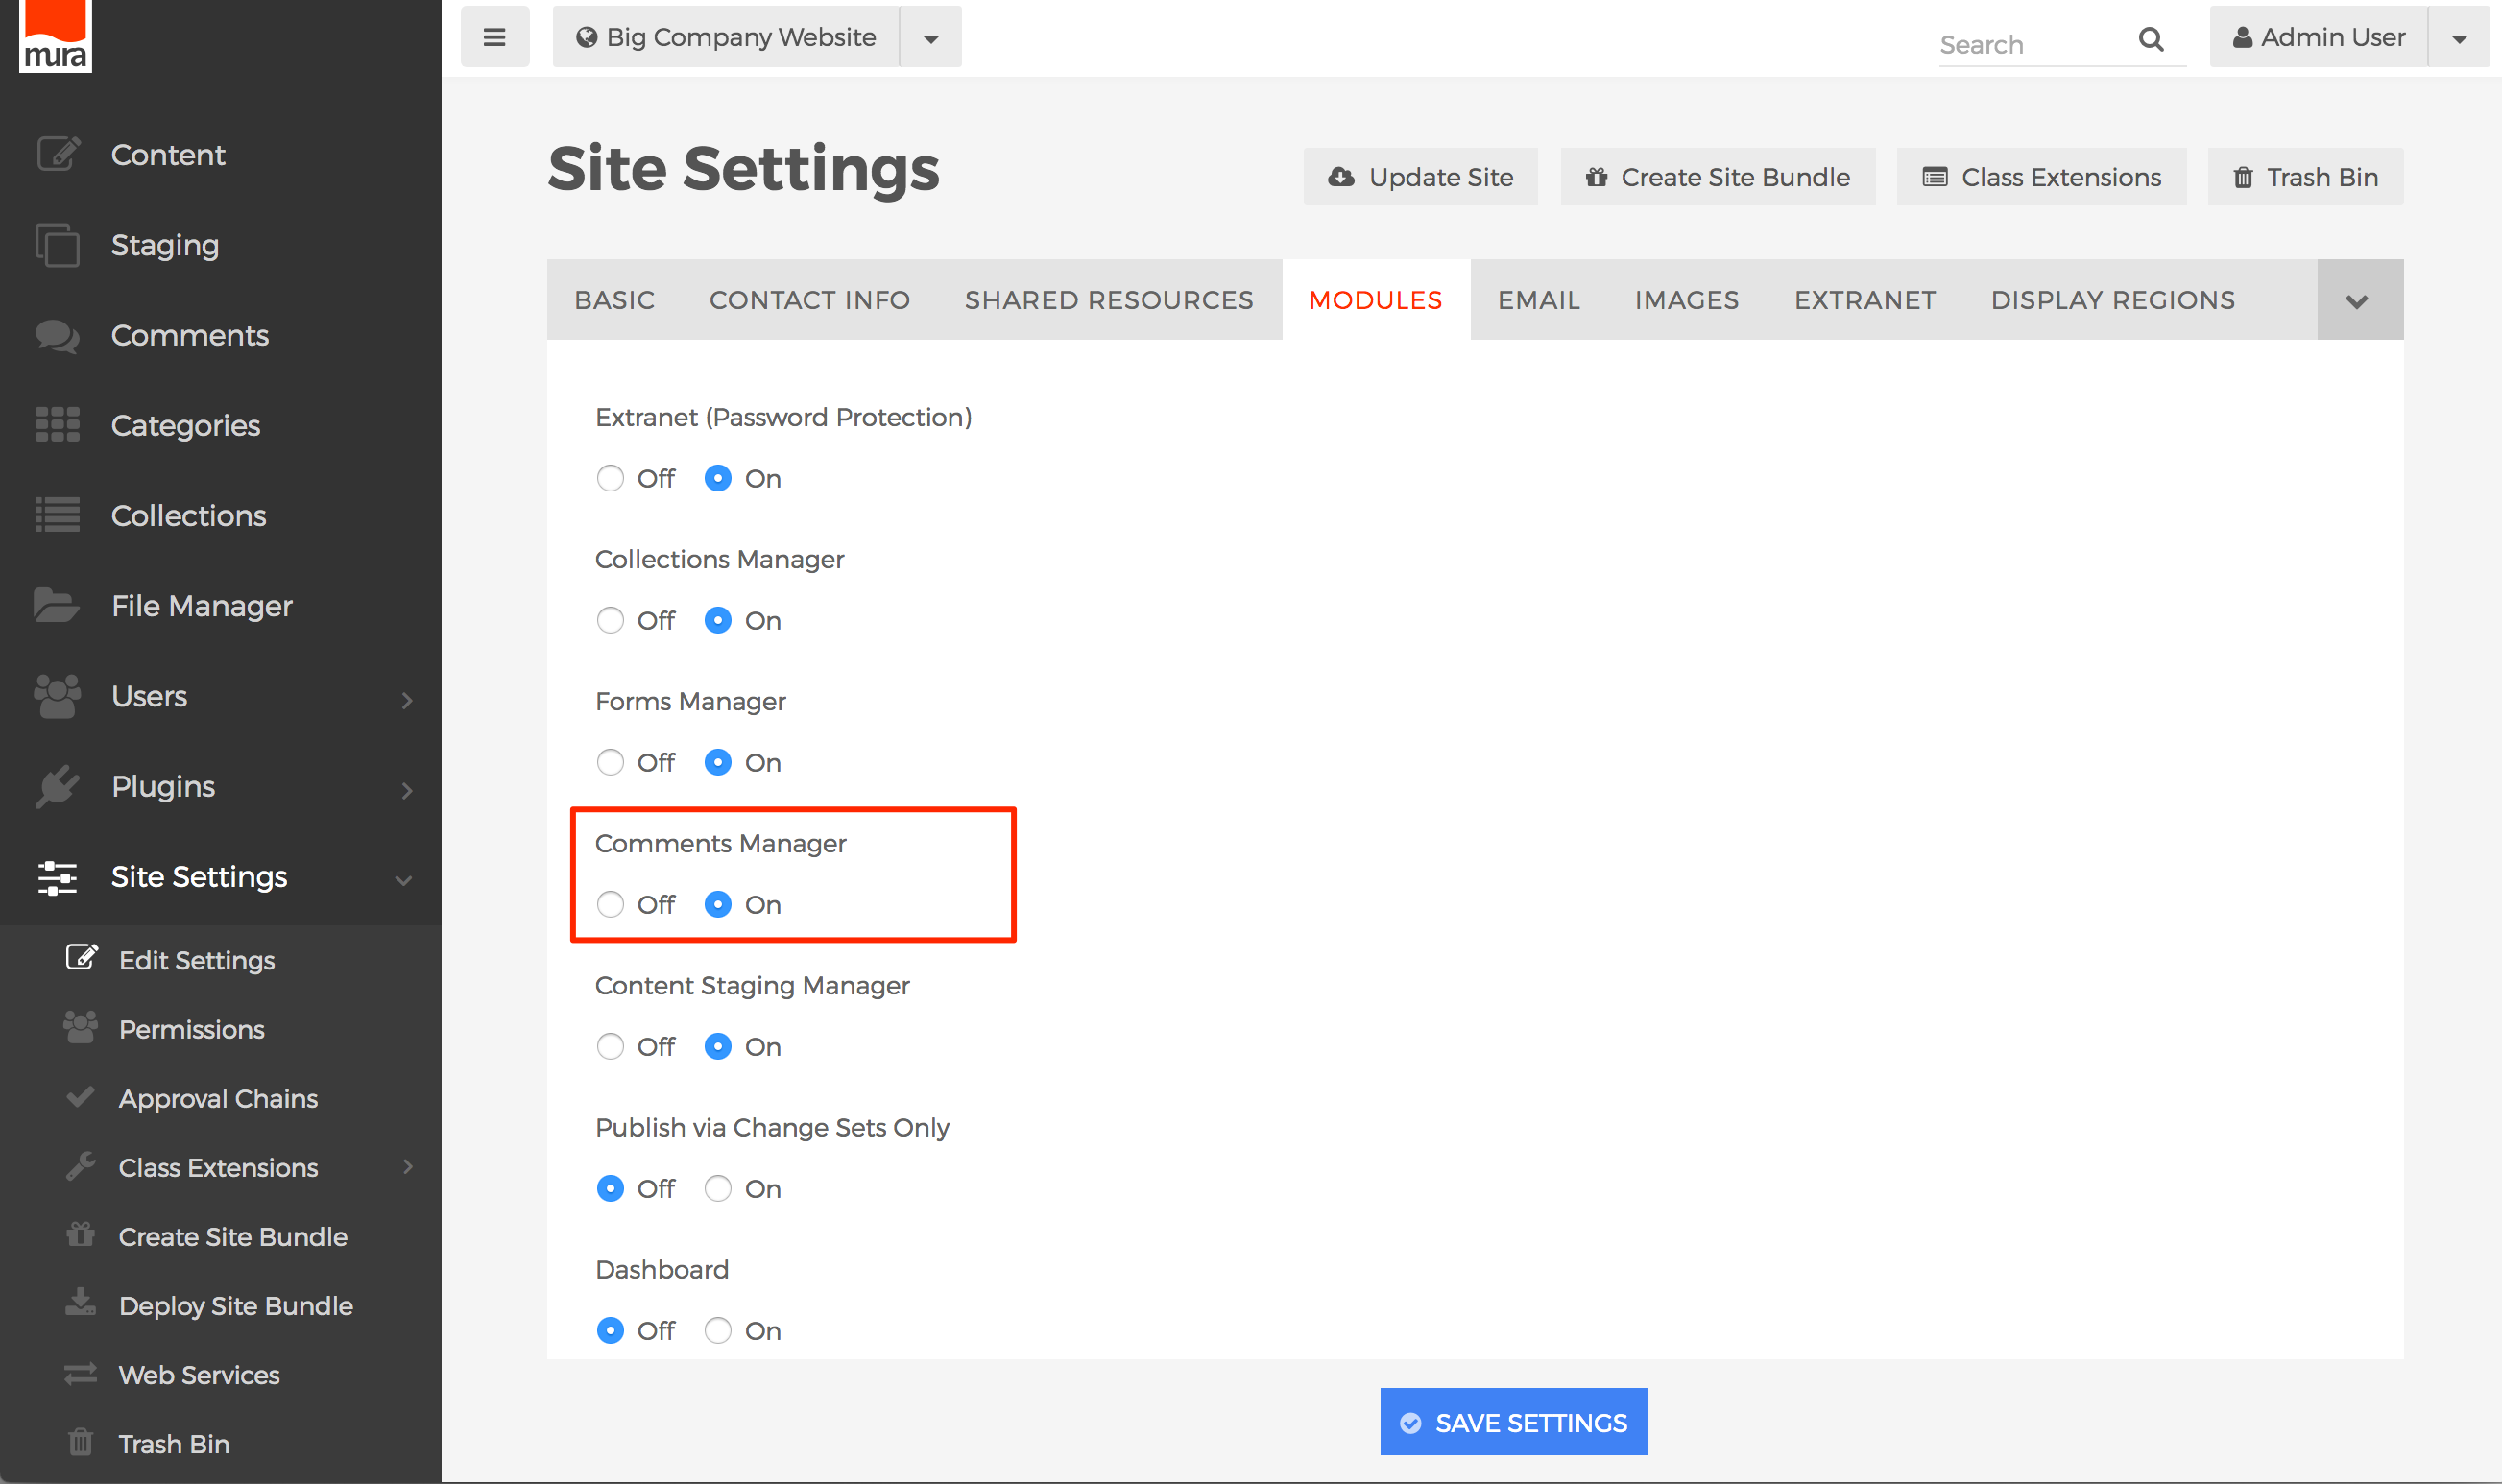
How to Enable/Disable Forms Manager
To enable or disable the Forms Manager, follow the steps below.
- From the back-end administration area of Mura, select Site Settings, then click Edit Settings.

- Select the Modules tab.

- Locate the field labeled Forms Manager, then select "On" to enable it, or "Off" if you wish to disable it.

- Click Save Settings.


How to Apply Permissions to Forms
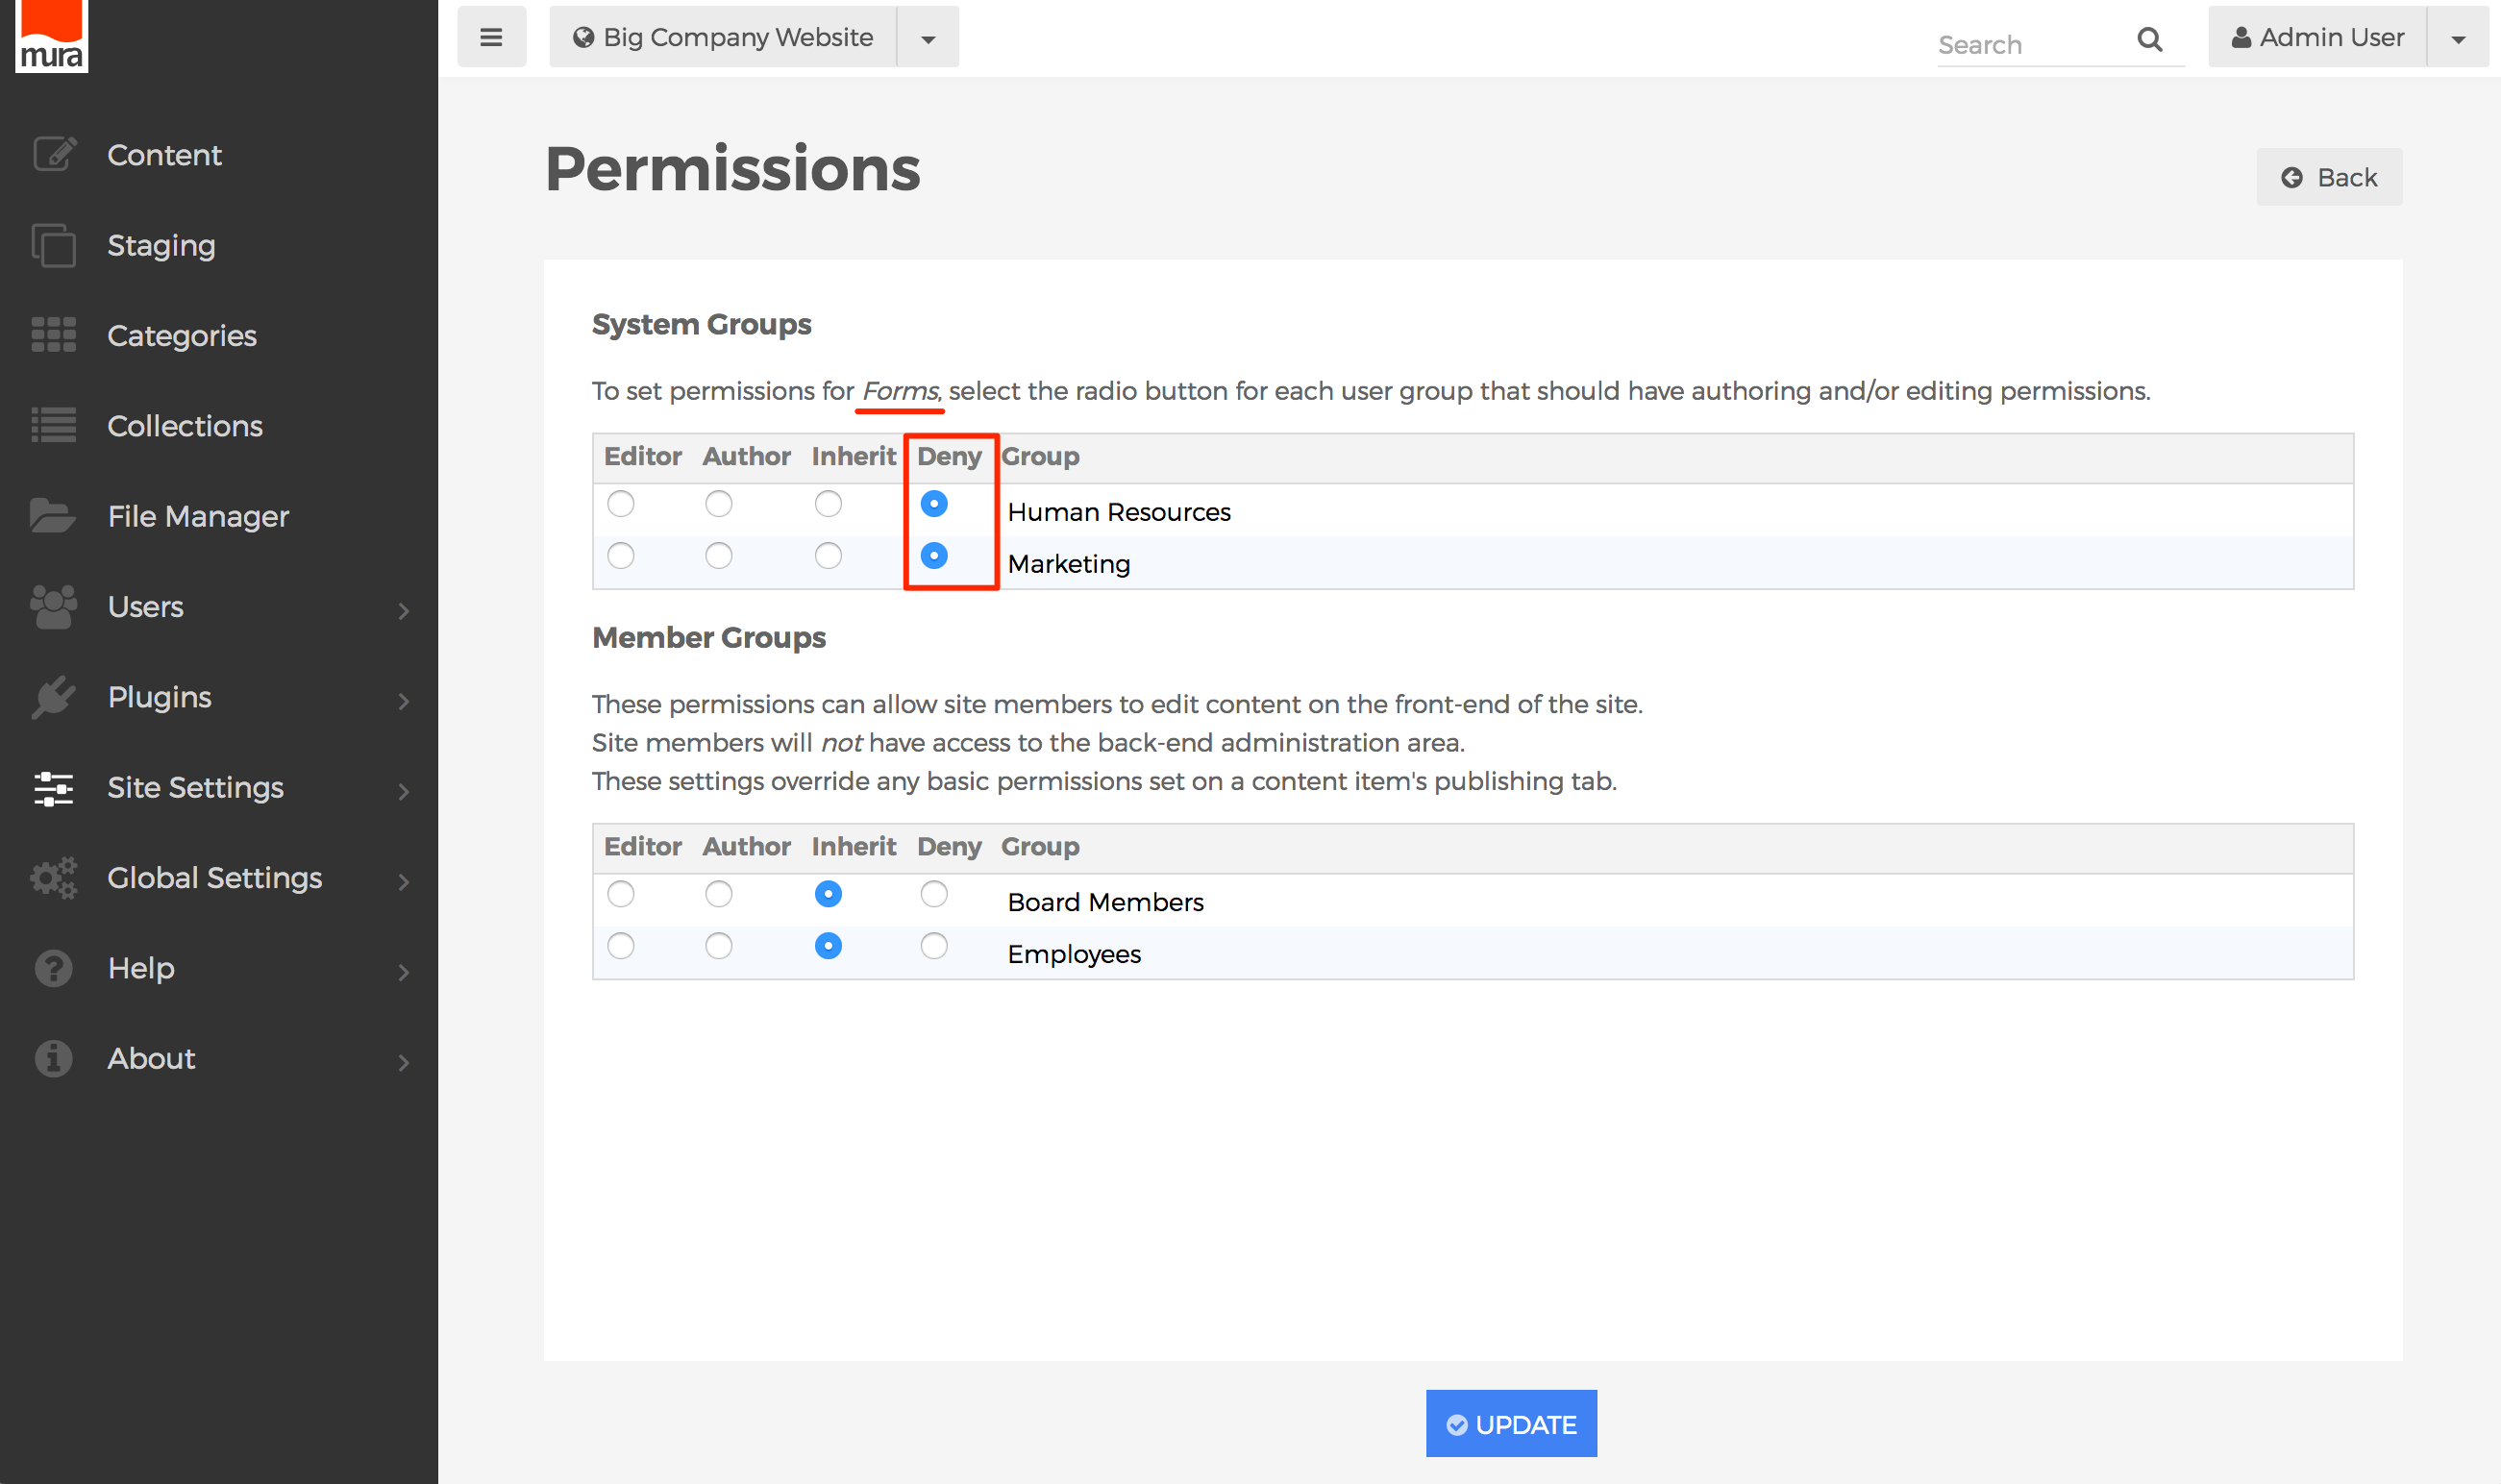
- From the Content screen, on the Tree View tab, click the Forms button.
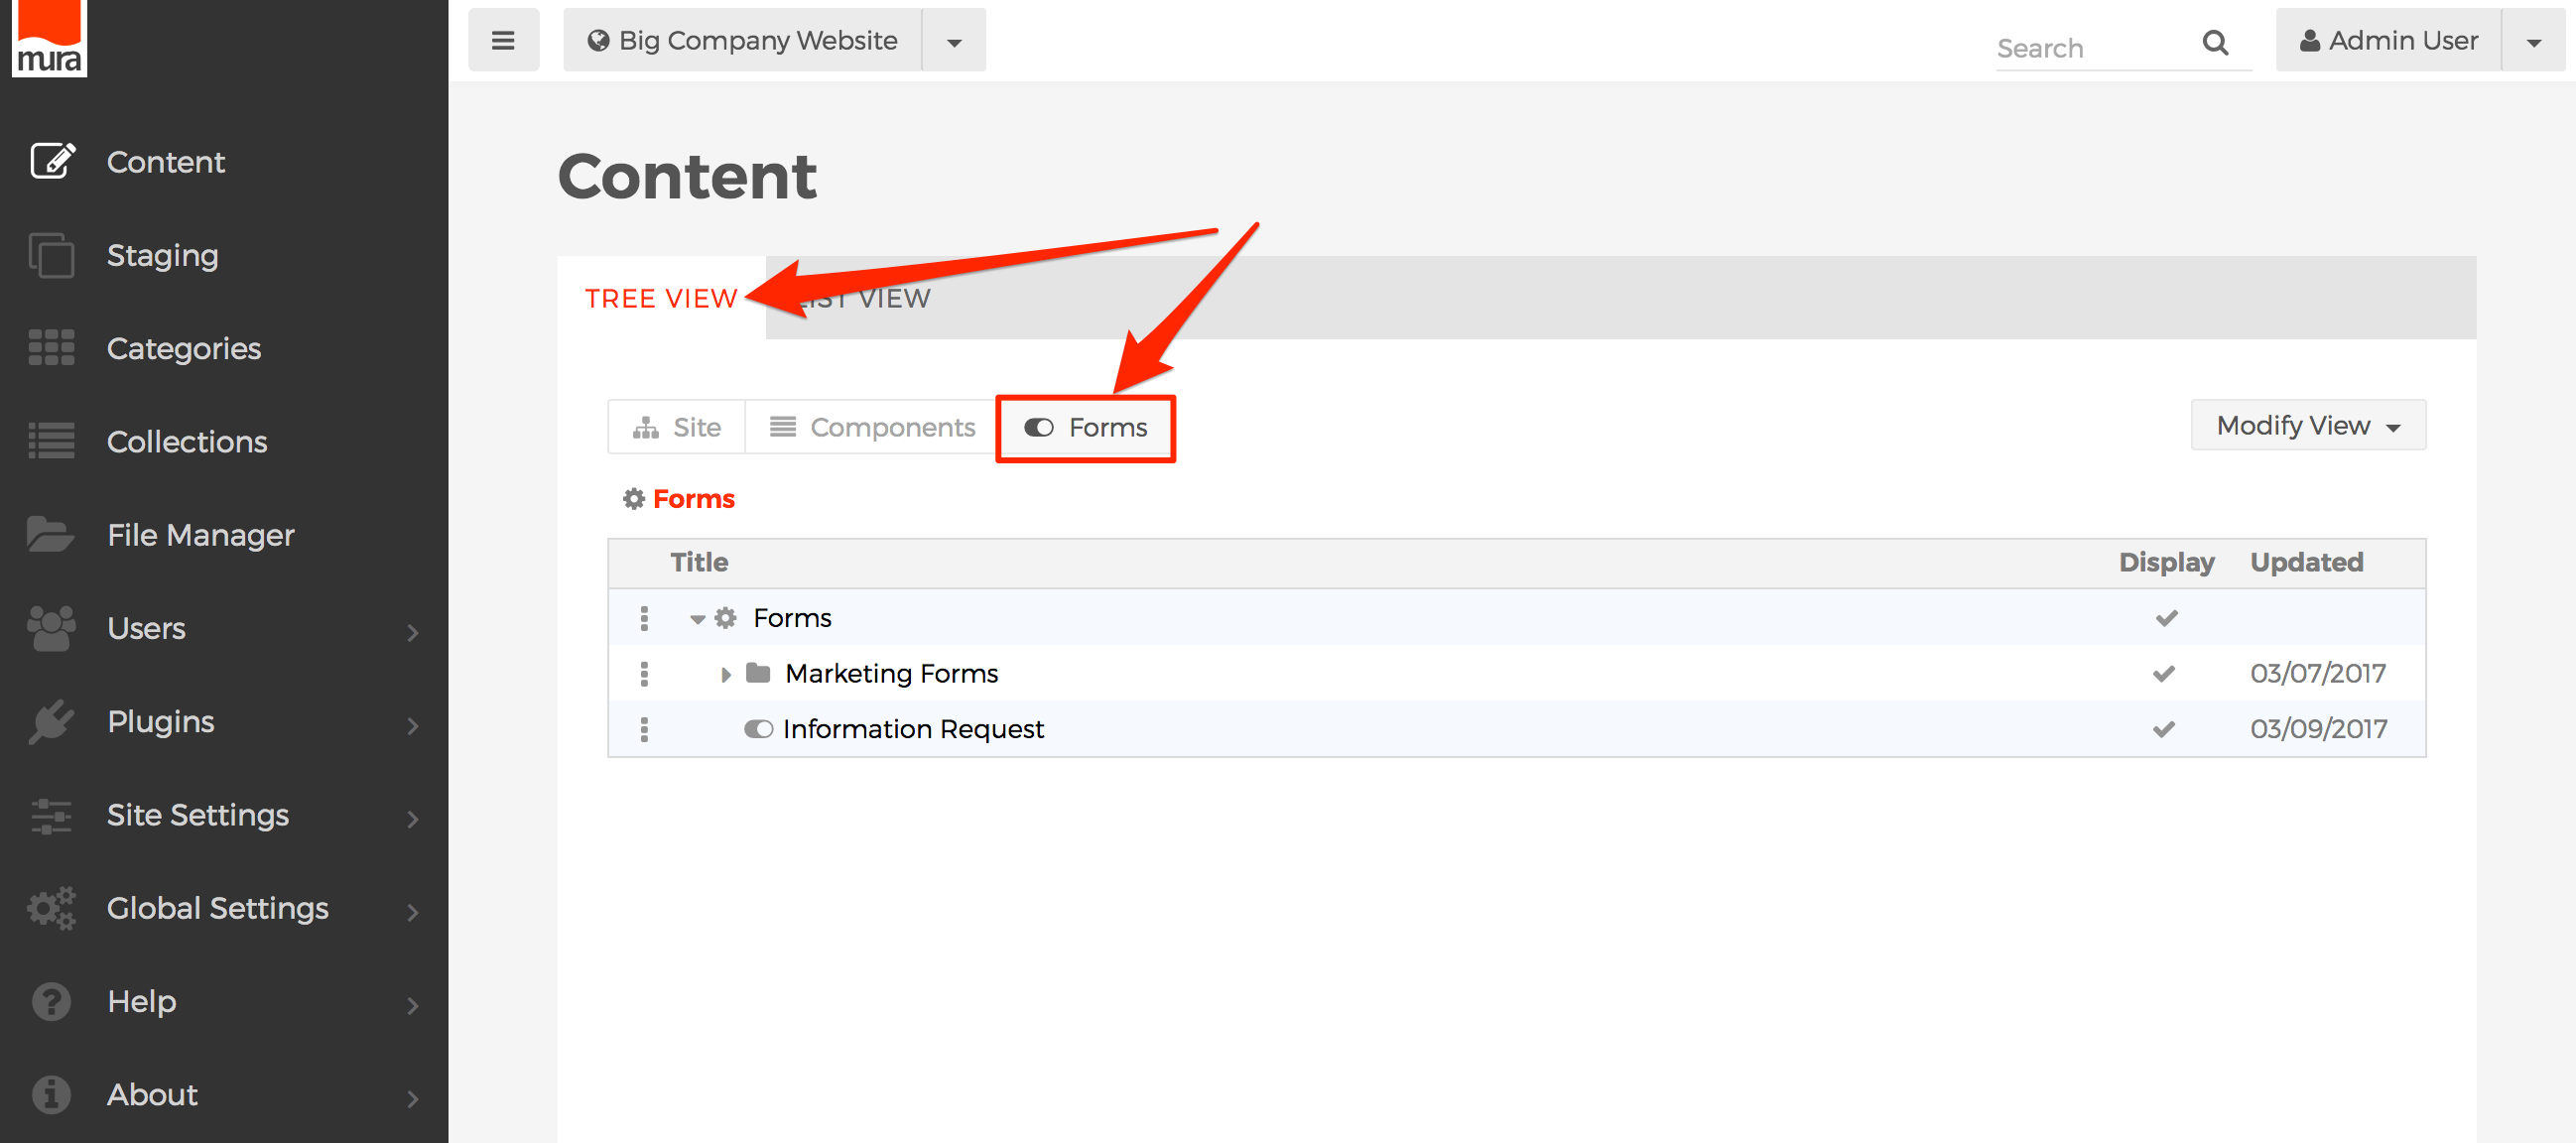
- Since all non-Admin groups begin with "Inherit" privileges, they will not be able to see the "Forms" button on the Content > Tree View tab. For example, the following screen is what a "Marketing Group" user would initially see before permissions for forms have been explicitly set. As you'll notice, this user is unable to see a "Forms" button at all.

- The first thing you'll want to decide on is whether or not you want the group to be able to edit forms by default. Then, you'll set permissions on the top-level "Forms" item itself, and those permissions will cascade down through the rest of the forms. So, if you explicitly set the group's permissions on the top-level Forms item to "Deny," the group will be able to see the "Forms" button on the Content > Tree View screen, and by default, they won't be able to actually edit anything, unless you explicitly set the group's role to "Editor" or "Author" by following the rest of the steps below. Conversely, if you set the group's permissions on the top-level Forms item to "Editor" or "Author," the group will inherit those rights throughout the Forms area, unless explicitly overridden somewhere down the tree. Follow the steps below for editing the permissions of the top-level Forms item itself.

- Editor
- Groups granted "Editor" permissions are able to "write" forms, as well as "publish" forms. This means they can create new forms, update existing forms, delete forms, and even publish forms (or, make them "live"), but only within the section(s) of the site where they have been granted these privileges. The "Admin" group automatically has Editor privileges throughout Mura.
- Author
- Groups granted "Author" permissions can only "write" forms. This means they can create new forms, and update existing forms. However, they are unable to publish or delete forms.
- Inherit
- If selected, permissions applied to the form's parent will be used. If the parent also has "Inherit" selected, then Mura will traverse up the tree until it finds an explicit setting. If Mura reaches the topmost form, and "Inherit" is selected, the permissions fall back to "Deny."
- Deny
- This is the default setting for all groups, except the "Admin" group. If selected, users of the specified group will only be able to see the Title, and tree structure of the forms. They will not be able to edit the form, or any of its children, unless explicitly overridden with a different setting down the tree.
- Editor
- Click the three-dot menu of the form you wish to manage permissions for, and select Permissions.
- Or, if editing a form, click the Actions button, and select Permissions.
- From the Permissions screen, select your desired options for each group.
- Click Update, to save your changes.
- Users will obtain the new roles/privileges on their next successful login. So, if a users is logged in when the permissions were updated, they will have to log out, and then log back in, to see the changes.


Content Staging Permissions
If you have the Content Staging Manager enabled on your site, you may want to allow groups the ability to manage Change Sets within the Content Staging Manager. By default, Super Admin Users, and members of the Admin group are automatically able to manage Change Sets.
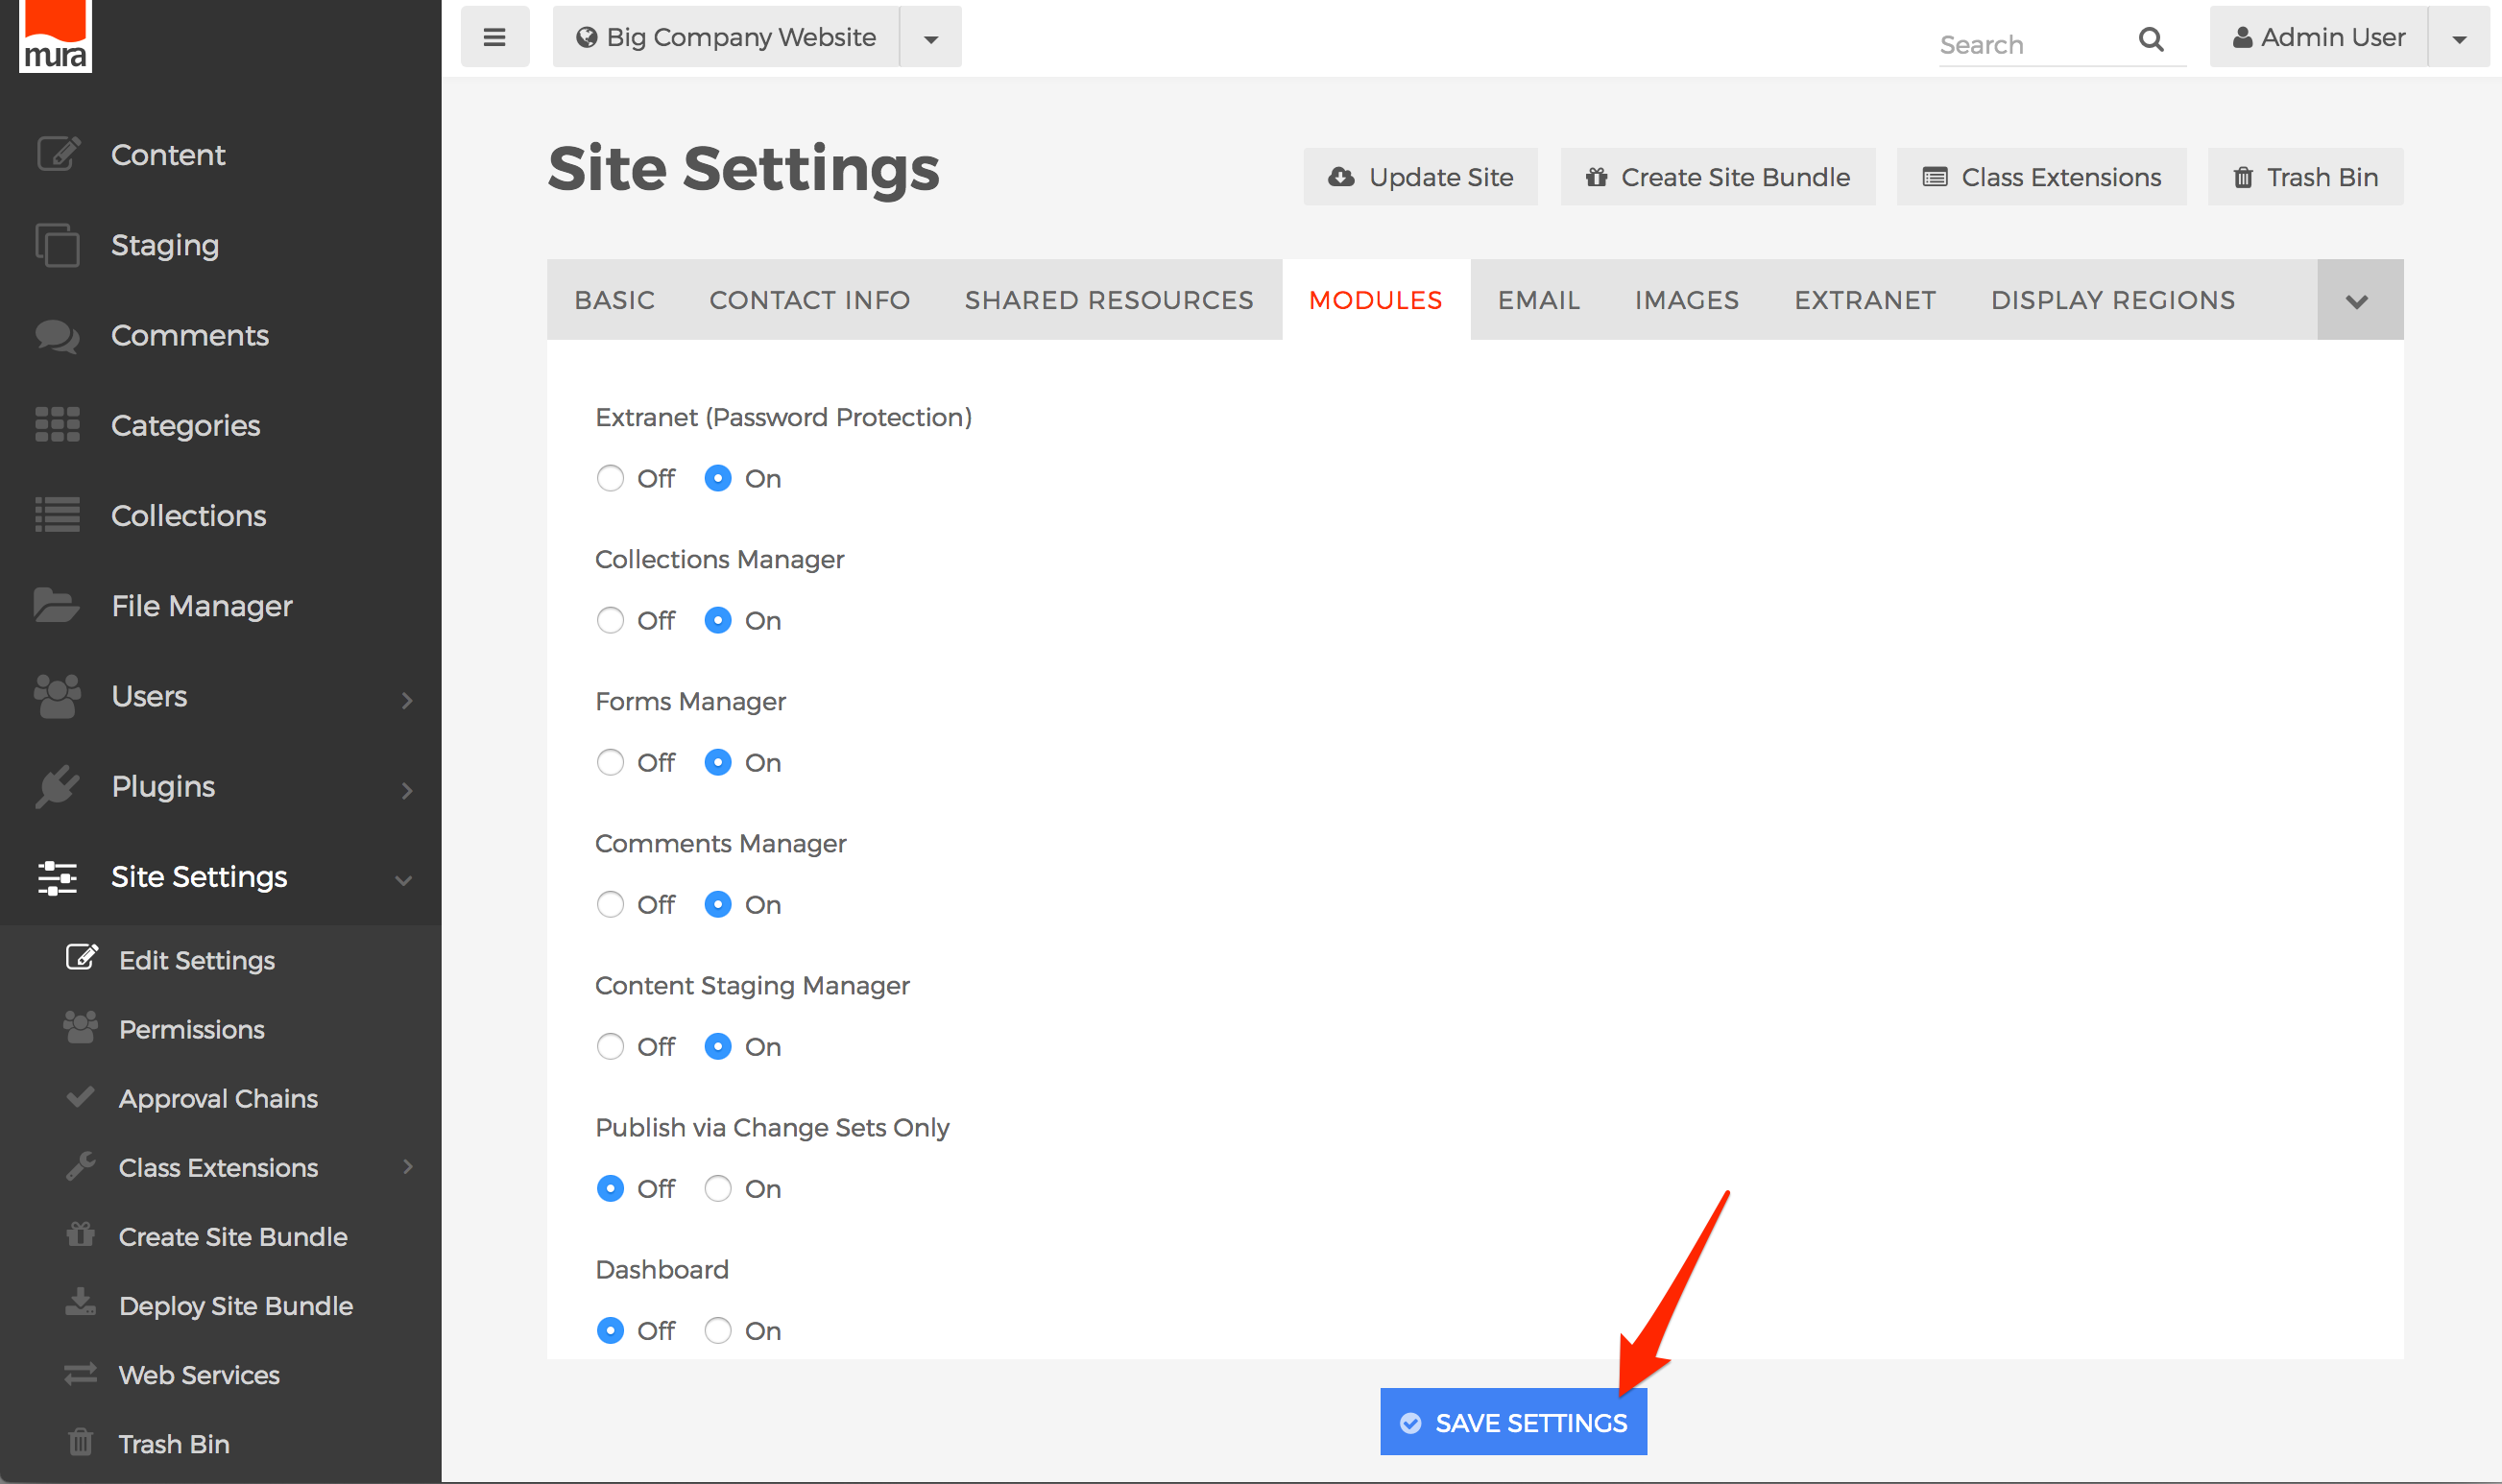
How to Enable/Disable Content Staging Manager
To enable or disable the Content Staging Manager, follow the steps below.
- From the back-end administration area of Mura, select Site Settings, then click Edit Settings.

- Select the Modules tab.

- Locate the field labeled Content Staging Manager, then select "On" to enable it, or "Off" if you wish to disable it.

- Click Save Settings.


How to Apply Permissions to Content Staging Manager
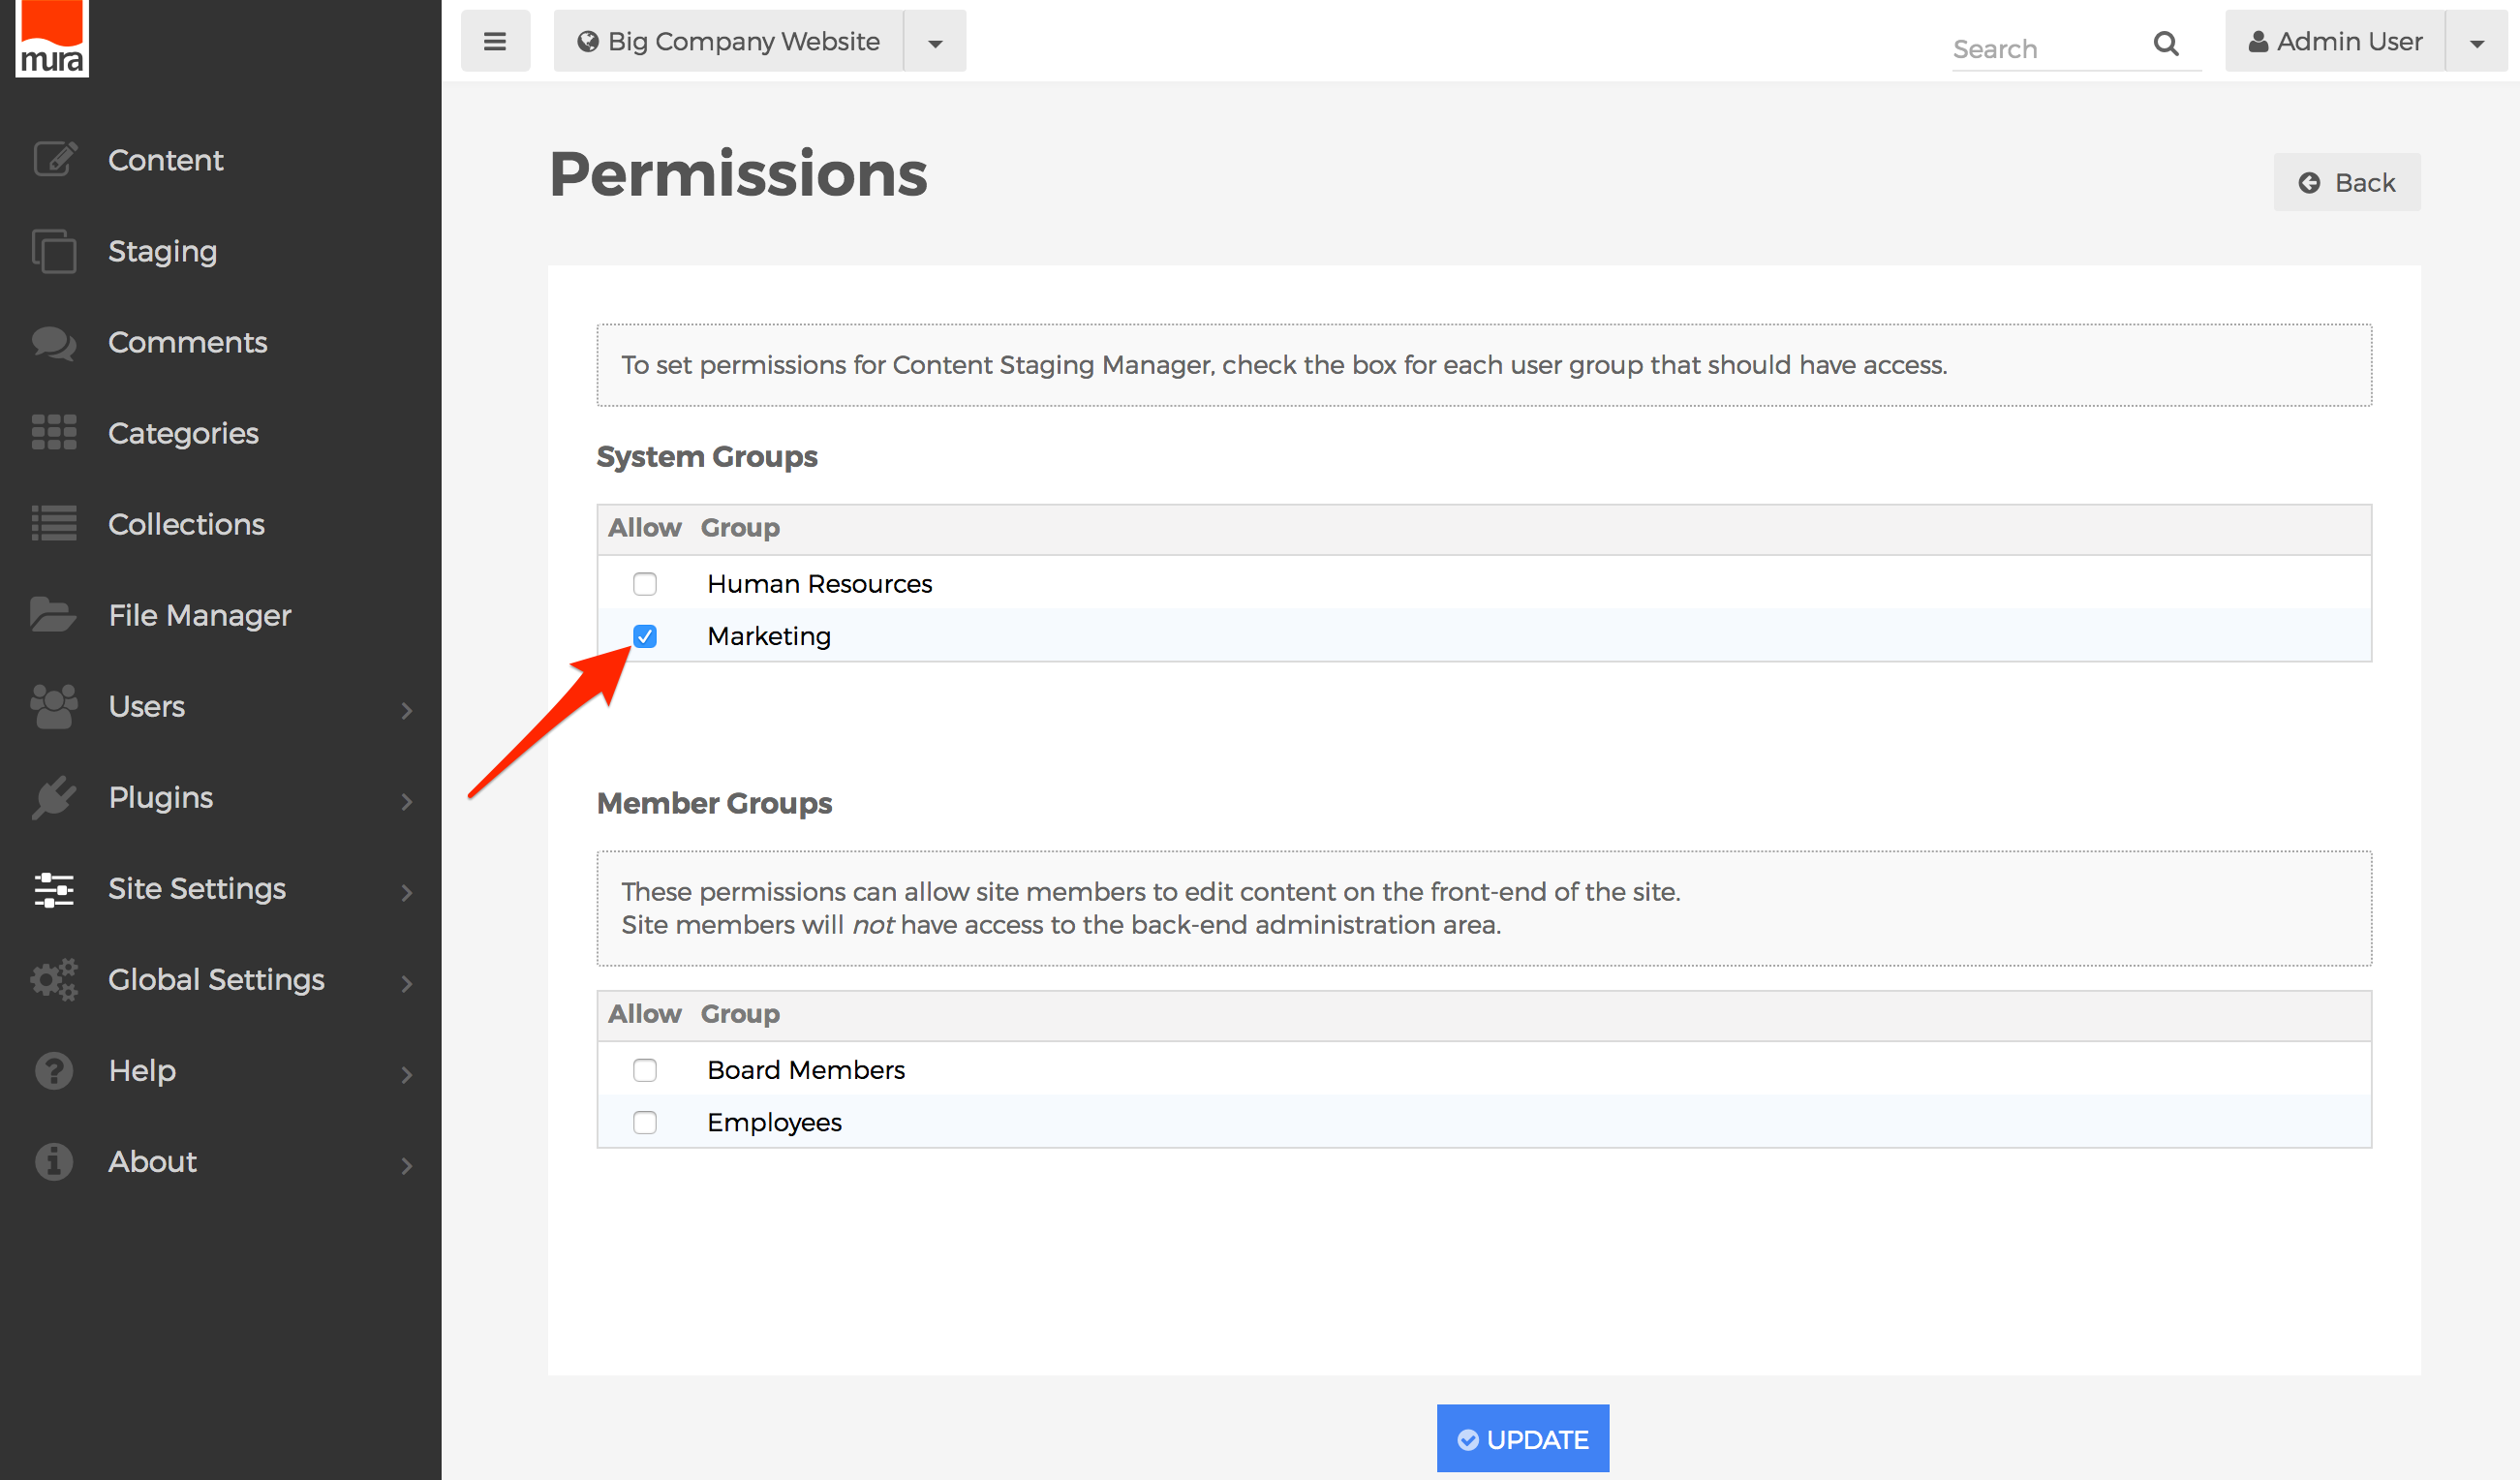
To allow groups the ability to manage Change Sets within the Content Staging Manager, follow the steps outlined below.
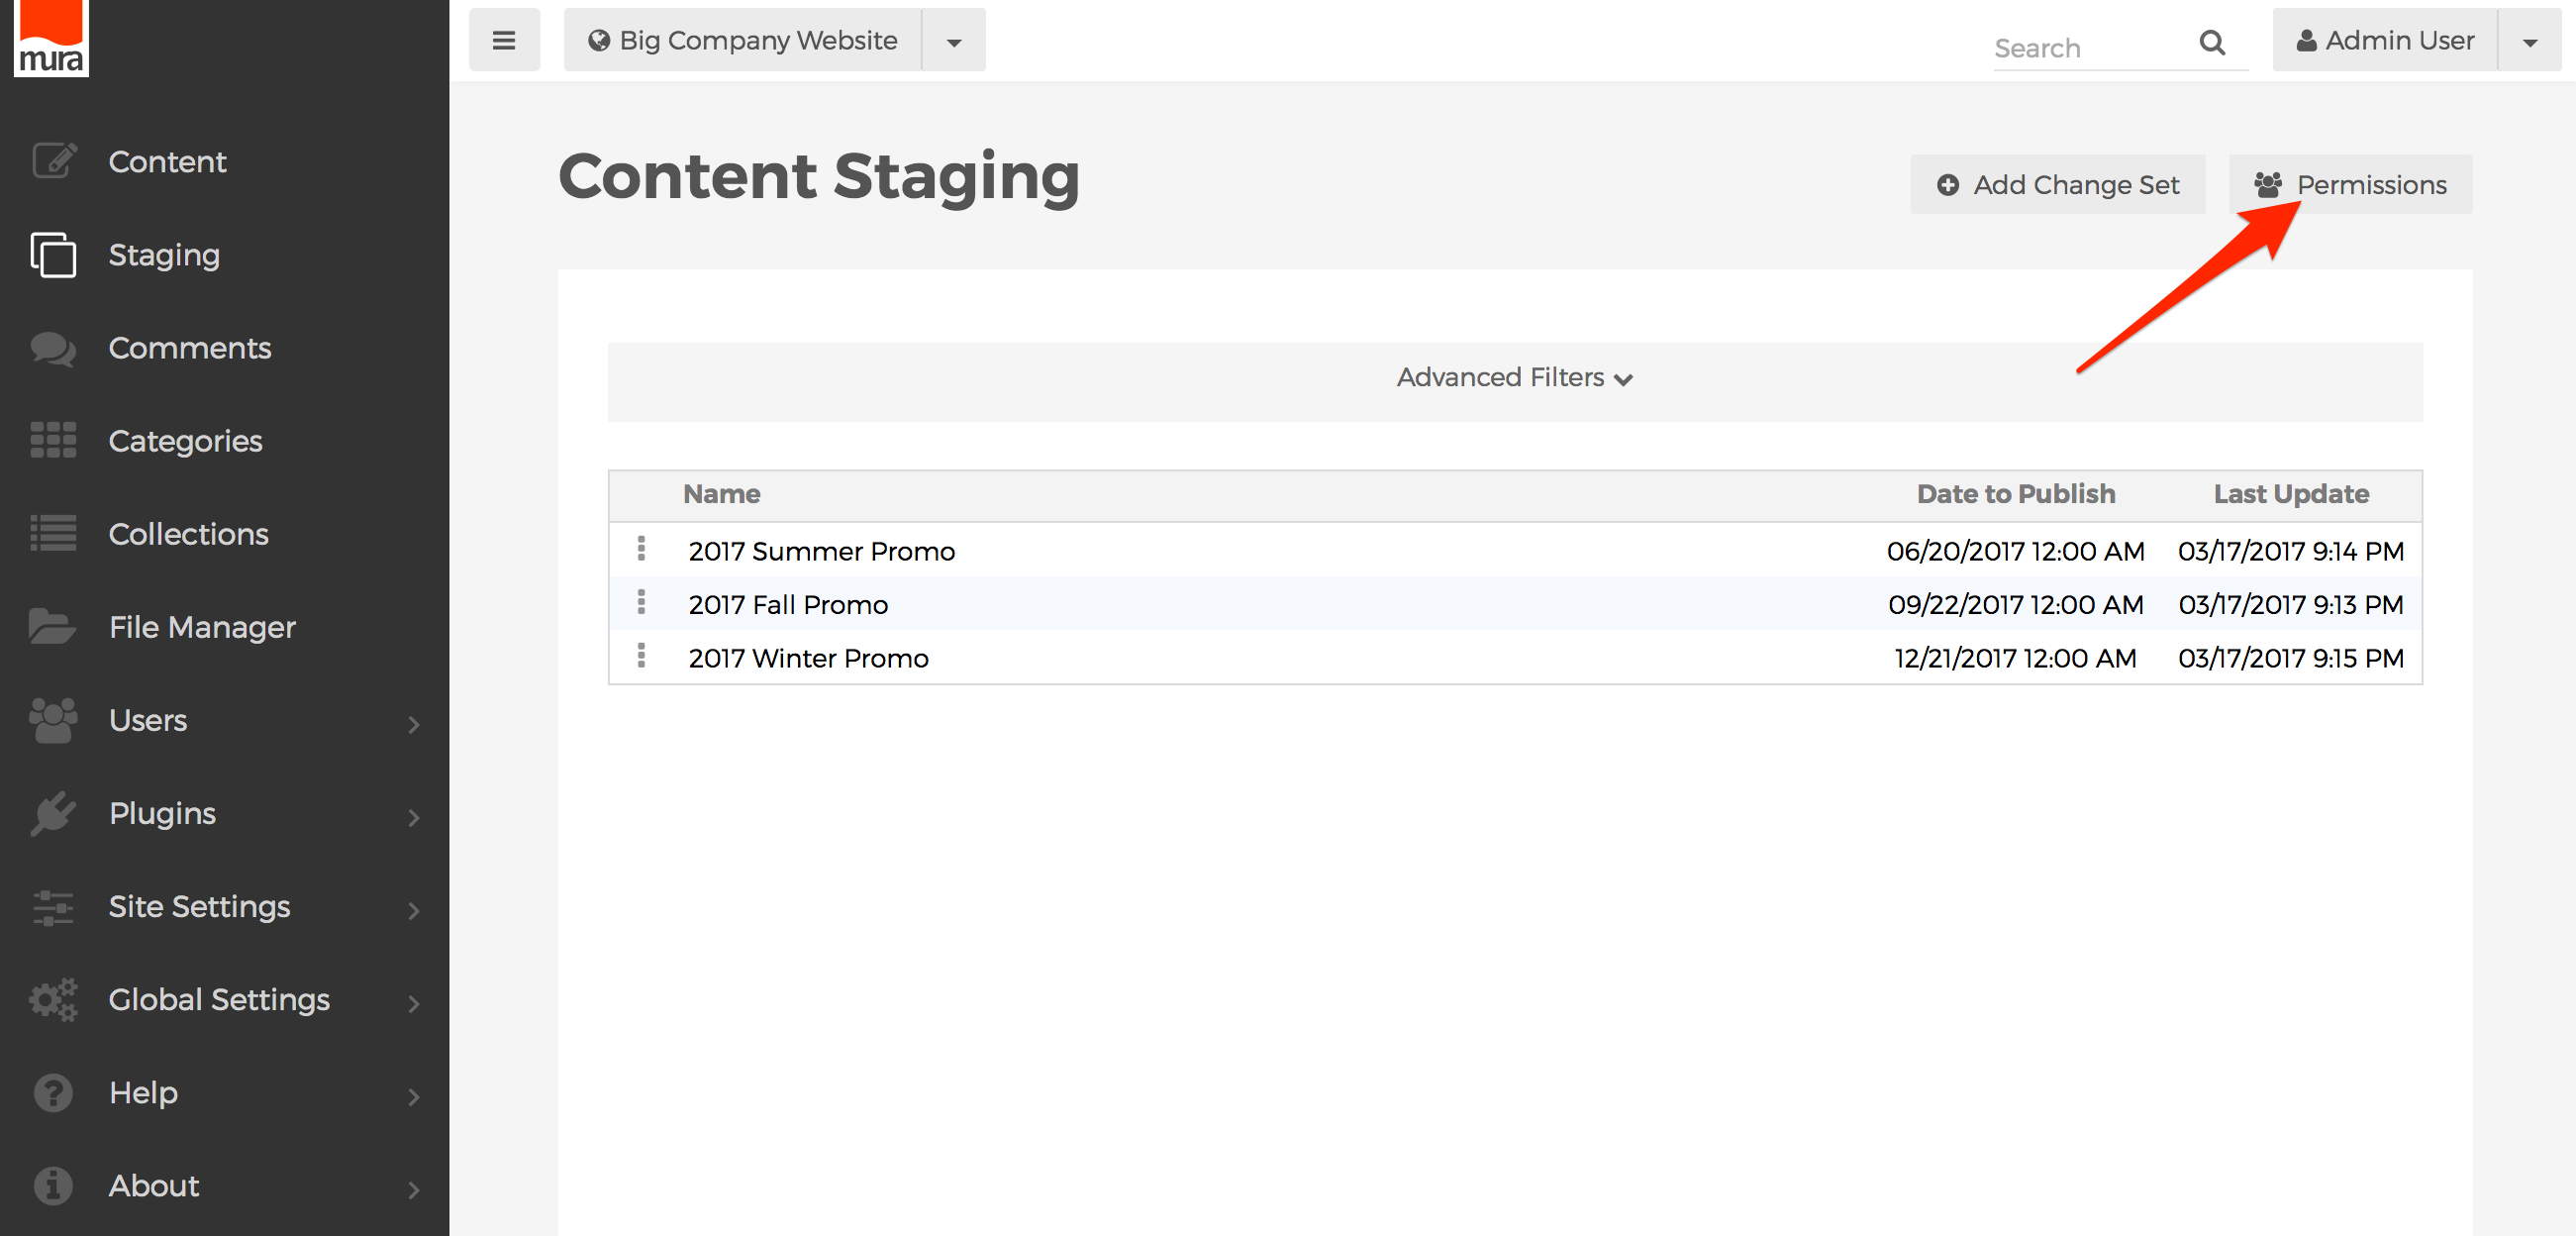
- From the back-end administration area of Mura, select Staging on the main navigation.
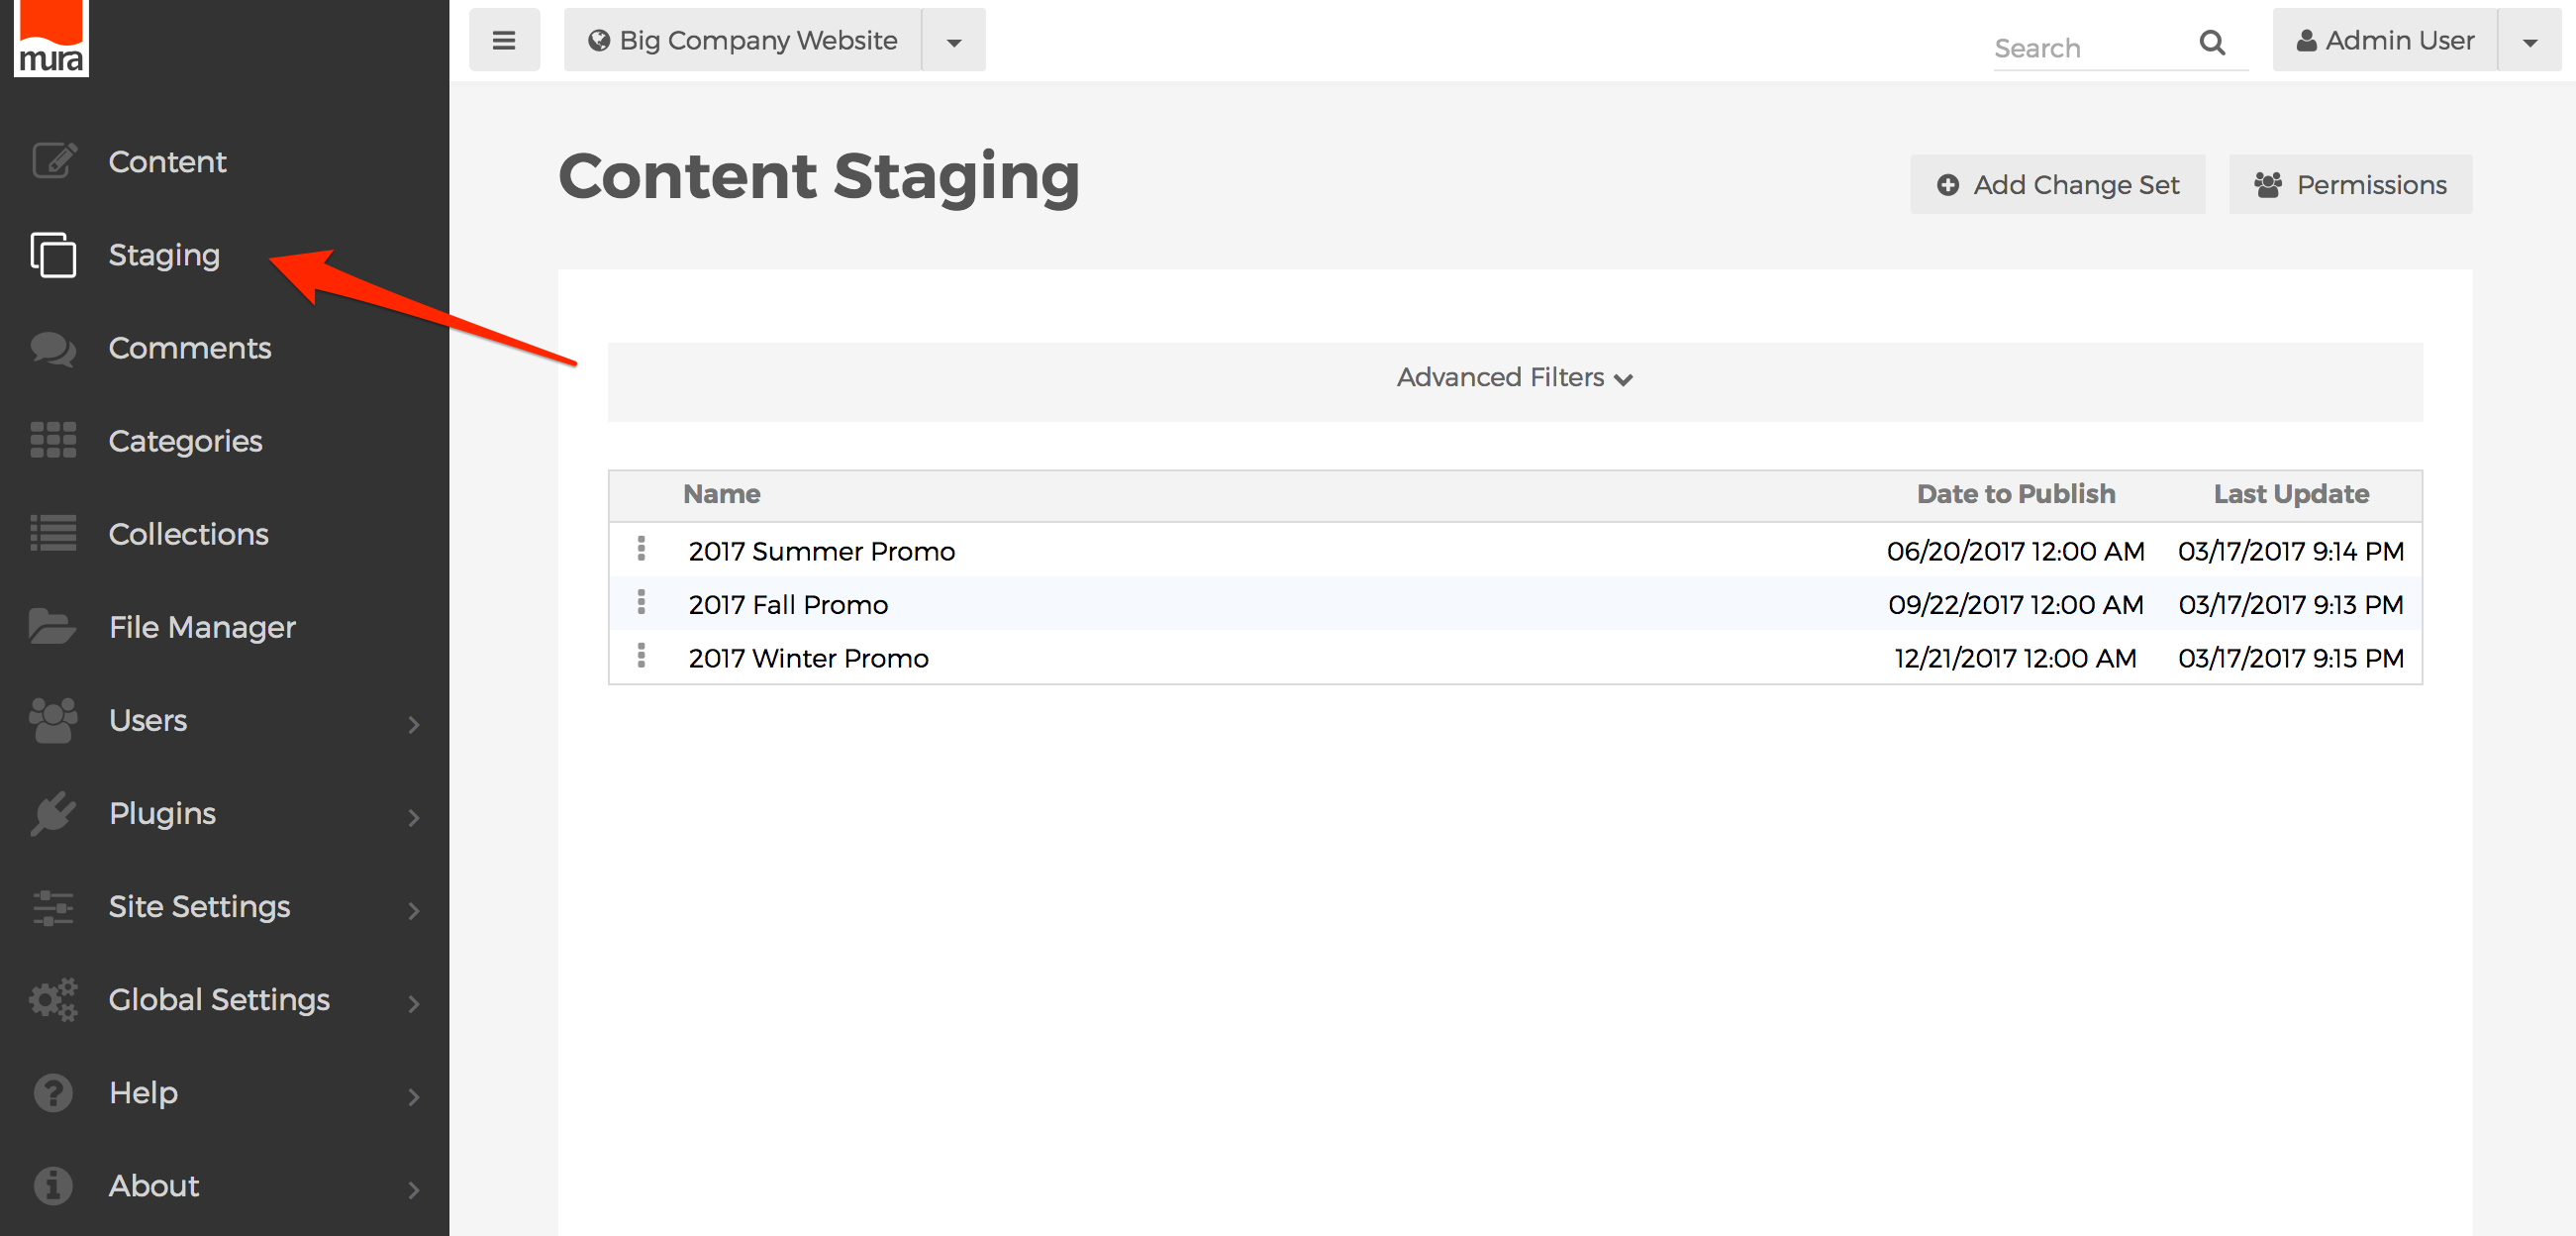
- From the Content Staging screen, click the Permissions button.

- Select the checkbox under "Allow" for each group you wish to enable access for.

- Click Update, to save your changes.

- Users will obtain the new roles/privileges on their next successful login. So, if a user is logged in when the permissions were updated, they will have to log out, and then log back in, to see the changes.


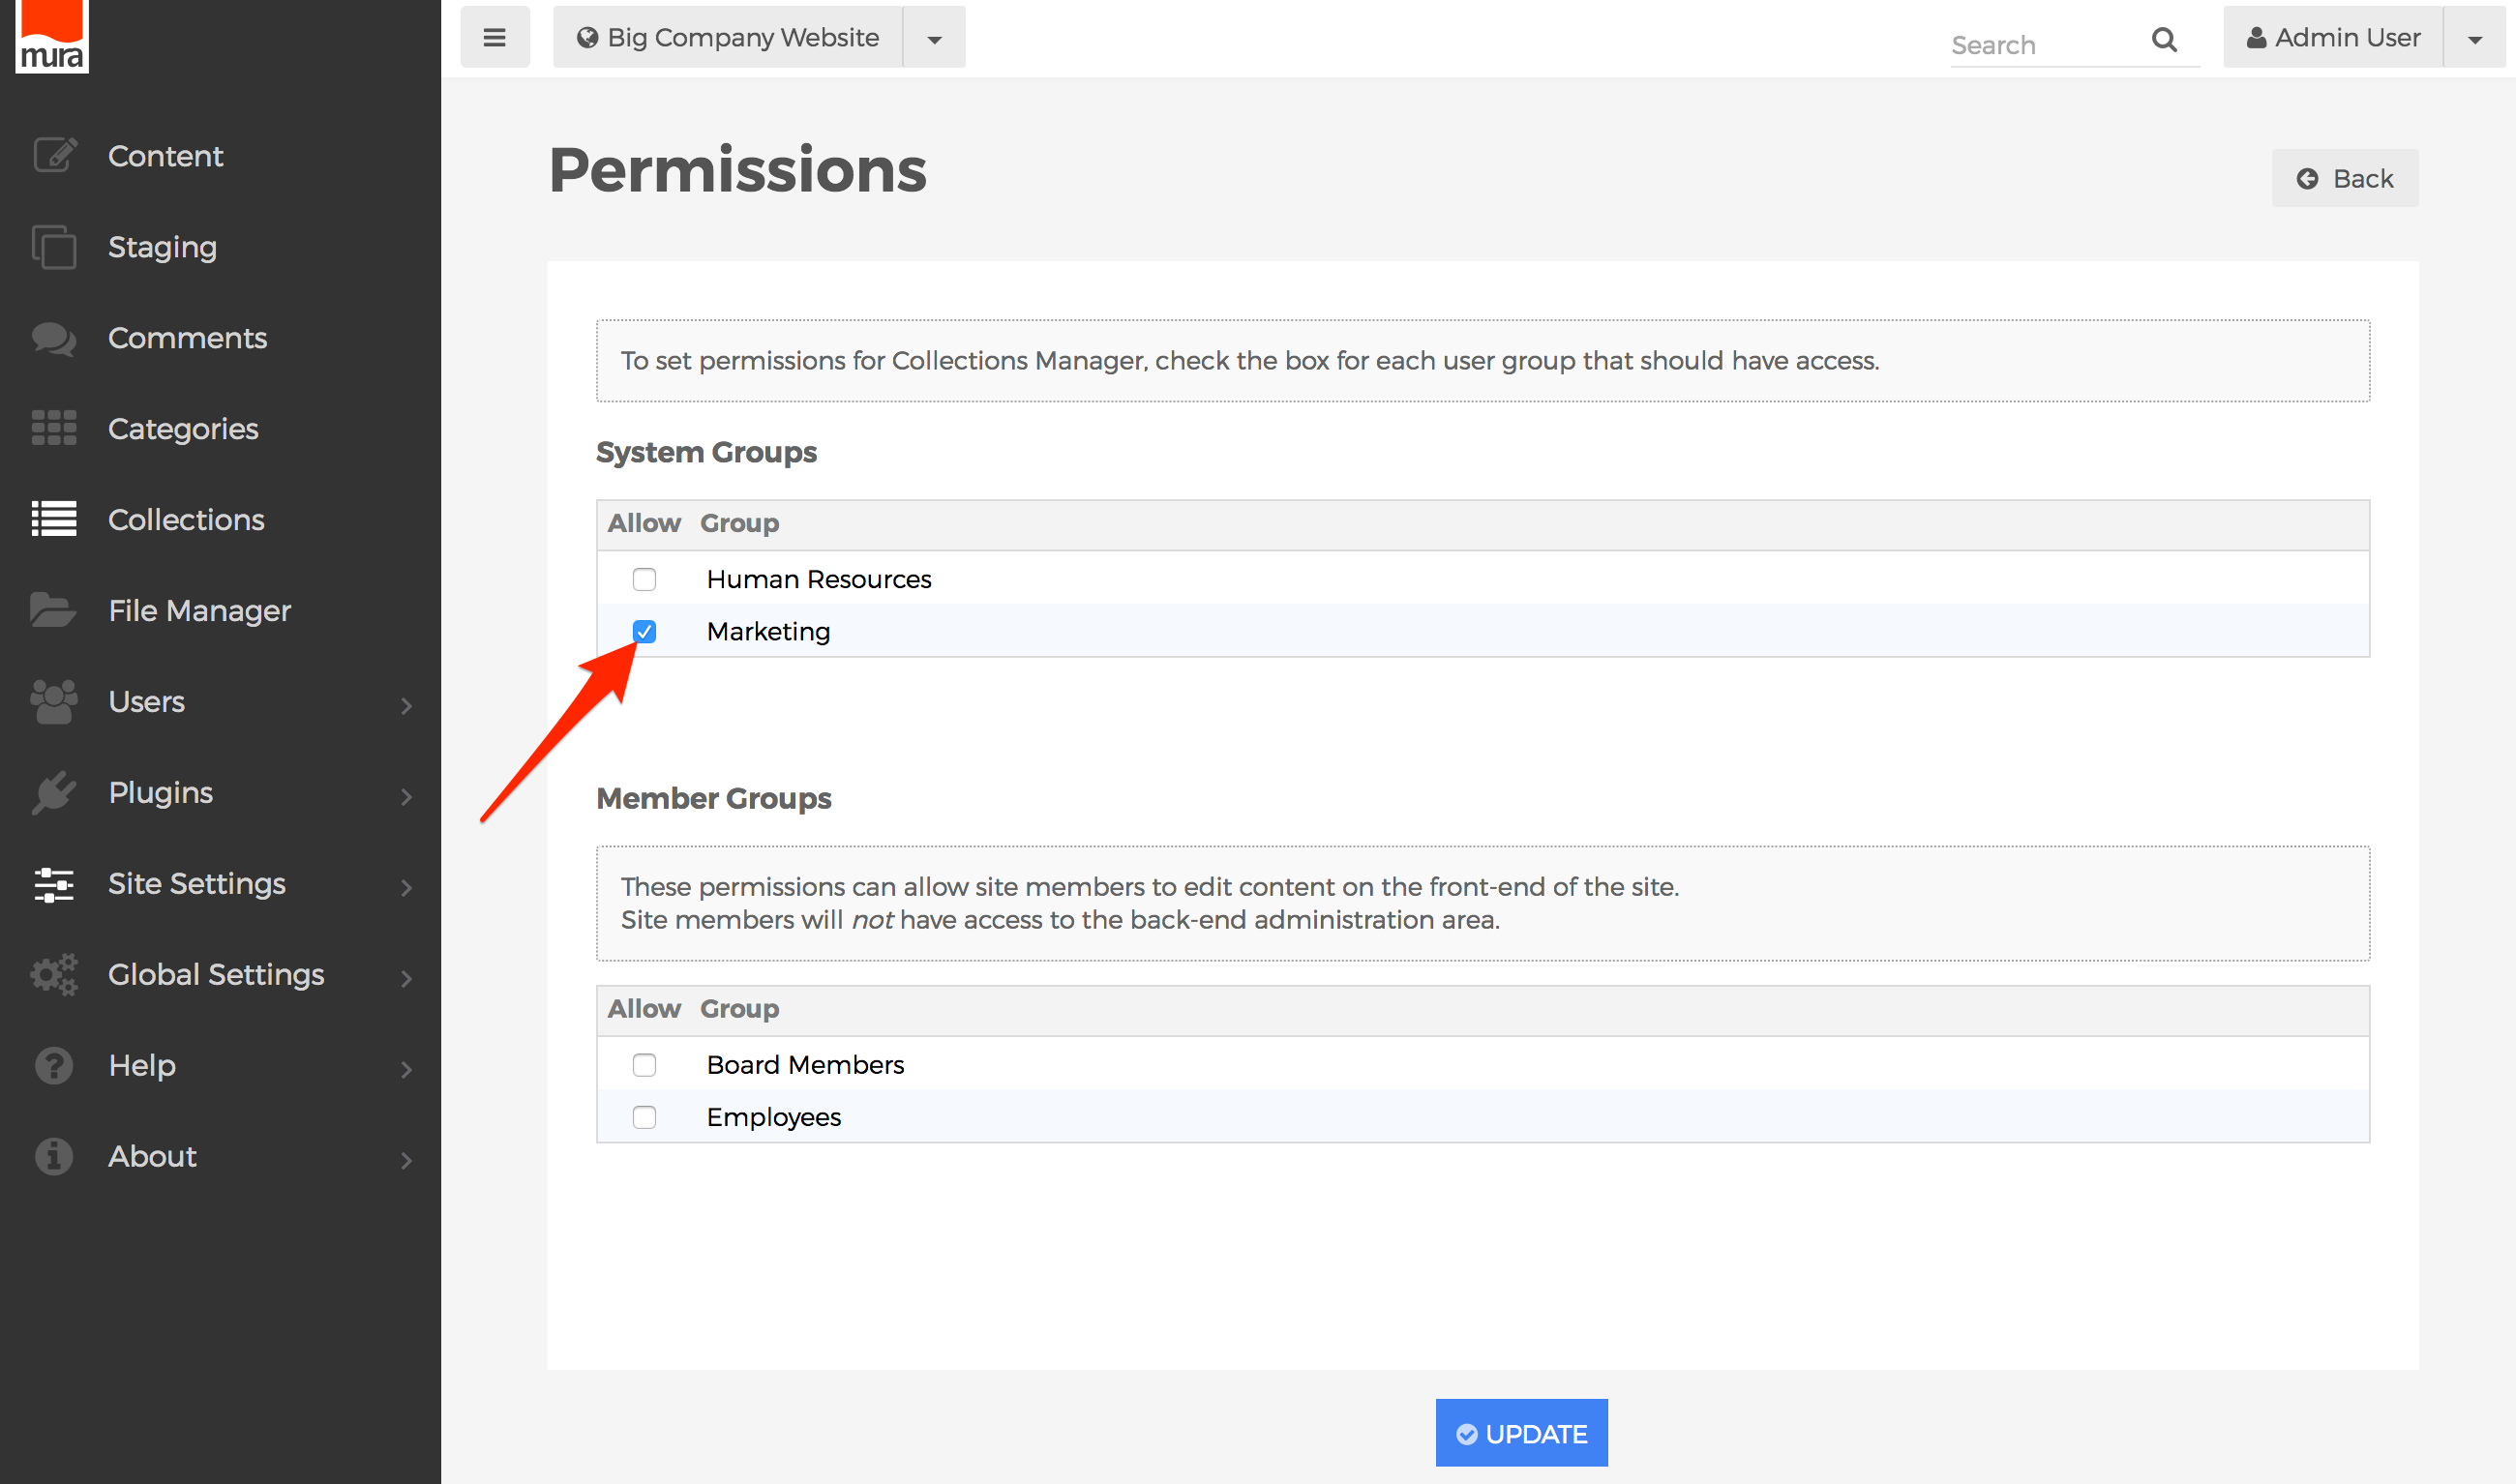
Collections Permissions
If you have enabled the Collections Manager, you may want to allow some groups the ability to manage Collections. By default, Super Admin Users, and members of the Admin group are automatically able to manage collections.
How to Enable/Disable Collections Manager
To enable or disable the Collections Manager, follow the steps below.
- From the back-end administration area of Mura, select Site Settings, then click Edit Settings.

- Select the Modules tab.
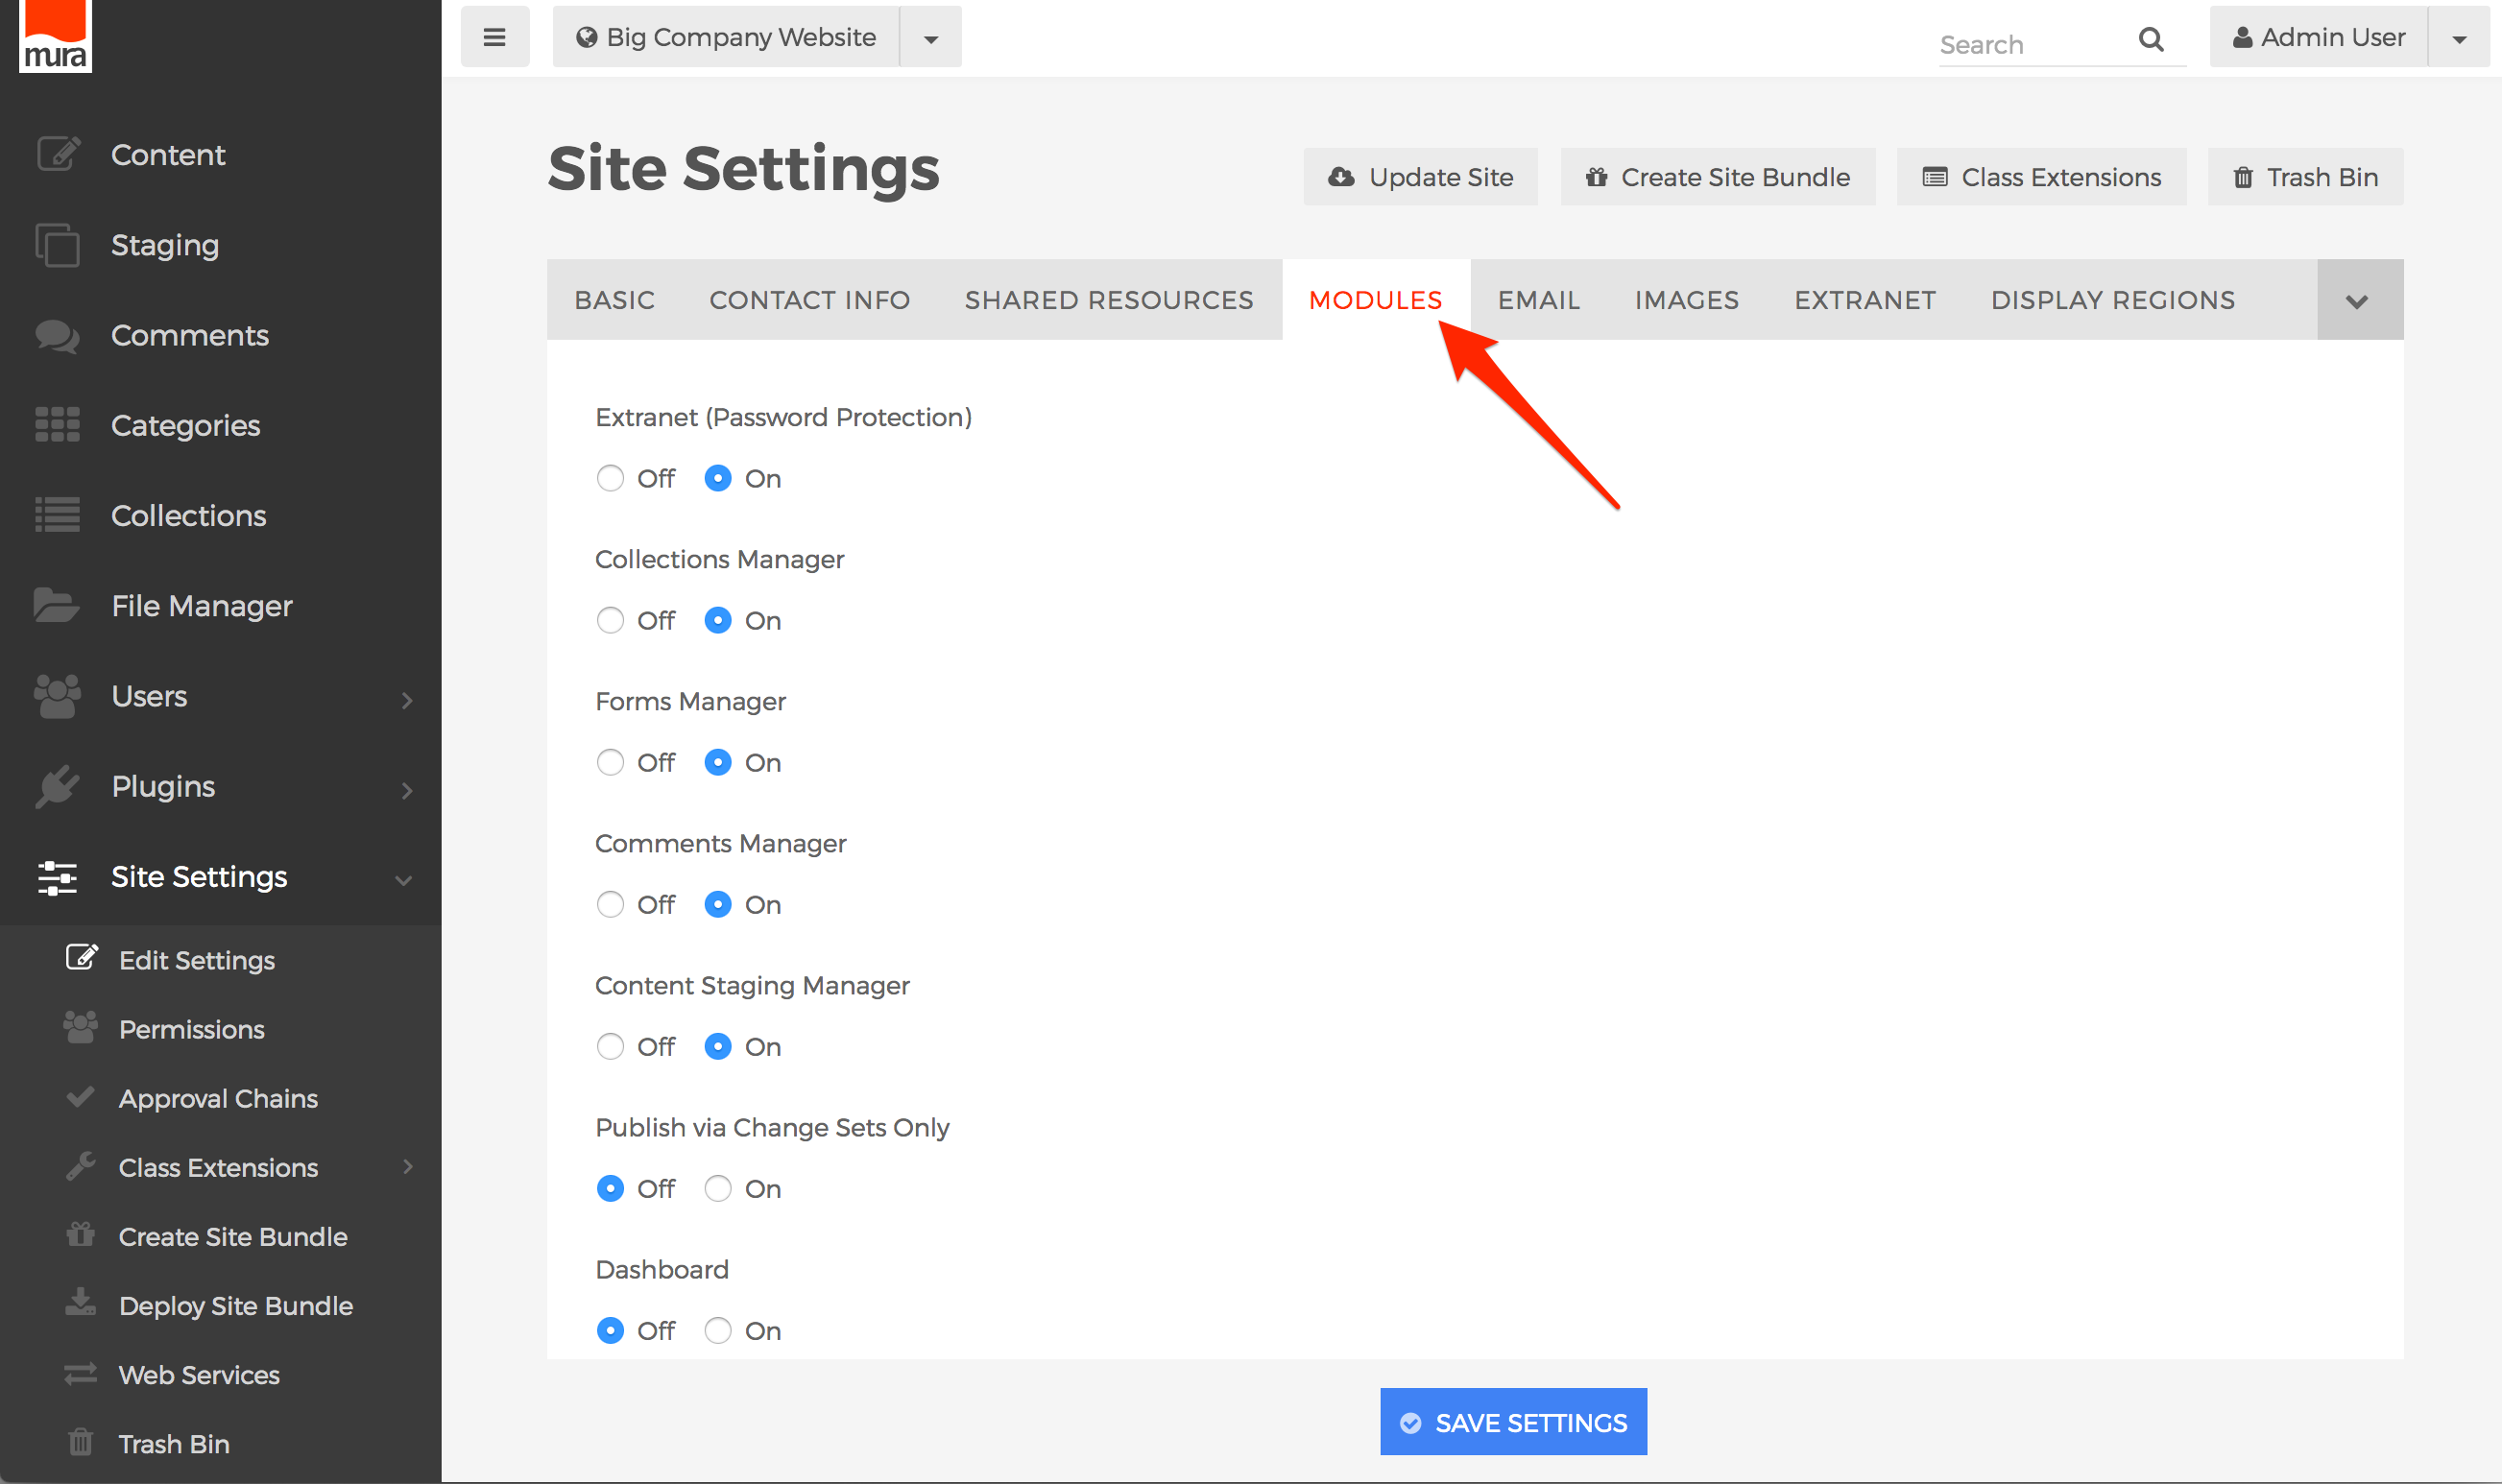
- Locate the field labeled Collections Manager, then select "On" to enable it, or "Off" if you wish to disable it.
- Click Save Settings.


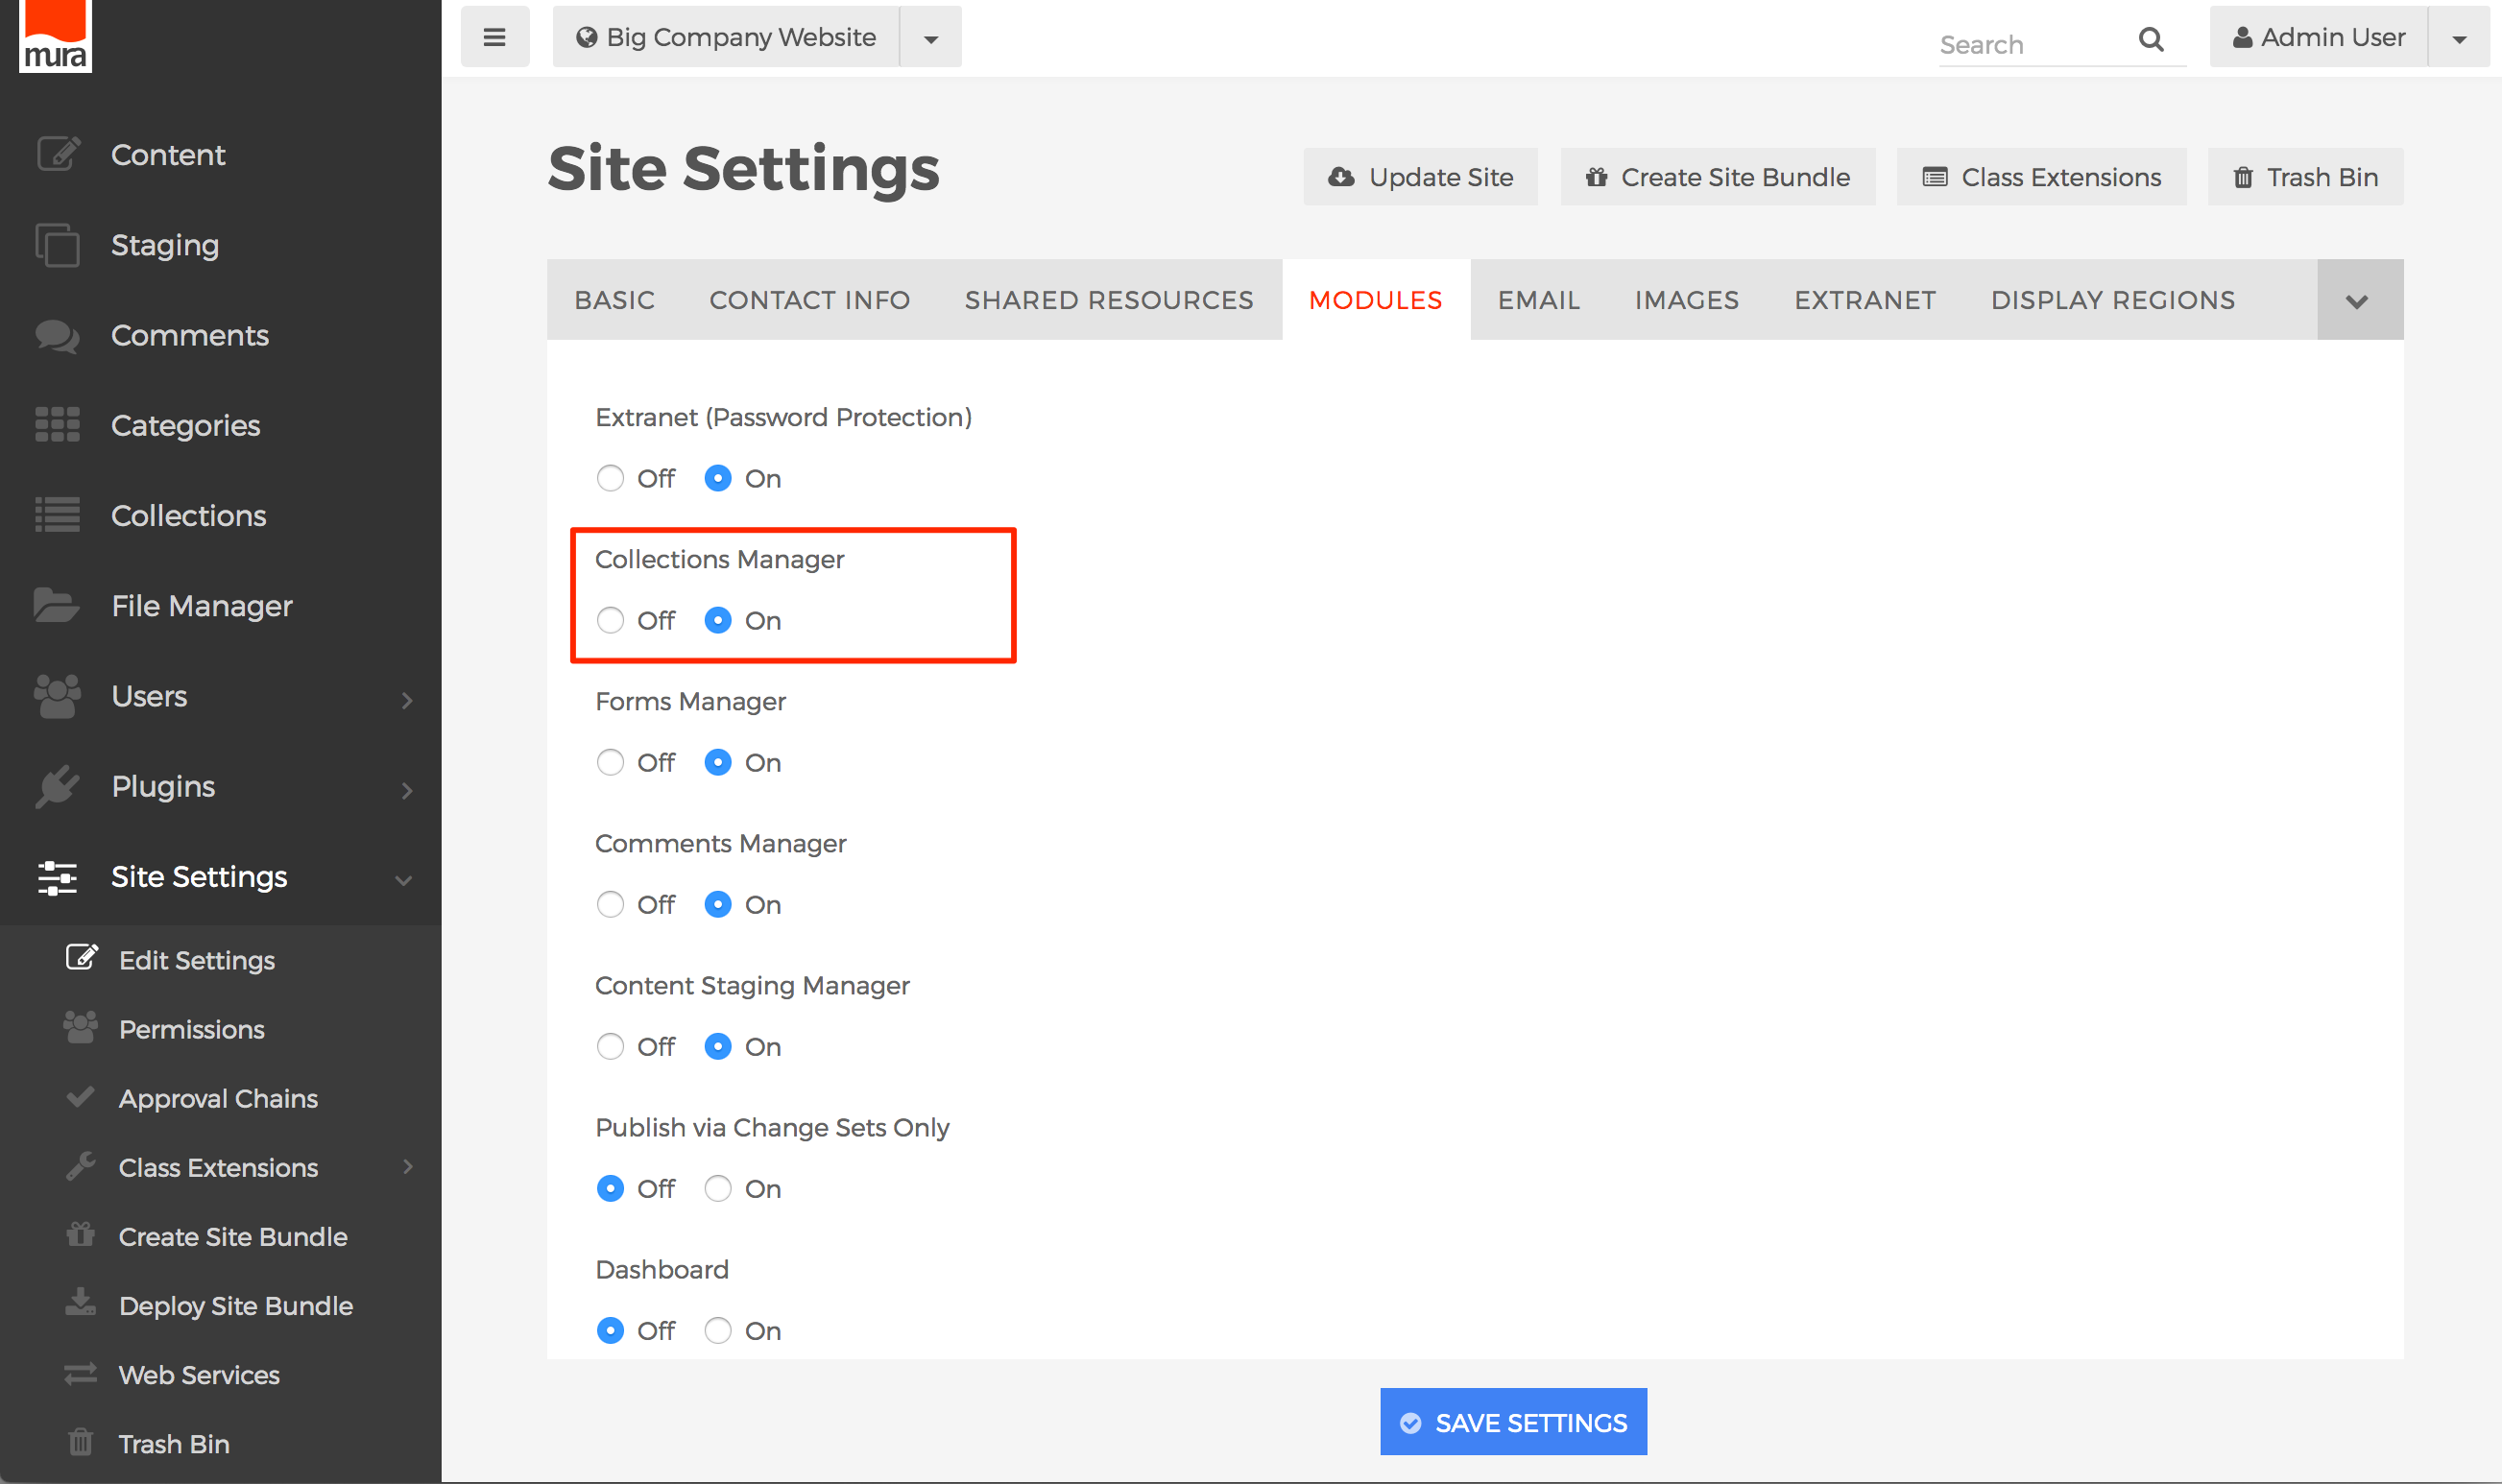
How to Apply Permissions to the Collections Manager
To allow groups the ability to manage Collections, follow the steps outlined below.
- From the back-end administration area of Mura, select Collections on the main navigation.
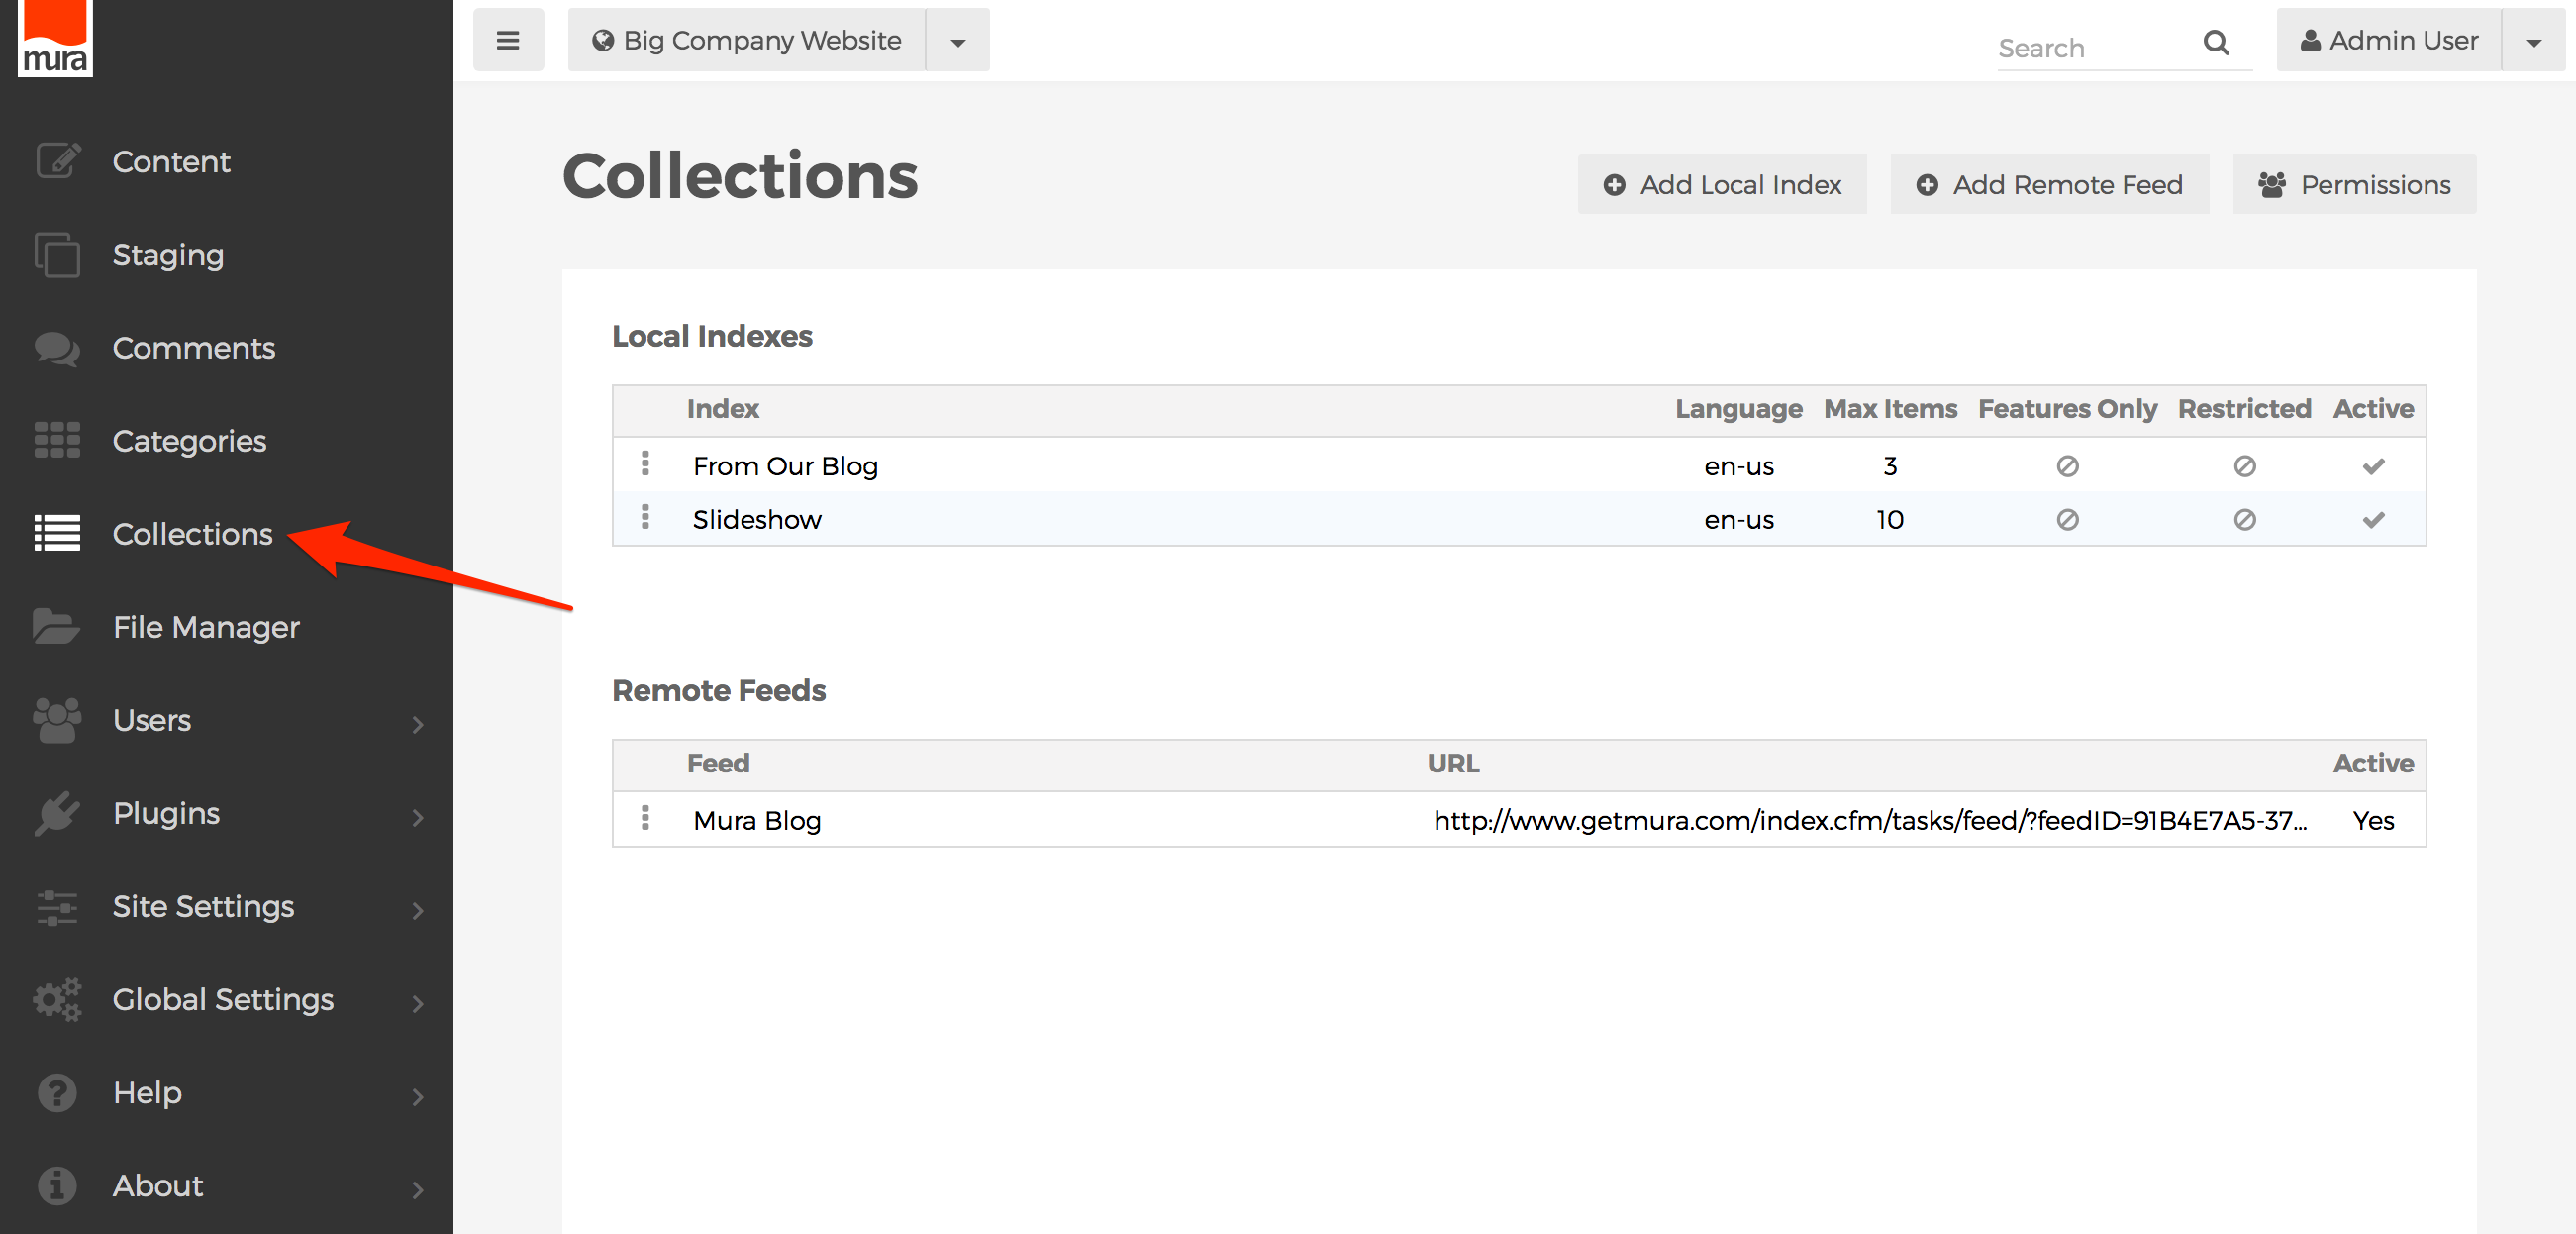
- From the Collections screen, click the Permissions button.
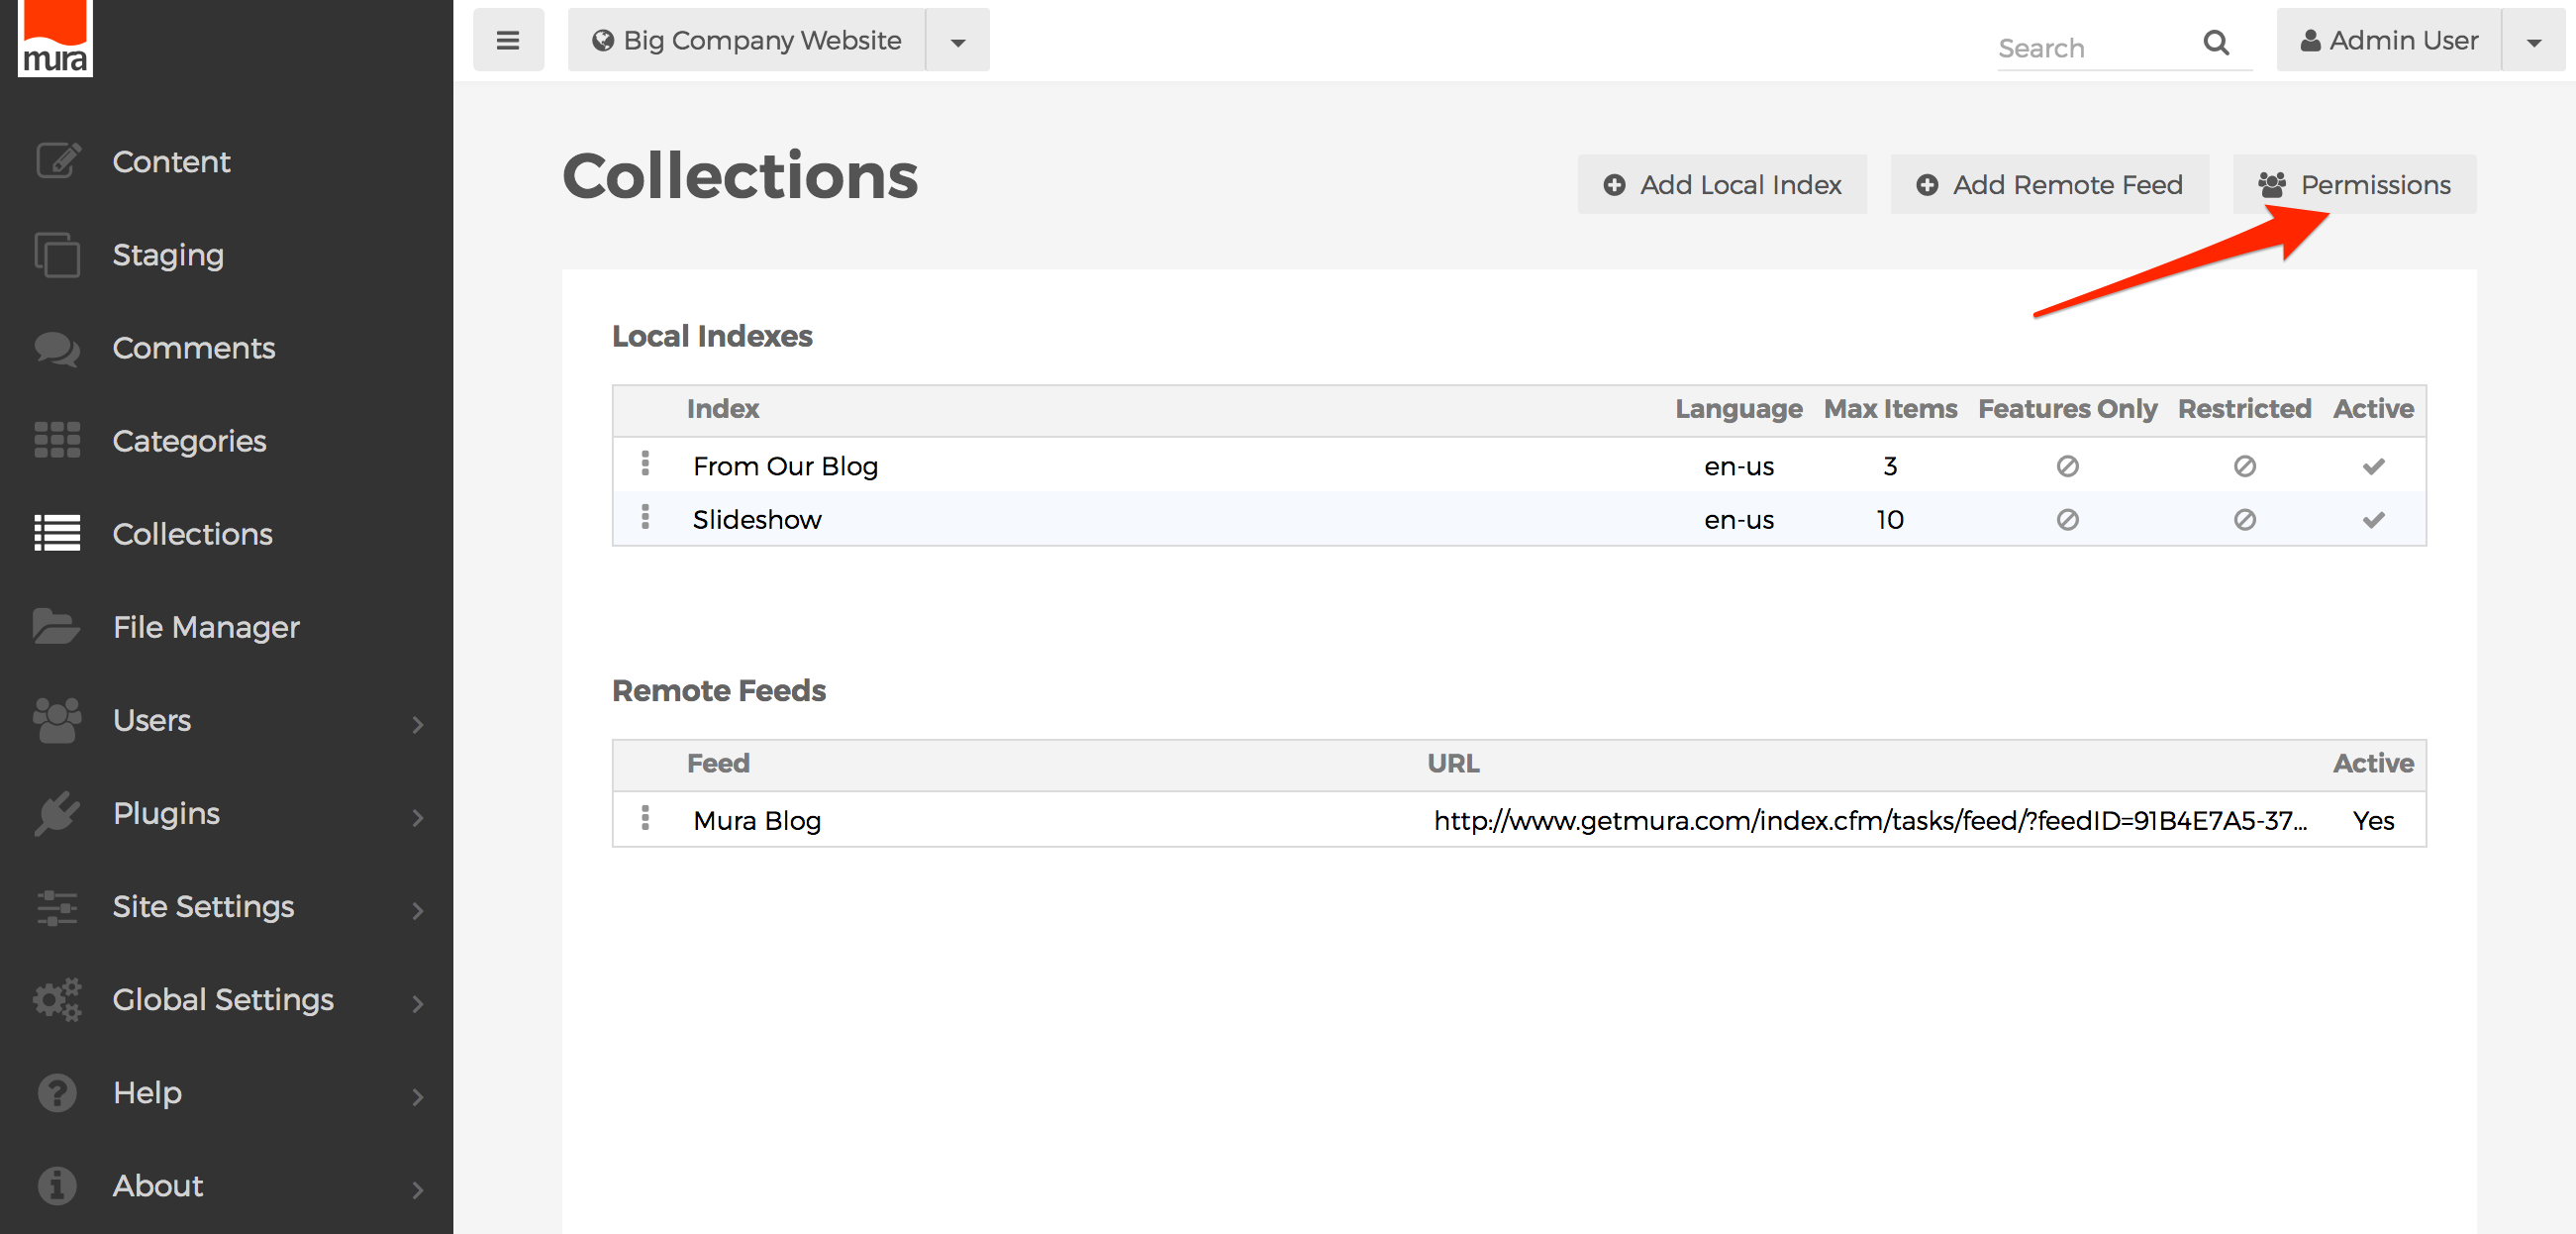
- Select the checkbox under "Allow" for each group you wish to enable access for.

- Click Update, to save your changes.

- Users will obtain the new roles/privileges on their next successful login. So, if a user is logged in when the permissions were updated, they will have to log out, and then log back in, to see the changes.


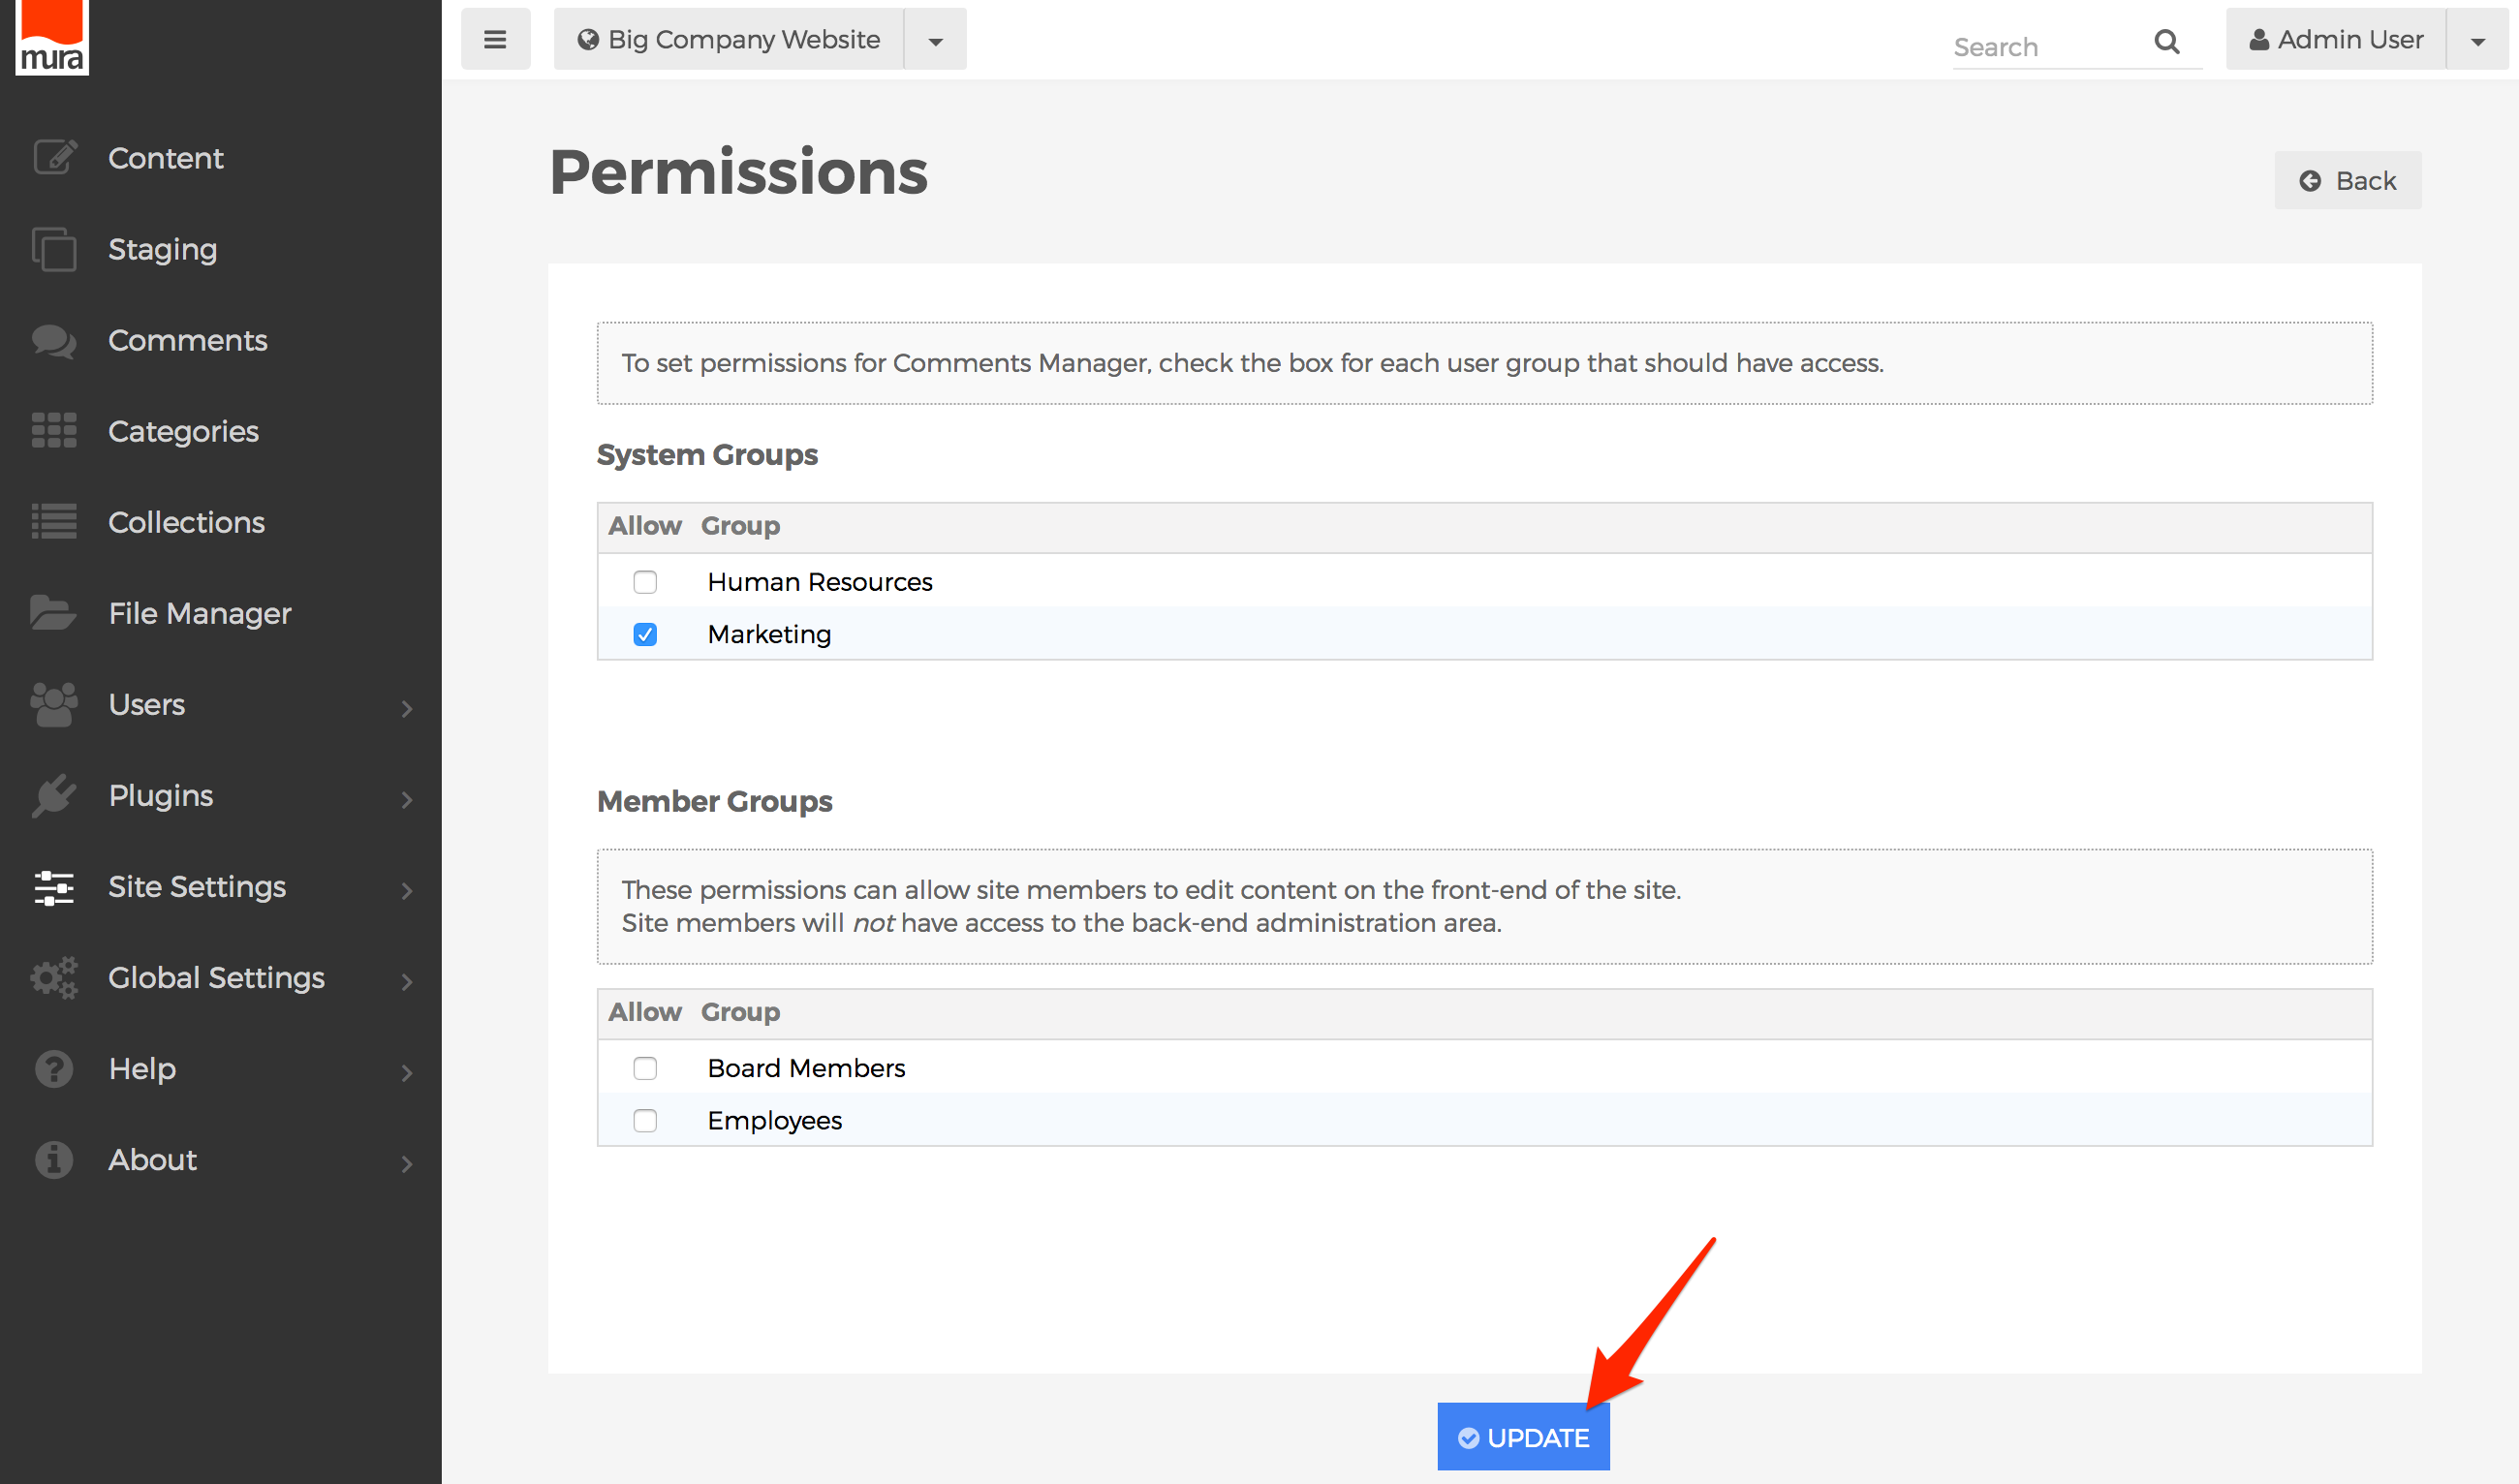
Comments Permissions
If you allow comments to be posted to your website, you are definitely going to need someone to help manage those comments. By default, Super Admin Users, and members of the Admin group are automatically able to manage comments.
How to Enable/Disable Comments Manager
To enable or disable the Comments Manager, follow the steps below.
- From the back-end administration area of Mura, select Site Settings, then click Edit Settings.

- Select the Modules tab.

- Locate the field labeled Comments Manager, then select "On" to enable it, or "Off" if you wish to disable it.

- Click Save Settings.


How to Require Approval of Comments
Some organizations prefer comments are moderated, or reviewed and "approved" before being posted for other visitors to the public-facing side of the site to see. To enforce this kind of process, follow the steps below.
- From the back-end administration area of Mura, select Site Settings, then click Edit Settings.

- Select the Basic tab.

- Locate the field labeled "Allow Comments to be Posted Without Site Admin Approval."
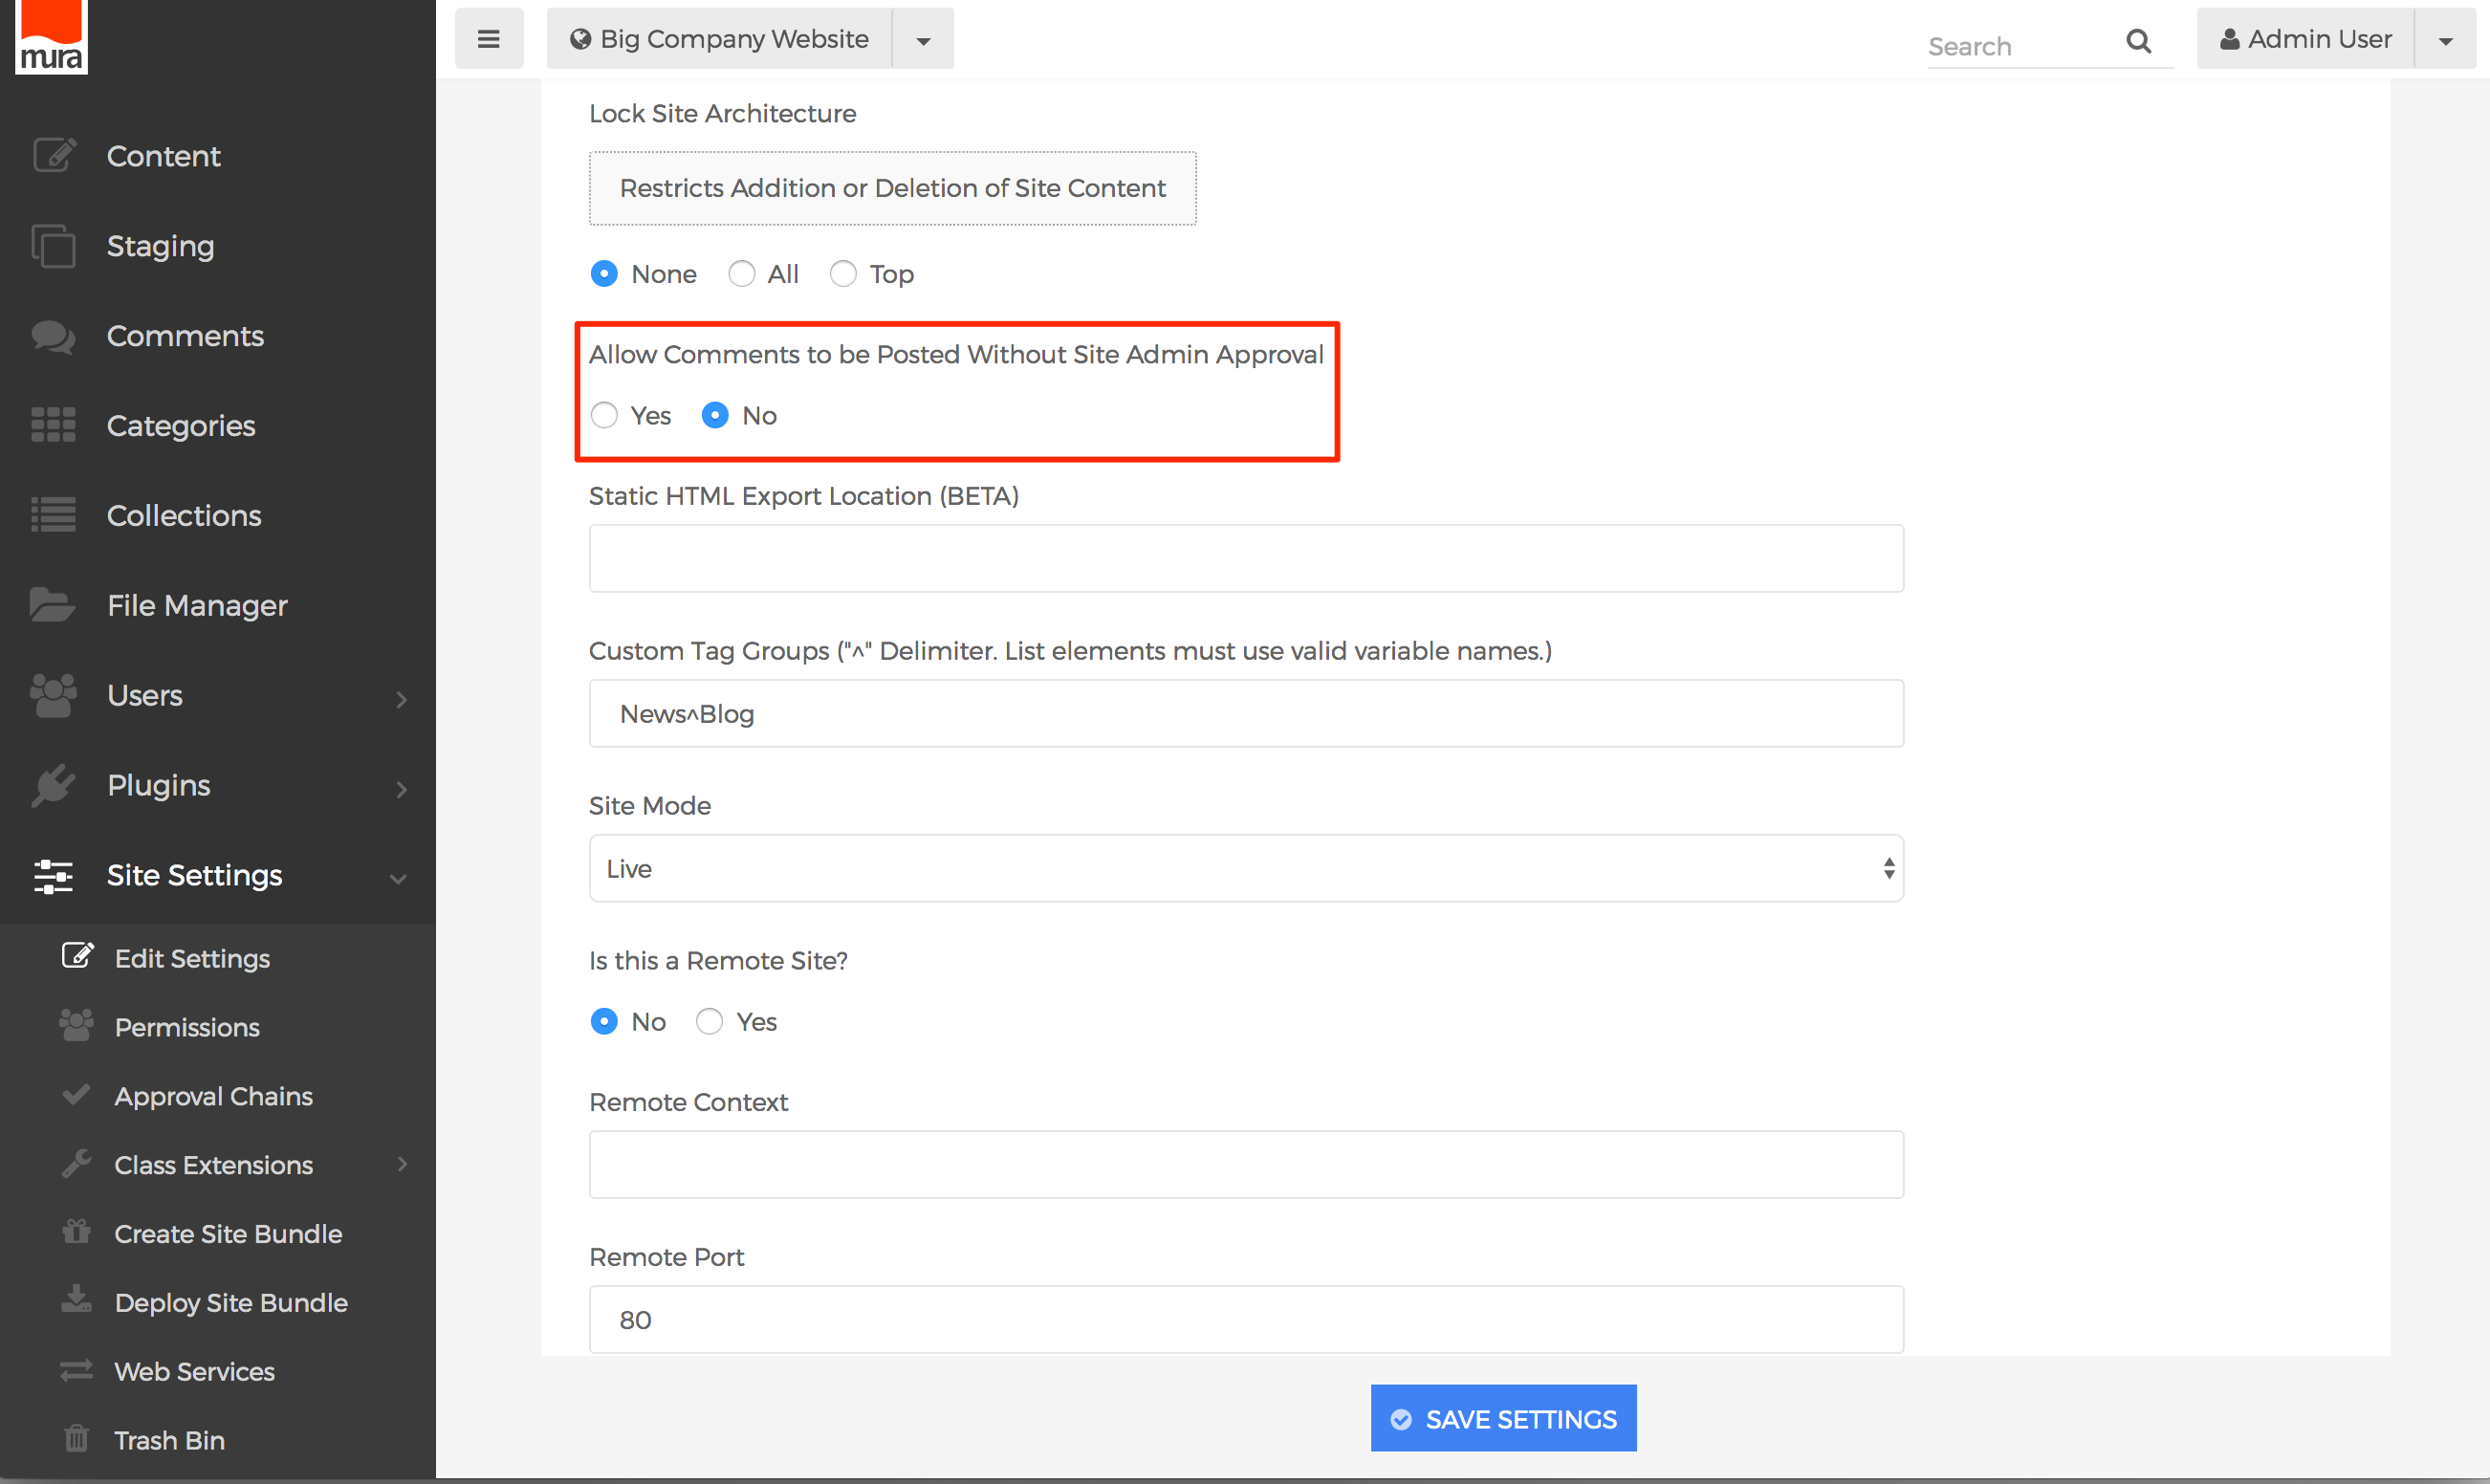
- Select "No" to require approval of all comments, or "Yes" if you don't wish to approve all comments before they are posted.
- Click Save Settings.


How to Apply Permissions to Comments Manager
To allow groups the ability to manage Comments, follow the steps outlined below.
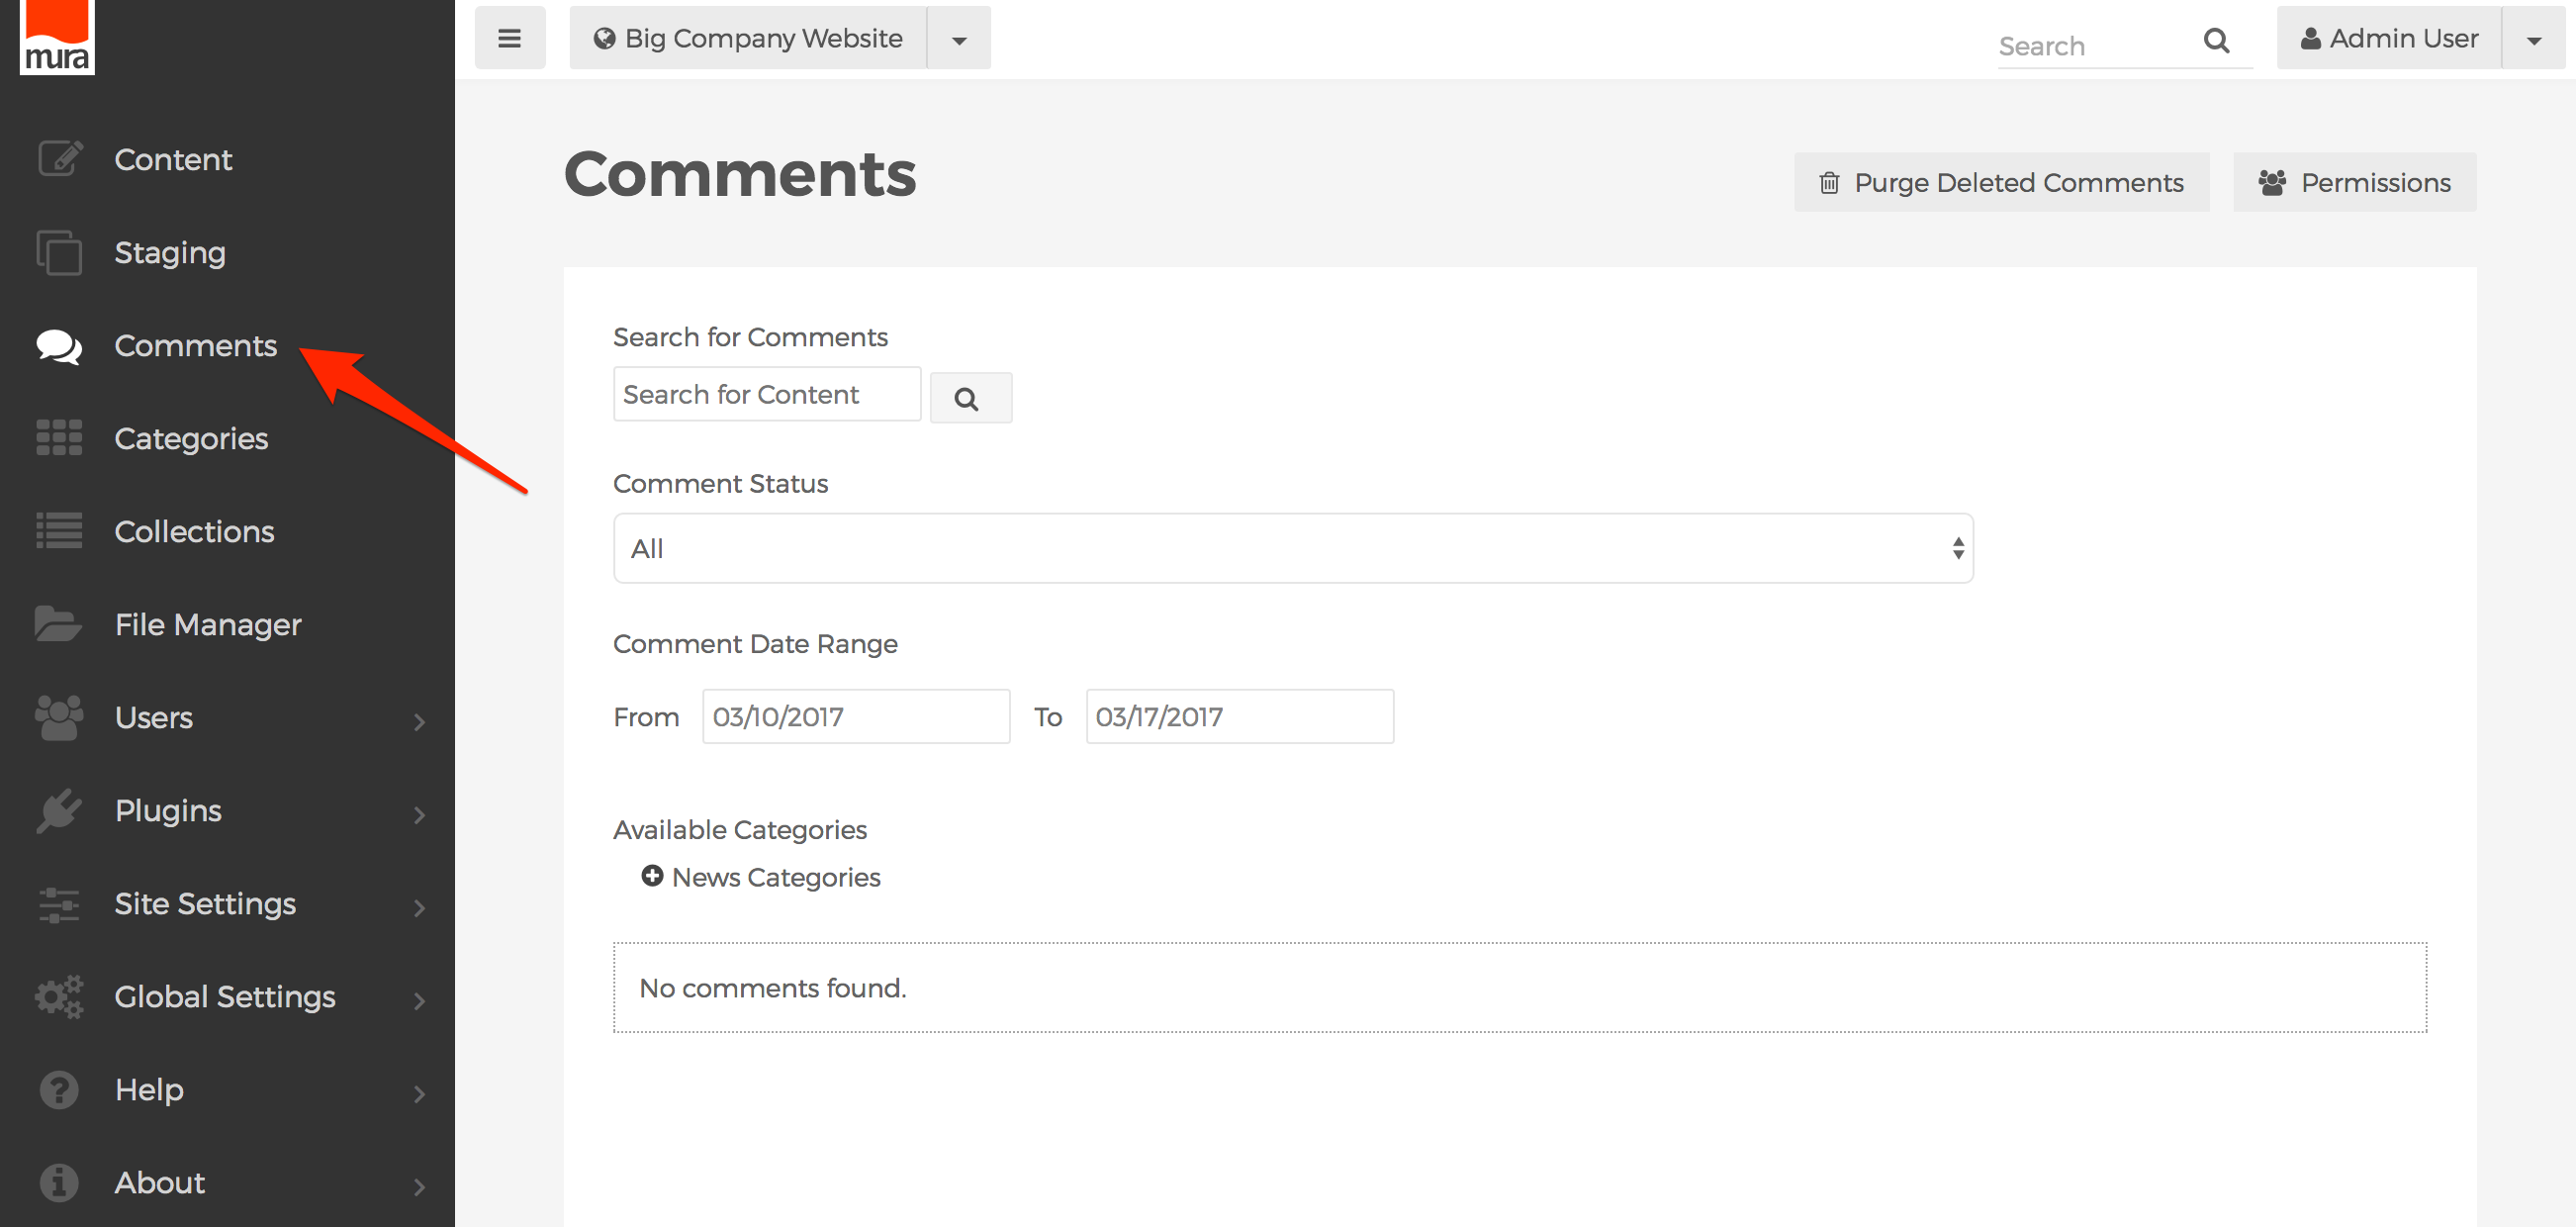
- From the back-end administration area of Mura, select Comments on the main navigation.

- From the Comments screen, click the Permissions button.
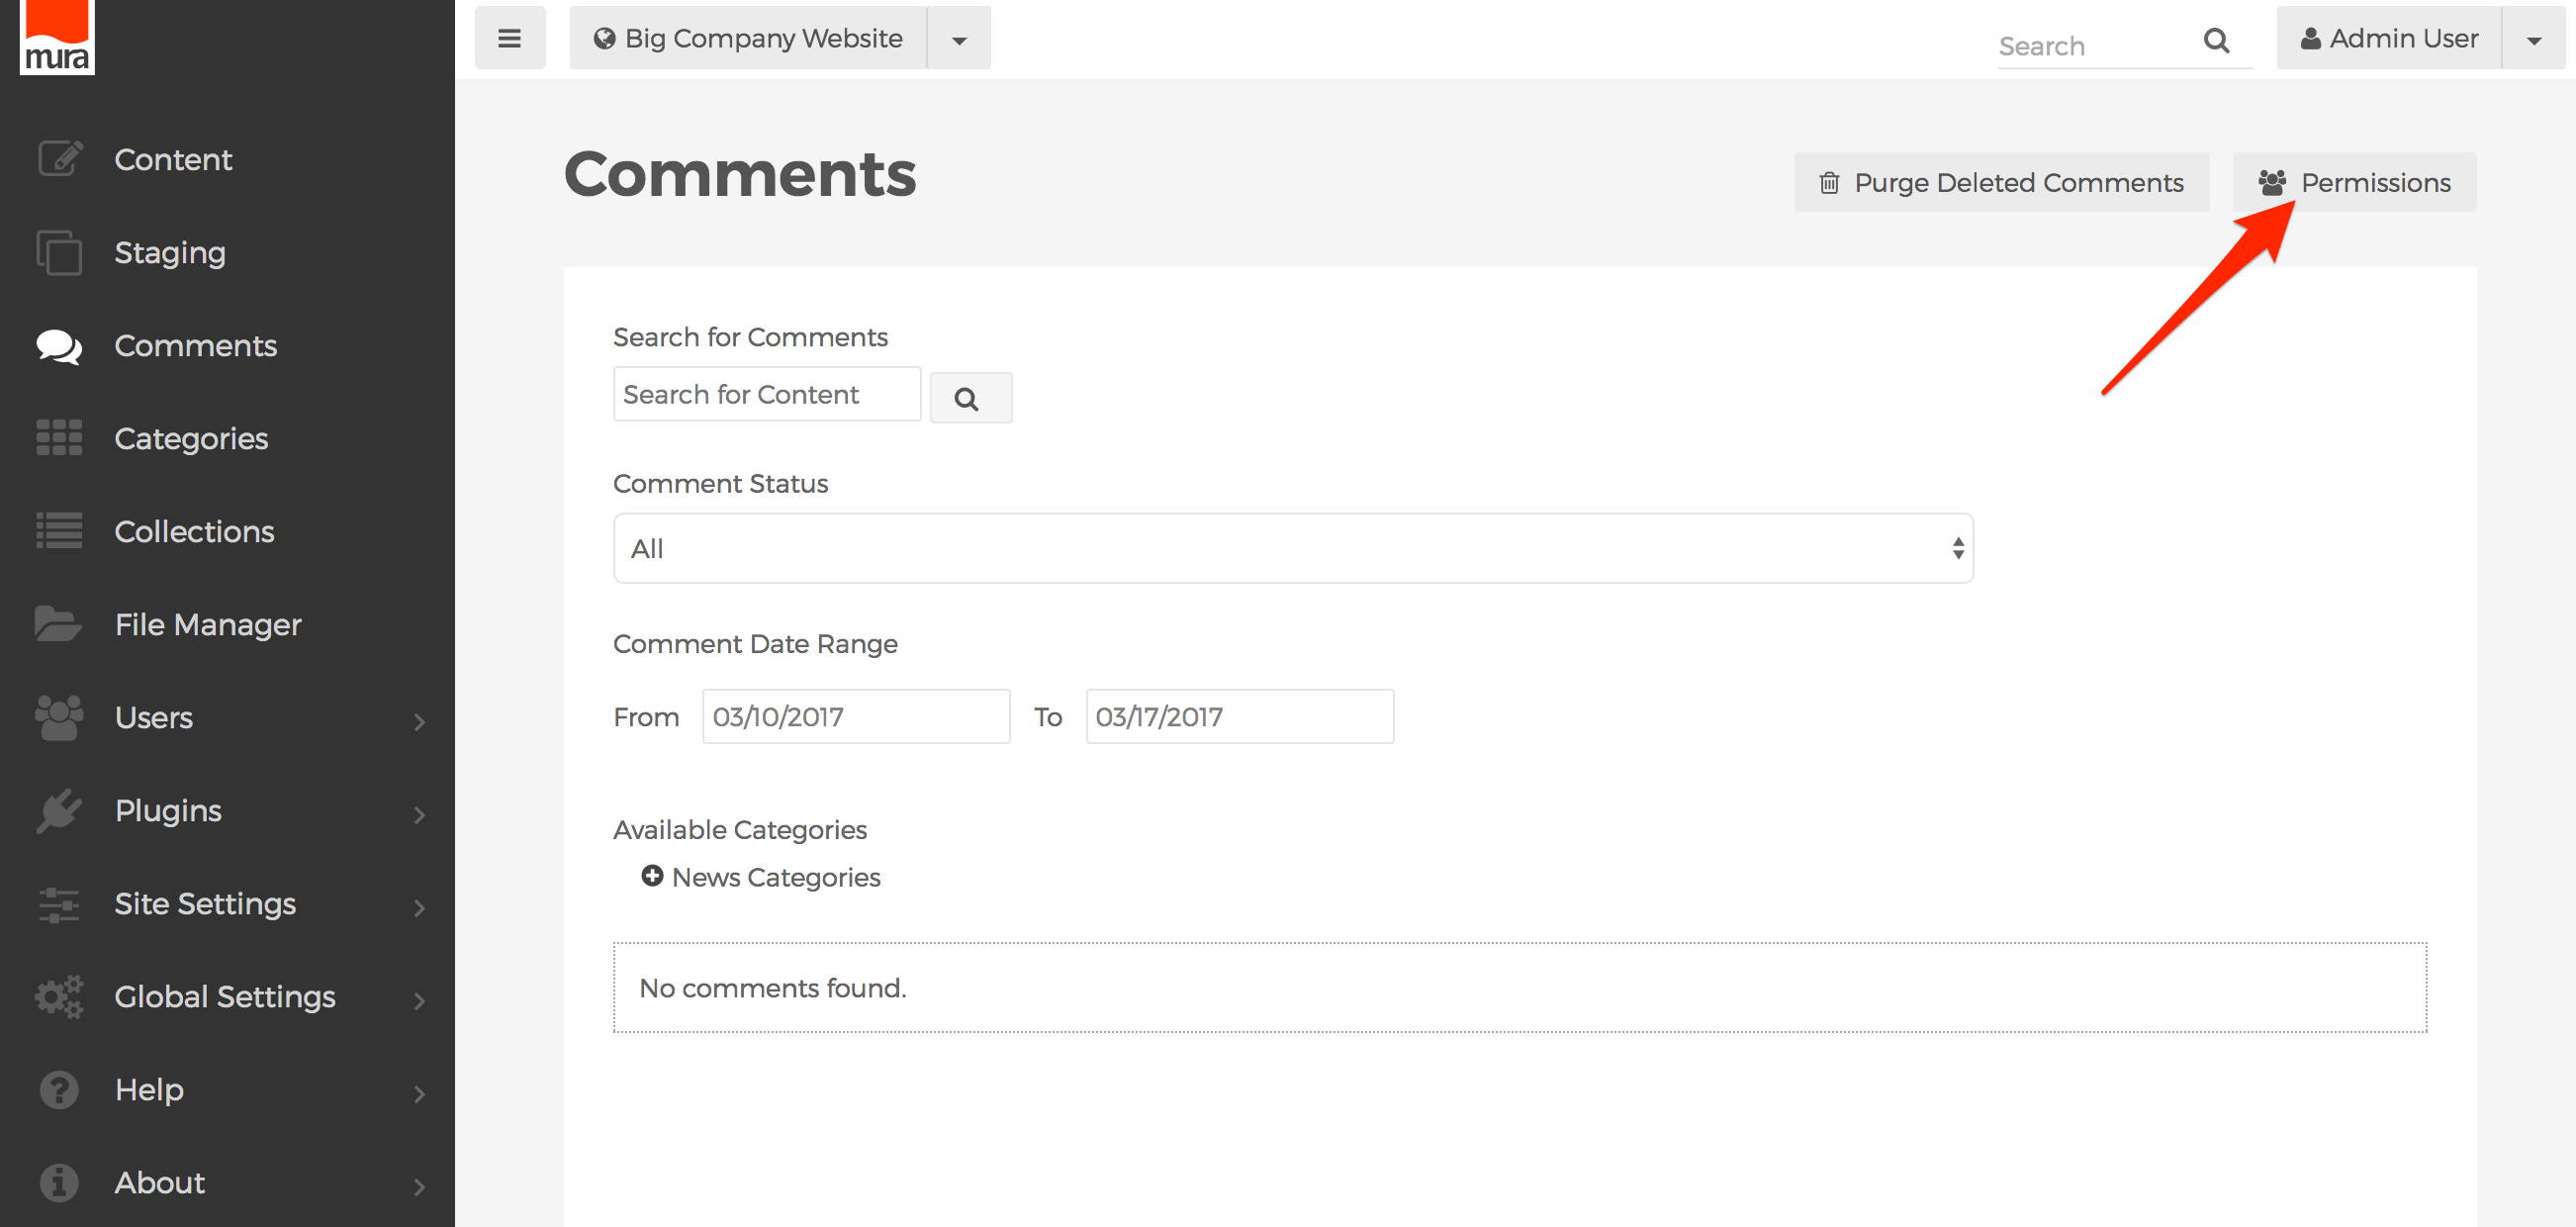
- Select the checkbox under "Allow" for each group you wish to enable access for.

- Click Update, to save your changes.

- Users will obtain the new roles/privileges on their next successful login. So, if a user is logged in when the permissions were updated, they will have to log out, and then log back in, to see the changes.


Publishing Workflows
In this section, you will learn about the various publishing workflow options that are available to you. From little-to no workflow at all, to forcing all content to go through strict approval chains, Mura can accommodate your organization's publishing workflow needs.
Simple Publishing Workflow
As you learned throughout the Permissions section, all permissions are "group-based." As you've also learned in the Author vs. Editor Roles section, "Editors" can write and publish content, while "Authors" can only "write" content. Whether you realized it or not, these are the basic cornerstones of the most basic publishing workflow within Mura.
In short, granting a group "Editor" privileges means users in the group can already publish their content. So, there's no need to notify anyone to review their additions and/or changes before making it "live." However, restricting a group to "Author" privileges forces those users to notify someone with "Editor" privileges in order to publish their additions and/or changes.
How "Authors" Can Notify "Editors"
In smaller organizations, of course an "Author" might be able to simply ask a known "Editor" who might be nearby to log in and review their new content. Or, "Authors" could send their own email message to a known "Editor" as well. However, "Authors" could also follow the steps outlined below to leverage a baked-in feature of Mura to send an email with a link to review the content. The steps below aren not limited to "Authors" as they could also be used by "Editors," if they wish to notify someone else about their changes.
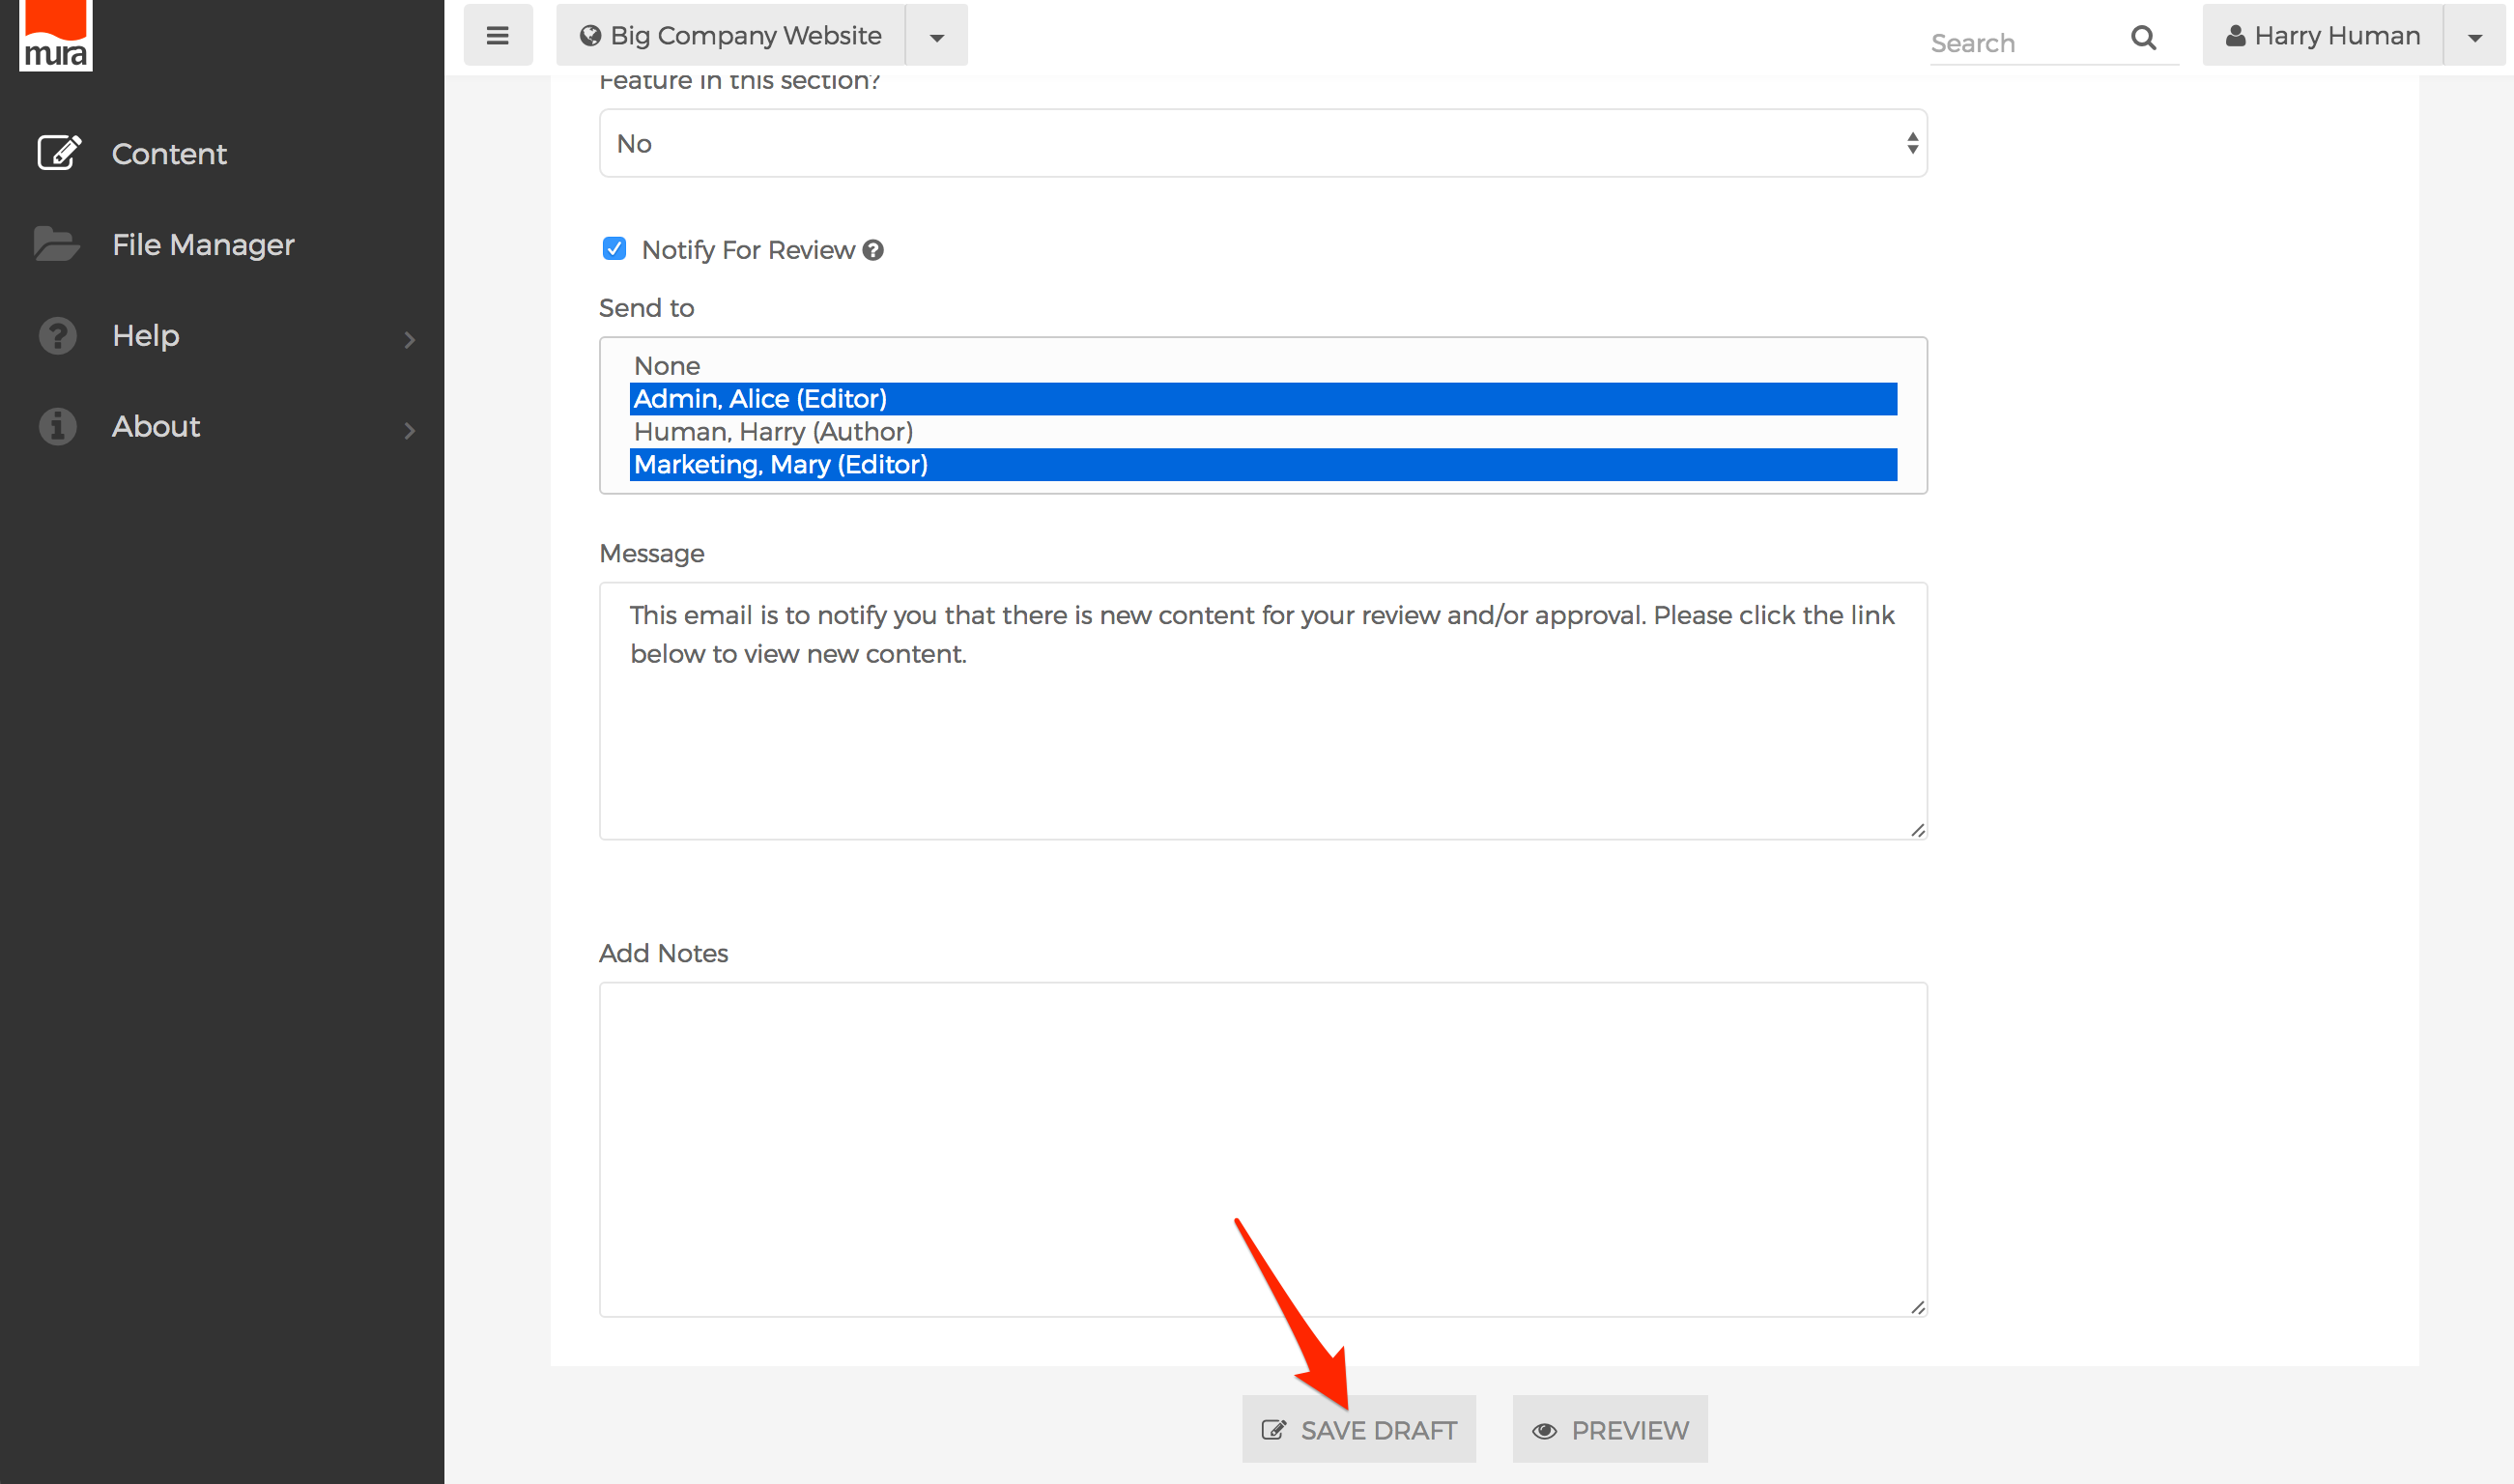
- When finished creating and/or updating a content item, select the Publishing tab.

- Towards the bottom of the Publishing tab, located the field labeled "Notify For Review."

- When you enable "Notify for Review" by clicking the checkbox, a couple of additional form fields should appear labeled "Send to" and "Message." The "Send to" field is a multi-select menu listing other users and their roles/privileges such as "Author" and "Editor." You may select users by using <CTRL> + click on a PC, or <CMD> + click on a Mac.
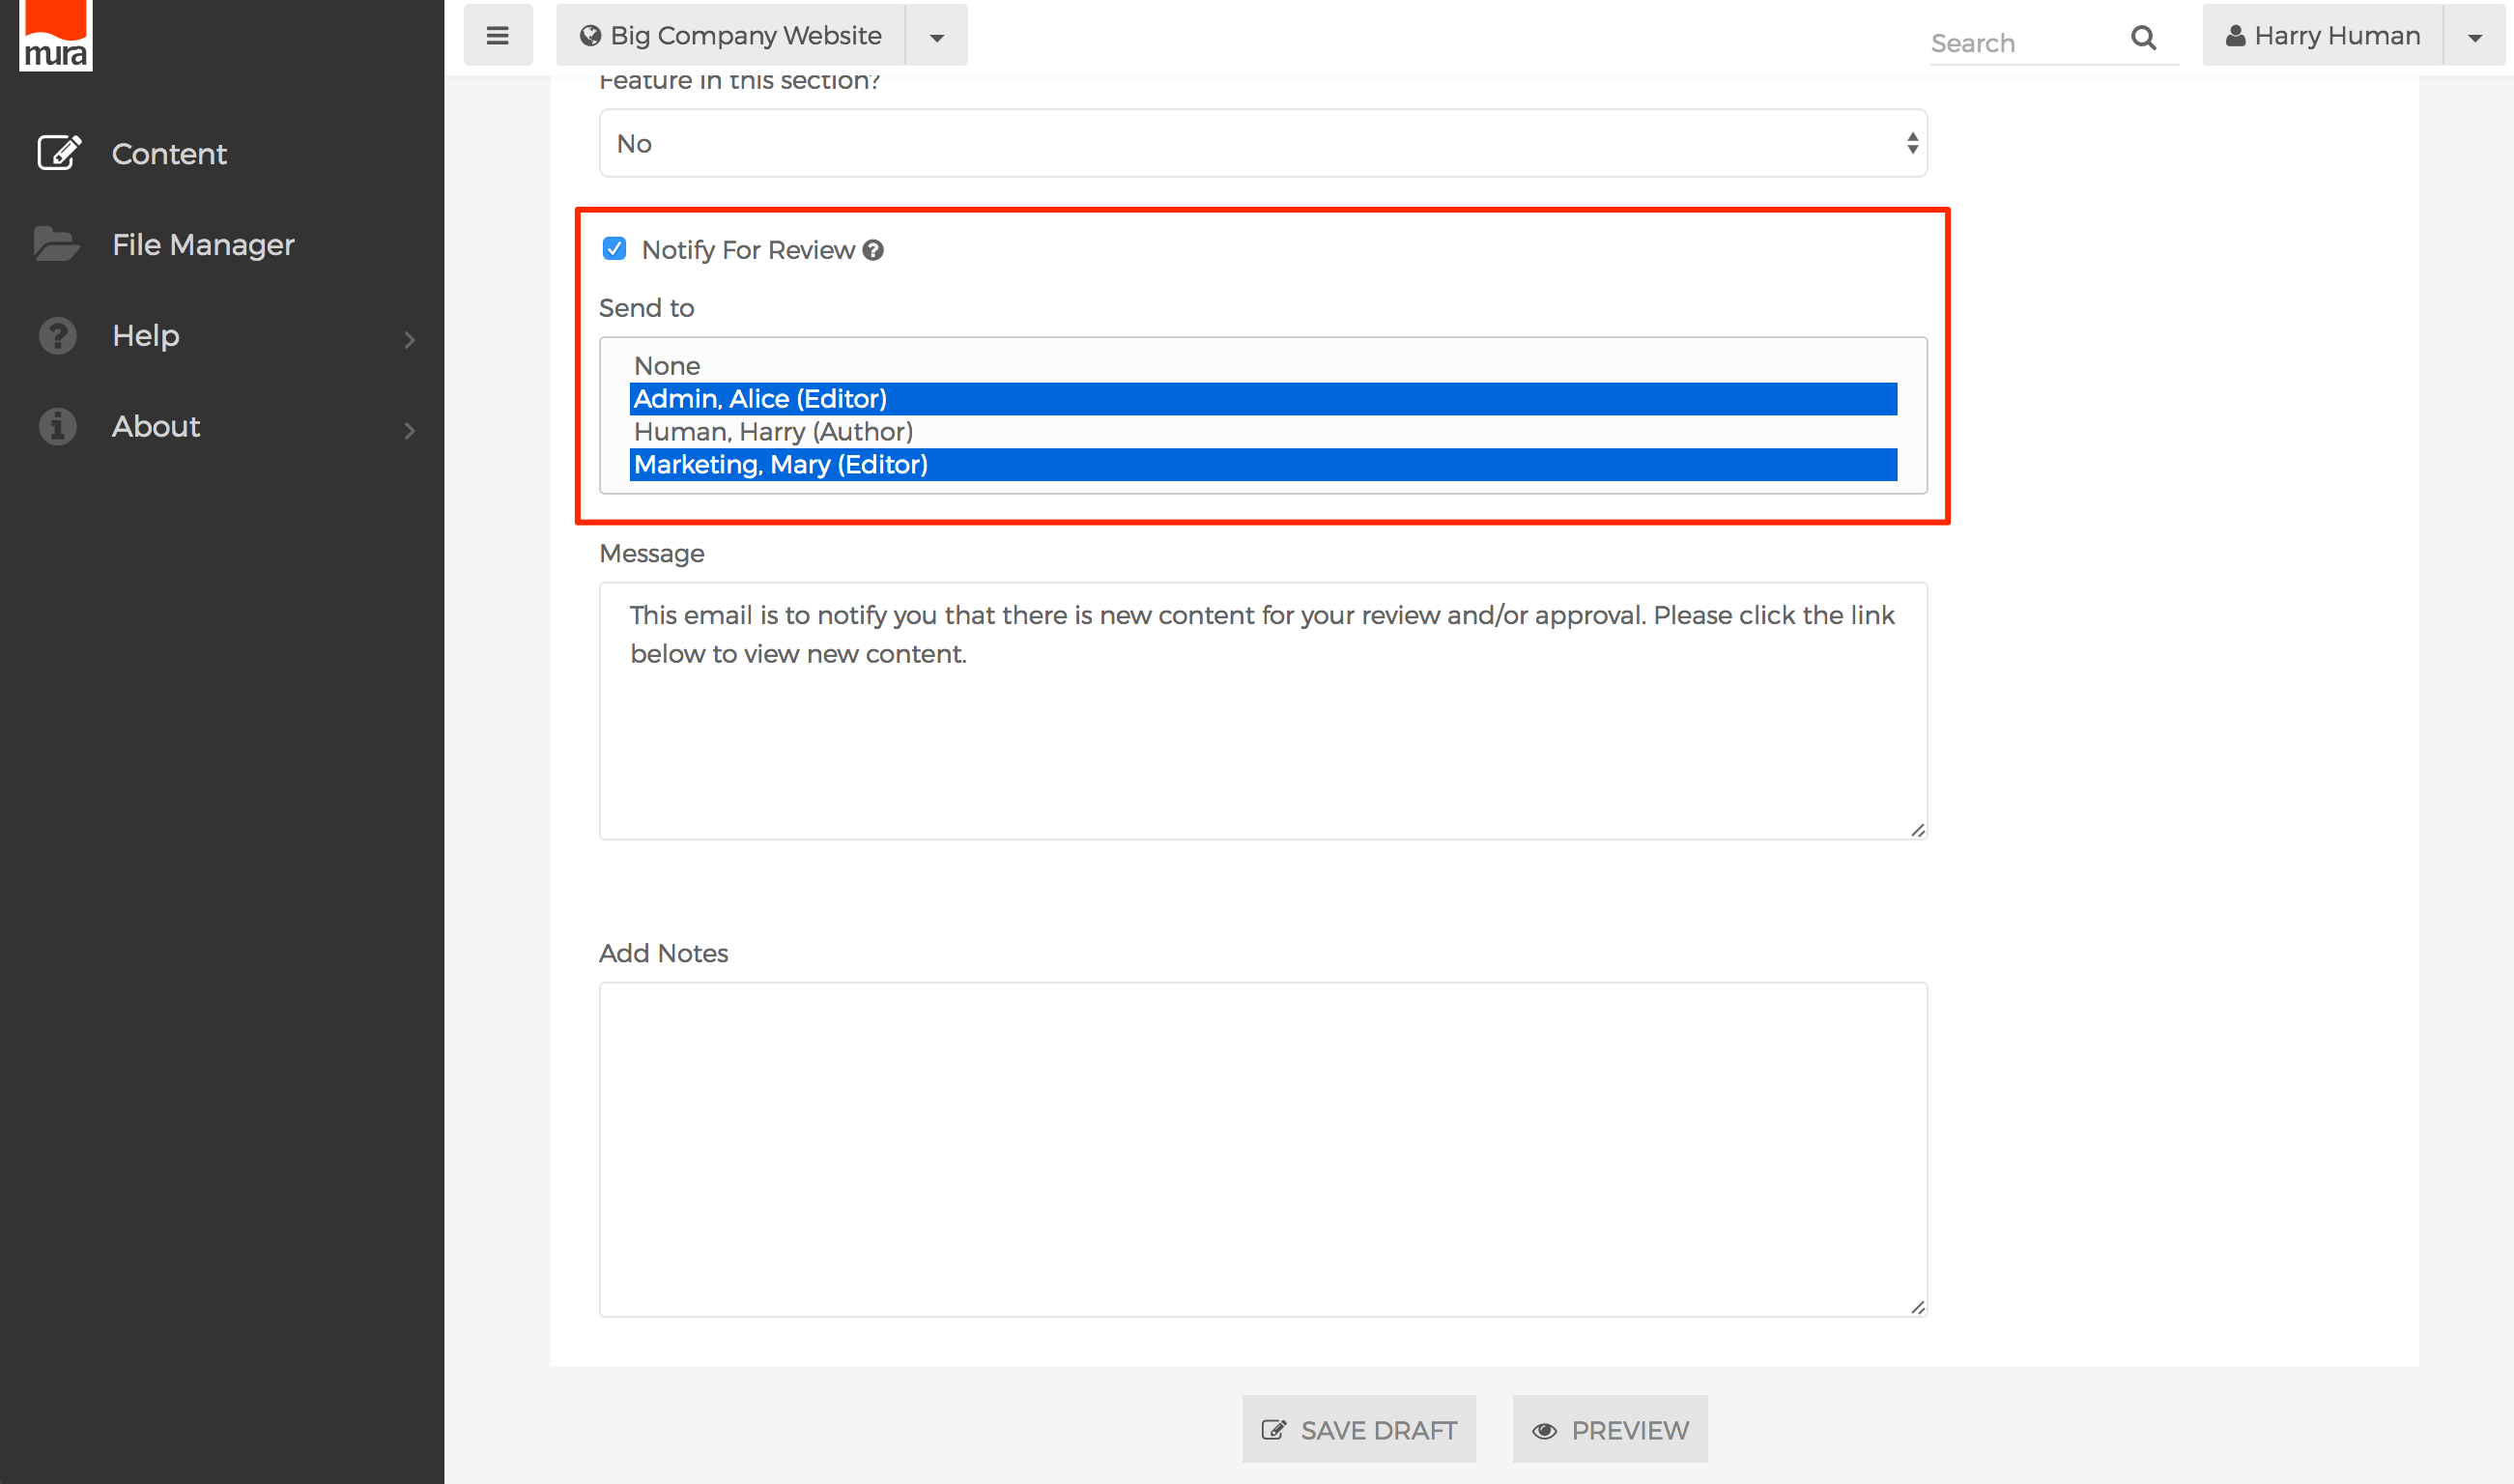
- If you wish to include a detailed message, you may enter it in the "Message" field. Otherwise, the default text will be sent.
- Click the Save Draft button, to save your changes, and an email will be sent to the selected user(s).


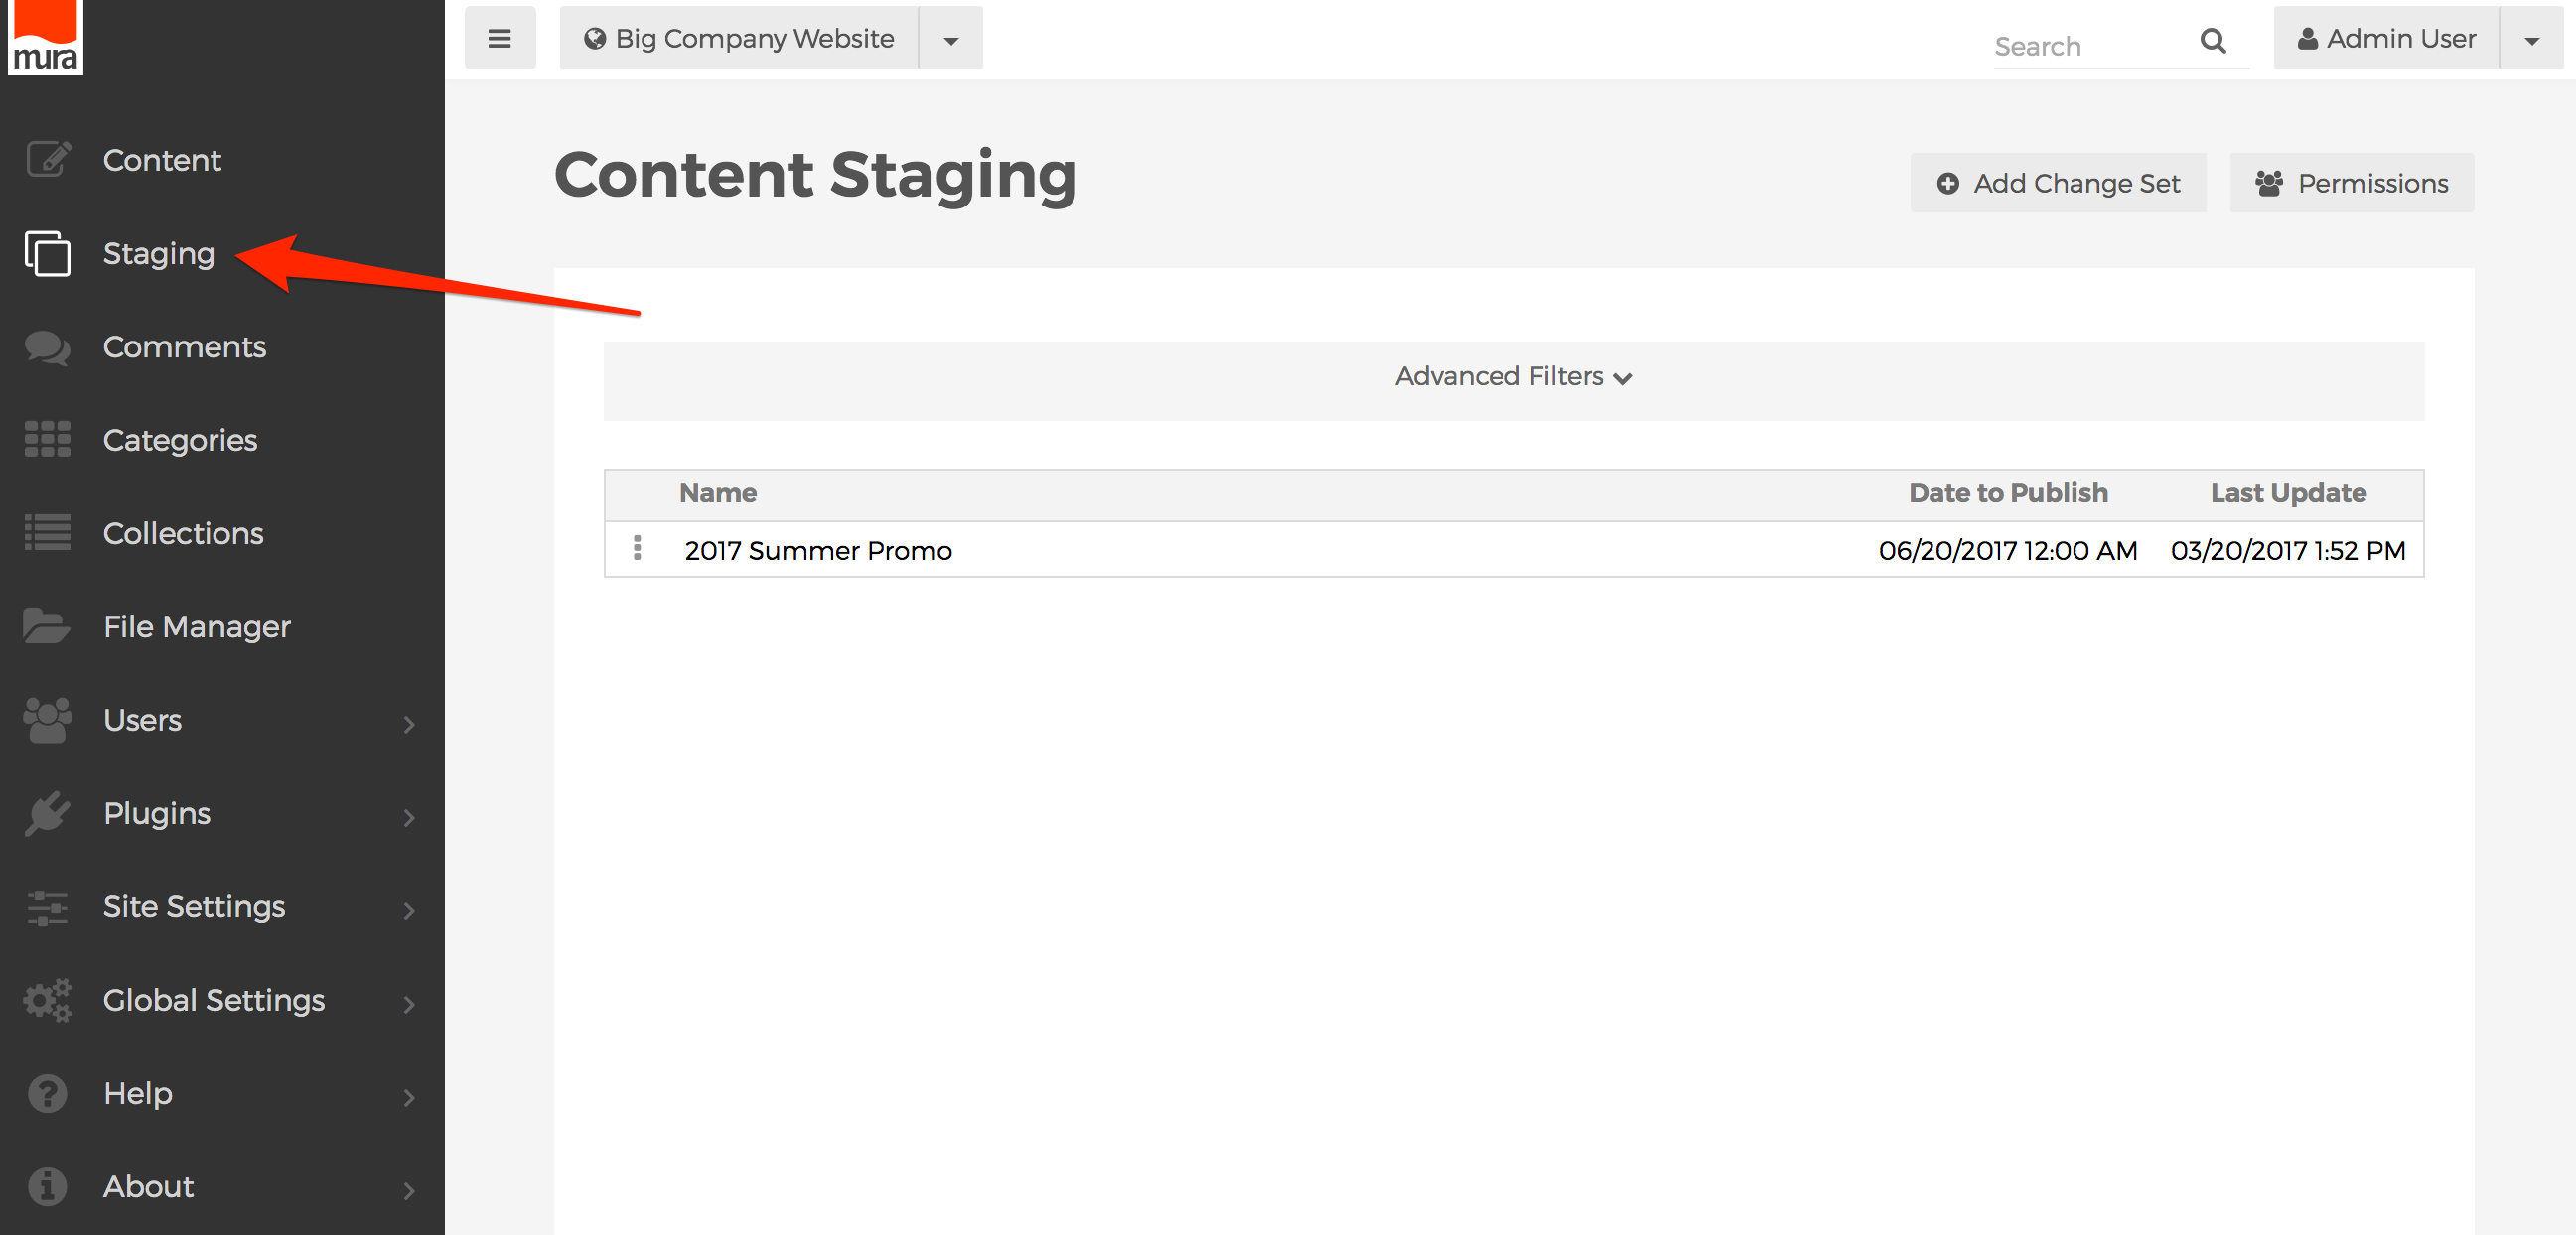
Content Staging
The Content Staging Manager provides a way to schedule a collection of content, via "Change Sets," to publish at the same date and time. A Change Set is like a bucket, where you can toss in any changes you want to make "live" at the same moment. In addition to being able to simultaneously publish a group of content, you can preview a site as if the content assigned to specific Change Sets has been published, before it's actually published.
Some organizations may also be interested in using Mura's ability to force all changes to be published via Change Sets, versus allowing the traditional ability to publish one-off changes.
How to Enable/Disable the Content Staging Manager
To enable or disable the Content Staging Manager, follow the steps below.
- From the back-end administration area of Mura, select Site Settings, then click Edit Settings.
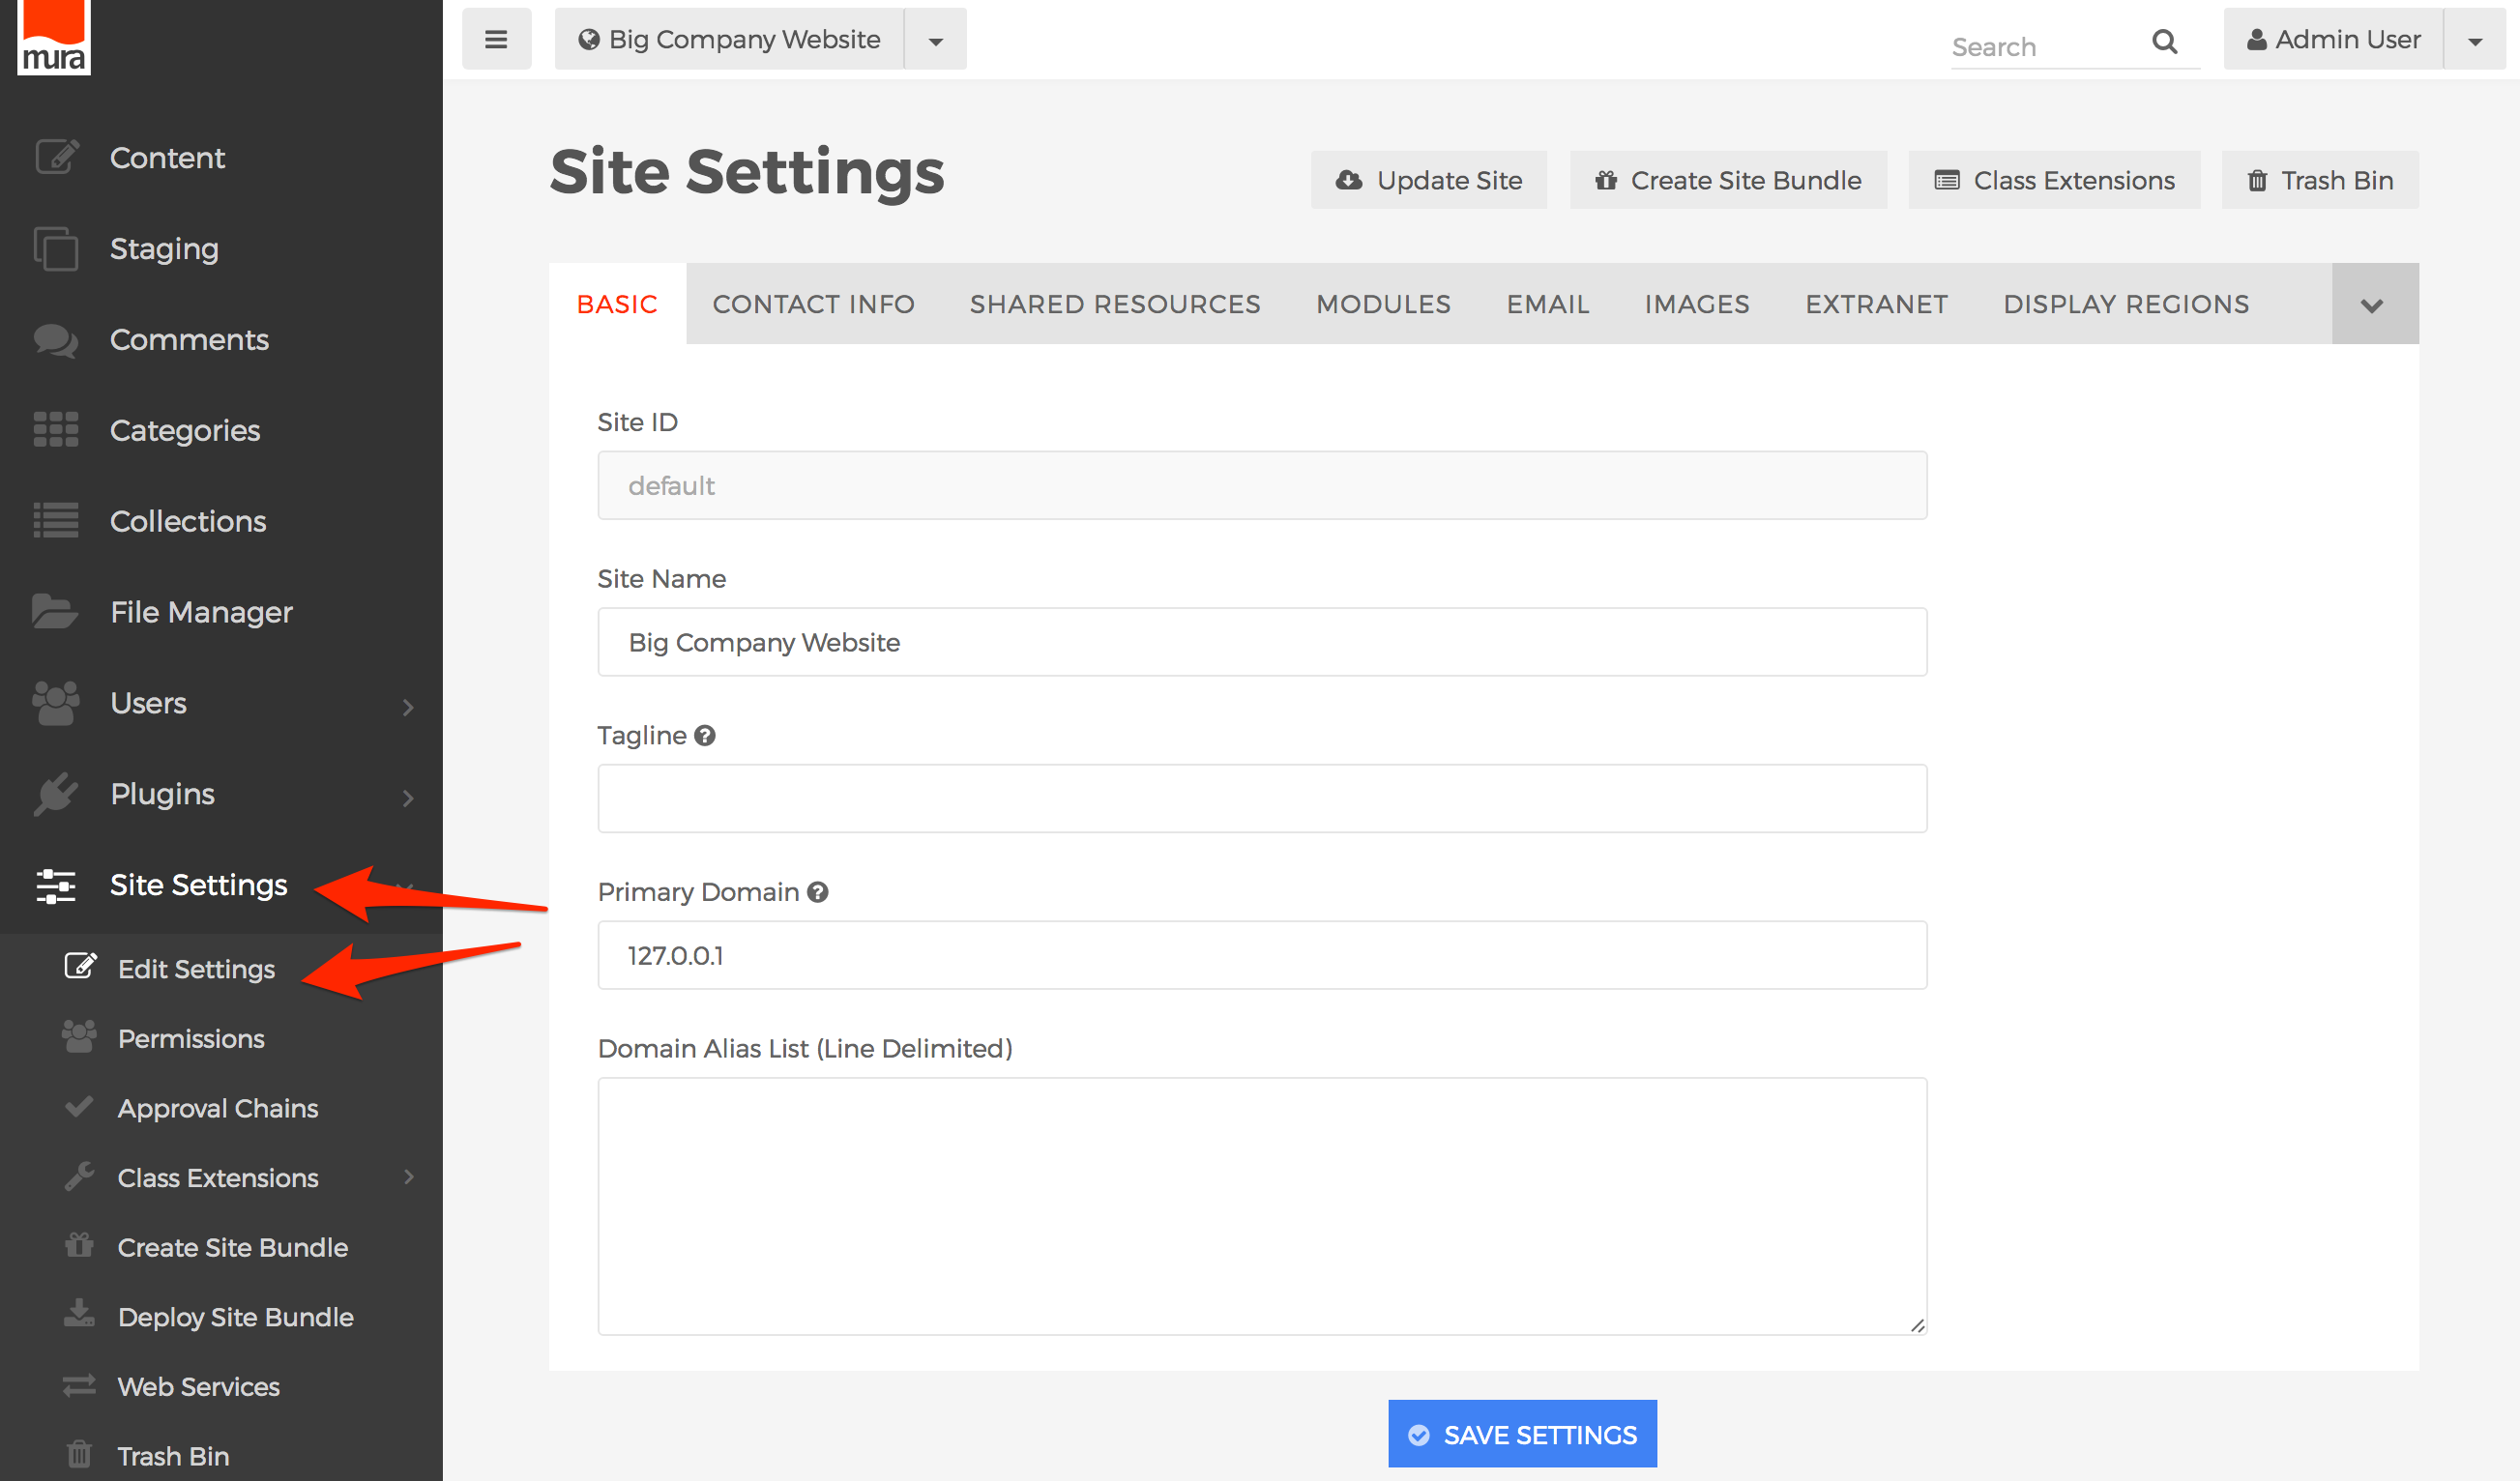
- Select the Modules tab.

- Locate the field labeled Content Staging Manager, then select "On" to enable it, or "Off" if you wish to disable it.
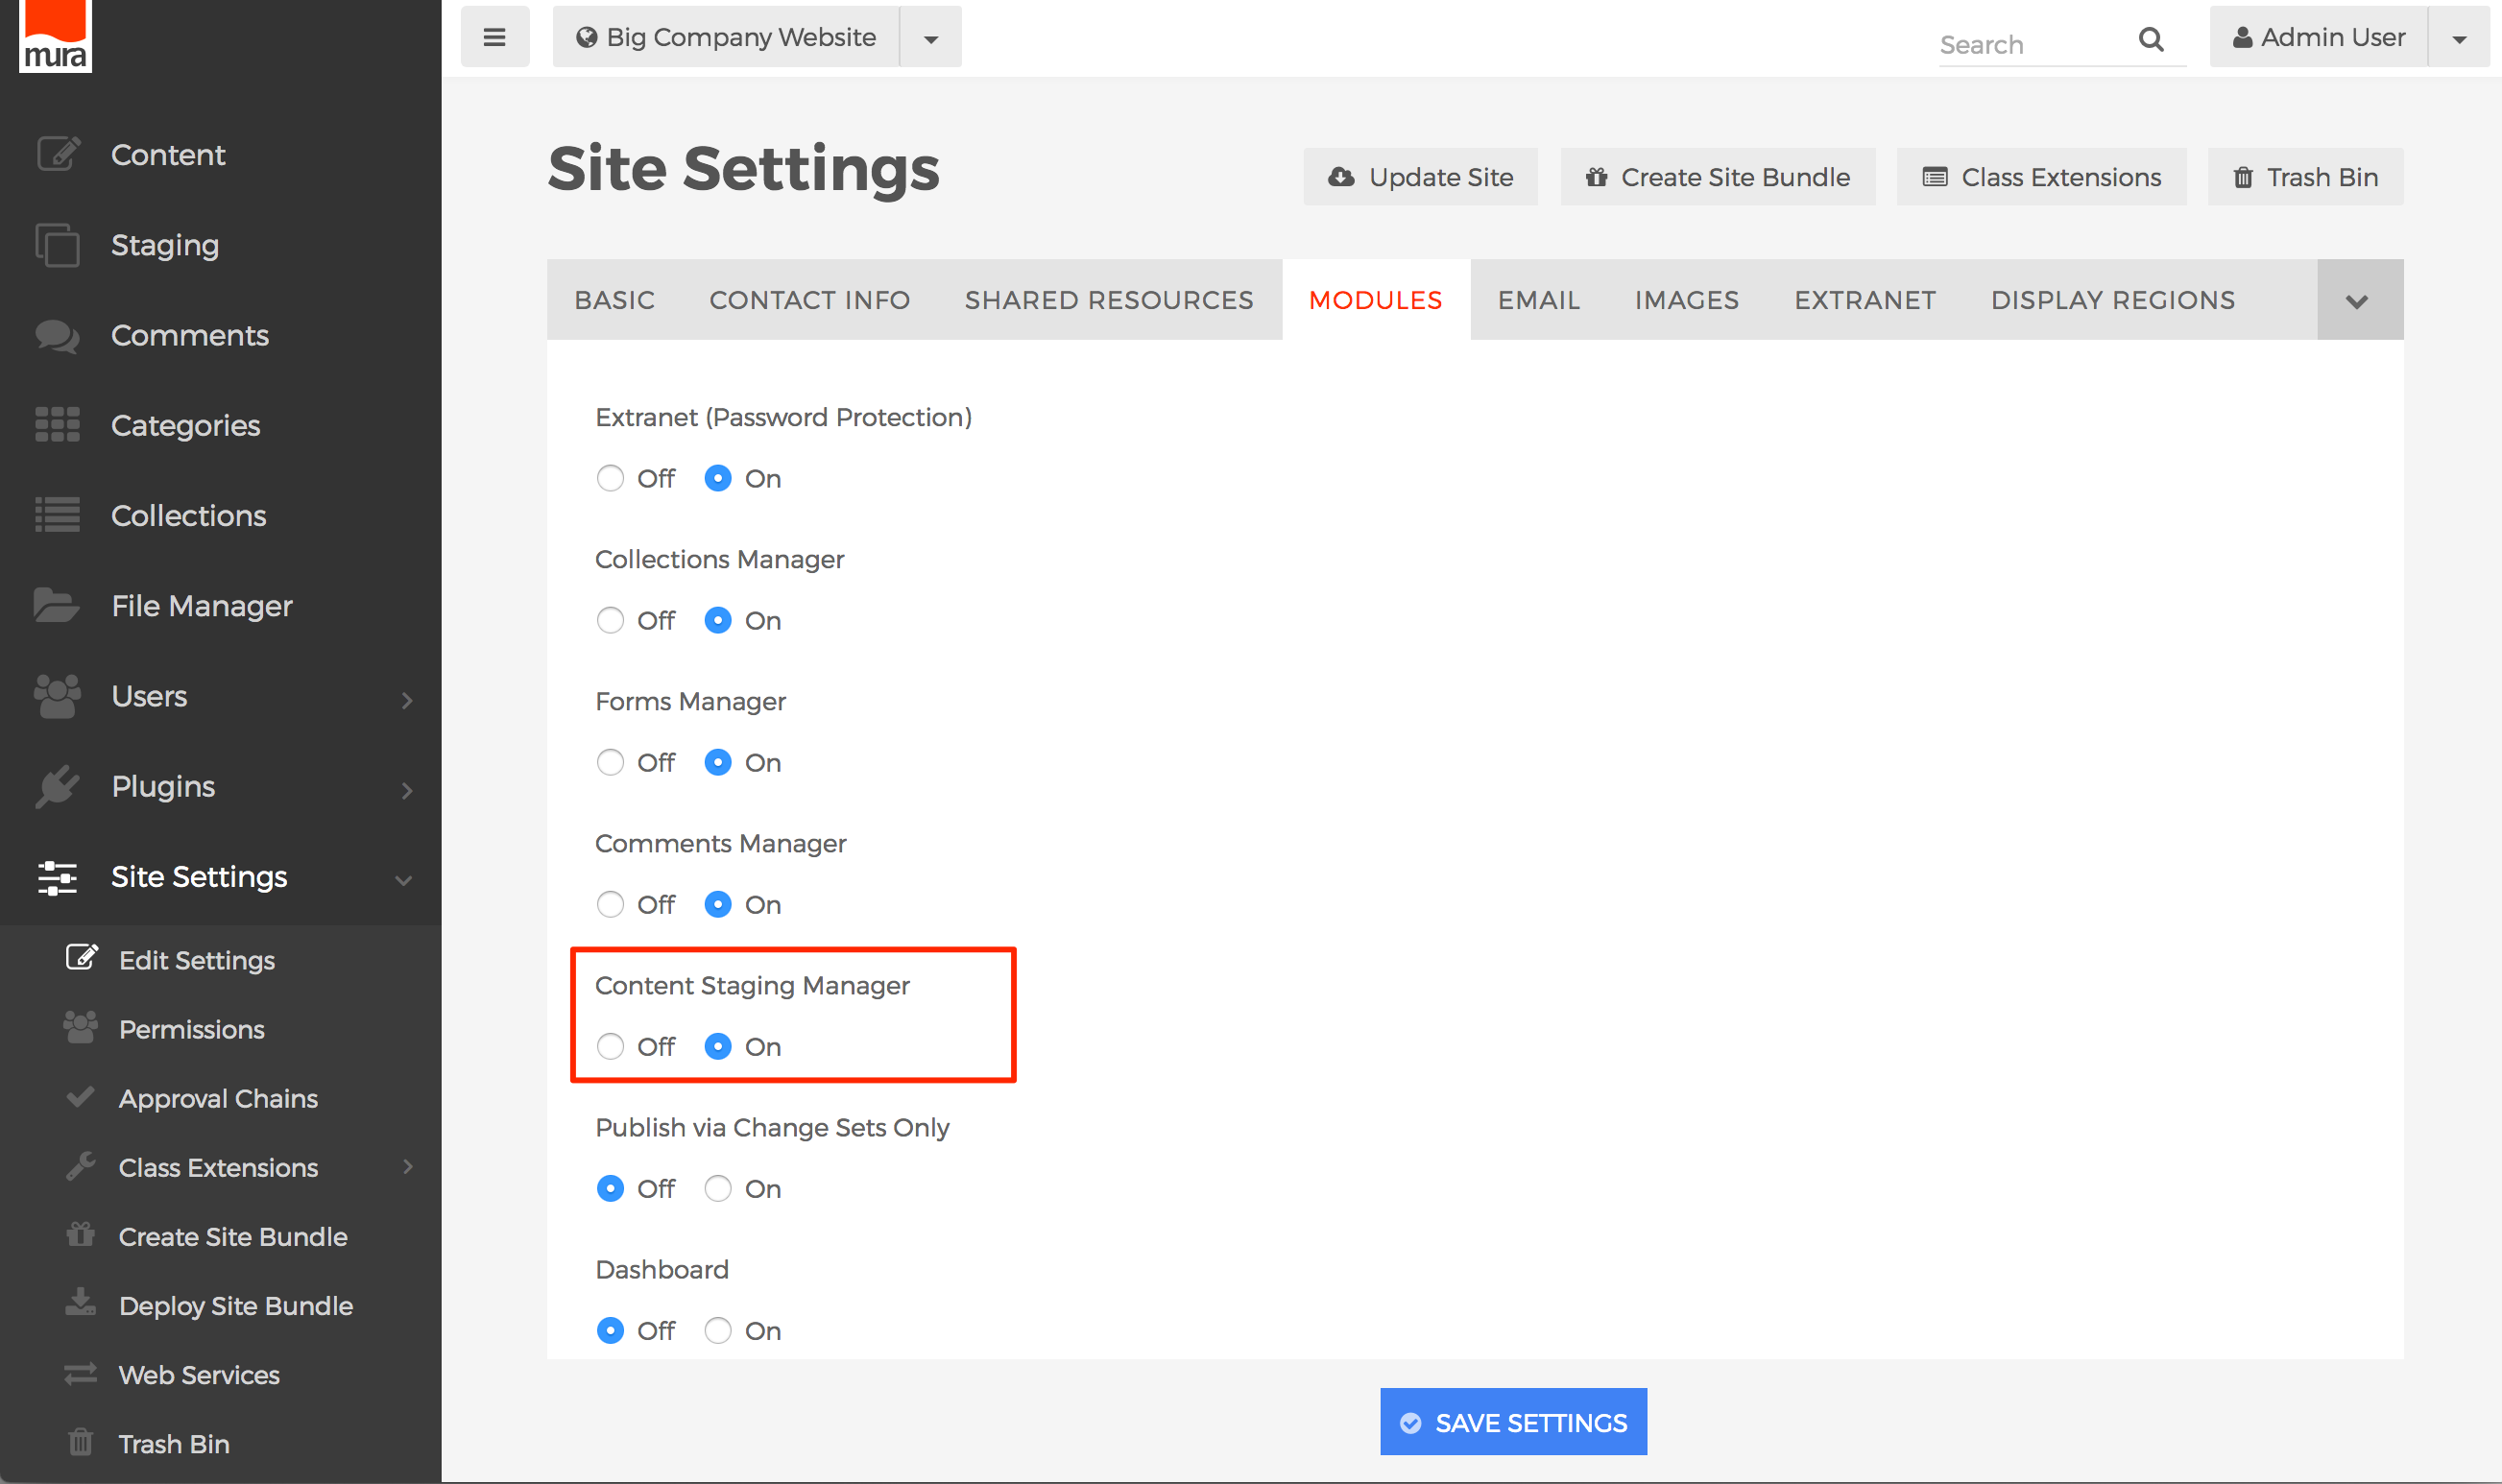
- Click Save Settings.


Create a Change Set
As previously mentioned, Change Sets are like buckets where you can toss all kinds of new content and updates together in one place. To create a Change Set, follow the steps below.
- From back-end administration area, select Staging on the main navigation.
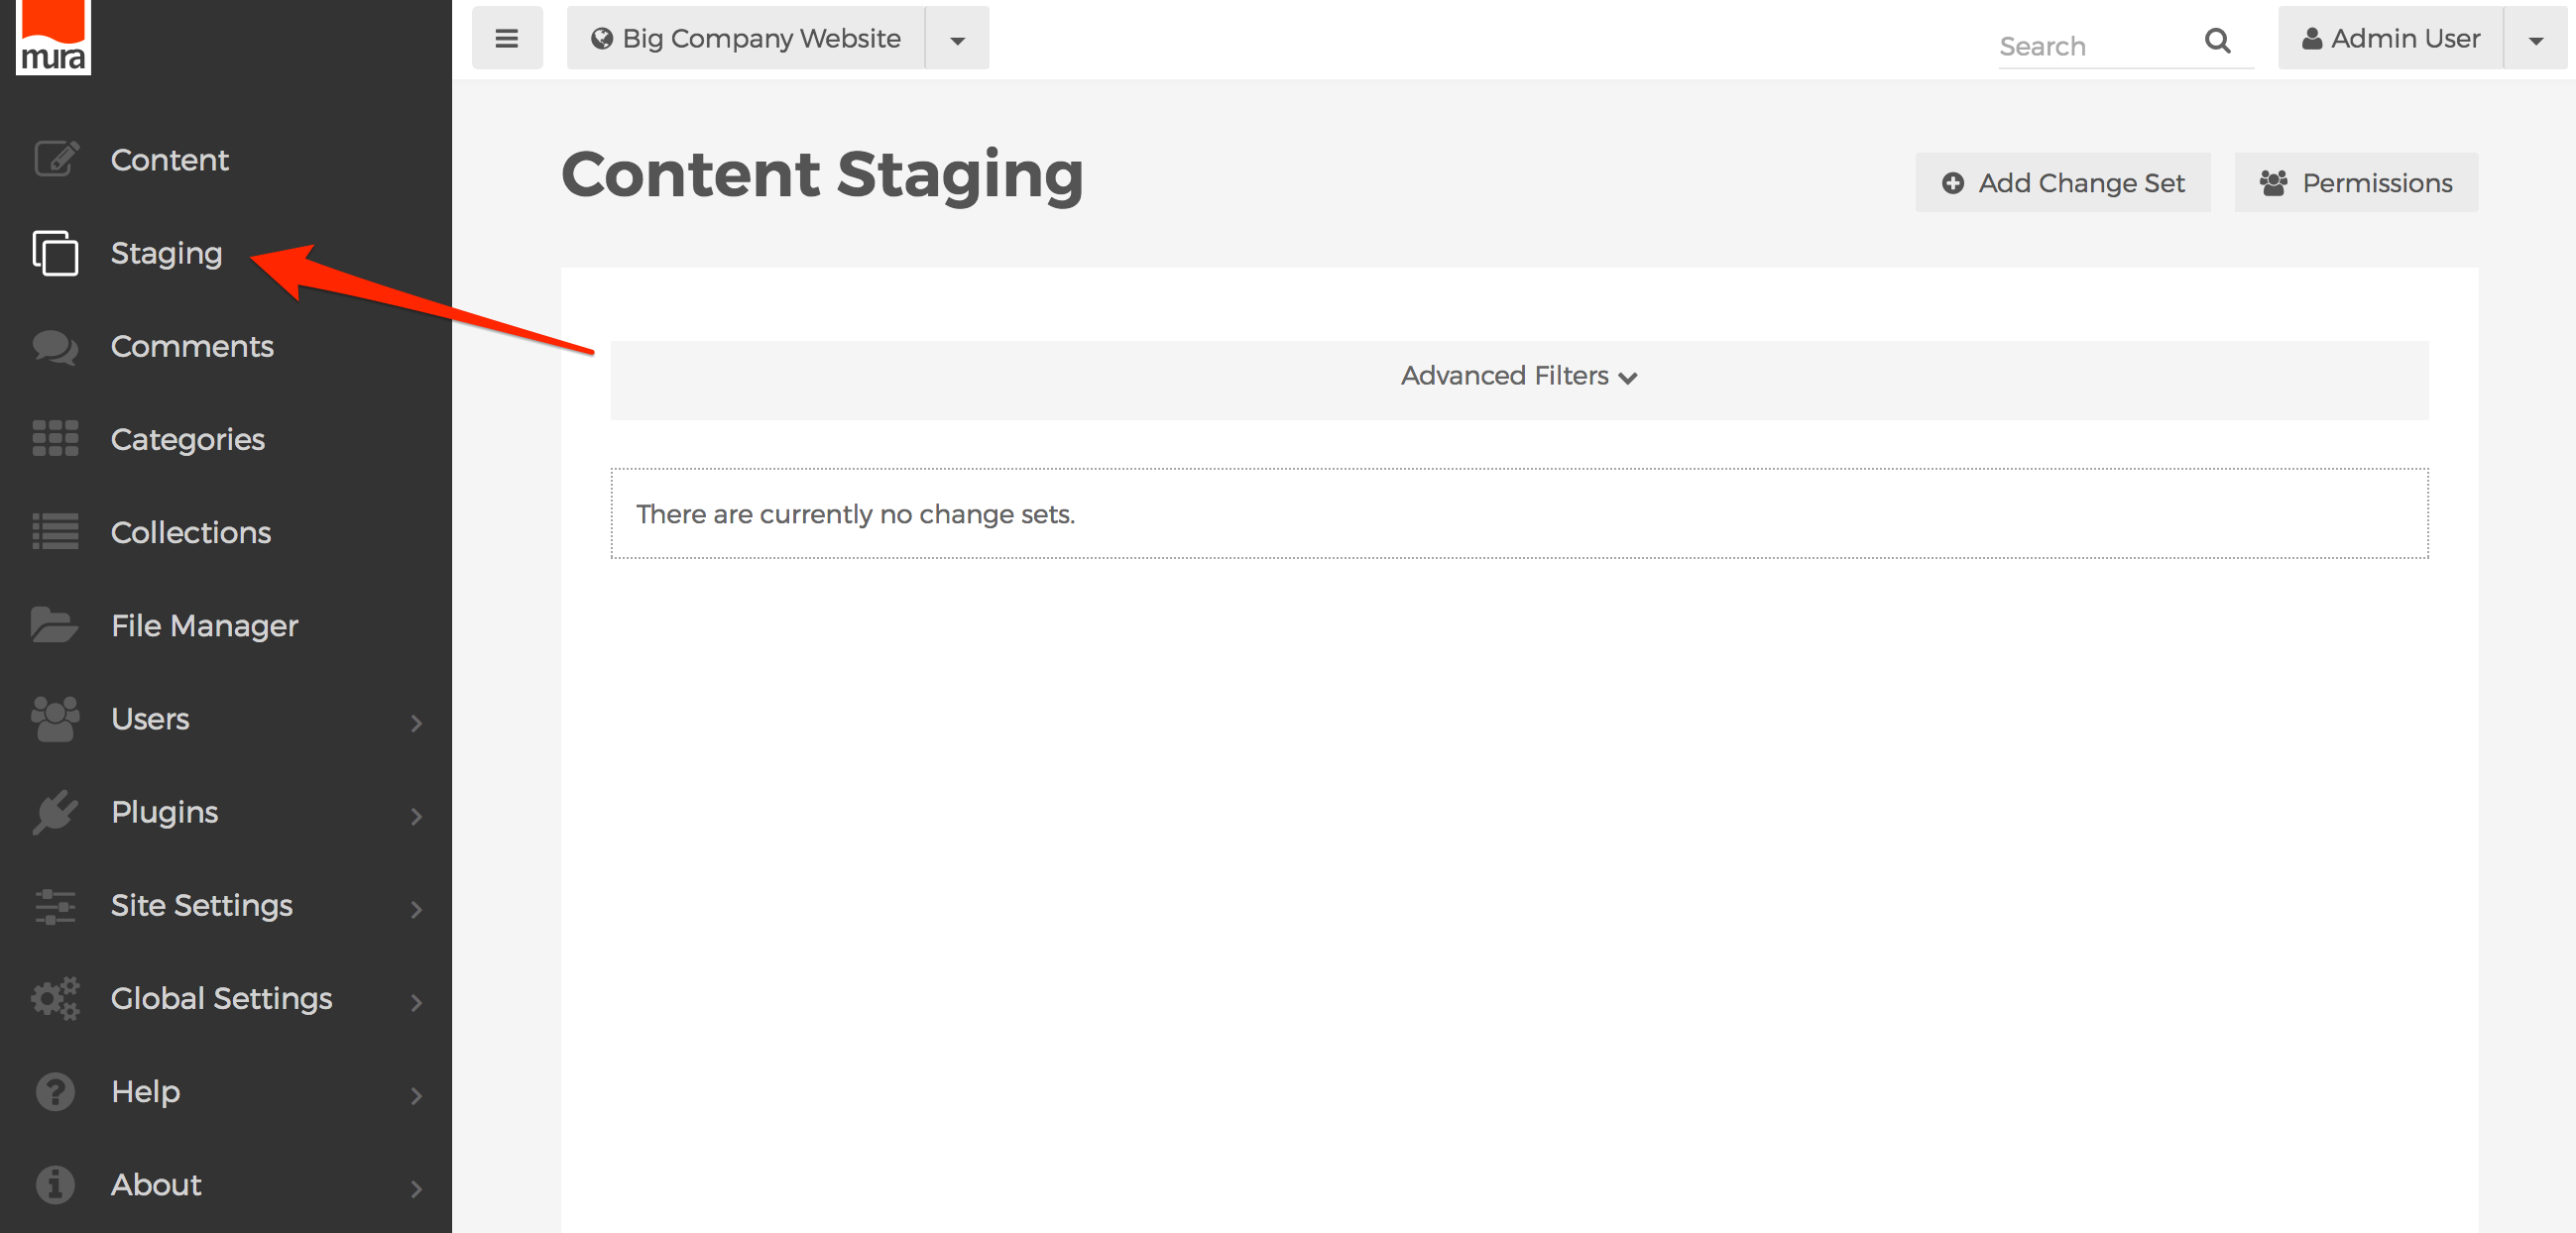
- This should display the Content Staging screen.
- Click the Add Change Set button.

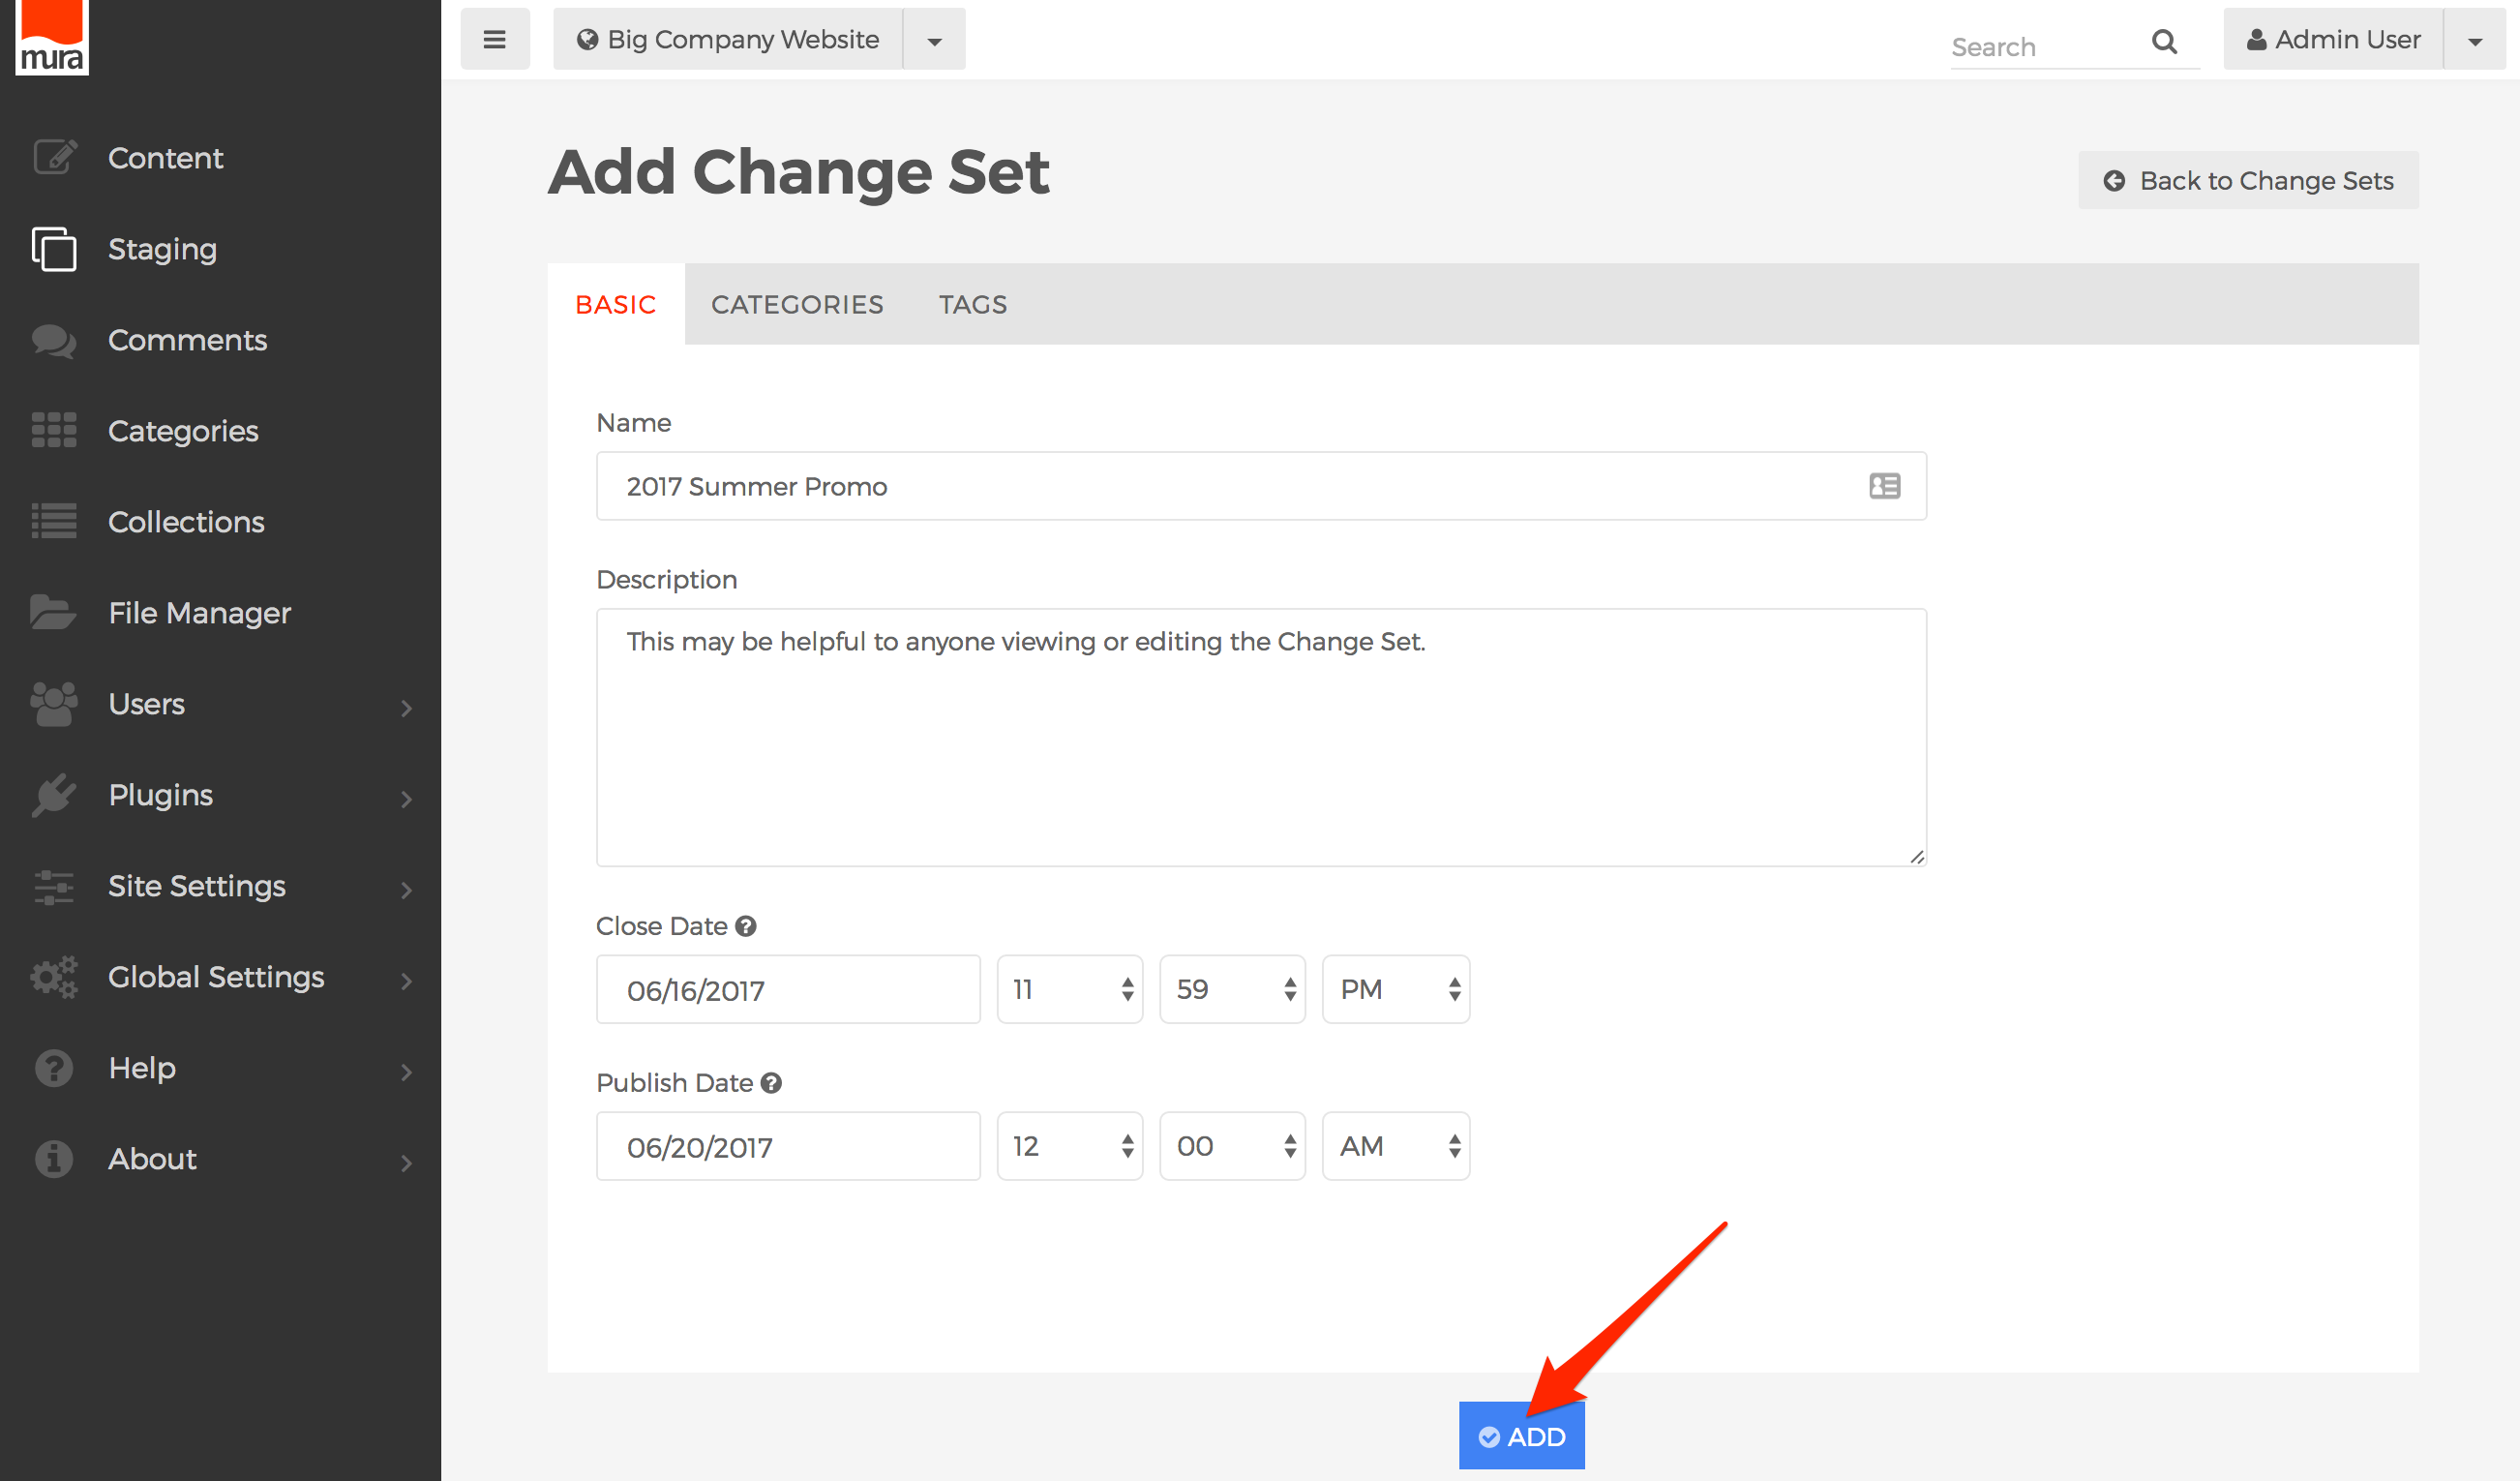
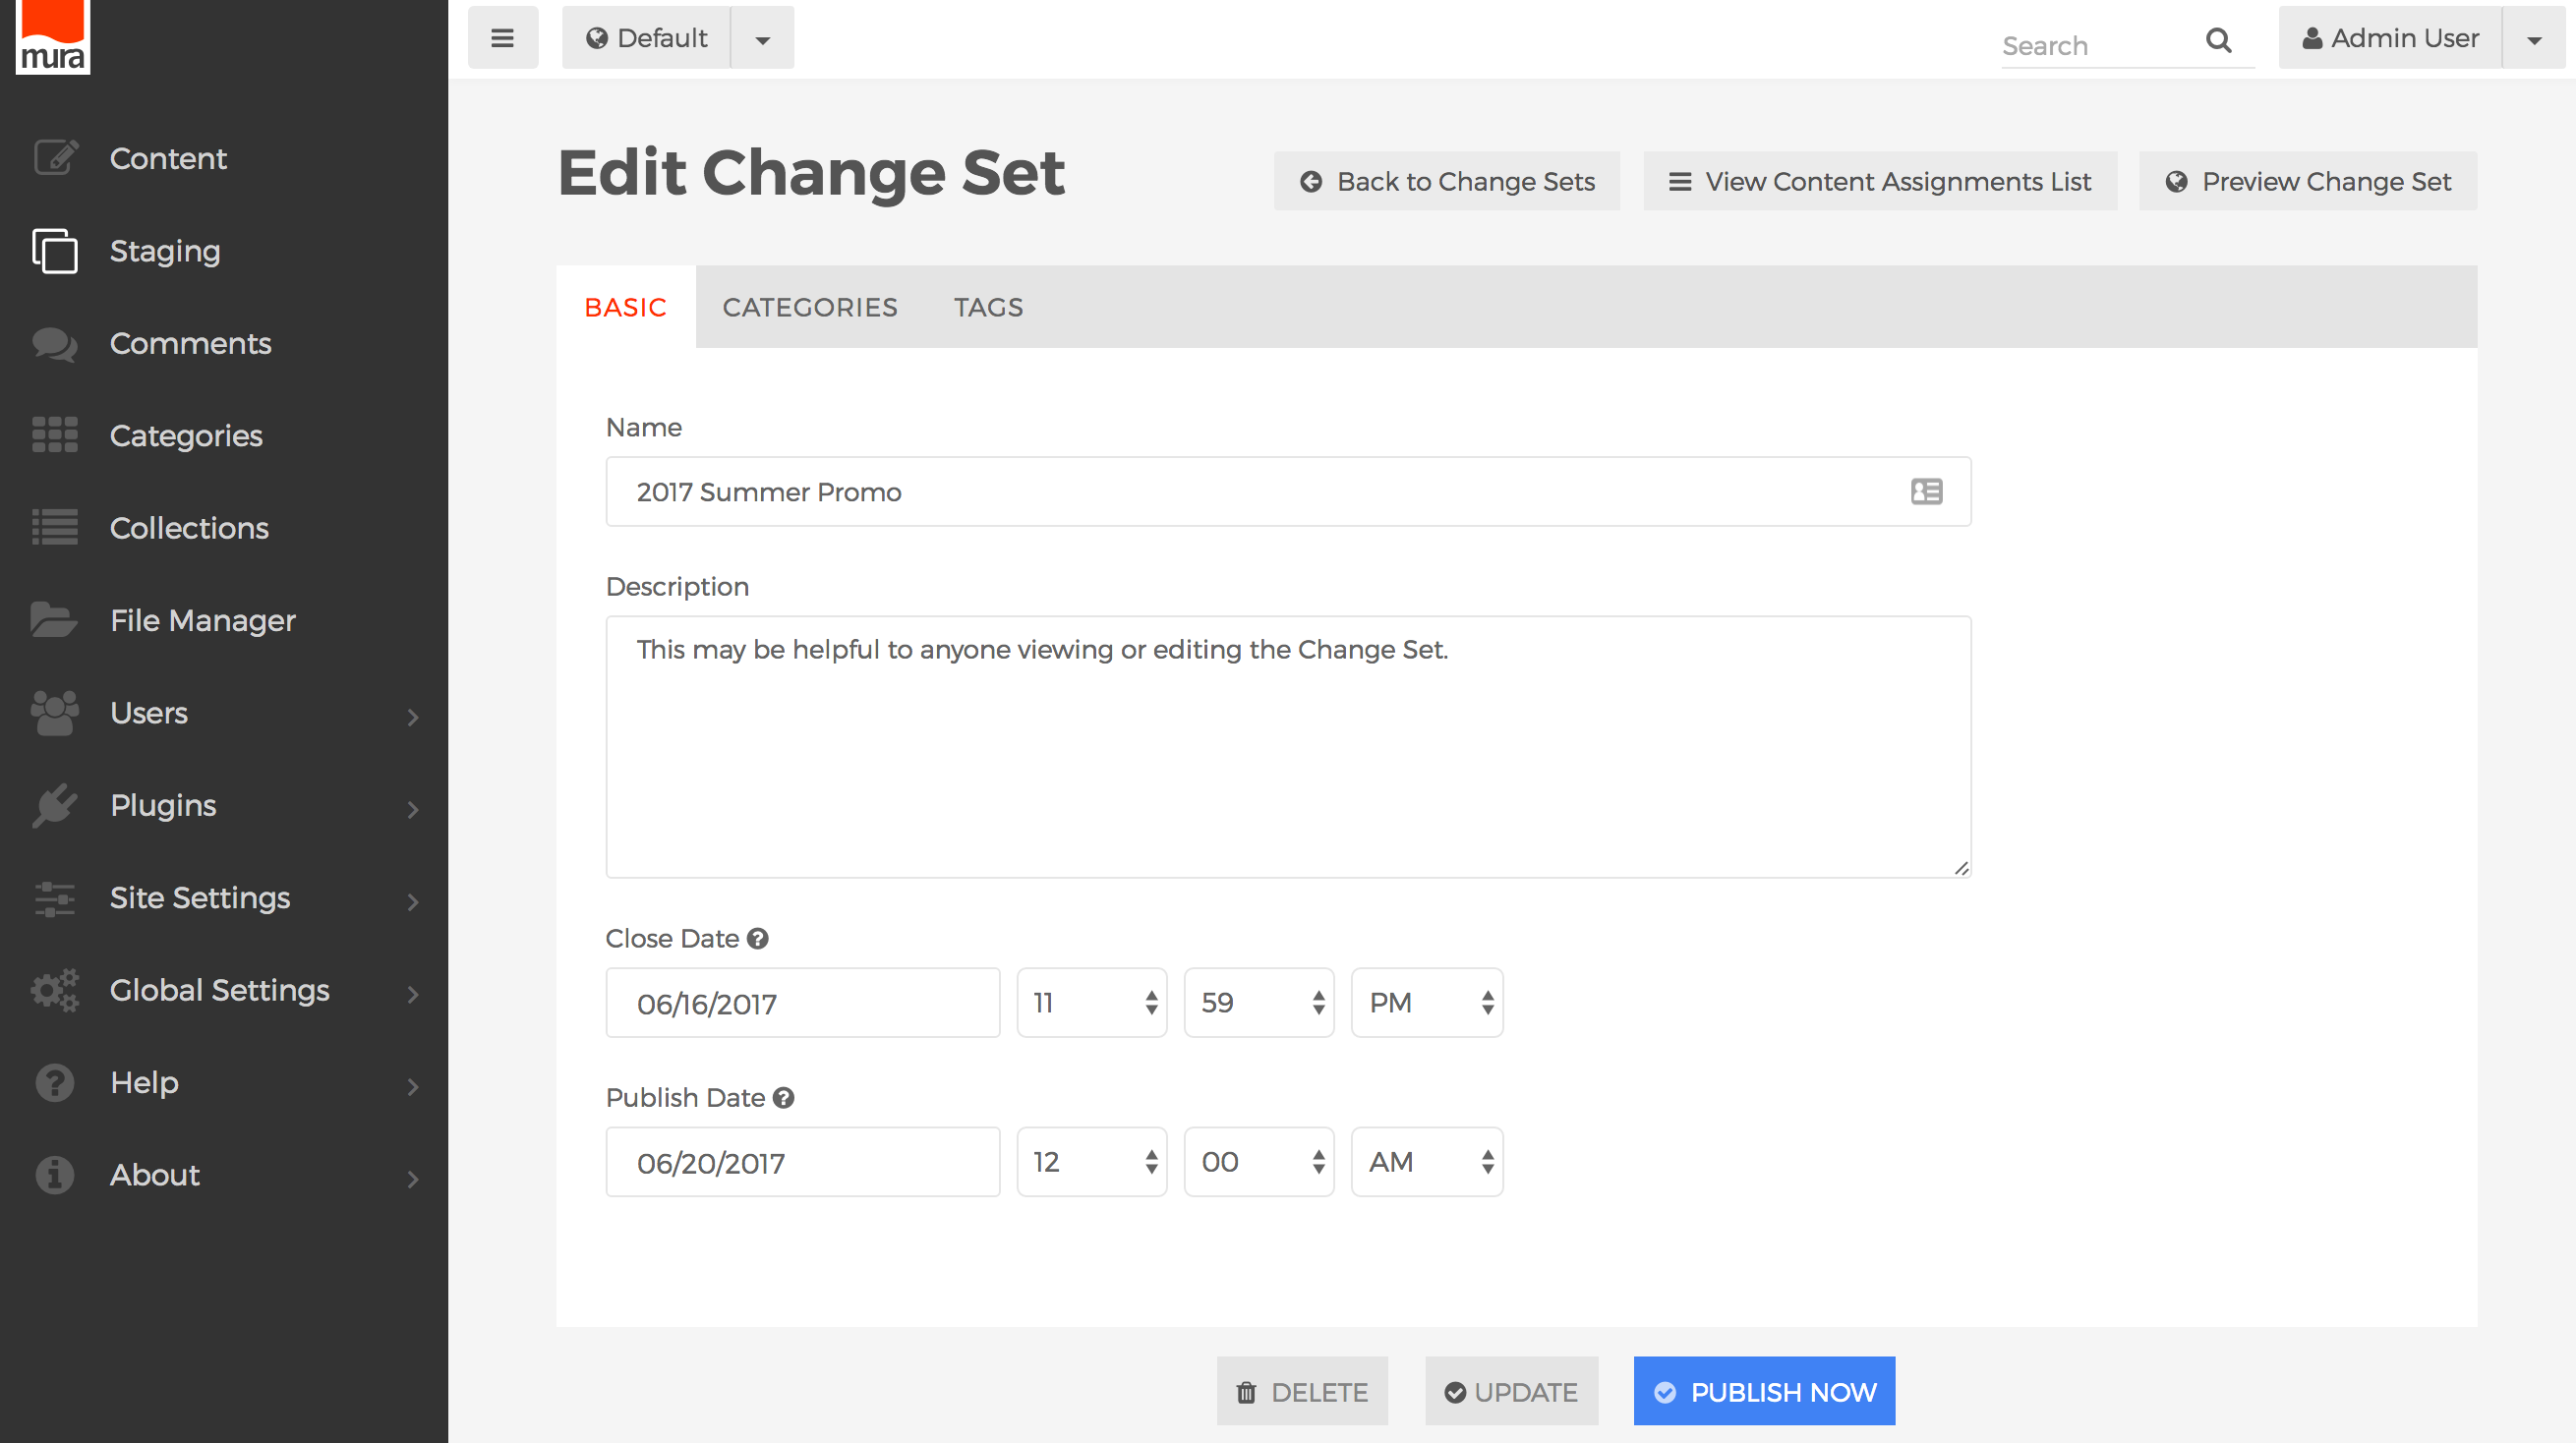
- You should now see the Add Change Set screen.
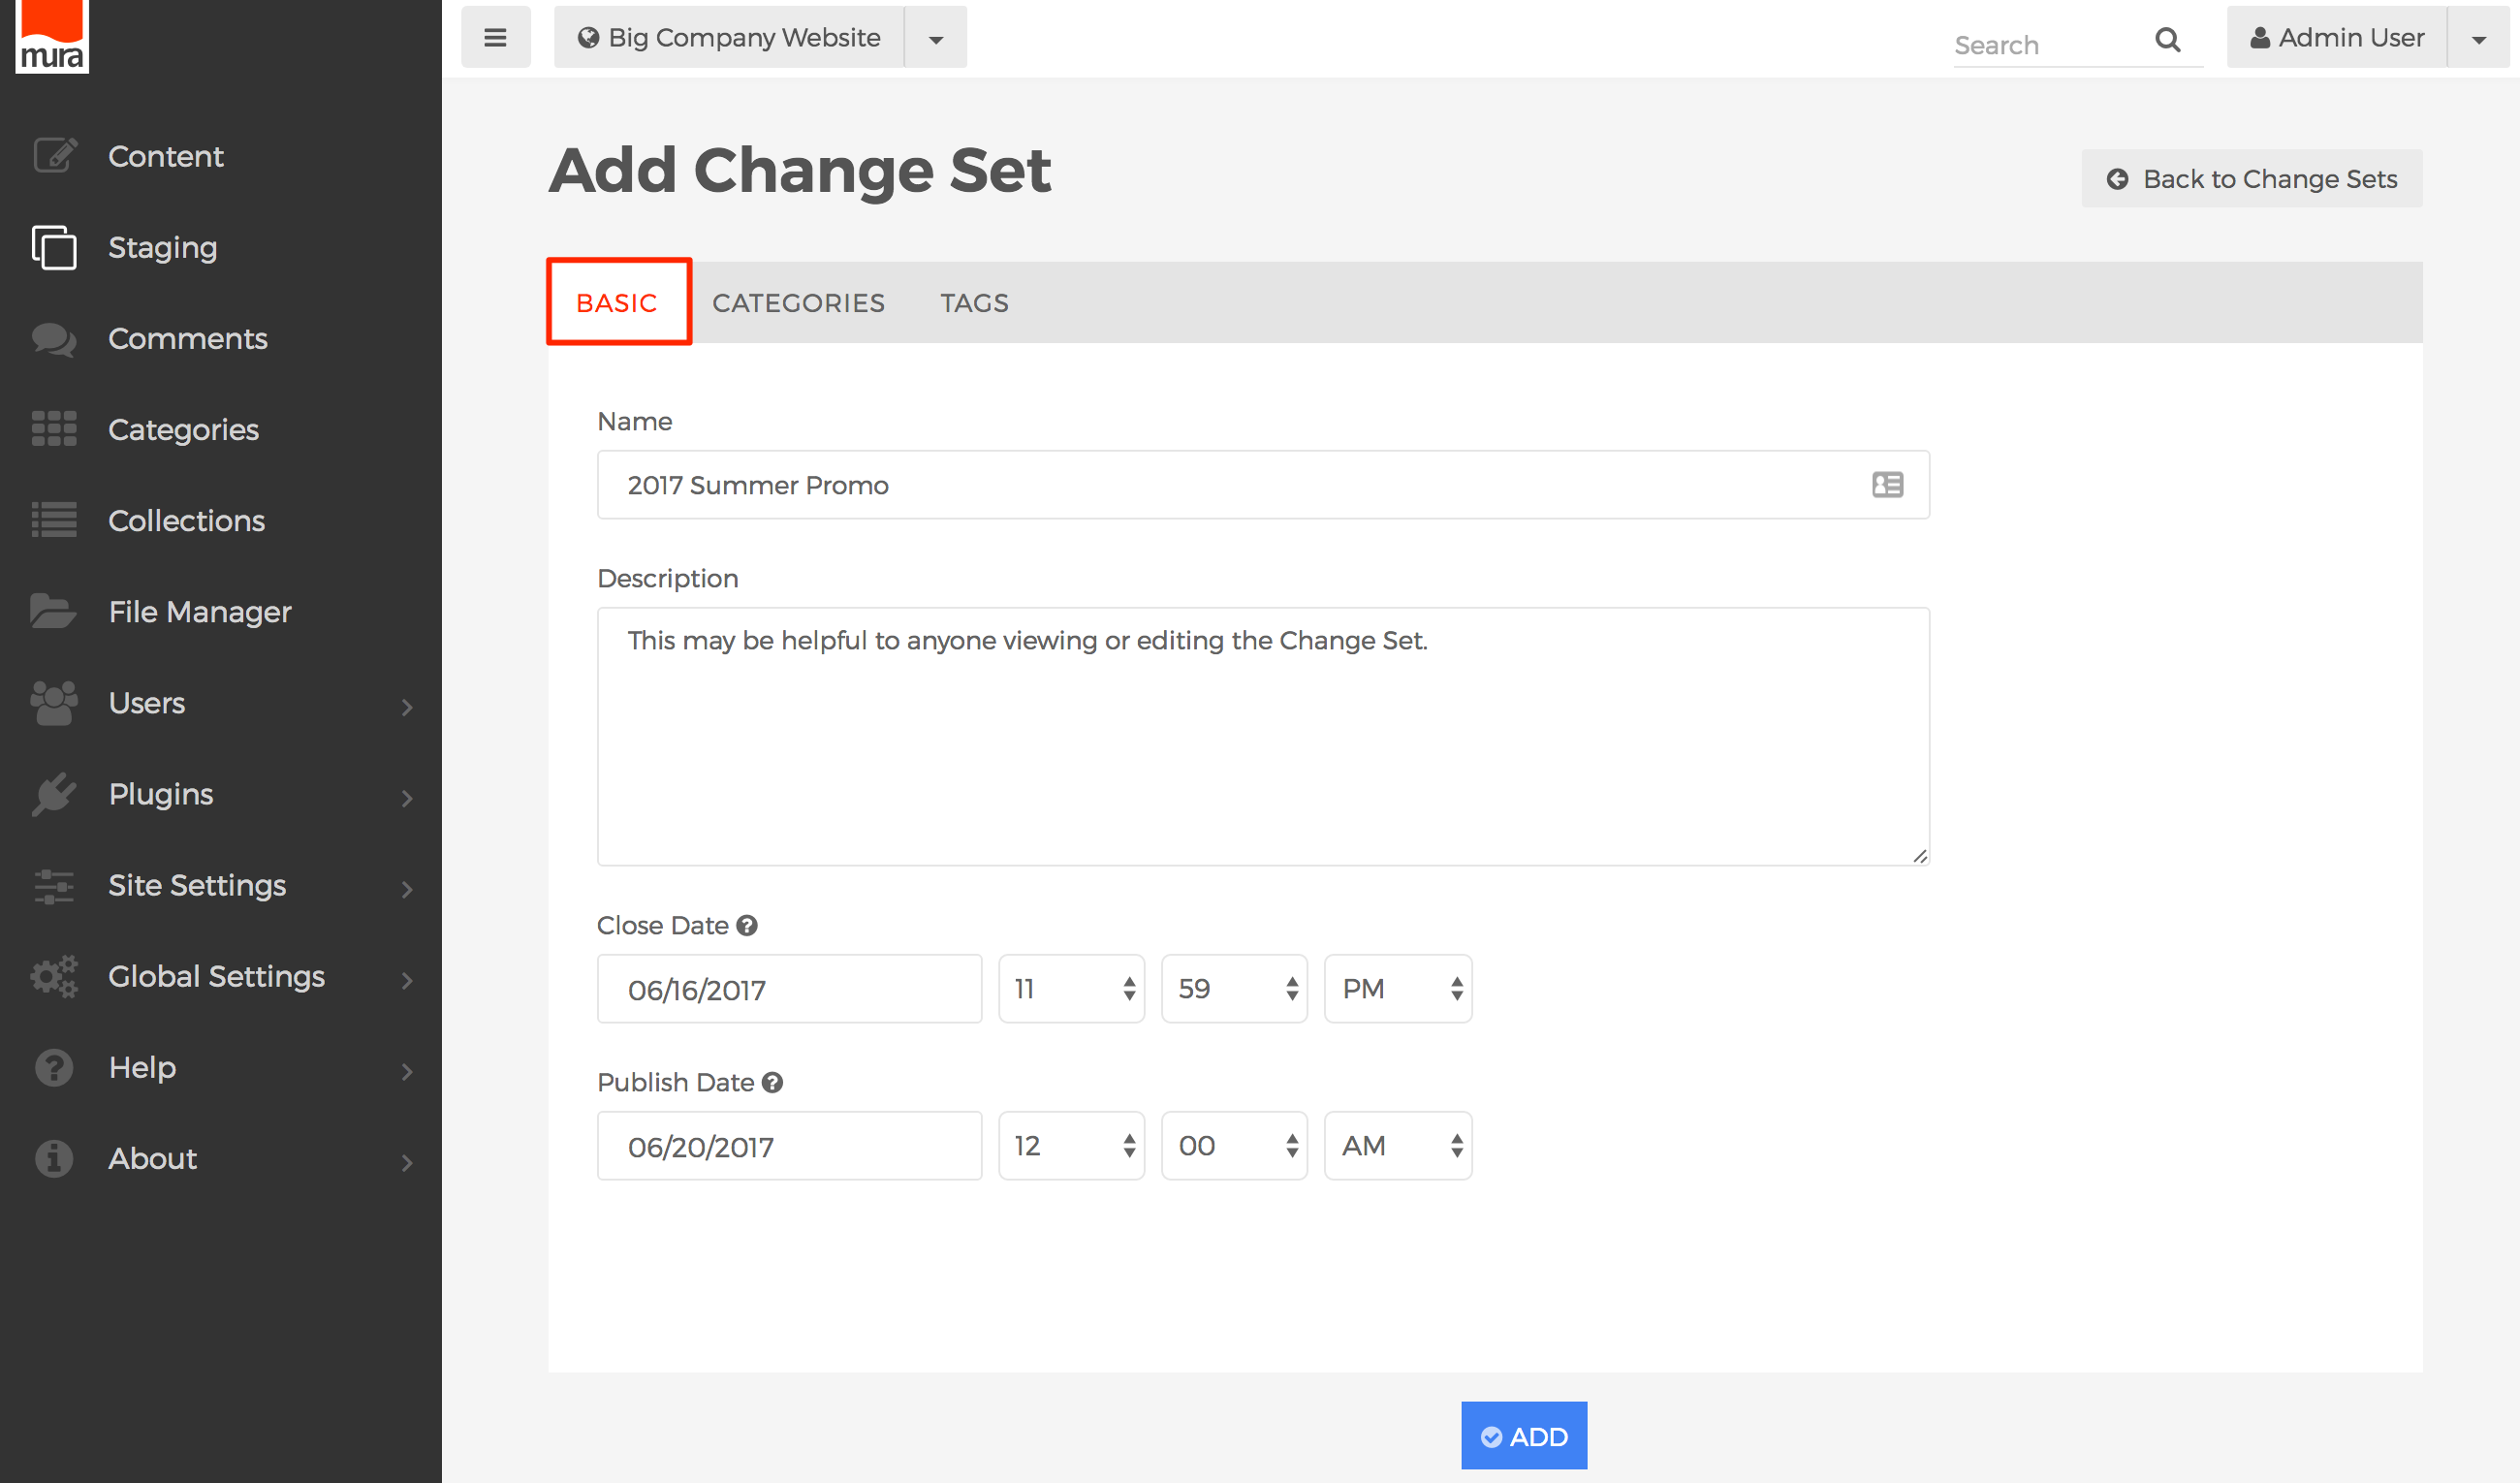
- Basic Tab
- Name
- A unique name for the Change Set (e.g., 2017 Summer Promo).
- Description
- A description that may be helpful for anyone viewing or editing the Change Set.
- Close Date
- The Close Date field may be used to prevent any users from adding more content after the specified date. This is useful so that users who need to review and/or approve the change set have time to do so, prior to the Change Set being published, which is why it's typically a good idea to enter a date and time at least a day or two ahead of the Publish Date.
- Publish Date
- This is the date and time all content assignments in the Change Set should go "live."
- Name
- Categories Tab
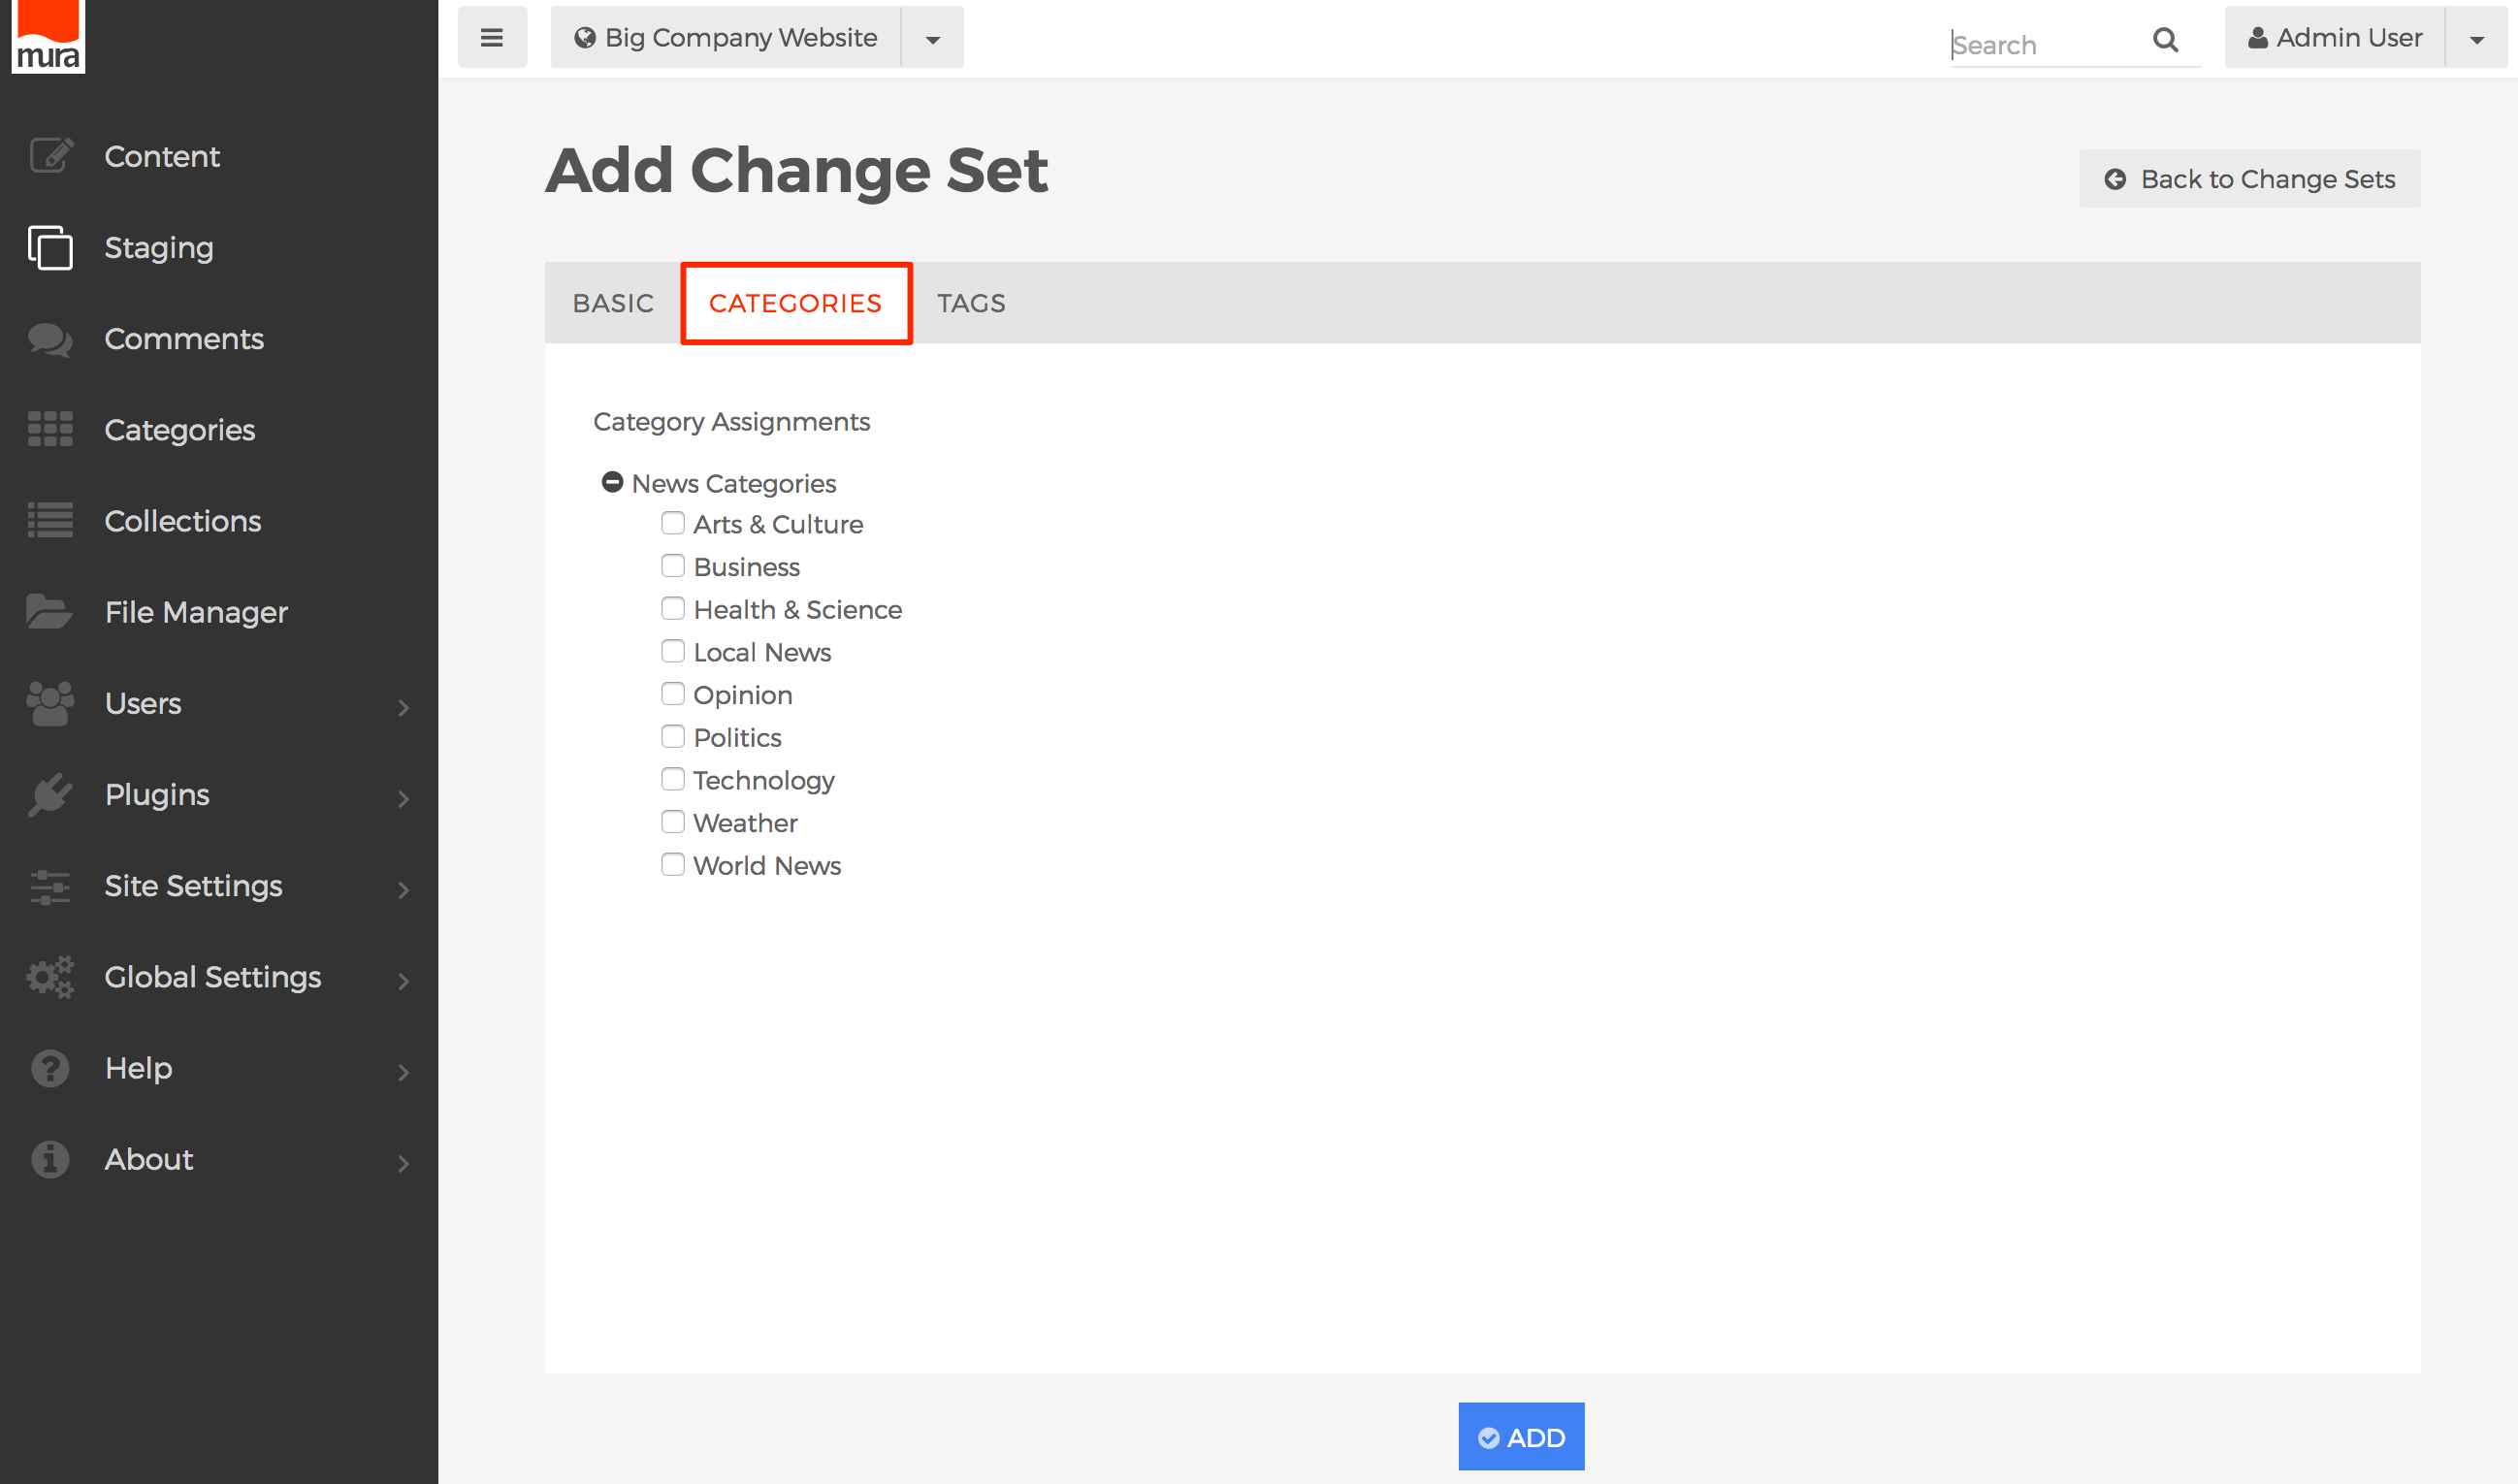
- You may categorize your Change Set by selecting your desired categories.
- Tags Tab
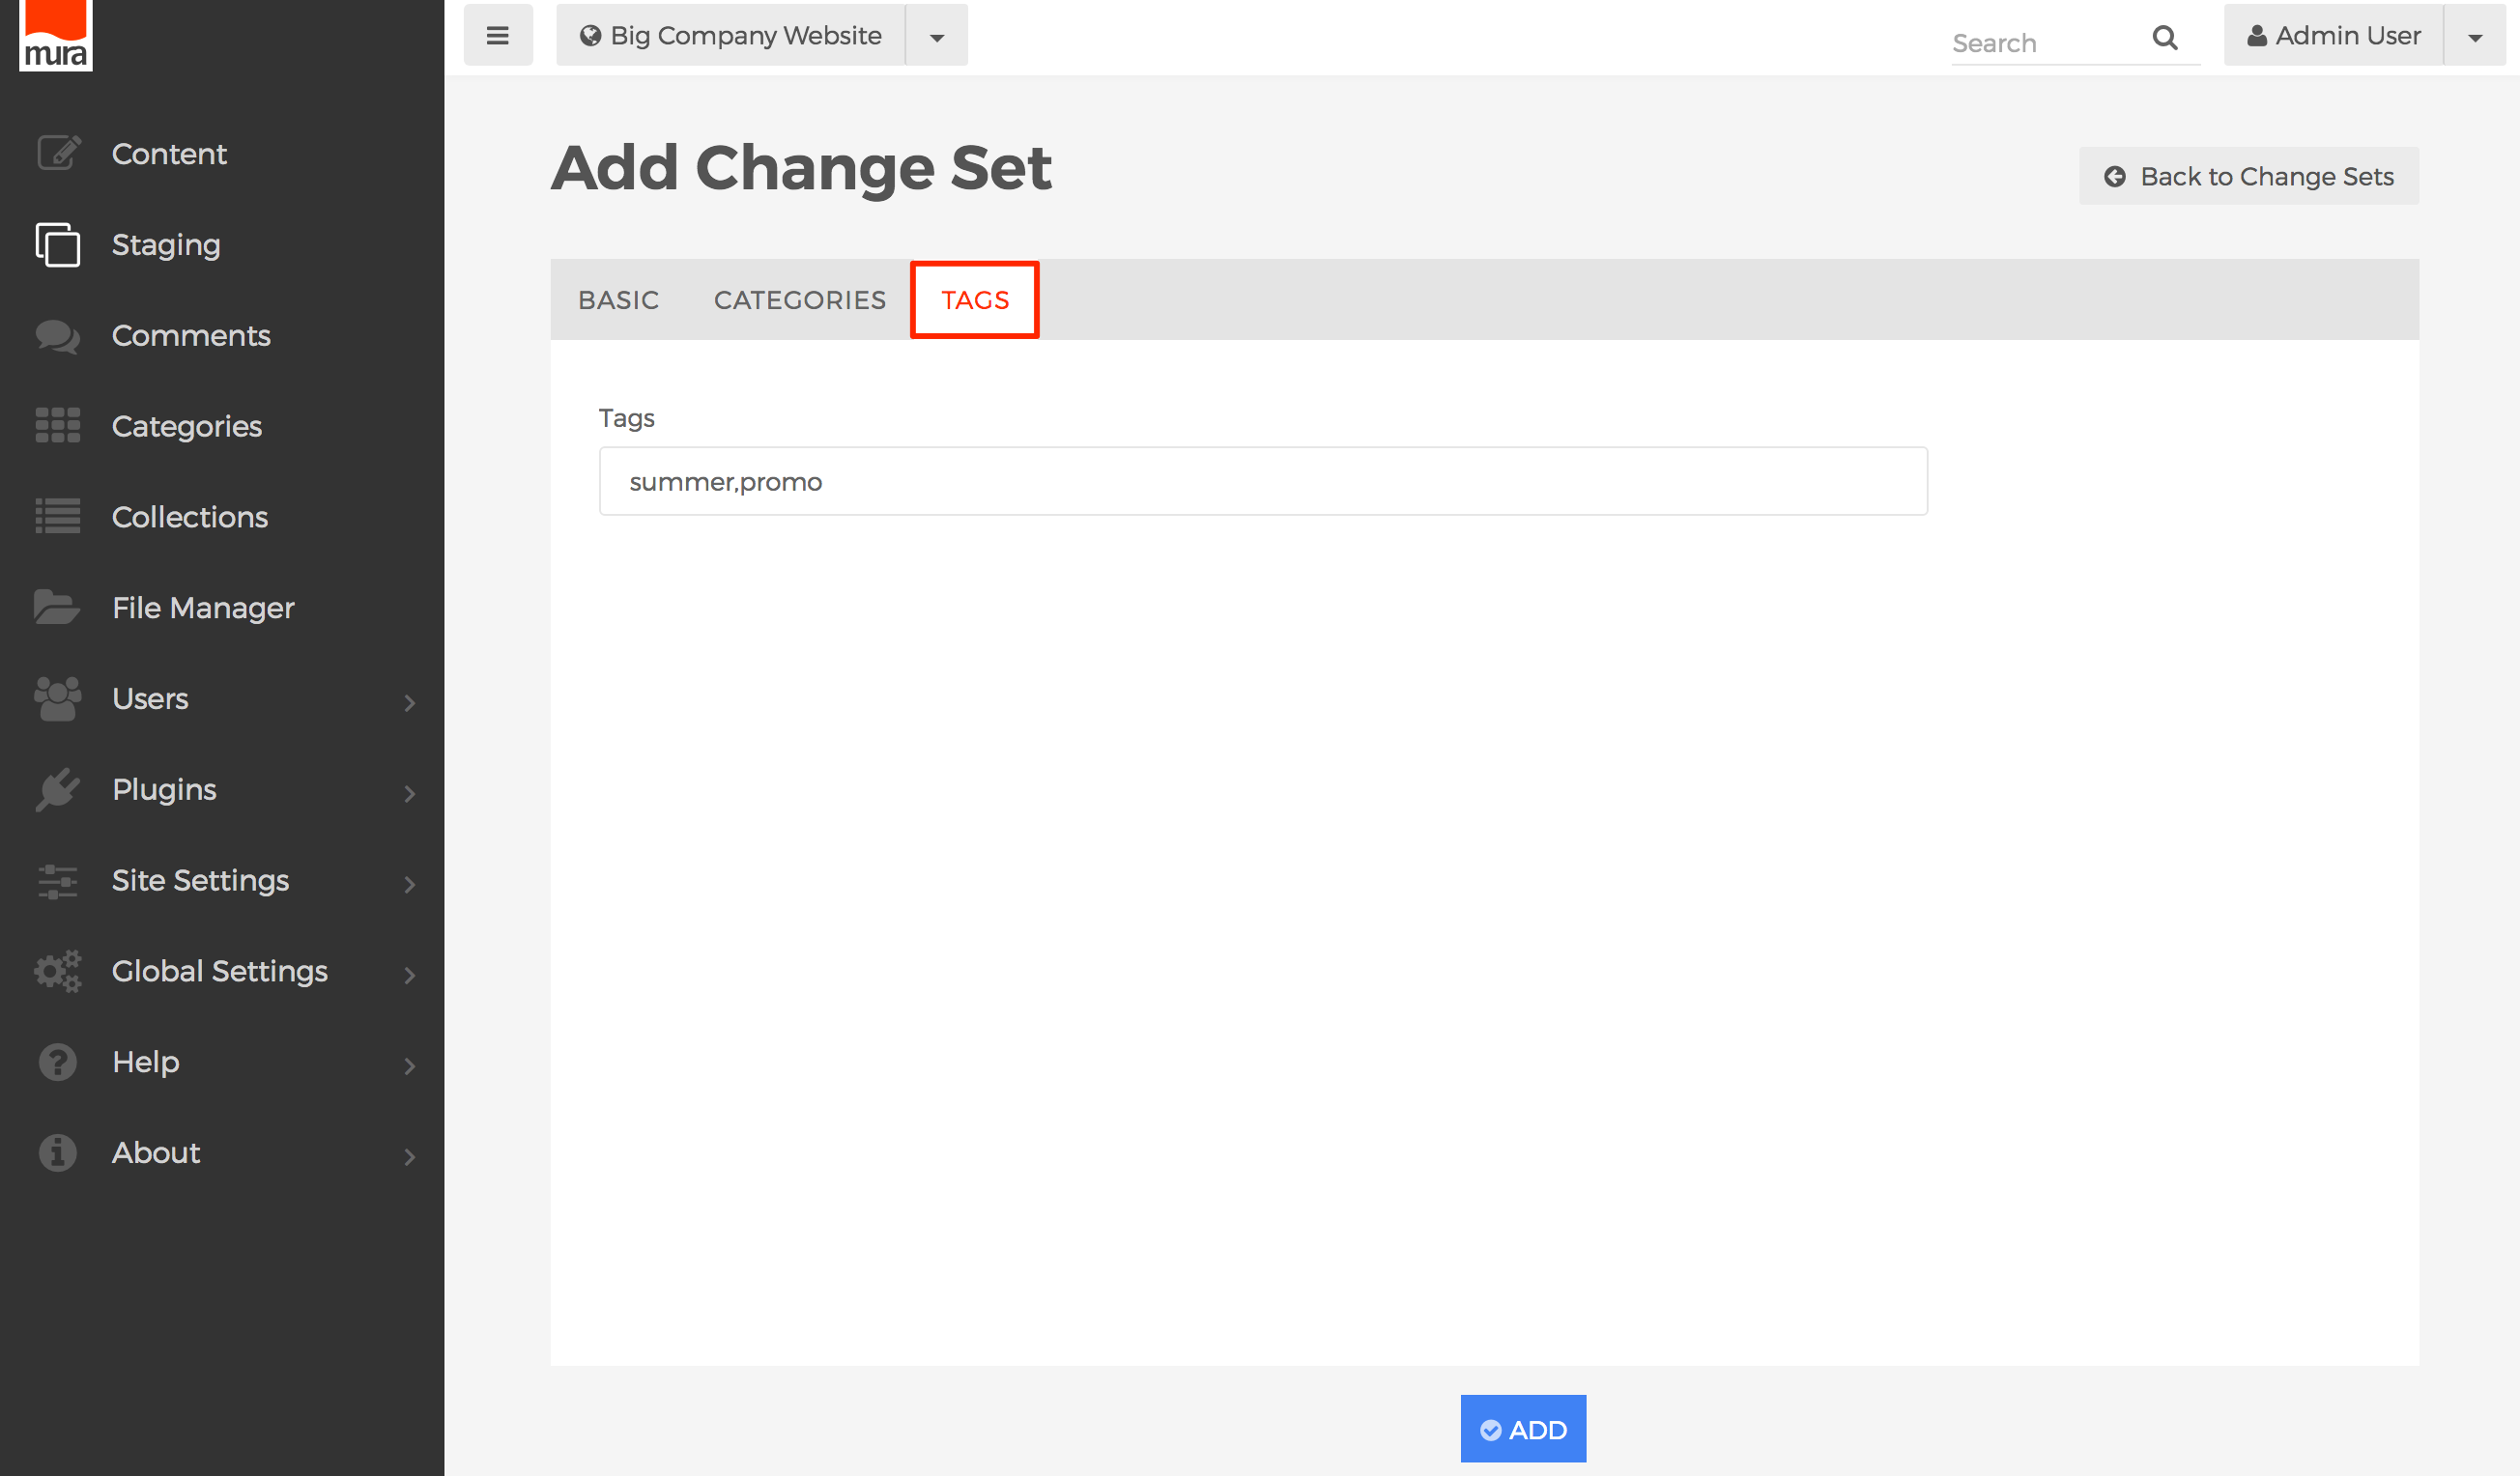
- You may enter a comma-delimited list of tags for the Change Set.
- Basic Tab
- Click Add, to save your new change set.


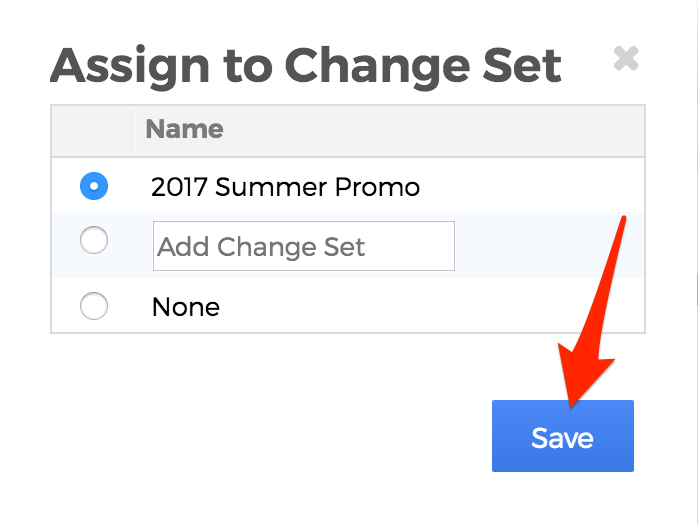
Assign Content to a Change Set
Mura allows you to add content items to Change Sets as well as Components and Forms. To add content to a Change Set, follow the steps below.
- Either create a new content item, or select an existing content item you wish to edit specifically for the Change Set.
- Once you have made your desired additions and/or changes, simply click the "Save to Change Set" button.
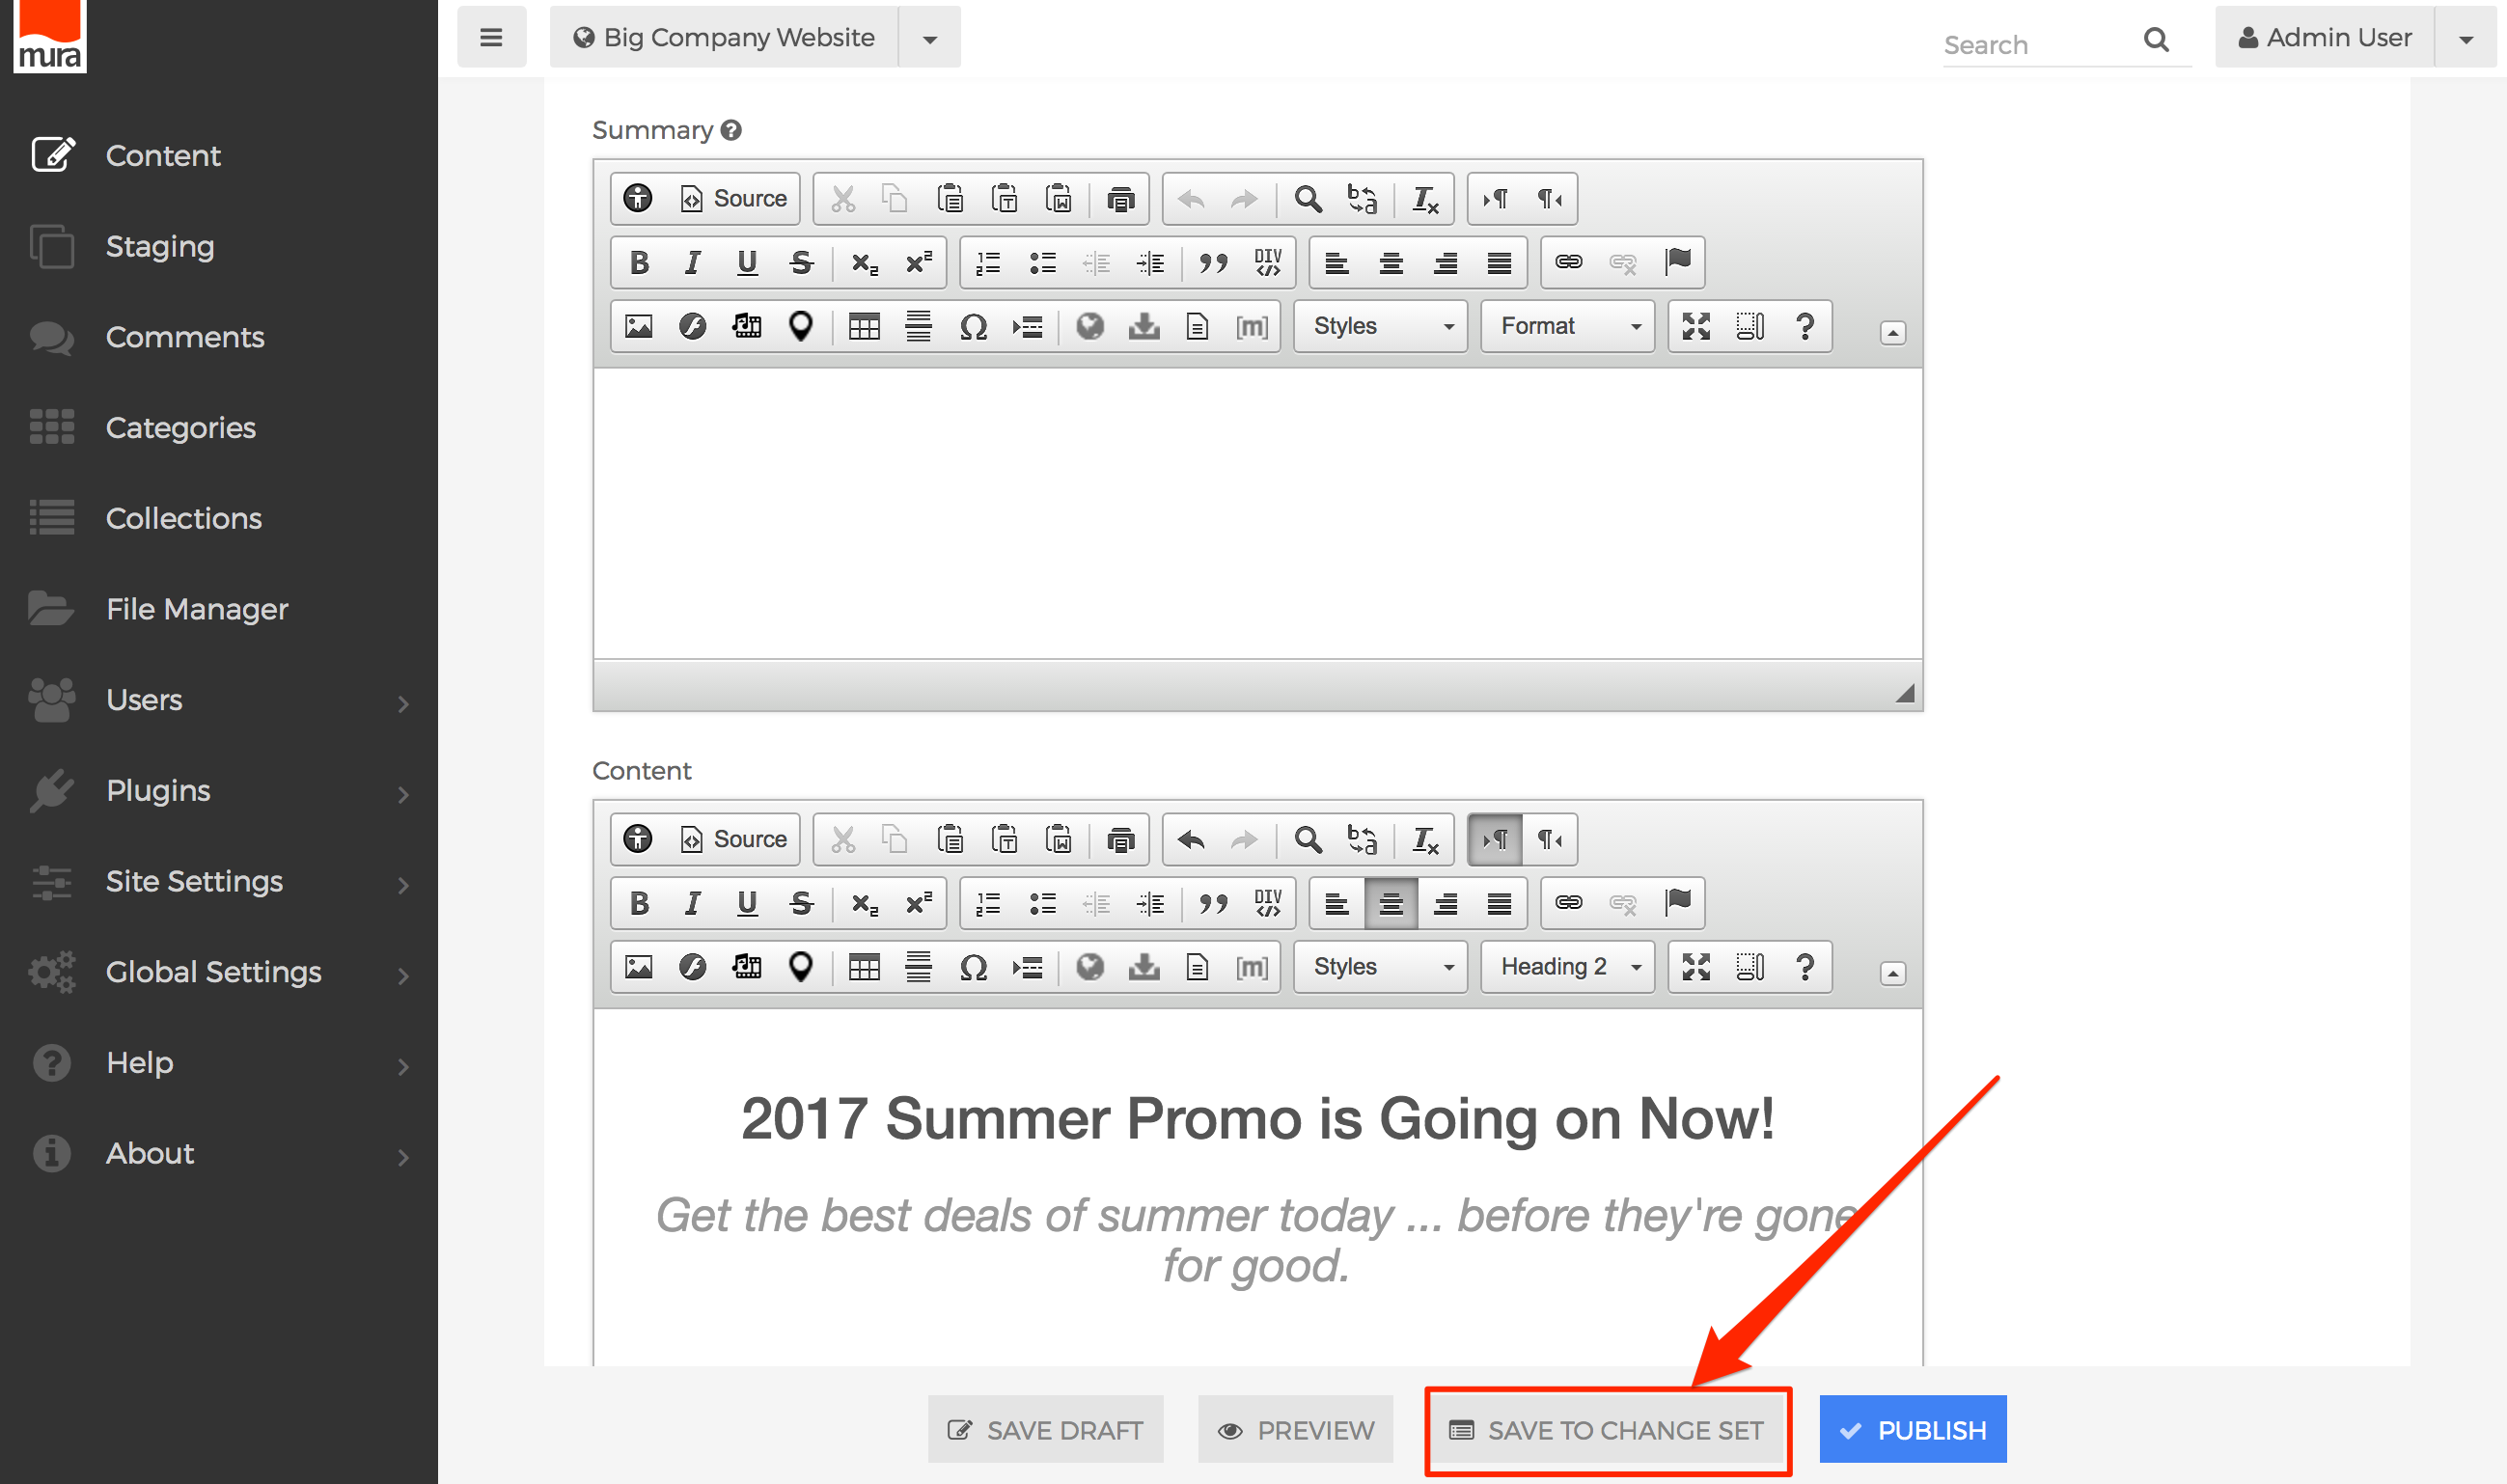
Note: Only groups with "Editor" privileges will be able to see the "Save to Change Set" button. - This should launch the Assign to Change Set dialog window. Select your desired Change Set from the list.
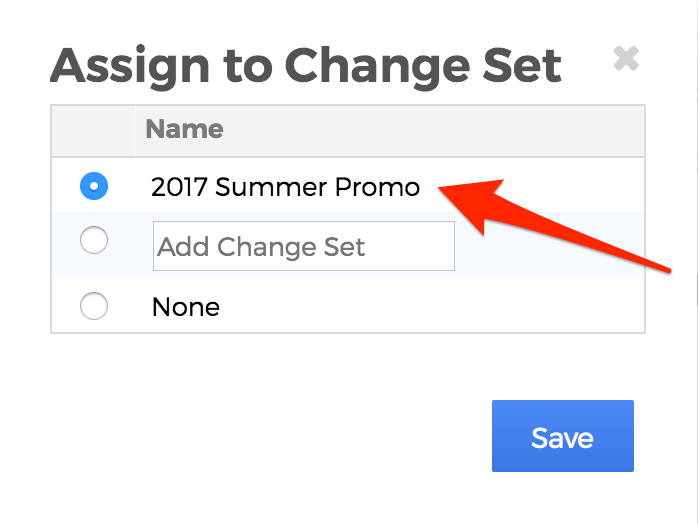
- Or, select the radio button next to the "Add Change Set" text box, enter a "Title" for it.
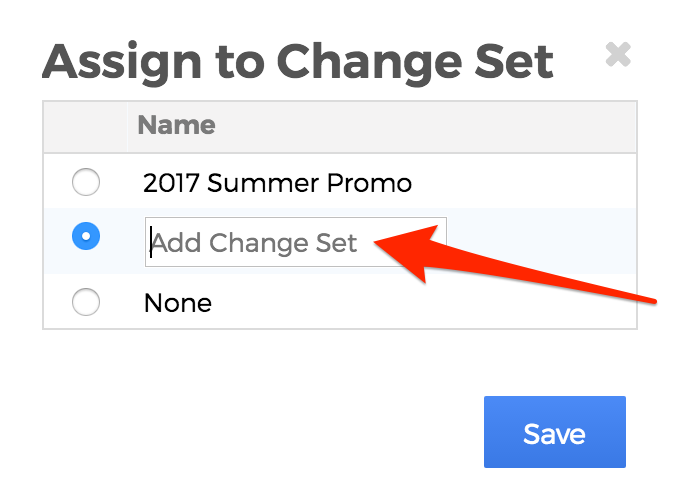
- Click Save, to save your changes to the Change Set.
- Repeat these steps for all content you wish to add to the Change Set.


View Content Assignment List
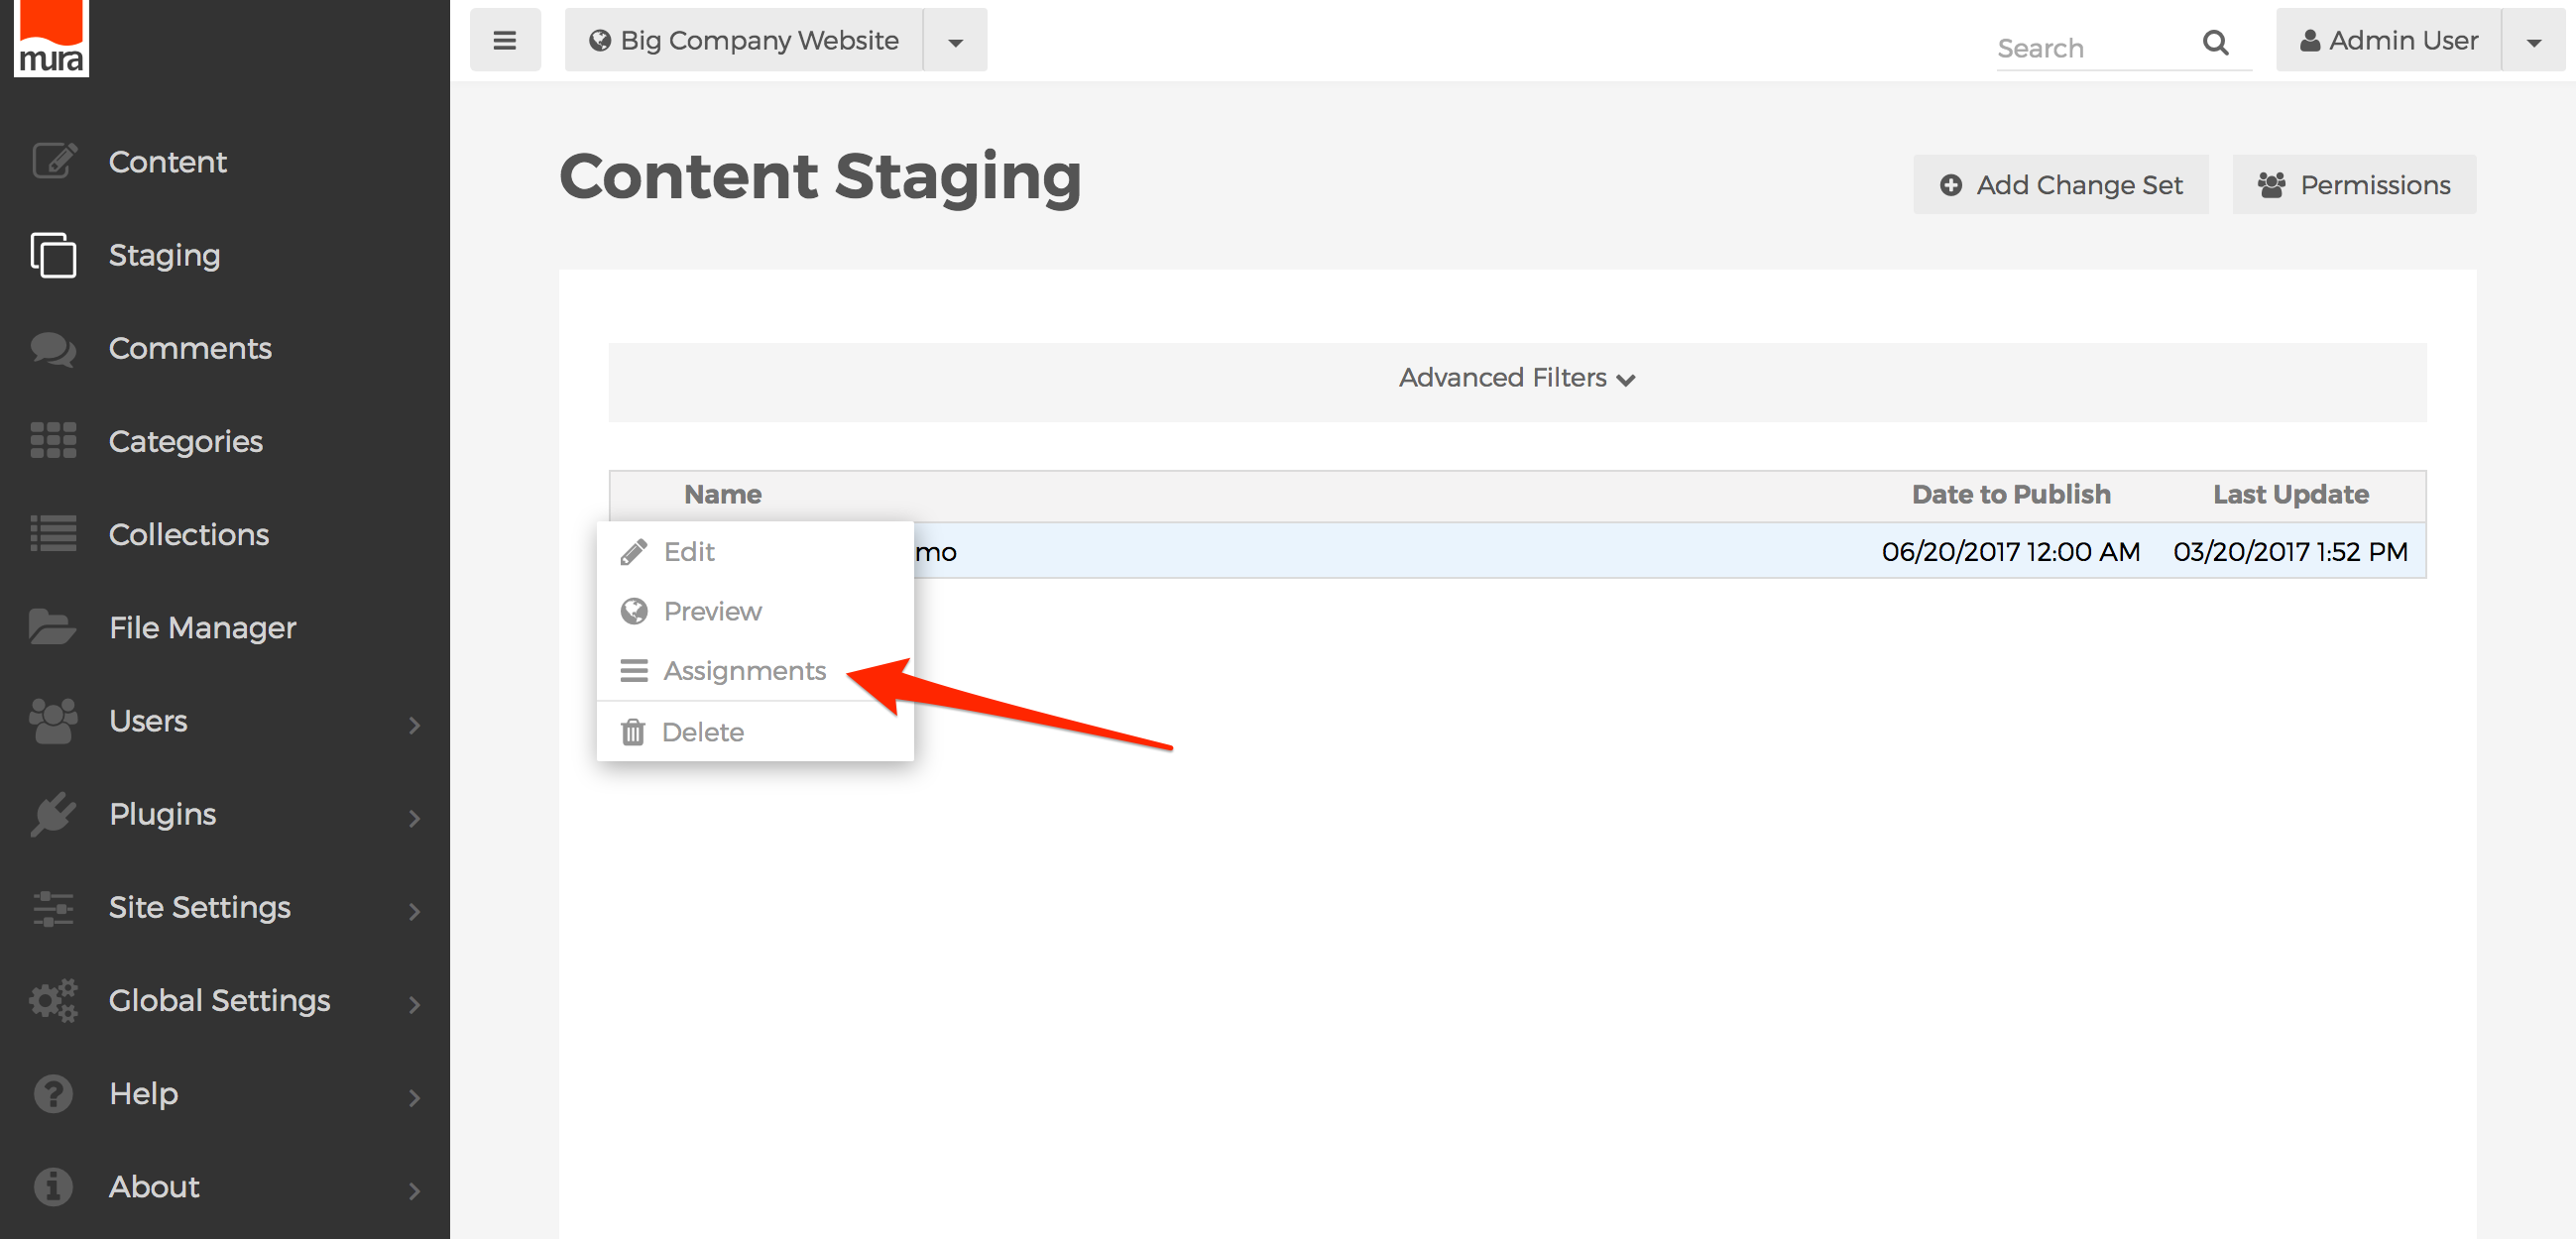
Mura maintains a listing of all content that has been assigned to each Change Set. To view the assignments, follow the steps below.
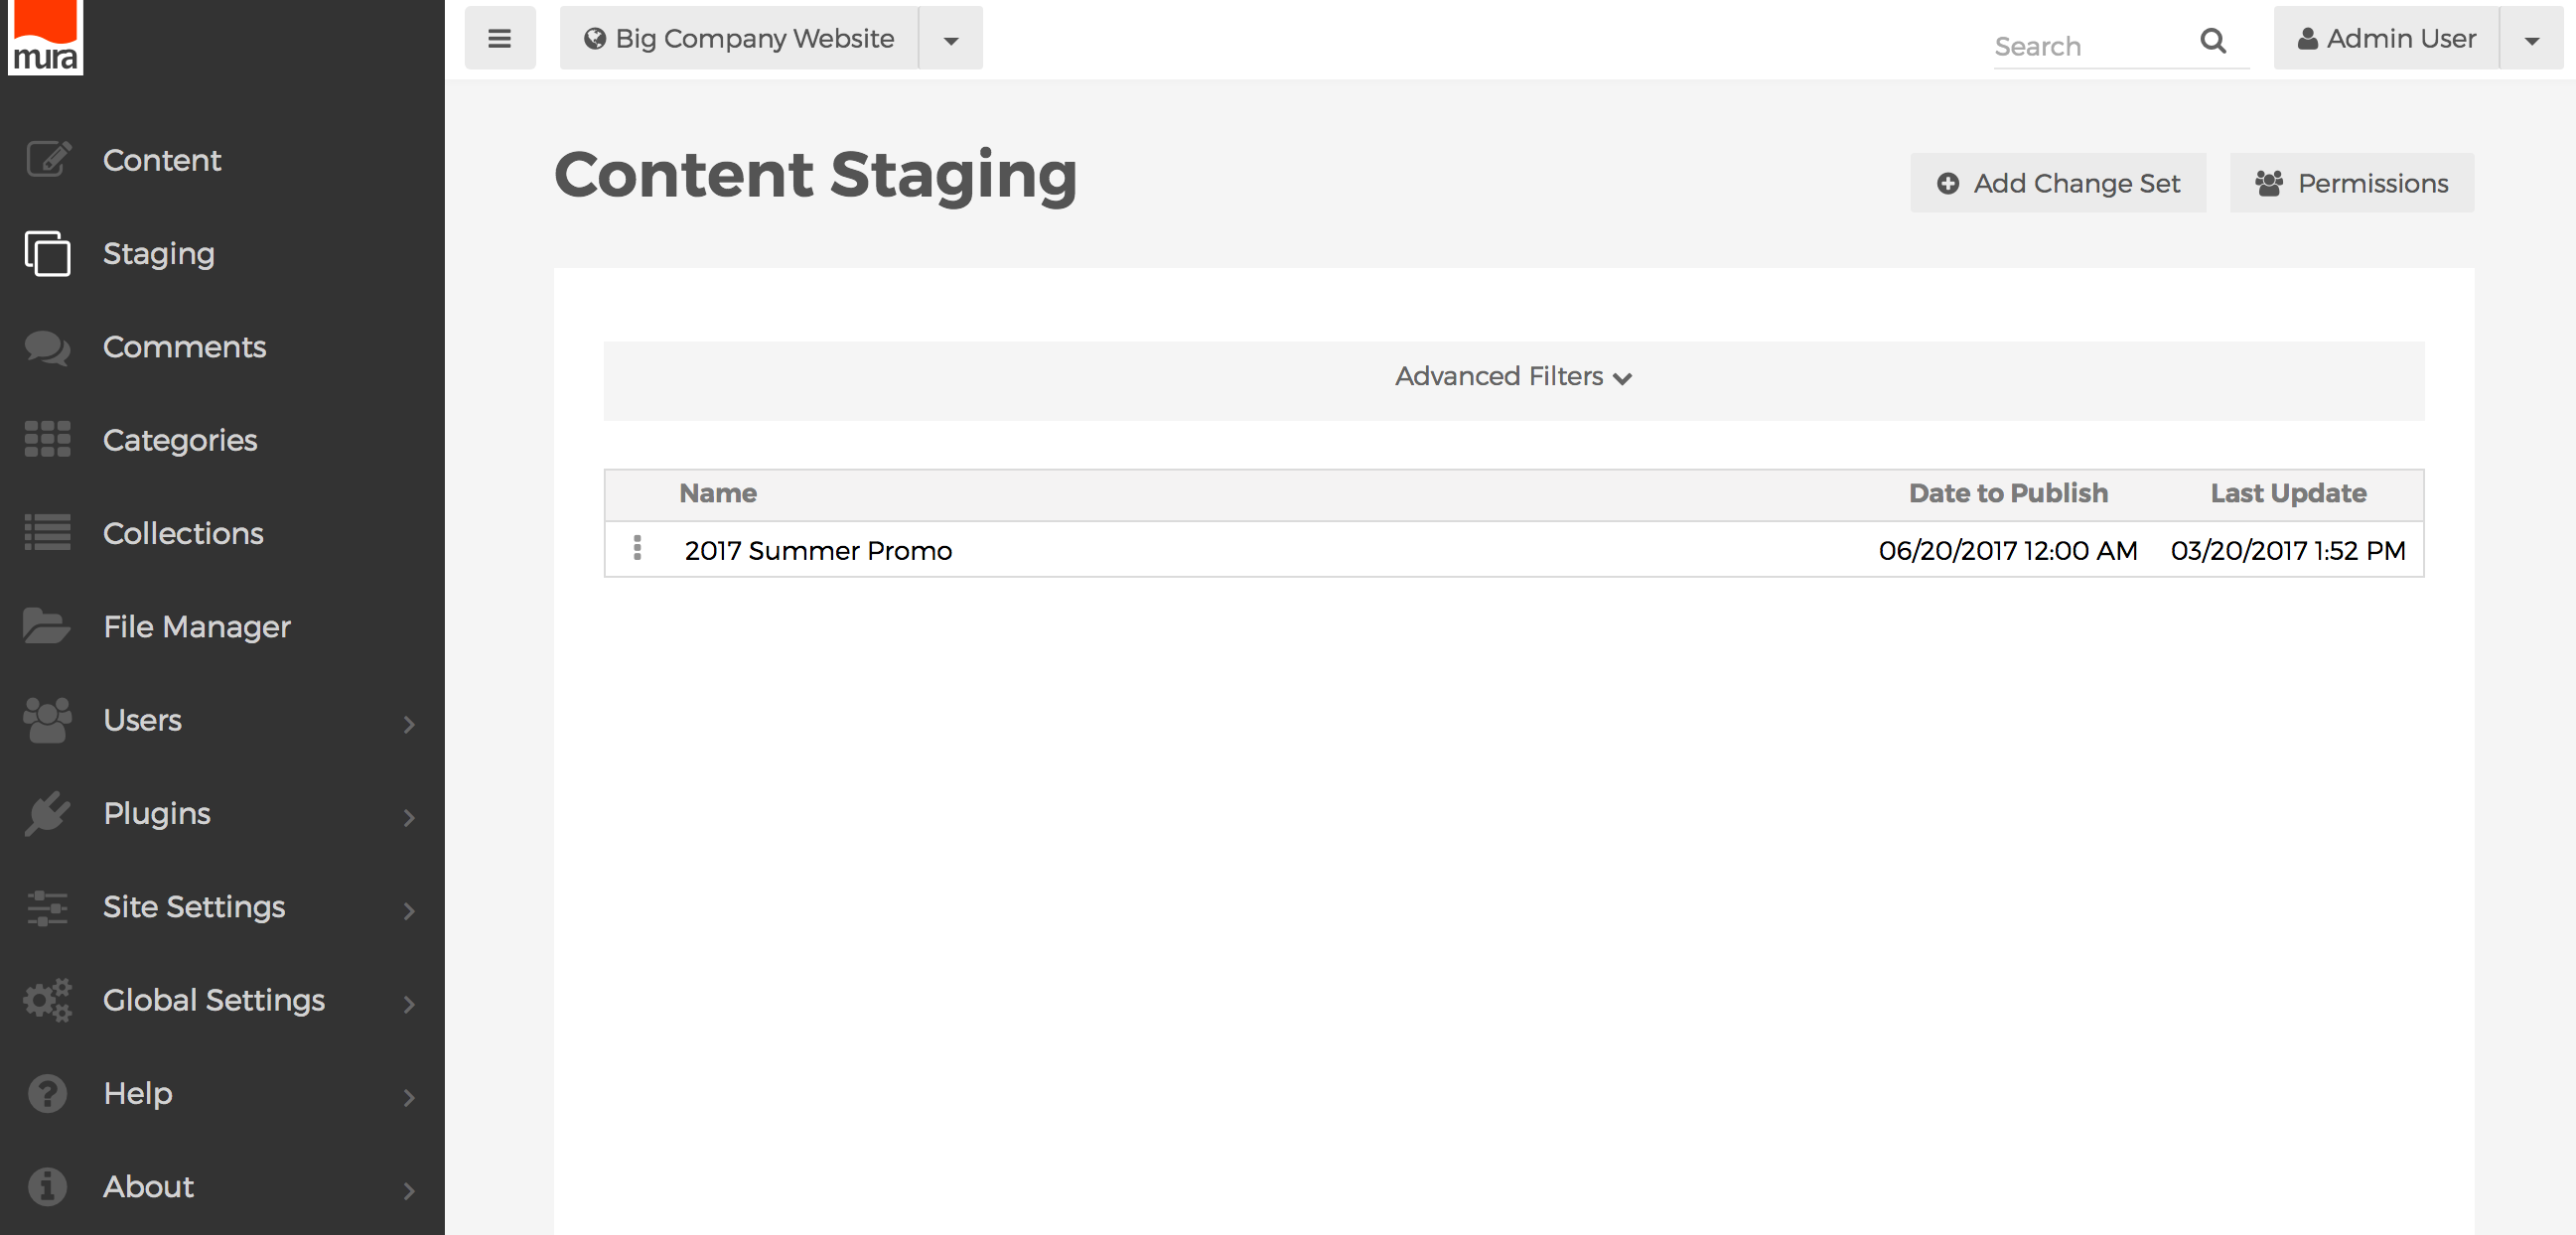
- From the back-end administration area of Mura, select Staging from the main navigation.

- You should be taken to the Content Staging screen.

- From the list of available Change Sets, select the three-dot menu next to the Change Set you wish to view assignments for, and select the Assignments option.

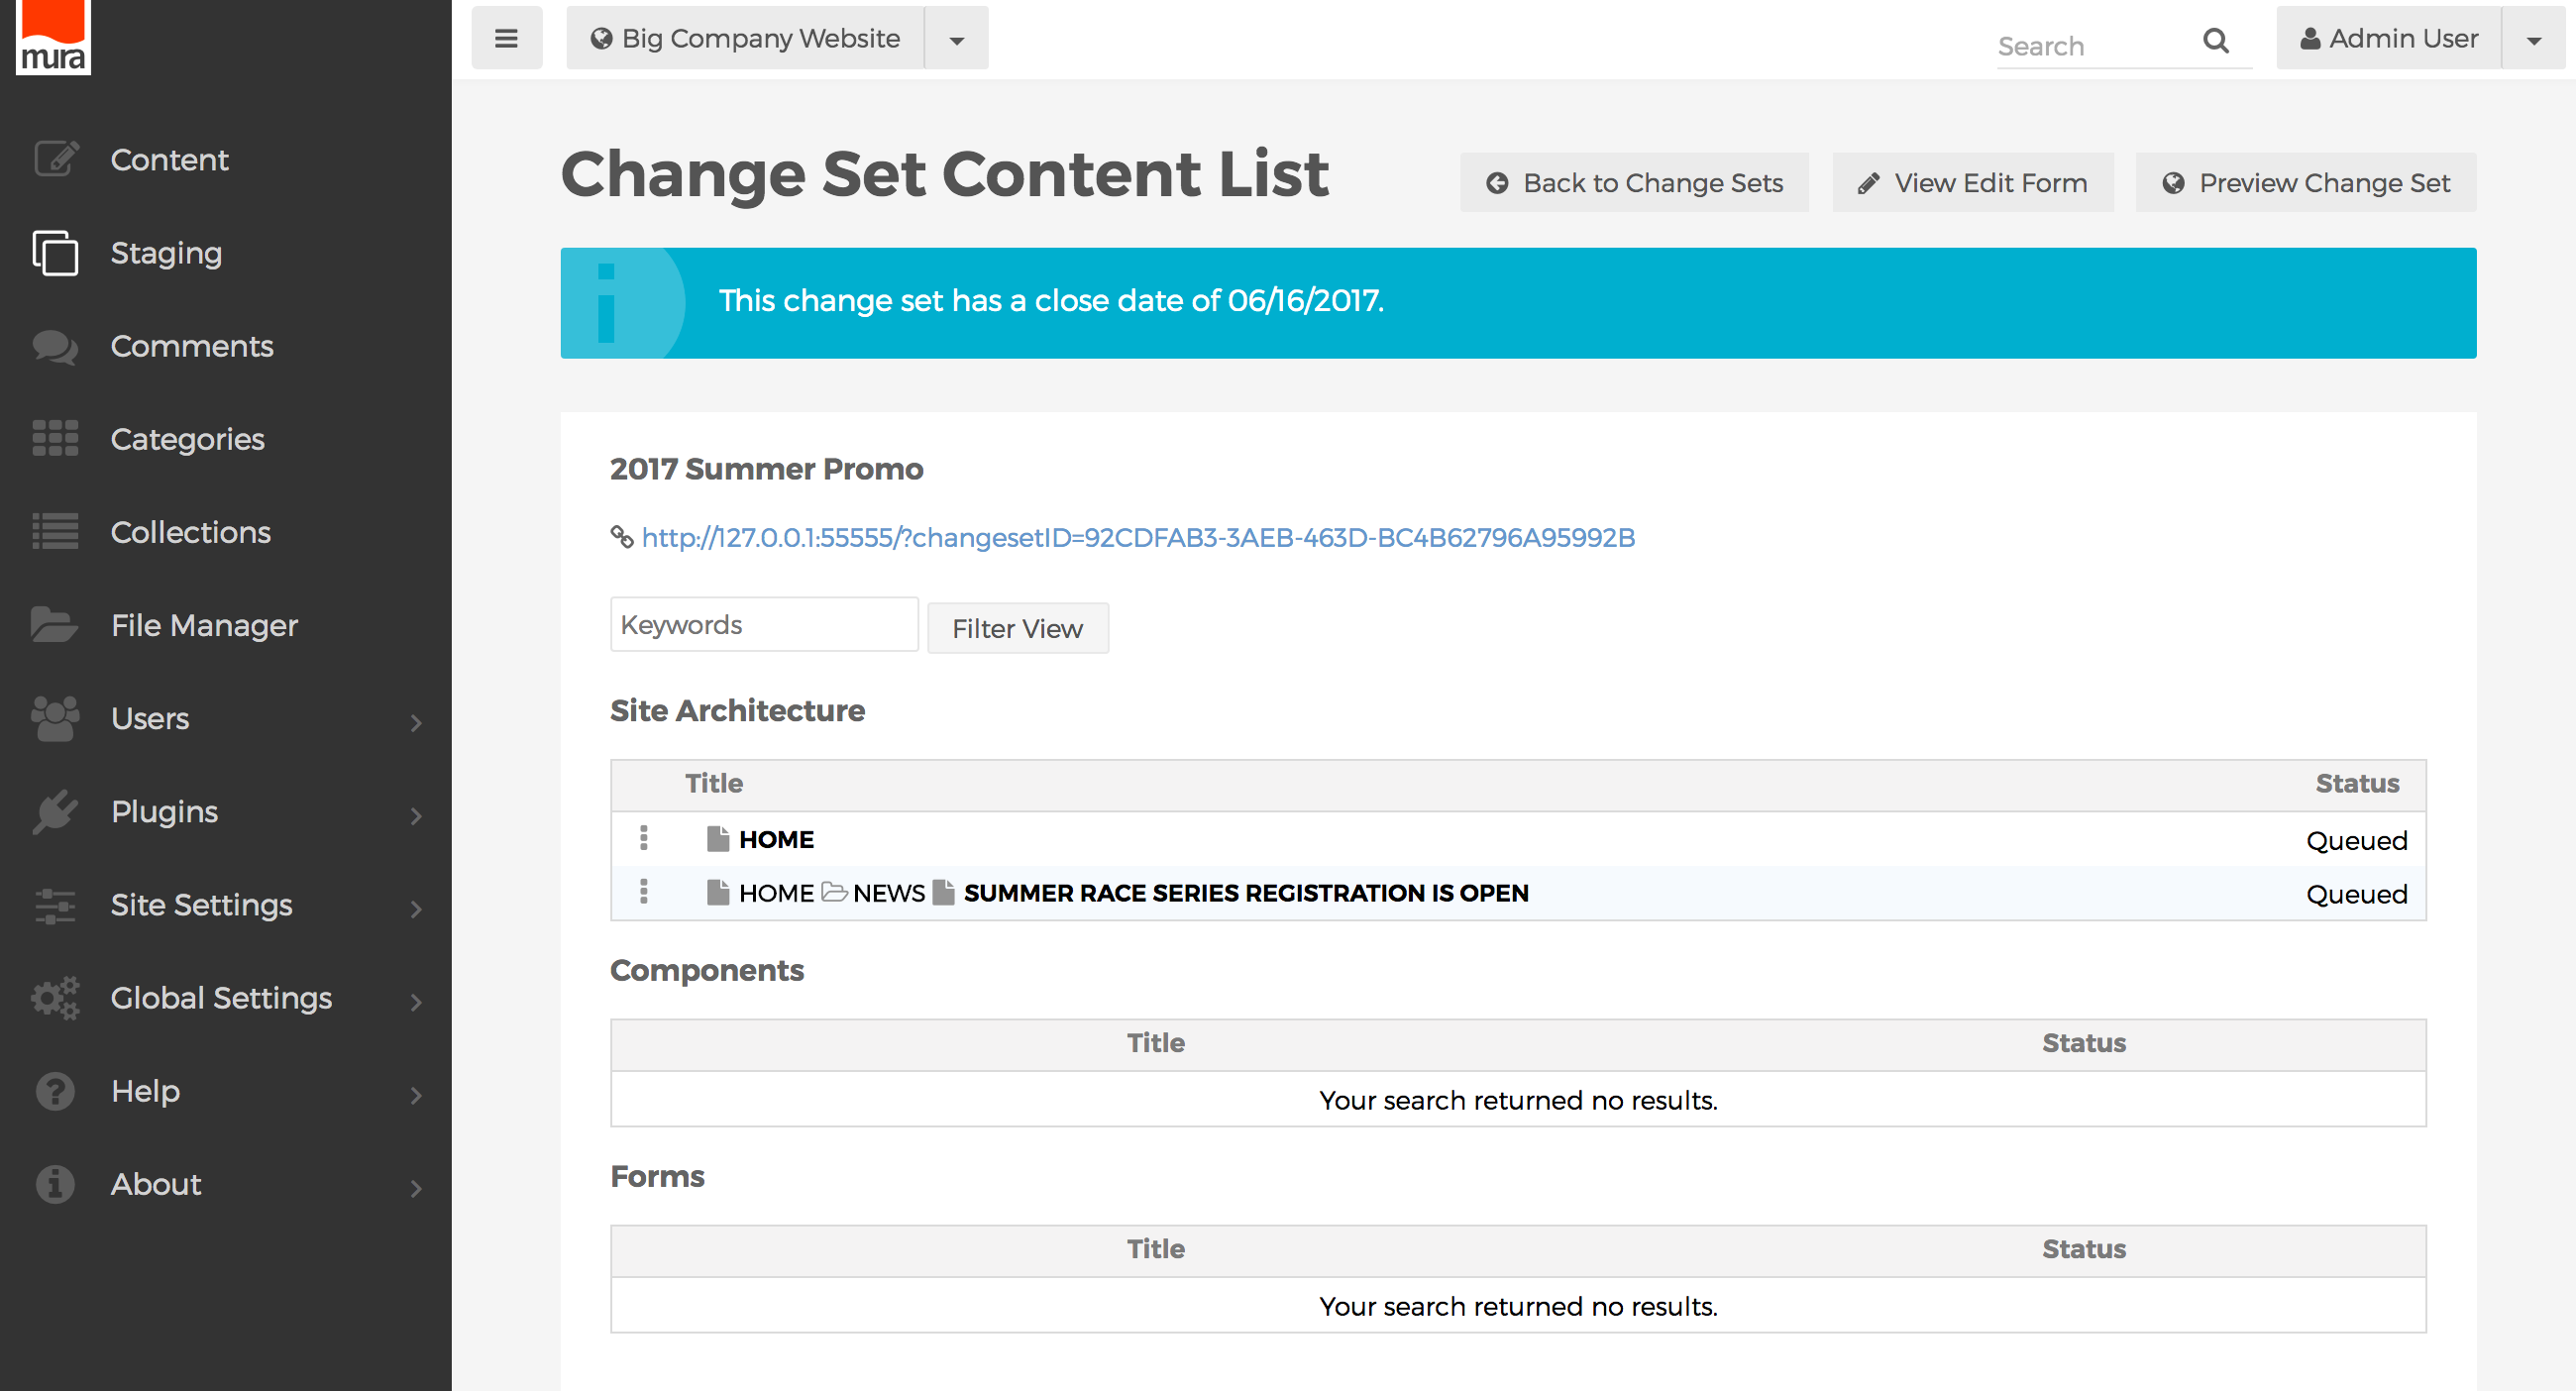
- You should be taken to the Change Set Content List screen. Any content, components, or forms that have been assigned to the Change Set, should be listed here.


Preview a Change Set
Once you have added content to a Change Set, you can preview your site to see what it will look like once the Change Set has been published. To preview a Change Set, or obtain a URL to share with other team members, follow the steps below.
- From the back-end administration area of Mura, select Staging from the main navigation.

- You should be taken to the Content Staging screen.

- From the list of available Change Sets, select the three-dot menu next the your desired Change set, and select the Preview option.

- Or, from the list of available Change Sets, select the three-dot menu next to the Change Set you wish to view assignments for, and select the Assignments option.

- You should be taken to the Change Set Content List screen. Here, you either click the Preview Change Set button, or click the shareable URL.
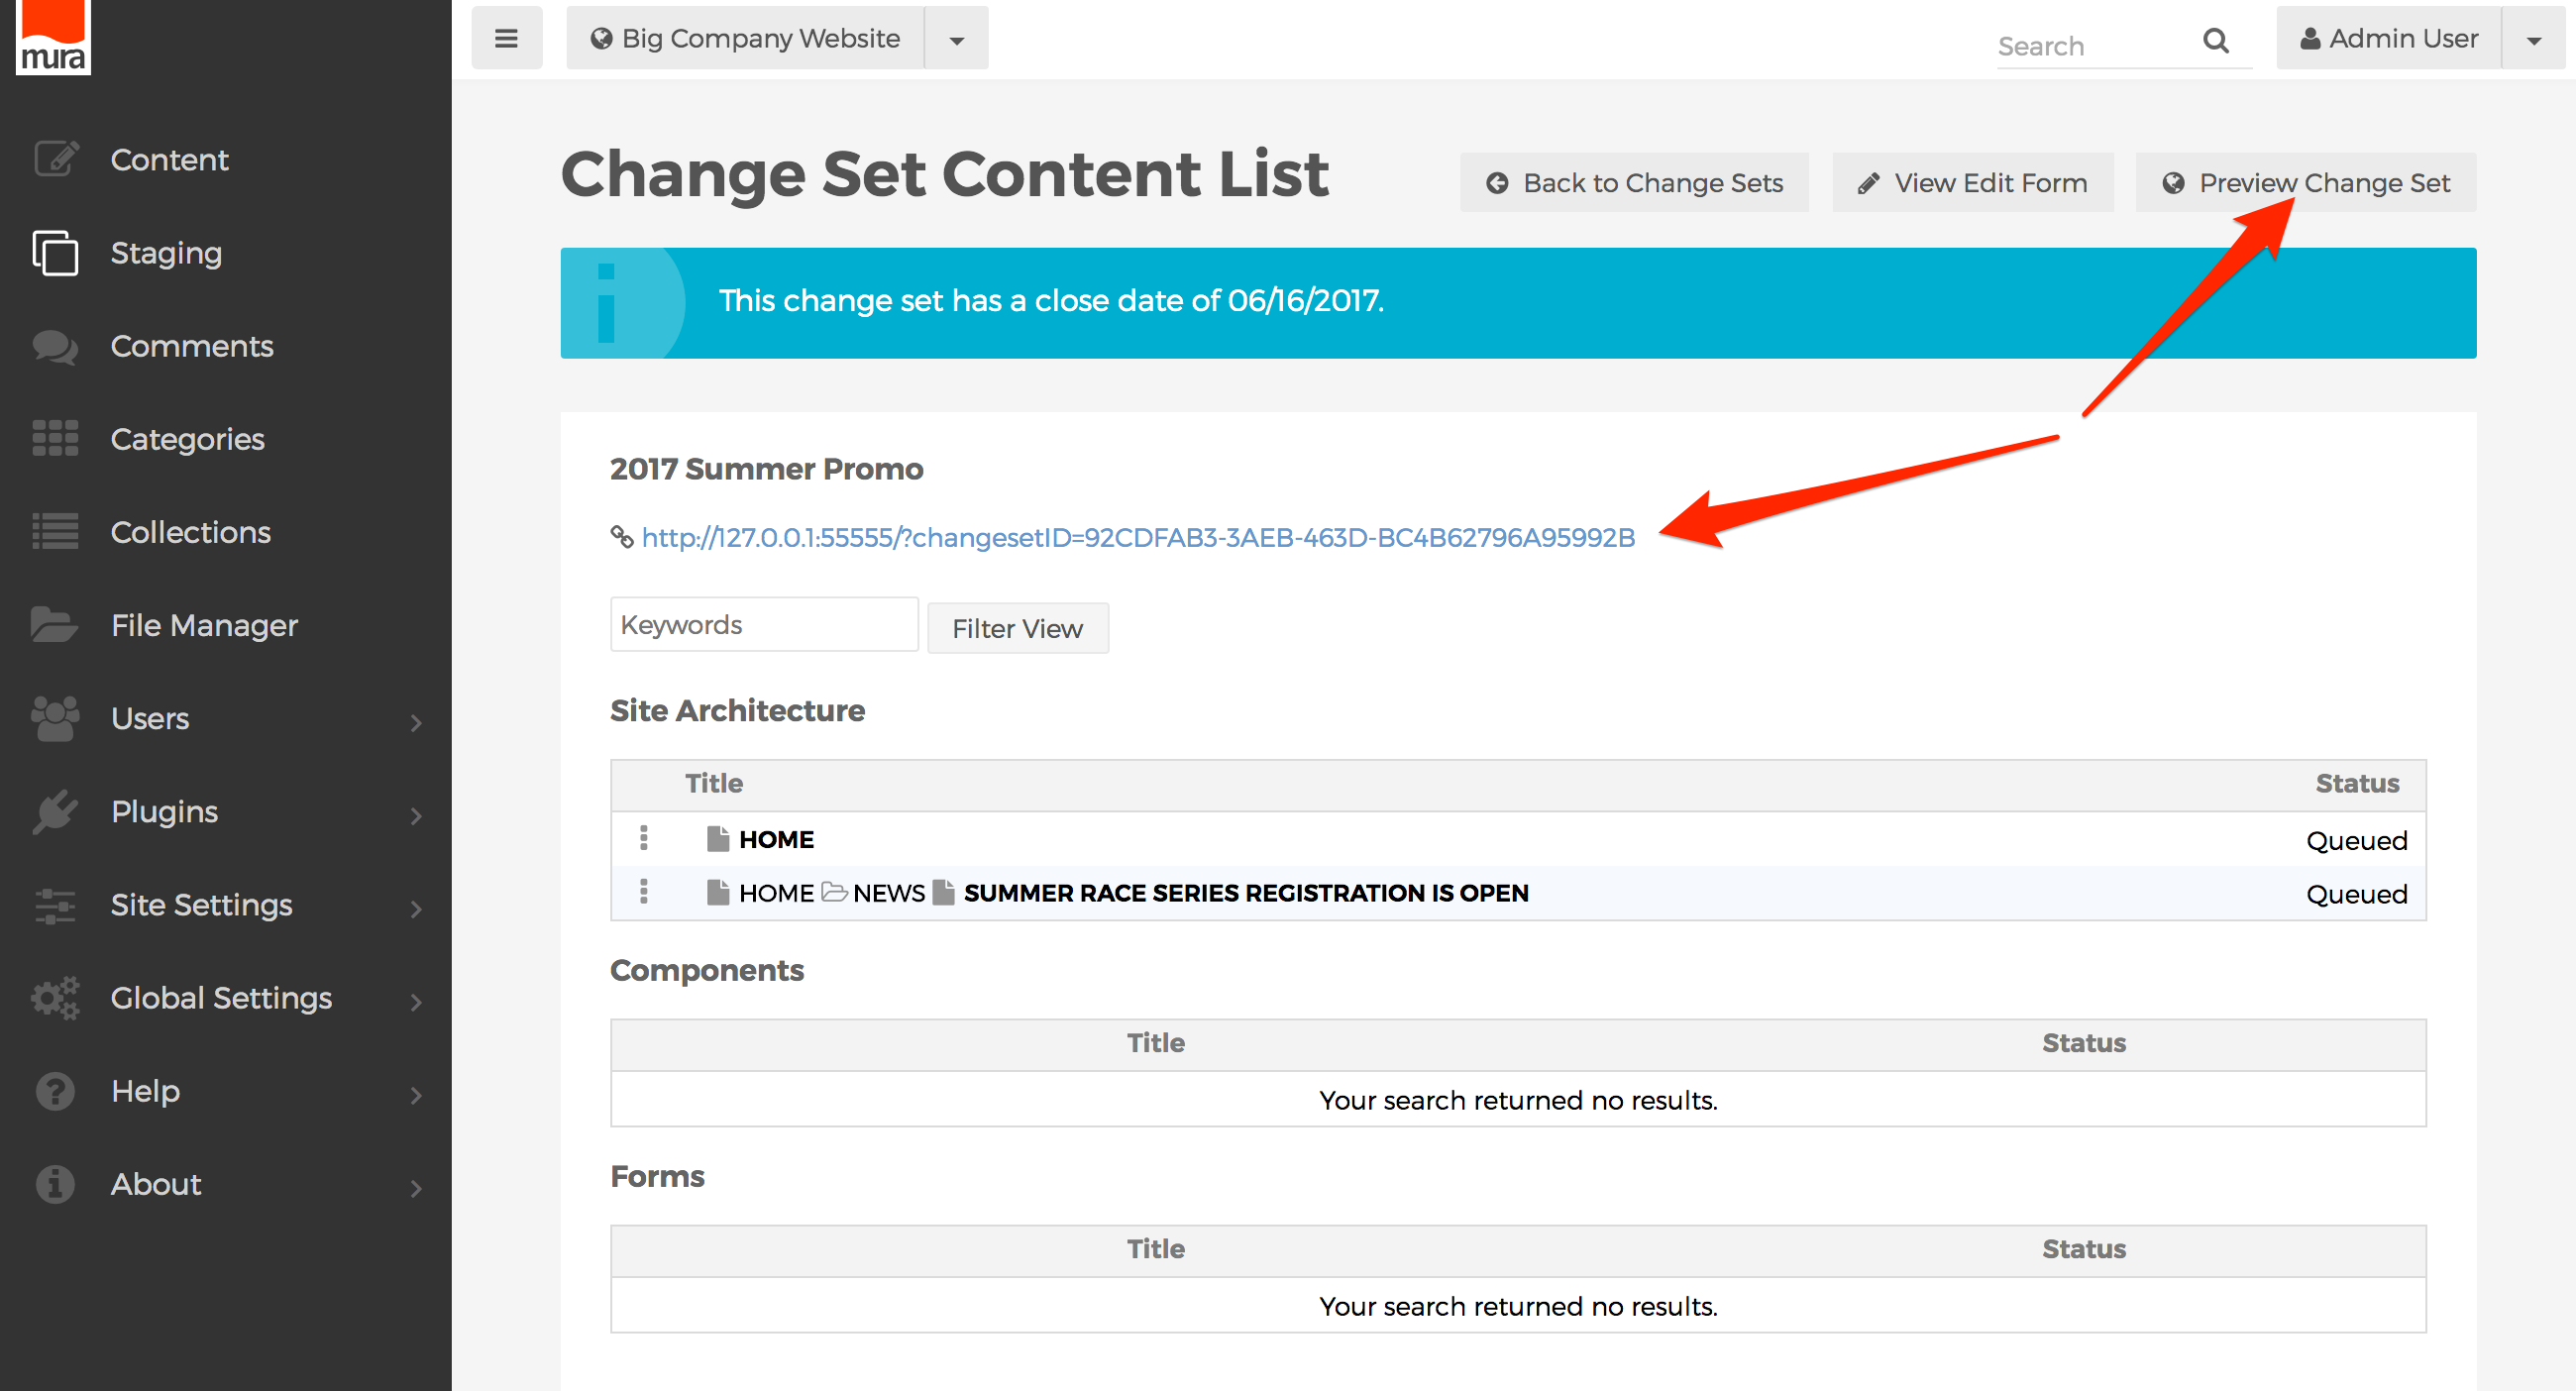
- The shareable URL may be used by people who don't even have an account in Mura, to see what the site would look like as if the changes were "live" or published. This is useful for organizations where people, such as managers, may want to see your changes, but not necessarily make any changes, or approve anything per se. As you can see in the image below, when a non-Mura use navigates to the shareable URL, an extremely limited version of Mura's front-end toolbar will appear at the top of the screen.

- Hovering over the name of the Change Set will reveal a list of other Change Sets, as well as the option to select "None" to exit the preview.

- Hovering over the next icon, will reveal a listing of content items included in the Change Set. You can click any of the links to navigate to the pages to view them in the future state as well.

- The last icon on the front-end toolbar indicates whether or not the content item you're currently viewing is included in the Change Set. A checkmark indicates "Yes," and the universal symbol for No (or sometimes "Ban"), indicates the content item is not included.


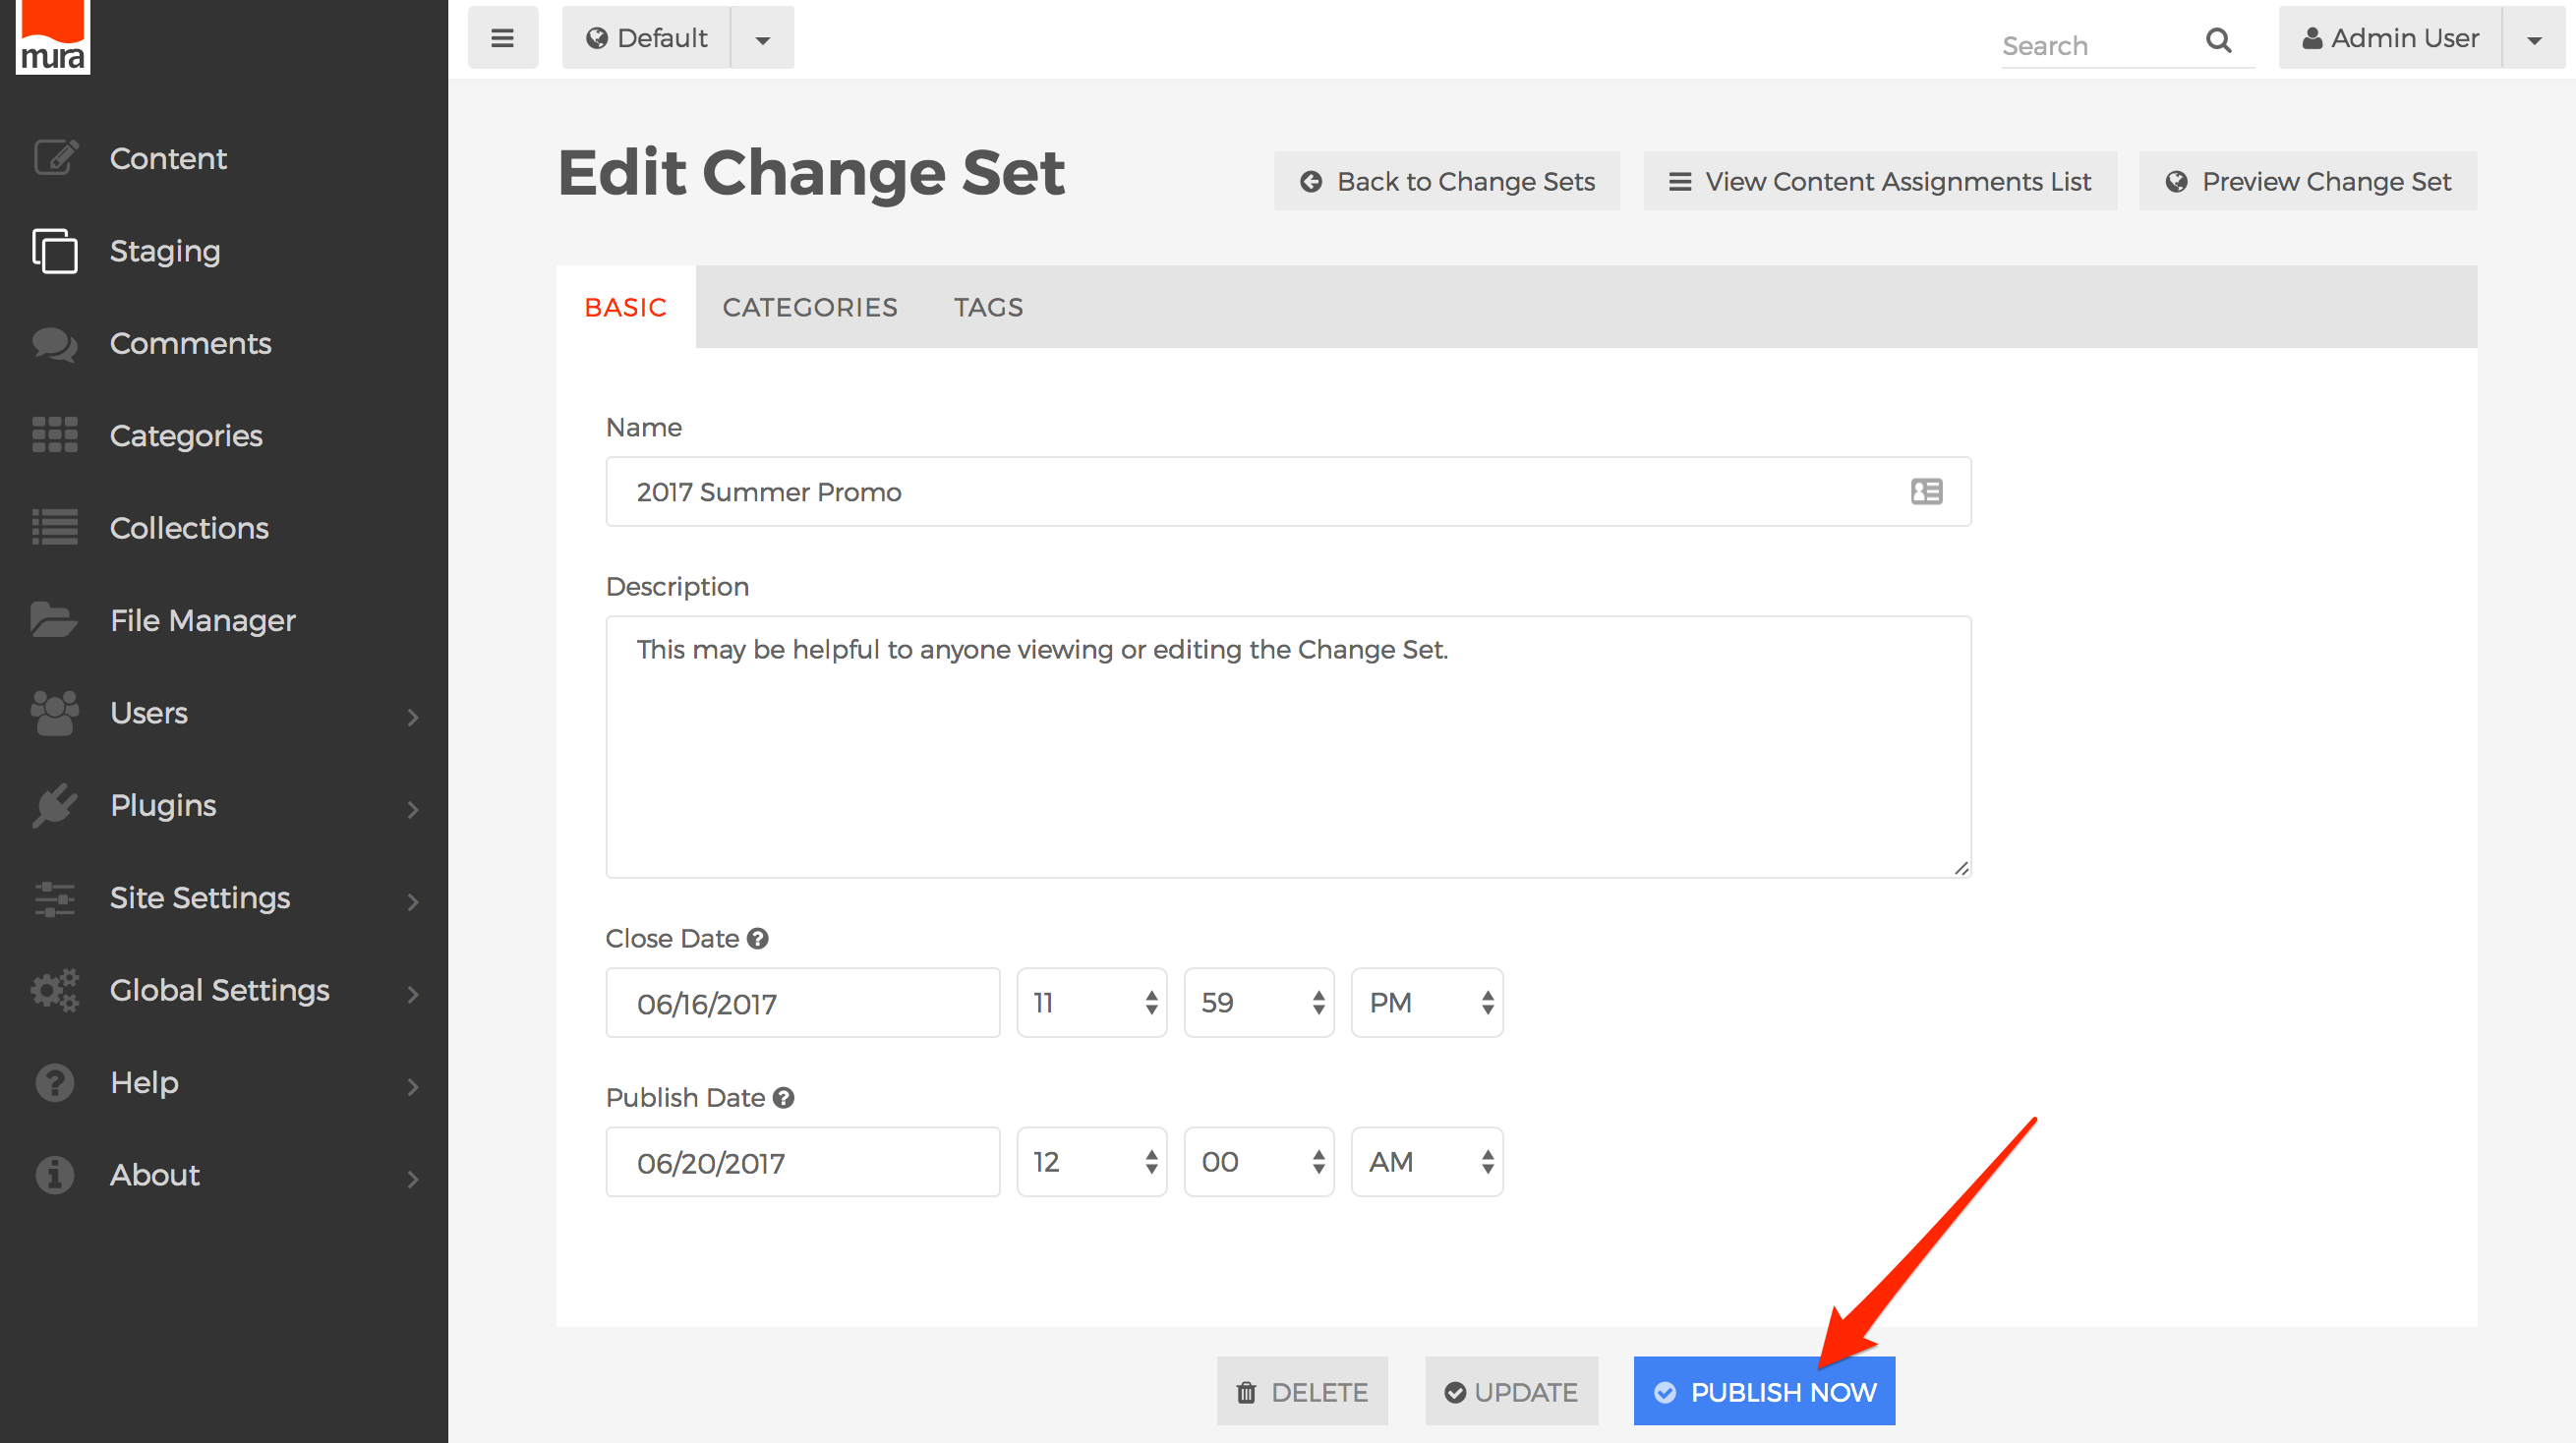
Publish a Change Set
If you enter a Publish Date when creating a Change Set, the Change Set will automatically publish all of the content assignments on that date and time. However, there may be times when you wish to publish everything ahead of schedule. So, Mura also allows you to manually publish a Change Set at any time.
- From the back-end administration area of Mura, select Staging from the main navigation.

- You should be taken to the Content Staging screen.

- From the list of available Change Sets, select the three-dot menu next the your desired Change set, and select the Edit option.

- You should be taken to the Edit Change Set screen.

- If you're ready to publish the Change Set, click Publish Now.
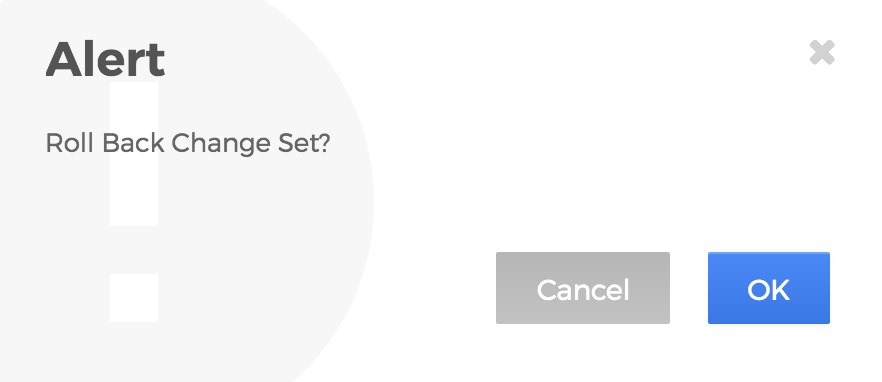
- You should be presented with an Alert dialog window to confirm your decision to publish. Select "OK" to confirm, or "Cancel" to stop.
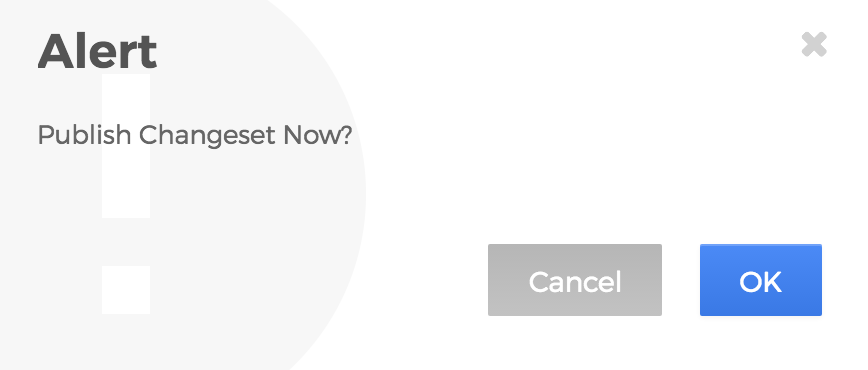
- Assuming you selected "OK," your Change Set should now be "live" and viewable on the public-facing side of your site.


Roll Back a Change Set
If you have published a Change Set, and for some reason, you wish to "un-publish" it, you can do so using Mura's "Roll Back" feature. Follow the steps below to Roll Back a Change Set.
- From the back-end administration area of Mura, select Staging from the main navigation.

- You should be taken to the Content Staging screen.

- From the list of available Change Sets, select the three-dot menu next the your desired Change set, and select the Edit option.
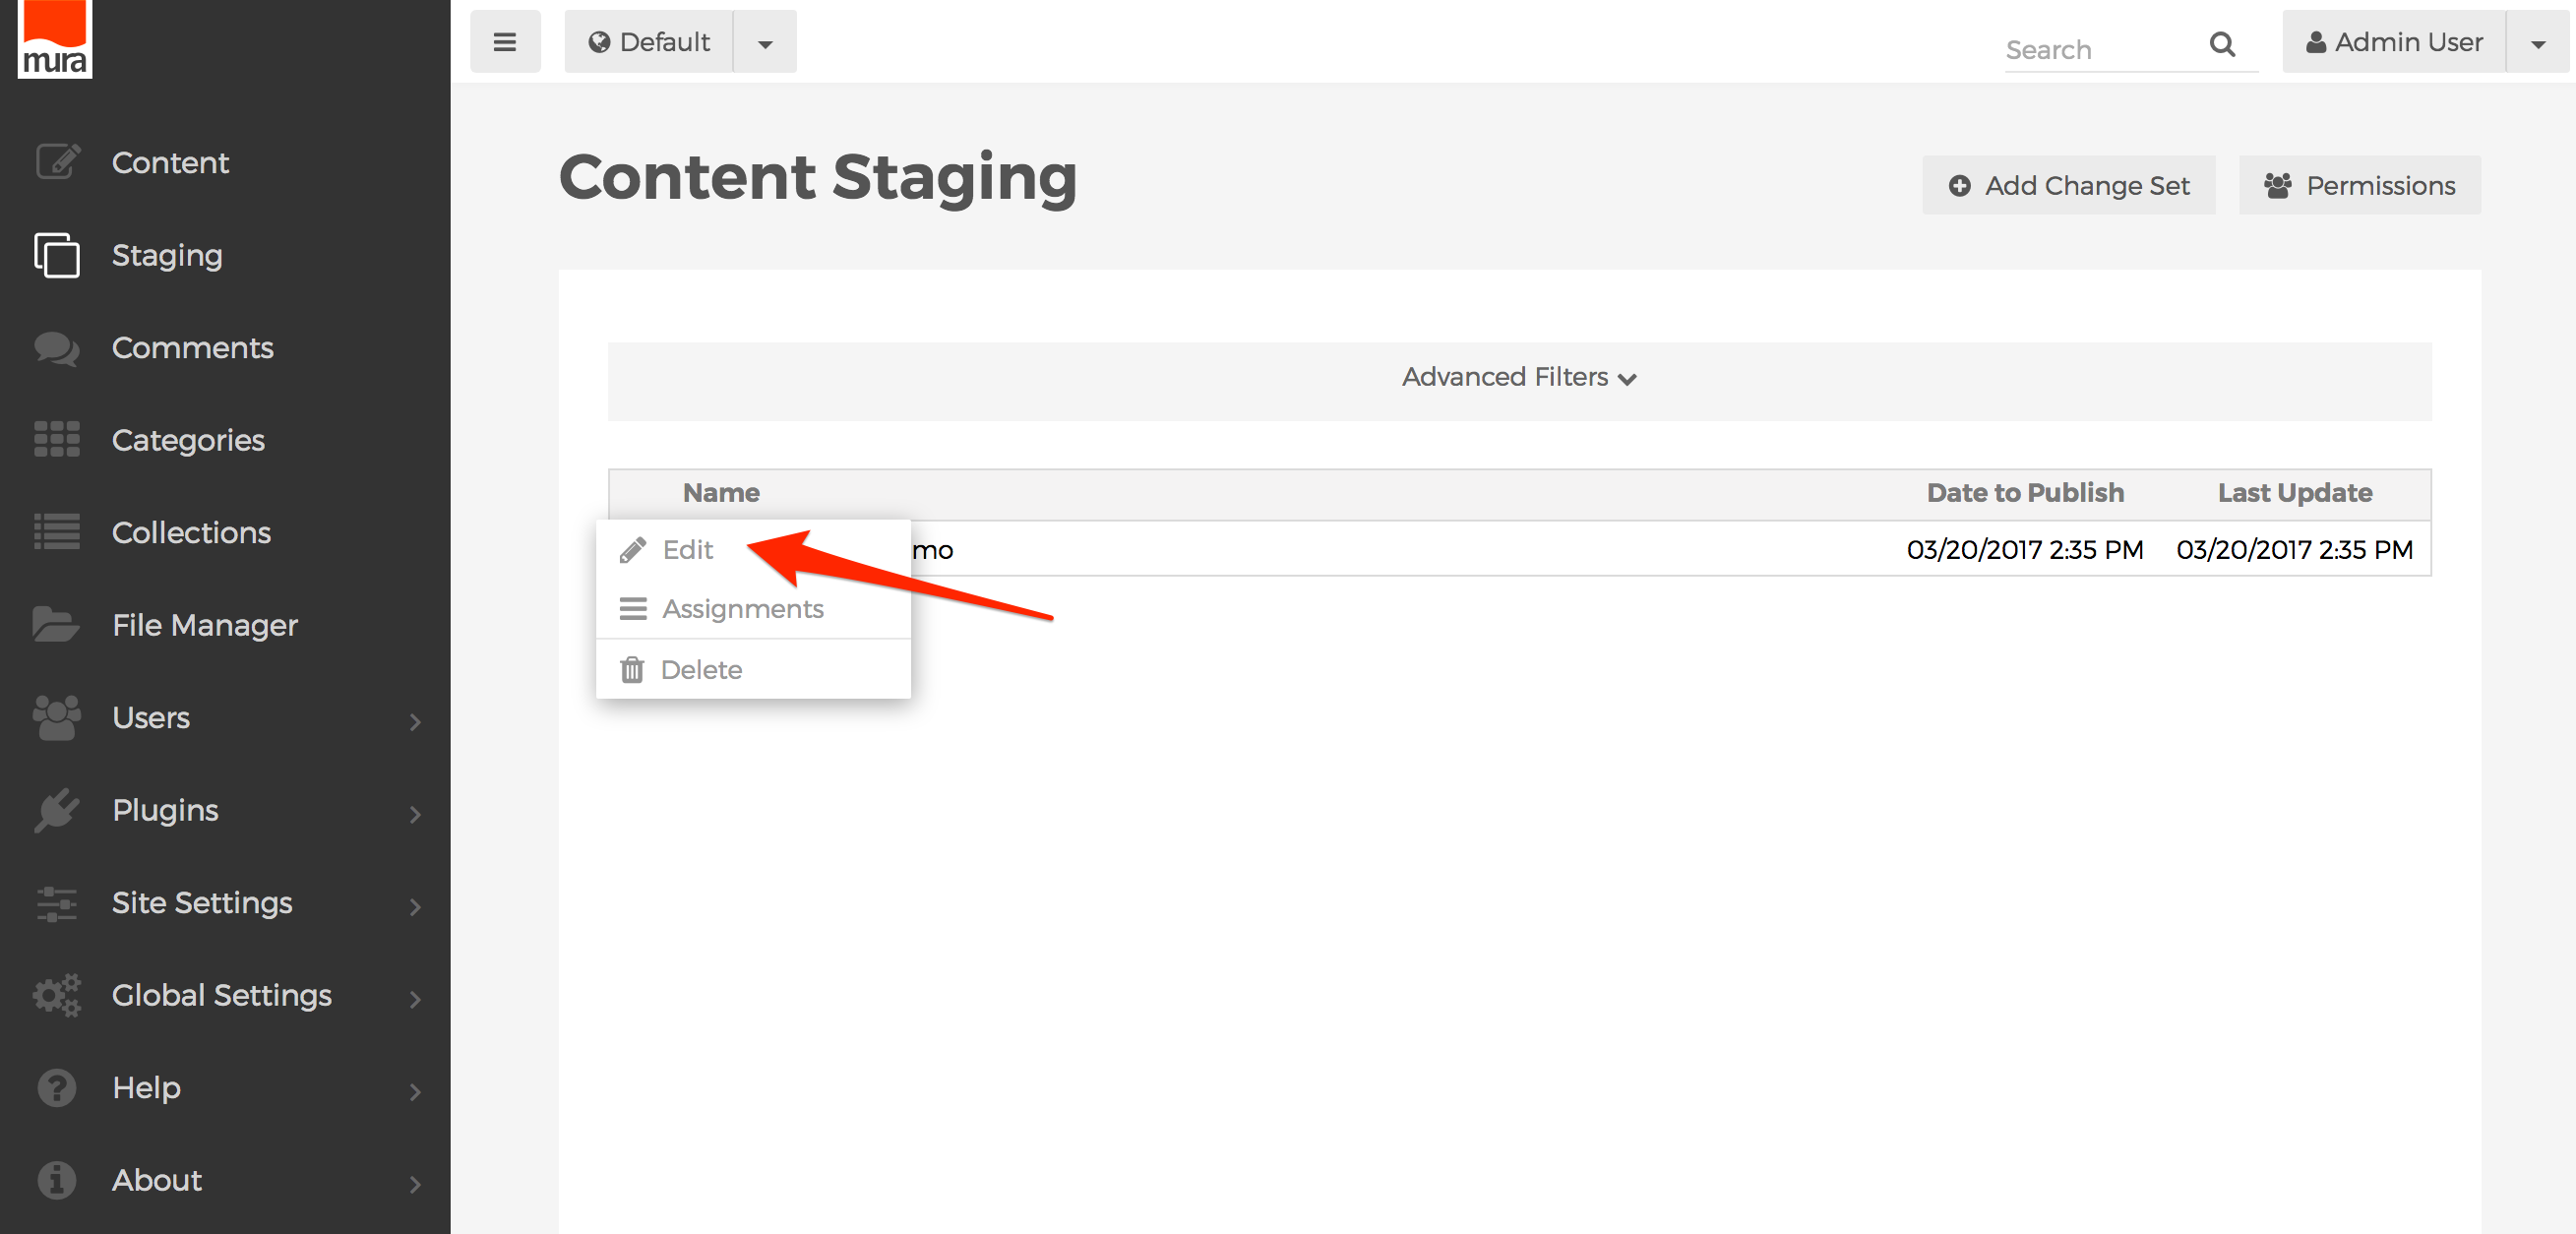
- You should be taken to the Edit Change Set screen. You should also see a notice that the change set has been published.
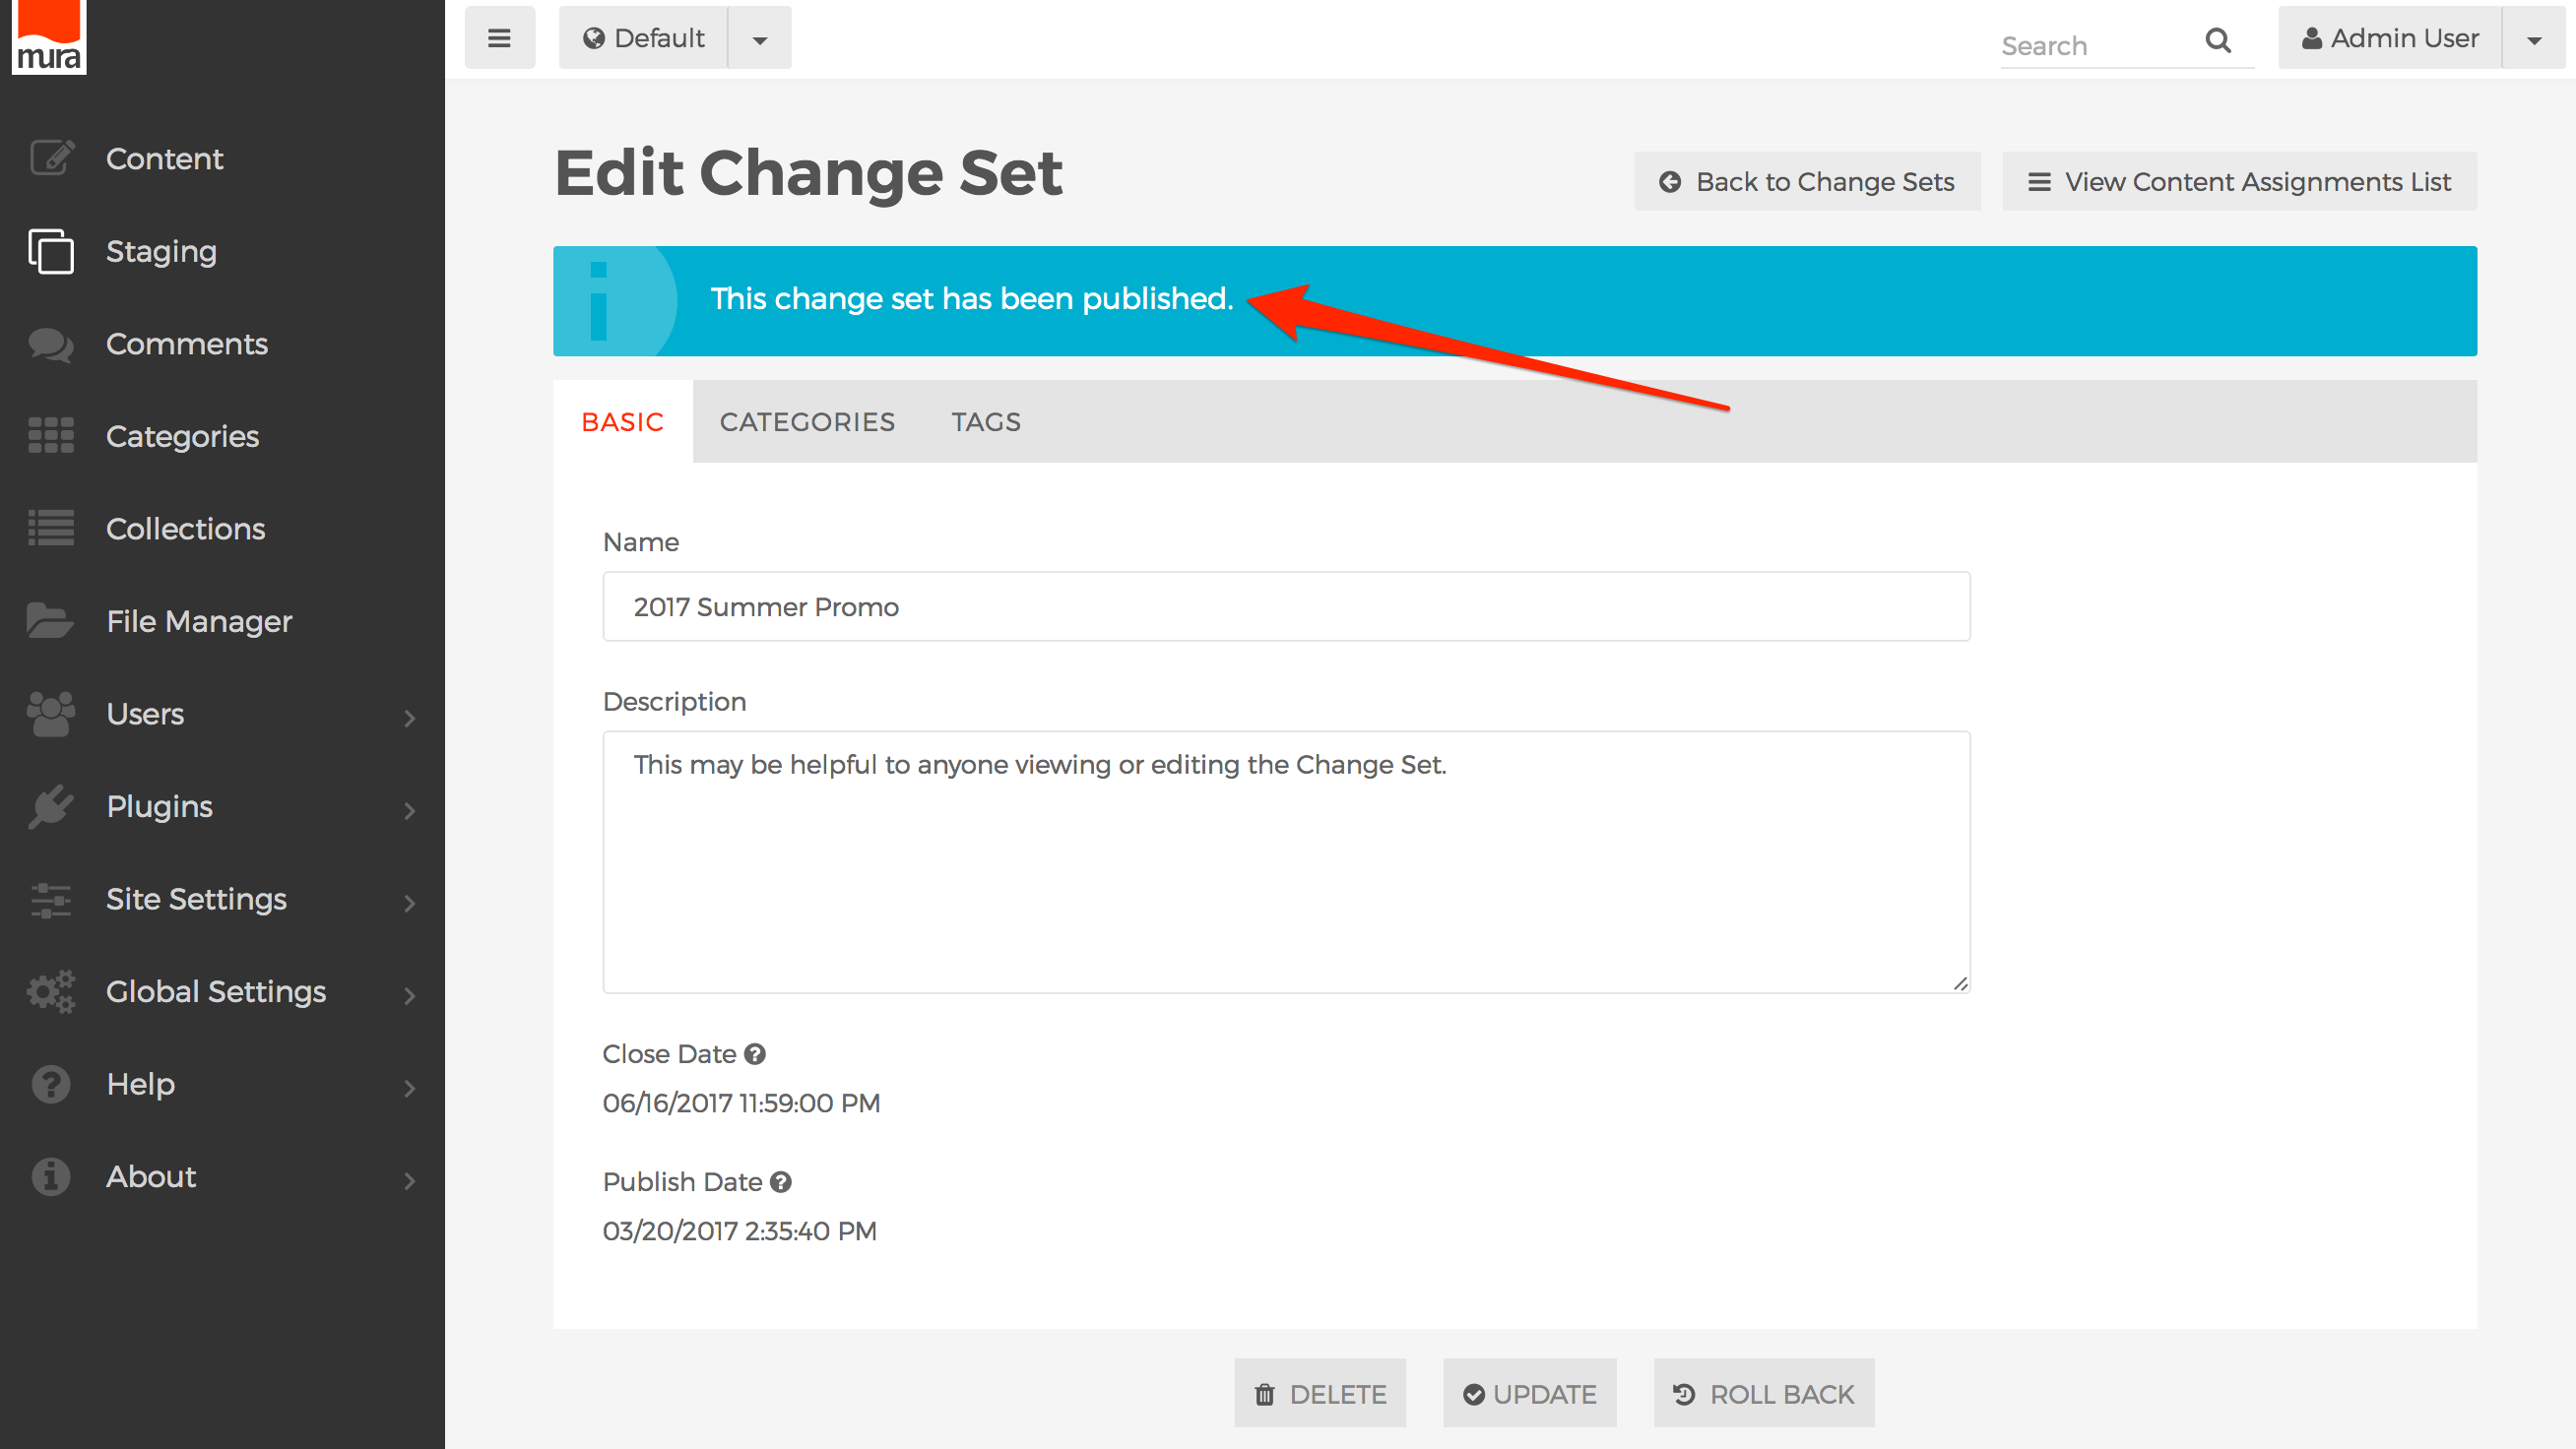
- Click the Roll Back button to un-publish your Change Set.

- You should be presented with an Alert dialog window to confirm your decision to roll back. Select "OK" to confirm, or "Cancel" to stop.
- Assuming you selected "OK," your Change Set should now revert back to un-published.
Note: Any "new" content which was originally assigned to the Change Set will still be "published." This behavior may change in a future version of Mura.


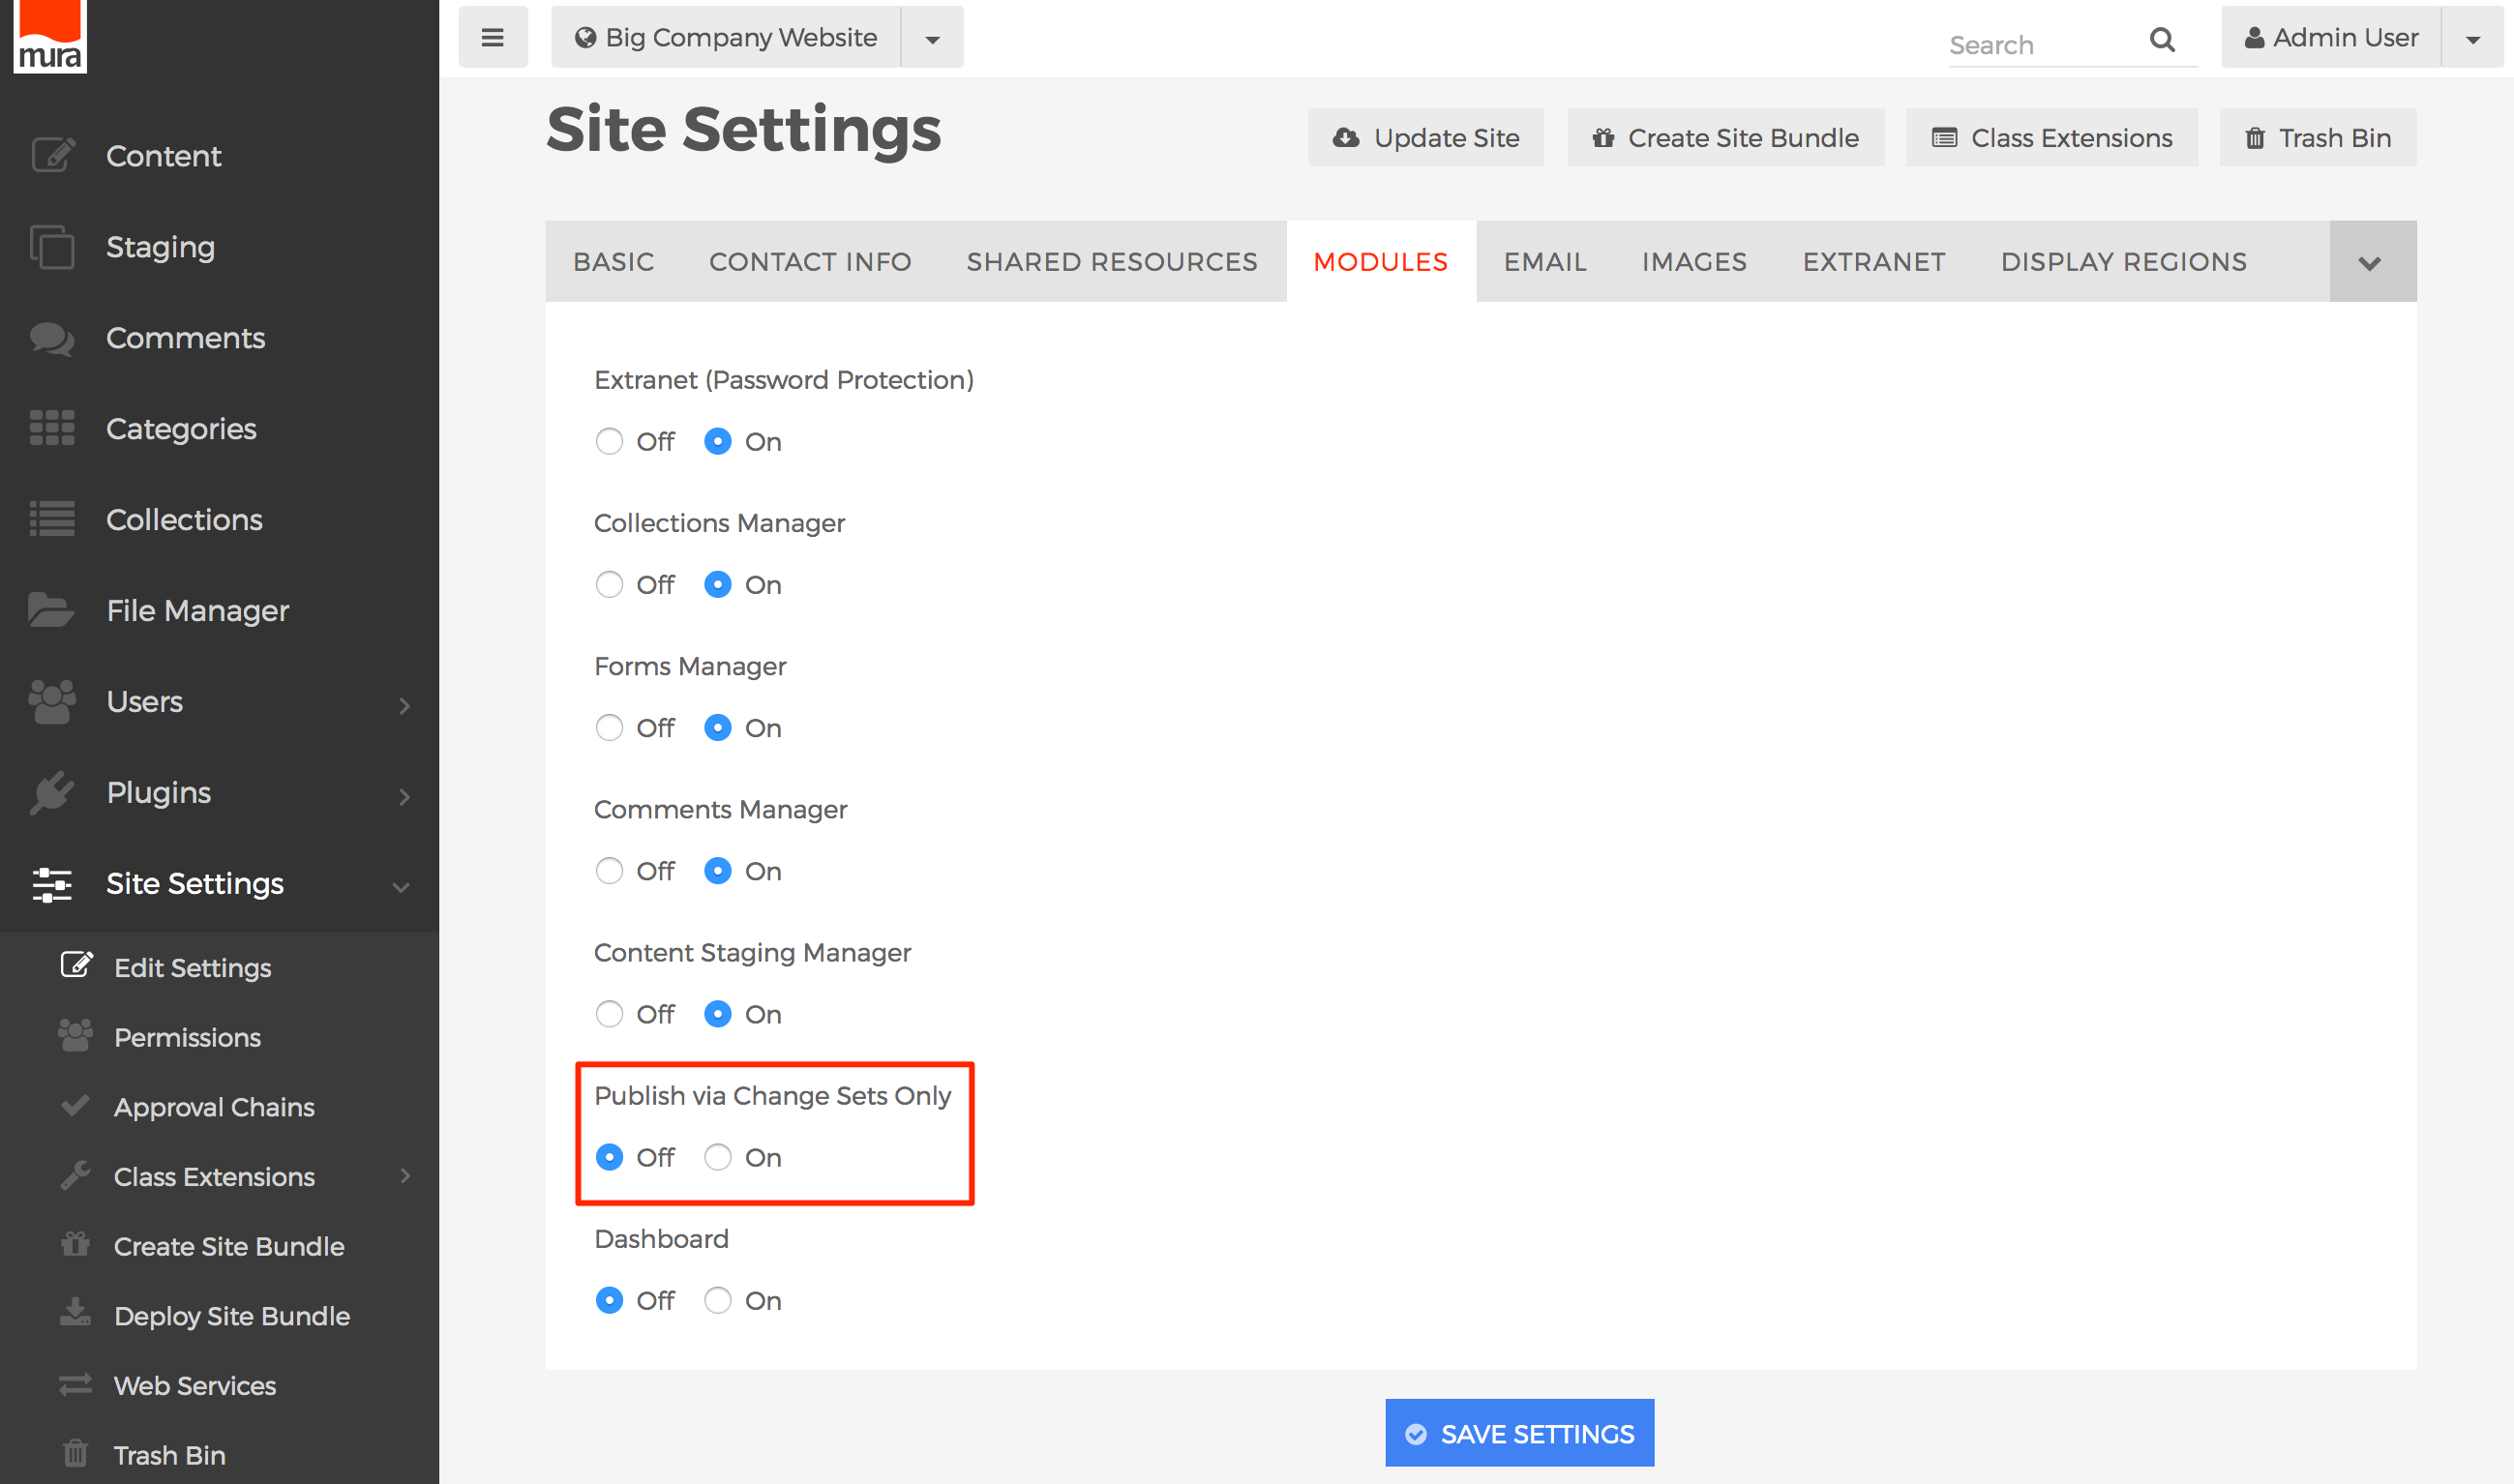
Enable/Disable Publish via Change Sets Only
If desired, you can force all content changes to be published through Change Sets, versus the standard publishing process. To enable or disable this feature, follow the steps below.
- From the back-end administration area of Mura, select Site Settings, then click Edit Settings.

- Select the Modules tab.

- Locate the field labeled Publish via Change Sets Only, then select "On" to enable it, or "Off" if you wish to disable it.

- Click Save Settings.


Approval Chains
Approval chains are collections of pre-defined publishing workflows where content must be approved by specified user groups, in a specific order, before the content is considered "live" and available for viewing on the public-facing side of your site.
For many organizations, teams responsible for managing content may be somewhat small, consisting of only a few people. However, they are typically responsible for reviewing and editing work from a much larger group of content contributors. Using a workflow that includes approval chains streamlines how and when publishing tasks happen, making everyone's job cleaner and much easier.
Create an Approval Chain
Only members of the Admin System Group and Super Admin Users have the ability to create, modify, and apply approval chains. Mura can automatically send email notifications to members of each group in the approval chain to inform them a review is needed.
Follow the steps below to create approval chains.
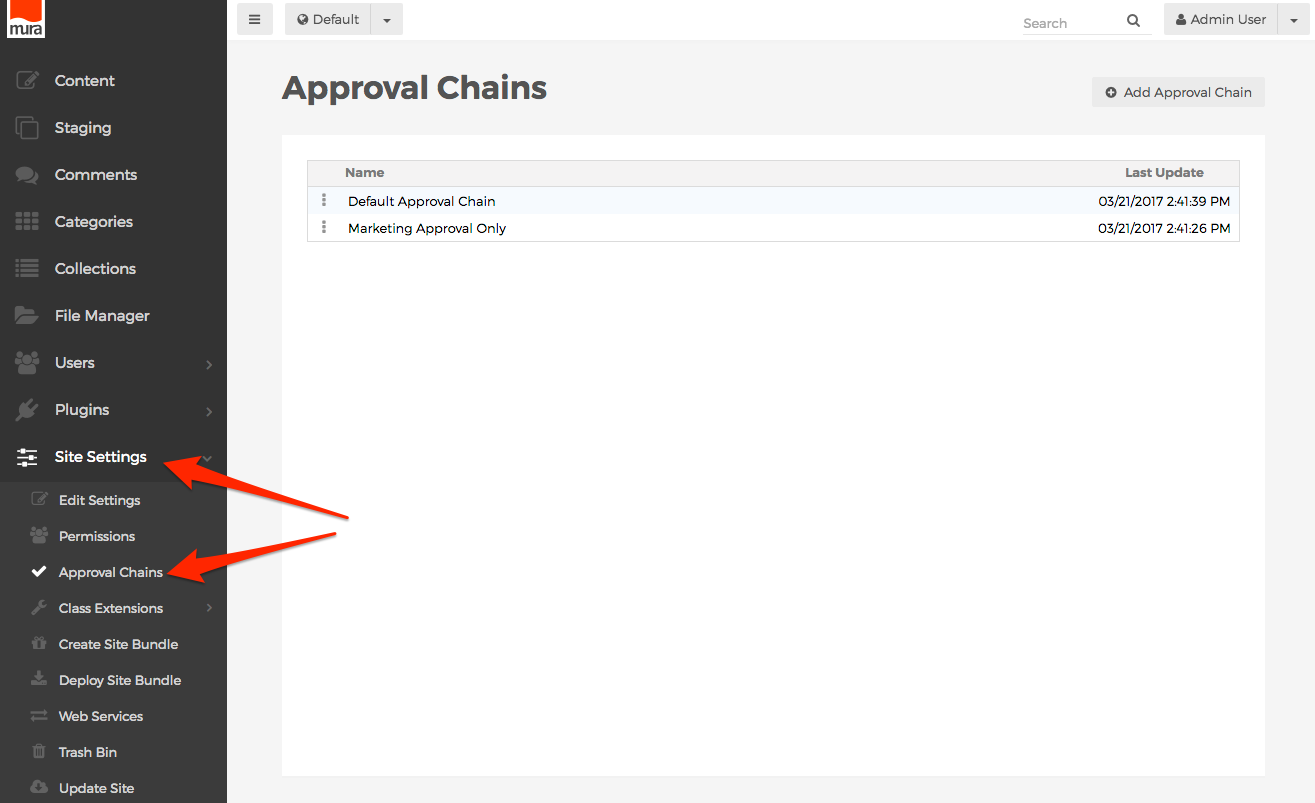
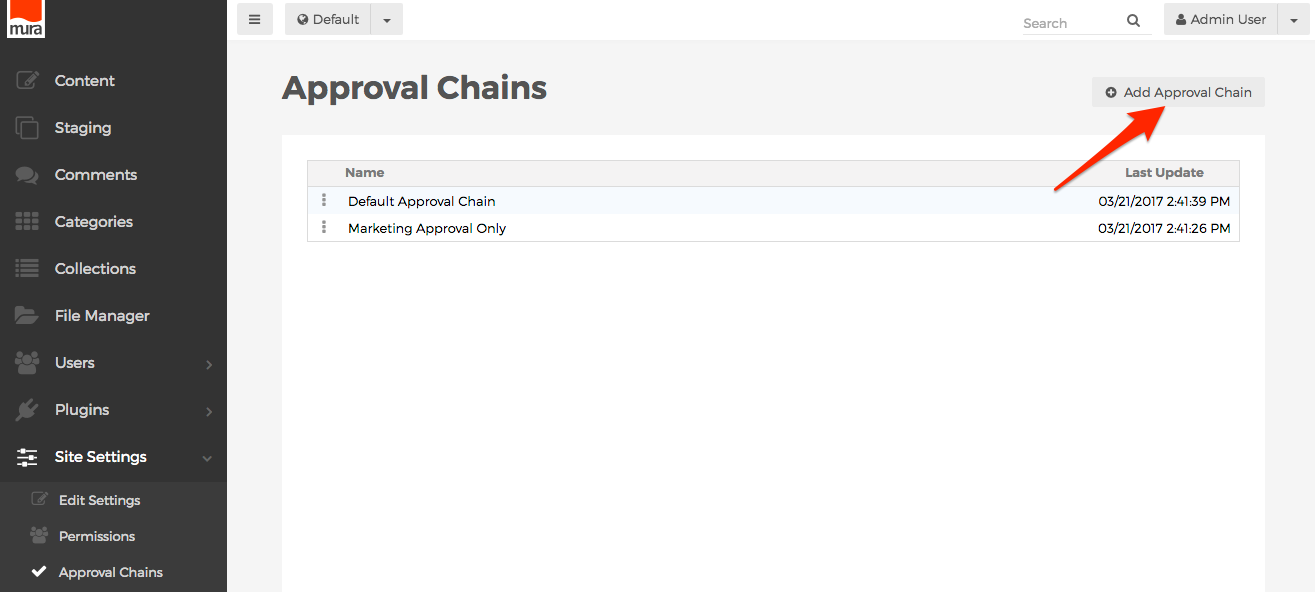
- From the back-end administration area of your site, select Site Settings on the main navigation, and click Approval Chains.
- You should see the Approval Chains screen, listing any existing approval chains.
- Click the Add Approval Chain button.

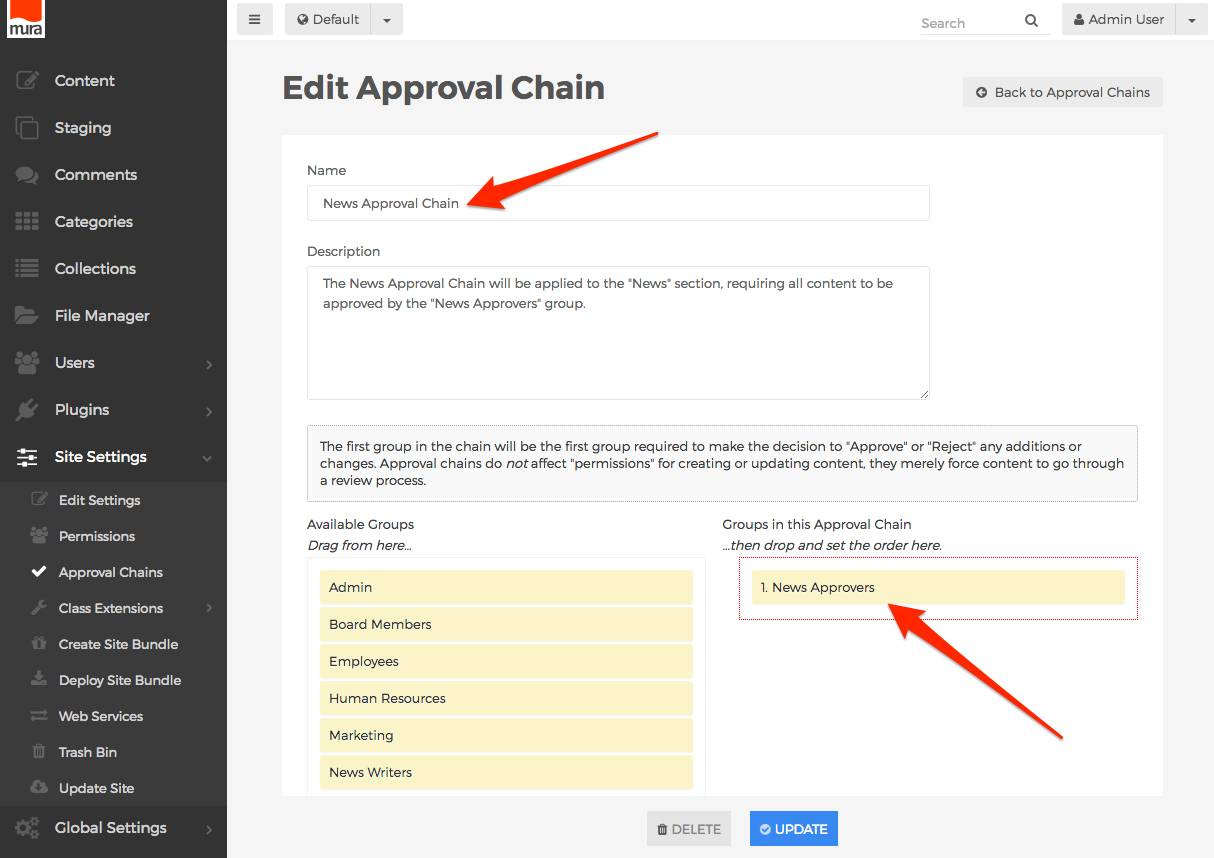
- The Edit Approval Chain screen should appear.
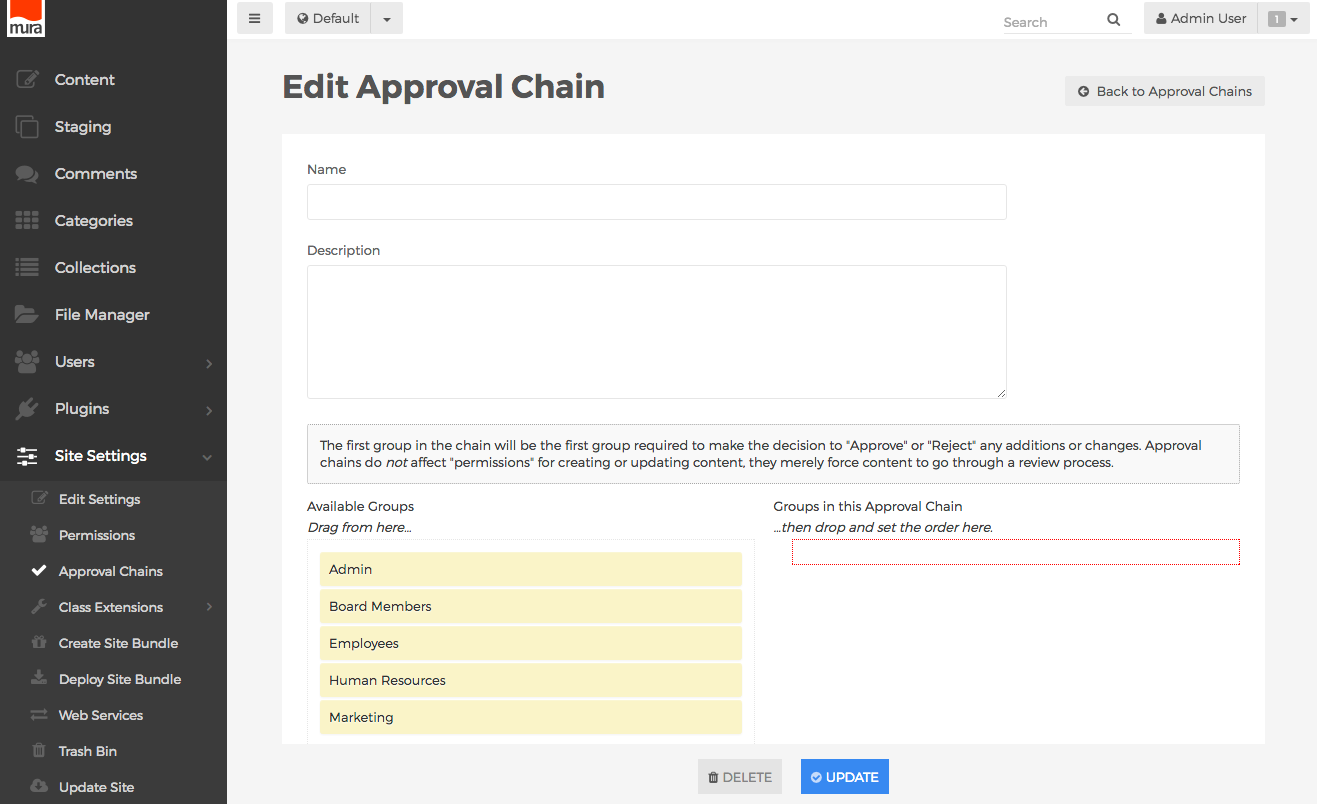
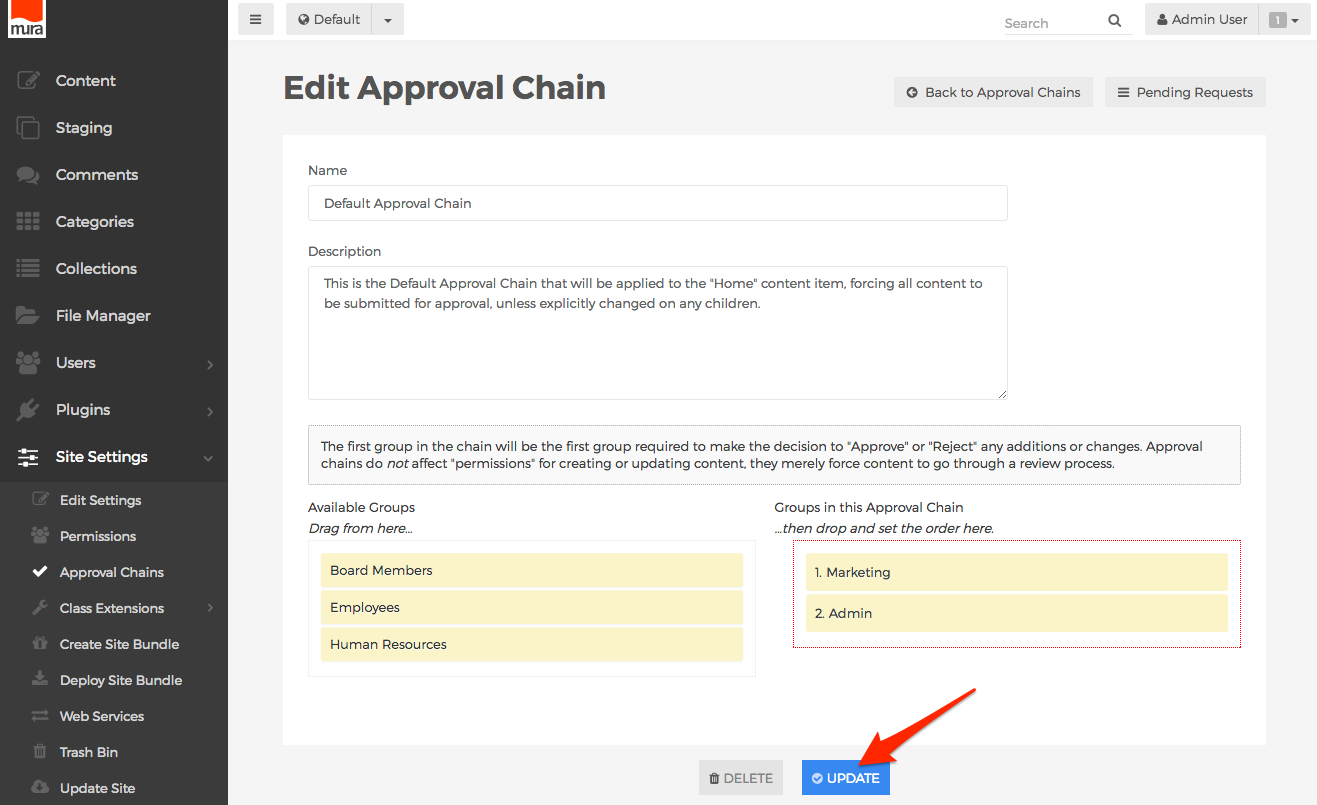
- Name
- Enter a name for the approval chain. If your organization will be utilizing more than one approval chain, you may want to use some descriptive text for the name so that it's easier to remember where you desired to apply the approval chain. For example, if you want to create a specific approval chain for the "News" section of your site, you could use "News Approval Chain" for this field.
- Description
- This is text area for you to enter descriptive notes to inform other administrators what the approval chain is being used for.
- Available Groups (Drag from here...)
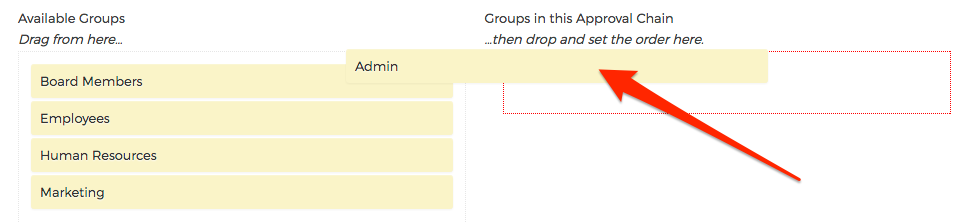
- This area lists all System Groups for the site. Using your mouse, you can "click and drag" your desired group from this section, move it over to the "Groups in this Approval Chain" area, and then release your mouse button to assign it to the approval chain. Then, repeat this process for each group you wish to be in the approval chain itself.
- Groups in this Approval Chain (...then drop and set the order here.)

- Groups listed here are merely the groups required for reviewing content before it is finally published and "live" for the public-facing side of your site. Approval chains do not affect "permissions" for creating or updating content within any section of a site where the approval chain has been applied, they merely force content to go through a review process. If you wish to establish permissions, please visit the Managing Permissions section.
- The first group in the chain will be the first group required to make the decision to "Approve" or "Reject" any additions or changes. The order number listed next to the group name indicates the order each group is required to review the content.
- You can also reorder the chain by clicking on the desired group you wish to move, dragging it to the desired location, and then releasing your mouse.
- To remove a group from the approval chain, "click and drag" the group back to the "Available Groups" area, and release your mouse button.
- Name
- Click Update, to save your approval chain.
- Repeat these steps to create any additional approval chains.


Now that you've created your approval chain(s), you'll want to apply the approval chain(s) to your site, or selected areas of your site.
How to Apply an Approval Chain
After you've created your desired approval chains, you will want to apply the approval chains to the desired areas of your site, to enforce your publishing workflows. Approval chains may be applied to content, components, and forms. Also, approval chains flow through to any descendants, unless explicitly overridden by a different approval chain option down the tree.
Keep in mind, approval chains do not affect "permissions" for creating or updating content within any section of a site where the approval chain has been applied, they merely force content to go through a review process. If you wish to establish permissions, please visit the Managing Permissions section.
However, only groups with Editor privileges will be able to submit content, components, or forms for approval. Groups with Author privileges will only be able to use the Simple Publishing Workflow. Some organizations may want to consider changing a group's privileges from Author to Editor after applying the approval chain, so they may be able to submit content for approval, instead of having to notify an Editor, who must then submit it for approval.
To apply an approval chain, follow the steps outlined below.
- From the back-end administrator of Mura, click Content from the main navigation.
- Navigate to the desired content item/section, component, or form, click the three-dot menu, and click Permissions. You may also apply your approval chain to the topmost item in the desired tree, which would then become the default approval chain applied to all descendants.

- You should see the Permissions screen.

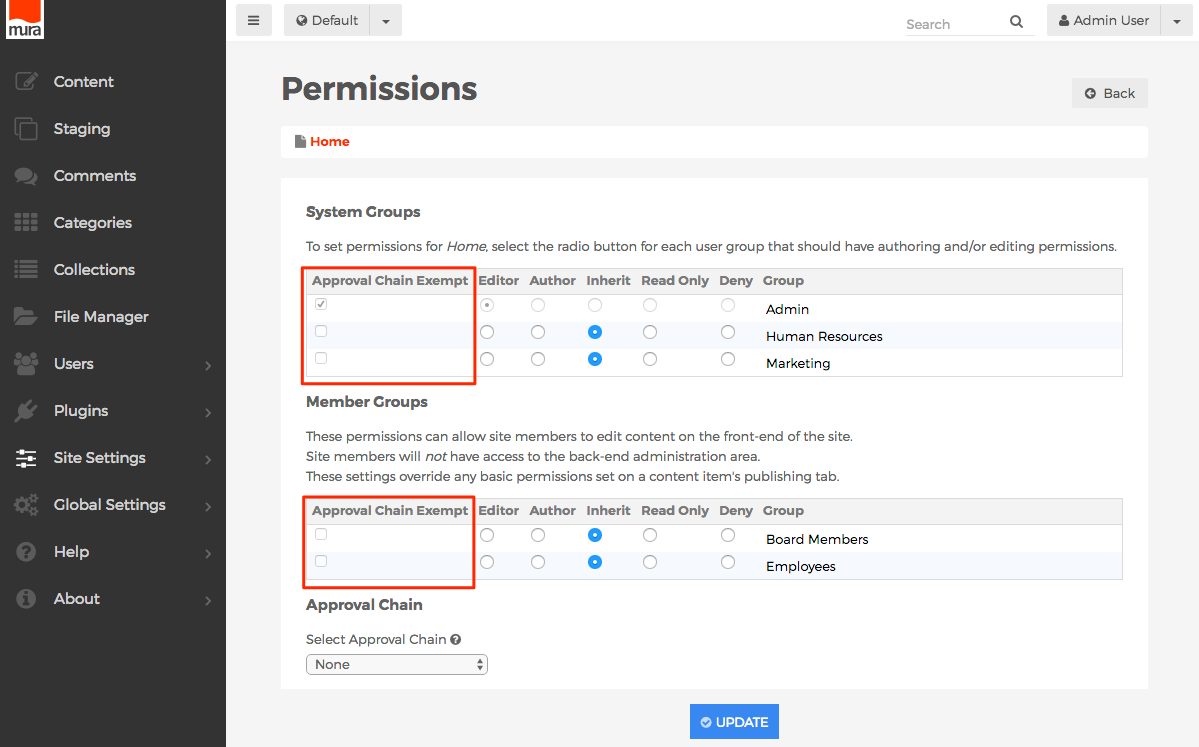
- Notice the column of checkboxes labeled Approval Chain Exempt, next to each group listed under both System Groups, and Member Groups. The checkbox is automatically enabled for the Admin System Group, and cannot be disabled. The checkboxes for all other groups will be read-only, unless the group is granted Editor privileges. If you select a checkbox for any other group(s) with Editor privileges, members of the selected group(s) will not have to submit anything for approval, and will be exempted from the approval chain process. Some organizations may choose this option if there is only one group in the selected approval chain, and they wish to exclude the group from having to submit their own content for approval.

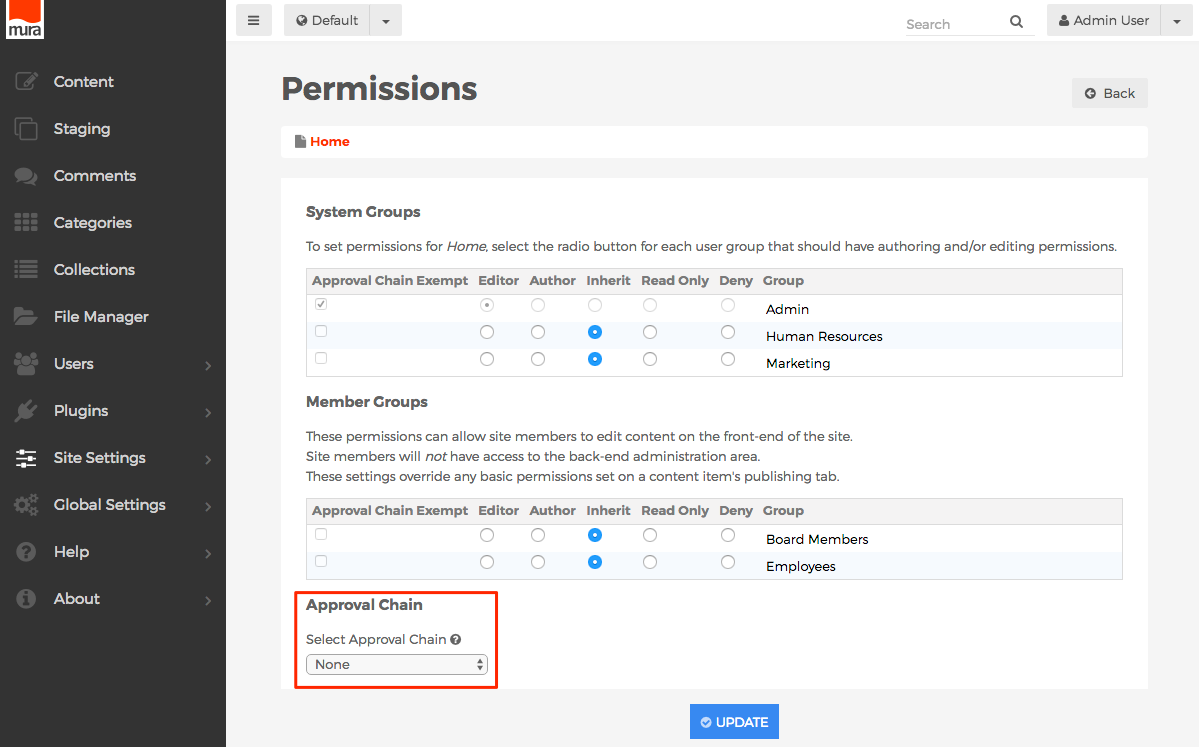
- Towards the bottom of the Permissions screen, locate the section of the form titled Approval Chain.

- Choose your desired option from the Select Approval Chain select menu.
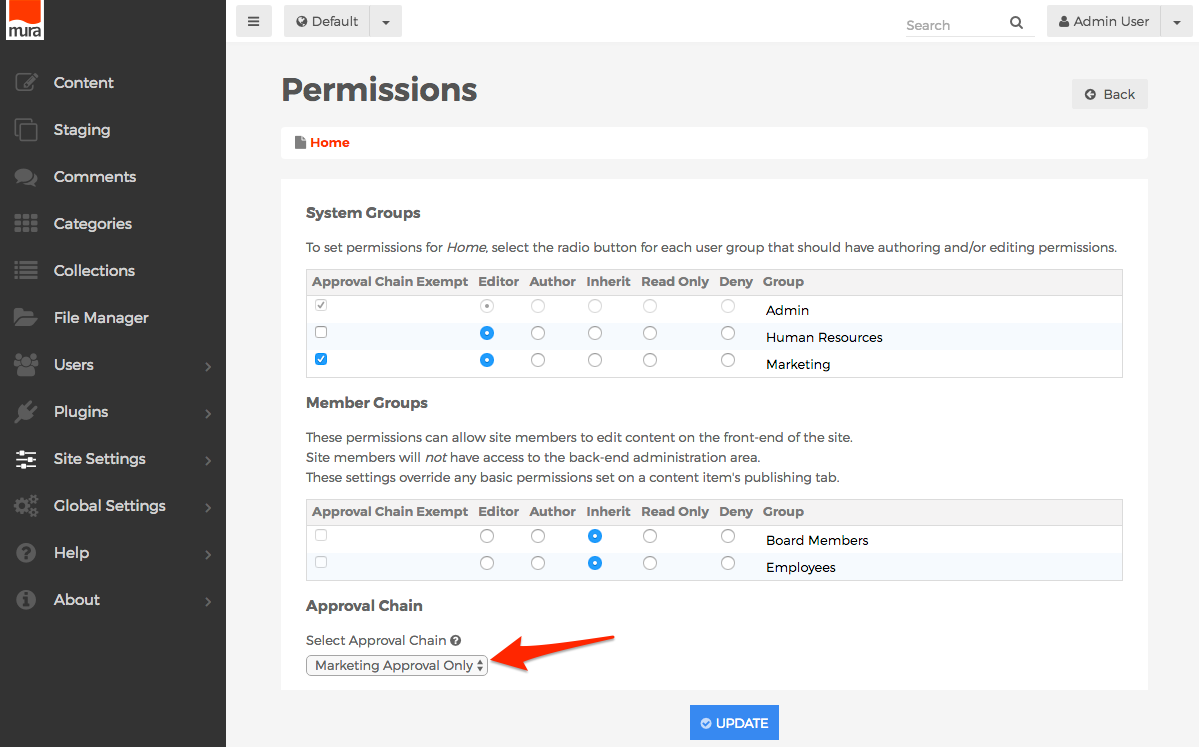
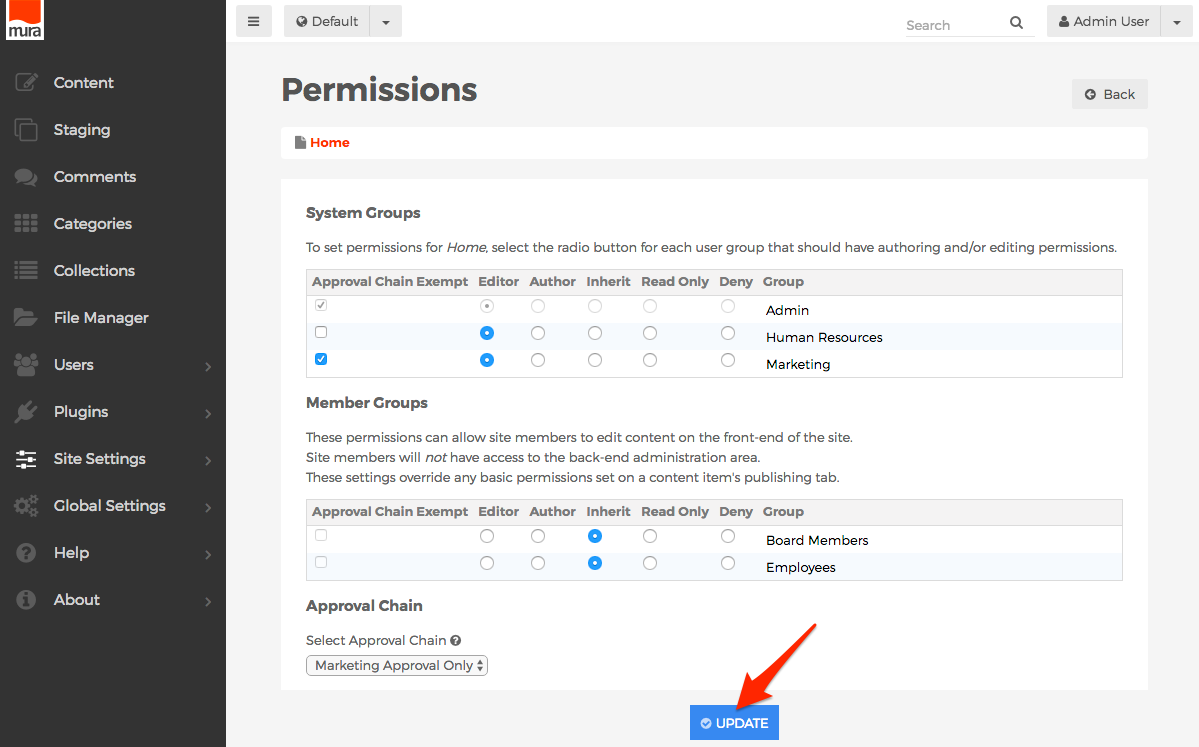
- Click the Update button, to save your changes.
- Repeat these steps for each section you wish to apply a different approval chain.


Example Approval Chain Workflow
Approval chains begin when a member of a group with Editor privileges submits new or edited content to a section of a site with an approval chain applied to it.
In this example, two groups will be represented:
- News Writers
- Creates, edits, and submits news content for approval
- News Approvers
- Edits, approves, and publishes all news content
For this example, the following illustration reflects the News Approval Chain, where the News Approvers group is required to approve all content wherever the approval chain has been applied.
In the following illustration, you'll see we've edited the Permissions of the News section of our site. Both the News Approvers and News Writers groups have Editor privileges, and the News Approvers group is exempt from the approval chain. This means members of the News Writers group will be able to submit content for approval, and members of the News Approvers group will be notified when someone needs to review the submitted content and "decision" it with either "Approve" or "Reject."
vvv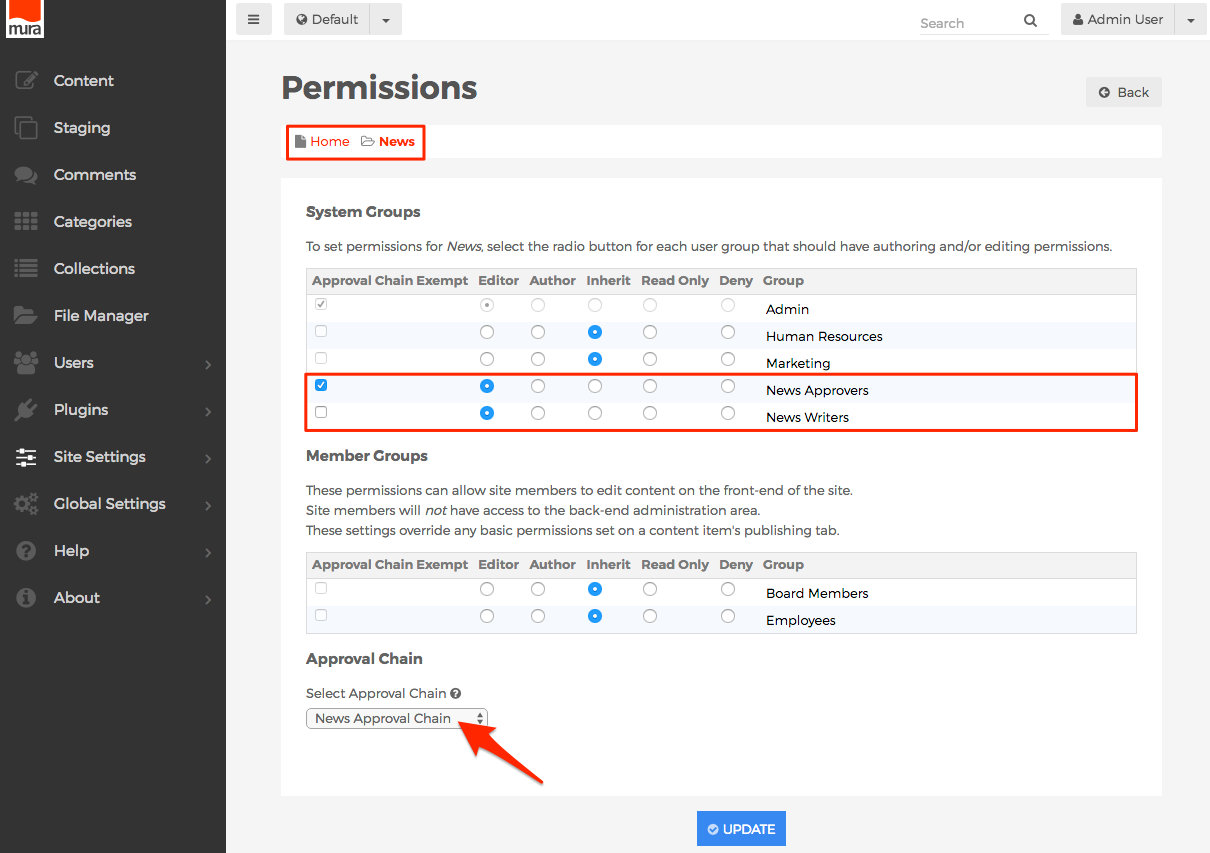
Submitting Content for Approval
Groups require Editor privileges in order to submit content for approval. If a group has only been granted Author privileges, they will have to notify an Editor, who in turn, may follow the steps outlined below to submit content for approval.
- Whenever a content item is either edited or added to a section which has an Approval Chain applied, the Publish button is replaced with a Send for Approval button. If Change Sets are enabled, the Save to Change Set button is replaced with Save to Change Set & Send for Approval. Keep in mind, only groups with Editor privileges will see these buttons. Groups with Author privileges will only see the Save Draft, and Preview buttons.
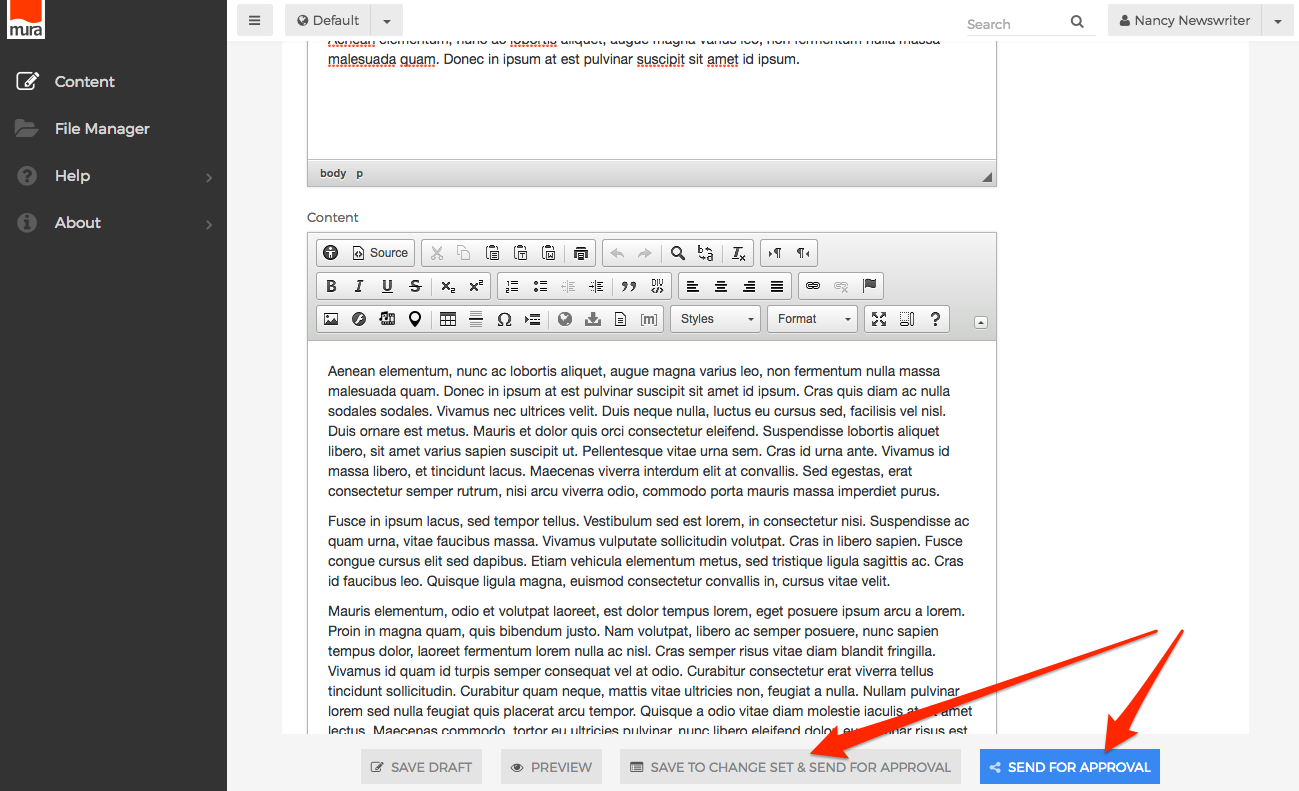
- Clicking any of the Send for Approval buttons triggers the Approval Chain process.
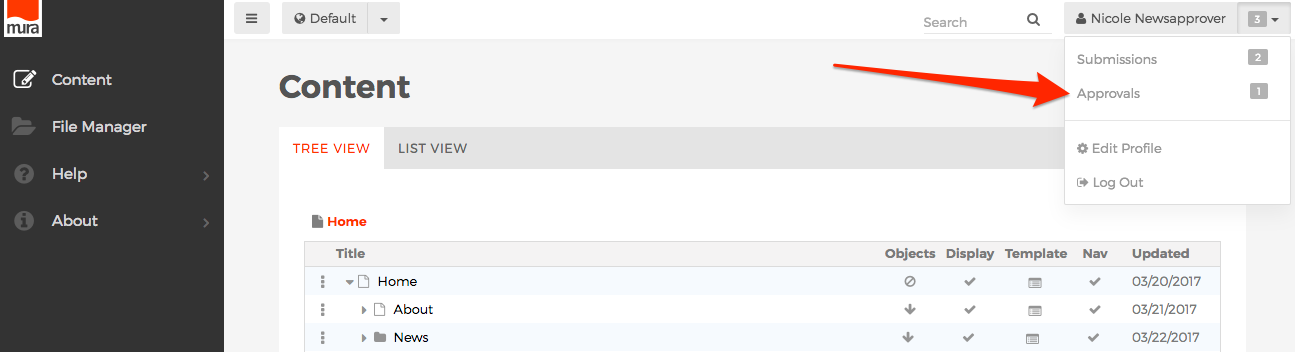
- To view your "submissions" for approval, click the down arrow of the user menu in the upper right corner of the screen, in the back-end administration area of Mura.
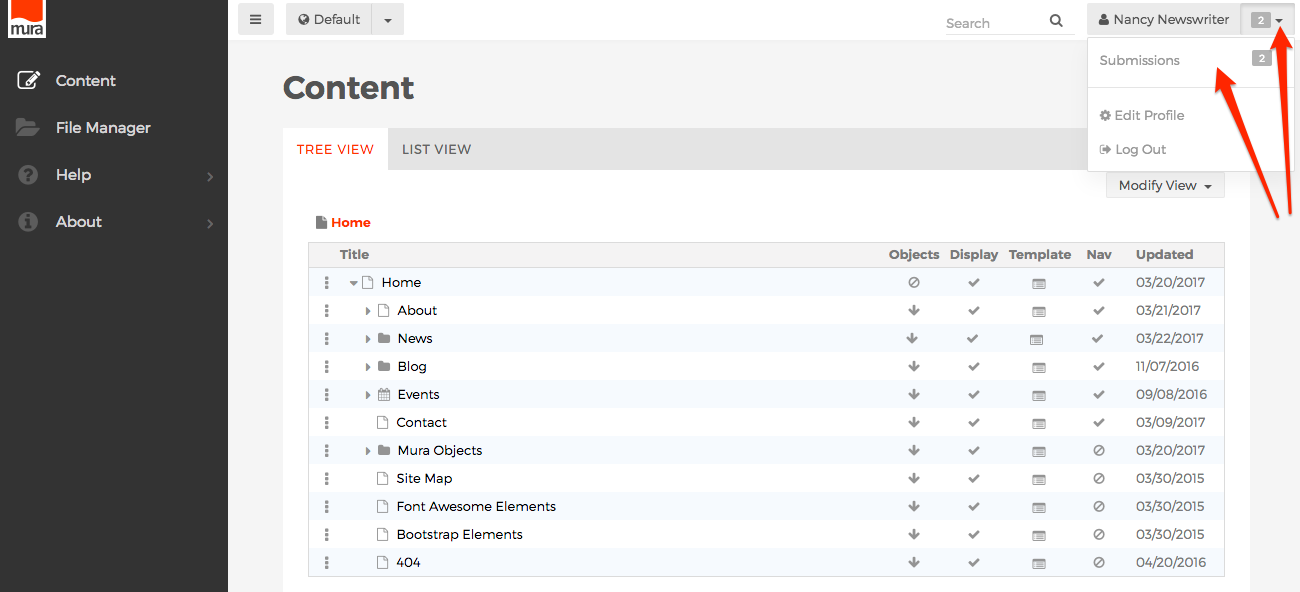
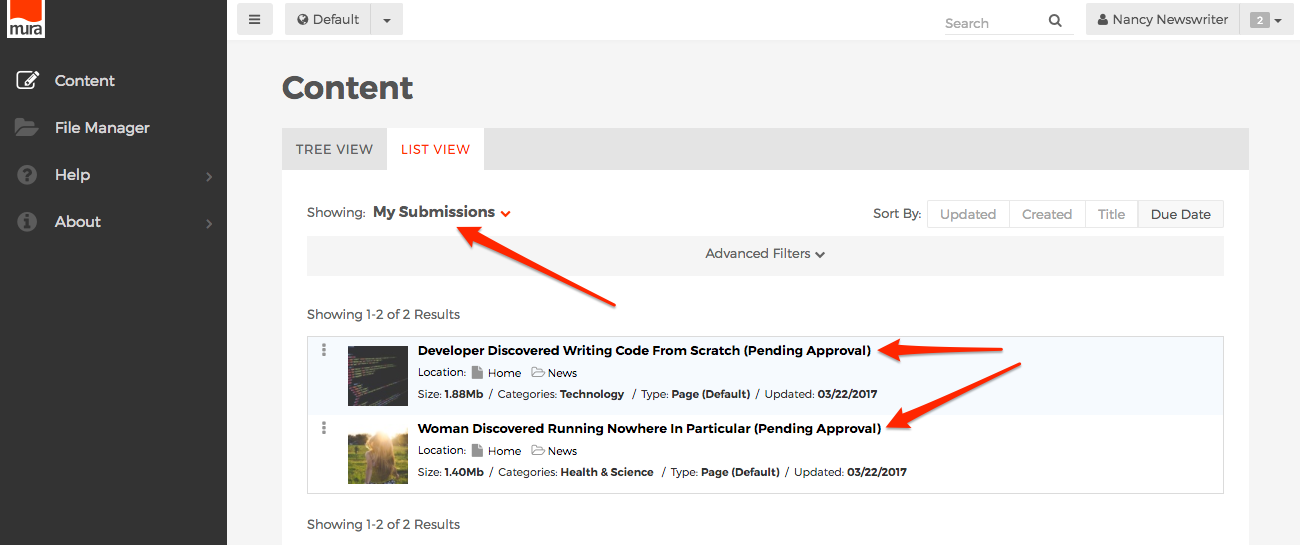
- You should then be taken to the Content > List View tab. The "Showing" filter will be preset to My Submissions, and all submitted content items in "Pending Approval" status will be listed.
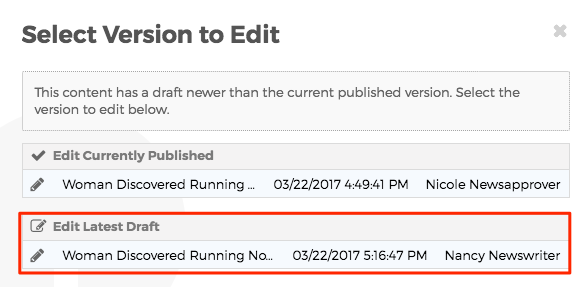
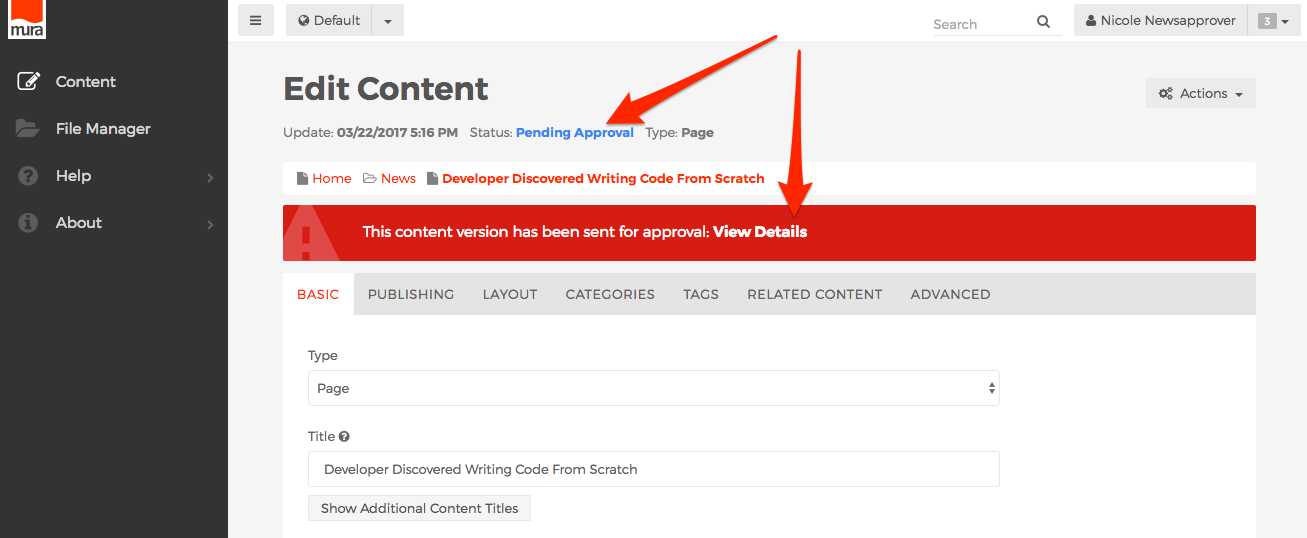
- If you wish to edit a content item in "Pending Approval" status, you can still do so, since it's technically in a "Draft" state. Attempting to edit the content item will invoke a Select Version to Edit dialog window. Select the "Edit Latest Draft" to edit the content item.

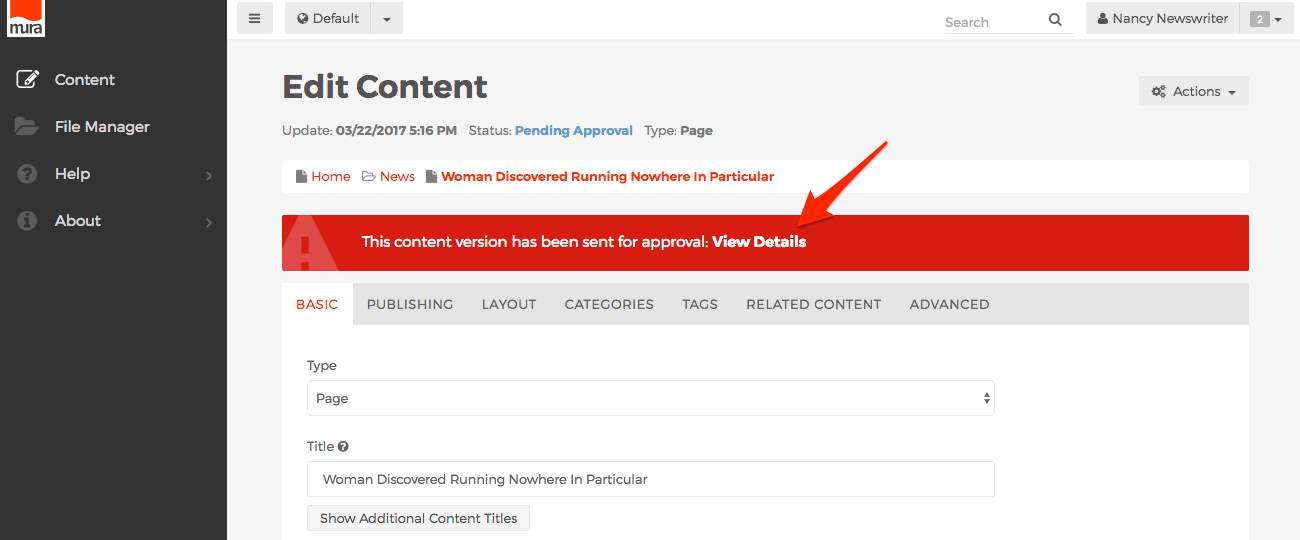
- When you edit the content item, an alert will appear above the tabs, with a link to View Details.

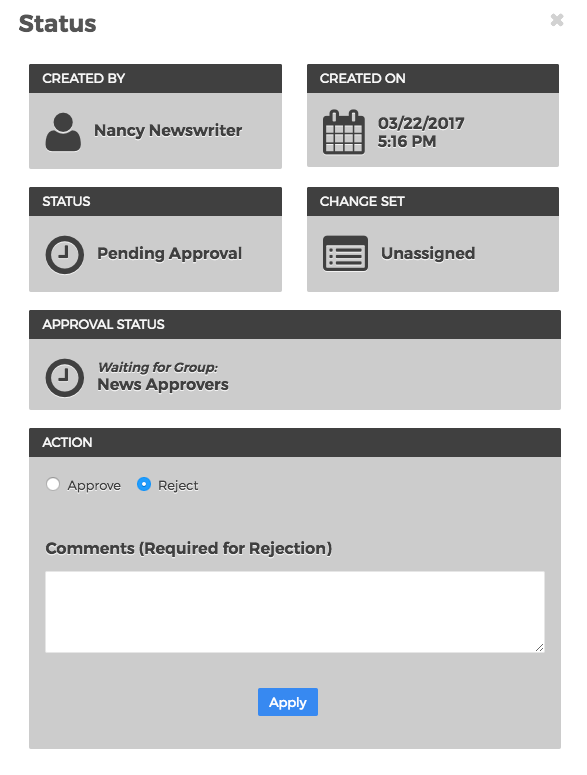
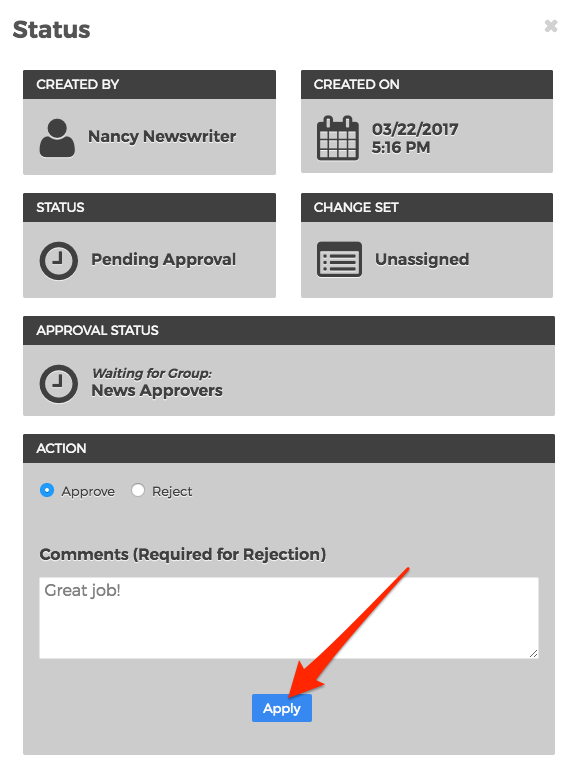
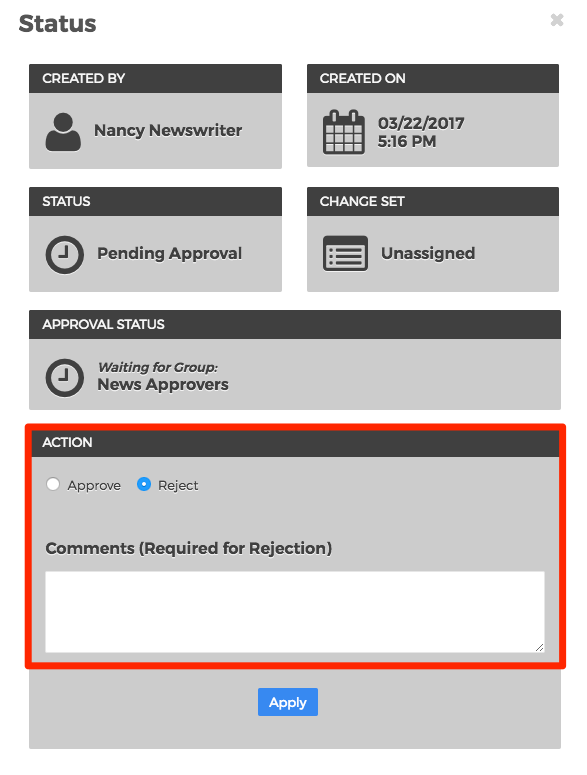
- Clicking the View Details link will launch the Status dialog window. You can see who created the content item, and which group the approval is waiting on.
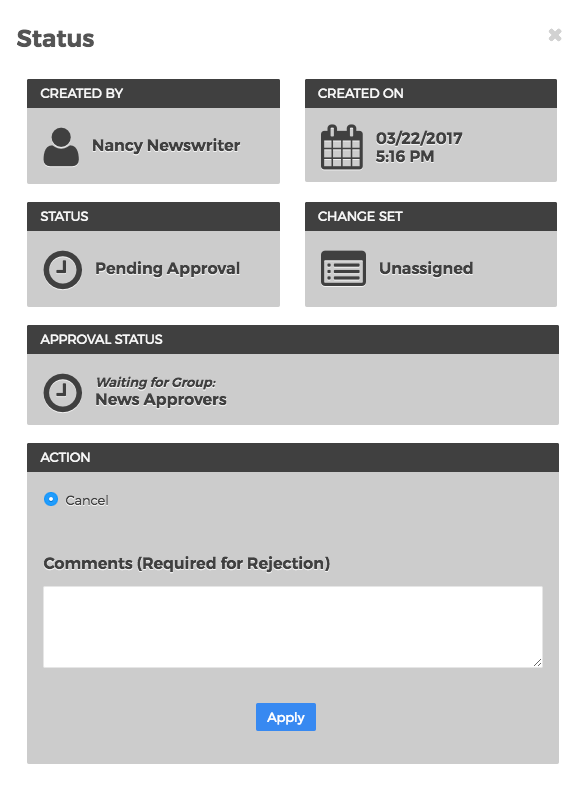
- If you wish to cancel your request, simply click the Apply button. Otherwise, click the "X" at the top right of the window to close the dialog window.


Reviewing and Decisioning Pending Approval Requests
Mura offers different workflow options for reviewing pending approval requests, based on which groups you've been assigned to. Super Admin Users and members of the Admin System Group have the ability to review all pending approval requests. Members of all other groups designated as approvers in an approval chain only have the ability to view pending approval requests for their specific groups.
How to Review and Decision a Pending Approval Request
- When logged in to the back-end administration area of Mura, to the right of your user menu, you may see a number next to the down arrow.
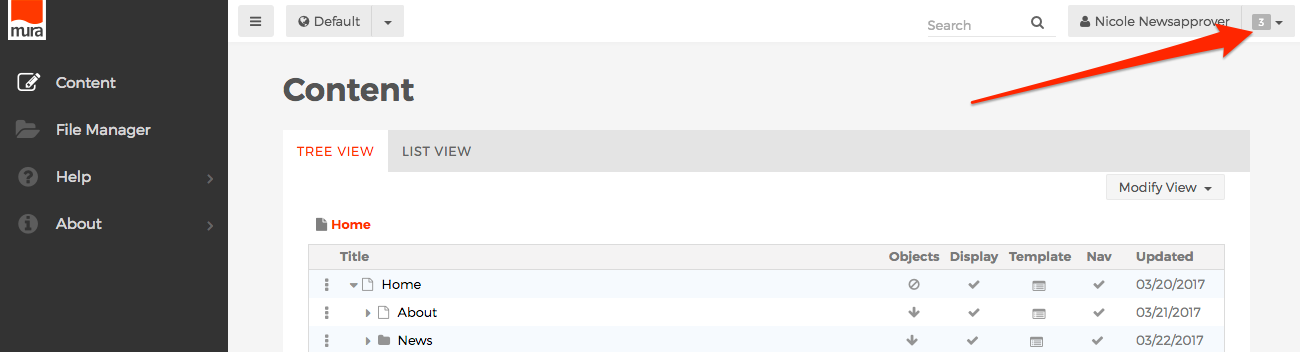
- Click the down arrow to open the user menu.
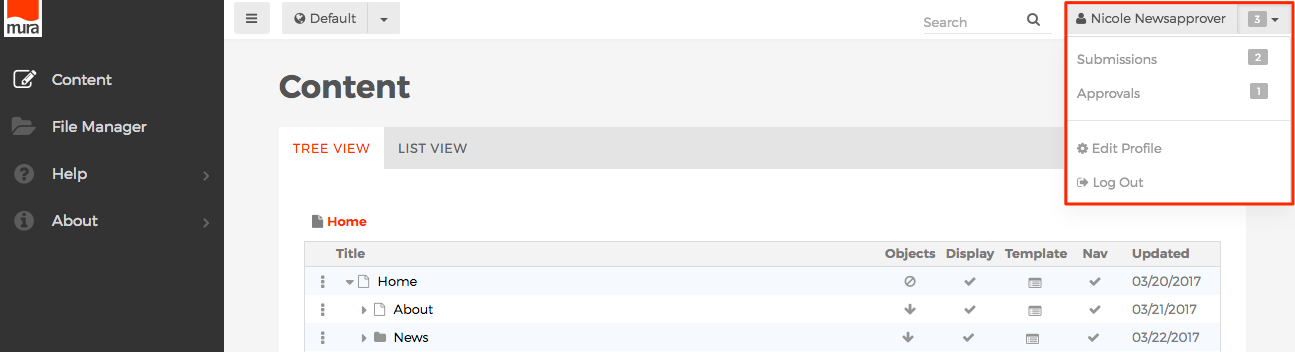
- Submissions
- The amount listed to the right indicates the number of content items the logged in user has submitted for approval.
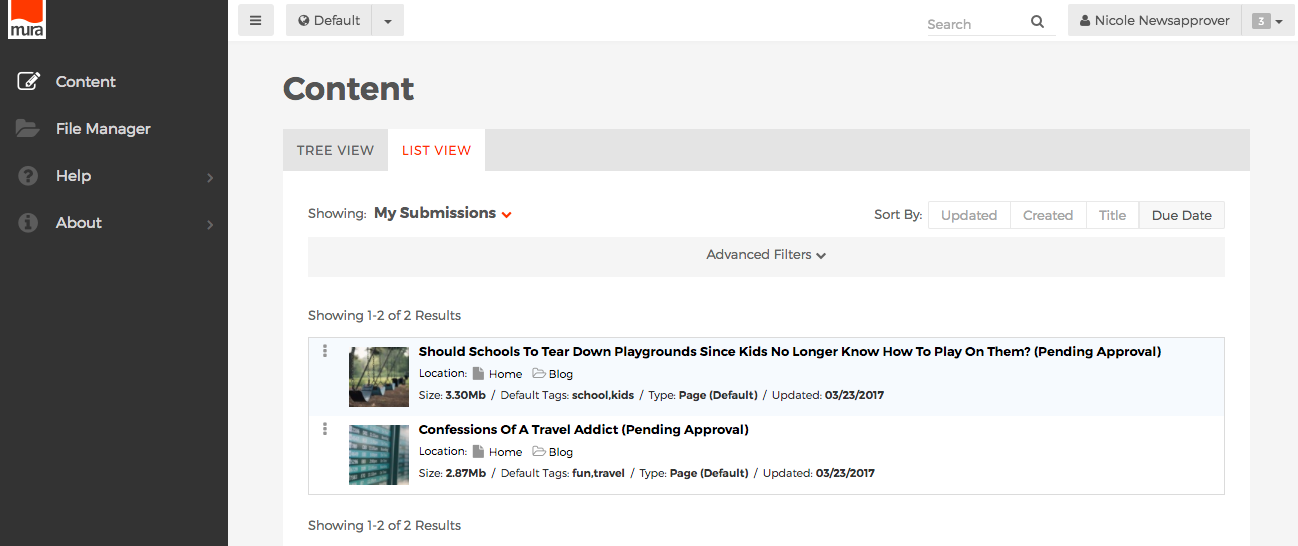
- Clicking the Submissions option will forward the user to the Content screen, with the List View tab enabled, and the Showing menu will be pre-selected with My Submissions which filters all site content in the list below it to display all content items the user has submitted that is still waiting to be decisioned.
- Approvals
- The amount listed to the right indicates the number of content items submitted for approval to a group the logged in user belongs to, and is waiting for someone to review, then decide whether to approve or reject the submission.
- Submissions
- From the user menu, select Approvals.

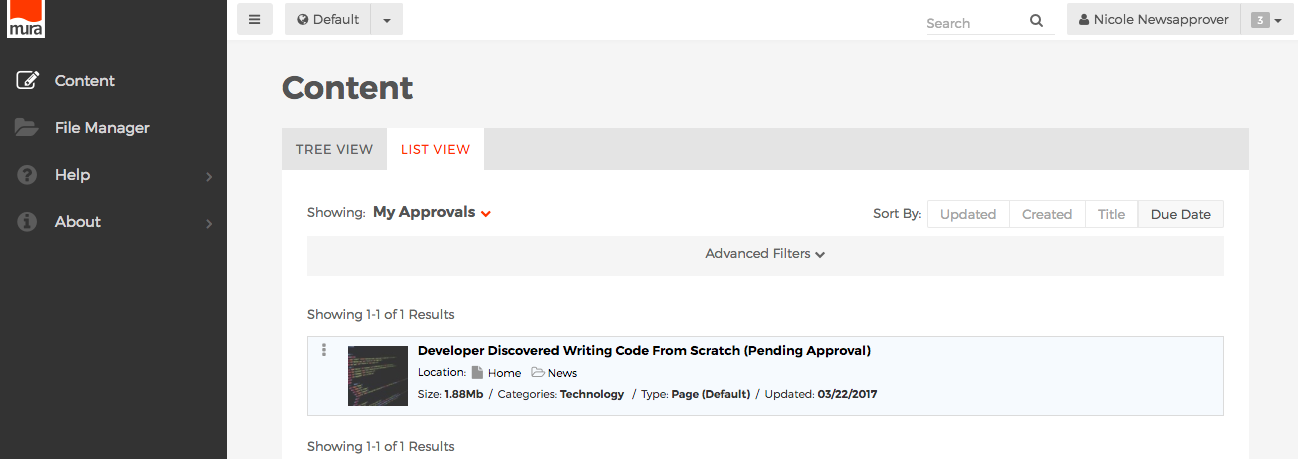
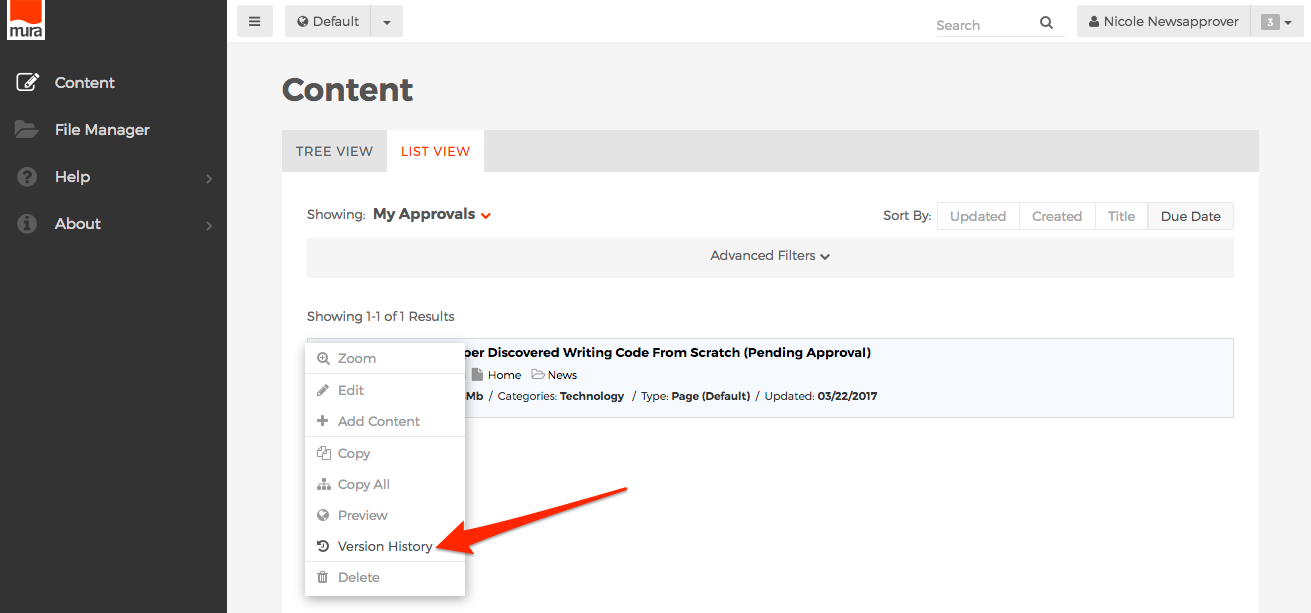
- You should be taken to the Content screen, with the List View tab enabled, and the Showing menu will be pre-selected with My Approvals which filters all site content in the list below it to display all content items waiting to be decisioned by the logged in user.
- From here, you a couple of options to review the submitted content. You could choose to preview the content from the front-end, public facing view of your site, or you could choose to review the content from the back-end administration area.
-
Review Via Front-End, Public Facing View
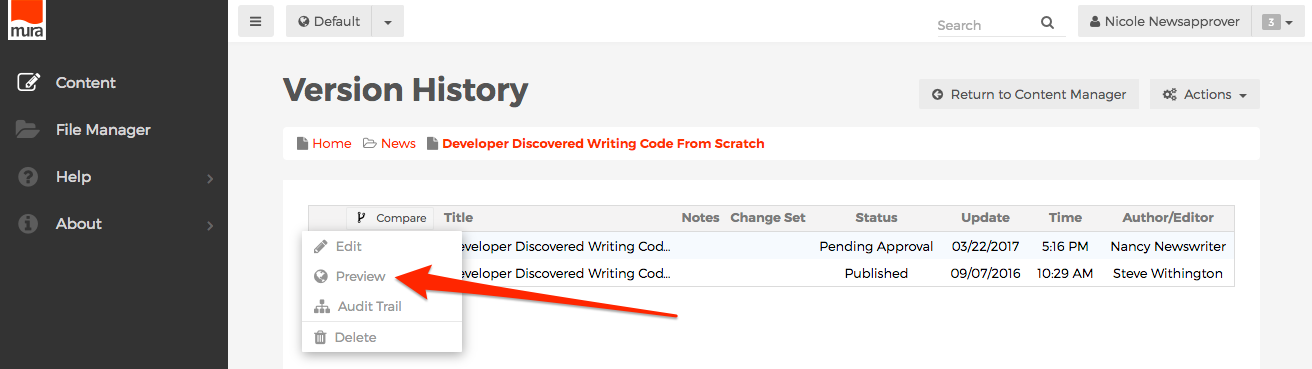
- Click the three-dot menu of the content item, and select Version History.

- From the Version History screen, locate the version with the Status of Pending Approval. Technically, there could be more than one version in Pending Approval when using Change Sets. So, you may have to repeat these steps for each Pending Approval version.
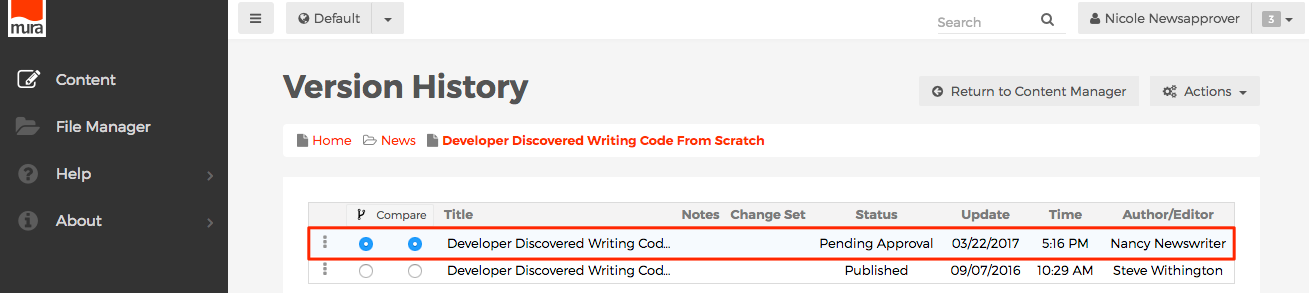
- Click the three-dot menu next to the Pending Approval version, and select Preview.
- The Pending Approval version will display in a new tab, reflecting how the content would look as if it were "live" and published.
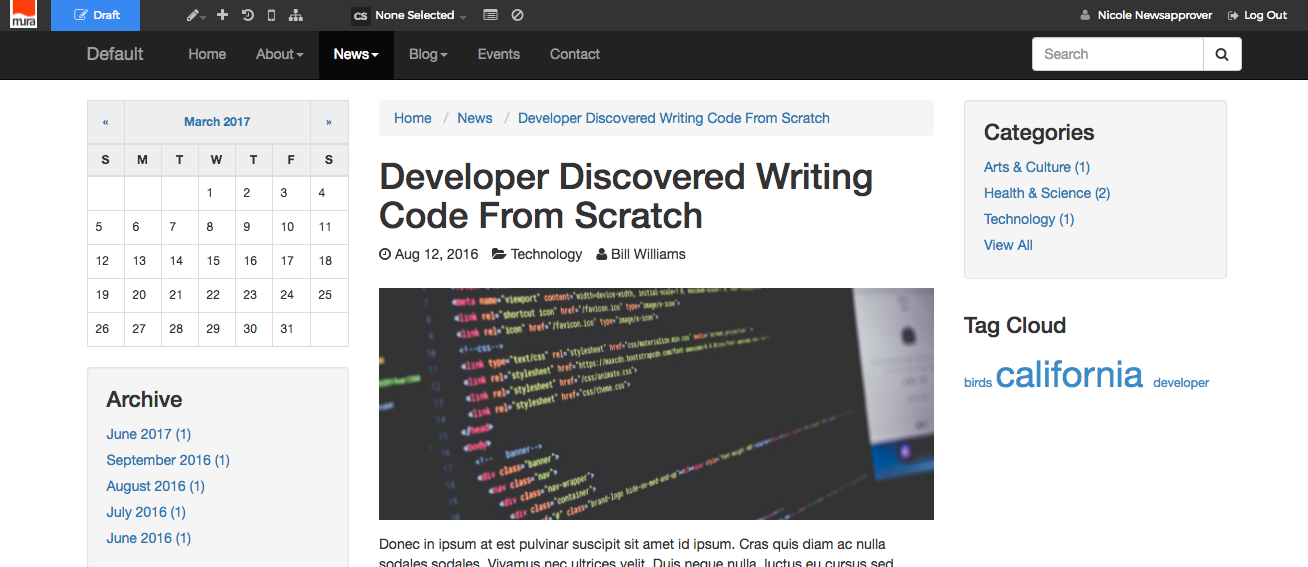
- Click the Draft status button on the front-end toolbar.
- The Status dialog window should appear.

- Continue the steps below.
- Click the three-dot menu of the content item, and select Version History.
-
Review Via Back-End Administration Area
- If you click the title of a content item, a Select Version to Edit dialog window will appear.
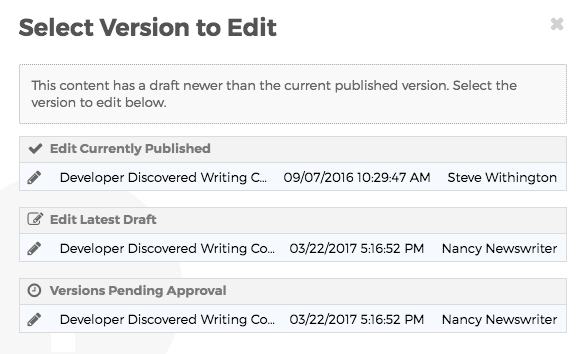
- Select the content item located under Versions Pending Approval by clicking the pencil icon or the title itself.
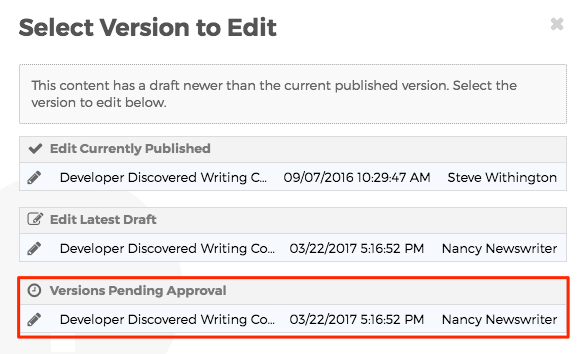
- You should be taken to the Edit Content screen. The Status should reflect "Pending Approval" and an alert should appear above the tabs with a link to View Details.

- Click either the Pending Approval link or the View Details link to reveal the Status dialog window.

- Continue the steps below.
- If you click the title of a content item, a Select Version to Edit dialog window will appear.
-
- From the Status dialog window, you can view details about the content item, and see which group the approval chain is waiting on under the Approval Status section. Under the Action section, you can choose to Approve or Reject the submission. If you choose Reject, you will be required to enter Comments, so the submitter will know why their content submission was rejected.

- Once you've made your decision, click the Apply button to save your decision.

- This process will need to be repeated by a member of any other group(s) assigned to the approval chain before the item will be officially Published.


Super Admin Users and Admin System Group Members Only
Super Admin Users and members of the Admin System Group have the ability to review all pending approval requests. Follow the steps below to view all pending approval requests.
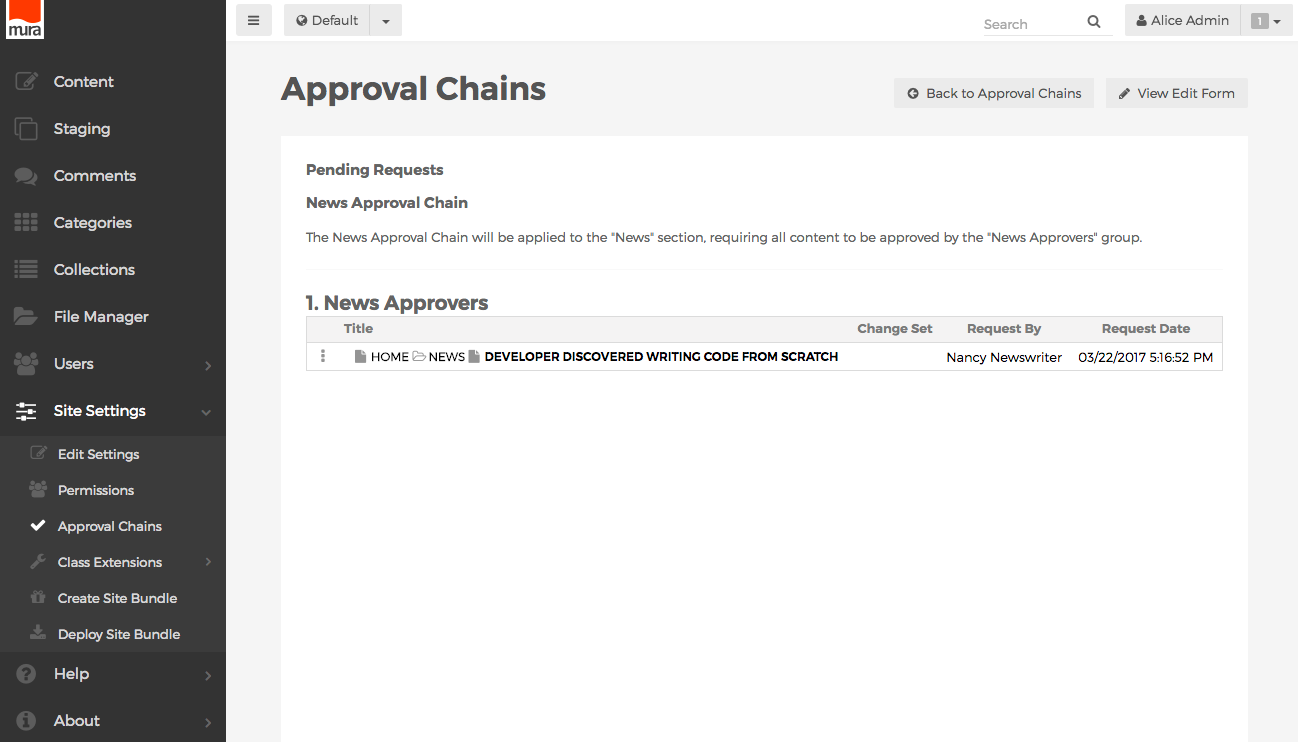
- Super Admin Users and members of the Admin System Group have the ability to view pending approval requests for any group. To do so, from the back-end administration area of Mura, they can select Site Settings from the main navigation, then click Approval Chains.
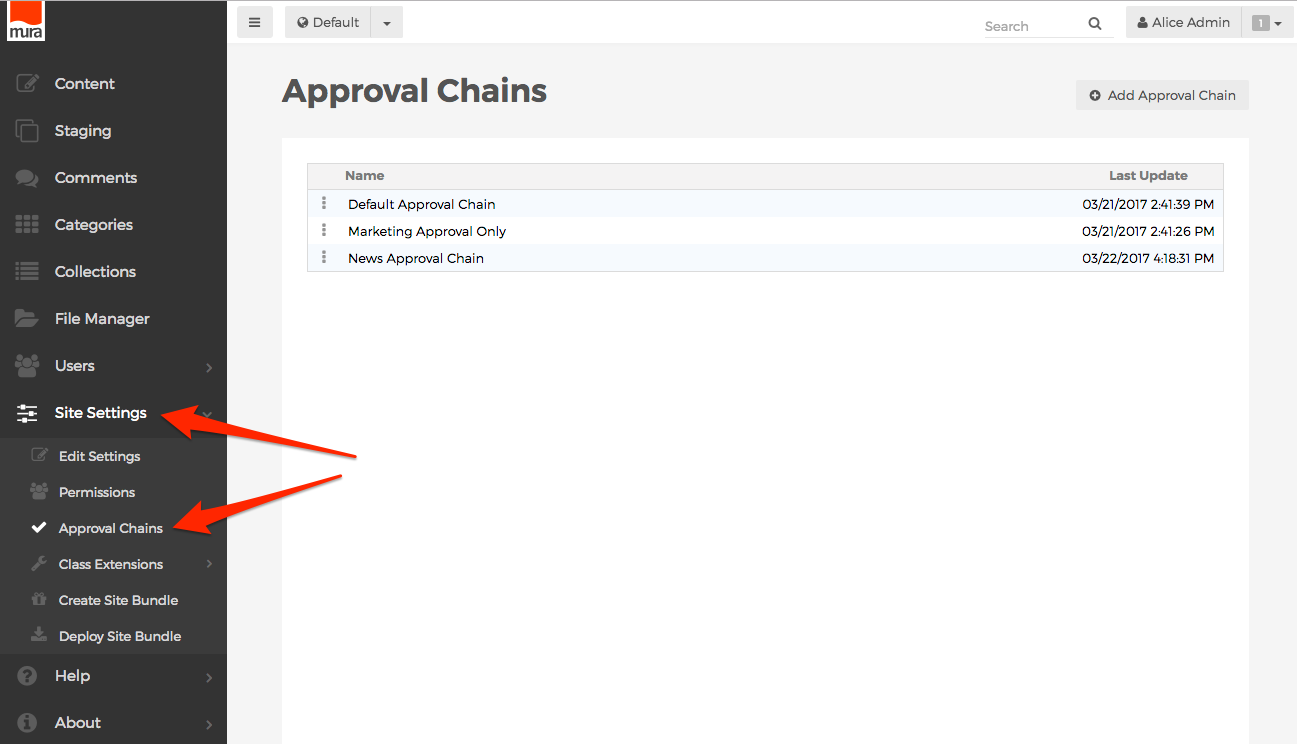
- From the Approval Chains screen. click the three-dot menu next to the desired group, then select Pending Requests. Or, click on the name of the approval chain itself to achieve the same result.
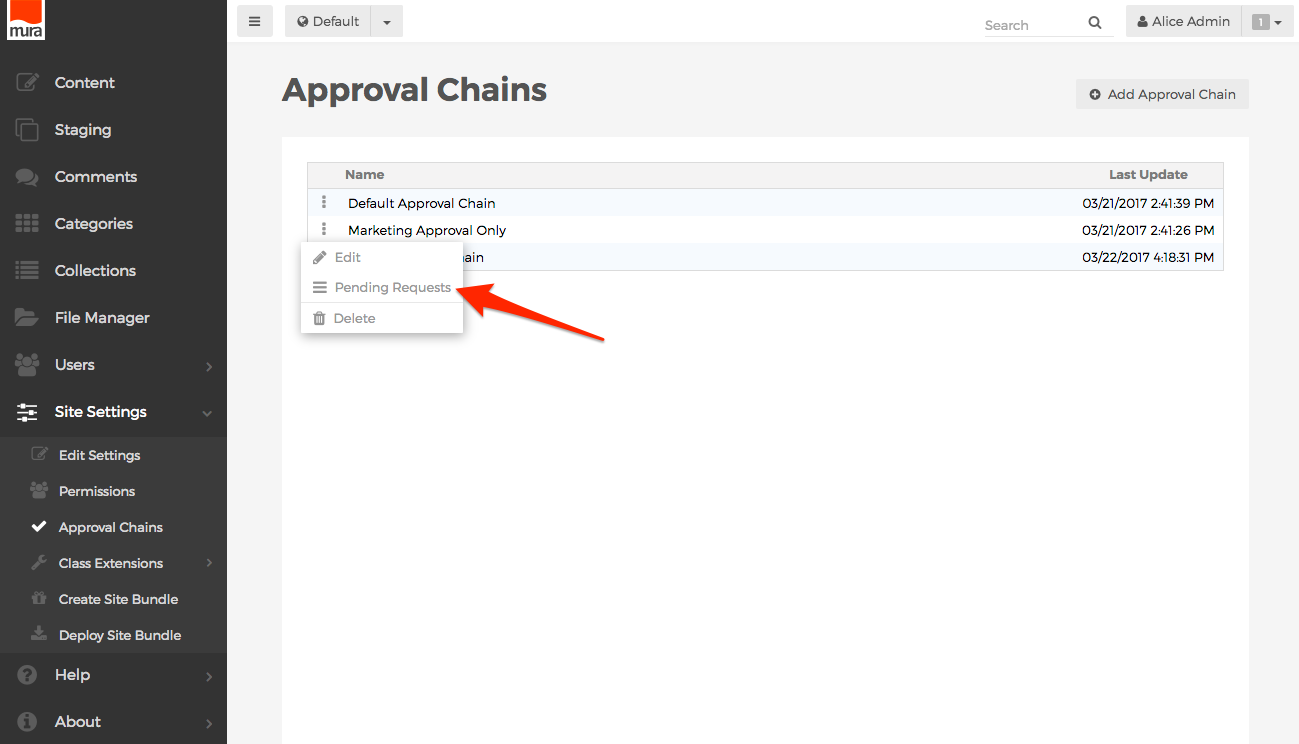
- The administrator should now be able to see a listing of all pending requests for the selected group.

- Click the three-dot menu of any content item to reveal a menu of options.
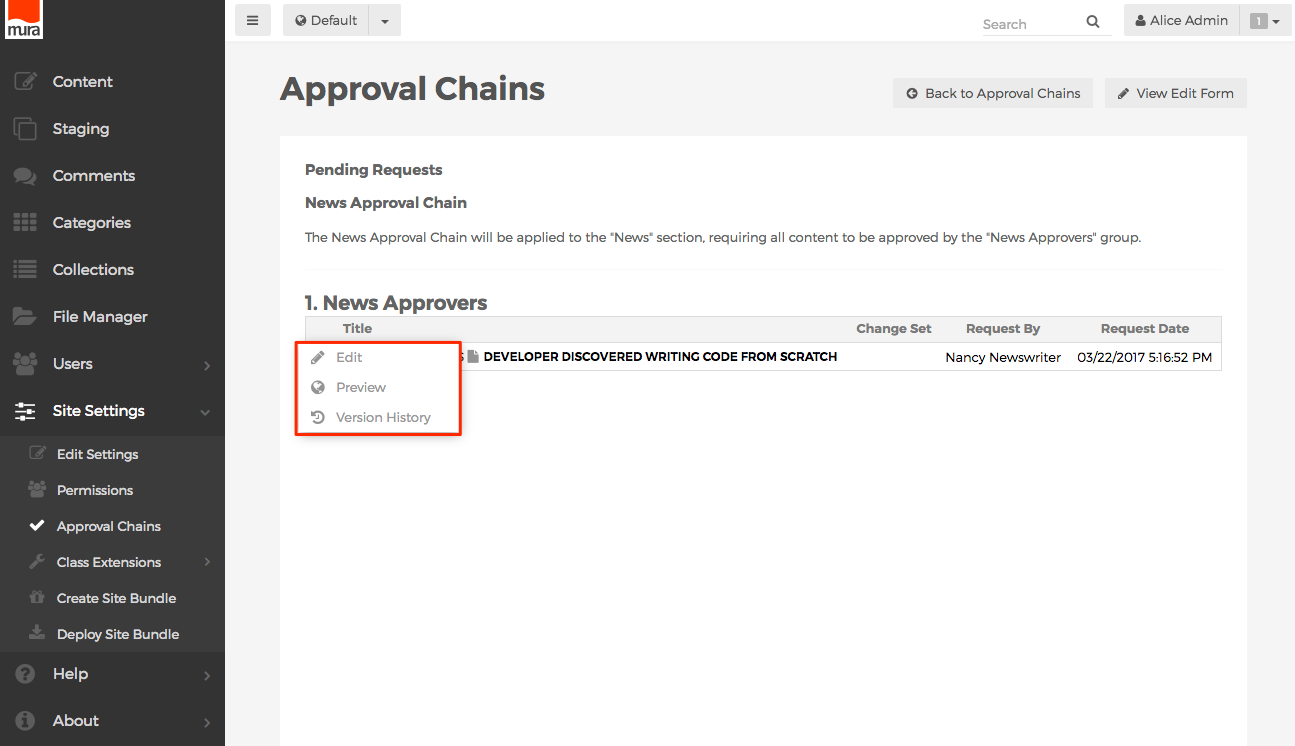
- Edit
- Forwards you to the Edit Content screen.
- Preview
- Displays the currently published version of the content item in a new tab.
- Version History
- Forwards you to the Version History screen, where you can select the desired version you wish to work with.
- Edit
- If you selected Edit from the three-dot menu, you should see the Edit Content Screen. The Status should reflect "Pending Approval" and an alert should appear above the tabs with a link to View Details.

- Click either the Pending Approval link or the View Details link to reveal the Status dialog window.

- From the Status dialog window, you can view details about the content item, and see which group the approval chain is waiting on under the Approval Status section. Under the Action section, you can choose to Approve or Reject the submission. If you choose Reject, you will be required to enter Comments, so the submitter will know why their content submission was rejected.

- Once you've made your decision, click the Apply button to save your decision.

- This process will need to be repeated by a member of any other group(s) assigned to the approval chain before the item will be officially Published.


Summary
In this section, you've learned how to create/manage groups and users, and learned the difference between "author" and "editor" roles. You also learned how to apply editing privileges to each group throughout the content area, and also how to enable or restrict access to other areas of the administrator such as who can manage Categories, Collections, and more. Lastly, you learned about the variety of publishing workflow options, and most likely discovered the one that best fits your organization's needs.