## Content Staging
The **Content Staging Manager** provides a way to schedule a collection of content, via "**Change Sets**," to publish at the same date and time. A **Change Set** is like a bucket, where you can toss in any changes you want to make "live" at the same moment. In addition to being able to simultaneously publish a group of content, you can preview a site as if the content assigned to specific Change Sets has been published, before it's actually published.
Some organizations may also be interested in using Mura's ability to [force all changes to be published via Change Sets](https://docs.getmura.com/v7-1/content-managers/groups-users-and-access-control/publishing-workflows/content-staging/enable-disable-publish-via-change-sets-only/), versus allowing the traditional ability to publish one-off changes.
## How to Enable/Disable the Content Staging Manager
To enable or disable the Content Staging Manager, follow the steps below.
1. From the back-end administration area of Mura, select **Site Settings**, then click **Edit Settings**.
[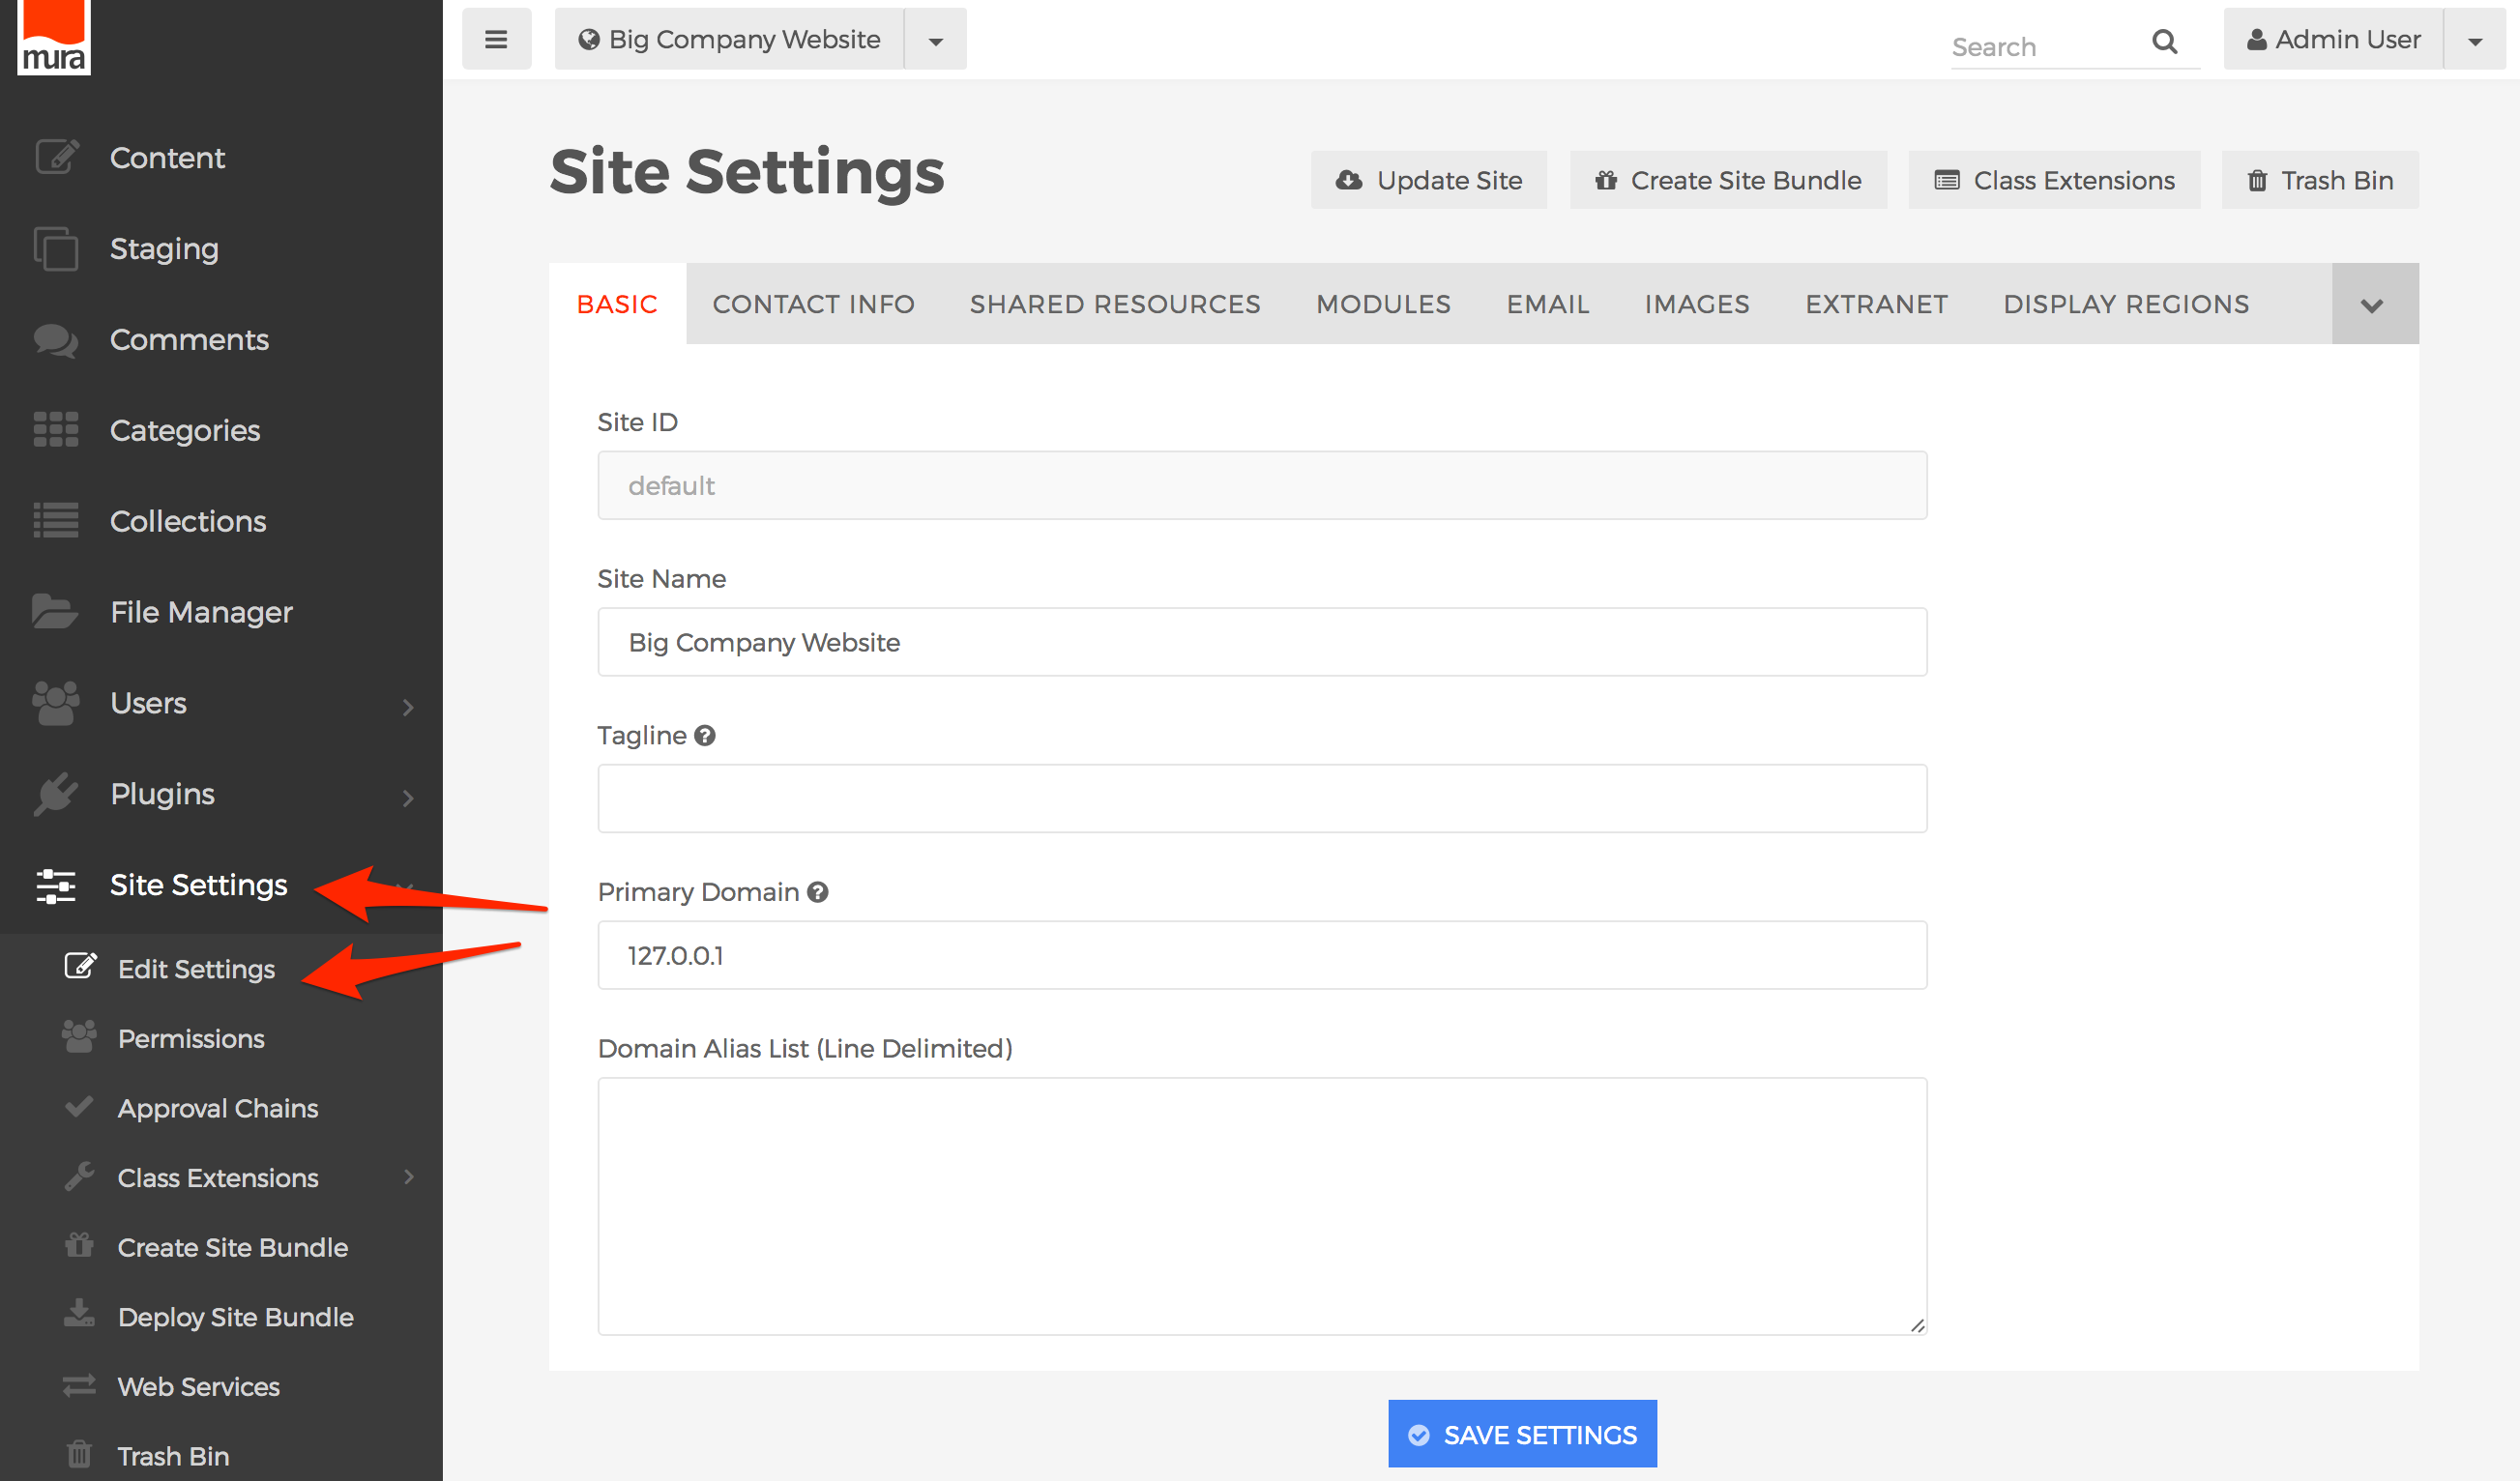](https://docs.deeztek.com/uploads/images/gallery/2021-02/image-1612835056630.png)
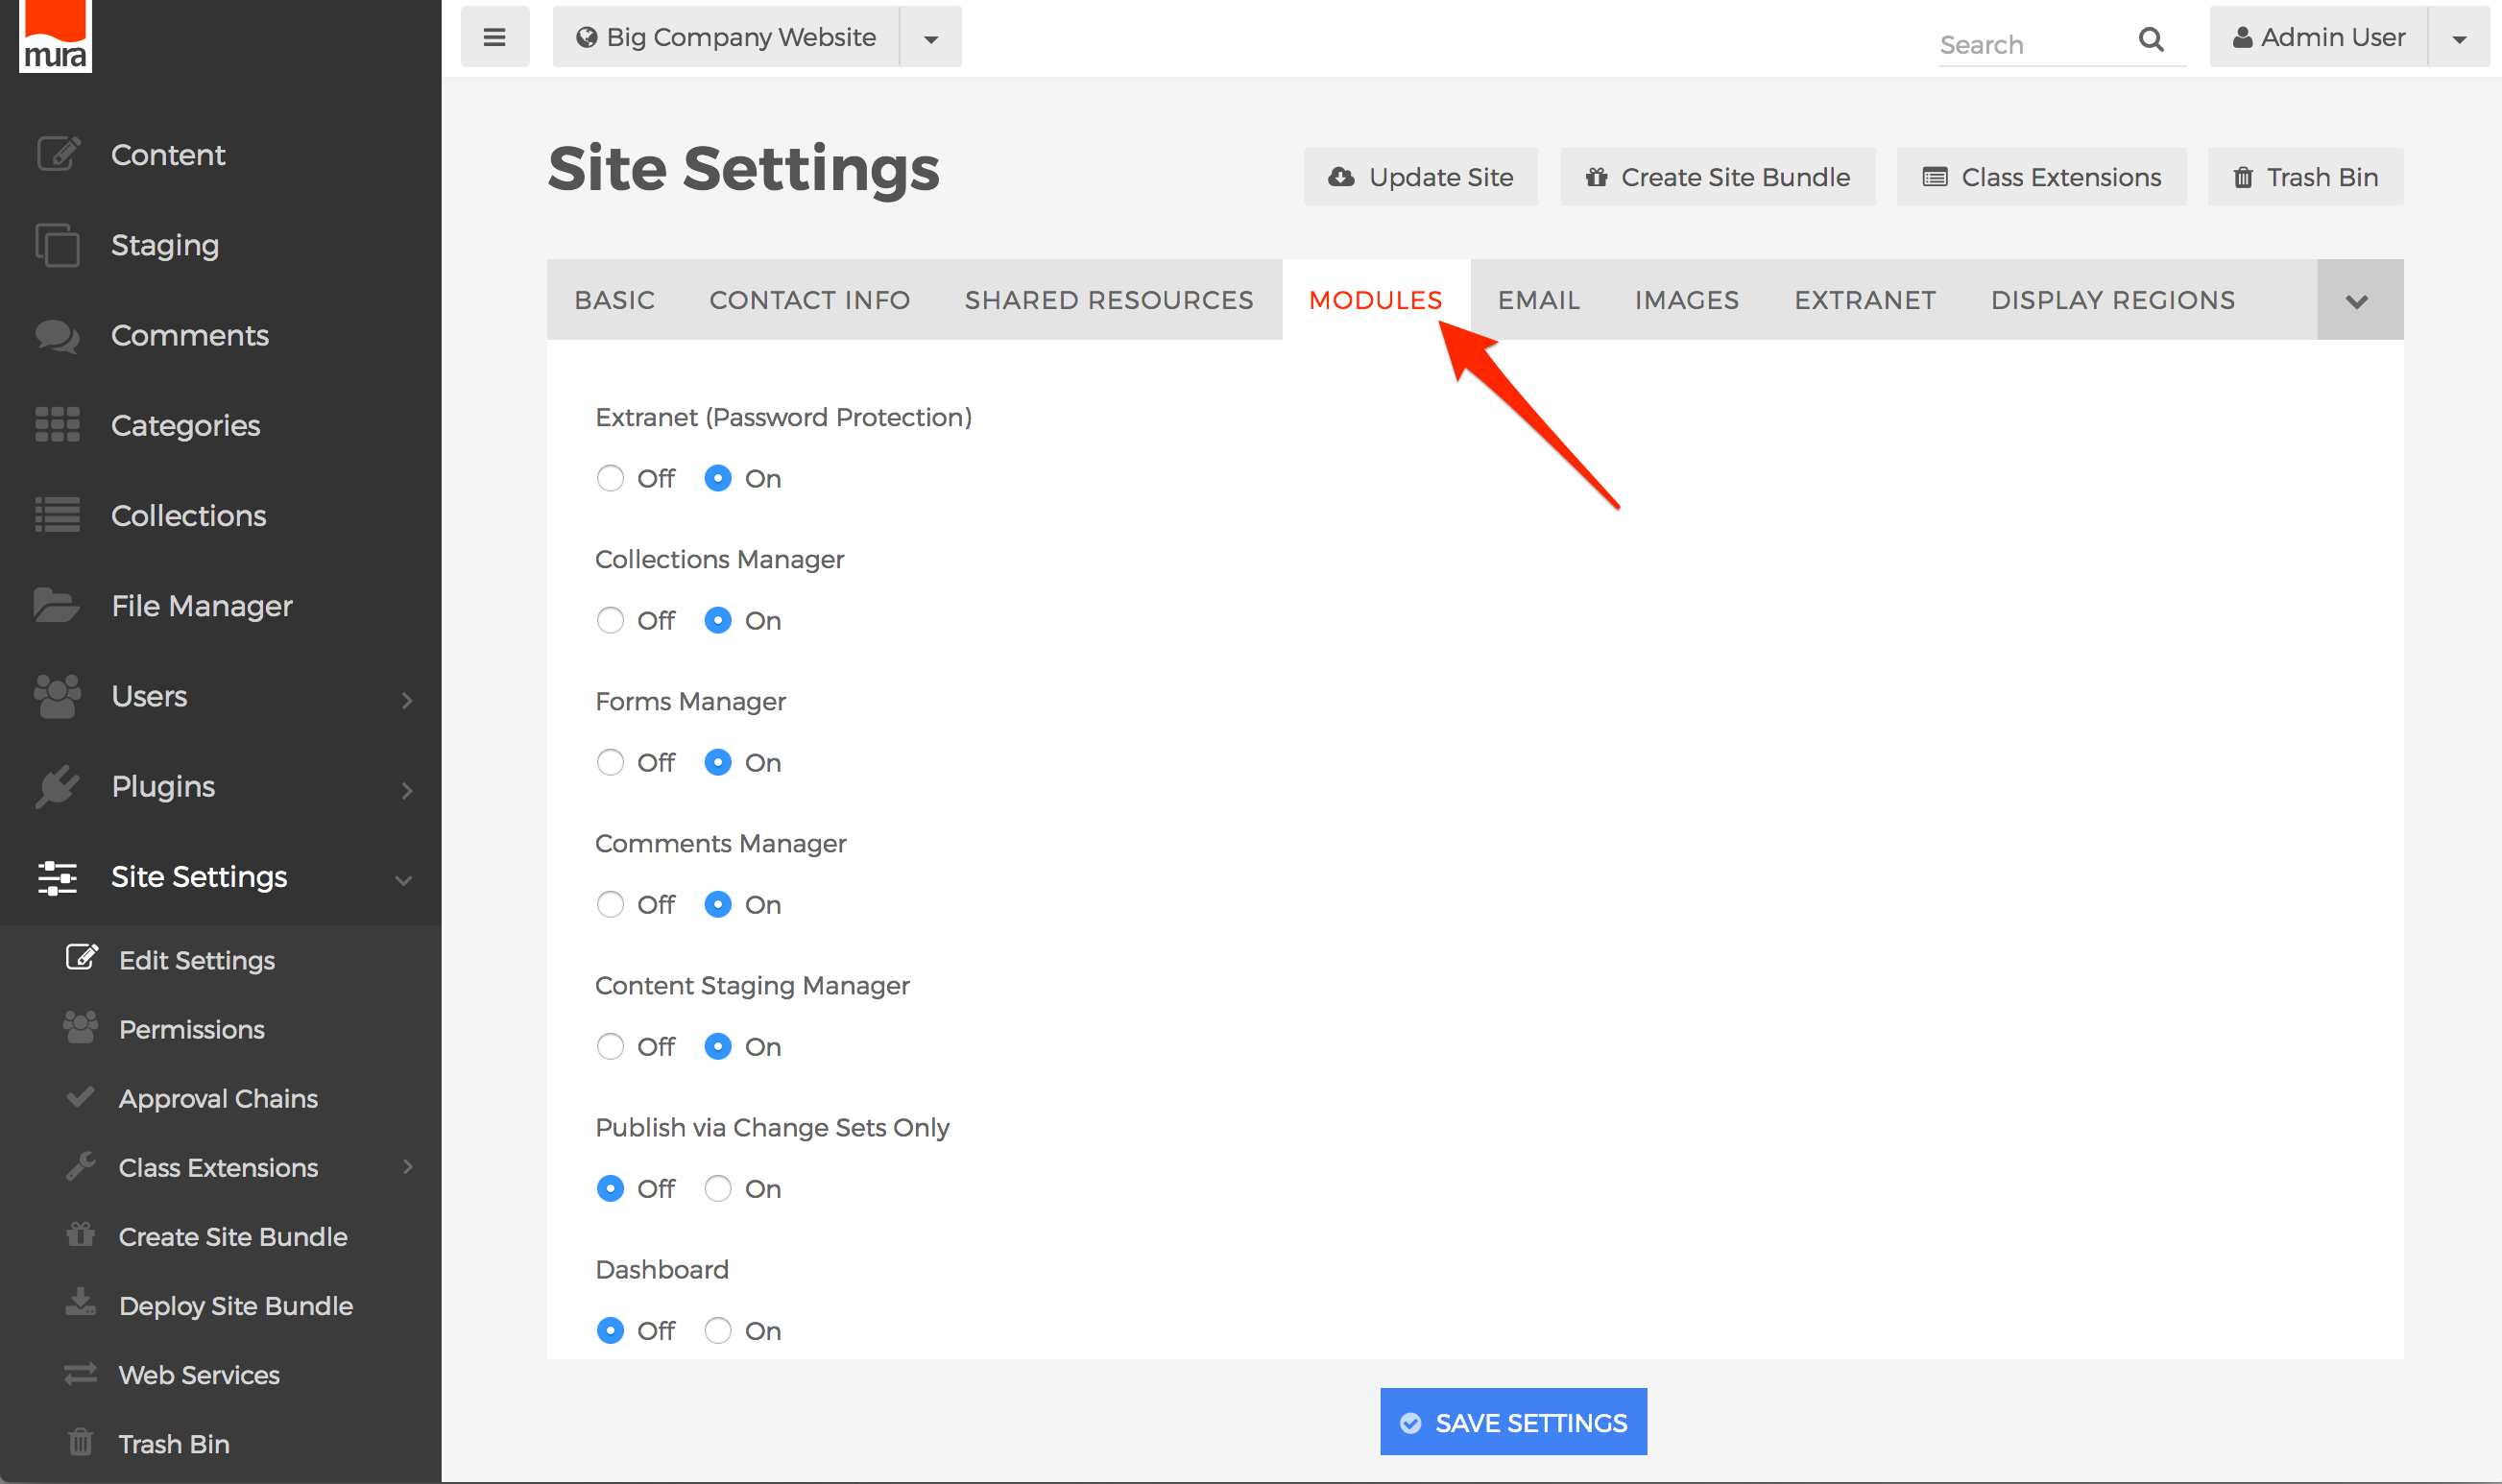
2. Select the **Modules** tab.
[](https://docs.deeztek.com/uploads/images/gallery/2021-02/image-1612835068052.png)
3. Locate the field labeled **Content Staging Manager**, then select "**On**" to enable it, or "**Off**" if you wish to disable it.
[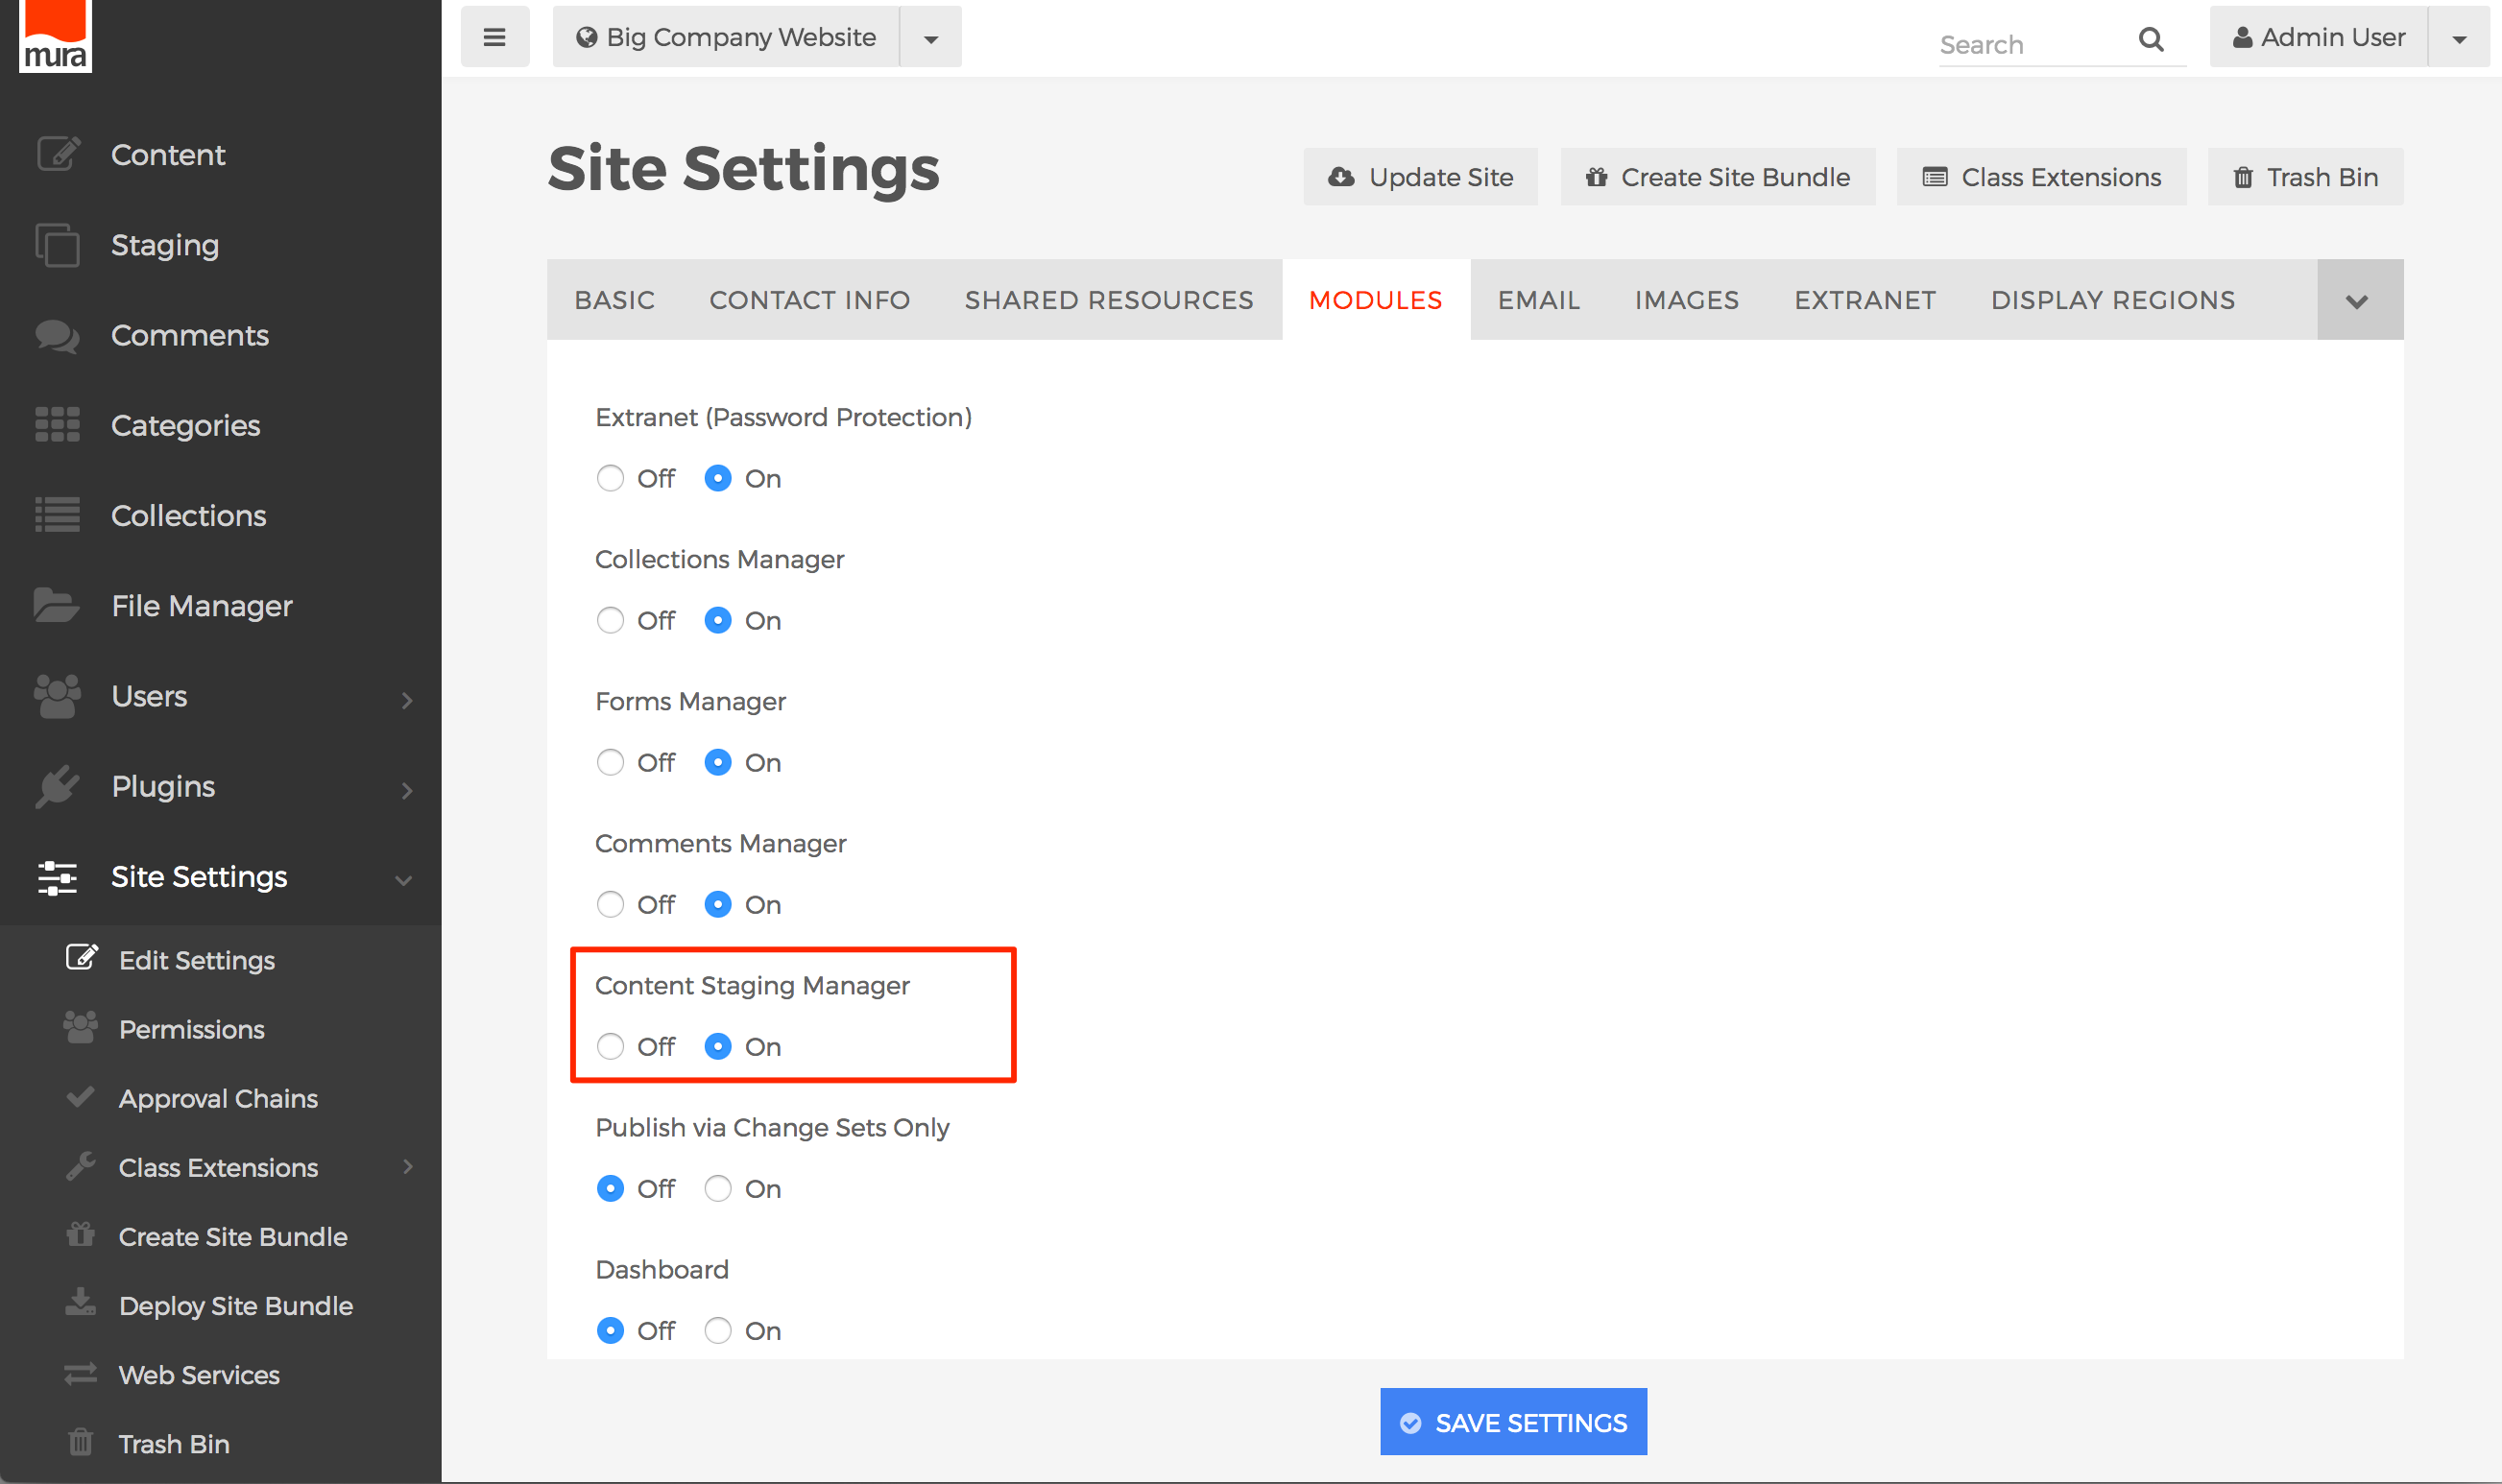](https://docs.deeztek.com/uploads/images/gallery/2021-02/image-1612835078038.png)
4. Click **Save Settings**.
[](https://docs.deeztek.com/uploads/images/gallery/2021-02/image-1612835097190.png)
## Create a Change Set
As previously mentioned, Change Sets are like buckets where you can toss all kinds of new content and updates together in one place. To create a **Change Set**, follow the steps below.
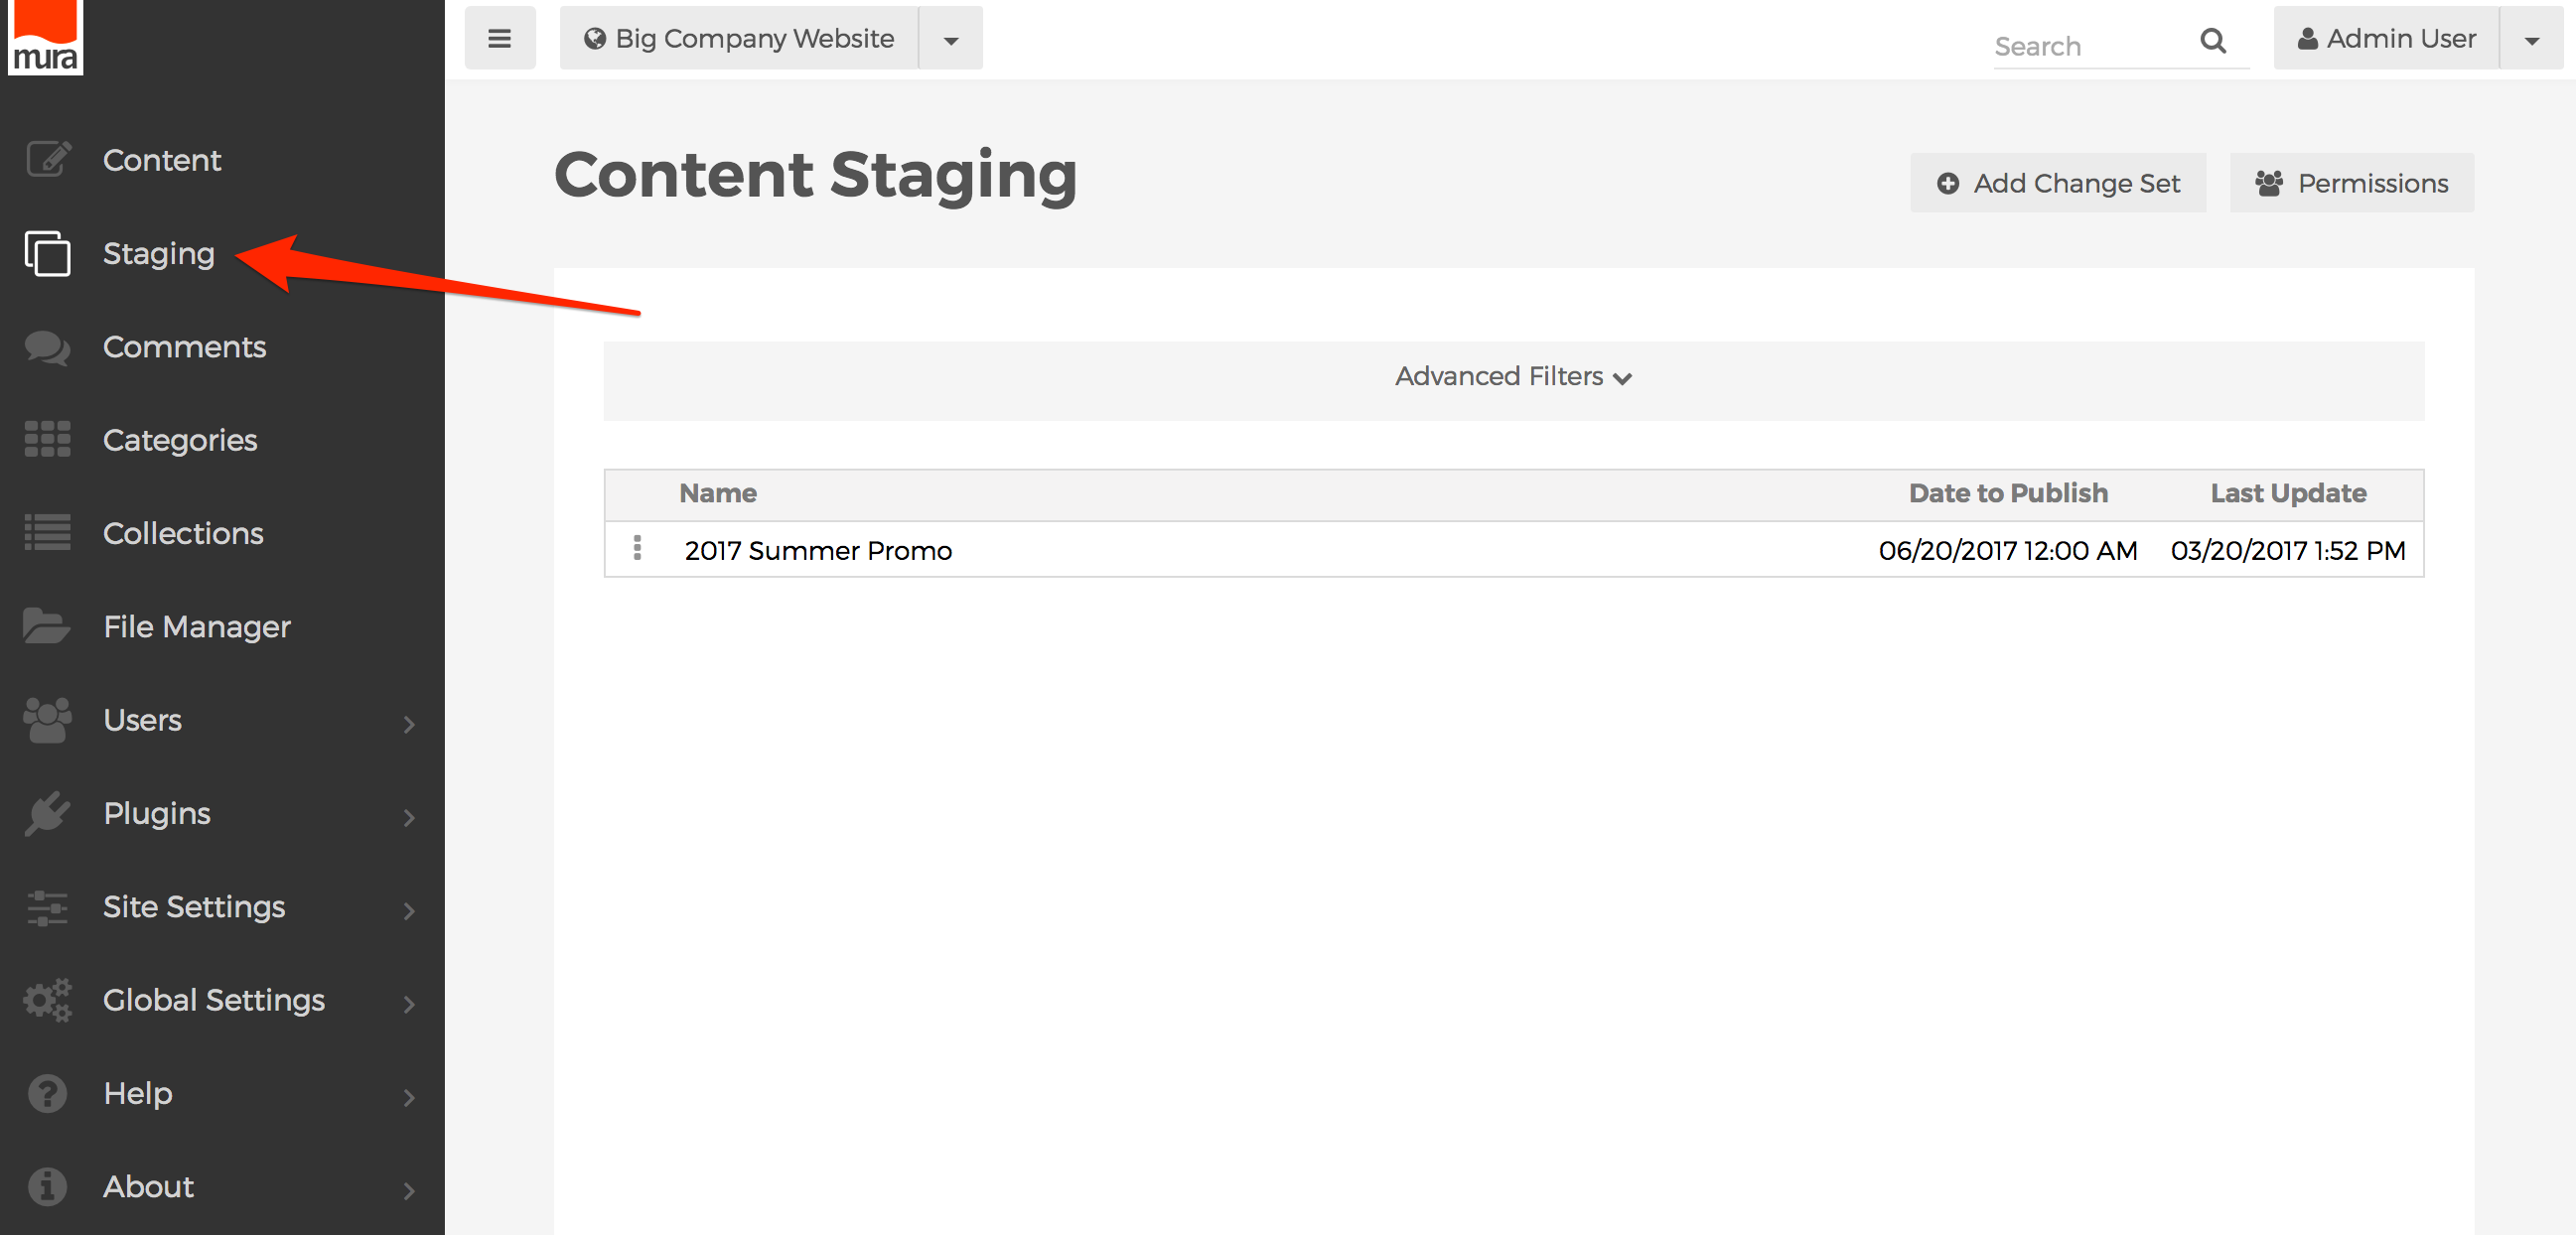
1. From back-end administration area, select **Staging** on the main navigation.
[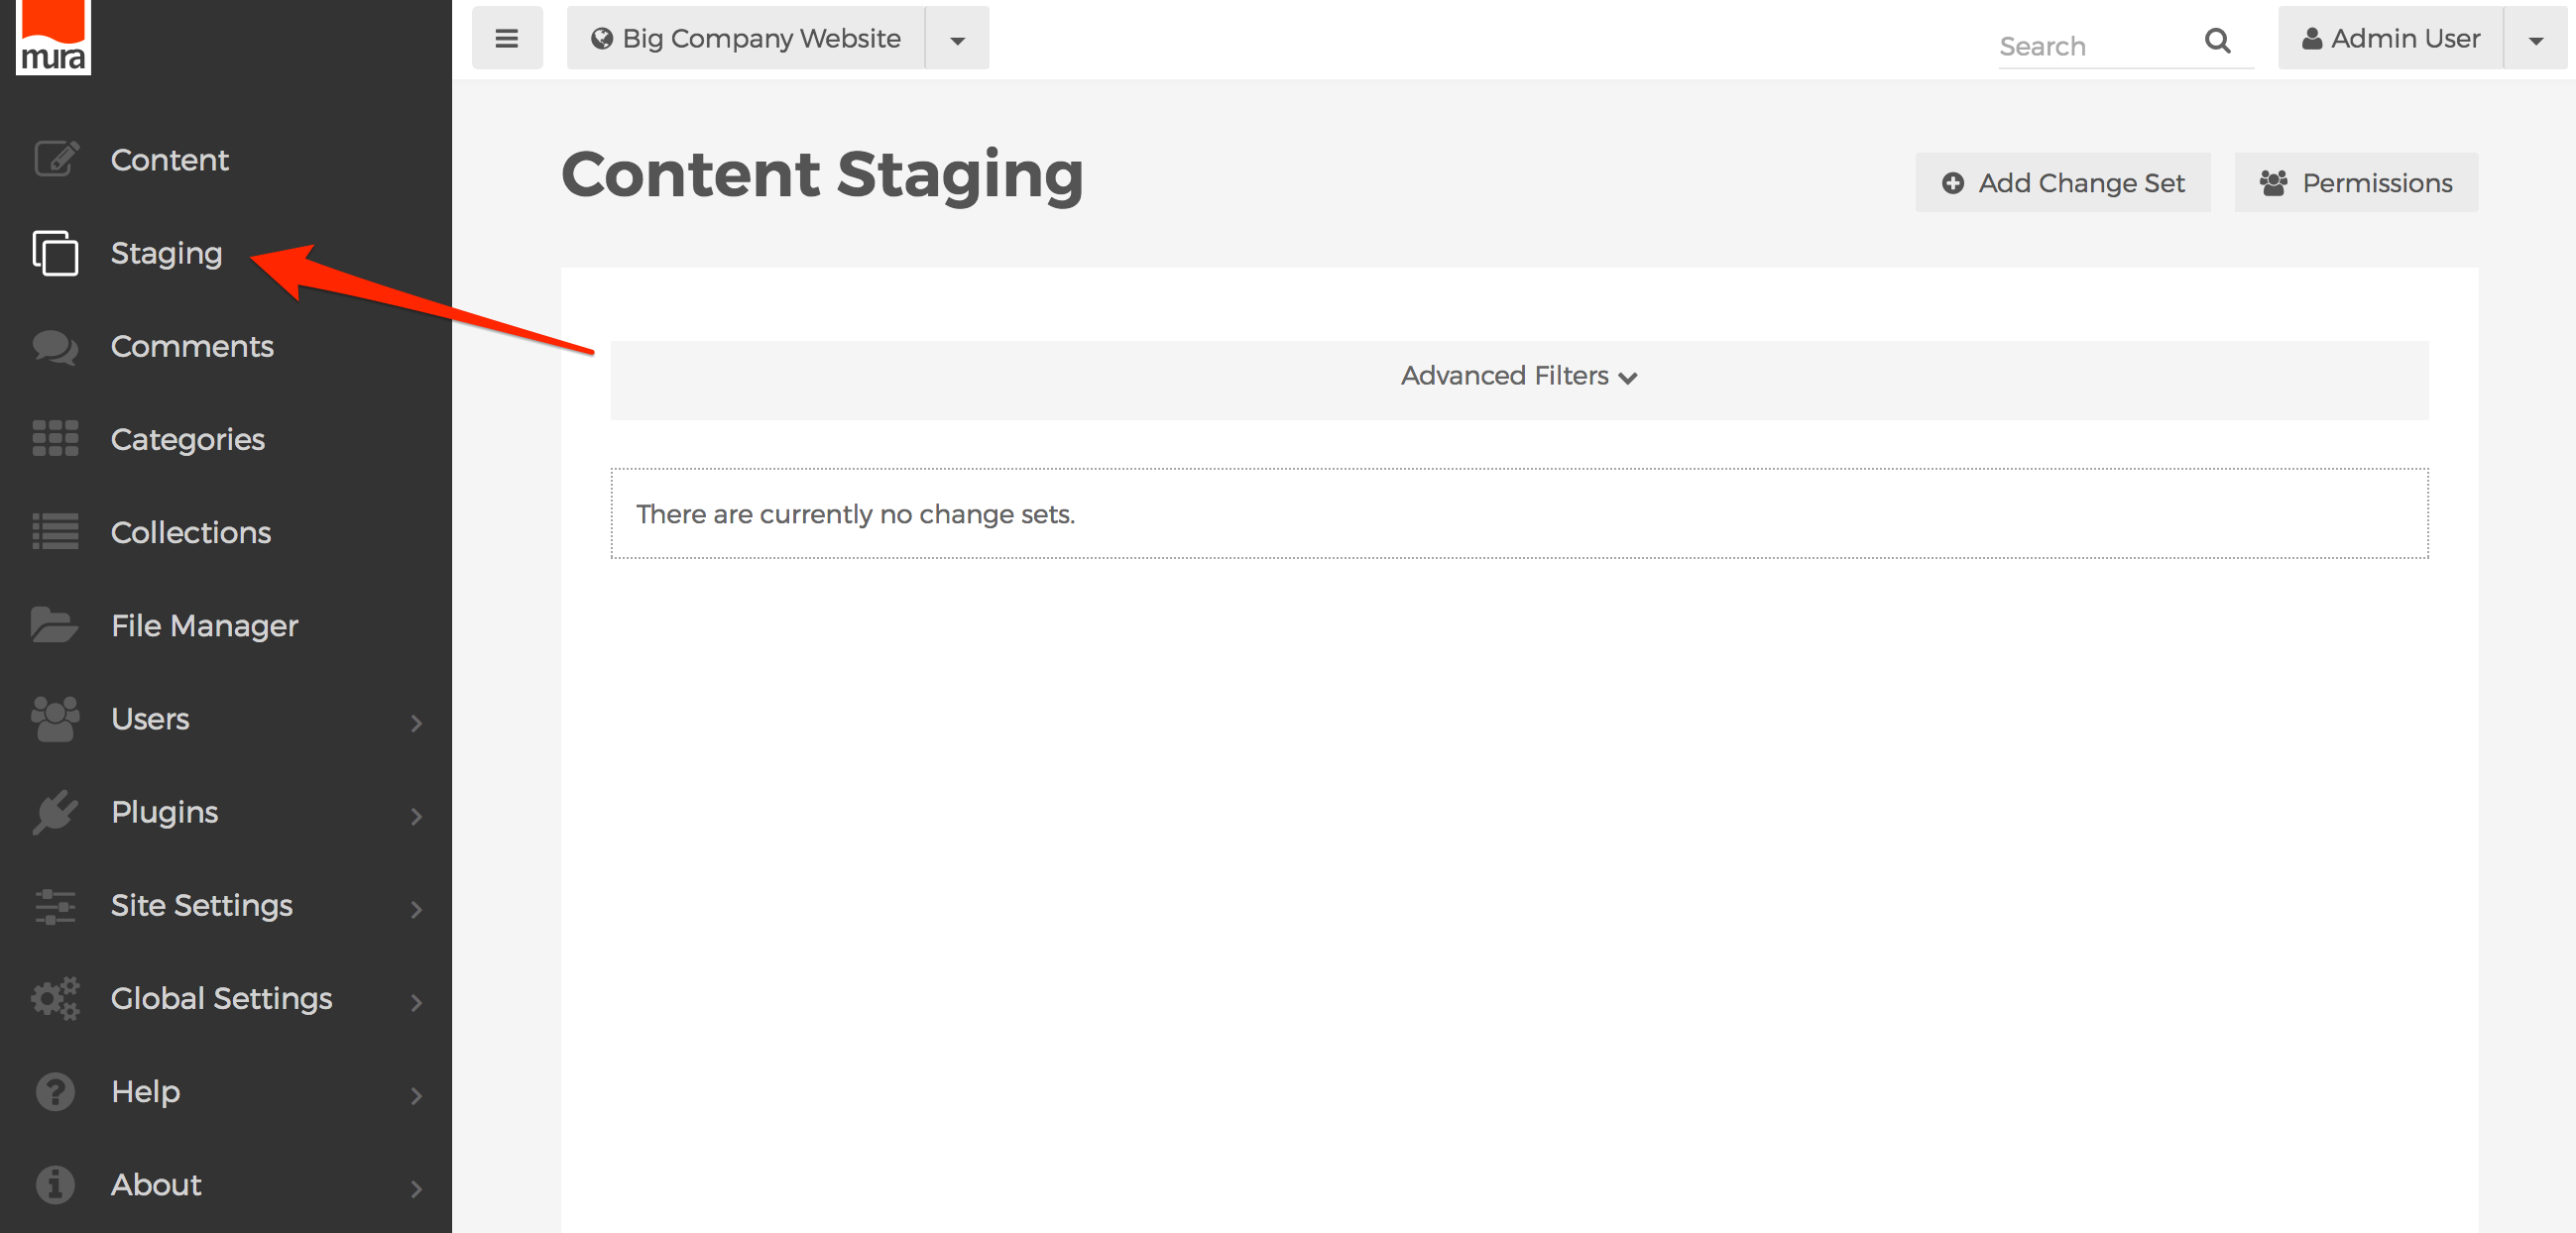](https://docs.deeztek.com/uploads/images/gallery/2021-02/image-1612835116003.png)
2. This should display the **Content Staging** screen.
[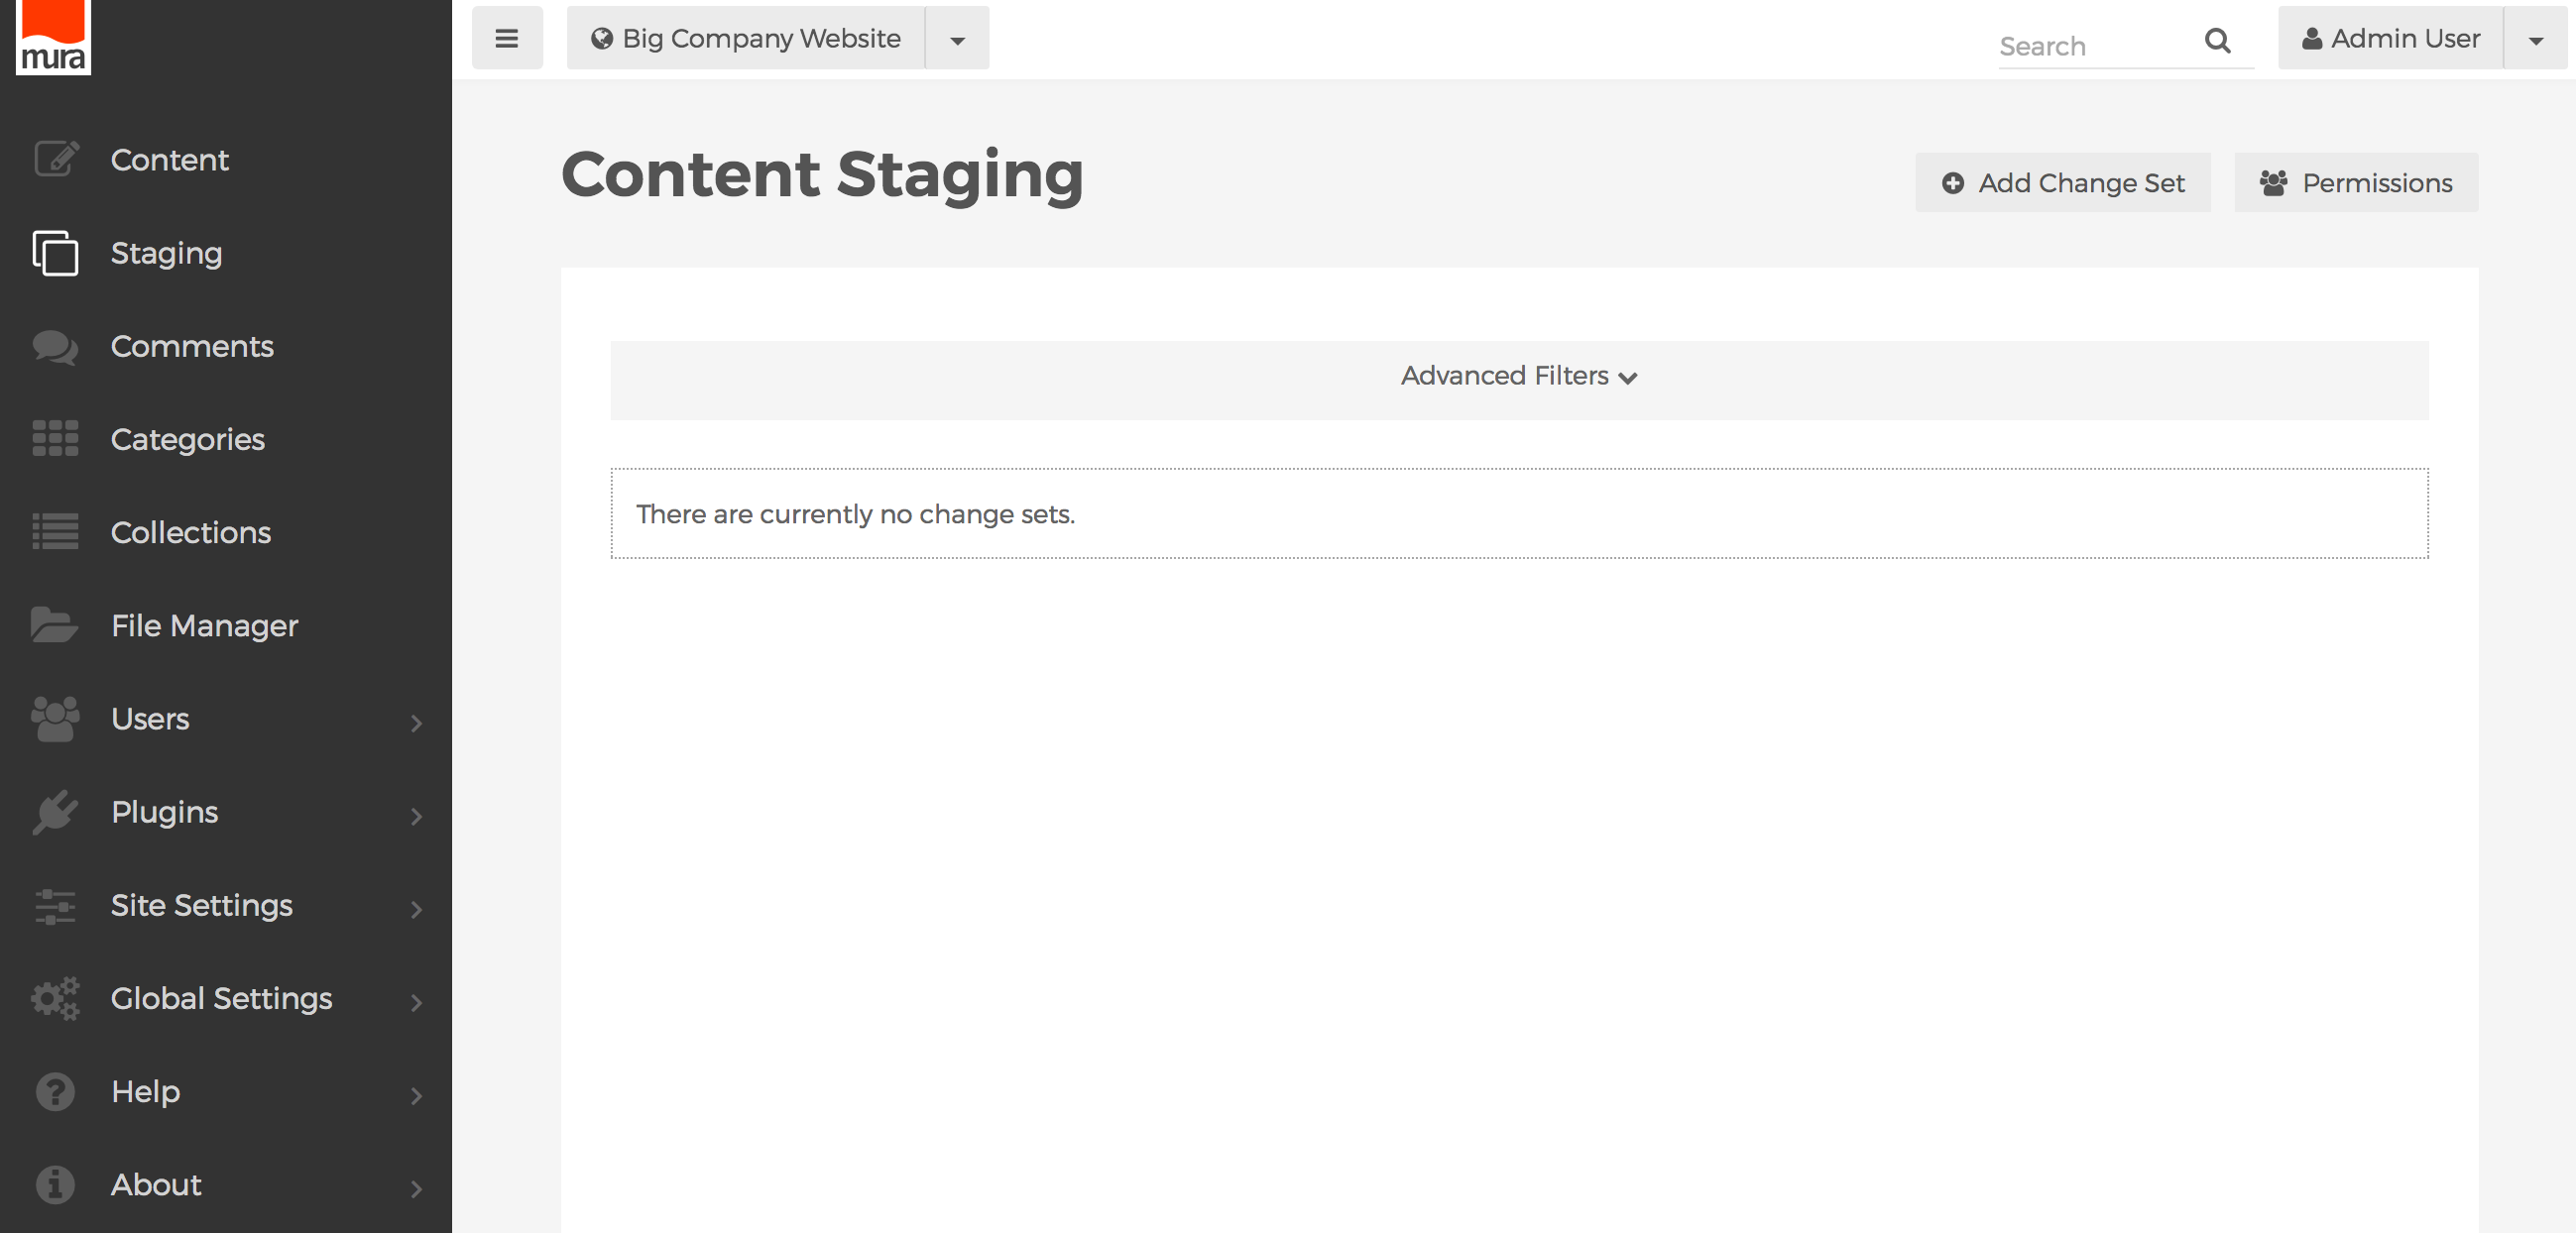](https://docs.deeztek.com/uploads/images/gallery/2021-02/image-1612835129433.png)
3. Click the **Add Change Set** button.
[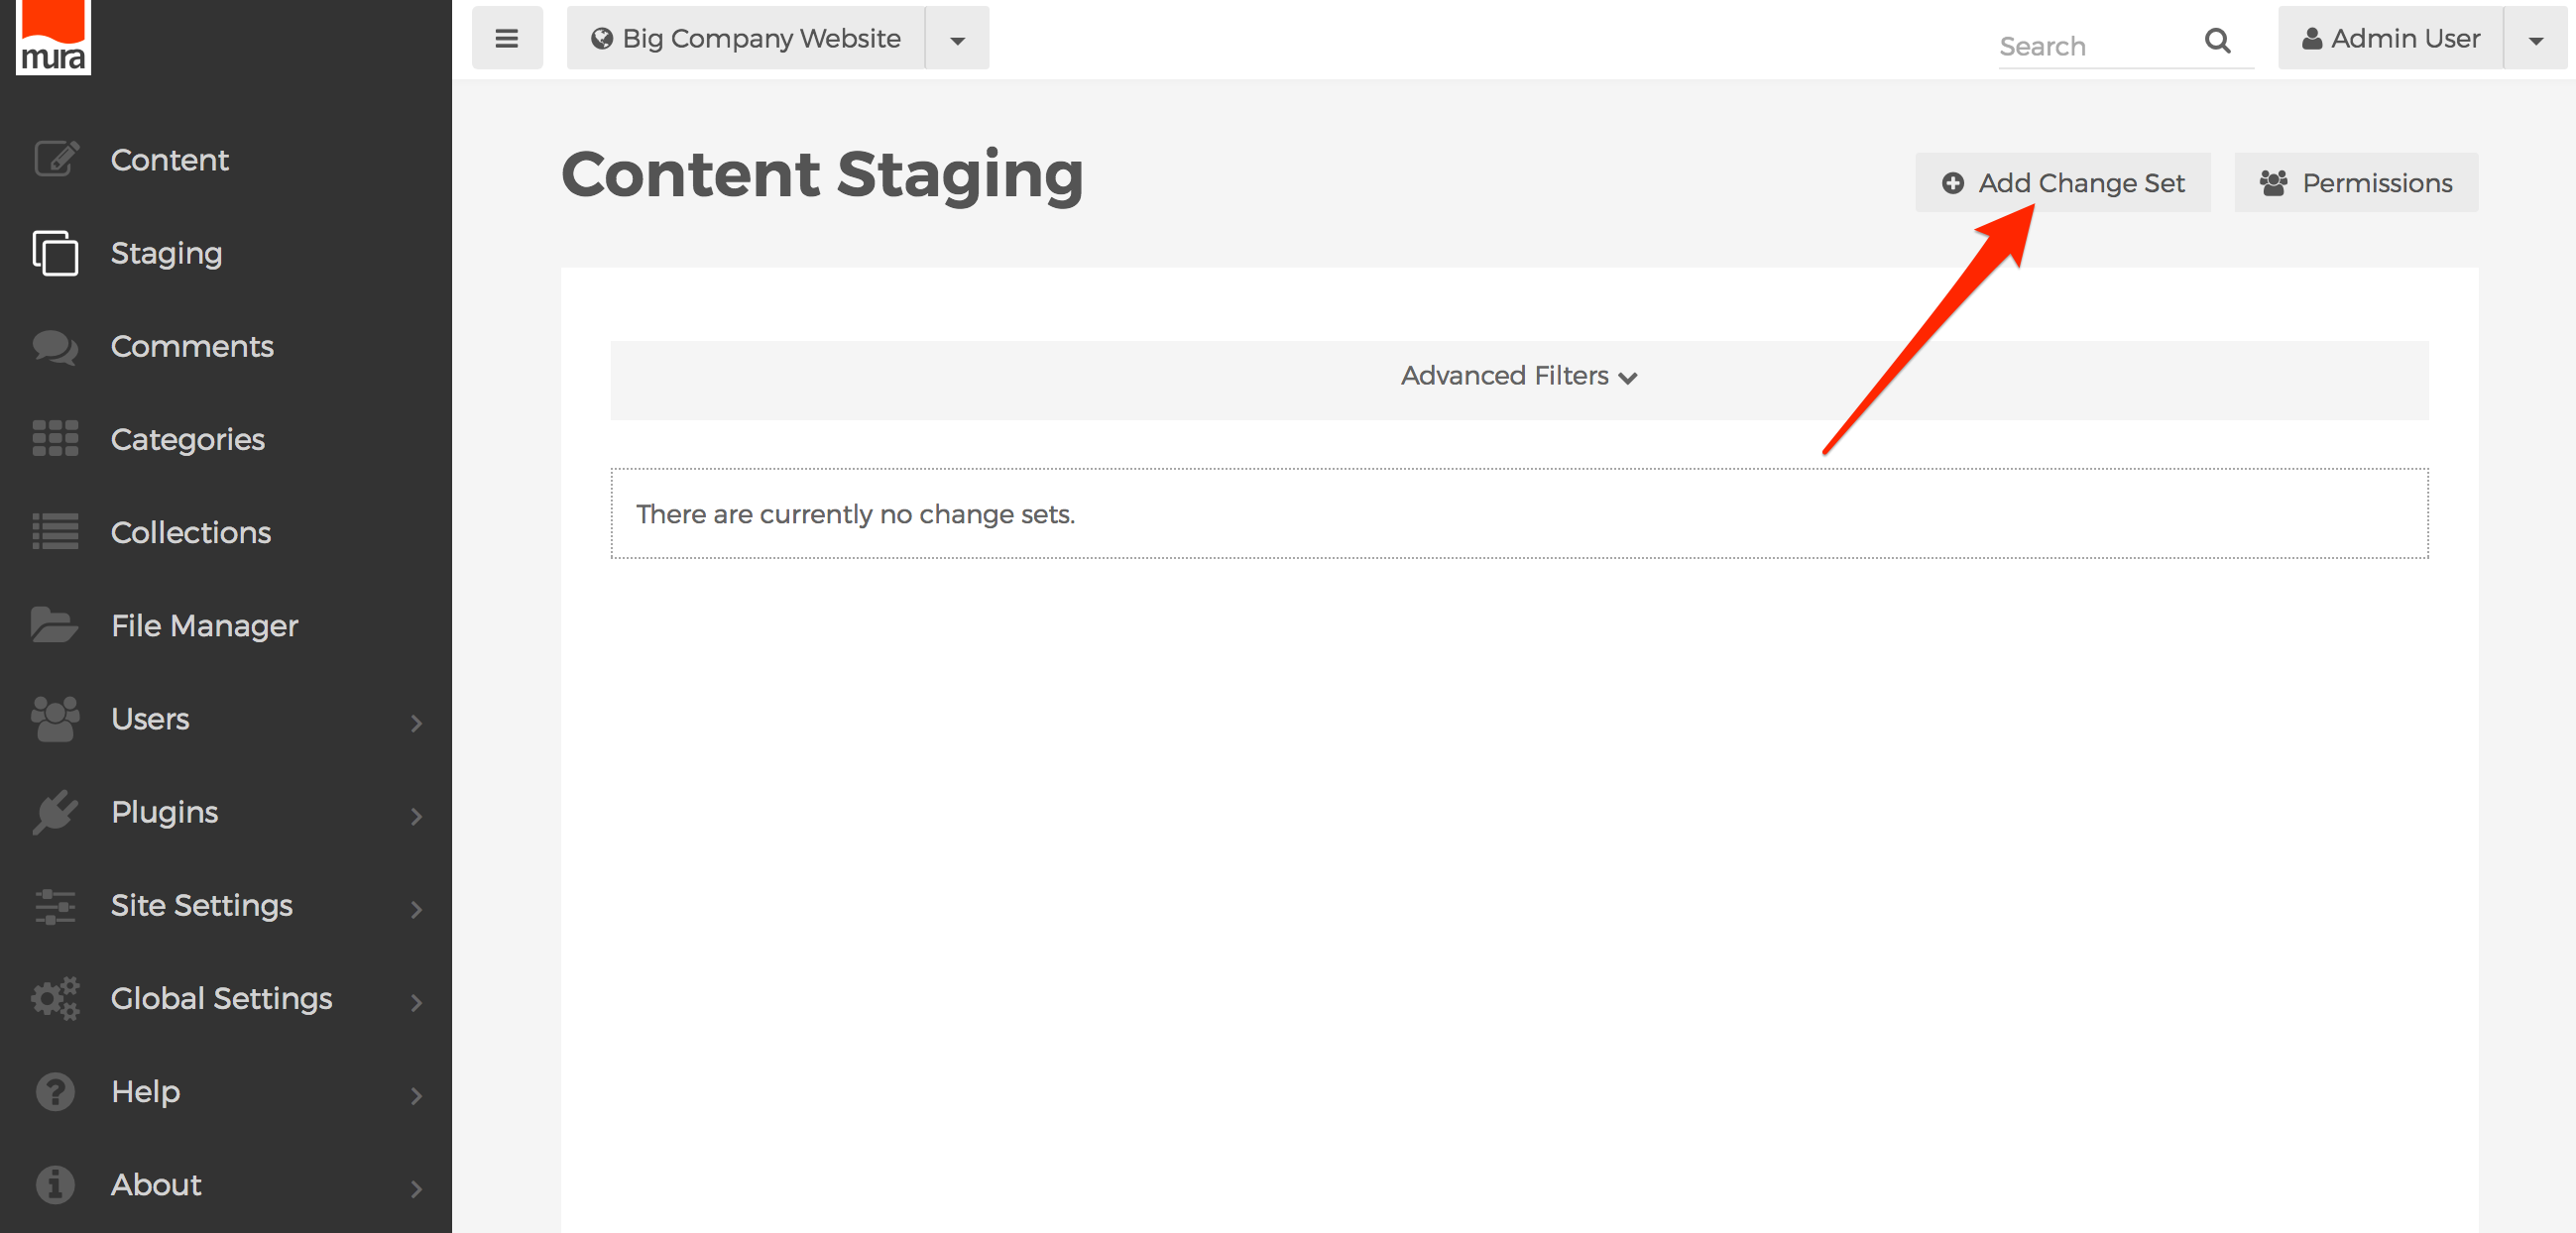](https://docs.deeztek.com/uploads/images/gallery/2021-02/image-1612835142663.png)
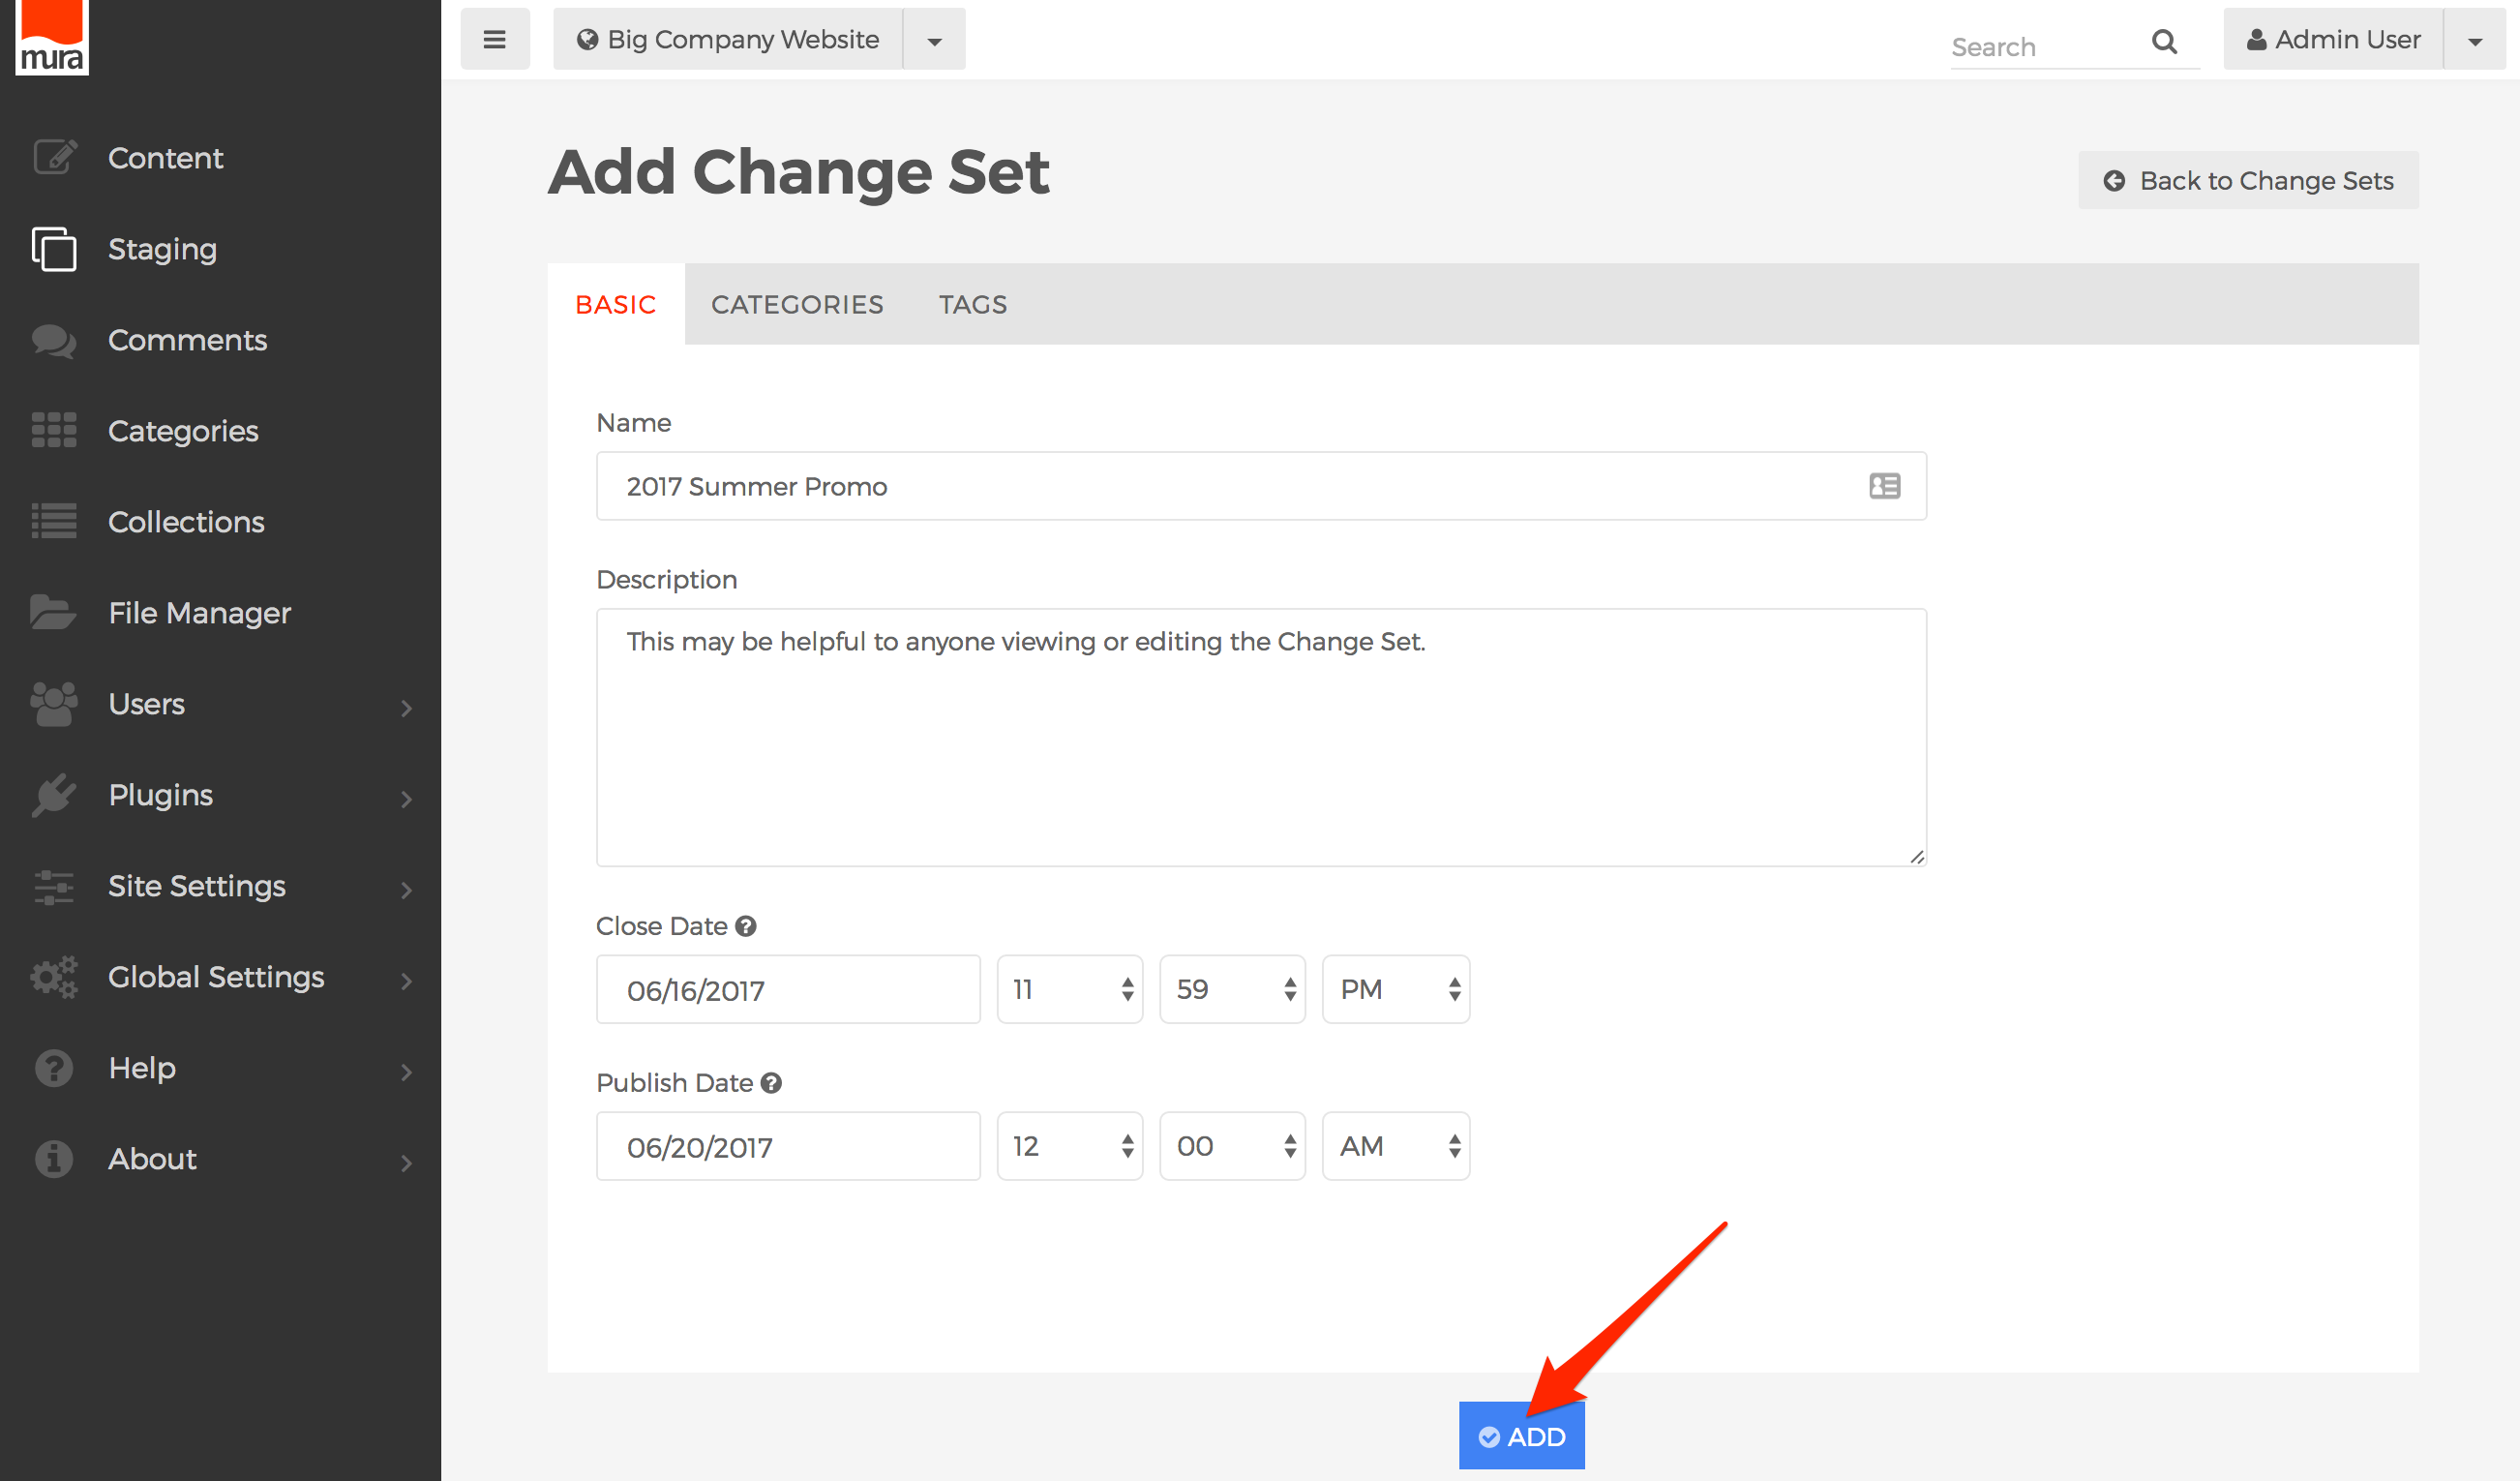
4. You should now see the **Add Change Set** screen.
[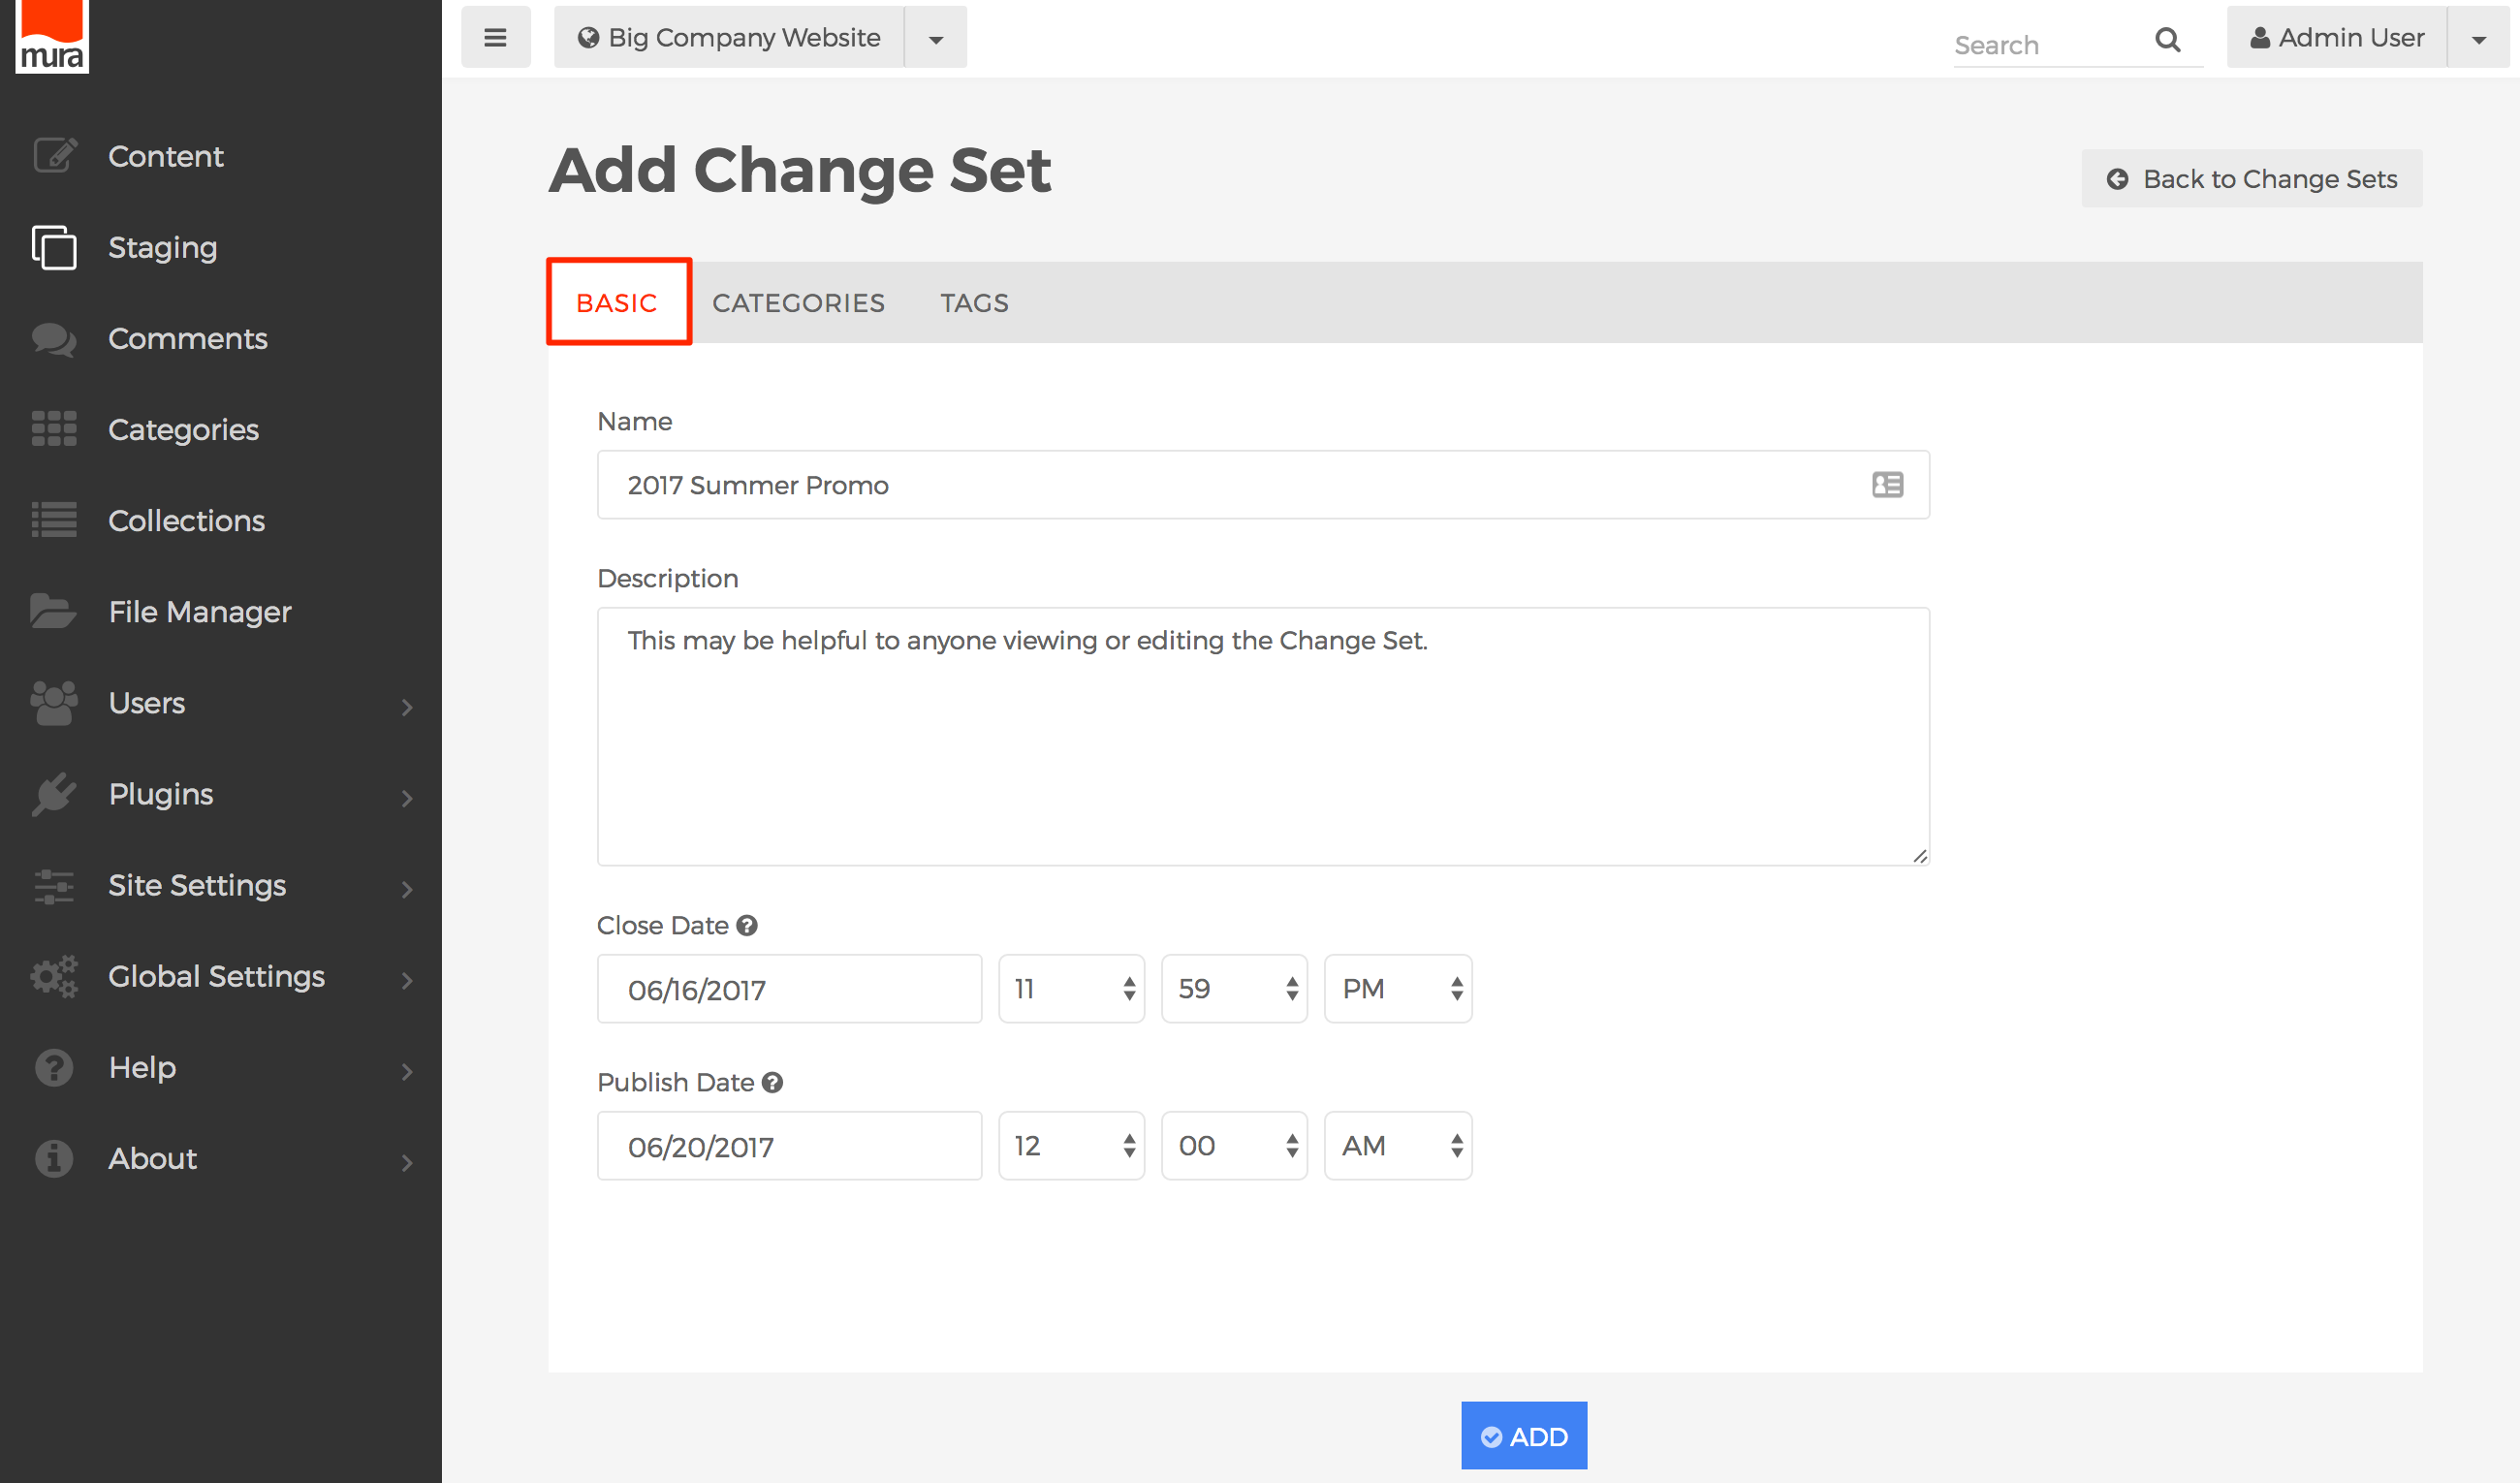](https://docs.deeztek.com/uploads/images/gallery/2021-02/image-1612835159928.png)
- **Basic Tab**
- **Name**
- A unique name for the Change Set (e.g., 2017 Summer Promo).
- **Description**
- A description that may be helpful for anyone viewing or editing the Change Set.
- **Close Date**
- The Close Date field may be used to prevent any users from adding more content after the specified date. This is useful so that users who need to review and/or approve the change set have time to do so, prior to the Change Set being published, which is why it's typically a good idea to enter a date and time at least a day or two ahead of the Publish Date.
- **Publish Date**
- This is the date and time all content assignments in the Change Set should go "live."
- **Categories Tab**
[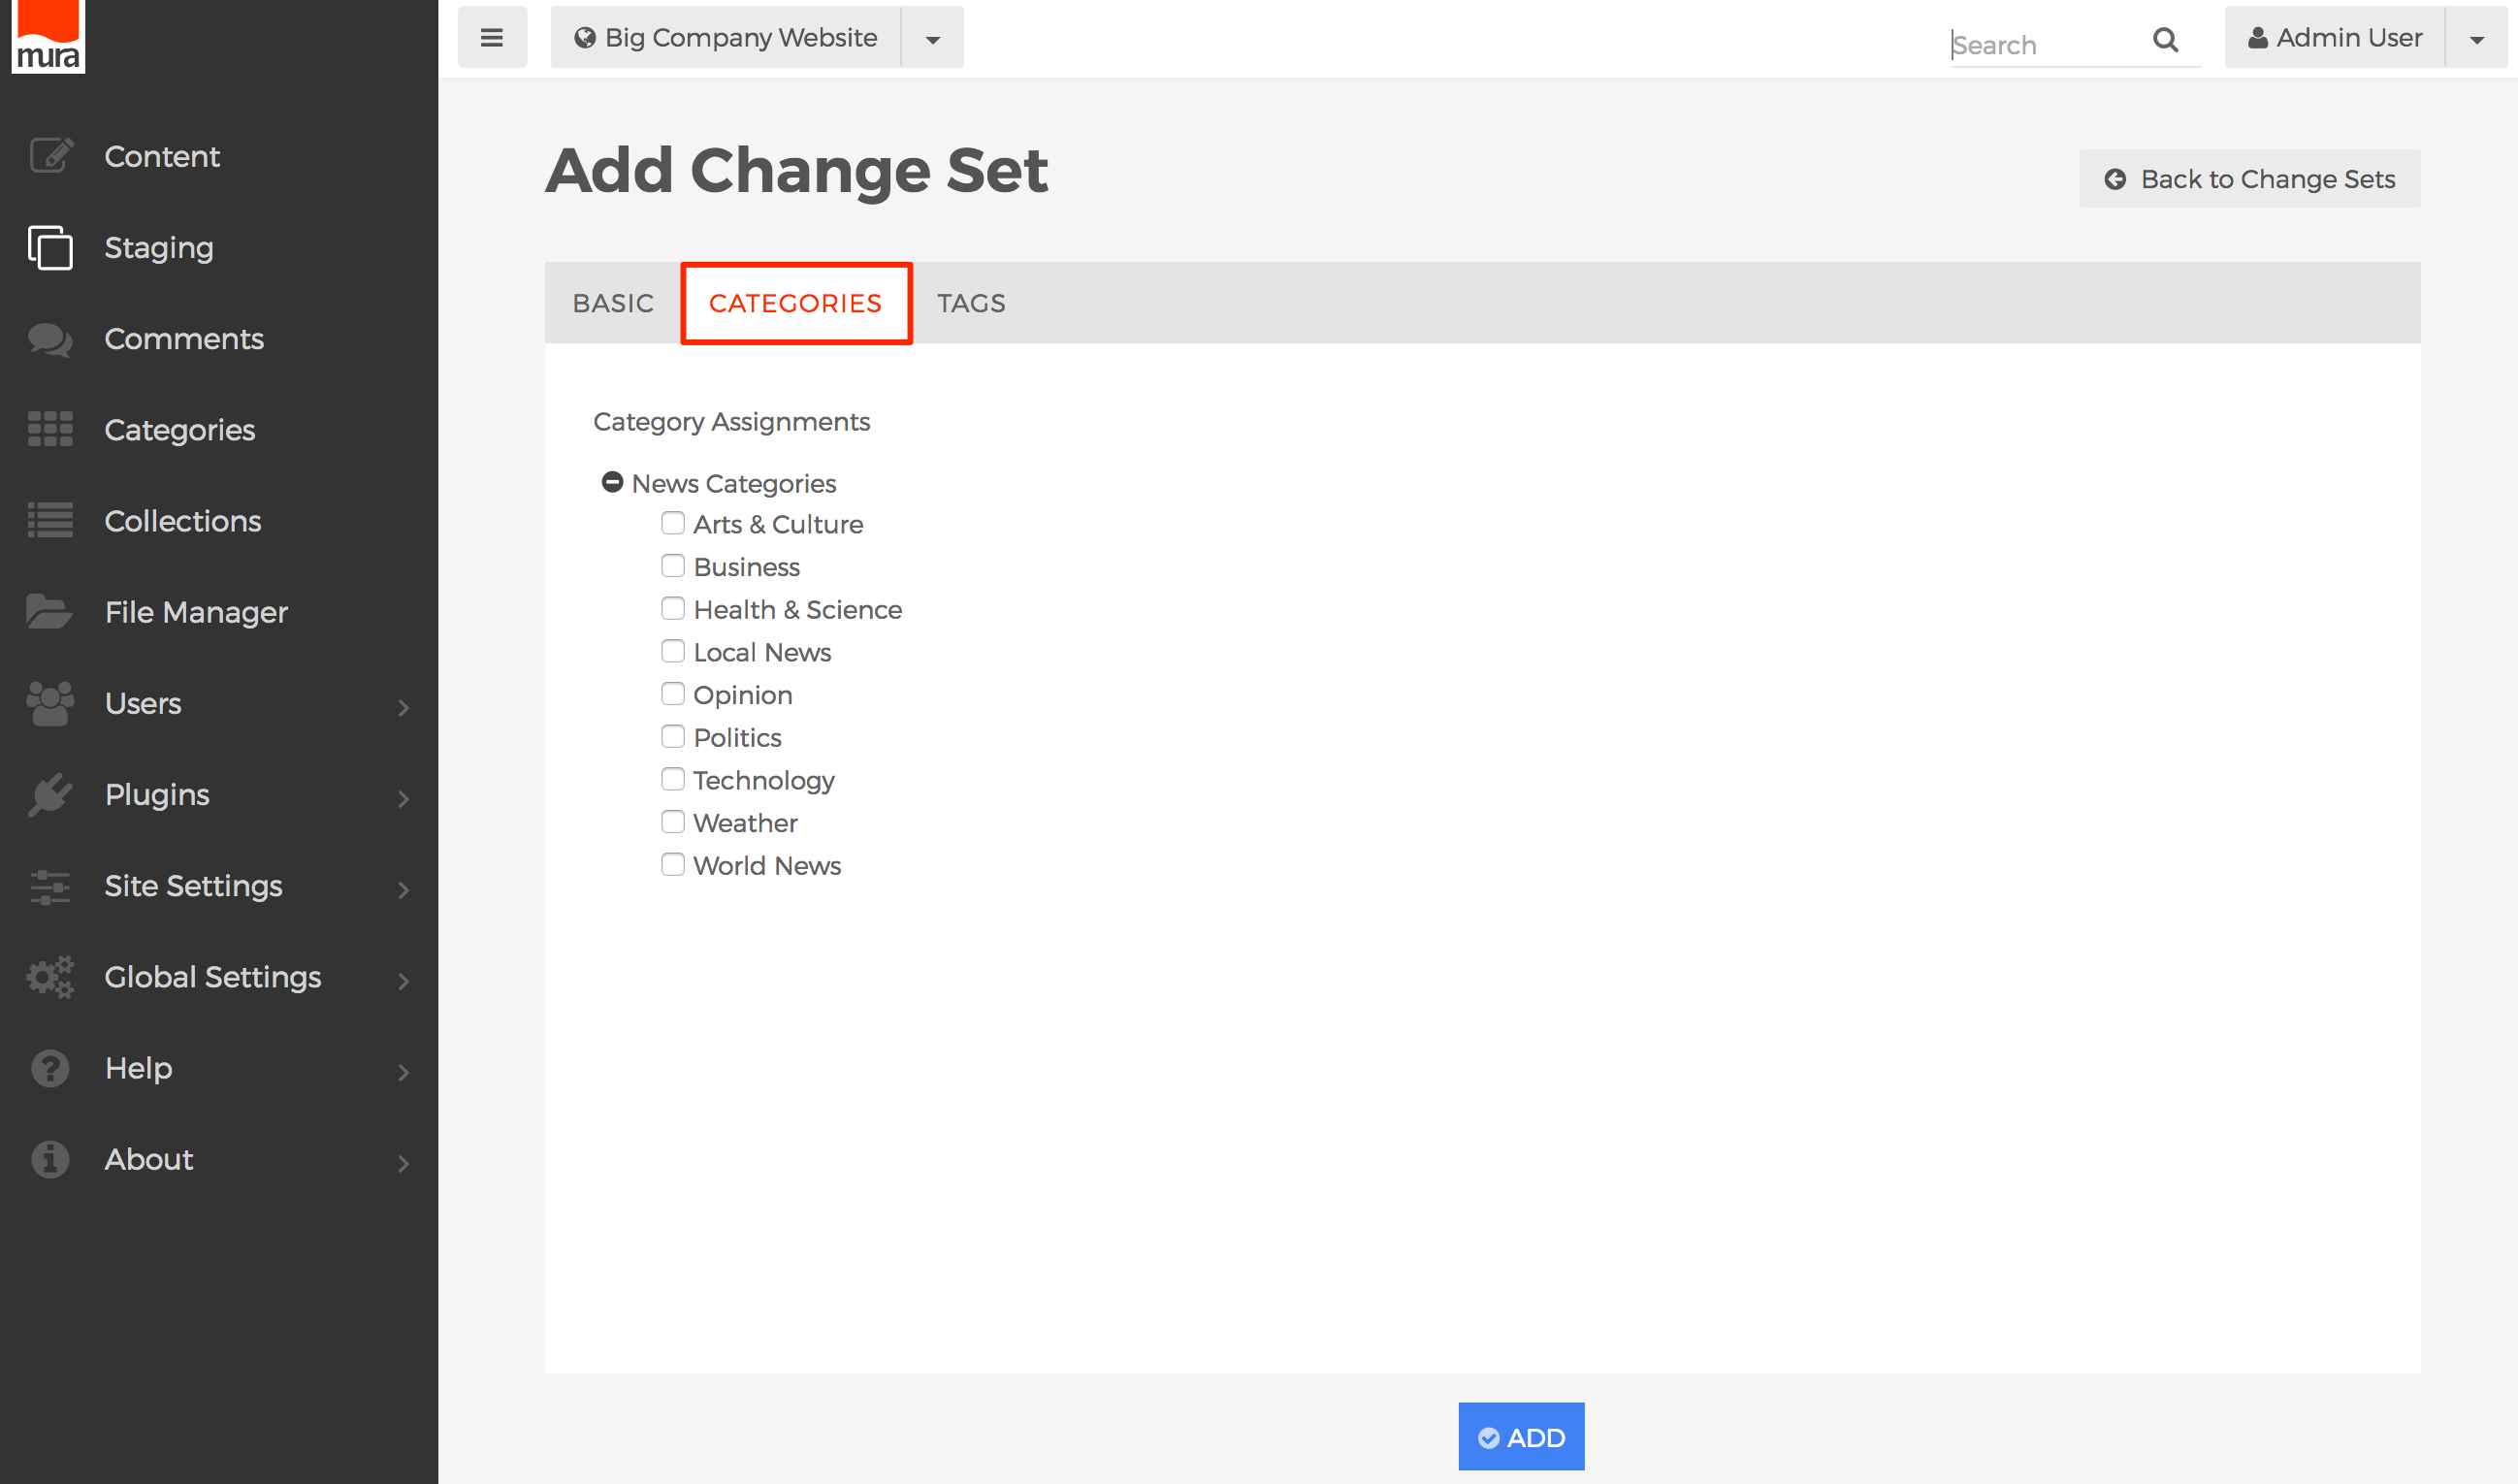](https://docs.deeztek.com/uploads/images/gallery/2021-02/image-1612835170813.png)
- You may categorize your Change Set by selecting your desired categories.
- **Tags Tab**
[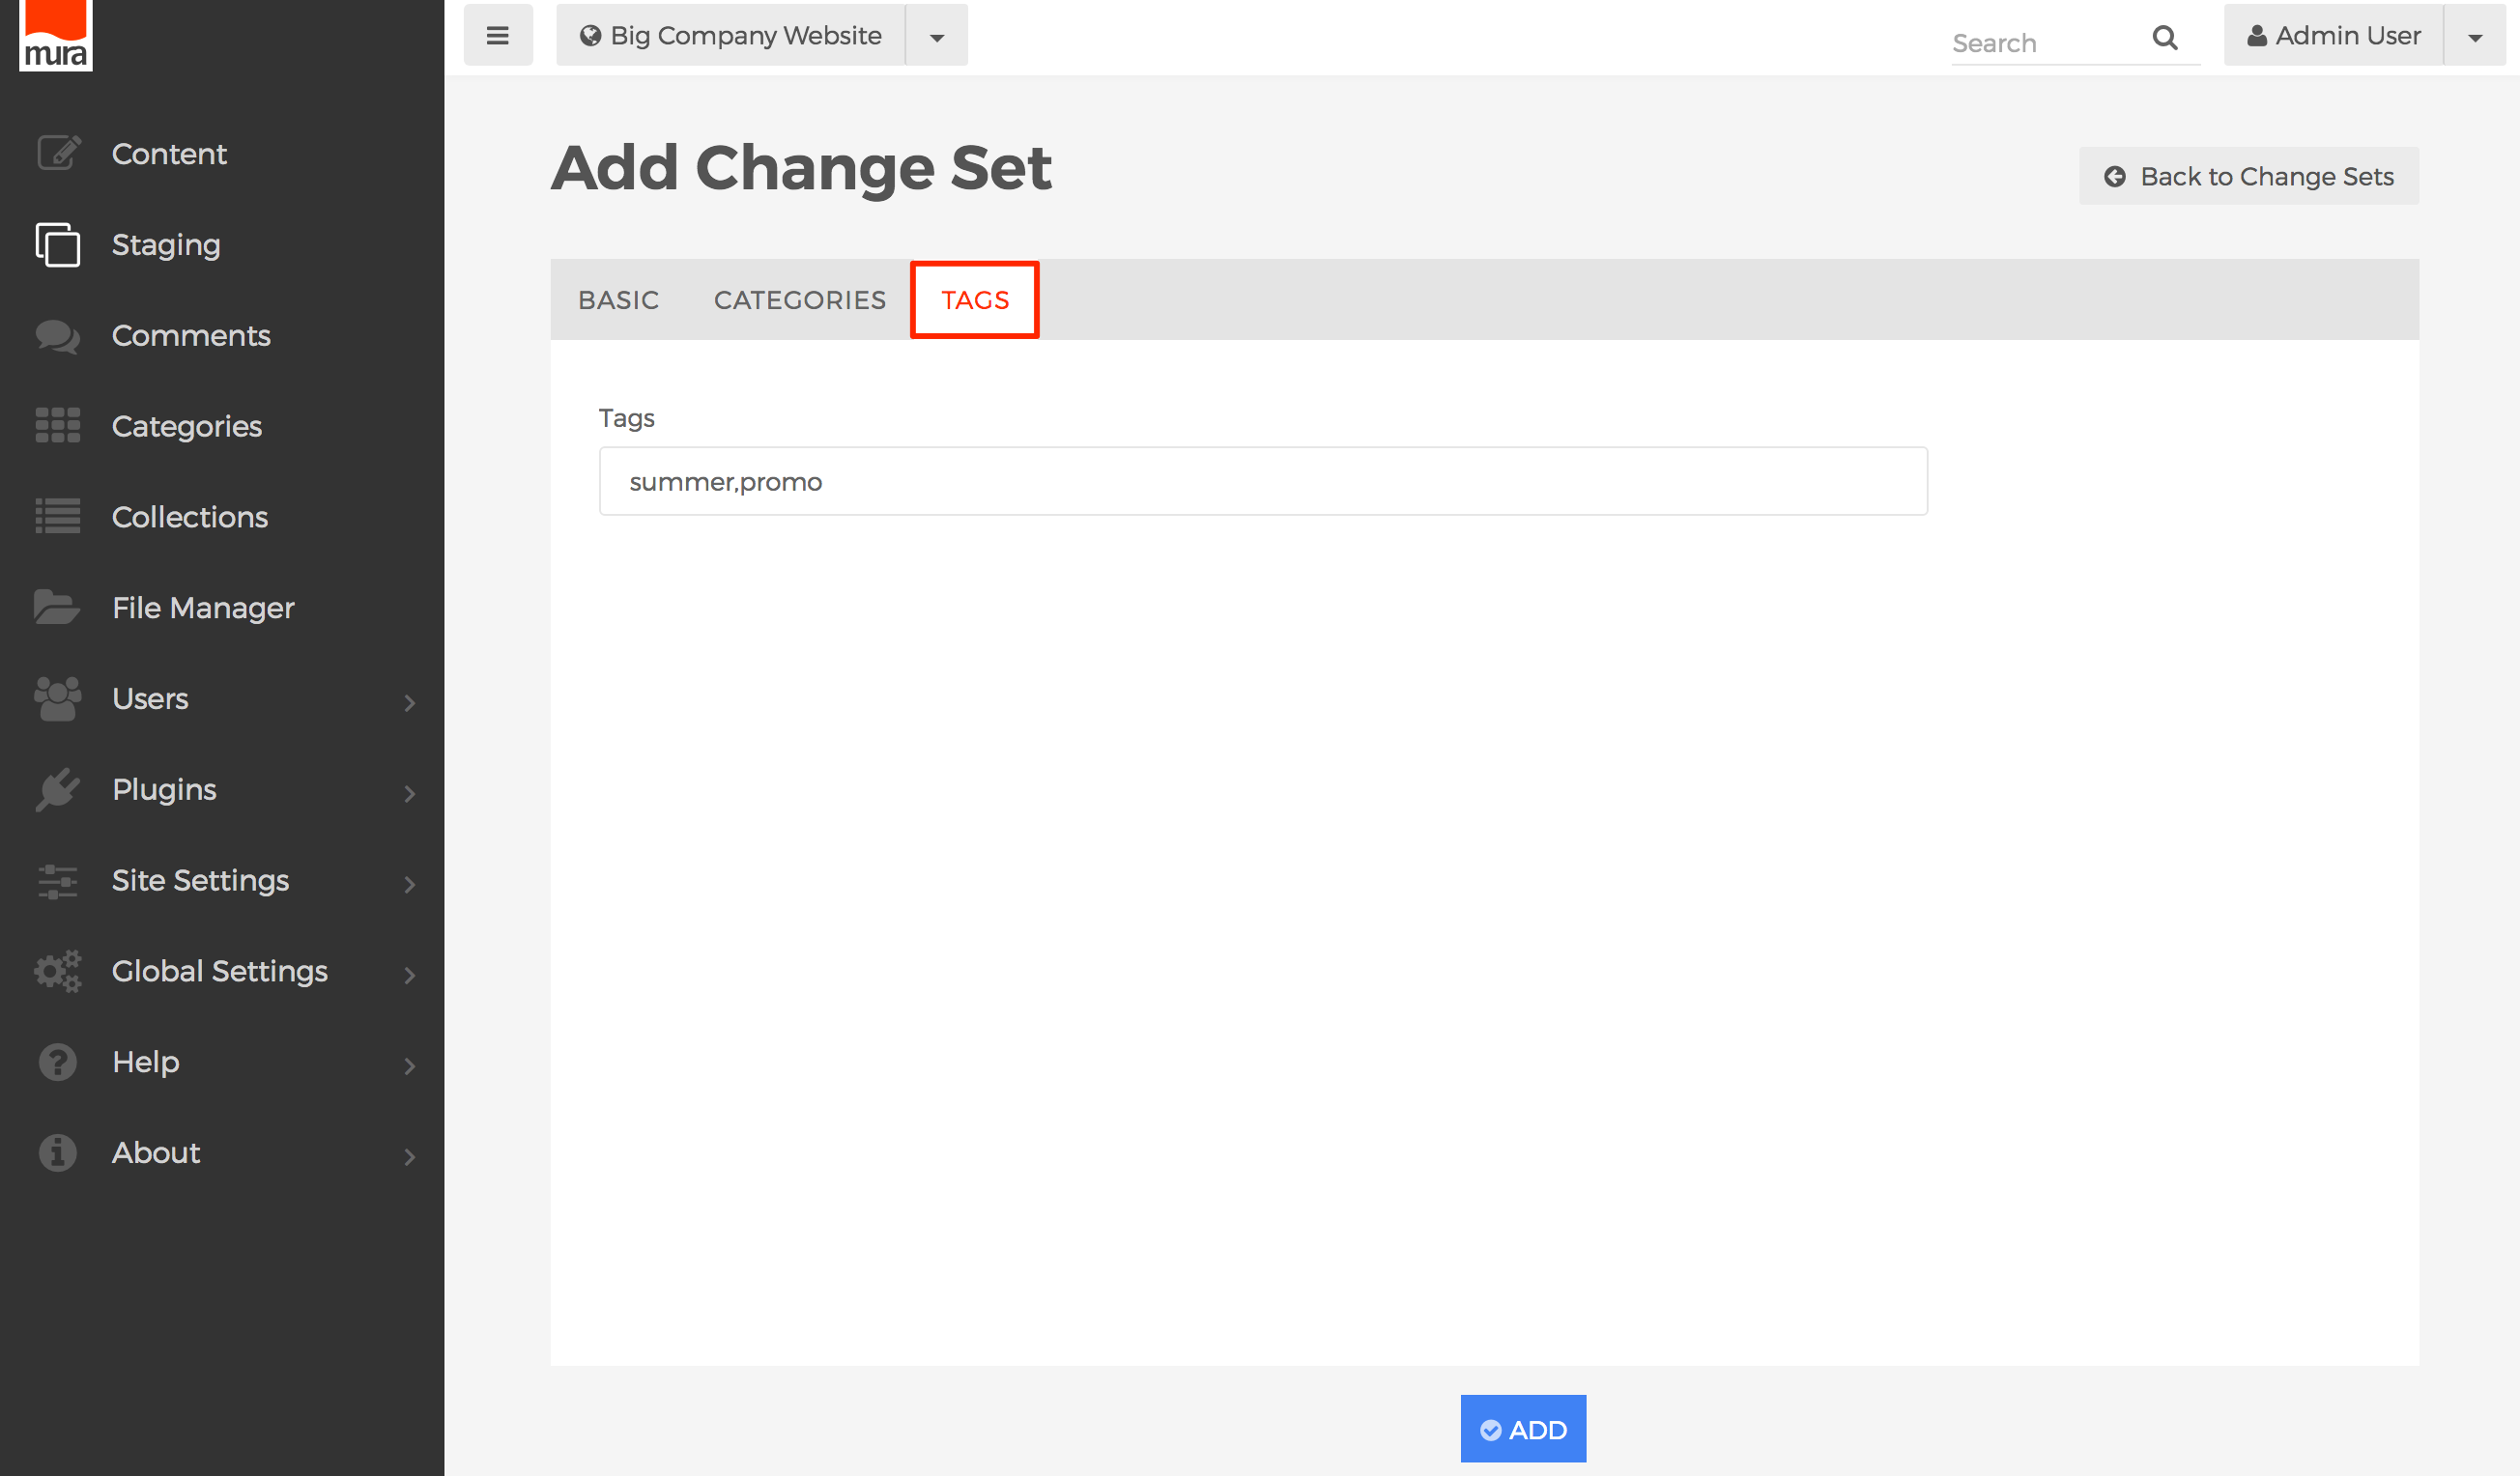](https://docs.deeztek.com/uploads/images/gallery/2021-02/image-1612835182829.png)
- You may enter a comma-delimited list of tags for the Change Set.
5. Click **Add**, to save your new change set.
[](https://docs.deeztek.com/uploads/images/gallery/2021-02/image-1612835227506.png)
## Assign Content to a Change Set
Mura allows you to add content items to Change Sets as well as Components and Forms. To add content to a Change Set, follow the steps below.
1. Either create a new content item, or select an existing content item you wish to edit specifically for the Change Set.
2. Once you have made your desired additions and/or changes, simply click the "**Save to Change Set**" button.
[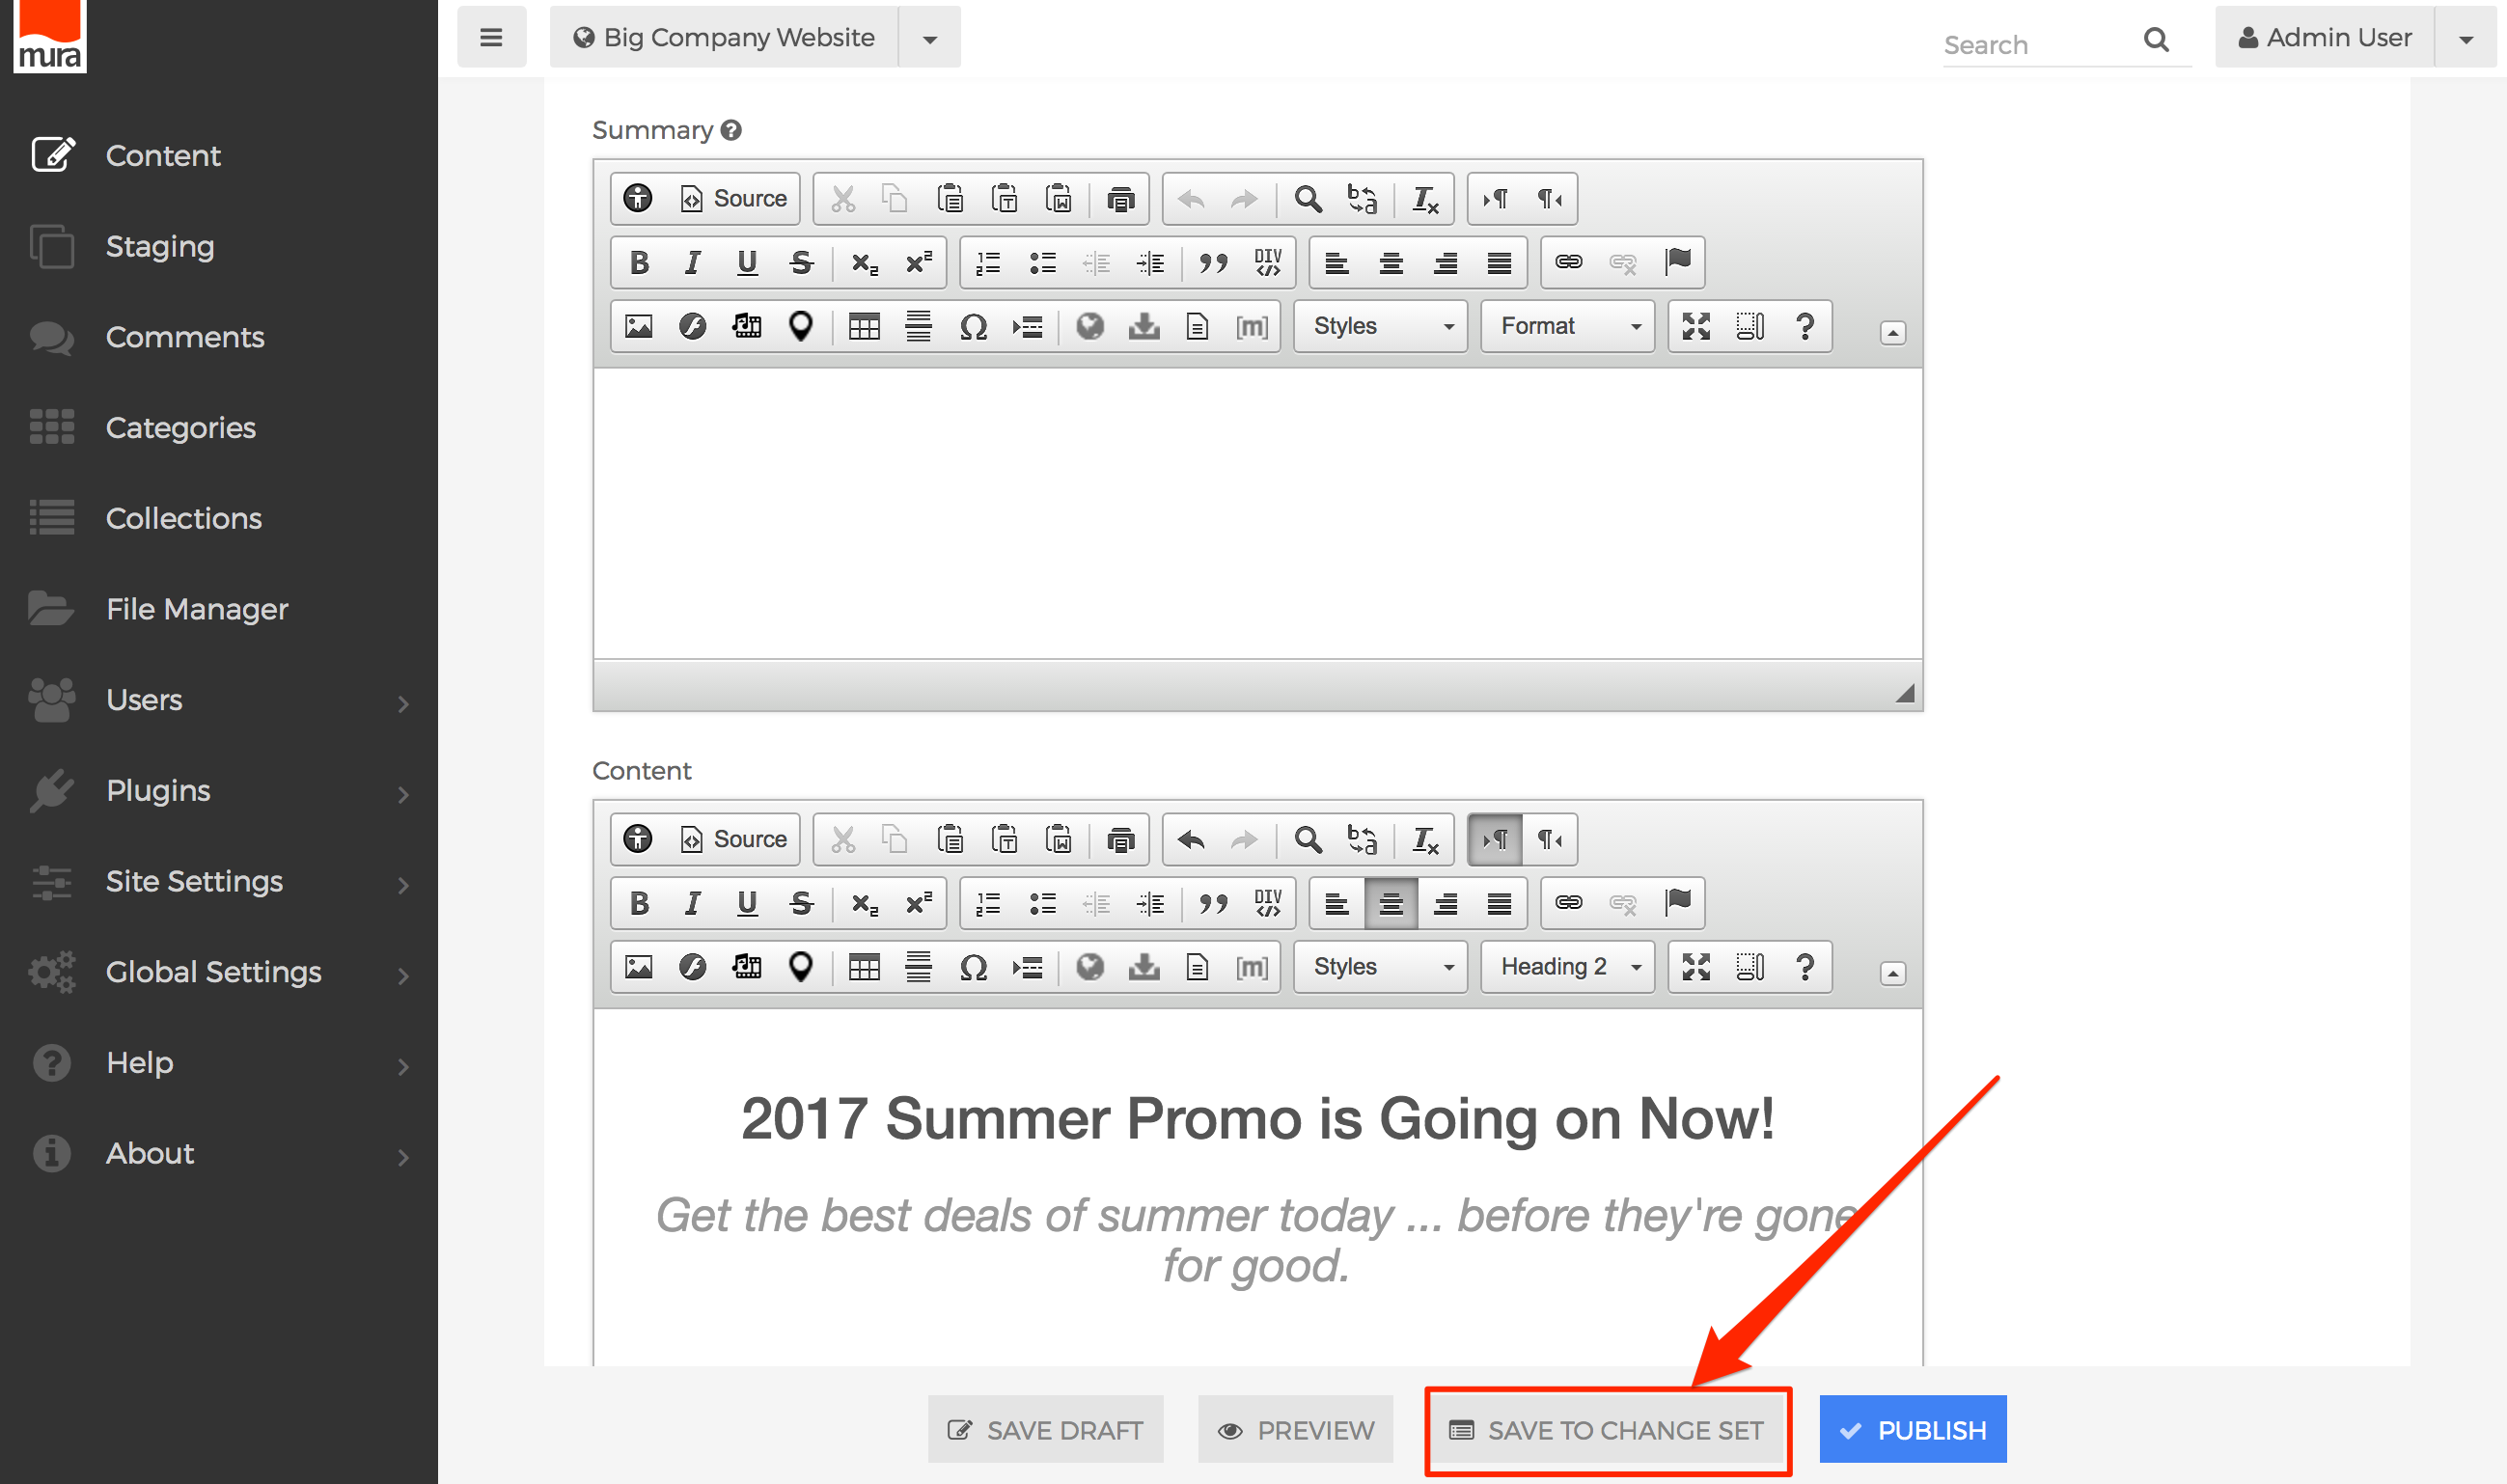](https://docs.deeztek.com/uploads/images/gallery/2021-02/image-1612835240033.png)
**Note**: Only groups with "Editor" privileges will be able to see the "Save to Change Set" button.
3. This should launch the **Assign to Change Set** dialog window. Select your desired **Change Set** from the list.
[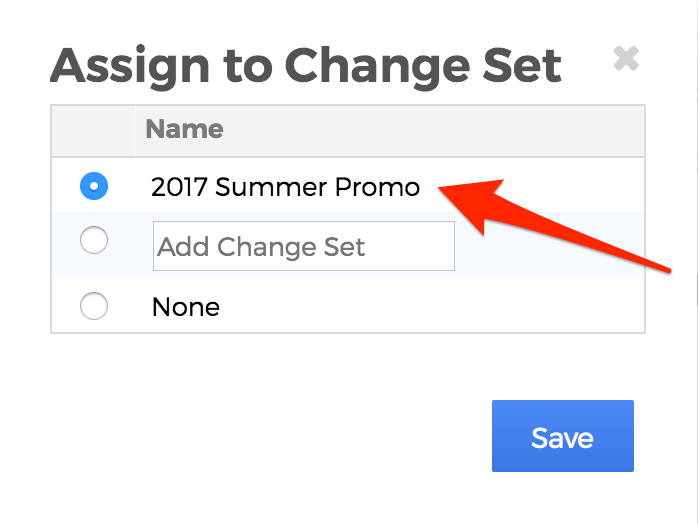](https://docs.deeztek.com/uploads/images/gallery/2021-02/image-1612835252644.png)
4. Or, select the radio button next to the "**Add Change Set**" text box, enter a "**Title**" for it.
[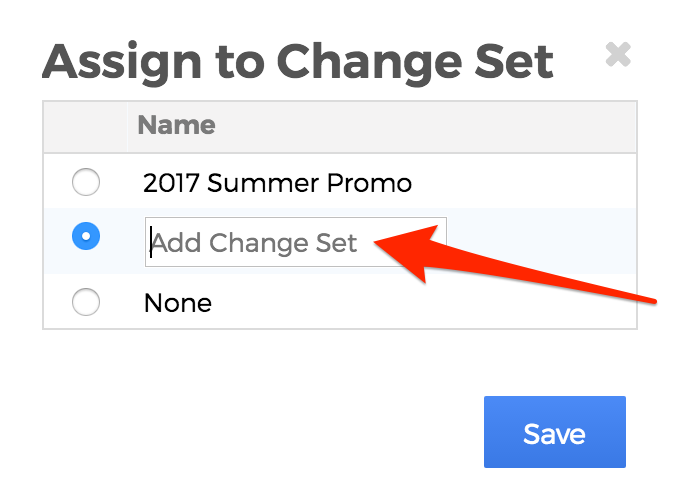](https://docs.deeztek.com/uploads/images/gallery/2021-02/image-1612835262294.png)
5. Click **Save**, to save your changes to the Change Set.
[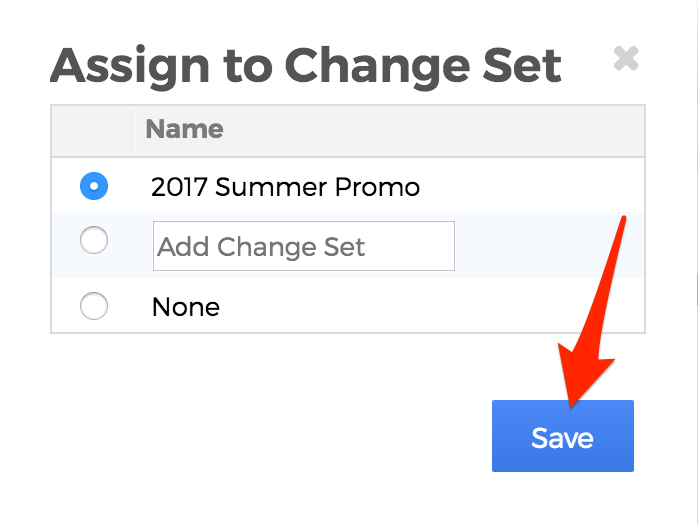](https://docs.deeztek.com/uploads/images/gallery/2021-02/image-1612835272401.png)
6. Repeat these steps for all content you wish to add to the Change Set.
## View Content Assignment List
Mura maintains a listing of all content that has been assigned to each Change Set. To view the assignments, follow the steps below.
1. From the back-end administration area of Mura, select **Staging** from the main navigation.
[](https://docs.deeztek.com/uploads/images/gallery/2021-02/image-1612835285287.png)
2. You should be taken to the **Content Staging** screen.
[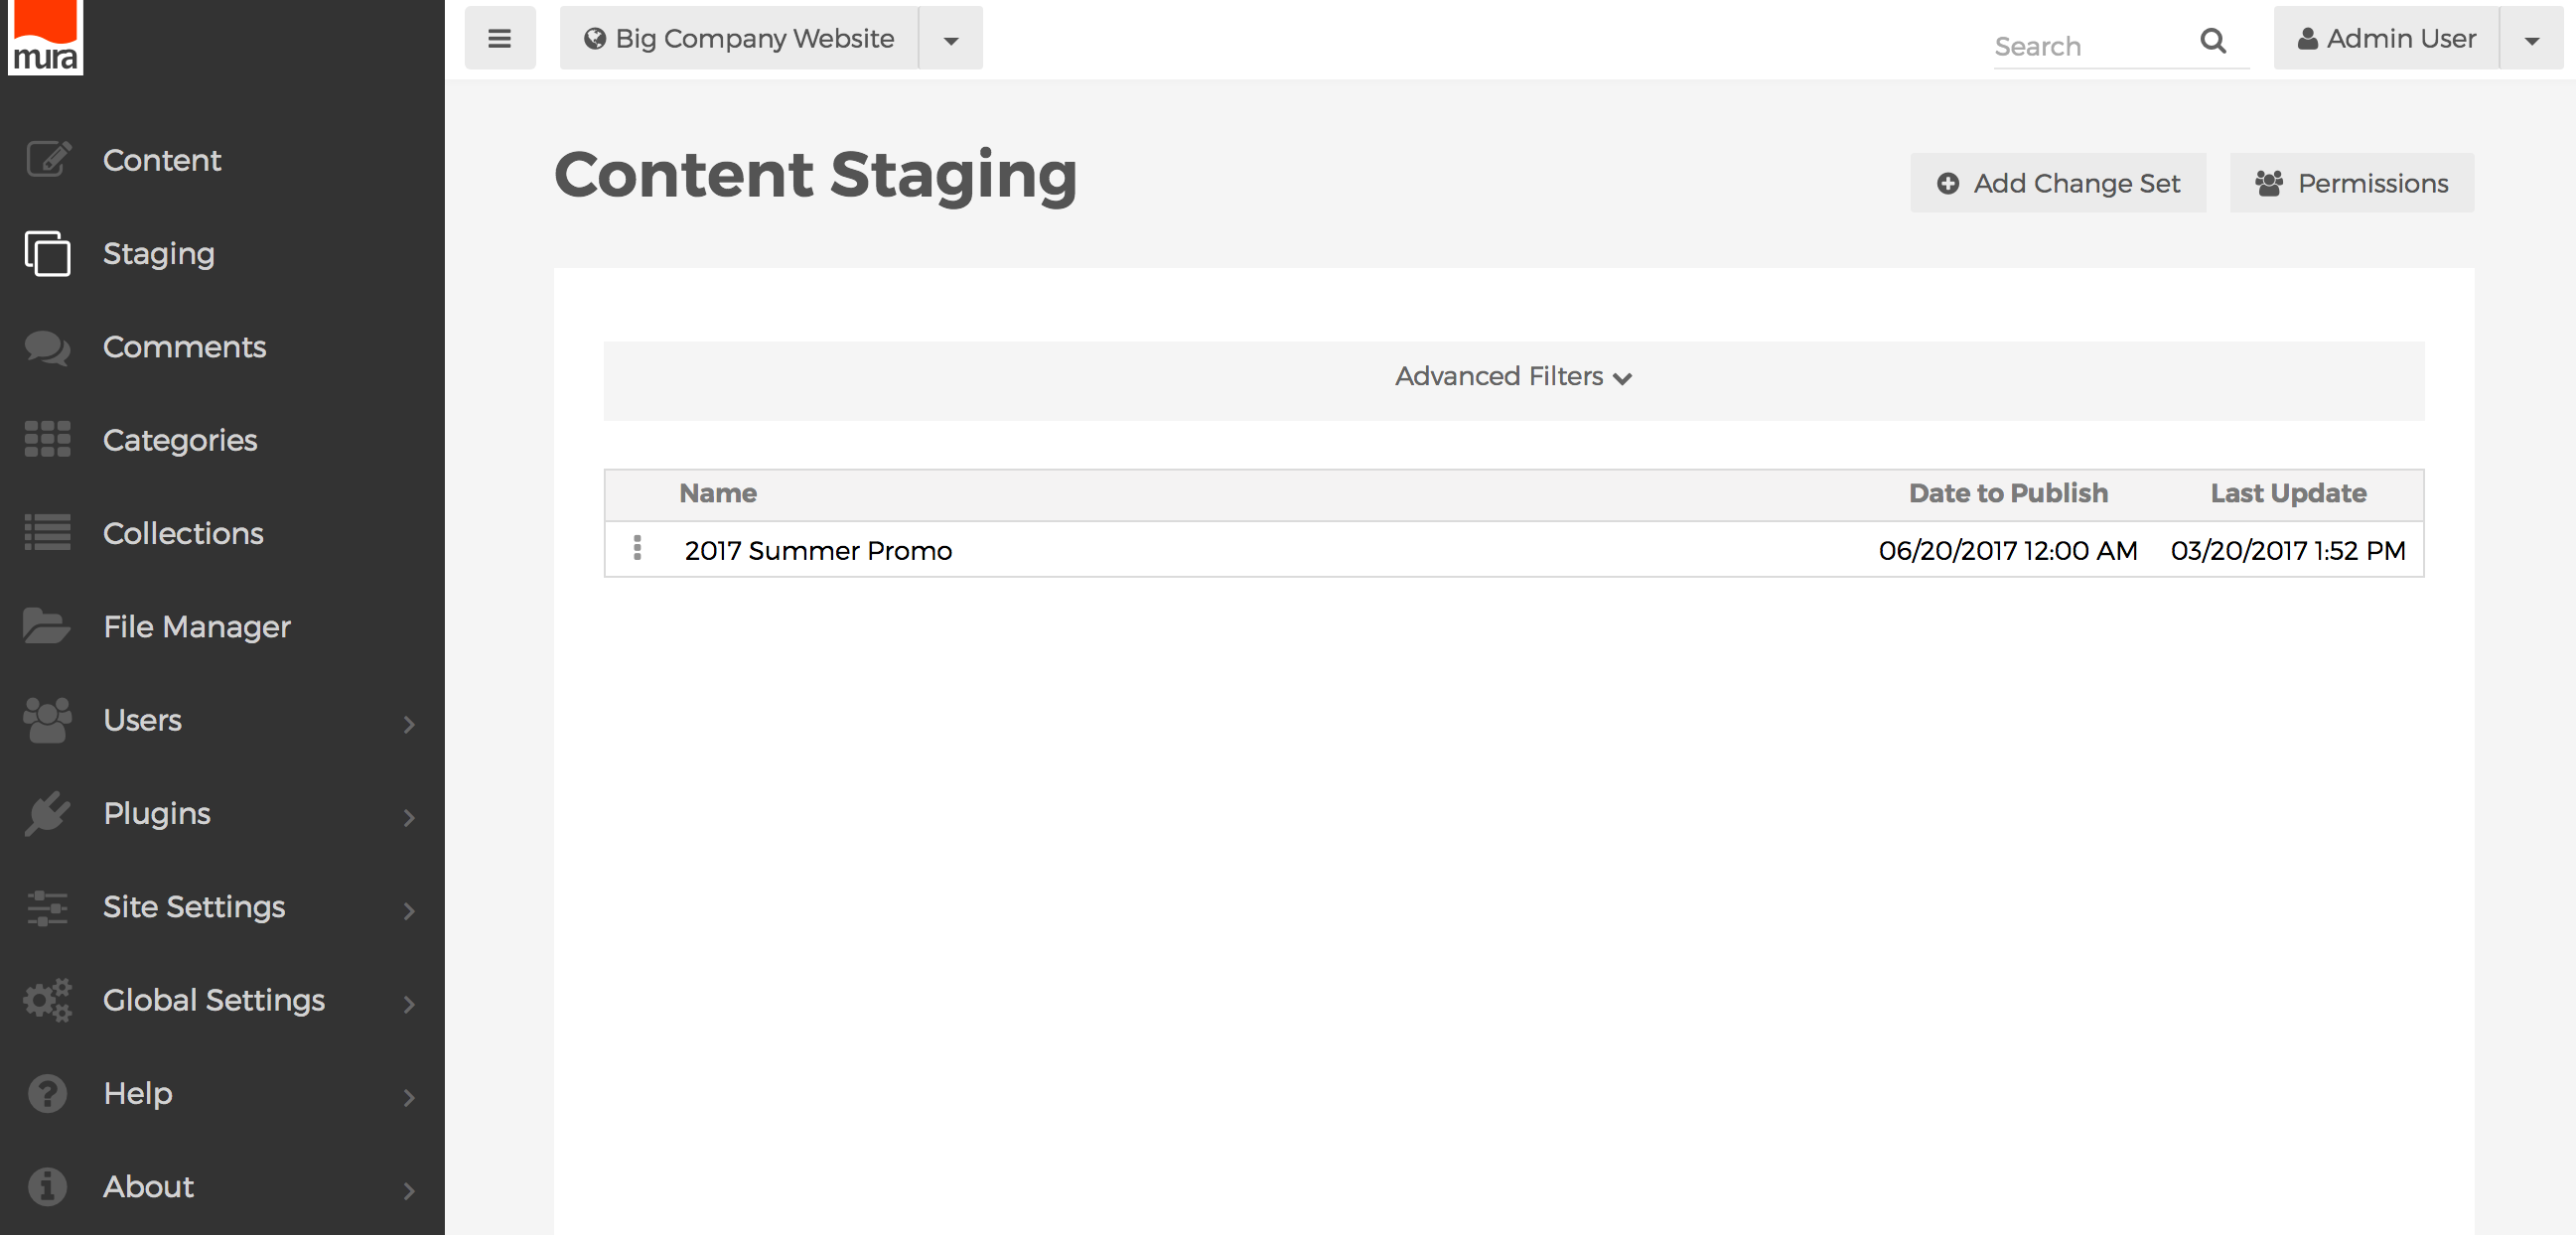](https://docs.deeztek.com/uploads/images/gallery/2021-02/image-1612835305072.png)
3. From the list of available Change Sets, select the three-dot menu next to the Change Set you wish to view assignments for, and select the **Assignments** option.
[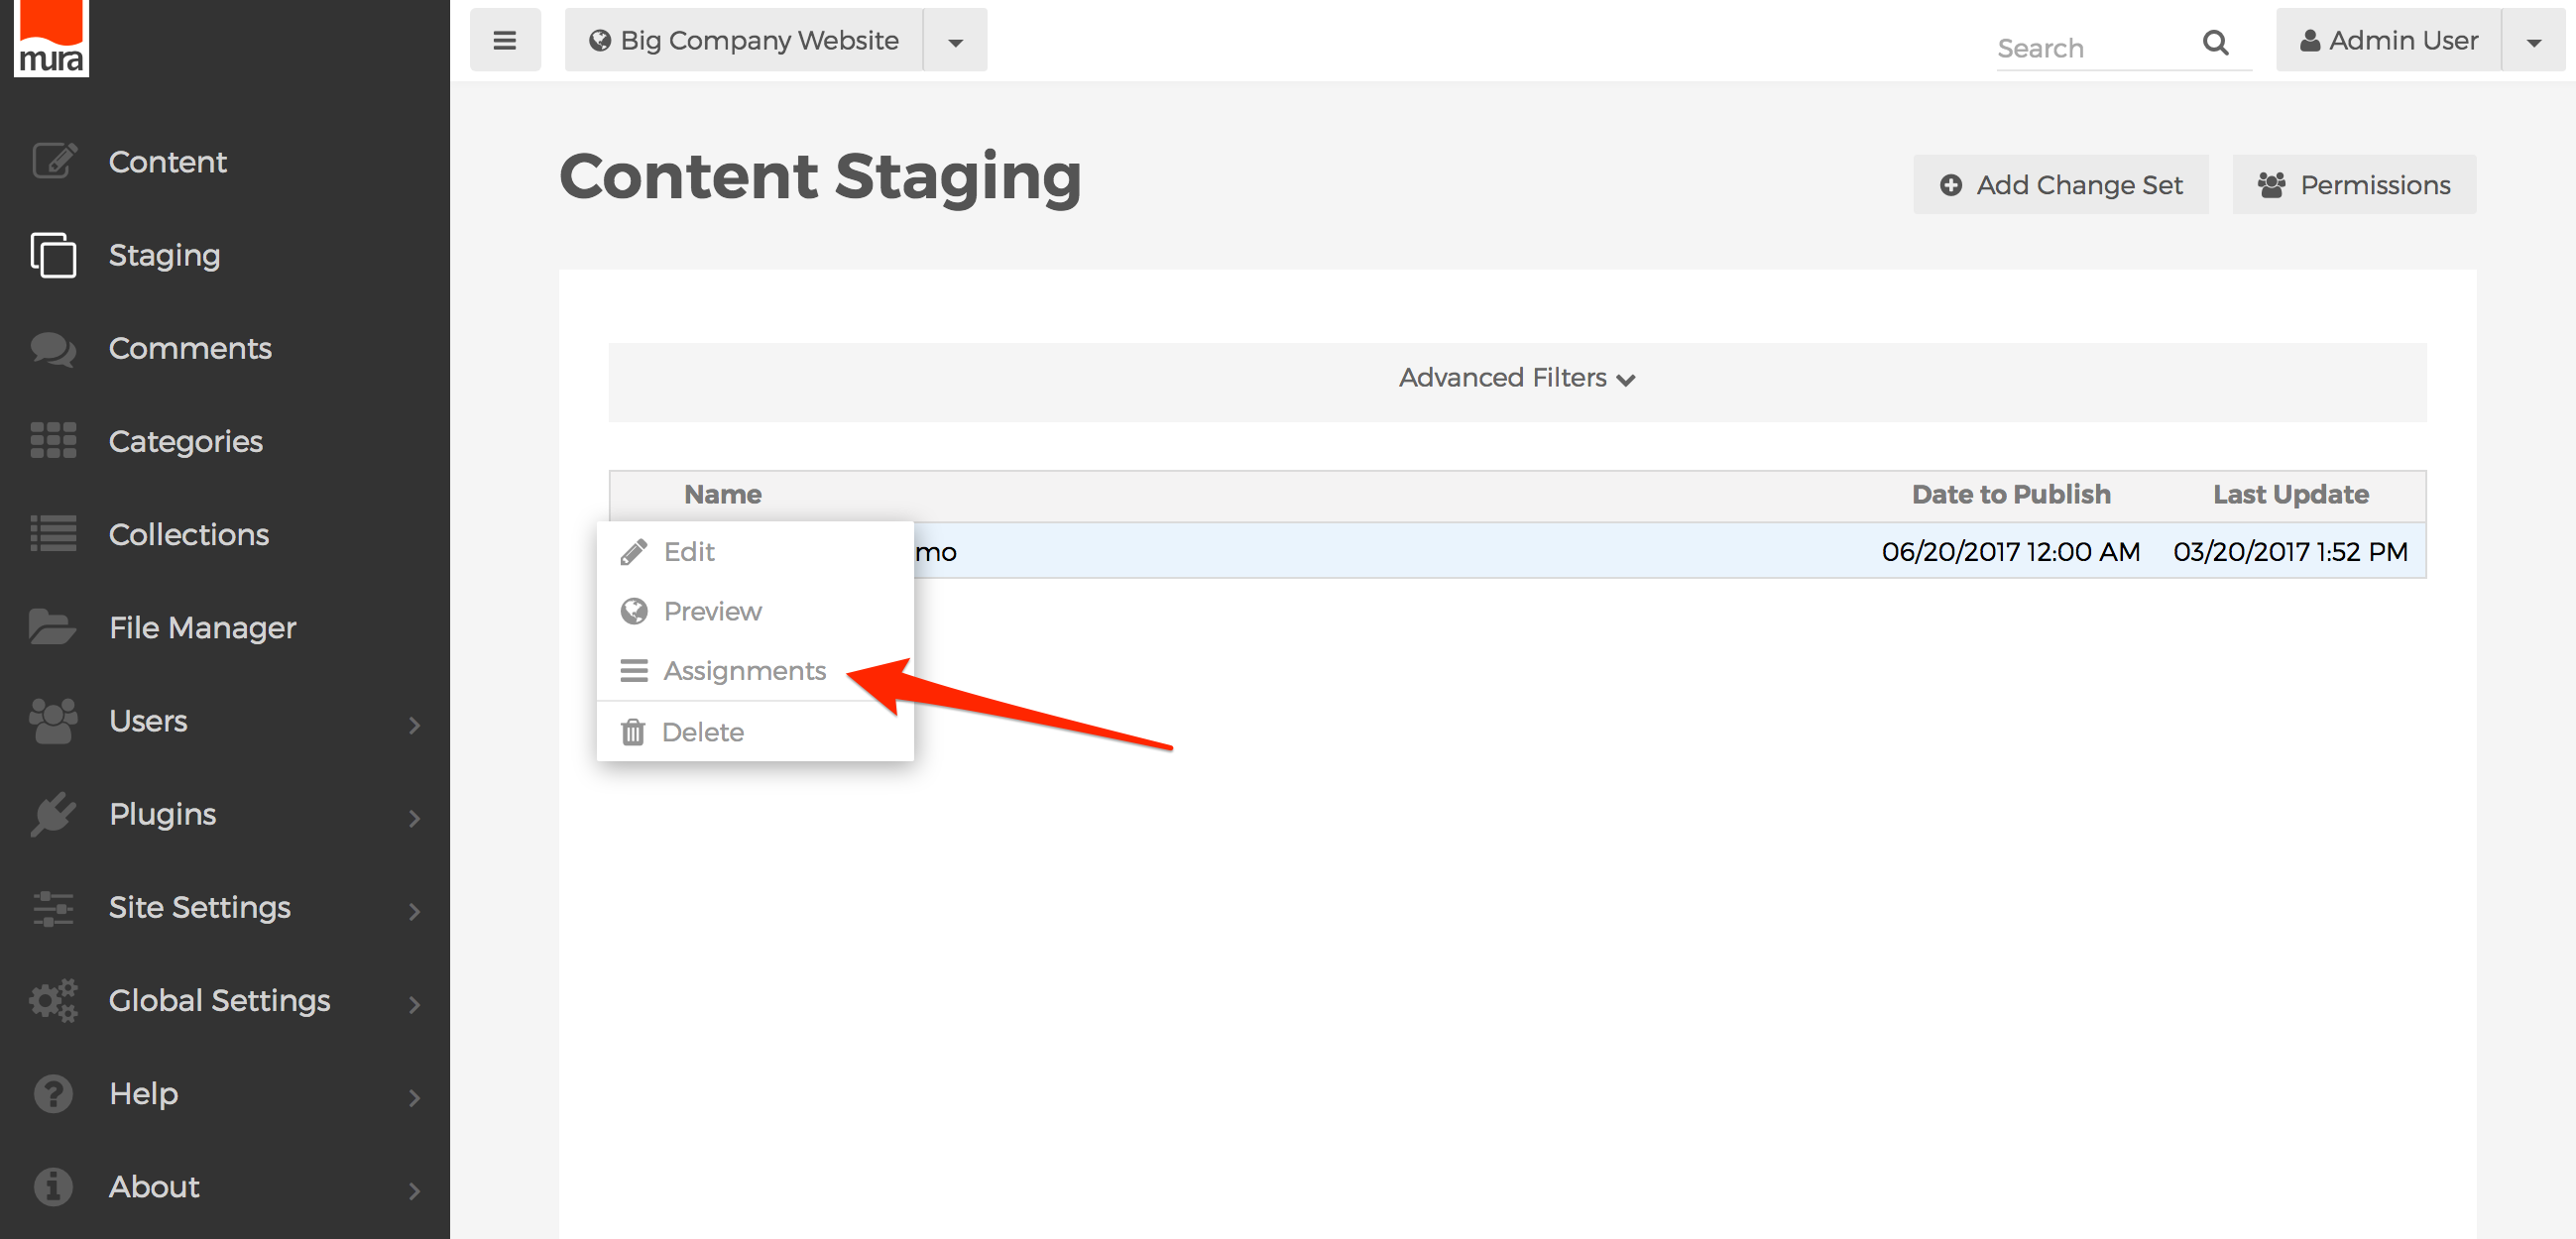](https://docs.deeztek.com/uploads/images/gallery/2021-02/image-1612835316735.png)
4. You should be taken to the **Change Set Content List** screen. Any content, components, or forms that have been assigned to the Change Set, should be listed here.
[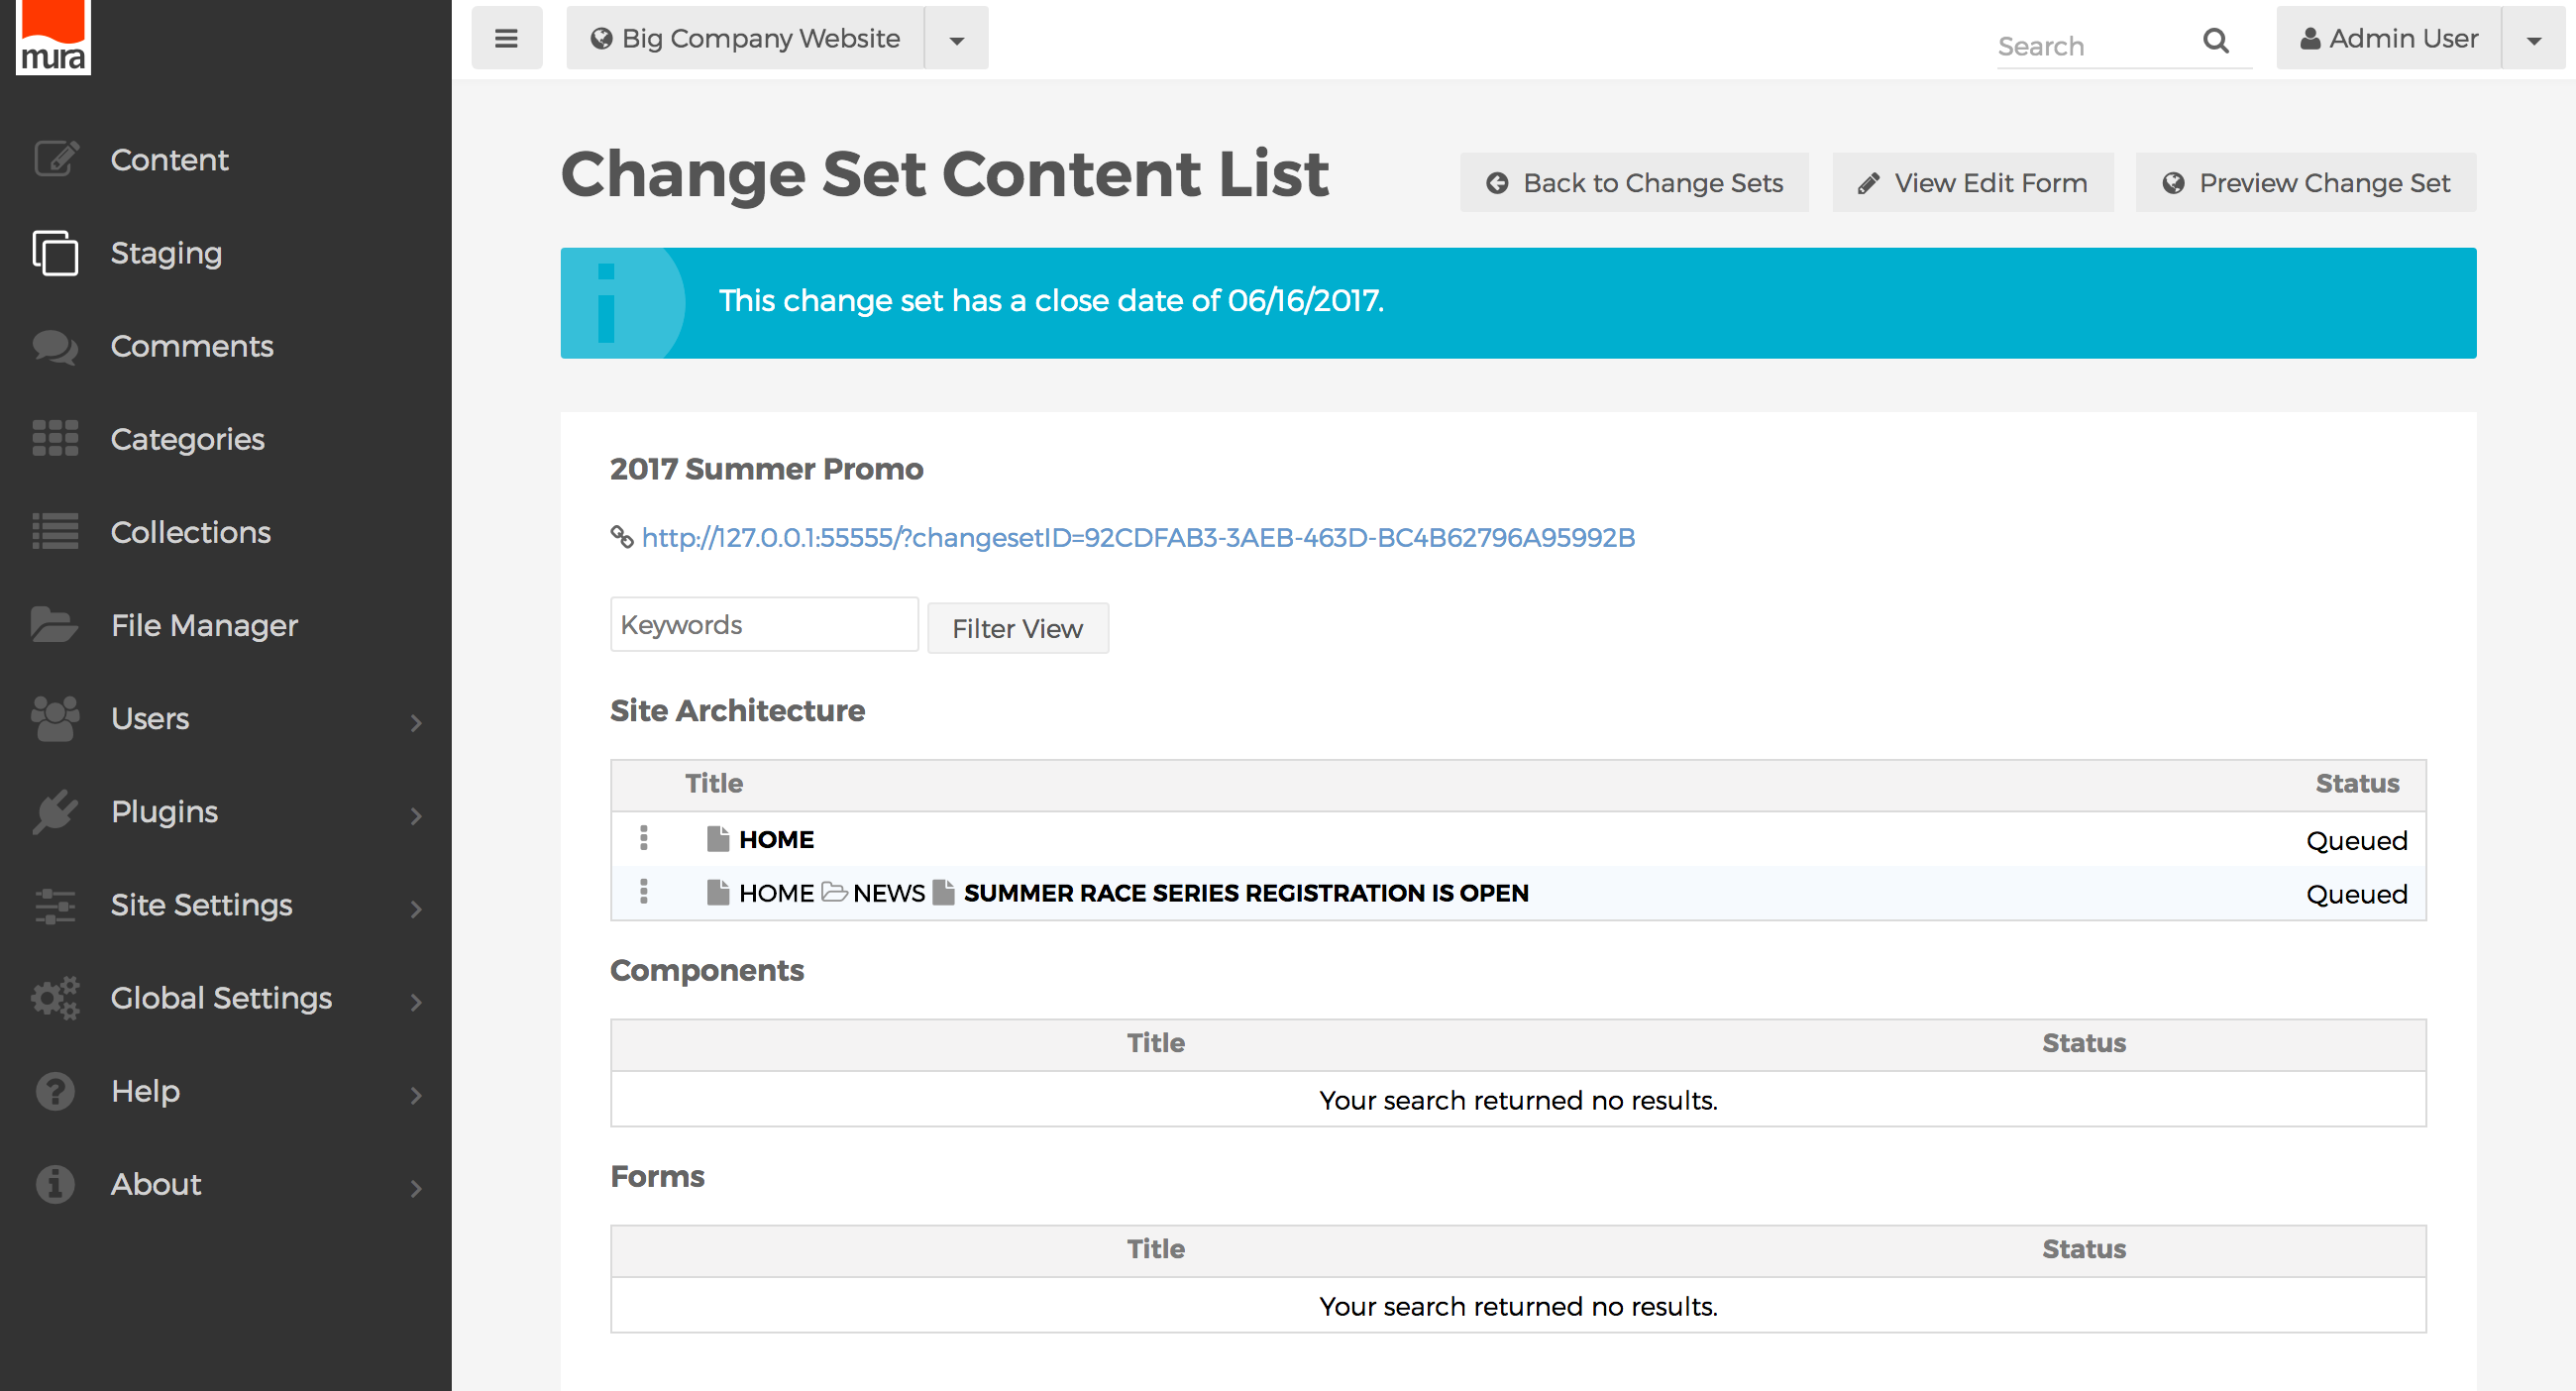](https://docs.deeztek.com/uploads/images/gallery/2021-02/image-1612835328390.png)
## Preview a Change Set
Once you have added content to a Change Set, you can preview your site to see what it will look like once the Change Set has been published. To preview a Change Set, or obtain a URL to share with other team members, follow the steps below.
1. From the back-end administration area of Mura, select **Staging** from the main navigation.
[](https://docs.deeztek.com/uploads/images/gallery/2021-02/image-1612835339516.png)
2. You should be taken to the **Content Staging** screen.
[](https://docs.deeztek.com/uploads/images/gallery/2021-02/image-1612835349357.png)
3. From the list of available Change Sets, select the three-dot menu next the your desired Change set, and select the **Preview** option.
[](https://docs.deeztek.com/uploads/images/gallery/2021-02/image-1612835360781.png)
4. **Or**, from the list of available Change Sets, select the three-dot menu next to the Change Set you wish to view assignments for, and select the **Assignments** option.
[](https://docs.deeztek.com/uploads/images/gallery/2021-02/image-1612835371574.png)
5. You should be taken to the **Change Set Content List** screen. Here, you either click the Preview Change Set button, or click the shareable URL.
[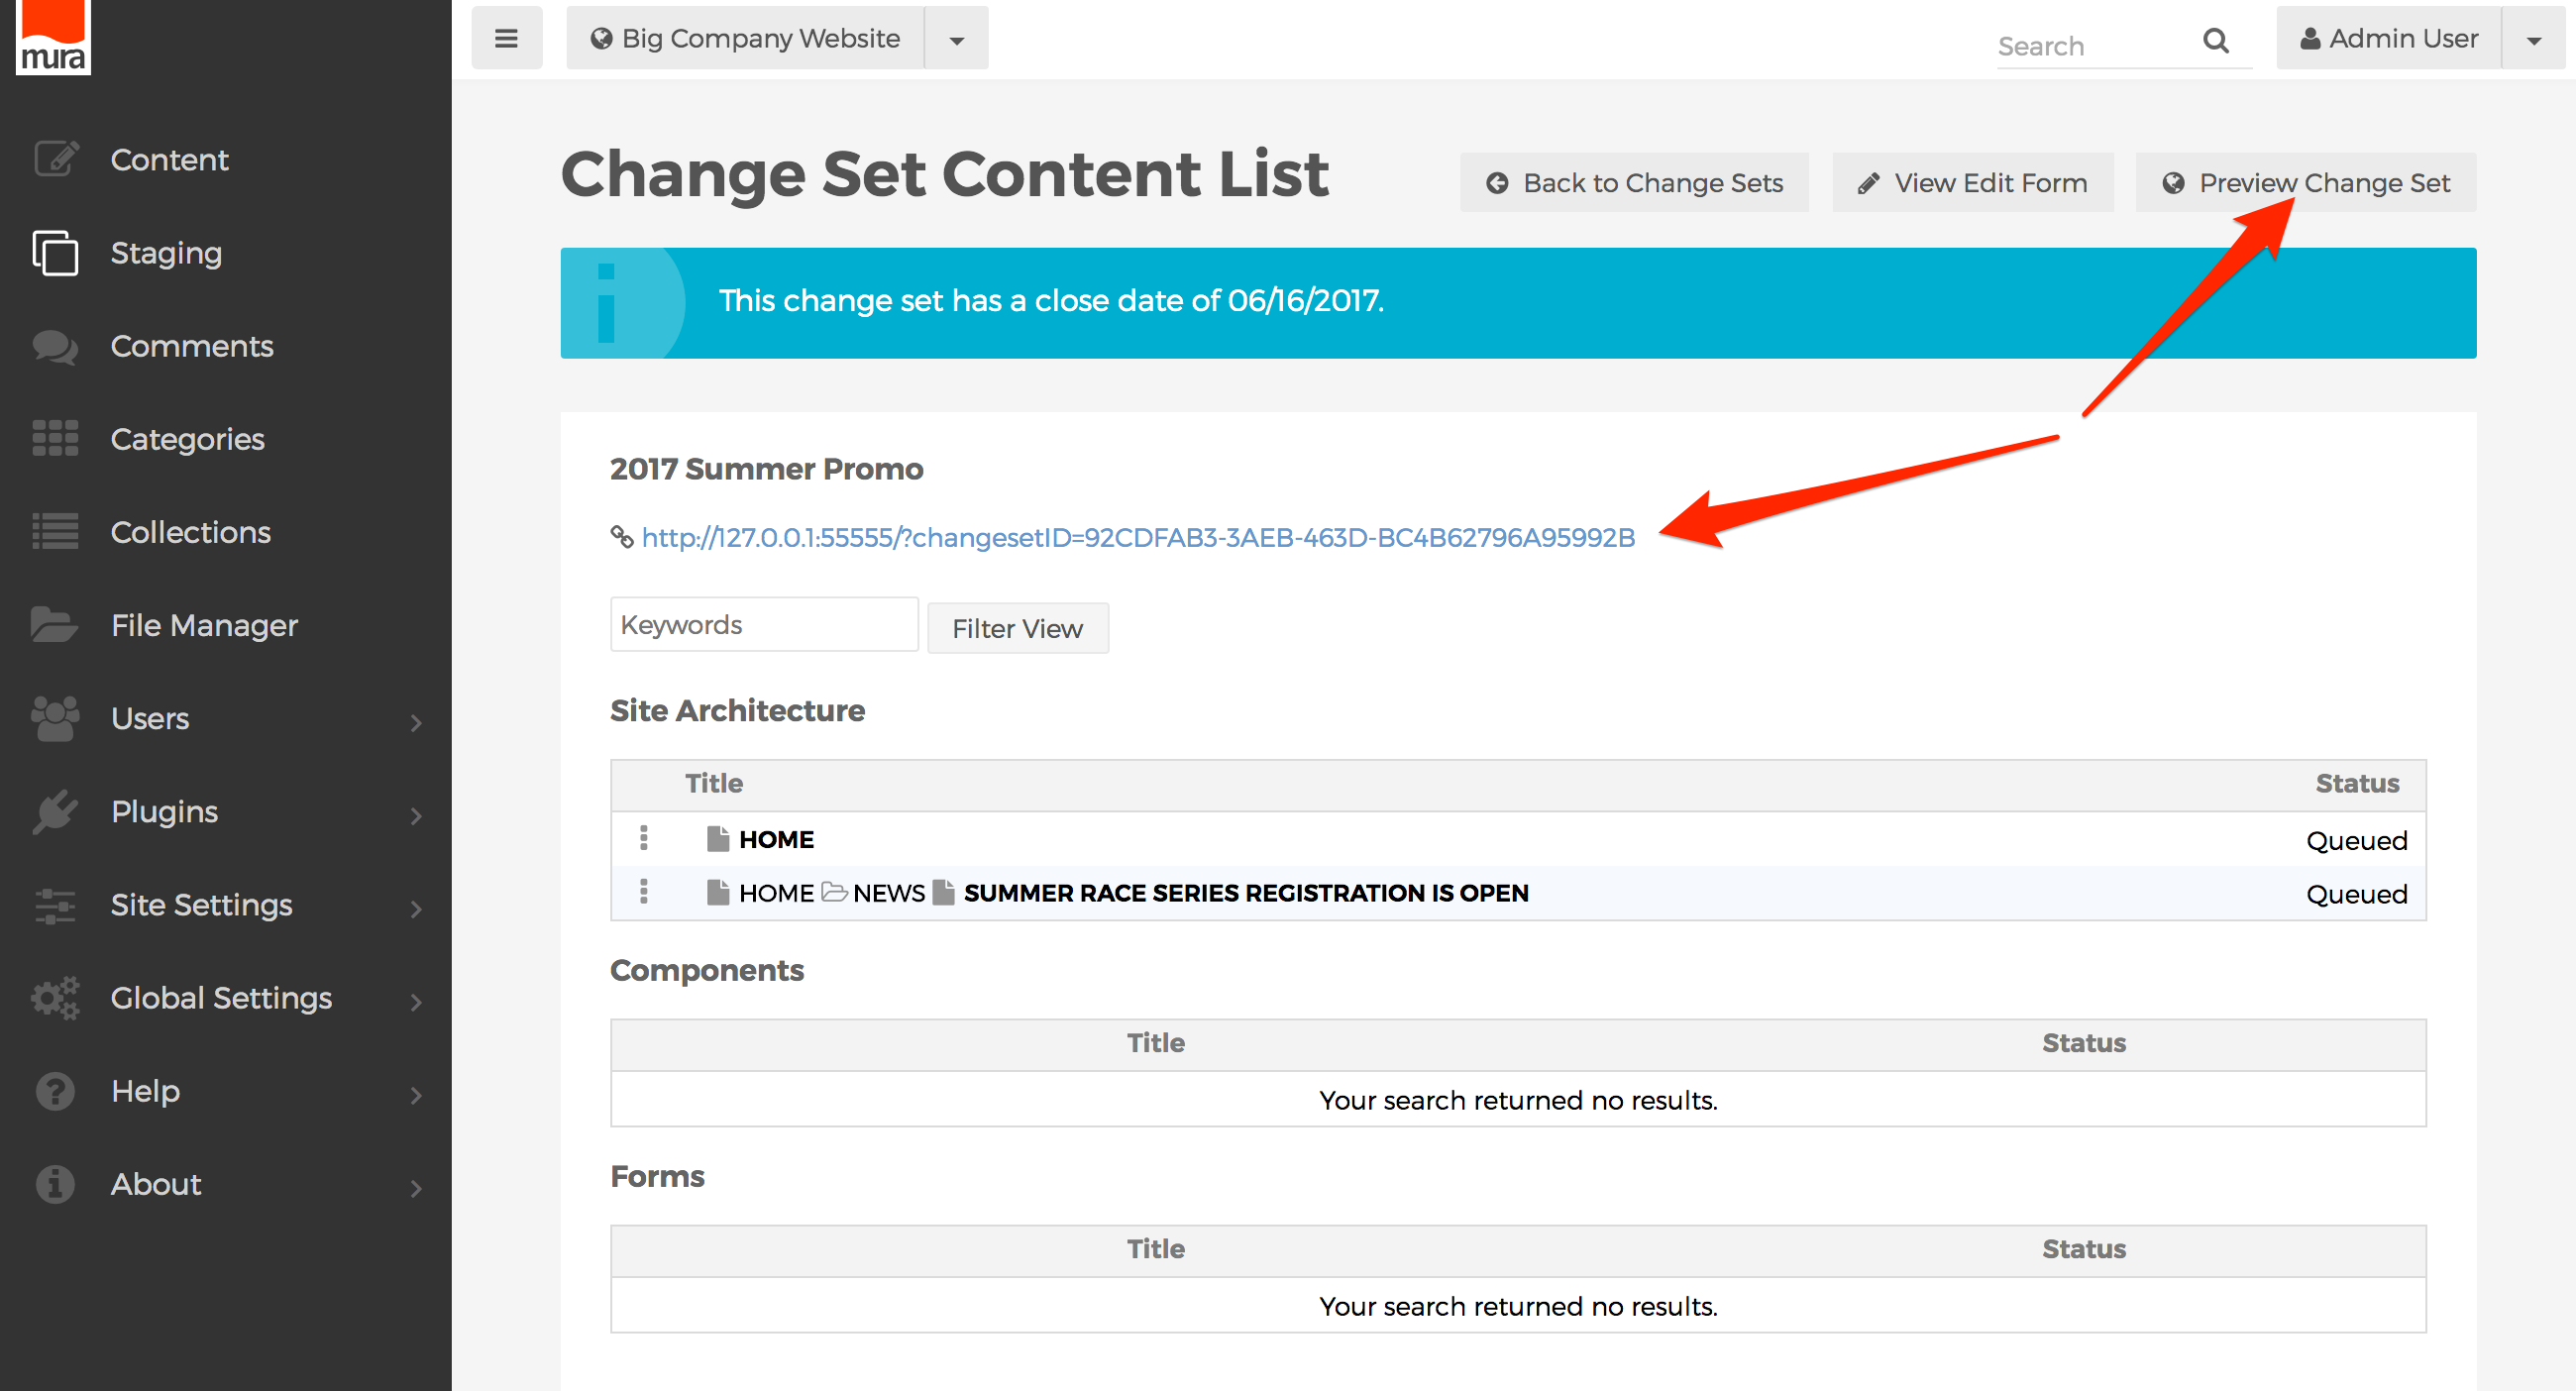](https://docs.deeztek.com/uploads/images/gallery/2021-02/image-1612835384727.png)
6. The shareable URL may be used by people who don't even have an account in Mura, to see what the site would look like as if the changes were "live" or published. This is useful for organizations where people, such as managers, may want to see your changes, but not necessarily make any changes, or approve anything per se. As you can see in the image below, when a non-Mura use navigates to the shareable URL, an extremely limited version of Mura's front-end toolbar will appear at the top of the screen.
[](https://docs.deeztek.com/uploads/images/gallery/2021-02/image-1612835395527.png)
7. Hovering over the name of the Change Set will reveal a list of other Change Sets, as well as the option to select "None" to exit the preview.
[](https://docs.deeztek.com/uploads/images/gallery/2021-02/image-1612835428532.png)
8. Hovering over the next icon, will reveal a listing of content items included in the Change Set. You can click any of the links to navigate to the pages to view them in the future state as well.
[](https://docs.deeztek.com/uploads/images/gallery/2021-02/image-1612835438064.png)
9. The last icon on the front-end toolbar indicates whether or not the content item you're currently viewing is included in the Change Set. A checkmark indicates "Yes," and the universal symbol for No (or sometimes "Ban"), indicates the content item is not included.
[](https://docs.deeztek.com/uploads/images/gallery/2021-02/image-1612835448860.png)
## Publish a Change Set
If you enter a Publish Date when creating a Change Set, the Change Set will automatically publish all of the content assignments on that date and time. However, there may be times when you wish to publish everything ahead of schedule. So, Mura also allows you to manually publish a Change Set at any time.
1. From the back-end administration area of Mura, select **Staging** from the main navigation.
[](https://docs.deeztek.com/uploads/images/gallery/2021-02/image-1612835458996.png)
2. You should be taken to the **Content Staging** screen.
[](https://docs.deeztek.com/uploads/images/gallery/2021-02/image-1612835470138.png)
3. From the list of available Change Sets, select the three-dot menu next the your desired Change set, and select the **Edit** option.
[](https://docs.deeztek.com/uploads/images/gallery/2021-02/image-1612835482023.png)
4. You should be taken to the **Edit Change Set** screen.
[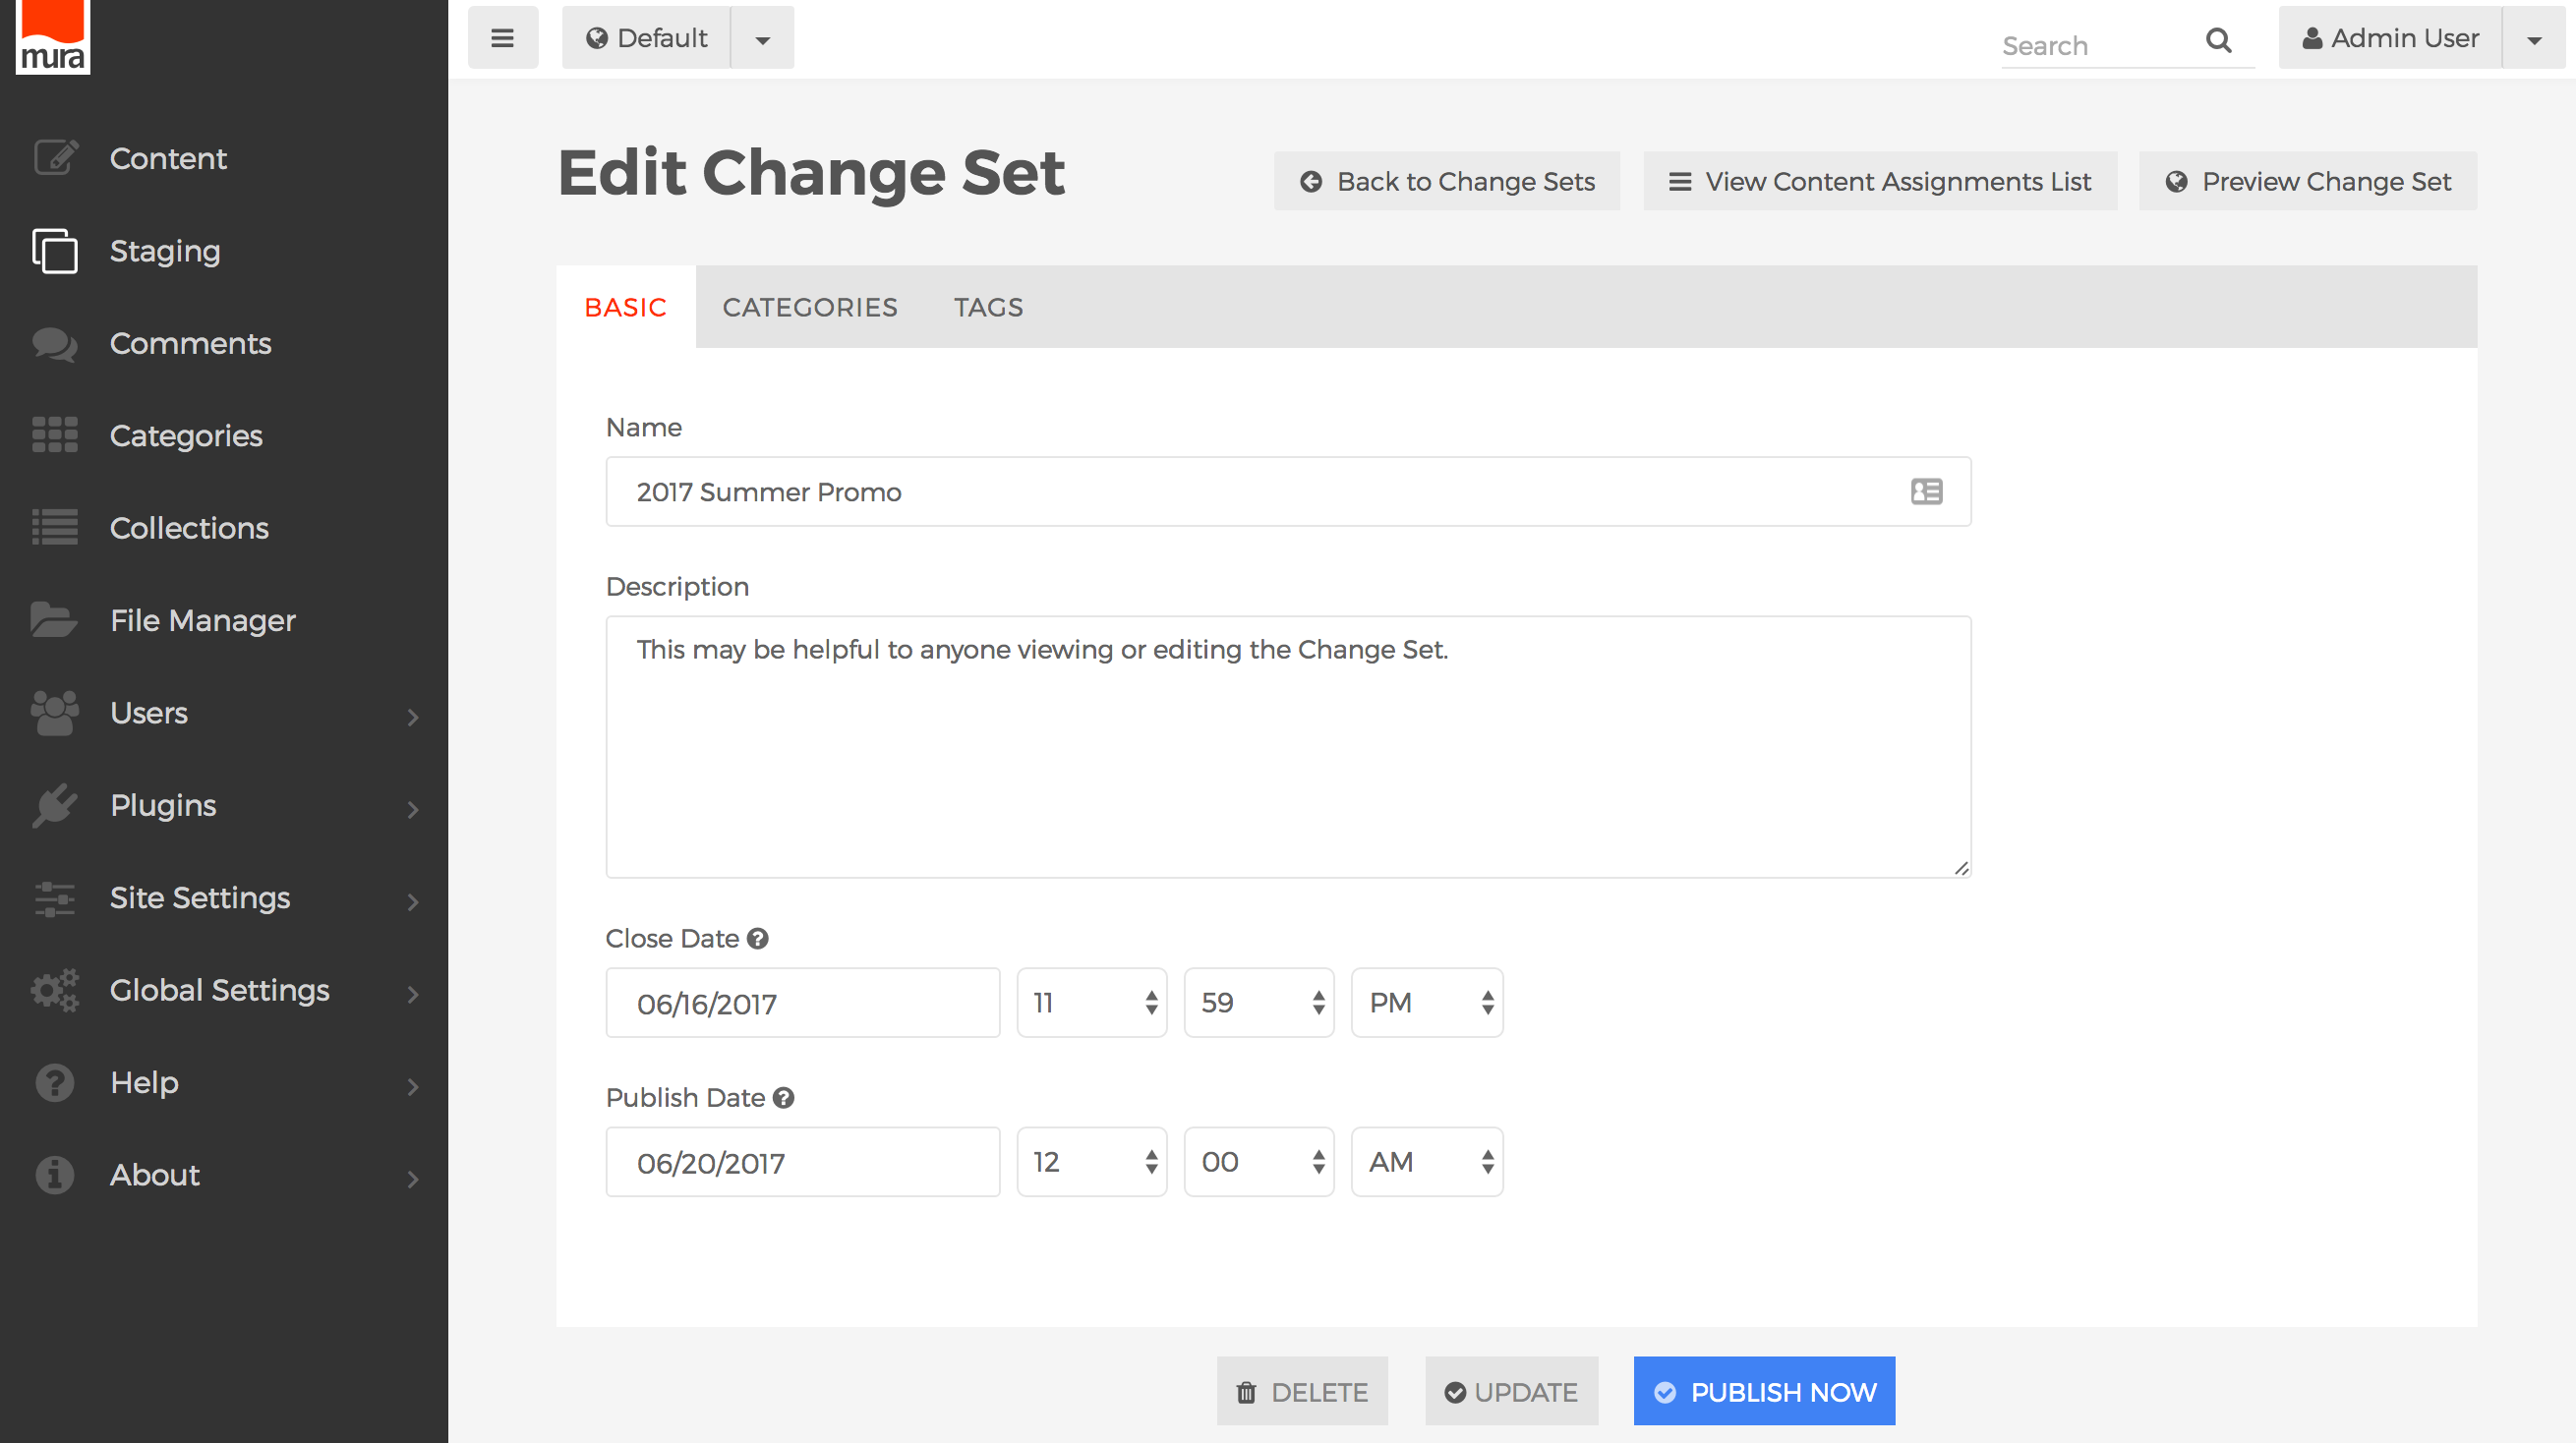](https://docs.deeztek.com/uploads/images/gallery/2021-02/image-1612835516521.png)
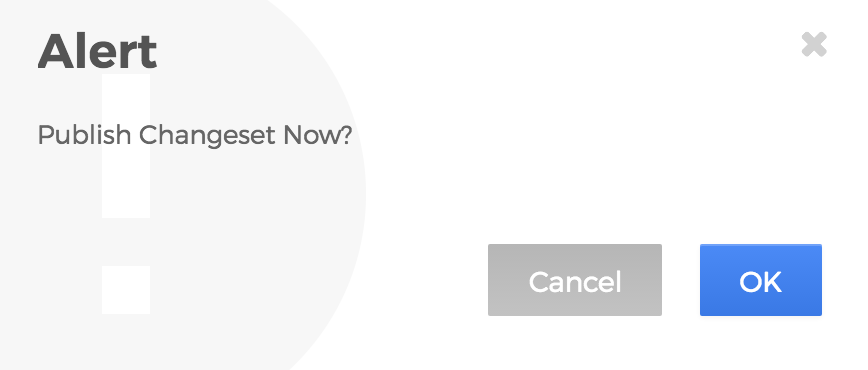
5. If you're ready to publish the Change Set, click **Publish Now**.
[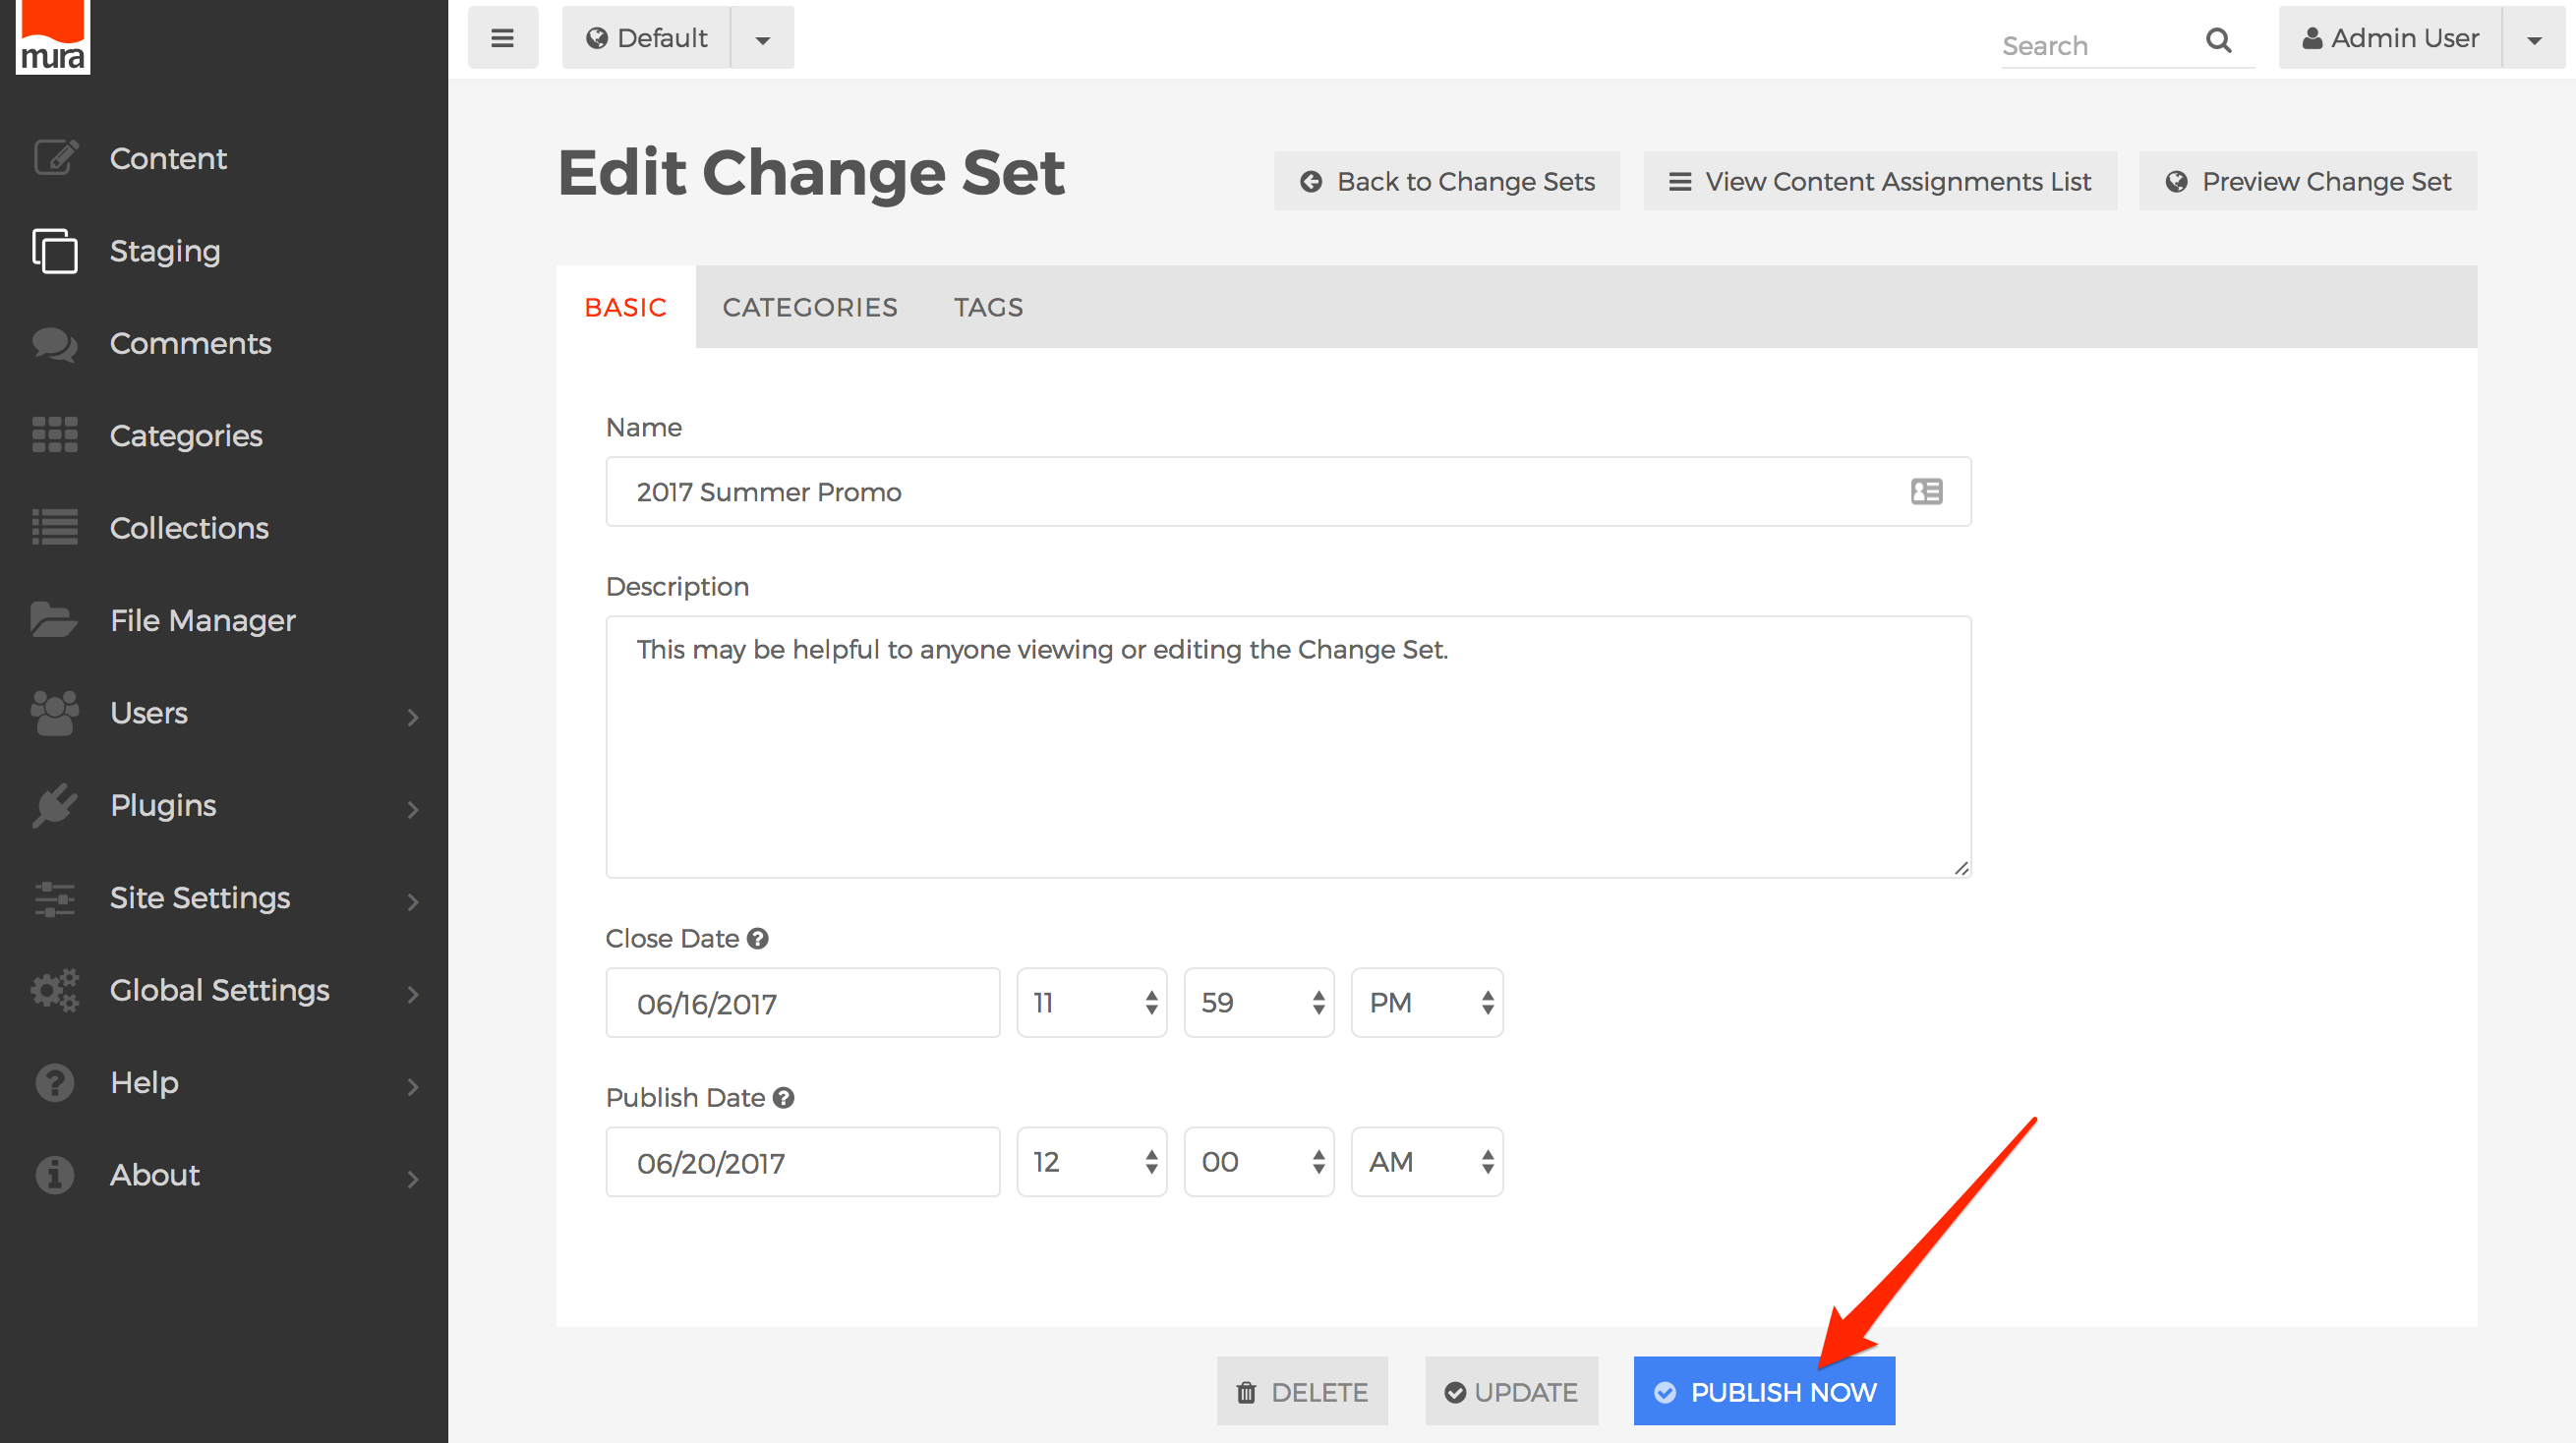](https://docs.deeztek.com/uploads/images/gallery/2021-02/image-1612835528004.png)
6. You should be presented with an **Alert** dialog window to confirm your decision to publish. Select "**OK**" to confirm, or "**Cancel**" to stop.
[](https://docs.deeztek.com/uploads/images/gallery/2021-02/image-1612835538341.png)
7. Assuming you selected "OK," your Change Set should now be "live" and viewable on the public-facing side of your site.
## Roll Back a Change Set
If you have published a Change Set, and for some reason, you wish to "un-publish" it, you can do so using Mura's "Roll Back" feature. Follow the steps below to Roll Back a Change Set.
1. From the back-end administration area of Mura, select **Staging** from the main navigation.
[](https://docs.deeztek.com/uploads/images/gallery/2021-02/image-1612835552487.png)
2. You should be taken to the **Content Staging** screen.
[](https://docs.deeztek.com/uploads/images/gallery/2021-02/image-1612835563338.png)
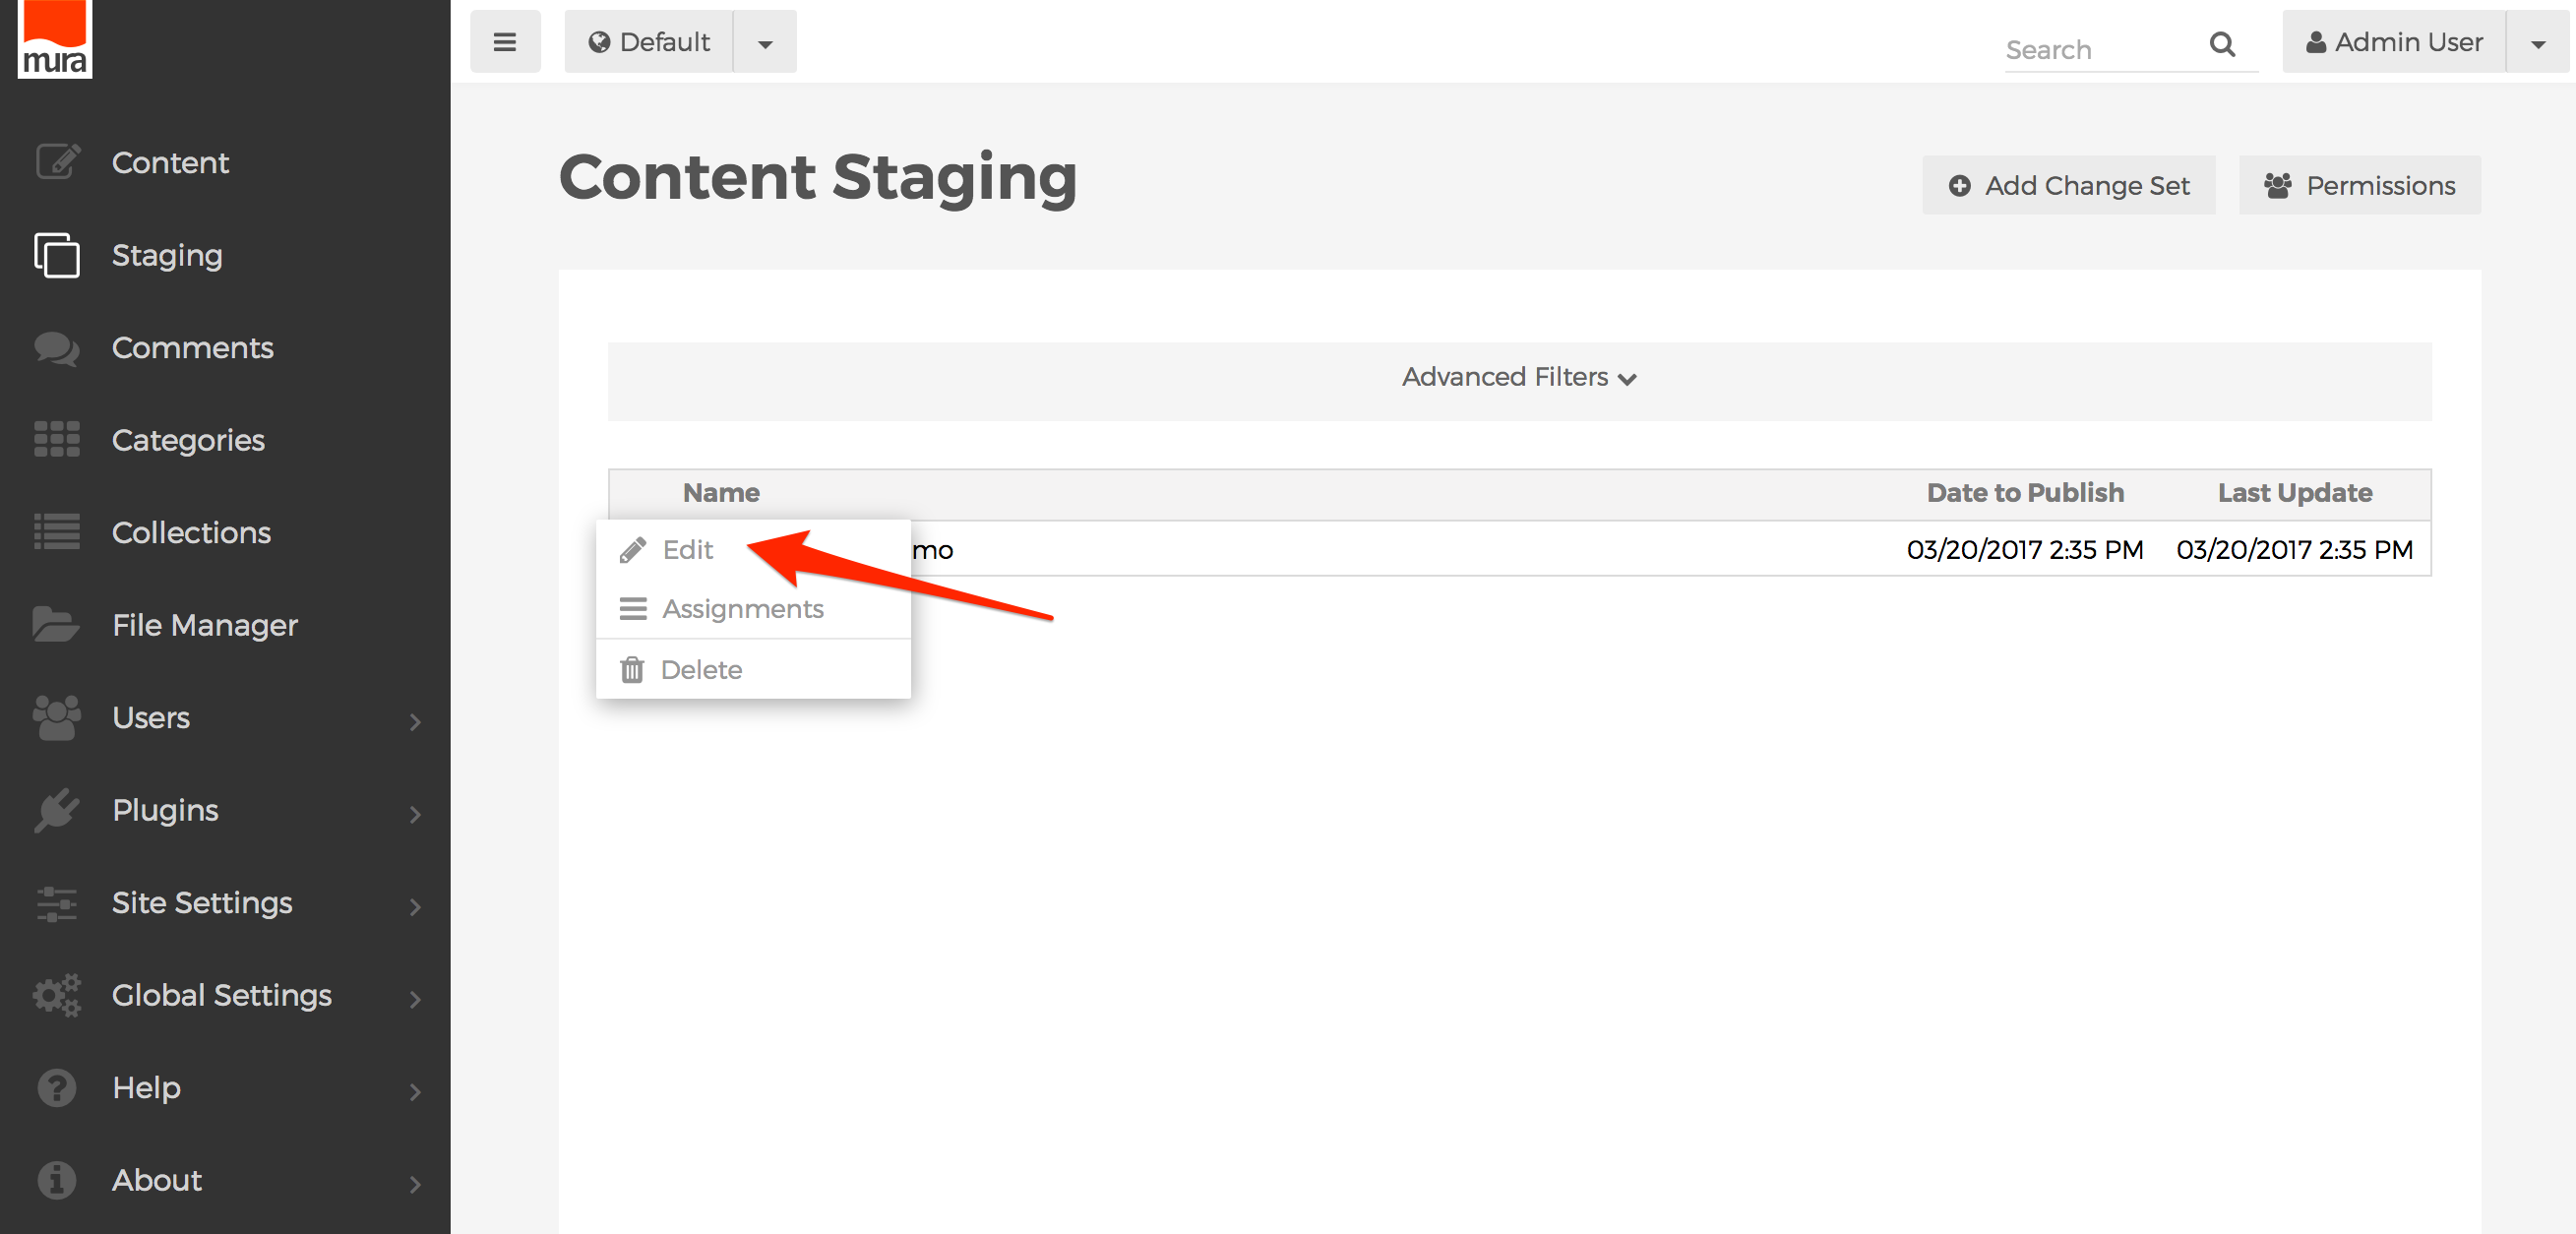
3. From the list of available Change Sets, select the three-dot menu next the your desired Change set, and select the **Edit** option.
[](https://docs.deeztek.com/uploads/images/gallery/2021-02/image-1612835576173.png)
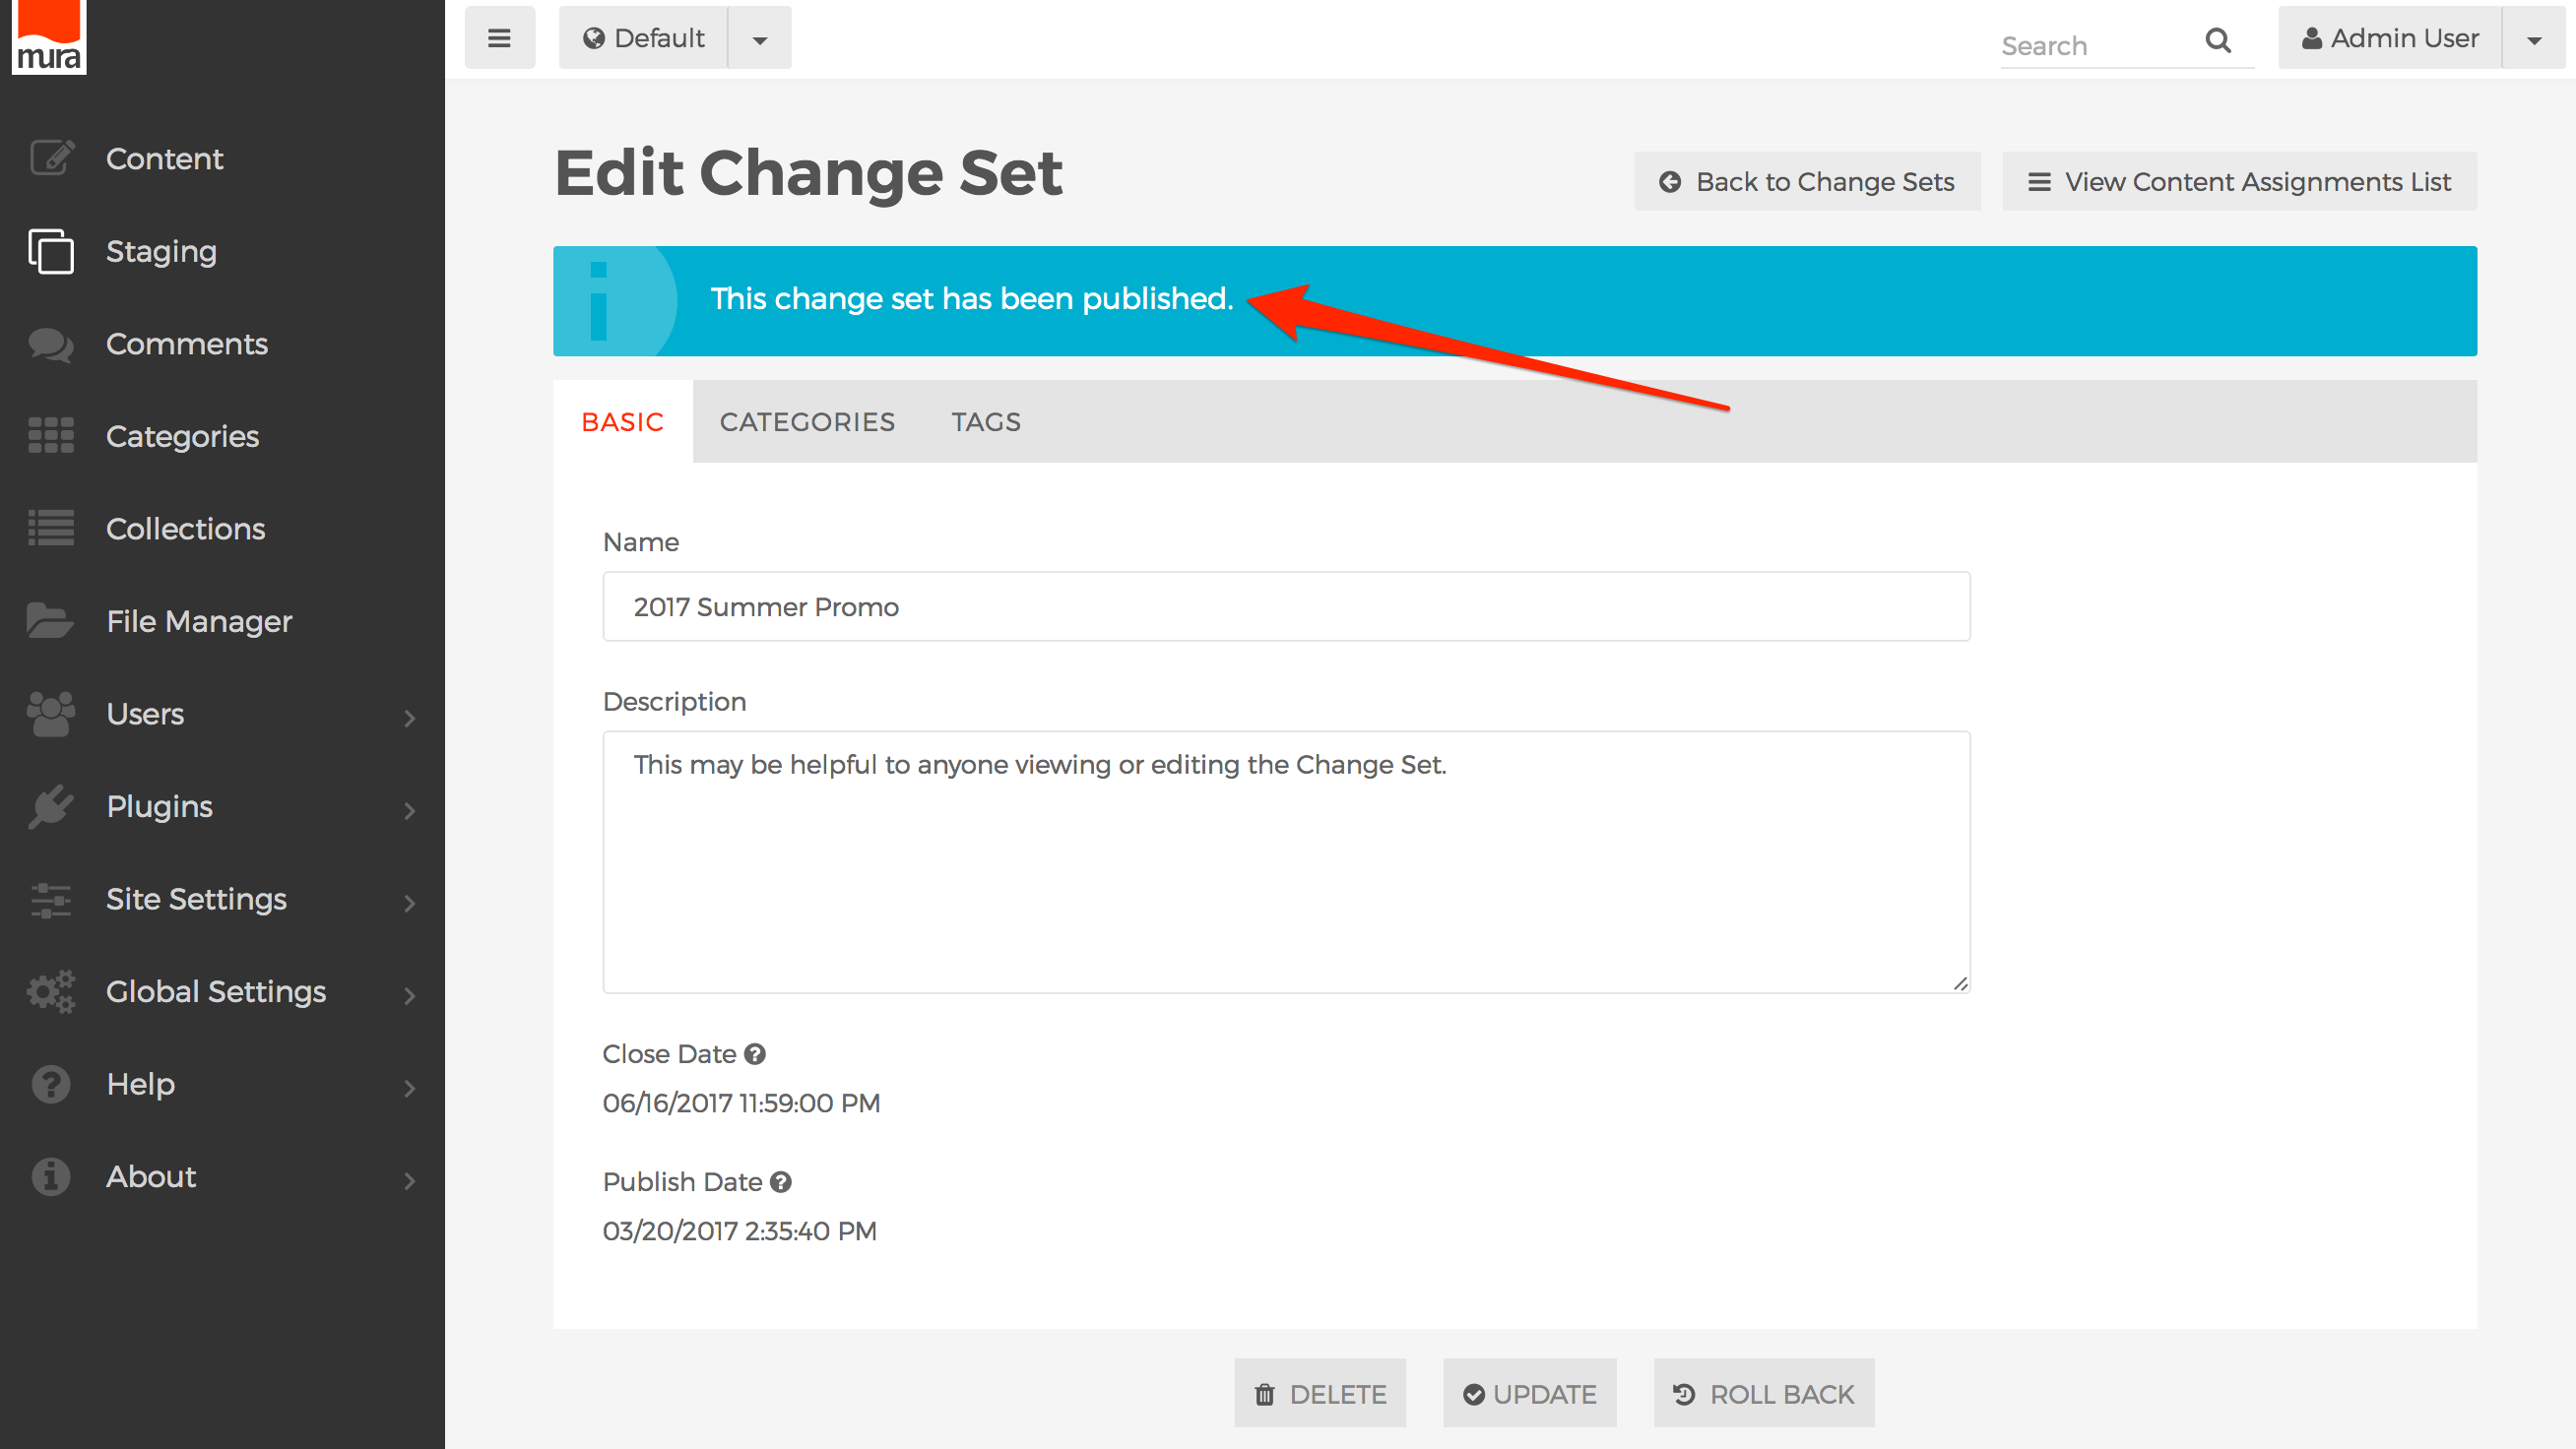
4. You should be taken to the **Edit Change Set** screen. You should also see a notice that the change set has been published.
[](https://docs.deeztek.com/uploads/images/gallery/2021-02/image-1612835594097.png)
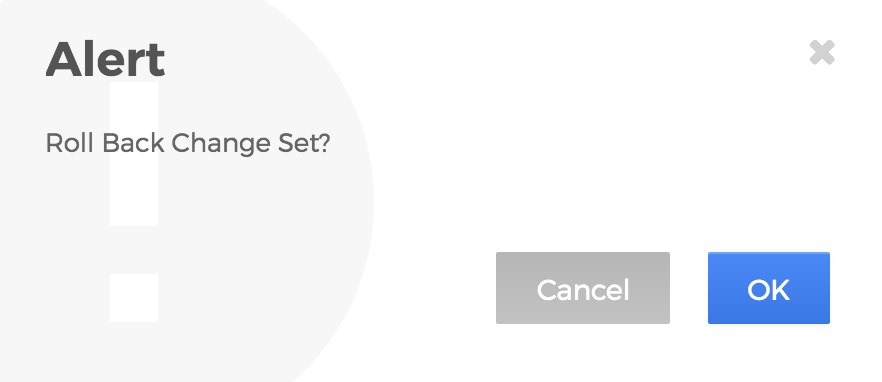
5. Click the **Roll Back** button to un-publish your Change Set.
[](https://docs.deeztek.com/uploads/images/gallery/2021-02/image-1612835606786.png)
6. You should be presented with an **Alert** dialog window to confirm your decision to roll back. Select "**OK**" to confirm, or "**Cancel**" to stop.
[](https://docs.deeztek.com/uploads/images/gallery/2021-02/image-1612835617417.png)
7. Assuming you selected "OK," your Change Set should now revert back to un-published.
**Note**: Any "new" content which was originally assigned to the Change Set will still be "published." This behavior may change in a future version of Mura.
## Enable/Disable Publish via Change Sets Only
If desired, you can force all content changes to be published through Change Sets, versus the standard publishing process. To enable or disable this feature, follow the steps below.
1. From the back-end administration area of Mura, select **Site Settings**, then click **Edit Settings**.
[](https://docs.deeztek.com/uploads/images/gallery/2021-02/image-1612835628531.png)
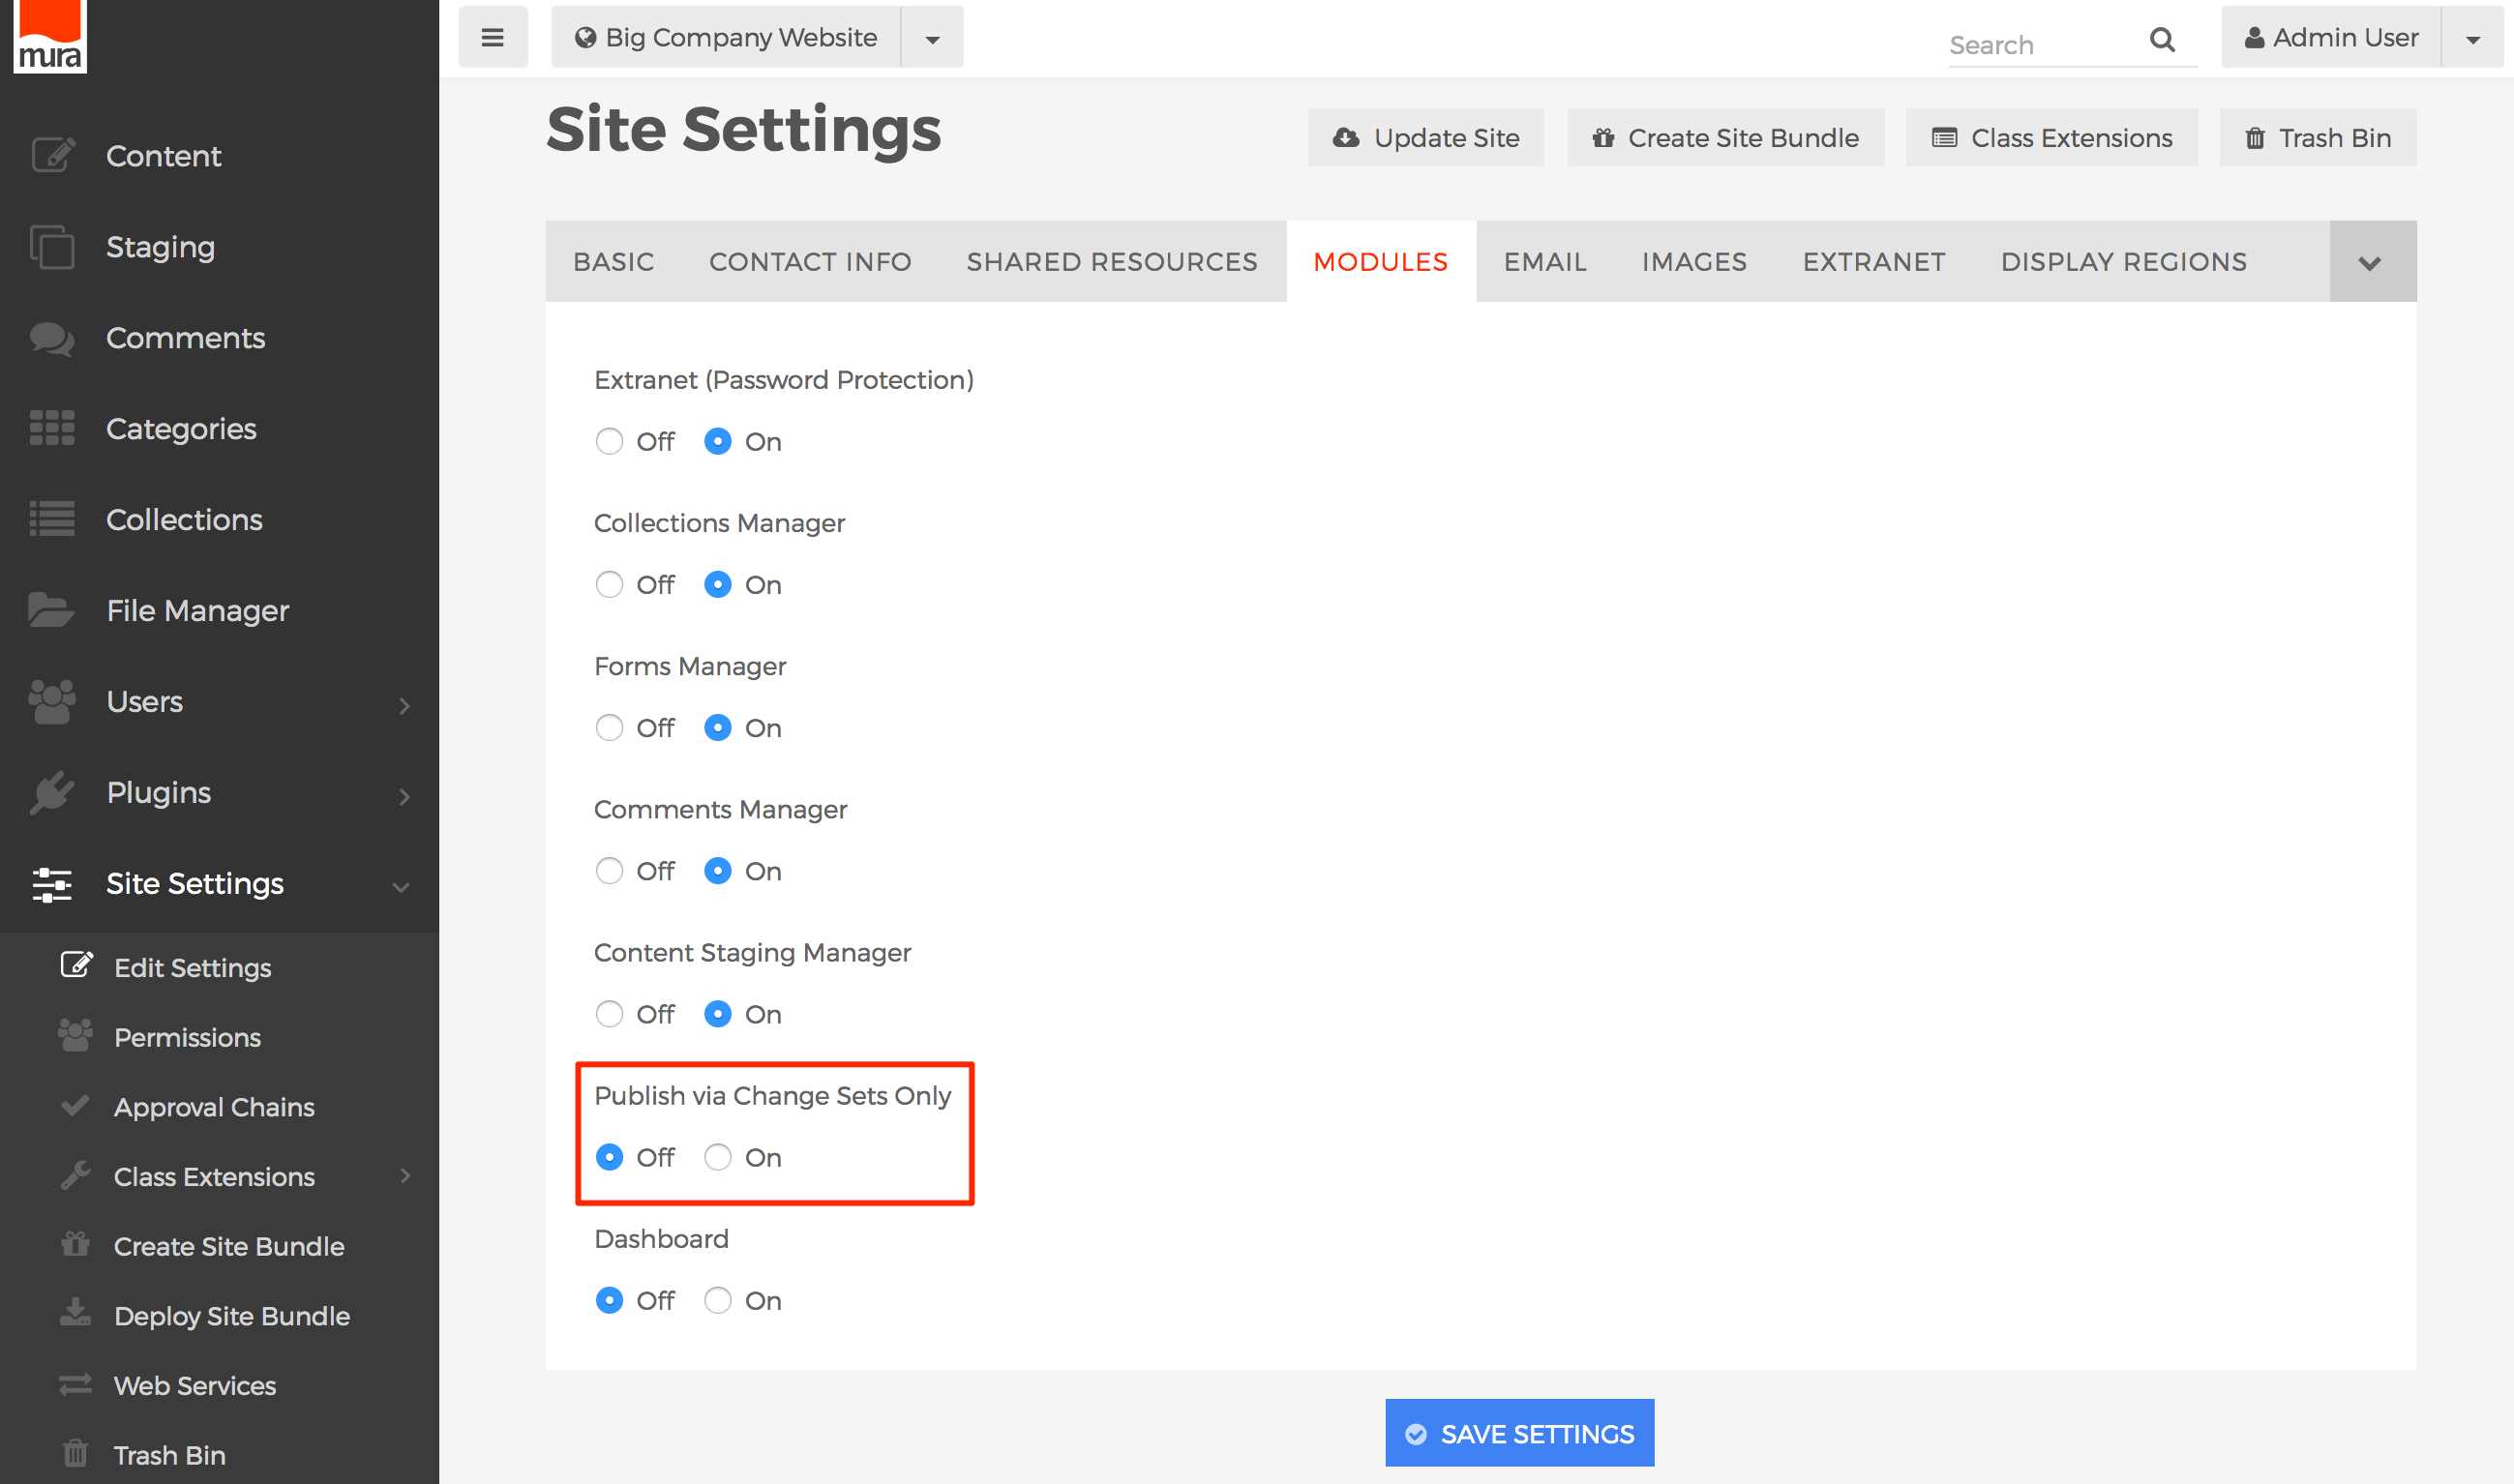
2. Select the **Modules** tab.
[](https://docs.deeztek.com/uploads/images/gallery/2021-02/image-1612835638643.png)
3. Locate the field labeled **Publish via Change Sets Only**, then select "**On**" to enable it, or "**Off**" if you wish to disable it.
[](https://docs.deeztek.com/uploads/images/gallery/2021-02/image-1612835775388.png)
4. Click **Save Settings**.
[](https://docs.deeztek.com/uploads/images/gallery/2021-02/image-1612835788267.png)