SMTP TLS Settings
NOTE:It's Thisimportant featureto isset onlySMTP availableTLS within order to transmit e-mail messages between your Hermes SEG Promachine License.and other e-mail servers with TLS encryption.
By default, SMTP TLS support in Hermes SEG is disabled. In this section you can enable Hermes SEG TLS support as well as installassociate the requiredSSL certificatescertificate andyou privatepreviously keyimported inor order to make it work.requested.
Hermes SEG support two SMTP TLS methods:
SMTPOpportunistic TLS Available
In this mode, any time a remote SMTP server makes a connection, Hermes SEG announces that it supports STARTTLS, however it does not require TLS encryption. This mode, is the recommended mode if you need TLS encryption.
SMTPMandatory TLS Required
In this mode, any time a remote SMTP server makes a connection, Hermes SEG announces STARTTLS and it will NOT accept email without TLS encryption. This mode should NEVER be used on a public Internet facing Hermes SEG.
Before you can set SMTP TLS, you must first have either imported or requested a SSL Certificate in orderthe System Certificates section for the Host Name you set in the Network Settings.
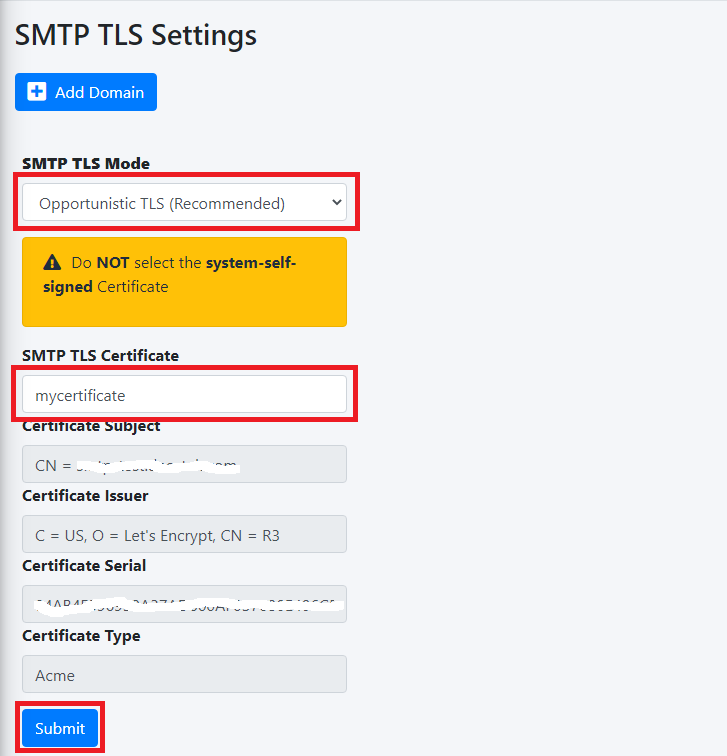
- Set the SMTP TLS Mode drop-down to
enableOpportunisticanyTLS or or Mandatory TLS as required. - The SMTP TLS Certificate field is pre-populated with the system-self-signed certificate. If you wish to use a SSL certificate you set in the System Certificates section above, simply delete the system-self-signed entry and start typing the friendly name of the
SMTP TLS methods,certificate you setup previously that matches the host name you set in the Network Settings. The system willneedPEMlocateencoded certificatesand anunecrypted Private Key.A PEM encodedthe certificateisandhumandisplayreadeableit in a drop-down list. Click on the certificatethat starts with:-----BEGIN CERTIFICATE-----and
ends with-----END CERTIFICATE-----An unecrypted Private Key starts with:-----BEGIN PRIVATE KEY-----and ends with-----END PRIVATE KEY-----1. CertificateUnder theSMTP TLS Settingssection, ensure you select eitherSMTP TLS AvailableorSMTP TLS Required. Once you maketheselection,systemthePastewillContentsautomatically populate all the rest of the Certificate,PasteConentsfieldsofsuchUnencryptedasKeyandthethePasteSubject,ConentsIssuer,of RootSerial andand Int CA Certificatefields will become enabledType (Figure 1).:
Figure 1

Open your PEM encoded certificate with a text editor and select and copyClick theentireSubmitcontents of the file to include the-----BEGIN CERTIFICATE-----and the-----END CERTIFICATE-----lines.Under thePaste Contents of Certificatefield, delete the existing contents so you are left with an empty field (if applicable).Paste the contents of the file you copied fromStep 2into the emptyPaste Contents of Certificatefieldbutton (Figure 2).:
Figure 2
2. Unecrypted Key
Open your unecrypted key with a text editor and select and copy the entire contents of the file to include the-----BEGIN PRIVATE KEY-----and the-----END PRIVATE KEY-----lines.Under thePaste Contents of Unecrypted Keyfield, delete the existing contents so you are left with an empty field.Paste the contents of the file you copied fromStep 1into the emptyPaste Contents of Unecrypted Keyfield (Figure 3).
Figure 3

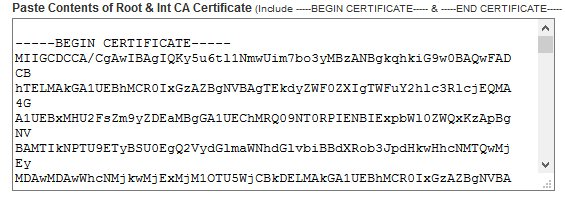
3. Root and Int CA Certificate
Open your PEM encoded CA Bundle certificate with a text editor and select and copy the entire contents of the file to include the-----BEGIN CERTIFICATE-----and the-----END CERTIFICATE-----lines. Please note that CA Bundle certificates usually include more than one certificate in a single file, so ensure you select ALL the certificates in the file.Under thePaste Contents of Root and Int CA Certificatefield, delete the existing contents so you are left with an empty field.Paste the contents of the CA Bundle certificate you copied fromStep 1into the emptyPaste Contents of Certificatefield (Figure 4).
Figure 4
After pasting all the contents, click on theSave & Apply Changesbutton.
After you click the Save & Apply Changes button, the system will perform a validation on the certificate, private key and CA bundle combination. If you get a Success!! message, your Hermes SEG is ready to go with TLS Encryption. If there are errors, verify the contents you pasted in each field especially the Certificate and the Unencrypted Key fields since those seem to be the cause of most errors.
4. Verify TLS Encryption and Certificate
The easiest way to verify whether or not your Hermes SEG TLS encryption is working correcly as well as verify the certificates you installed, is to goto http://www.checktls.com/perl/live/TestReceiver.pl and run the TestReceiver test.