System Backup and Restore
InSystem thisBackup sectionand willSystem Restore are configured and ran in the CLI as root. There is a Backup script located at /opt/hermes/scripts/system_backup.sh and a Restore script located at /opt/hermes/scripts/system_restore.sh. These scripts should not be ablemoved/copied to other locations. System Backups should be scheduled via Cron other other mechanism to point to /opt/hermes/scripts/system_backup.sh.
Before scheduling system_backup.sh, it's highly recommended that you runit manually to ensure proper operation before scheduling it. The backups can be stored to a mount that you have previously configured in your system such as SMB, NFS etc...
System Backup
The /opt/hermes/scripts/system_backup.sh script accepts several flags with corresponding values enclosed in single quotes in order to configure oneits orbehavior.
- The -D flag sets the number of days of backups to retain. For example, -D '7' would configure it to delete any backups older than 7 days.
- The -P flag sets the path to store the backups WITHOUT the trailing slash. For example -P '/mnt/backups' configures the backup
jobstoforstoreyourallHermesbackupsSEG.inBackupsthejobs/mnt/backups path. - The -E flag sets the recipient to send backup success/failure notifications. For example, -E 'recipient@domain.tld' configures the backup to send notifications to recipient@domain.tld.
- The -F flag sets the sender where the backup success/failure notifications would come from. For example, -F ' 'sender@domain.tld' configures the backup to send notications from sender@domain.tld.
- The -B flag sets the backup mode. The backup mode can be
configuredeithertosysteminclude(backs up all Hermes related files and databases EXCLUDING thesysteme-mailconfigurationarchive), archive (backs up ONLY the e-mail archive) or all (backups all Hermes related files including the databases as well as thestorede-mailemailarchive).archive.ForHowever,example,including-B 'system' sets thestoredbackupemailmodearchivetoinbackaup all Hermes related files and databases. - The -R flag sets the MySQL root password that the backup
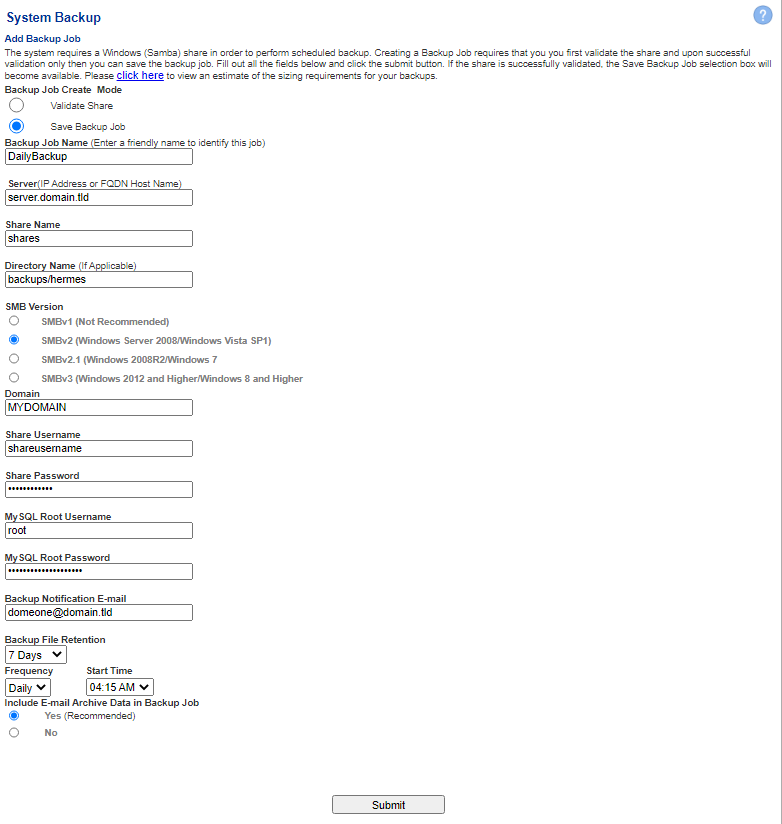
jobwillcan take a considerable amount of time to complete, so instead we recommend that backups jobs be run without including the email archive and instead configuring anEmail Archivejob underSystem --> Email Archive.Hermes SEG uses CIFS (Windows Shares) to store system backups. Shares have to be successfully validated first before Backup Jobs can be saved.Validate ShareBy default, when creating a new Backup Job, theBackup Job Create Modefield is automatically set toValidate Shareand theSave Backup Jobfield isdisabled. The Save Backup Job field only gets enabled when a share is succesfully validated.Enter a friendly name under theBackup Job NamefieldEnter an IP Address or a FQDN Host name of the server hosting the share under theServerfieldEnter the name of the share under theShare NamefieldEnter the name of a directory under the share if applicable under theDirectory NamefieldSelect theSMB Versionthe server hosting the shareEnter domain name under theDomainfieldEnter the username who has access to that share under theUsernamefieldEnter the password for the username fromStep 6under thePasswordfieldEnter the Hermes SEGMySQL Root Username(Usually root)Enter the Hemres SEGMySQL Root PasswordEnter a valid email addressneed in order togetbacksuccessupor failure notifications fromall thebackupHermesjobdatabases.underFortheexample,Backup-NotificationRE-mail'supersercretpass'fieldSelectsets thenumberMySQLofrootdayspassword toretainsupersercretpass.
backup
Putting underit the Backupall Filetogether, Retention drop-downif field.you Available options are, 7 Days, 14 Days, 21 Days and 28 Days. The system will use the Backup File Retentionwanted to automaticallyrun deletean olderall backupsbackup, soyou thatcan your storage doesn't get filled up
/opt/hermes/scripts/system_backup.sh either-D selecting7 a-P date'/mnt/backups' by-E clicking'to@domain.tld' the-F calendar'from@domain.tld' button-B or'all' by-R manually entering a date in the form of mm/dd/yyyy in the Start Date field.Figure 1
Share Validation Successful
If the validation is succesful, you will receive the following message (Figure 2)
Figure 2
You will also notice that the the Save Backup Job option will be enabled under the the Backup Job Create Mode on top of the page. Select the the Save Backup Job option and click the the Submit button to save the job (Figure 3).
Figure 3
The job will be saved under the the Existing Backup Jobs Jobs section on the bottom of the page (Figure 4)
Figure 4
Share Validation Unsuccessful
If the validation is unsuccesful, you will receive the following message (Figure 5).
Figure 5
Check the information supplied and share permissions and try validating the share again.
Manually Run Backup Job
Note: Only one Backup Job can be run at a time.
Any saved backup jobs will run according to the schedule you set. Alternatively if you wish to run a job immediately:
- Click on the green arrow
buttonbutton.jpg)
thethe Run
Figure 6
- In
thethe Confirmation Window, clickthethe YesClickingClicking No, will take you back to the System Backup page.
Figure 7
If a Backup Job is in progress, the button under the Run column of every Backup Job will become disabled (Figure 8)
Figure 8
Delete Backup Job
If you wish to delete an existing Backup Job and the job is NOT running:
- Click on the red X
Figure 9
- In the Confirmation Window, click
thethe YesClickingClicking No, will take you back to the System Backup page.
Figure 10


