System Backup
In this section will be able to configure one or more scheduled backup jobs for your Hermes SEG. Backups jobs can be configured to include the system configuration as well as the stored email archive. However, including the stored email archive in a backup job can take a considerable amount of time to complete, so instead we recommend that backups jobs be run without including the email archive and instead configuring an Email Archive job under System --> Email Archive.
Hermes SEG uses CIFS (Windows Shares) to store system backups. Shares have to be successfully validated first before Backup Jobs can be saved.
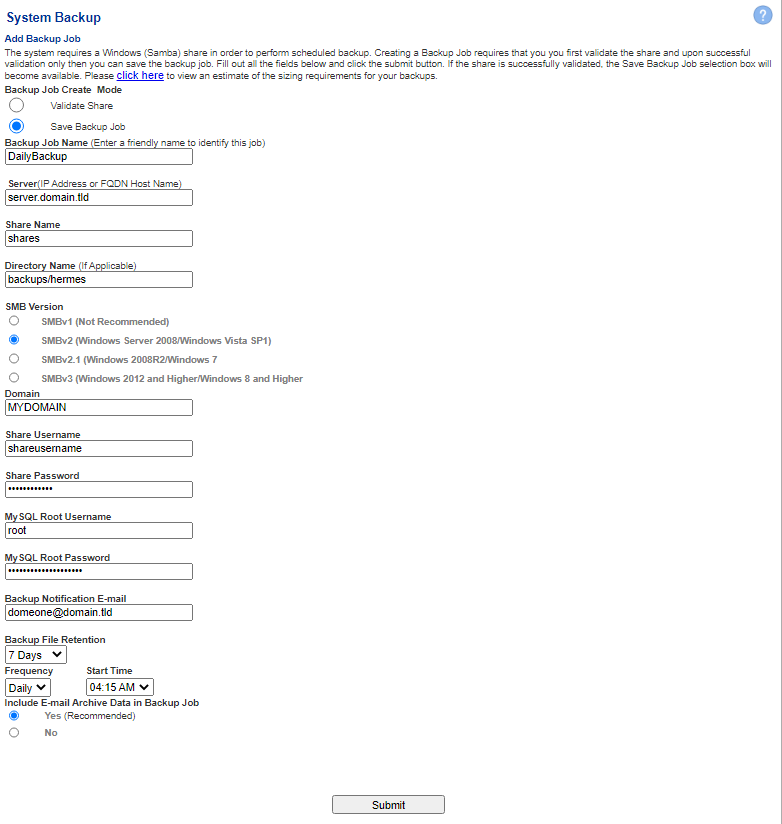
Validate Share
By default, when creating a new Backup Job, the Backup Job Create Mode field is automatically set to Validate Share and the Save Backup Job field is disabled. The Save Backup Job field only gets enabled when a share is succesfully validated.
- Enter a friendly name under the Backup Job Name field
- Enter an IP Address or a FQDN Host name of the server hosting the share under the Server field
- Enter the name of the share under the Share Name field
- Enter the name of a directory under the share if applicable under the Directory Name field
- Select the SMB Version the server hosting the share
- Enter domain name under the Domain field
- Enter the username who has access to that share under the Username field
- Enter the password for the username from Step 6 under the Password field
- Enter the Hermes SEG MySQL Root Username (Usually root)
- Enter the Hemres SEG MySQL Root Password
- Enter a valid email address in order to get success or failure notifications from the backup job under the Backup Notification E-mail field
- Select the number of days to retain backup files under the Backup File Retention drop-down field. Available options are, 7 Days, 14 Days, 21 Days and 28 Days. The system will use the Backup File Retention to automatically delete older backups so that your storage doesn't get filled up
- Select the backup frequency from the Frequency drop-down field. Available options are Daily, Weekly and Monthly.
- Enter a date for the backups to start by either selecting a date by clicking the calendar button or by manually entering a date in the form of mm/dd/yyyy in the Start Date field.
- Select a time for the backups to start by selecting a time from the Start Time drop-down field
- Select either Yes or No in the Include E-mail Archive Data in the Backup Job
- Click the Submit button to validate the share (Figure 1)
Figure 1
Share Validation Successful
If the validation is succesful, you will receive the following message (Figure 2)
Figure 2
You will also notice that the Save Backup Job option will be enabled under the Backup Job Create Mode on top of the page. Select the Save Backup Job option and click the Submit button to save the job (Figure 3).
Figure 3
The job will be saved under the Existing Backup Jobs section on the bottom of the page (Figure 4)
Figure 4
Share Validation Unsuccessful
If the validation is unsuccesful, you will receive the following message (Figure 5).
Figure 5
Check the information supplied and share permissions and try validating the share again.
Manually Run Backup Job
Note: Only one Backup Job can be run at a time.
Any saved backup jobs will run according to the schedule you set. Alternatively if you wish to run a job immediately:
- Click on the green arrow button
.jpg) under the Run column to run any job immediately (Figure 6)
under the Run column to run any job immediately (Figure 6)
Figure 6
- In the Confirmation Window, click the Yes button (Figure 7). Clicking No, will take you back to the System Backup page.
Figure 7
If a Backup Job is in progress, the button under the Run column of every Backup Job will become disabled (Figure 8)
Figure 8
Delete Backup Job
If you wish to delete an existing Backup Job and the job is NOT running:
- Click on the red X under the Delete column (Figure 9)
Figure 9
- In the Confirmation Window, click the Yes button (Figure 10). Clicking No, will take you back to the System Backup page.
Figure 10


