Message History
Hermes SEG keeps a log and a copy of each email message it sends and receives for archiving purposes. The number of log entries and actual messages the system keeps depends on the amount of storage space available on the system. The system automatically starts purging the oldest email logs and email messages once the internal storage reaches 95% capacity.
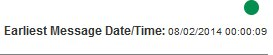
You can easily see the data/time of the oldest message that the system has retained by looking on the upper right-hand corner of the page in the Earliest Message Date/Time field (Figure 1).
Figure 1

For a low to medium traffic system, an email archive of up to 5 years is possible assuming that no Email Archive job has been setup in order to free up space. If an email Archive job has been setup, the email archive can become virtually unlimited since the email messages will be stored off the local storage.
In
Message thisHistory pageDate/Time youRange willand beMessage ableResults to perform the following functions:Limit
Set the Number of Mesages to DisplaySort Email MessagesSearch Email MessagesRelease Email Messages to Internal Recipient MailboxesCreate Block & Allow Sender RulesTrain the Bayes DatabaseView & Download Email Messages
For security reasons, the following keywords are not allowed in any search field:
SelectUpdatejoindeleteinsertalldrop
Set the Number of Messages to Display
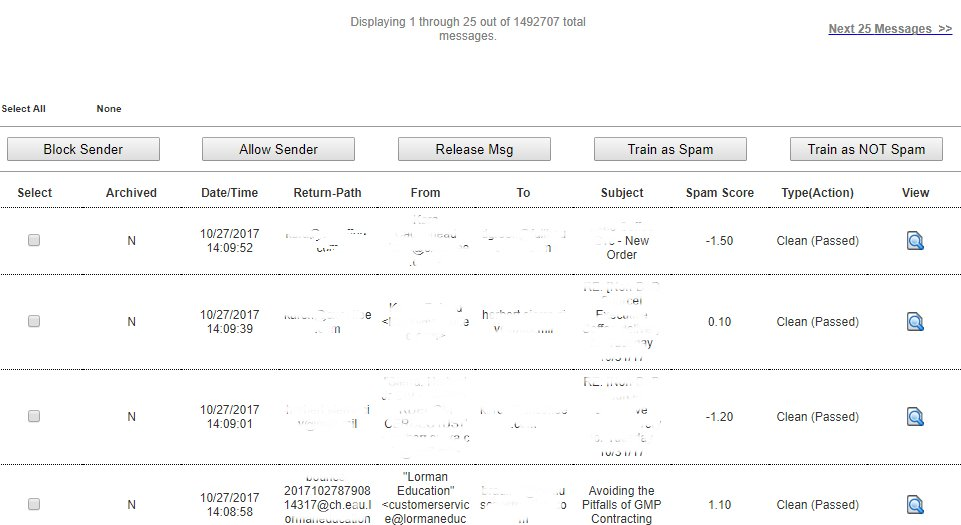
By defaultdefault, the Message History &displays Archivethe latest 1000 page displays 25 messages atfrom athe time.day You can selectbefore to display 50, 75 or 100 the current day. Please note that if your system has processed more than 1000 messages atduring athat time.
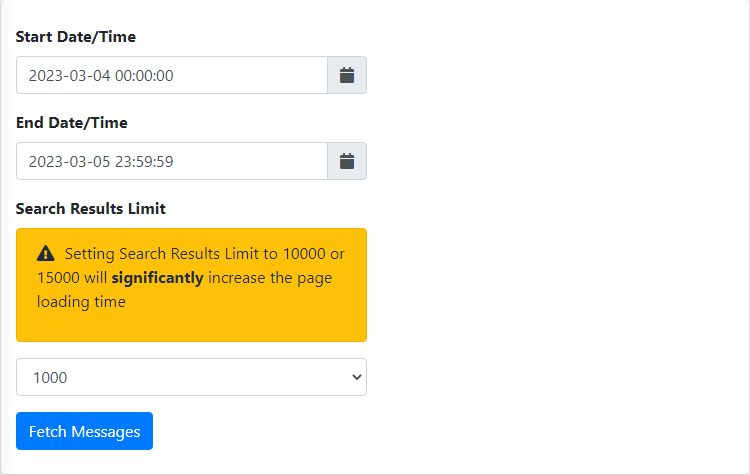
Click onperiod, thethedisplayeddrop-downmessagesfnextwilltonottheNonecessarilyofencompassMsgsthattoentiredisplayfield,date/timeselectrage. The date/time range as well as the number of messages to be displayed can be adjusted by setting the Start Date/Time, End Date/Time, Search Results Limit fields and clicking the Fetch Messages button (Figure 1). Please note setting the Search Results Limit to 10000 or 15000 messages will significantly increase the page loading time. It's best to have approximate dates and times if you wish todisplaysearch for specific messages.
Figure 1
Sorting Messages
You can sort messages by ascending or descending values by simply clicking the Archived, Date/Time, Sender IP, Return-Path, From, To, Subject, Score, Type and clickAction onheaders the Go buttonof the message results (Figure 2)2).
Figure 2

Sort
Email Messages
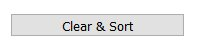
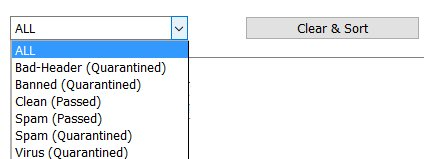
Click on drop-down field containing the messages types, select a message type you wish to sort for and click on the Clear & Sort button (Figure 3).
Figure 3

You can sort by the following types of messages:
ALL - These selection will display all messages regardless of message type.
Clean (Passed) - These are email messages that no problems were found and were succesfully delivered to their intended recipient.
Spam (Passed) - These are email messages that were tagged as Spam but they did not score high enough to be quarantined, thus they were succesfully delivered to their intended recipient albeit tagged as Spam.
Spam (Quarantined) - These are email messages that were tagged as Spam and scored high enough to be quarantined.
Bad-Header (Quarantined) - These are email messages that were detected as having bad headers thus they were quarantined.
Banned (Quarantined) - These are email messages that contained banned file attachments thus they were quarantined.
Virus (Quarantined) - These are email messages that contained malware thus they were quarantined.
If you sort by any type of message, in other words if the message type selection drop-down is set to anything but the ALL entry, message searches will be performed for the message type selected. For example, if you have sorted by the message type Spam (Quarantined) and you perform a search by date range, the results are only going to show entries matching the date range AND the message type Spam (Quarantined). If you wish to perform a search for all messages, ensure you have sorted by ALL message types.
Clicking on the Clear & Sort button, will clear any previous searches.
Search EmailSearching Messages
You can search email messages by by Date/Time Range, the the From field, the the Return-Path field, the the To field, the the Subject field and you can also search in the the body or a a header of a message.
Searching by DATE/TIME
Searching by DATE/TIME allows you to search for messages that were received/sent between the dates and times you specify.
- Ensure the Search Field(s) drop-down is set
to to DATE ONLY.
Ensure Ensure Search Phrase Phrase field is empty.- Enter
a a Start Date (you can click on the Calendar button to bring up the calendar to select a date or you can simply enter a date in the format format dd/mm/yyyy)
- Select
a a Start Time by selecting a an entry from the the Start Time drop-down (entries are in 15-minute increments)
- Enter
an an End Date (you can click on the Calendar button to bring up the calendar to select a date or you can simply enter a date in the format format dd/mm/yyyy)
- Select
an an End Time by selecting a an entry from the the End Time drop-down (entries are in 15-minute increments)
- Click
the the Advanced Search button (Figure 4)
Figure 4

- If any results are found they will be displayed underneath the Search section (Figure 5).
Figure 5

Searching by FROM, RETURN-PATH, TO, SUBJECT
Searching by FROM, RETURN-PATH, TO or SUBJECT allows you to search for messages that match the search criteria you specify in the From field, Return-Path field, the To field or the Subject field of a mesage.
- Ensure the Search Field(s) drop-down is set
to to FROM, RETURN-PATH, TO or SUBJECT.
- Enter the criteria to search for in
the the Search Phrase Phrase field. Please note that in case of a Return-Path field search, the search criteria must be the exact email address or the system will not return any results.
- Click
the the Advanced Search button (Figure 6).
Figure 6

- If any results are found they will be displayed underneath the Search section (Figure 7).
Figure 7

Searching by BODY/HEADERS
Searching by the BODY/HEADERS allows you to search for messages that match the search criteria you specify in the body or the headers of messages. The search Criteria can be any keyword or phrase.
Search results for BODY/HEADERS searches are limited to a maximum of 500 entries.
While a BODY/HEADERS search is in progress, no other BODY/HEADER searches can be performed, however, other types of search by Date/Time Range, From, To and Subject field can still be performed.
Please note that BODY/HEADERS searches are limited to messages stored locally on the appliance. Any messages that have been archived outside the appliance will not be searched.
- Ensure the Search Field(s) drop-down is set
to to BODY/HEADERS.
- Enter the criteria to search for in
the the Search Phrase Phrase field.
- Click
the the Advanced Search button (Figure 8).
Figure 8

- Searching by BODY/HEADERS is a very system intensive operation. Search results are not displayed like all other searches. Instead the system creates a search job that runs in the background. While a BODY/HEADER search is in progress the system displays a red dot on the upper right-hand corner of the page above
the the Earliest Message Date/Time field (Figure 9).
Figure 9

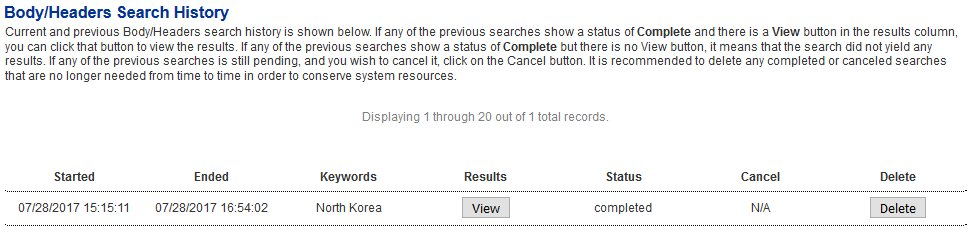
- Clicking on the red dot will redirect to
the the Body/Headers Search History page, where you can view the status and/or cancel of a pending BODY/HEADERS search. If a search is pending and you wish to cancel it, you can click on the the Cancel button under the Cancel column of a pending search (Figure 10).
Figure 10

- After a BODY/HEADERS search is complete, the red dot will turn green (Figure 11).
Figure 11

- Clicking on the green dot will redirect to
the the Body/Headers Search History page, where you can view the search results and/or delete the search results of the BODY/HEADERS search. You can view the search results by clicking on the the View button under the the Results column or you can delete the search results by clicking the the Delete button under the the Delete column column (Figure 12).
Figure 12

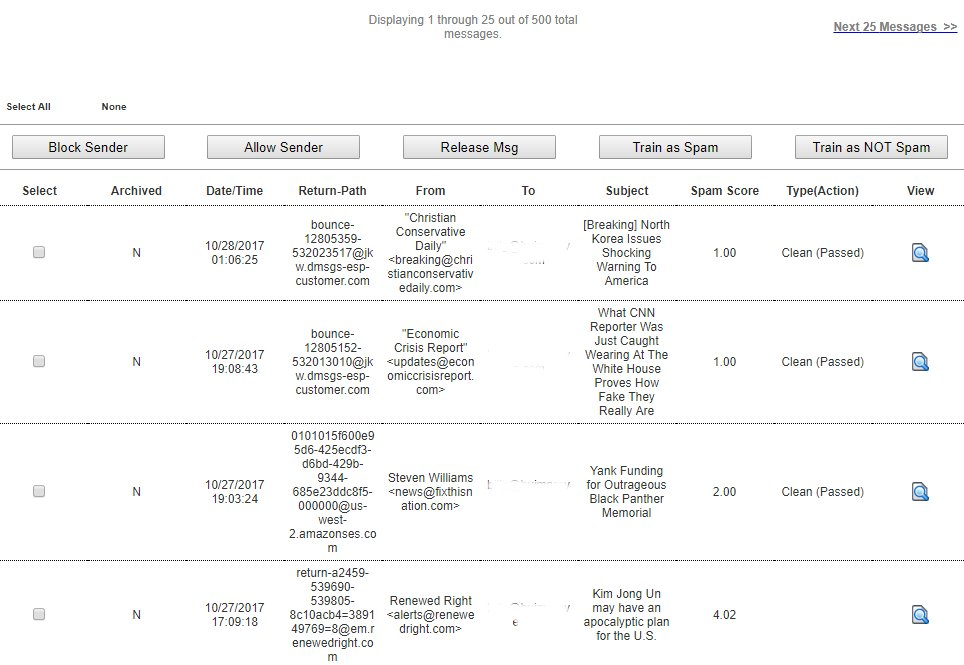
- Clicking on
the the View View button, will re-direct you back to the the Message History & Archive page where it will display display ONLY the results of the BODY/HEADER search (Figure 13).
Figure 13

- After you finished
reviewing reviewing you MUST clear the BODY/HEADER results from the the Message History & Archive page by clicking on the the Clear & Sort Sort button on top of the page (Figure 14). Clearing the BODY/HEADER results will revert the the Message History & Archive page to displaying the default message history.
Figure 14
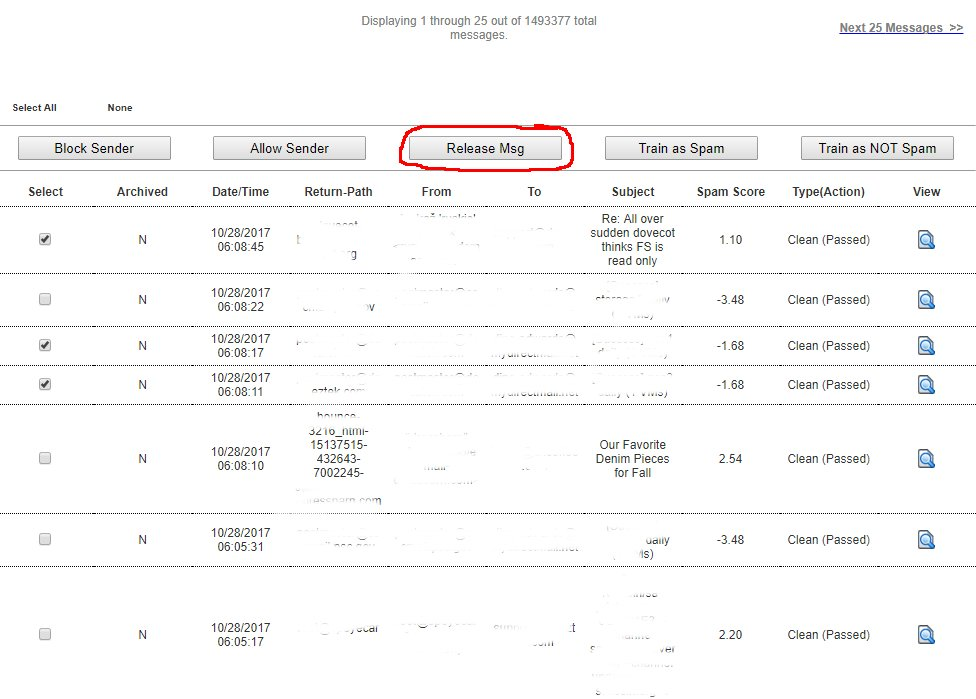
Release Email Messages to Internal Recipient Mailboxes
Releasing messages will instruct the sytem to deliver the messages selected to the intended intended Internal Recipient mailbox. This action can be performed for any type of message regardless if the message was inititally quarantined. This is useful for releasing lost email back to users or releasing quarantined messages that were never delivered to the user's mailbox.
The system can ONLY release messages stored in local storage. Messages that have been archived to external storage via an Archive Job cannot be released. They can only be viewed and/or downloaded.
When you click on Release Msg button the system will NOT display a loading message like normal (Figure 15) and the system may appear unresponsive. However, please be patient while your system processes the request before trying a different request. Some requests involving lots of messages may take a while to process.
Figure 15

- On
the the Message History & Archive page, in the message history section, place a check on the checkbox(es) under the the Select column of the message(s) you wish to release and then click on the the Release Msg button (Figure 16).
Figure 16

- Messages will be released and delivered to the intended Internal Recipient mailbox indicated in
the the To column of each respective message.
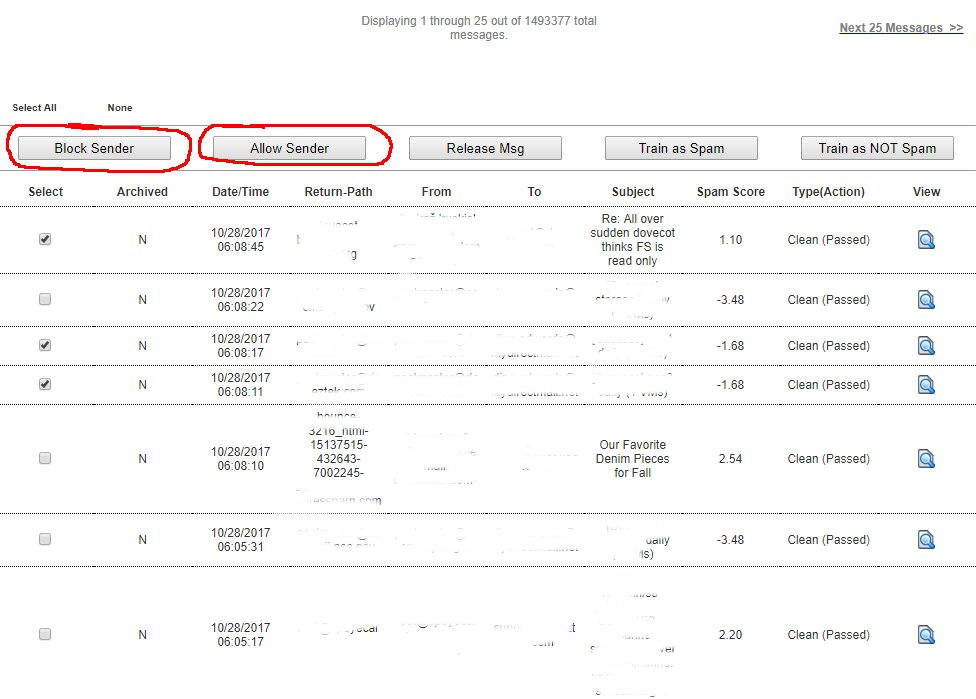
Create Block & Allow Sender Rules
Block/Allow rules should NOT be used as a method of spam control. Spam should be handled by training the Bayes Filter instead. Legitimate mass marketing email campaigns should be handled by unsubscribing from those campaigns.
When you click on Block Sender or the Allow Sender buttons the system will NOT display a loading message like normal (Figure 17) and the system may appear unresponsive. However, please be patient while your system processes the request before trying a different request. Some requests involving lots of messages may take a while to process.
Figure 17
- You can easily create Block/Allow rules by selecting one or more messages and clicking either
the the Block Sender or the the Allow Sender buttons (Figure 18).
Figure 18

- This will automatically create rules with either a Block or Allow action under
the the Content Checks --> Sender Checks Bypass Bypass section using the the email address displayed in the the From column as the Sender and the Internal Recipient email address displayed in the the To column of the Message History section.
Note, that most marketing/spam email campaigns will auto generate the the From email address each time they send out emails. An auto generated email address will look similar to the example below:
d-3-2492042-40004013-2-1-us2-c2bf84fa@aflac-onlineservices.com
In this example, each time an email goes out from this email campaign, the string before the the @ @ (d-3-2492042-40004013-2-1-us2-c2bf84fa) will always be different while the domain string after the the @ (aflac-onlineservices.com) will remain the same. Therefore, creating a block/allow rule using the the From email address is pointless since the Block/Allow rule you previously created will not fire next time an email from this marketing campaign gets received since the string before the the @ will be different. In these cases, it's recommended to navigate to to Content Checks --> Sender Check Bypass and follow the instructions under the the Add Domain Sender Check Bypass to Internal Recipient Recipient section in order to create a rule by using the domain string after the the @ (aflac-onlineservices.com).
Train the Bayes Database
The Bayes Database needs to be initially trained with at least 200 spam messages before it becomes enabled. The more you train the Bayes Database the more accurate it becomes, however anything over 5000 messages does not seem to improve accuracy.
You can check if the Bayes Database is enabled by running the following command in a command prompt:
spamassassin -D --lint 2>> sa.txt
Next, list the contents of sa.txt:
cat sa.txt
If you see an entry similar to the one below, this indicates that the Bayes Database is disabled and it needs to be trained further before it becomes enabled. In the example below, the Bayes Database needs to be trained with 189 additional spam messages ( 200-11=189):
debug: bayes: Not available for scanning, only 11 spam(s) in
Bayes DB < 200
You should NEVER use legitimate mass marketing emails to train the Bayes Database as Spam. Inversely, you should NEVER use spam emails to train the Bayes Database as non-spam. These actions will corrupt the Bayes Database and lead to the system misidentifying spam and non-spam emails. Additionally, you should avoid training the Bayes Database with forwarded spam emails.
When you click on the Train as Spam or the Train as NOT Spam buttons the system will NOT not display a loading message like normal (Figure 19) and the system may appear unresponsive. However, please be patient while your system processes the request before trying a different request. Some requests involving lots of messages may take a while to process.
Figure 19

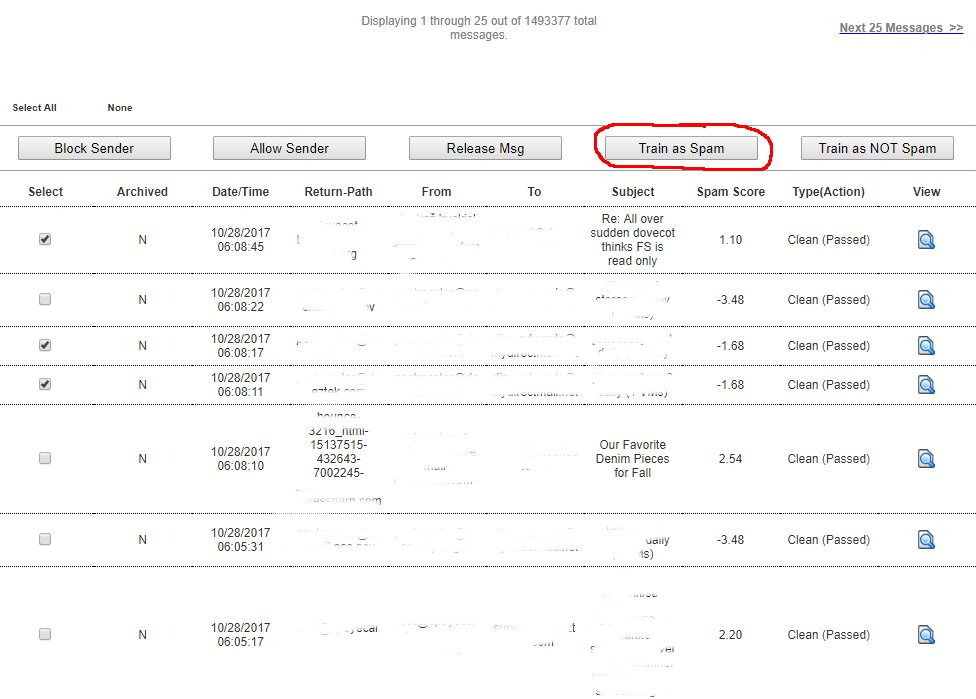
Train as Spam
- On
the the Message History & Archive page, in the message history section, place a check on the checkbox(es) under the the Select column of of spam message(s) you wish to use for training the Bayes Database and then click on the the Train as Spam Spam button button (Figure 20).
Figure 20

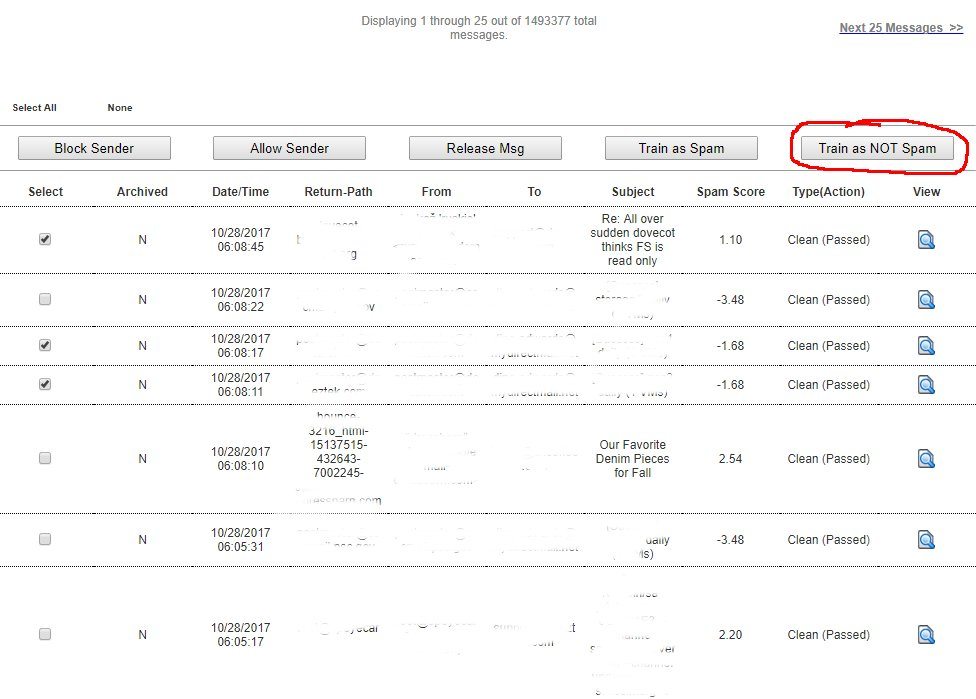
Train as NOT Spam
- On
the the Message History & Archive page, in the message history section, place a check on the checkbox(es) under the the Select column of the the NON spam message(s) you wish to use for training the Bayes Database and then click on the the Train as NOT Spam Spam button button (Figure 21).
Figure 21
View & Download Email Messages
- On
the the Message History & Archive page, under the View column, click on the icon of the message you wish to view and/or download.
 You will be redirected to the the View Message page (Figure 22).
When viewing a message, the system automatically disables links and any external content automatically.
Figure 22
The The View Message Message page is organized in 5 sections:
Command Buttons - This section contains the following 6 buttons:
- Back
- Allows you to return to the Message History & Archive Page while keeping any search parameters intact.
- Block
- Allows you to set a Block Rule for the sender of the message.
- Allow
- Allows you to set an Allow Rule for the sender of the message.
- Release
- Allows you to release the message to the Internal Recipient mailbox.
- Spam
- Allows you to train the Bayes Database with the message as spam.
- NOT Spam
- Allows you to train the Bayes Database with the message as Non-Spam (Figure 23).
Figure 23

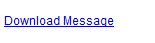
Download Message - Clicking on the Download Message link will allow you to download the message in .eml format which can be opened by an email client such as Outlook (Figure 24).
Use extreme care when downloading messages and/or opening attachments within messages since they may contain malware.
Figure 24
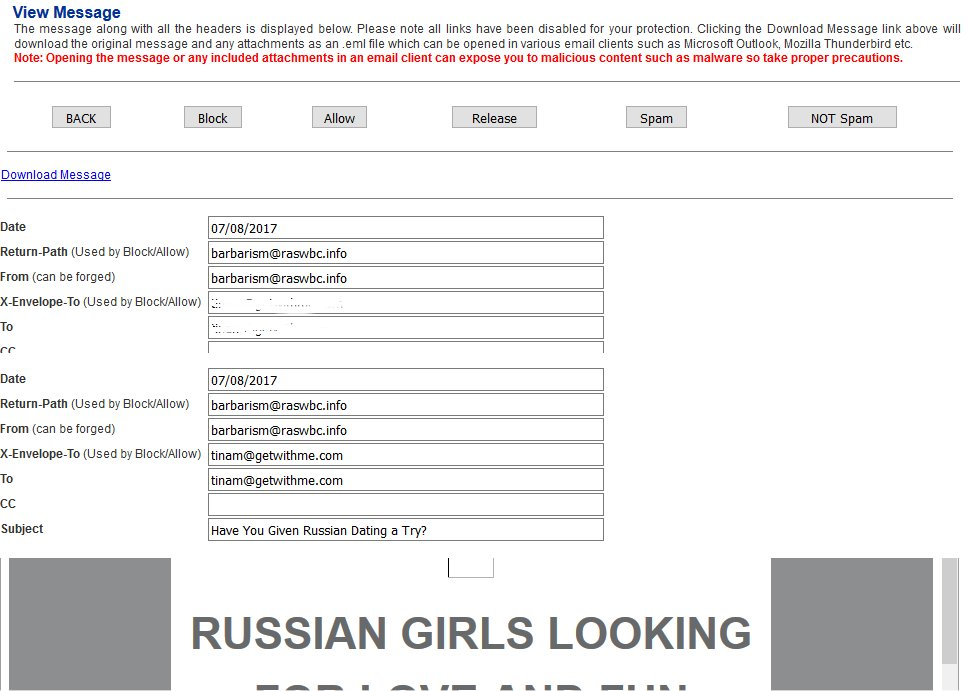
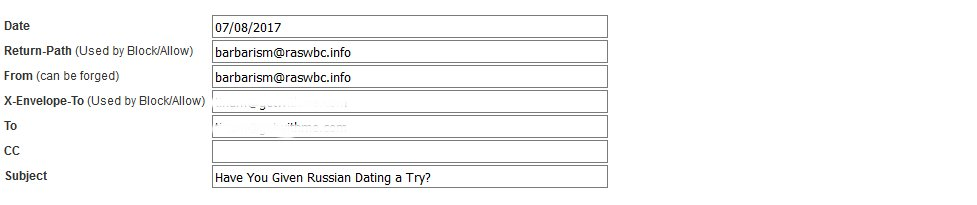
Message Details - This section shows the following headers of the message:
- Date
- The date the message was received/sent
- Return-
Path Path - This is the email address that is to be used for non-delivery receipts. This is the header that the system uses in order to create the Block/Allow rules.
From From - This is the email address indicating who the message is from, however this can be easily forged or it can be different from the Return-Path header is the email was sent on the behalf of someone else. This header is NOT used by the system for Block/Allow rules.- X-Envelope-
To To - This is the email address of the original recipient based on the SMTP envelope. This is the header that the system uses in order to create the Block/Allow rules.
To To - The email address the message was delivered to. This does NOT always match the final recipient, thus this header is NOT used by the sytem for Block/Allow rules.CC CC - This is the the email address that a copy of the message was also sent to. This header is not necessarily populated.Subject Subject - This is the subject header of the message (Figure 25).
Figure 25

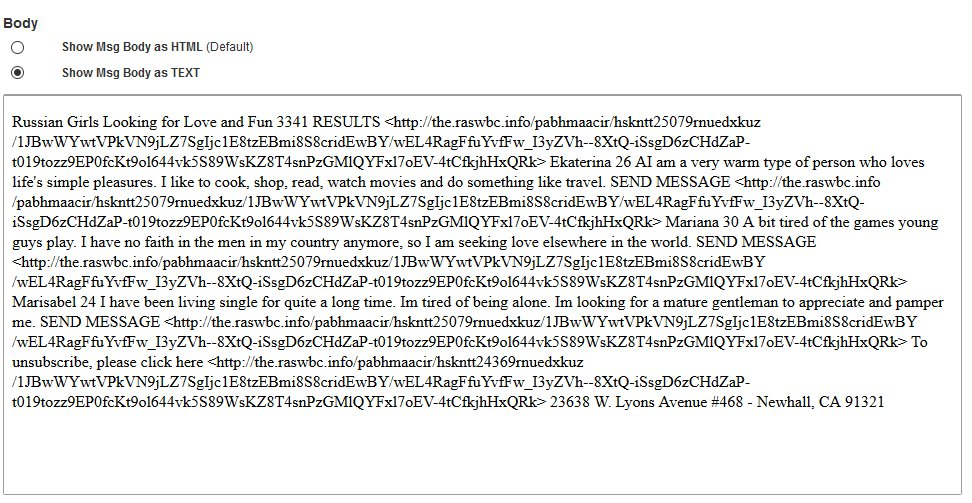
Message Body - This section shows the content inside the body of a message. The body section has two modes to display the body of a message:
- Show Msg Body as HTML
- This is the default mode when viewing a message. This mode displays any HTML elements that may be inside the body of a message (Figure 26).
Figure 26
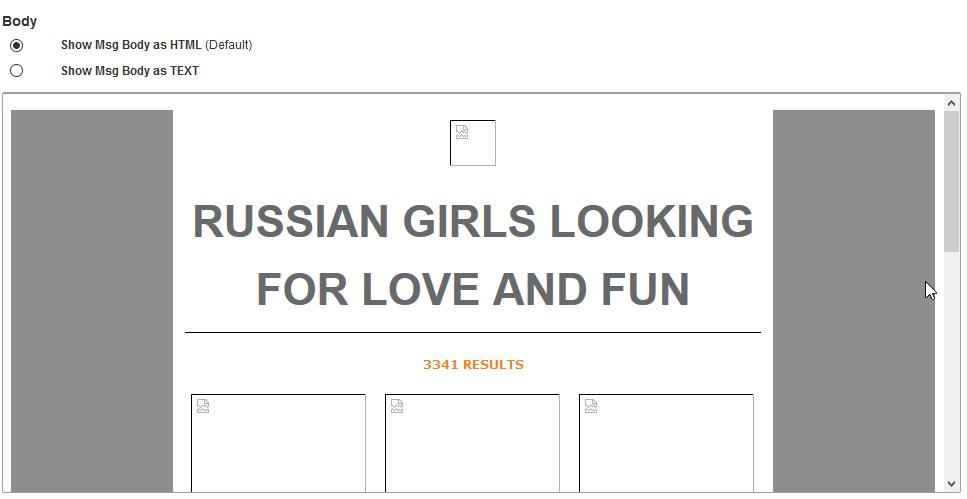
If the message body is blank, the message may not contain HTML elements, in that case try clicking on the Show Msg Body as Text selection.
- Show Msg Body as Text
- This mode displays the body of a message in text only (Figure 27).
Figure 27
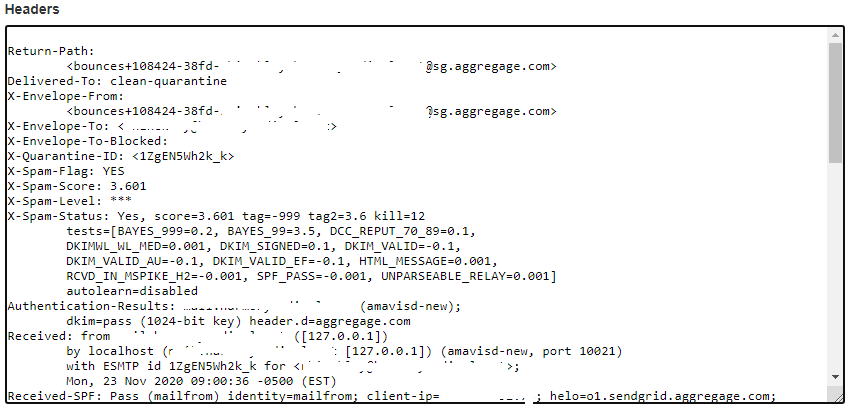
Message Headers - This section shows the message headers which can contain a lot of useful information such as spam score, the antispam filter tests that it scored, the sending email server IP address etc. (Figure 28).
Figure 28

Click on drop-down field containing the messages types, select a message type you wish to sort for and click on theClear & Sortbutton (Figure 3).
Figure 3
You can sort by the following types of messages:
ALL- These selection will display all messages regardless of message type.Clean (Passed)- These are email messages that no problems were found and were succesfully delivered to their intended recipient.Spam (Passed)- These are email messages that were tagged as Spam but they did not score high enough to be quarantined, thus they were succesfully delivered to their intended recipient albeit tagged as Spam.Spam (Quarantined)- These are email messages that were tagged as Spam and scored high enough to be quarantined.Bad-Header (Quarantined)- These are email messages that were detected as having bad headers thus they were quarantined.Banned (Quarantined)- These are email messages that contained banned file attachments thus they were quarantined.Virus (Quarantined)- These are email messages that contained malware thus they were quarantined.
If you sort by any type of message, in other words if the message type selection drop-down is set to anything but the ALL entry, message searches will be performed for the message type selected. For example, if you have sorted by the message type Spam (Quarantined) and you perform a search by date range, the results are only going to show entries matching the date range AND the message type Spam (Quarantined). If you wish to perform a search for all messages, ensure you have sorted by ALL message types.
Clicking on the Clear & Sort button, will clear any previous searches.
Search EmailSearching Messages
You can search email messages by by Date/Time Range, the the From field, the the Return-Path field, the the To field, the the Subject field and you can also search in the the body or a a header of a message.
Searching by DATE/TIME
Searching by DATE/TIME allows you to search for messages that were received/sent between the dates and times you specify.
- Ensure the Search Field(s) drop-down is set
toto DATE ONLY. EnsureEnsure SearchPhrasePhrase field is empty.- Enter
aa Start Dateformatformat dd/mm/yyyy) - Select
aa Start Timethethe Start Time - Enter
anan End Dateformatformat dd/mm/yyyy) - Select
anan End Timethethe End Time - Click
thethe Advanced Search
Figure 4

- If any results are found they will be displayed underneath the Search section (Figure 5).
Figure 5

Searching by FROM, RETURN-PATH, TO, SUBJECT
Searching by FROM, RETURN-PATH, TO or SUBJECT allows you to search for messages that match the search criteria you specify in the From field, Return-Path field, the To field or the Subject field of a mesage.
- Ensure the Search Field(s) drop-down is set
toto FROM, RETURN-PATH, TO or SUBJECT. - Enter the criteria to search for in
thethe SearchPhrasePhrase field. - Click
thethe Advanced Search
Figure 6

- If any results are found they will be displayed underneath the Search section (Figure 7).
Figure 7
Searching by BODY/HEADERS
Searching by the BODY/HEADERS allows you to search for messages that match the search criteria you specify in the body or the headers of messages. The search Criteria can be any keyword or phrase.
Search results for BODY/HEADERS searches are limited to a maximum of 500 entries.
While a BODY/HEADERS search is in progress, no other BODY/HEADER searches can be performed, however, other types of search by Date/Time Range, From, To and Subject field can still be performed.
Please note that BODY/HEADERS searches are limited to messages stored locally on the appliance. Any messages that have been archived outside the appliance will not be searched.
- Ensure the Search Field(s) drop-down is set
toto BODY/HEADERS. - Enter the criteria to search for in
thethe SearchPhrasePhrase field. - Click
thethe Advanced Search
Figure 8

- Searching by BODY/HEADERS is a very system intensive operation. Search results are not displayed like all other searches. Instead the system creates a search job that runs in the background. While a BODY/HEADER search is in progress the system displays a red dot on the upper right-hand corner of the page above
thethe Earliest Message Date/Time
Figure 9

- Clicking on the red dot will redirect to
thethe Body/Headers Search Historythethe Cancel
Figure 10

- After a BODY/HEADERS search is complete, the red dot will turn green (Figure 11).
Figure 11
- Clicking on the green dot will redirect to
thethe Body/Headers Search Historythethe Viewthethe Resultsthethe Deletethethe Deletecolumncolumn (Figure 12).
Figure 12
- Clicking on
thetheViewView button, will re-direct you back tothethe Message History & Archivedisplaydisplay ONLY
Figure 13
- After you finished
reviewingreviewing you MUST clear the BODY/HEADER resultsthethe Message History & Archivethethe Clear &SortSort button on top of the page (Figure 14). Clearing the BODY/HEADER results will revertthethe Message History & Archive
Figure 14

Release Email Messages to Internal Recipient Mailboxes
Releasing messages will instruct the sytem to deliver the messages selected to the intended intended Internal Recipient mailbox. This action can be performed for any type of message regardless if the message was inititally quarantined. This is useful for releasing lost email back to users or releasing quarantined messages that were never delivered to the user's mailbox.
The system can ONLY release messages stored in local storage. Messages that have been archived to external storage via an Archive Job cannot be released. They can only be viewed and/or downloaded.
When you click on Release Msg button the system will NOT display a loading message like normal (Figure 15) and the system may appear unresponsive. However, please be patient while your system processes the request before trying a different request. Some requests involving lots of messages may take a while to process.
Figure 15

- On
thethe Message History & Archivethethe Selectthethe Release Msg
Figure 16
- Messages will be released and delivered to the intended Internal Recipient mailbox indicated in
thethe To
Create Block & Allow Sender Rules
Block/Allow rules should NOT be used as a method of spam control. Spam should be handled by training the Bayes Filter instead. Legitimate mass marketing email campaigns should be handled by unsubscribing from those campaigns.
When you click on Block Sender or the Allow Sender buttons the system will NOT display a loading message like normal (Figure 17) and the system may appear unresponsive. However, please be patient while your system processes the request before trying a different request. Some requests involving lots of messages may take a while to process.
Figure 17

- You can easily create Block/Allow rules by selecting one or more messages and clicking either
thethe Block Senderthethe Allow Sender
Figure 18
- This will automatically create rules with either a Block or Allow action under
thethe Content Checks --> Sender ChecksBypassBypass section using the the email address displayed inthethe Fromthethe To
Note, that most marketing/spam email campaigns will auto generate the the From email address each time they send out emails. An auto generated email address will look similar to the example below:
d-3-2492042-40004013-2-1-us2-c2bf84fa@aflac-onlineservices.com
In this example, each time an email goes out from this email campaign, the string before the the @ @ (d-3-2492042-40004013-2-1-us2-c2bf84fa) will always be different while the domain string after the the @ (aflac-onlineservices.com) will remain the same. Therefore, creating a block/allow rule using the the From email address is pointless since the Block/Allow rule you previously created will not fire next time an email from this marketing campaign gets received since the string before the the @ will be different. In these cases, it's recommended to navigate to to Content Checks --> Sender Check Bypass and follow the instructions under the the Add Domain Sender Check Bypass to Internal Recipient Recipient section in order to create a rule by using the domain string after the the @ (aflac-onlineservices.com).
Train the Bayes Database
The Bayes Database needs to be initially trained with at least 200 spam messages before it becomes enabled. The more you train the Bayes Database the more accurate it becomes, however anything over 5000 messages does not seem to improve accuracy.
You can check if the Bayes Database is enabled by running the following command in a command prompt:
spamassassin -D --lint 2>> sa.txt
Next, list the contents of sa.txt:
cat sa.txt
If you see an entry similar to the one below, this indicates that the Bayes Database is disabled and it needs to be trained further before it becomes enabled. In the example below, the Bayes Database needs to be trained with 189 additional spam messages ( 200-11=189):
debug: bayes: Not available for scanning, only 11 spam(s) in Bayes DB < 200
You should NEVER use legitimate mass marketing emails to train the Bayes Database as Spam. Inversely, you should NEVER use spam emails to train the Bayes Database as non-spam. These actions will corrupt the Bayes Database and lead to the system misidentifying spam and non-spam emails. Additionally, you should avoid training the Bayes Database with forwarded spam emails.
When you click on the Train as Spam or the Train as NOT Spam buttons the system will NOT not display a loading message like normal (Figure 19) and the system may appear unresponsive. However, please be patient while your system processes the request before trying a different request. Some requests involving lots of messages may take a while to process.
Figure 19

Train as Spam
- On
thethe Message History & Archivethethe Selectofof spam message(s)thethe Train asSpamSpambuttonbutton (Figure 20).
Figure 20
Train as NOT Spam
- On
thethe Message History & Archivethethe Selectthethe NON spam message(s)thethe Train as NOTSpamSpambuttonbutton (Figure 21).
Figure 21

View & Download Email Messages
- On
thethe Message History & Archive page, under the View column, click on the icon of the message you wish to view and/or download.thethe View Message

When viewing a message, the system automatically disables links and any external content automatically.
Figure 22

TheThe ViewMessageMessage page is organized in 5 sections:
Command Buttons - This section contains the following 6 buttons:
- Back
- Block
- Allow
- Release
- Spam
- NOT Spam
Figure 23

Download Message - Clicking on the Download Message link will allow you to download the message in .eml format which can be opened by an email client such as Outlook (Figure 24).
Use extreme care when downloading messages and/or opening attachments within messages since they may contain malware.
Figure 24

Message Details - This section shows the following headers of the message:
- Date
- Return-
PathPath - This is the email address that is to be used for non-delivery receipts. This is the header that the system uses in order to create the Block/Allow rules. FromFrom - This is the email address indicating who the message is from, however this can be easily forged or it can be different from the Return-Path header is the email was sent on the behalf of someone else. This header is NOT used by the system for Block/Allow rules.- X-Envelope-
ToTo - This is the email address of the original recipient based on the SMTP envelope. This is the header that the system uses in order to create the Block/Allow rules. ToTo - The email address the message was delivered to. This does NOT always match the final recipient, thus this header is NOT used by the sytem for Block/Allow rules.CCCC - This is the the email address that a copy of the message was also sent to. This header is not necessarily populated.SubjectSubject - This is the subject header of the message (Figure 25).
Figure 25
Message Body - This section shows the content inside the body of a message. The body section has two modes to display the body of a message:
- Show Msg Body as HTML
Figure 26

If the message body is blank, the message may not contain HTML elements, in that case try clicking on the Show Msg Body as Text selection.
- Show Msg Body as Text
Figure 27

Message Headers - This section shows the message headers which can contain a lot of useful information such as spam score, the antispam filter tests that it scored, the sending email server IP address etc. (Figure 28).
Figure 28