Email Archive
In this section will be able to configure a scheduled archive jobs for your Hermes SEG.
An Email Archive Job will create a separate email archive on external storage by creating a directory named /mnt on that share, copying all the emails stored on the appliance to that directory, verifying that the emails copied correctly and then delete them from the appliance local storage in order to free up space.
Archived emails can still be viewed and downloaded form the Hermes SEG Administration Console or User Self-Service Console as long as the external storage is mounted on the appliance. However, archived emails cannot be released to user mailboxes.
In addition to archiving the email on the appliance to external storage, an archive job will also allow you to create a compressed 7-zip snapshot of the latest archive on the external storage . The 7-zip snapshot is useful for having multiple backup copies of the e-mail archive.
Each time an Email Archive Job runs, it creates a detailed log of each and every message that is moved and deleted from the appliance local storage. At the end of the job, this log is compressed as a 7-zip file and then moved to the external archive storage. For Email Archive Jobs configured without a compressed 7-zip snapshot of the latest archive, the system will automatically prune logs older than 14-days by default. For Email Archive Jobs configured with a compressed 7-zip snapshot of the latest archive, the system will automatically prune logs following the Compressed 7-zip Snapshot Retention Period setting of the job.
Hermes SEG requires a CIFS (Windows Share) share to an external storage in order to perform scheduled email archives. Shares have to be successfully validated first before an Archive Job can be saved. Only one Archive Job can be created.
Note: It is highly recommended that you archive email to an external deduplicating storage.
Note: Windows Server 2012 and above has support for deduplication, however if you are planning on utilizing Windows Server deduplication, you must disable Windows Kernel Case Insensitivity and you must NEVER use Windows file tools to manage the email archive because case sensitivity will not be preserved and the appliance will not able to access the archived emails.
Note: Email Archive Jobs can be a very time consuming process depending on the number of emails stored on the appliance. The initial Archive Job can take days or even weeks to complete.
Validate Share
By default, when creating a new Archive Job, the Archive Job Create Mode field is automatically set to Validate Share and the Save Archive Job field is disabled. The Save Archive Job field only gets enabled when a share is succesfully validated.
- Enter a friendly name under the Archive Job Name field
- Enter an IP Address or a FQDN Host name of the server hosting the share under the Server field
- Enter the name of the share under the Share Name field
- Enter the name of a directory under the share if applicable under the Directory Name field
- Enter domain name under the Domain field
- Enter the username who has access to that share under the Username field
- Enter the password for the username from Step 6 under the Password field
- Enter a valid email address in order to get success or failure notifications from the backup job under the Notification E-mail Address field
- Select the number of days to archive email older than in the Archive Emails Older Than drop-down box. For instance, if you want to have 3 months worth of archive emails stored on the appliance and archive the rest, you would select 90 Days from the drop-down box.
- Select Yes on the Create Compressed 7-zip Snapshot field if you want the system to create Compressed 7-zip format snapshots of the email archive stored on the share. If you select Yes, after all the emails have been archived on the share, the system will additionally create a 7-zip compressed archive of all the emails on the share. This is useful for having multiple copies of the email archive for retention purposes.
- Select the number of days to retain Compressed 7-zip Snapshot files on the Compressed 7-zip Snapshot Retention Period drop-down field. Available options are, 7 Days, 14 Days, 21 Days and 28 Days. The system will use the Compressed 7-zip Snapshot Retention Period you selected to automatically delete older snapshot files so that your external storage doesn't get filled up.
- Select the job frequency from the Frequency drop-down field. Available options are Daily, Weekly and Monthly.
- Enter a date for the archive job to start by either selecting a date by clicking the calendar button or by manually entering a date in the form of mm/dd/yyyy in the Start Date field.
- Select a time for the archive job to start by selecting a time from the Start Time drop-down field
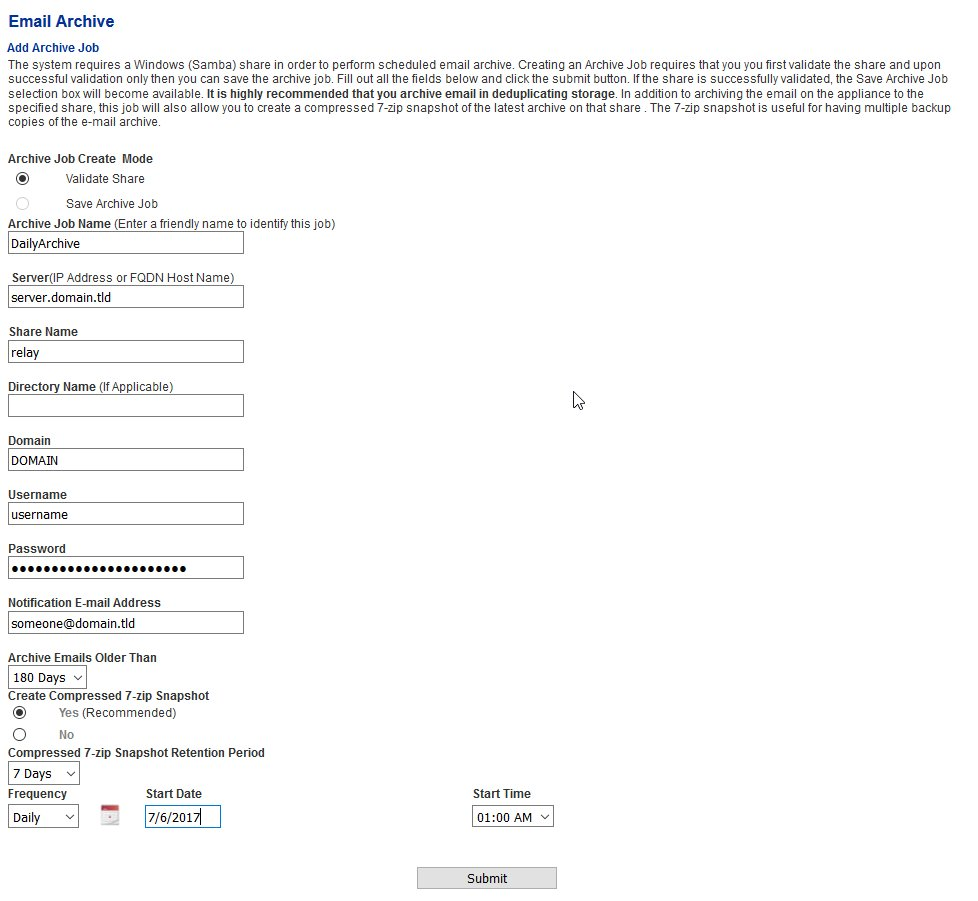
- Click the Submit button to validate the share (Figure 1)
Figure 1
Share Validation Succesful
If the validation is succesful, you will receive the following message (Figure 2)
Figure 2

You will also notice that the Save Archive Job option will be enabled under the Archive Job Create Mode on top of the page. Select the Save Archive Job option and click the Submit button to save the job (Figure 3).
Figure 3

The job will be saved under the Existing Archive Job section on the bottom of the page (Figure 4)
Figure 4

Share Validation Unsuccessful
If the validation is unsuccesful, you will receive the following message (Figure 5).
Figure 5

Check the information supplied and share permissions and try validating the share again.
Manually Run Archive Job
The saved archive job will run according to the schedule you set. Alternatively if you wish to run it immediately:
- Click on the green arrow button
 under the Run/Stop column to run the job immediately (Figure 6)
Figure 6

- In the Confirmation Window, click the Yes button (Figure 7). Clicking No, will take you back to the Email Archive page.
Figure 7

If the Archive Job is in progress, the button under the Run/Stop column will become a red square ![]() (Figure 8)
(Figure 8)
Figure 8

Stop an Active Archive Job
If you wish to stop an active Archive Job:
- Click on the red square button
 under the Run/Stop column (Figure 9)
Figure 9

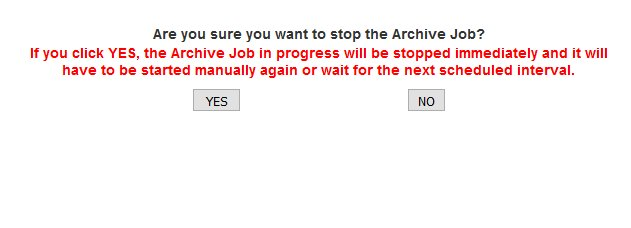
- In the Confirmation Window, click the Yes button (Figure 10). Clicking No, will take you back to the Email Archive page.
Figure 10
Delete Archive Job
If you wish to delete the existing Archive Job and the job is NOT running:
- Click on the red X
 under the Delete column (Figure 11)
Figure 11

- In the Confirmation Window, click the Yes button (Figure 12). Clicking No, will take you back to the Email Archive page.
Figure 12

Remount Archive Share
Note: You cannot remount the Archive share if the Archive Job is in progress.
Figure 13

Restore External Storage Archive from Compressed 7-zip Snapshot File
As mentiond above, if you are storing your email archive on an external storage share on a Windows server, you must NEVER use Windows file tools to manage the email archive because case sensitivity will not be preserved and the appliance will not able to access the archived emails. This includes, attempting to restore the email archive from a Compressed 7-zip Snapshot file. The restore process should always be done from the Hermes SEG appliance.
- Login to Hermes SEG via SSH or the virtual console and become root and then type the hermes account password when prompted:
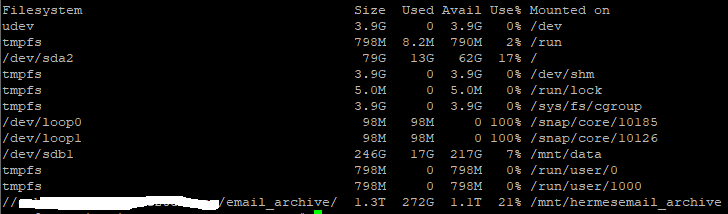
sudo su- Ensure the email archive share is mounted:
df -h- Look for the /mnt/hermesemail_archive mount (Figue 14)
Figure 14

- Change to the /mnt/hermesemail_archive directory:
cd /mnt/hermesemail_archive- List files in that directory
lshermesemail_archive_07-06-2017-0224.7z hermesemail_archive_07-11-2017-0303.7z
hermesemail_archive_07-07-2017-0201.7z hermesemail_archive_07-12-2017-0304.7z
hermesemail_archive_07-08-2017-0153.7z hermesemail_archive_07-13-2017-0246.7z
hermesemail_archive_07-09-2017-0313.7z hermesemail_archive_07-14-2017-0149.7z
hermesemail_archive_07-10-2017-0315.7z mntIf the mnt directory exists
Change to that directory:
cd mnt/If the mnt directory does NOT exist
Create the directory:
mkdir mntChange to that directory:
cd mnt/- Restore the email archive to the share by running the following command where hermesemail_archive_mm-dd-yyyy-hhmm.7z is the name of the Compressed 7-zip Snapshot file from the listing in Step 6:
7za x ../hermesemail_archive_mm-dd-yyyy-hhmm.7z