Console Settings
NOTE: This feature is only available withThe Hermes SEG ProConsole License.Settings sets the method you wish to access Hermes SEG machine which includes the Admin Console, User Console and the Ciphermail Console. By default, the Console Mode is set to IP Address, however, an IP address is not contusive to using SSL certificates. Therefore, if you plan to use a SSL certificate to access the Hermes SEG machine, you must set the Console Mode to Host Name. The Host Name you set it does NOT necessarily have to the the same Host Name you set in Network Settings above. The Host Name and Primary Domain Name you set in the Network settings is used for SMTP transactions such as SMTP TLS and it's not related to Hermes SEG console access.
Set the Console Mode drop-down to Host Name and in the resultant Host Name field that appears, fill in the desired host anem you wish to use (Figure 1):
Figure 1
In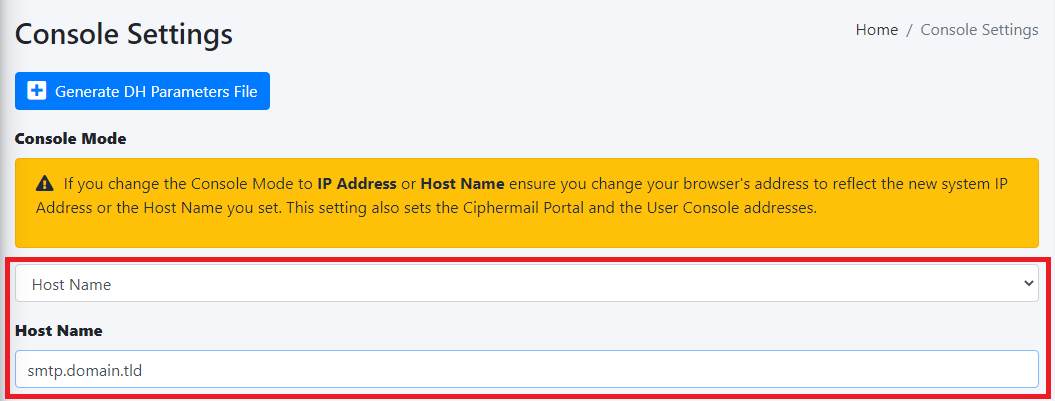
this
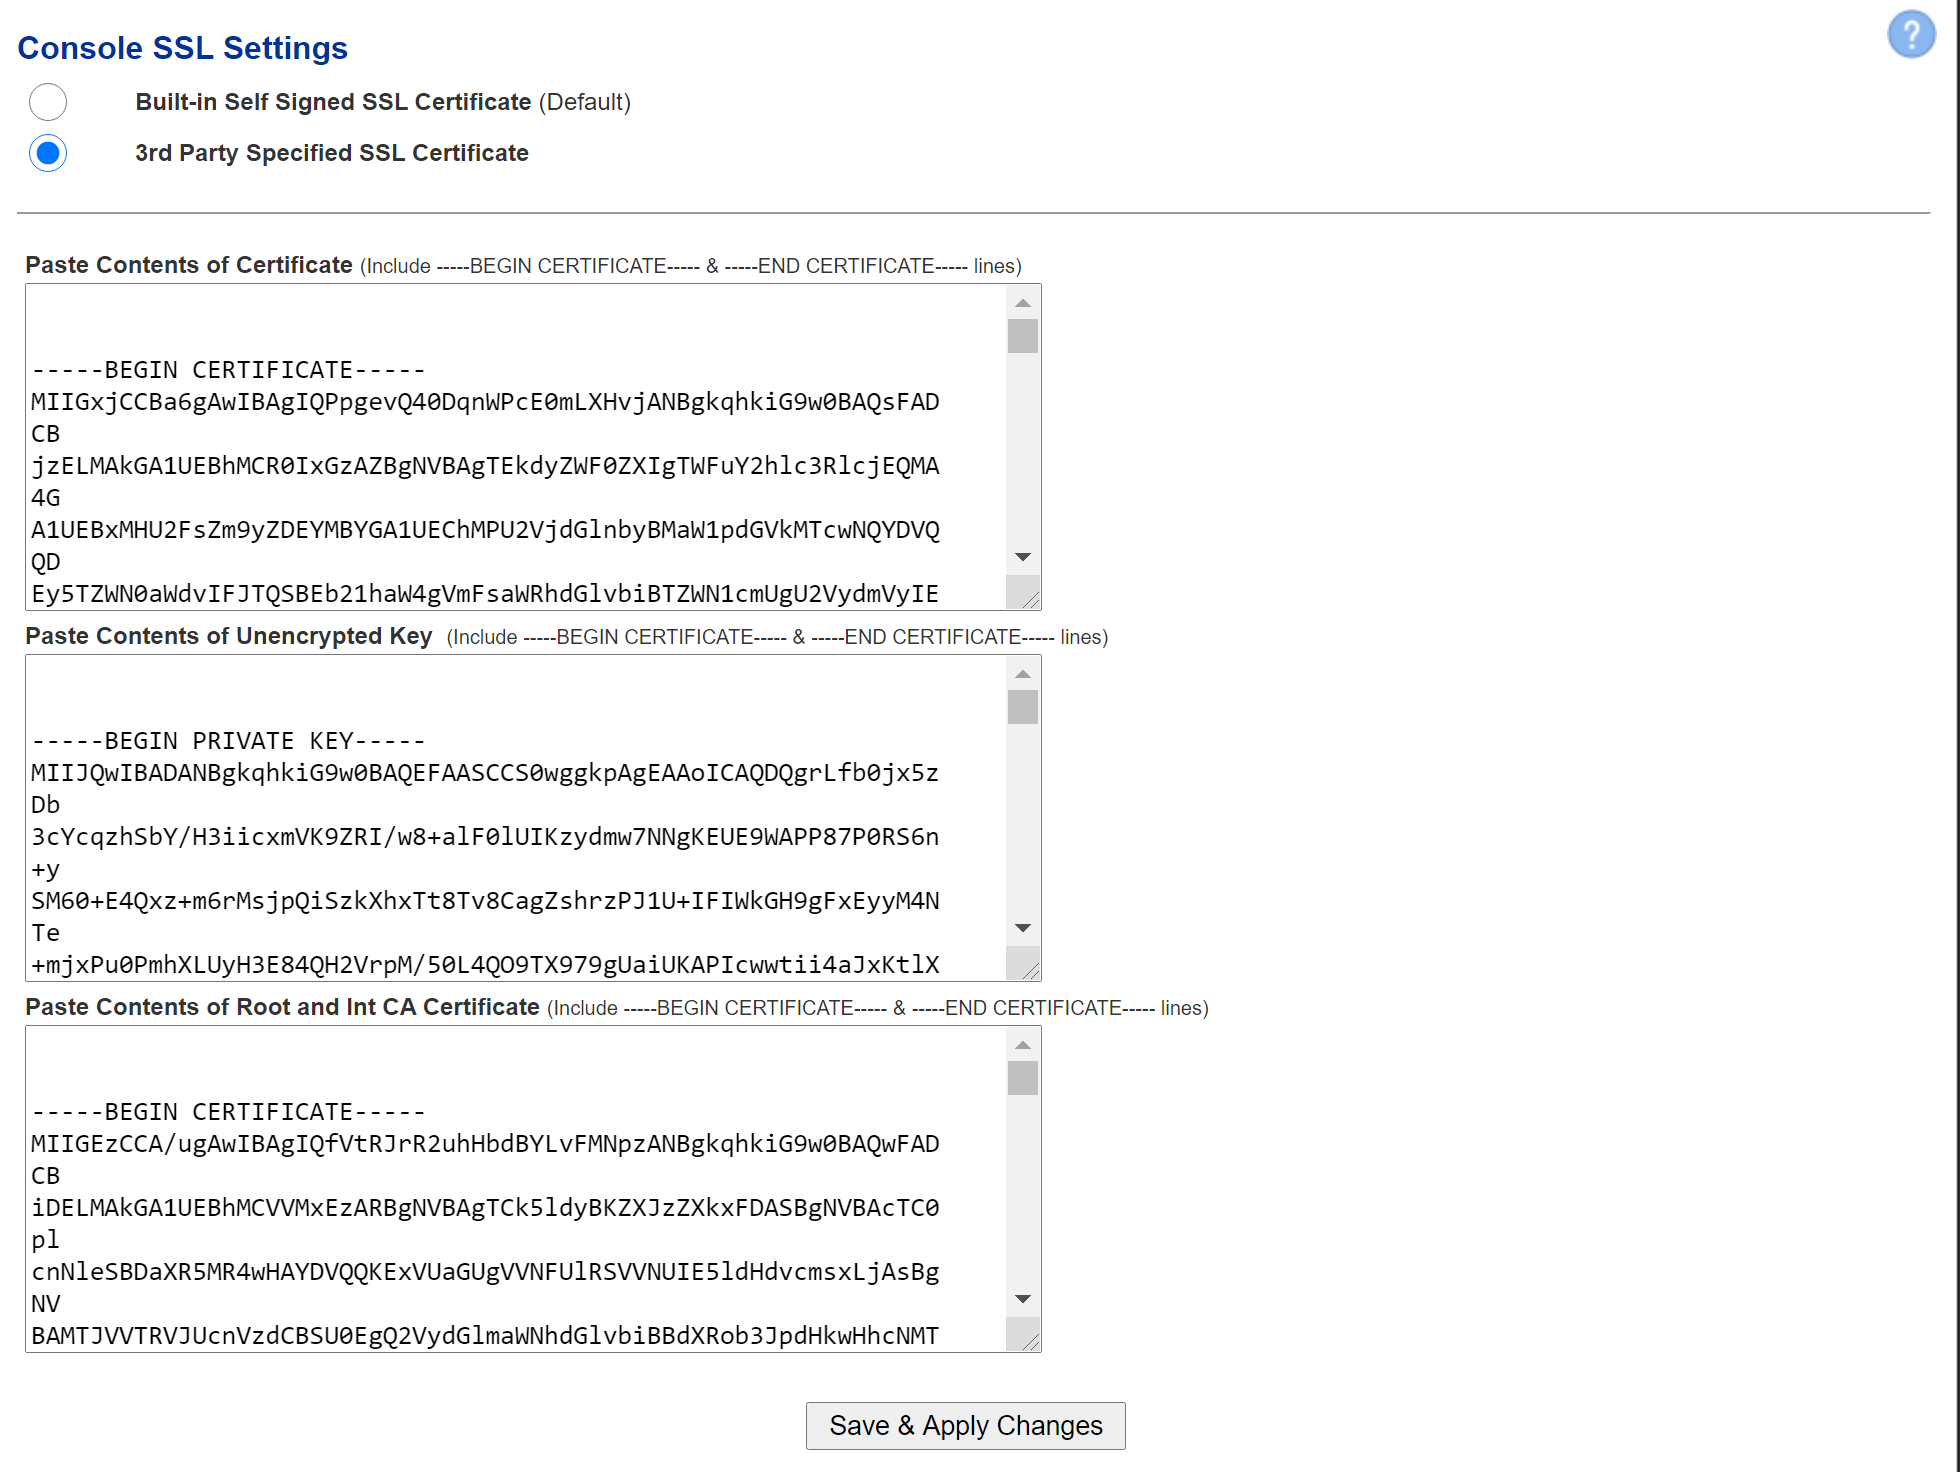
The Console Certificate field is pre-populated with the system-self-signed certificate. If you wish to use a SSL certificate you set in the Set System Certificates section above, simply delete the system-self-signed entry and start typing the friendly name of the certificate you cansetup specifypreviously that matches the host name. The system will locate the certificate and display it in a customdrop-down 3rdlist. partyClick CAon certificate,the private keycertificate and CAthe chainsystem forwill automatically populate all the Administrationrest Consoleof asthe wellCertificate fields such as the UserSubject, Self-ServiceIssuer, Portal.Serial Hermes SEG comes pre-configured with a self-signed certificate which is not ideal for a production systems since self-signed certificates generate browser errors. You will need PEM encoded certificates and an Type (unecryptedFigure Private2):
Key
Figure 2.
A
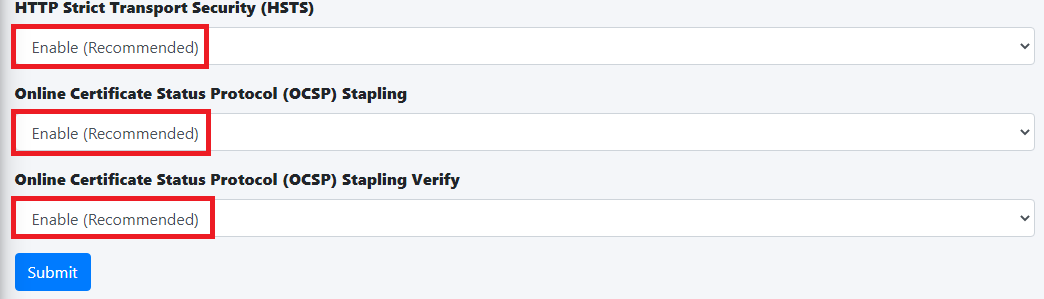
PEMencodedWe certificatehighly is human readeable certificaterecommend that
startsyou with:enable -----BEGINHTTP CERTIFICATE-----
Strict andTransport endsSecurity with
-----END CERTIFICATE-----
An unecrypted Private Key starts with:
-----BEGIN PRIVATE KEY-----
and ends with
-----END PRIVATE KEY-----
1. Certificate
Under the Console SSL Settings(HSTS),
ensure you select 3rd Party Specified SSLOnline Certificate Status Protocol (OCSP) Stapling, Online Certficiate Status Protocol (OCSP) Stapling Verify. Onceand you makeclick the
selection, the Paste Contents of Certificate, Paste Conents of Unencrypted Key and the Paste Conents of Root and and Int CA Certificate fields will become enabled.
Open your PEM encoded certificate with a text editor and select and copy the entire contents of the file to include the -----BEGIN CERTIFICATE----- and the -----END CERTIFICATE----- lines.
Under the Paste Contents of Certificate field, delete the existing contents so you are left with an empty field.
Paste the contents of the file you copied from Step 2 into the empty Paste Contents of Certificate field.
2. Unecrypted Key
Open your unecrypted key with a text editor and select and copy the entire contents of the file to include the -----BEGIN PRIVATE KEY----- and the -----END PRIVATE KEY----- lines.
Under the Paste Contents of Unecrypted Key field, delete the existing contents so you are left with an empty field.
Paste the contents of the file you copied from Step 1 into the empty Paste Contents of Unecrypted Key field.
3. Root and Int CA Certificate
Open your PEM encoded CA Bundle certificate with a text editor and select and copy the entire contents of the file to include the -----BEGIN CERTIFICATE----- and the -----END CERTIFICATE----- lines. Please note that CA Bundle certificates usually include more than one certificate in a single file, so ensure you select ALL the certificates in the file.
Under the Paste Contents of Root and Int CA Certificate field, delete the existing contents so you are left with an empty field.
Paste the contents of the CA Bundle certificate you copied from Step 1 into the empty Paste Contents of Certificate field.
After pasting all the contents, click on the Save & Apply ChangesSubmit button (
Figure 13)
.:
Figure 13
After clicking the Submit button and you changed the Console Mode from IP Address to Host Name, your browser will NOT automatically redirect you to the new console address. Ensure you enter the new address in your browser as https://<HOST_NAME>/admin/ where <HOST-NAME> is the new Host Name you set above.
Additionally, we recommend that you generate a DH (Diffie-Hellman) Parameters file by clicking the Generate DH Parameters File button and on the resultant Generate Diffie-Hellman (DH) Parameters File confirmation window, click
the on SaveYes &(Figure Apply4):
Changes
Figure 4 button,
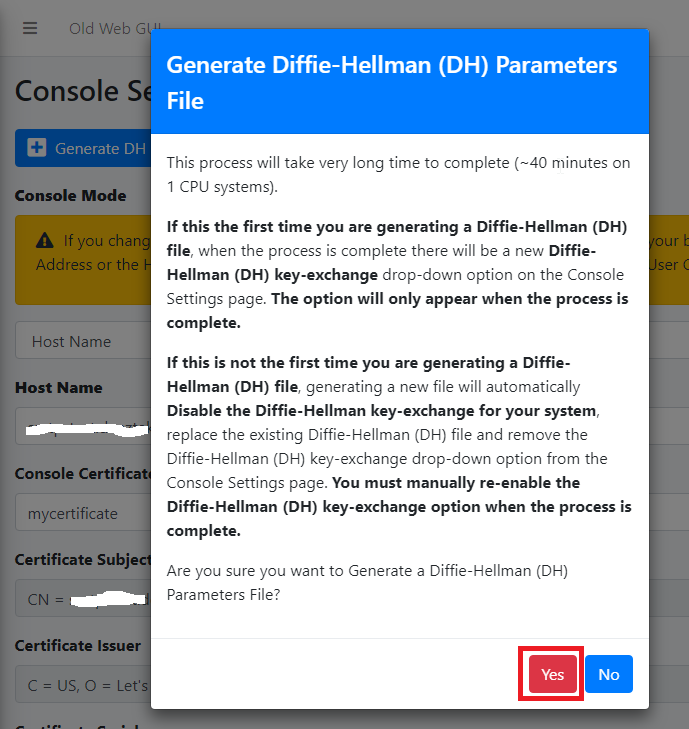
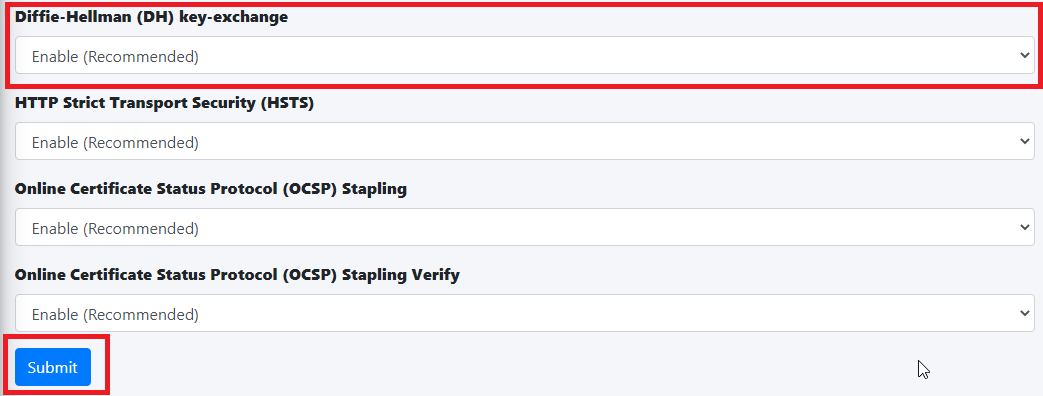
Generating a DH Parameters file can take a very long time to complete (~40 minutes on 1-CPU systems). You can proceed to configure the rest of your system (DO NOT reboot the system willwhile performit's generate a validationDH Parameters file) and check back under System --> Console Settings to see if a new Diffie-Hellman (DH) key-exchange drop-down appears set it to Enable and click the Submit button below (Figure 5).
Figure 5

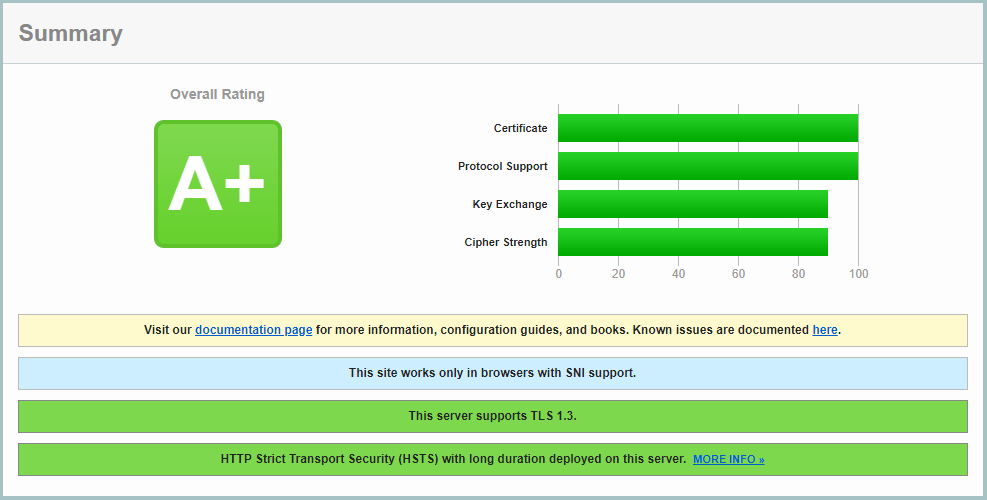
If you follow the above recommendations, you should be able to achive an A+ rating on the certificate,Qualys privateSSL keyLabs andSSL CAServer bundleTest combination.(Figure If6):
youFigure get6
a Success!! message, refresh your browser to see your new certificate. If there are errors, verify the contents you pasted in each field especially the Certificate and the Unencrypted Key fields since those seem to be the cause of most errors.