Vmware
- How to Create VMFS Datastore on Vmware OS bootdrive
- Vmware ESXi NUT Client Installation and Configuration
- Create OVA using vmware ovftool on ESXi or Vcenter
- In-Guest UNMAP, EnableBlockDelete and VMFS-6
- How to Increase Virtual Machine Disk Size in VMware
- Reduce Virtual Machine Disk Size (VMDK) on VMWare ESXi
How to Create VMFS Datastore on Vmware OS bootdrive
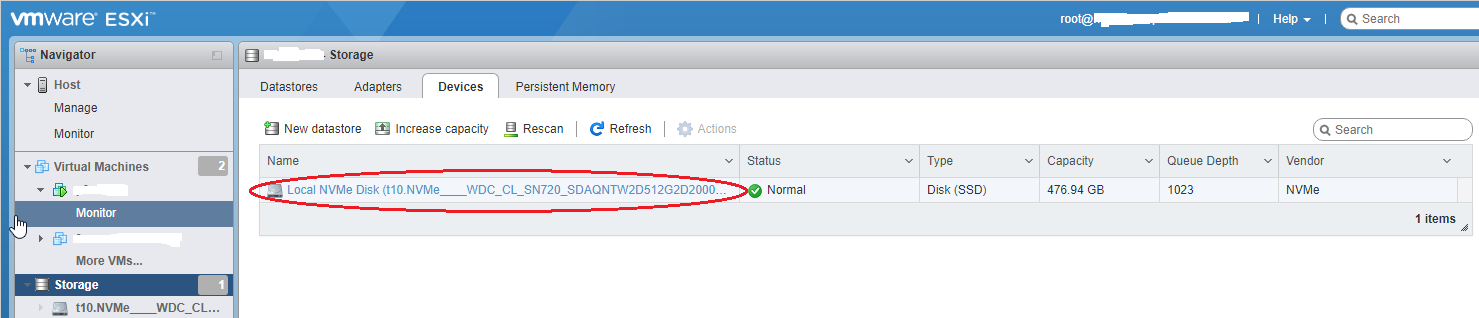
Normally a vmfs partition is already created by ESXi on the boot drive. You can verify by going logging into the ESX Web GUI and navigating to Storage --> Devices --> Boot disk (Figure 1).
Figure 1
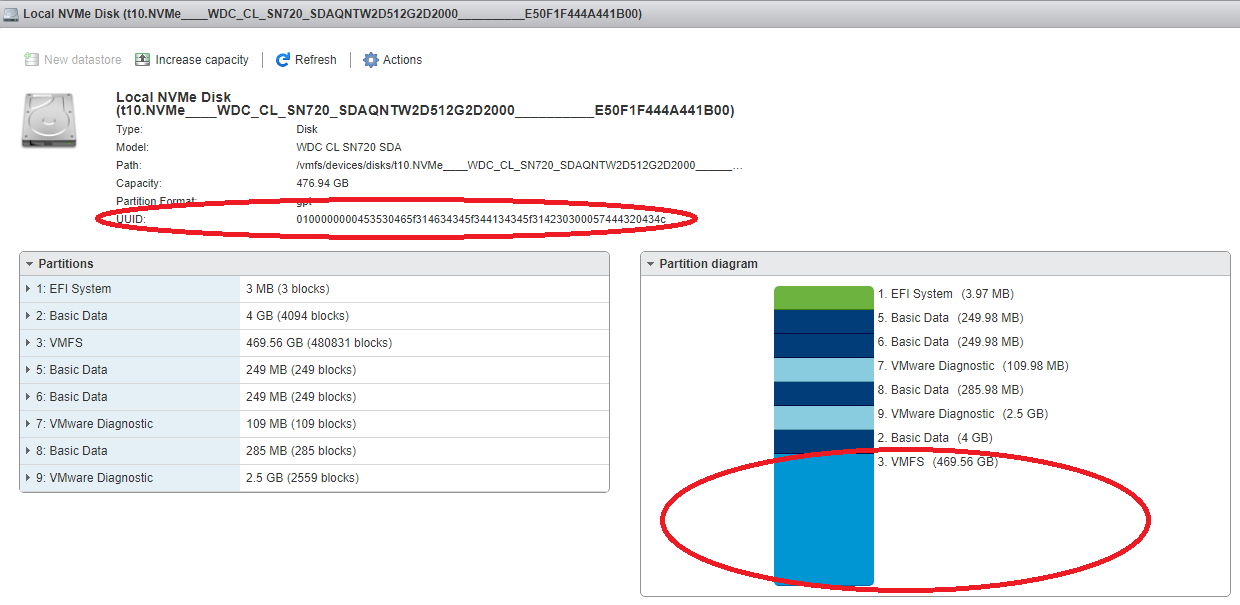
Clicking on the drive will show the Partition diagram of the boot drive and the vmfs partition is usually partition 3. Make a note of the UUID of the device and the partition number (Figure 2).
Figure 2
Create a vmfs datastore named datastore-ssd on the the boot device using the UUID and the partition number you noted above using the command below (Device format is /vmfs/devices/disks/ vm1.<UUID>:3):
vmkfstools --createfs vmfs6 -S datastore-ssd /vmfs/devices/disks/vml.0100000000453530465f314634345f344134345f314230300057444320434c:3If successful, you should get an output similar to below:
create fs deviceName:'/vmfs/devices/disks/vml.0100000000453530465f314634345f344134345f314230300057444320434c:3', fsShortName:'vmfs6', fsName:'datastore-ssd'
deviceFullPath:/dev/disks/t10.NVMe____WDC_CL_SN720_SDAQNTW2D512G2D2000__________E50F1F444A441B00:3 deviceFile:t10.NVMe____WDC_CL_SN720_SDAQNTW2D512G2D2000__________E50F1F444A441B00:3
ATS on device /dev/disks/t10.NVMe____WDC_CL_SN720_SDAQNTW2D512G2D2000__________E50F1F444A441B00:3: not supported
.
Checking if remote hosts are using this device as a valid file system. This may take a few seconds...
Scanning for VMFS-6 host activity (4096 bytes/HB, 1024 HBs).
Creating vmfs6 file system on "t10.NVMe____WDC_CL_SN720_SDAQNTW2D512G2D2000__________E50F1F444A441B00:3" with blockSize 1048576, unmapGranularity 1048576, unmapPriority default and volume label "datastore-ssd".
Successfully created new volume: 5fc102ac-257939bc-7e5b-0cc47ac8166c
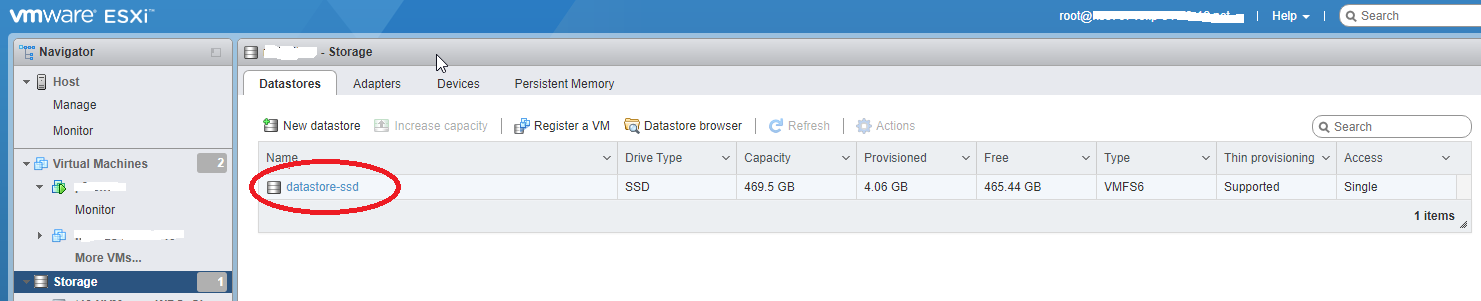
Additionally, the datastore you created should appear under Storage --> Datastores in your ESXi Web Gui (Figure 3).
Figure 3
Vmware ESXi NUT Client Installation and Configuration
Requirements
- You must have a NUT server connected to a UPS and configured in your environment.
- SSH must be enabled on your ESXi installation
- Community acceptance level must be enabled on your ESXi installation in order to install the client
Download
Download the latest NutClient-ESXi-x.x.x-x.x.x-offline_bundle.zip package from: https://github.com/rgc2000/NutClient-ESXi/releases.
Install
- Secure copy the NutClient-ESXi-x.x.x-x.x.x-offline_bundle.zip to your ESXi server’s /tmp directory by either using WinSCP/pscp in Windows or scp in Linux.
- Set ESXi Community Acceptance level:
esxcli software acceptance set --level=CommunitySupportedIf you get the following error:
 [AcceptanceConfigError]
 Secure Boot enabled: Cannot change acceptance level to community.
 Please refer to the log file for more details.
You must disable Secure Boot in your computer BIOS and re-try the installation again.
- Install bundle:
esxcli software vib install -d /tmp/NutClient-ESXi-x.x.x-x.x.x-offline_bundle.zip- If installation was successful you should see the following output:
Installation Result

   Message: Operation finished successfully.

   Reboot Required: false

   VIBs Installed: Margar_bootbank_upsmon_x.x.x-x.x.x

   VIBs Removed:

VIBs Skipped:- You can now delete the files in the /tmp directory and disable the SSH service if desired.
ESXi Configuration
- In the ESXi Web client, navigate to Host —> Manage —> System —> Advanced Settings. In the Search box enter UserVars.Nut (Figure 1).
Figure 1

- Configure the following variables:
NutUpsName: Name of the UPS on the NUT server (in the form of inverter_name@server_name or server_ip). Several inverters can be entered separated by a space. There will be no system shutdown until the last UPS still standing has given the shutdown command.
NutUser: Name of the NUT server login account
NutPassword: NUT Server Connection Account Password
NutFinalDelay: Seconds to wait after receiving the low battery event to shut down the system
NutSendMail: Set to 1 for the NUT client to send an e-mail to each important event of the UPS
NutMailTo: E-mail address to send UPS events to
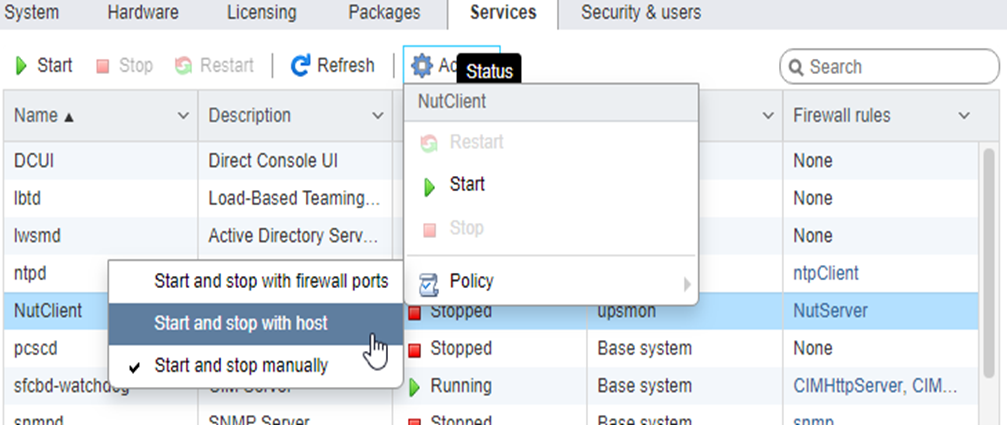
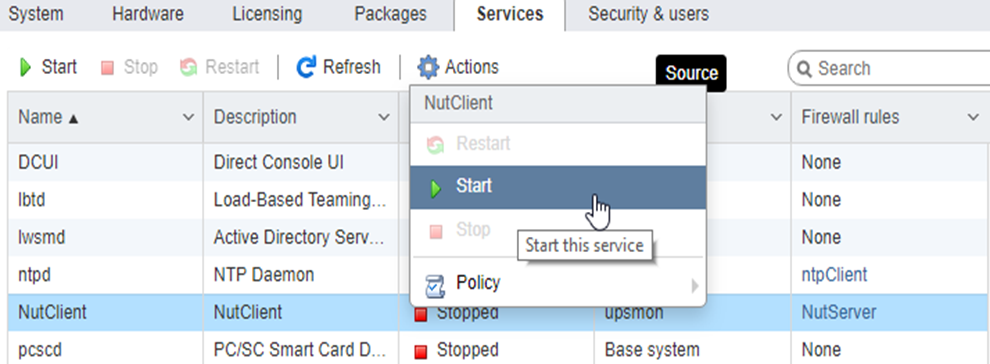
- In the ESXi Web client, navigate to Host —> Manage —> Services —> NutClient —> Actions —> Policy —> Start and Stop with Host (Figure 2).
Figure 2
- In the ESXi Web client, navigate to Host —> Manage —> Services —> NutClient —> Actions —> Start (Figure 3).
Figure 3
Tips
- Use the ESXi host configuration tab in the vSphere Client to decide how to start and stop (or suspend) virtual machines. This order will be respected by the UPS shutdown procedure.
- The clean shutdown of the OS in the virtual machines is only possible if the vmware tools are installed.
- To uninstall the NUT client, use the following command:
esxcli software vib remove -n upsmon- To update the NUT client, use the following command:
esxcli software vib update -d /tmp/NutClient-ESXi-x.x.x-x.x.x-offline_bundle.zip- To estimate the time needed for the server to shut down on UPS alert, type the command below on the host ESXi (by ssh or on the console). The shutdown procedure is immediately started:
/opt/nut/sbin/upsmon -c fsd- If the NUT Client is configured correctly, the ESXi /var/log/syslog.log should have a message similar to below where ups@UPSHOST is the ups name and the UPS host you setup earlier :
2019-09-22T13:28:07Z upsmon[2111424]: Communications with UPS ups@UPSHOST establishedCreate OVA using vmware ovftool on ESXi or Vcenter
-
Download ovftool for Windows 64 from vmware.com and install.
-
From an elevated command prompt, navigate to c:\Program Files\VMware\VMware OVF Tool
-
Run any of the following commands depending on your environment:
Vcenter Example (local)
ovftool --noSSLVerify vi://[USERNAME]@[VHOST]/[DATACENTER]/vm/[MACHINE_NAME] C:\ova\[OVA_MACHINE_NAME].ovaESXi Example (Share):
ovftool --noSSLVerify vi://[USERNAME]@[ESXI_HOST]/[MACHINE_NAME] \\[FILE_SERVER]\[SHARE]\[MACHINE_NAME].ovaIn-Guest UNMAP, EnableBlockDelete and VMFS-6
Original Article URL: https://www.codyhosterman.com/2017/08/in-guest-unmap-enableblockdelete-and-vmfs-6/
Credit: Cody Hosterman
EnableBlockDelete with VMFS-5
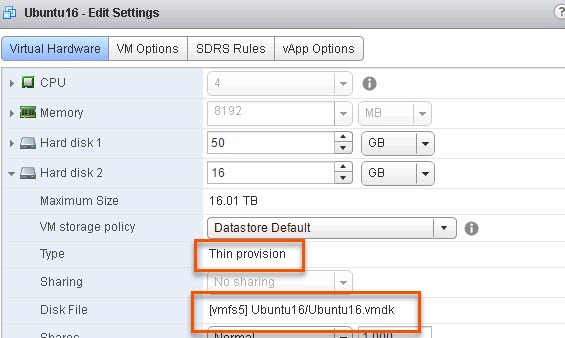
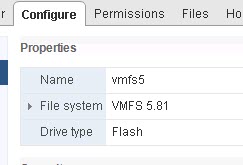
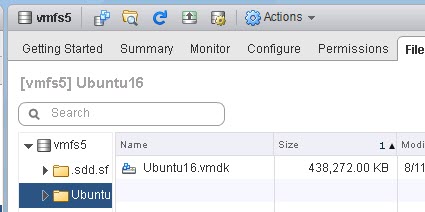
I have a Ubuntu VM with a thin virtual disk on a VMFS-5 volume.
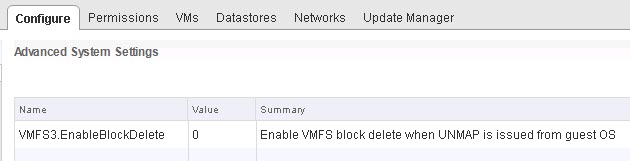
Furthermore, I have EnableBlockDelete DISABLED on the ESXi host (set to 0). It is important to note that this is a host-wide setting.
In my VM, I will put ext4 on the virtual disk then mount it:
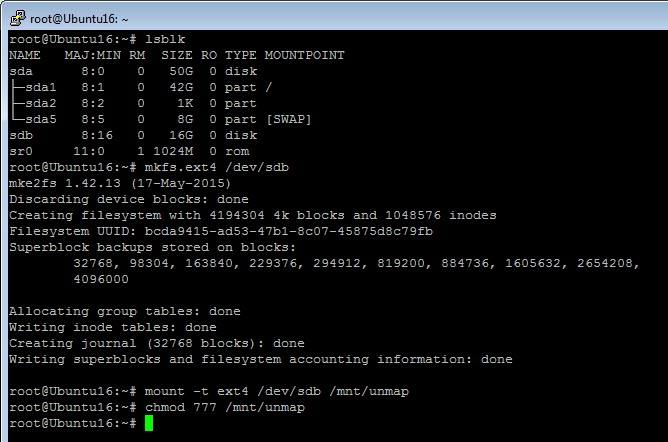
We can see through sg_vpd that UNMAP is supported on this virtual disk:
root@Ubuntu16:~# sg_vpd /dev/sdb -p lbpv |grep "Unmap"
 Unmap command supported (LBPU): 1
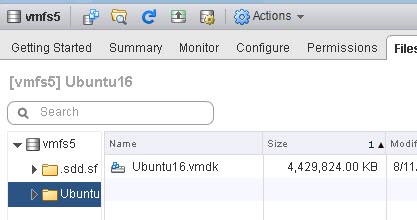
Now I will put some data on the file system. A couple of OVAs.

root@Ubuntu16:/mnt/unmap# df -h /mnt/unmap
Filesystem Size Used Avail Use% Mounted on
/dev/sdb 16G 3.9G 11G 26% /mnt/unmap
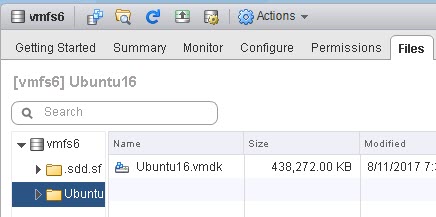
My file system reports as having 3.9 GB used. My VMDK is 4.4 GB in size.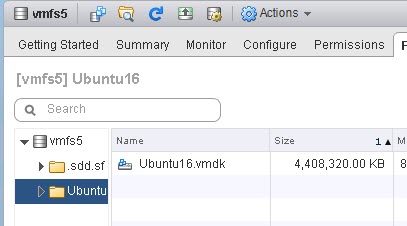
There is about 400 MB of capacity that was written when the file system was created, which explains the difference between those.
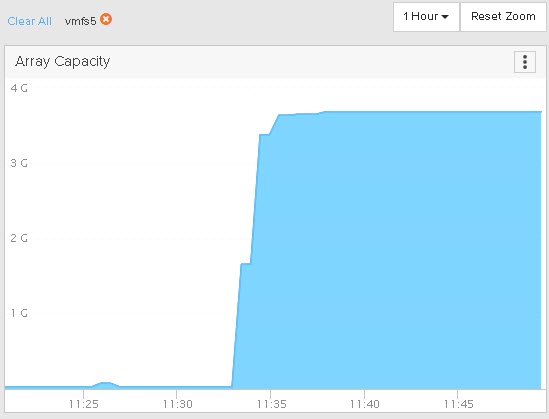
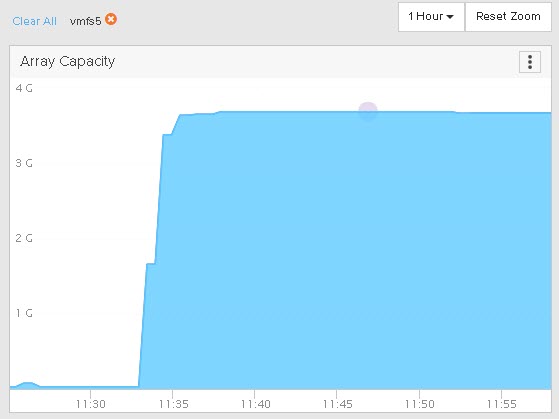
The underlying array reports 3.7 GB used. Smaller due to data reduction. Since the OVAs are compressed already, there isn’t a ton of data reduction to do.
Okay, so let’s delete the OVAs.

We can see the file system is now down to 44 MB used:
root@Ubuntu16:/mnt/unmap# df -h /mnt/unmap
Filesystem Size Used Avail Use% Mounted on
/dev/sdb 16G 44M 15G 1% /mnt/unmap
But if we look at the VMDK, it is still 4.4 GB:
And the array is unchanged too.
So we now have dead space in the VMDK and on the array, because those blocks are no longer in use by the guest. So, in Linux, to reclaim space you can either mount the file system with the discard option so UNMAP is triggered immediately upon file deletion, or you can manually run it with fstrim. I did not mount with the discard option, so I will run fstrim.
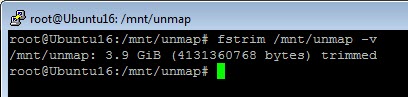
root@Ubuntu16:/mnt/unmap# fstrim /mnt/unmap -v
/mnt/unmap: 3.9 GiB (4131360768 bytes) trimmed
Now if we look at my VMDK, we will see it has shrunk to 400 MB:
But my array is still reporting it as used. This is because EnableBlockDelete is not turned on. The UNMAP in the guest only makes the VMDK size accurate by shrinking it down. But the underlying physical device is not told.
So at this point (since it is VMFS-5) I have to run esxcli storage vmfs unmap to reclaim it.
esxcli storage vmfs unmap -l vmfs5

Once complete, we can see the capacity reclaimed on the array:
So this is the default behavior. Let’s enable EnableBlockDelete and repeat the process.
I will copy the data back to the file system, which will grow the virtual disk again and write data back to the FlashArray. We can see we have 3.9 GB used again on my file system.
root@Ubuntu16:/mnt/unmap# df -h /mnt/unmap
Filesystem Size Used Avail Use% Mounted on
/dev/sdb 16G 3.9G 11G 26% /mnt/unmap
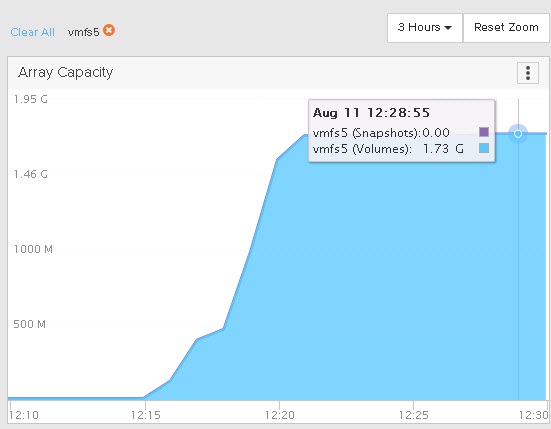
My virtual disk is back to 4.4 GB:
My array reduced it to 1.7 GB:
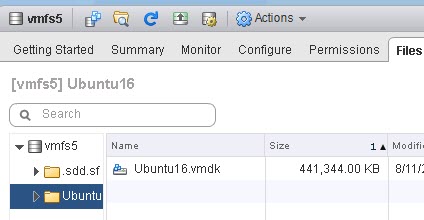
So now to delete the data and run fstrim. My virtual disk shrinks to 400ish MB again:
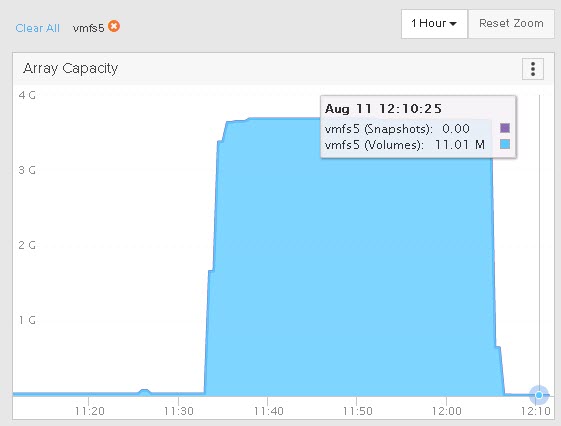
My space on my array is reclaimed immediately this time! No need to run esxcli to unmap.
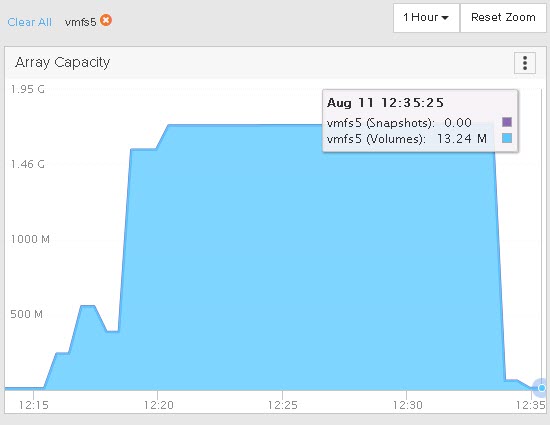
I ran fstrim at 12:33:00 and the space was reclaimed on the array automatically by 12:33:55.
Great! So now, back to the original question, what about VMFS-6?
EnableBlockDelete and VMFS-6
As you are likely aware, VMFS-6 introduced automatic UNMAP. So you no longer need to ever use esxcli to run UNMAP on the VMFS.
So let’s repeat the test.
I moved my VMDK to my VMFS-6 datastore:
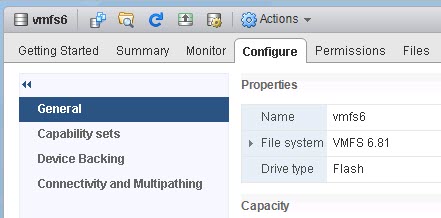
I will not go through every step again, let’s just start from the “we just deleted the files” step, but we have yet to run fstrim. So we have dead space.
VMFS-6: EnableBlockDelete Disabled, Auto-UNMAP Enabled
In this test, I have EnableBlockDelete disabled on my host and auto-UNMAP enabled on the datastore.

If I use vsish, I can see no automatic UNMAPs have been issued to this datastore from my host.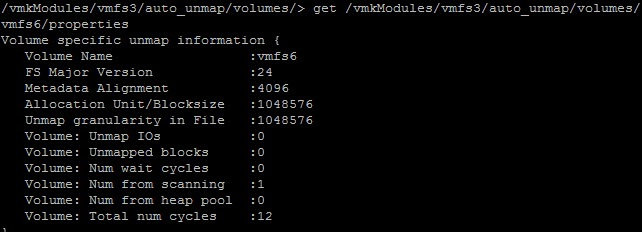
Note “UNMAP IOs” and “Unmapped blocks” are both zero.
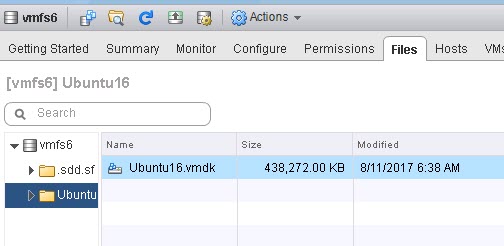
So I run fstrim. My VMDK is back down to 400 MB:
If we look back at the array, we see the space reclaims, but not quite as fast, took a few minutes.
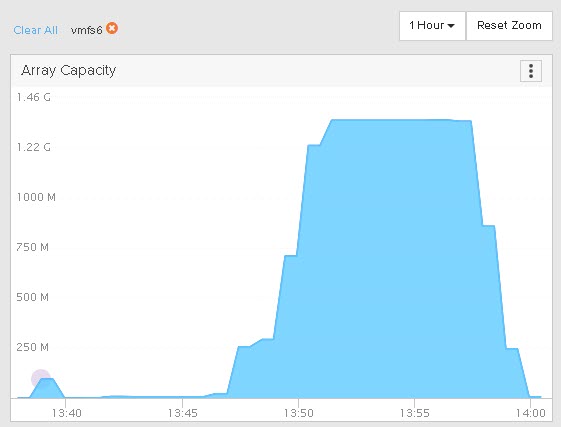
Since EnableBlockDelete was disabled and auto-unmap was enabled we can see this was auto-unmap. We can further show that by looking back at vsish:
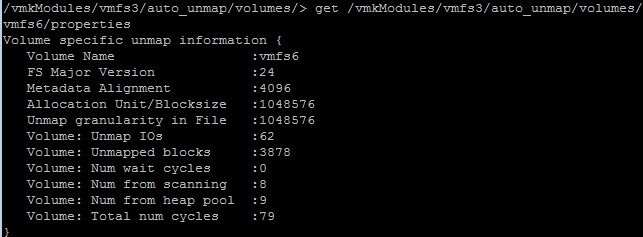
62 UNMAP I/Os and 3878 blocks reclaimed. So we don’t need to turn on EnableBlockDelete in the case of VMFS-6!
VMFS-6: EnableBlockDelete Enabled, Auto-UNMAP Disabled
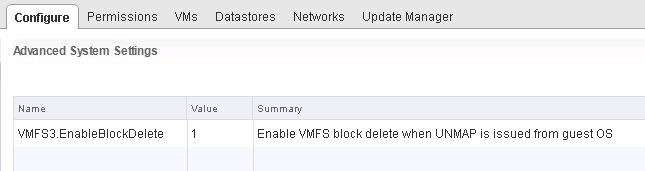
In this test, I have EnableBlockDelete enabled on my host…
…and auto-UNMAP disabled on the datastore:

Let’s run through the process again. I refreshed my environment so counters are reset etc. Add the VMDK, put data on it, delete the data and run fstrim:
The VMDK shrank back down:
But if we look at the array, nothing happens.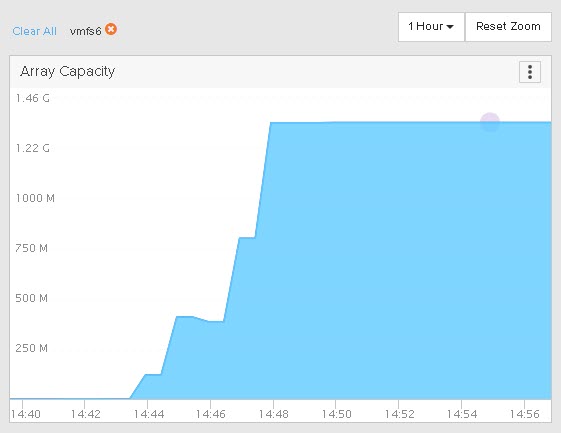
So this shows that EnableBlockDelete is ignored for VMFS-6 volumes. So in this situation we would have to enable automatic UNMAP to reclaim this space, or run the standard esxcli manual UNMAP.
Conclusion
So what does this tell us. A couple things.
- In order to have full end-to-end UNMAP with VMFS-5 volumes, you need to enable EnableBlockDelete.
- For VMFS-6 automatic UNMAP takes care of the VMFS reclamation portion for you.
An interesting thing here is that automatic UNMAP invokes fairly quickly. When you delete a VM or a virtual disk, automatic UNMAP can possibly take 12-24 hours to reclaim the space. But with in-guest UNMAP, as soon as the VMDK shrinks, automatic UNMAP kicks in fairly quickly–in a few minutes. Mimicking the behavior of EnableBlockDelete. Which is great–you don’t lose functionality by moving to VMFS-6.
I will note, that this was done with 6.5 U1. From my understanding there was a bug in 6.5.0 that EnableBlockDelete was actually honored with VMFS-6 and it would issue UNMAP when a VMDK shrank when the setting was enabled. The problem was that UNMAP was issued twice, as the EnableBlockDelete-invoked UNMAP did not prevent the automatic async UNMAP from issuing reclaim. So UNMAP was issued twice.
This behavior was changed in 6.5 P1 and of course in 6.5 U1.
How to Increase Virtual Machine Disk Size in VMware
Original Article: https://woshub.com/increase-virtual-disk-vmware/
Increase the Size of VM Disk (VMDK) in VMware
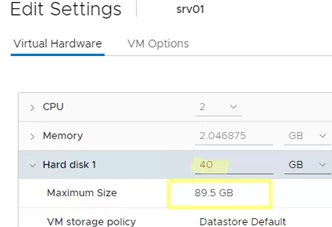
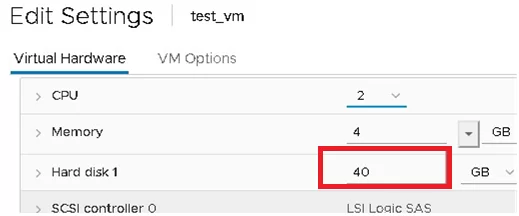
For example, you have a virtual machine with a single virtual hard disk file (vmdk) of 40GB, and you plan to increase this virtual disk size to 50GB.
- Connect to your vCenter server or a standalone ESXi host using the vSphere Web Client;
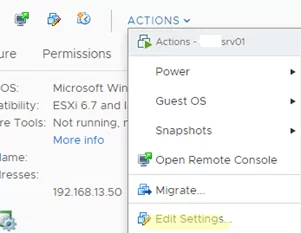
- Find the virtual machine and open its settings (Actions -> Edit Settings);
- Find the virtual disk you want to extend. In this example, the VM has only one Hard Disk 1 with a size of 40 GB. Specify the new disk size in this field and save the settings. Note that the maximum disk size available for this type of datastore (VMFS, NFS, vSAN) is specified in the Maximum size field;
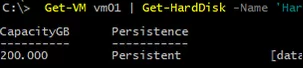
You can also use the VMware PowerCLI module cmdlets to increase the size of the virtual machine VMDK disk. Install the PowerCLI module on your Windows or Linux computer:Install-Module -Name VMware.PowerCLI
Connect to your vCenter server or ESXi host:
Connect-VIServer hostname
Run the following command to expand the virtual disk:
Get-HardDisk VMTest1 | where {$_.Name -eq "hard disk 1"} | Set-HardDisk -CapacityGB 50 -ResizeGuestPartition -Confirm:$false
Then you can use the Invoke-VMScript cmdlet to extend a partition in the guest operating system:
Invoke-VMScript -VM VMTest1 -ScriptText "echo select vol c > c:\diskpart.txt && echo extend >> c:\diskpart.txt && diskpart.exe /s c:\diskpart.txt" -GuestUser $guestUser -GuestPassword $guestPass -ScriptType BAT
Don’t forget to terminate the PowerShell management session once you’re done:
Disconnect-VIserver -Confirm:$false
Now that you have increased the virtual disk size in the VMware console, you need to extend the partition in the guest OS
Extend a Partition in a Windows Virtual Machine
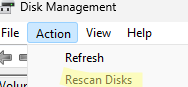
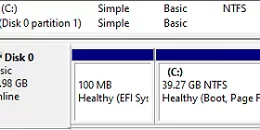
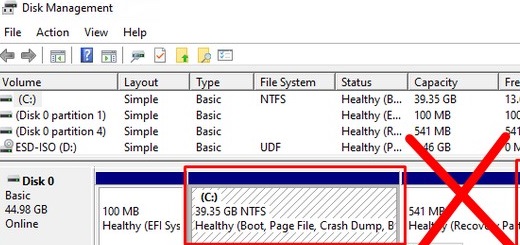
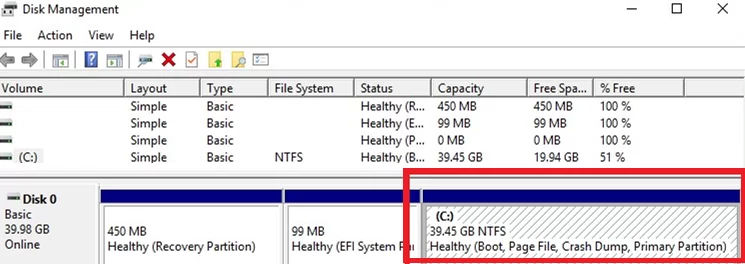
You must start the Disk Management console (Computer Management-> Storage-> Disk Management) and run the Rescan Disk command for the guest Windows OS to see the additional space.
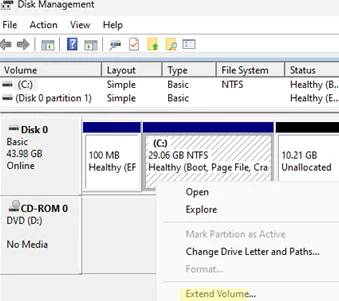
Next, select the partition you want to extend and click Extend Volume.
Specify how many MB of unallocated space you want to add to the selected Windows partition (in the field Select the amount of space in MB).

Now click Next -> Finish and check if your C drive has been successfully extended.
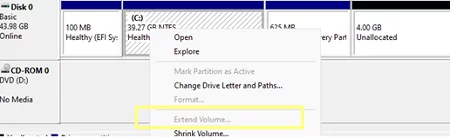
In that case, you won’t be able to extend your C: drive unless you delete or move the Recovery partition to the end of the drive. We have described this procedure in the article Extend Volume option is grayed out in Windows.
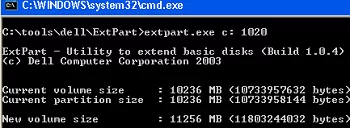
Windows XP and Windows Server 2003 don’t support the online extension of the system C: volume. You can use Dell’s ExtPart tool to expand the system partition without rebooting.
To extend the system partition in Windows 2003/XP, copy the tool to the guest operating system and run it with the following parameters:
extpart.exe c: 1020
, where c: is the name of the volume you want to extend, and 1020 is the size (in MB) you want to extend the disk by.
You can also extend the offline VM disc partition in other ways:
- Boot your virtual machine from any LiveCD (for example, GParted), and increase the partition;
- Connect a virtual VMDK file to another VM and extend the partition on that machine;
- Use the VMware vCenter Converter tool to reconfigure the volume size.
How to Extend Partition in Linux Virtual Machine?
Now let’s look at how to expand the disk partition if you have a Linux family guest operating system installed in your virtual machine.
The first thing to do is to make sure that Linux sees the new disk size. To start a rescan, run the command:
$ echo 1>/sys/class/block/sdd/device/rescan
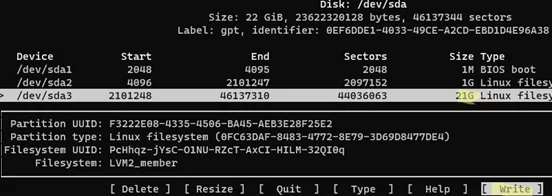
Use the cfdisk tool to show the available virtual hard disk space:
$ sudo cfdisk
This example shows that the /dev/sda drive has 2 GB of free space. Select the partition you want to extend (which is /dev/sda3 in this example) and chose Resize from the bottom menu.
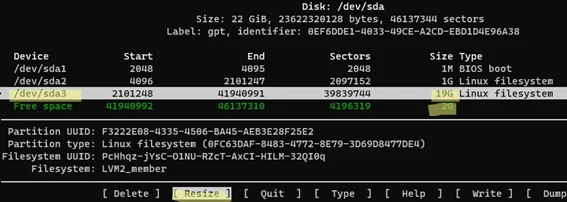
Then click Write to apply the changes to the partition.
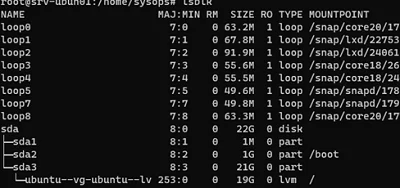
In my case, I need to extend the partition in an Ubuntu 22.04 LTS virtual machine. By default, this version of Ubuntu is installed on LVM volume:
$ sudo lsblk
Before you can extend an LVM volume, you need to increase the physical volume (PV):
$ sudo pvresize /dev/sda3
Once that’s done, you can extend the logical volume (we’ll use all the free space available):
$ sudo lvextend -l +100%FREE /dev/mapper/ubuntu--vg-ubuntu--lv

The next step is extending the file system:
$ sudo resize2fs /dev/mapper/ubuntu--vg-ubuntu--lv
Check free disk space in Linux:
$ df -h

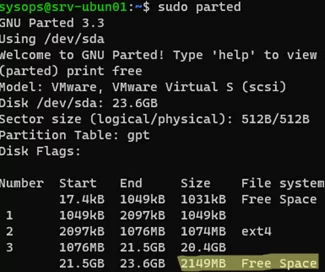
If you do not have LVM volumes, you can use the parted tool to extend partitions in Linux:
$ sudo parted
Let’s check how much unallocated space you have on the disk:
print free
As you can see, Free Space = 2149MB
To extend the /dev/sda3 partition, run:
resizepart 3
Specify a new partition size (in this example, we need to specify the End size from the Free Space block):
End? [21.5GB]? 23.6G
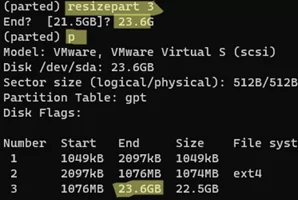
Then exit the parted:
quit
All that remains is to grow an ext4/3/2 file system.
$ sudo resize2fs /dev/sda3
Reduce Virtual Machine Disk Size (VMDK) on VMWare ESXi
Original Article: https://woshub.com/shrinking-vmdk-virtual-disk-vmware-esxi/
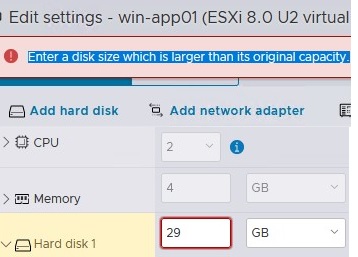
In this article, we will look at how to reduce the size of a virtual machine’s hard disk (VMDK) in VMware ESXi. From the vSphere Client GUI, you cannot reduce the size of a virtual disk (only the option to increase the VM disk size is available). An error occurs when you try to specify a smaller VM disk size: Enter a disk size which is larger than its original capacity.
Before you can reduce the size of the virtual disk on the VMWare ESXi datastore:
- Delete all virtual machine snapshots;
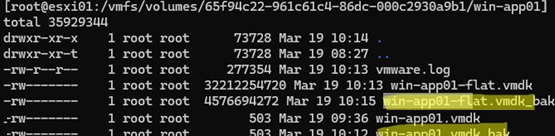
- Backup the virtual machine, or at least make a copy of the *.vmdk and the *-flat.vmdk files of the virtual hard disk you want to shrink. In the ESXi console, run the following commands:
cp vmname.vmdk backup_vmname.vmdk
cp vmname-flat.vmdk backup_vmname-flat.vmdk
Reducing the virtual disk file in VMware is a two-step process:
- Shrink the partition size within the guest OS;
- Reduce the size of a VMware virtual machine’s VMDK file on VMFS (NFS) datastore.
How to Shrink Disk Partition in the Guest OS
First of all, reduce the size of the disk partition in the guest operating system
If the VM has a Windows guest OS installed:
- Open the Disk Management console (
diskmgmt.msc); - In this case, the WinRE
Recovery Partitionis to the right of the partition we want to shrink. To shrink the partition in Windows, there should be no other partitions to the right of the partition you are trying to shrink. You need to either move the winre.wim recovery image from a separate partition to the system one, or move the recovery partition to the beginning of the partition table (both options are described in detail in the post: Cannot extend volume blocked by a recovery partition);
- You can now reduce the size of the main partition. In modern versions of Windows, you can reduce the size of the partition without rebooting; in older versions, you have to use the
sdeletetool. Click on the partition and select Shrink Volume;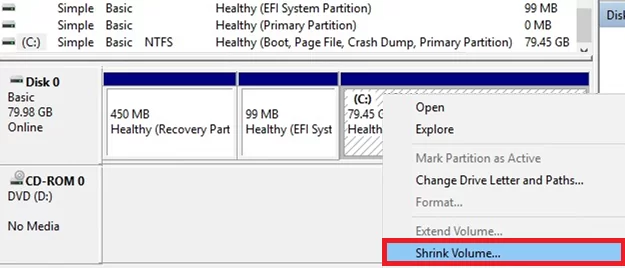
- Suppose you need to reduce VM disk size by 40GB. In the Enter the amount of space to shrink in MB box, type 40960 MB (
40 GB x 1024) and click Shrink;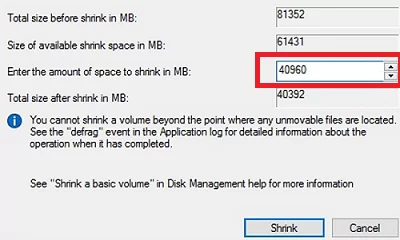
- When the shrink task is complete, 40GB of unallocated space will appear to the right of your main partition.

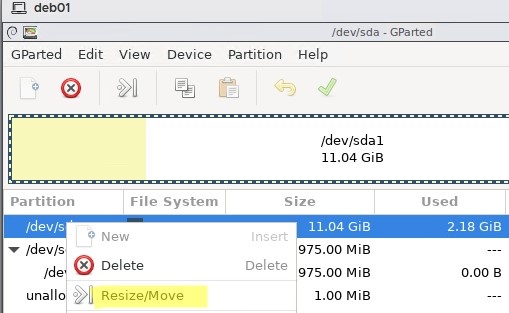
For the Linux VMs, you can boot the virtual machine from a GParted LiveCD (GNOME Partition Editor) if you need to reduce the size of the root partition. Shrink partitions using the GParted GUI’s Resize/Move menu. Move partitions if necessary. To apply changes, select Edit -> Apply all operations. The tool will resize partitions and reduce the file system using Rezise2fs.
Boot the Linux guest VM and check that everything is working correctly.
Reduce the Size of a VMware Virtual Machine Disk (VMDK)
You can now reduce the size of the VMDK file on the VMware VMFS file system.
- Shut down the VM;
- Use SSH to connect to the ESXi host on which the virtual machine is registered;
- Navigate to the directory where the VM vmdk file is located (you can find the path to the VMDK file in the virtual disk properties in the vSphere client):
cd /vmfs/volumes/datastore/test-VM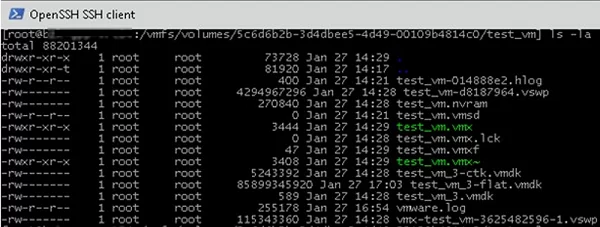
- List the virtual disk configuration file (*.vmdk) using the cat command:
# cat test_vm_3.vmdk
The size of the vmdk disk is set in the #Extent description section (after the RW symbols). In this case, it is 167772160 (80 GB *1024*1024*1024 / 512);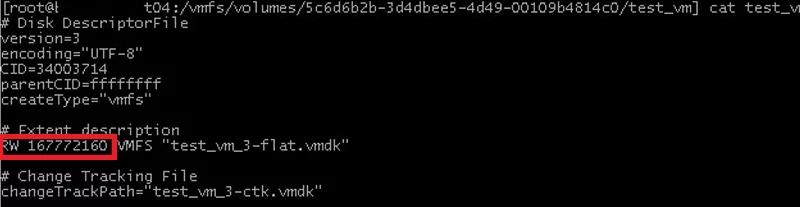
- I want to reduce my VMDK disk by 40 GB. This means that I have to specify 83886080 in the Extent description section. This value is calculated as follows:
167772160(current disk size) –83886080(40 GB*1024*1024*1024 / 512); - Edit the virtual disk configuration file using vi:
# vi test_vm_3.vmdk - Use the down arrow key to scroll to the line containing the disk size and press
i(to edit it). Specify the new size of the virtual disk. Press ESC to exit the edit mode and then type:wq-> Enter to save the changes;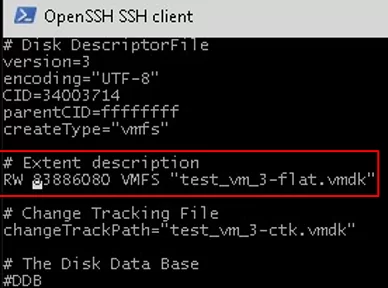
- The remaining step is to migrate the VM to another datastore using Storage VMotion. The virtual machine properties will show the new virtual disc size after the virtual machine files are moved.
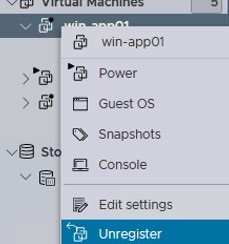
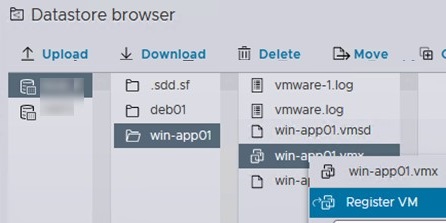
Then go to the Storage section, find the VMFS/NFS datastore where the VM is located -> click Datastore Browser, find the VM directory, click on the VMX file, and select Register.
Or you can clone the VMDK file using this command:
vmkfstools -i test_vm_3.vmdk test_vm_3_newsize.vmdk
Then delete the original VMDK file and clone the disk again, to revert to its original name:
rm test_vm_3.vmdk
rm test_vm_3-flat.vmdk
vmkfstools -i test_vm_3_newsize.vmdk test_vm_3.vmdk
Make sure that the new size of the virtual disk is now displayed in the VM properties.
Then start the VM, logon to the guest OS, and check that the unallocated space has disappeared, and the disk size has been reduced.
Shrink a VMDK Disk Using VMware vCenter Converter Standalone
You can reduce the size of virtual machine hard disks using the VMware vCenter Converter Standalone. This free GUI tool allows you to clone a source VM and set the size of the new disk to be smaller than the original (there must be free space on the guest file system).
Cons:
- V2V conversion is quite slow;
- There must be enough free space on the datastore to save a new VM;
- A new MAC address is assigned to the new VM.
Pros:
- Simple graphical interface;
- An exact copy of a VM is created;
- The source VM won’t be corrupted by incorrect disk resizing actions.
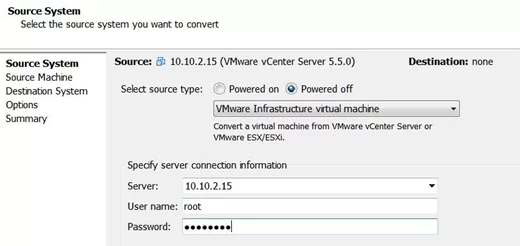
Run VMware Converter and specify the ESXi host or vCenter address.
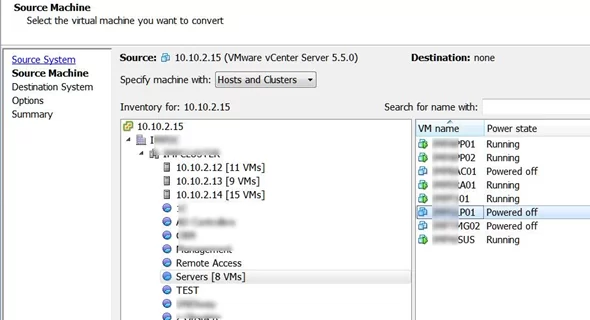
Select the source VM.
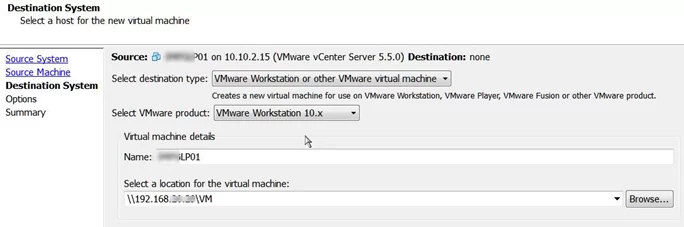
Set the virtual hardware settings for your new (destination) VM.
Go to the disk edit mode (Data to copy -> Edit).
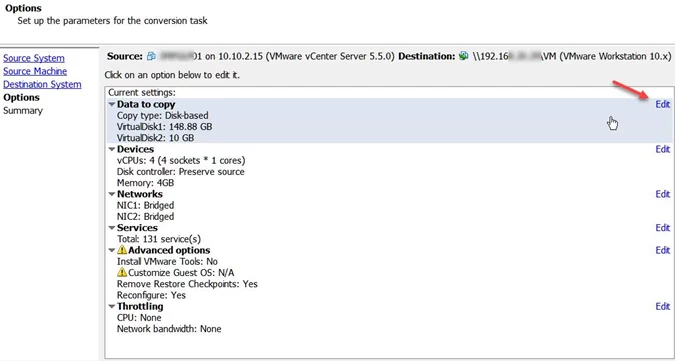
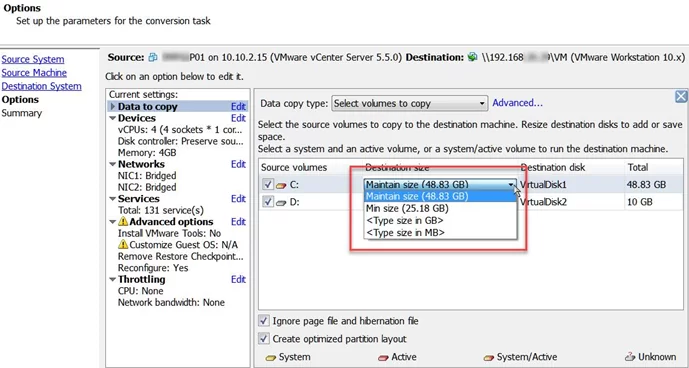
Select the copy mode: Select volumes to copy.
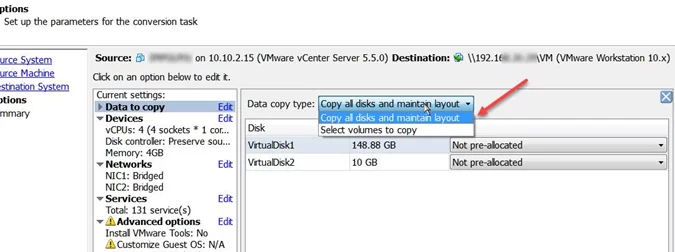
Specify the new virtual disk size for your new VM. In my example, 48 GB on the virtual disk is occupied by the guest OS, and the total disk size is 150 GB. We will reduce the size of the virtual disk to 60 GB.
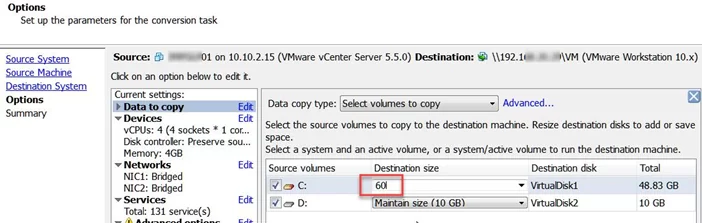
Run the VM conversion process. When finished, turn off the source VM and power on the new one. Check that the virtual disk size has been reduced. The original VM can then be removed.