Ubuntu
- Install and Configure OpenVPN Client
- Install and Configure Fail2Ban on Ubuntu 18.04
- Install and Configure PureFTPd Ubuntu 18.04
- How To Setup a Firewall with UFW on an Ubuntu and Debian Cloud Server
- How to Install and Configure KVM on Ubuntu 18.04 LTS
- Installing NUT (Network UPS Tools) on Ubuntu 18.04 LTS
- Upgrade php 7.3 Ubuntu 18.04 LTS
- Setup NTP Server using NTPd on Ubuntu 20.04/18.04
- Ubuntu Add and Delete Users
- Install and Configure xmrig for Monero XMR Crypto Mining
- Upgrade Ubuntu 20.04 Linux Kernel
- Freeing Inode Usage
- Install and Configure SSTP Client Ubuntu 22.04
- Switching a Primary User Between ThinLinc and xrdp from SSH
- Enable passwordless sudo for user
Install and Configure OpenVPN Client
Install OpenVPN client
apt install openvpn -y
Manually connect to OpenVPN server
-
Generate .ovpn file on OpenVPN server and copy to OpenVPN client machine
-
Run the command below to connect:
openvpn --config client.ovpn
Automatically connect to OpenVPN server
-
Generate .ovpn file on OpenVPN server and copy to OpenVPN client machine under /etc/openvpn directory as a .conf file. For example, if you have a my-server.ovpn file you would run the following command:
cp my-server.ovpn /etc/openvpn/my-server.conf
-
Create credentials file in /etc/openvpn/my-server-creds.txt
vi /etc/openvpn/my-server-creds.txt
-
Enter the username and password each one in a separate line like below:
openvpn_username
somepassword
-
Save the file
-
Edit /etc/openvpn/my-server.conf file:
vi /etc/openvpn/my-server.conf
-
Locate the auth-user-pass line in the file and add the credentials file filename next to it like below:
...
auth-user-pass my-server-creds.txt
...
-
Save the file
-
Edit /etc/default/openvpn:
vi /etc/default/openvpn
-
Uncomment the following line (remove the # from the front) :
AUTOSTART="all"
-
Save the file
-
Restart the OpenVPN service on the OpenVPN client:
systemctl restart openvpn
-
Reboot the OpenVPN Client server and ensure it connects automatically
Install and Configure Fail2Ban on Ubuntu 18.04
Installing fail2ban can be done with a single command:
sudo apt-get install -y fail2banWhen that command finishes, fail2ban is ready to go. You'll want to start and enable the service with the commands:
sudo systemctl start fail2bansudo systemctl enable fail2banConfiguring a jail
Next we're going to configure a jail for SSH login attempts. In the /etc/fail2ban directory, you'll find the jail.conf file. Do not edit this file. Instead, we'll create a new file, jail.local by copying the jail.conf to it, and override any similar settings in jail.conf. Our new jail configuration will monitor /var/log/auth.log, use the fail2ban sshd filter, set the SSH port to 22, and set the maximum retry to 3. To do this, issue the command:
sudo cp /etc/fail2ban/jail.conf /etc/fail2ban/jail.locallocate the [sshd] section, and edit to match the following contents:
[sshd]
enabled = true
port = 22
filter = sshd
logpath = /var/log/auth.log
maxretry = 3
bantime = 604800 # ban for 7 days
Next, locate and uncomment the ignoreip variable and set it as below where 192.xxx.xxx.xxx is your IP address. Enter multiple addresses and/or networks separated by a space:
ignoreip = 127.0.0.1/8 ::1 192.xxx.xxx.xxxSave and close that file. Restart fail2ban with the command:
sudo systemctl restart fail2banAt this point, if anyone attempts to log into your Ubuntu Server via SSH, and fails three times, they will be prevented from entry, by way of iptables blocking their IP Address.
Testing and unbanning
You can test to make sure the new jail works by failing three attempts at logging into the server, via ssh. After the third failed attempt, the connection will hang. Hit [Ctrl]+[c] to escape and then attempt to SSH back into the server. You should no longer be able to SSH into that server from the IP address you were using.
You can then unban your test IP address with the following command:
sudo fail2ban-client set sshd unbanip IP_ADDRESSwhere IP_ADDRESS is the banned IP Address.
You should now be able to log back into the server with SSH.
Install and Configure PureFTPd Ubuntu 18.04
Install the PureFTPd :
sudo apt-get install pure-ftpd -yEdit /etc/inetd.conf file and comment out (add a # at the start of) the line containing ftp if such an entry exists:
sudo vi /etc/inetd.confEdit /etc/default/pure-ftpd-common and verify the STANDALONE_OR_INETD=standalone entry is set:
sudo vi /etc/default/pure-ftpd-commonAdd a "ftpgroup" in the system:
sudo groupadd ftpgroupAdd a "ftpuser" user in the system:
sudo useradd -g ftpgroup -d /dev/null -s /etc ftpuserAdd a virtual PureFTPd user. I'm going to use "joe" as an example:
sudo pure-pw useradd joe -u ftpuser -d /name/of/directorywhere /name/of/directory is the directory where you want user joe to have FTP access. This directory is where user joe is going to be locked in once they log on the server with FTP. Whether you create a directory for joe to have access or you use an existing directory, ensure the user/group ftpuser/ftpgroup you created earlier is the owner of that directory as follows:
chown -R ftpuser:ftpgroup /name/of/directoryNow, create the PureFTPd virtual user database:
sudo pure-pw mkdbCreate the following symbolic links for PureFTPd to funtion properly:
sudo ln -s /etc/pure-ftpd/pureftpd.passwd /etc/pureftpd.passwd
sudo ln -s /etc/pure-ftpd/pureftpd.pdb /etc/pureftpd.pdb
sudo ln -s /etc/pure-ftpd/conf/PureDB /etc/pure-ftpd/auth/PureDB
Ensure that the file /etc/pure-ftpd/conf/UnixAuthentication file only contains the word no:
sudo vi /etc/pure-ftpd/conf/UnixAuthenticationRestart PureFTPd before changes take effect:
sudo /etc/init.d/pure-ftpd restartConfigure PureFTPd Options
PureFTPd on Ubuntu/Debian distros use the pure-ftpd-wrapper which will parse any properly named file in the "/etc/pure-ftpd/conf" directory and read the values and in turn pass to the pure-ftpd daemon. This eliminates the need editing long configuration files. There are a lot of files that can be placed in the "/etc/pure-ftpd/conf" directory for different configuration options, but I'm only going to concentrate on a handful. For a complete list of all the files refer to the following http://manpages.ubuntu.com/manpages/har ... per.8.html link.
Passive Mode Port Range
Passive mode can be enabled by simply issuing the following from the command line for setting a range of 30000 through 31000:
echo 30000 31000 > /etc/pure-ftpd/conf/PassivePortRangeBind to specific address and port number
If you wish to set PureFTPd to listen to a specific port number, issue the following from the command line. In this example we set port number "666" as the FTP port:
echo 192.168.xxx.xxx,666 > /etc/pure-ftpd/conf/BindDisable name resolution in PureFTPd
I highly recommend you set this option in PureFTPd. This will disable the server trying to resolve the client's hostname. If it's not set, the server will sometimes throw a 425 Invalid Address given errors. Setting this option will fix those errors as well as speed up logins.
echo 'yes' > /etc/pure-ftpd/conf/DontResolveSet passive IP in PureFTPd
If you are behind a NAT, it’s recommended you set the public IP address of your PureFTPd server as follows:
echo '1.2.3.4' > /etc/pure-ftpd/conf/ForcePassiveIP
Enable TLS on PureFTPd
The FTP protocol in general is very insecure. The username/passwords are sent using clear text and the data transfers are also insecure. Enabling TLS will allow you to secure your FTP sessions to include the username/passwords as well as the data transfers.
Install OpenSSL:
sudo apt-get install openssl -yIf you want to accept plain AND TLS sessions, issue the following on the command line:
echo 1 > /etc/pure-ftpd/conf/TLSIf you want to accept TLS sessions ONLY, issue the following on the command line:
echo 2 > /etc/pure-ftpd/conf/TLSCreate the SSL certificate for TLS
Create a "private" directory under "/etc/ssl/" if one doesn't exist yet:
mkdir /etc/ssl/privateGenerate a self-signed certificate as follows:
openssl req -x509 -nodes -days 7300 -newkey rsa:2048 -keyout /etc/ssl/private/pure-ftpd.pem -out /etc/ssl/private/pure-ftpd.pemFill in the certificate information as required.
For 3rd party SSL certificates, enter the private key and corresponding chain certs in the following order inside /etc/ssl/private/pure-ftpd.pem:
-----BEGIN RSA PRIVATE KEY-----

(Private Key)

-----END RSA PRIVATE KEY-----

-----BEGIN CERTIFICATE-----

(Primary SSL certificate)

-----END CERTIFICATE-----

-----BEGIN CERTIFICATE-----

(Intermediate certificate)

-----END CERTIFICATE-----

-----BEGIN CERTIFICATE-----

(Root certificate)

-----END CERTIFICATE-----
Troubleshooting
You may see the following warning when trying to connect to your PureFTPd server:
[WARNING] Can't login as [joe]: account disabled
"Sorry, but I can't trust you"
[WARNING] Can't login as [joe]: account disabled (uid < 1021)
These two warnings occur if your system set the UserID (UID) and/or GroupID (GID) associated with the ftpuser user are below 1000. To see what the current values are, type the following at a shell:
id ftpuserShould output similar to below:
uid=572(ftpuser) gid=972(ftpgroup) groups=972(ftpgroup)The actual numbers don't matter much, but they should be equal or higher than 1000 for PureFTPd to be happy. To fix the UserID (UID) portion, open a shell and type:
sudo usermod -u 1021 -p -U ftpuserTo fix the GroupID (GID):
sudo groupmod -g 1021 ftpgroupAdditionally, you can set the MinUID that PureFTPd expects by setting the following:
echo 1021 > /etc/pure-ftpd/conf/MinUIDEnsure to restart the Pure-FTPD daemon:
systemctl restart pure-ftpdManage PureFTPd Users
The commands below are for performing common tasks with the PureFTPd user database. This assumes that username is the PureFTPd virtual user you are managing, ftpuser is the system user you are associating the virtual user with and /name/of/directory is the directory you want that virtual user to have access.
Remember that after every change in the PureFTPd database, you MUST commit the changes by typing sudo pure-pw mkdb and always make sure that ftpuser/ftpgroup are the owners of whatever directory you want that user to have access:
Add Users:
sudo pure-pw useradd username -u ftpuser -d /name/of/directoryChange User Password:
sudo pure-pw passwd usernameShow User Details:
sudo pure-pw show usernameDelete user:
sudo pure-pw userdel usernameUpdate PureFTPd Virtual User Database:
sudo pure-pw mkdbHow To Setup a Firewall with UFW on an Ubuntu and Debian Cloud Server
What is UFW?
UFW, or Uncomplicated Firewall, is a front-end to iptables. Its main goal is to make managing your firewall drop-dead simple and to provide an easy-to-use interface. It’s well-supported and popular in the Linux community—even installed by default in a lot of distros. As such, it’s a great way to get started securing your sever.
Before We Get Started
First, obviously, you want to make sure UFW is installed. It should be installed by default in Ubuntu, but if for some reason it’s not, you can install the package using aptitude or apt-get using the following commands:
sudo aptitude install ufwor
sudo apt-get install ufwCheck the Status
You can check the status of UFW by typing:
sudo ufw statusRight now, it will probably tell you it is inactive. Whenever ufw is active, you’ll get a listing of the current rules that looks similar to this:
Status: active
To Action From
-- ------ ----
22 ALLOW Anywhere
Using IPv6 with UFW
If your VPS is configured for IPv6, ensure that UFW is configured to support IPv6 so that will configure both your IPv4 and IPv6 firewall rules. To do this, open the UFW configuration with this command:
sudo vi /etc/default/ufwThen make sure "IPV6" is set to "yes", like so:
IPV6=yesSave and quit. Then restart your firewall with the following commands:
sudo ufw disablesudo ufw enableNow UFW will configure the firewall for both IPv4 and IPv6, when appropriate.
Set Up Defaults
One of the things that will make setting up any firewall easier is to define some default rules for allowing and denying connections. UFW’s defaults are to deny all incoming connections and allow all outgoing connections. This means anyone trying to reach your cloud server would not be able to connect, while any application within the server would be able to reach the outside world. To set the defaults used by UFW, you would use the following commands:
sudo ufw default deny incomingand
sudo ufw default allow outgoingNote: if you want to be a little bit more restrictive, you can also deny all outgoing requests as well. The necessity of this is debatable, but if you have a public-facing cloud server, it could help prevent against any kind of remote shell connections. It does make your firewall more cumbersome to manage because you’ll have to set up rules for all outgoing connections as well. You can set this as the default with the following:
sudo ufw default deny outgoingAllow Connections
The syntax is pretty simple. You change the firewall rules by issuing commands in the terminal. If we turned on our firewall now, it would deny all incoming connections. If you’re connected over SSH to your cloud server, that would be a problem because you would be locked out of your server. Let’s enable SSH connections to our server to prevent that from happening:
sudo ufw allow sshAs you can see, the syntax for adding services is pretty simple. UFW comes with some defaults for common uses. Our SSH command above is one example. It’s basically just shorthand for:
sudo ufw allow 22/tcpThis command allows a connection on port 22 using the TCP protocol. If our SSH server is running on port 2222, we could enable connections with the following command:
sudo ufw allow 2222/tcpOther Connections We Might Need
Now is a good time to allow some other connections we might need. If we’re securing a web server with FTP access, we might need these commands:
sudo ufw allow wwwsudo ufw allow 80/tcp sudo ufw allow ftpsudo ufw allow 21/tcpYou mileage will vary on what ports and services you need to open. There will probably be a bit of testing necessary. In addition, you want to make sure you leave your SSH connection allowed.
Port Ranges
You can also specify port ranges with UFW. To allow ports 1000 through 2000, use the command:
sudo ufw allow 1000:2000/tcpIf you want UDP:
sudo ufw allow 1000:2000/udpIP Addresses
You can also specify IP addresses. For example, if I wanted to allow connections from a specific IP address (say my work or home address), I’d use this command:
sudo ufw allow from 192.168.255.255Denying Connections
Our default set up is to deny all incoming connections. This makes the firewall rules easier to administer since we are only selectively allowing certain ports and IP addresses through. However, if you want to flip it and open up all your server’s ports (not recommended), you could allow all connections and then restrictively deny ports you didn’t want to give access to by replacing “allow” with “deny” in the commands above. For example:
sudo ufw allow 80/tcpwould allow access to port 80 while:
sudo ufw deny 80/tcpwould deny access to port 80.
Deleting Rules
There are two options to delete rules. The most straightforward one is to use the following syntax:
sudo ufw delete allow sshAs you can see, we use the command “delete” and input the rules you want to eliminate after that. Other examples include:
sudo ufw delete allow 80/tcpor
sudo ufw delete allow 1000:2000/tcpThis can get tricky when you have rules that are long and complex.
A simpler, two-step alternative is to type:
sudo ufw status numberedwhich will have UFW list out all the current rules in a numbered list. Then, we issue the command:
sudo ufw delete [number]where “[number]” is the line number from the previous command.
Turn It On
After we’ve gotten UFW to where we want it, we can turn it on using this command (remember: if you’re connecting via SSH, make sure you’ve set your SSH port, commonly port 22, to be allowed to receive connections):
sudo ufw enableYou should see the command prompt again if it all went well. You can check the status of your rules now by typing:
sudo ufw statusor
sudo ufw status verbosefor the most thorough display.
To turn UFW off, use the following command:
sudo ufw disableReset Everything
If, for whatever reason, you need to reset your cloud server’s rules to their default settings, you can do this by typing this command:
sudo ufw reset
How to Install and Configure KVM on Ubuntu 18.04 LTS
Original How-To URL: https://www.linuxtechi.com/install-configure-kvm-ubuntu-18-04-server/
KVM (Kernel-based Virtual Machine) is an open source full virtualization solution for Linux like systems, KVM provides virtualization functionality using the virtualization extensions like Intel VT or AMD-V. Whenever we install KVM on any linux box then it turns it into the hyervisor by loading the kernel modules like kvm-intel.ko( for intel based machines) and kvm-amd.ko ( for amd based machines).
KVM allows us to install and run multiple virtual machines (Windows & Linux). We can create and manage KVM based virtual machines either via virt-manager graphical user interface or virt-install & virsh cli commands.
In this article we will discuss how to install and configure KVM hypervisor on Ubuntu 18.04 LTS server. I am assuming you have already installed Ubuntu 18.04 LTS server on your system. Login to your server and perform the following steps.
Verify Whether your system support hardware virtualization
Execute below egrep command to verify whether your system supports hardware virtualization or not,
egrep -c '(vmx|svm)' /proc/cpuinfo1
If the output is greater than 0 then it means your system supports Virtualization else reboot your system, then go to BIOS settings and enable VT technology.
Now Install “kvm-ok” utility using below command, it is used to determine if your server is capable of running hardware accelerated KVM virtual machines
sudo apt install cpu-checkerRun kvm-ok command and verify the output,
sudo kvm-okINFO: /dev/kvm existsKVM acceleration can be used
Install KVM and its required packages
Run the below apt commands to install KVM and its dependencies
sudo apt updatesudo apt install qemu qemu-kvm libvirt-bin bridge-utils virt-managerOnce the above packages are installed successfully, then your local user (In my case linuxtechi) will be added to the group libvirtd automatically.
Start & enable libvirtd service
Whenever we install qemu & libvirtd packages in Ubuntu 18.04 Server then it will automatically start and enable libvirtd service, In case libvirtd service is not started and enabled then run beneath commands,
sudo service libvirtd startsudo update-rc.d libvirtd enableNow verify the status of libvirtd service using below command,
service libvirtd statusOutput would be something like below:

Configure Network Bridge for KVM virtual Machines
Network bridge is required to access the KVM based virtual machines outside the KVM hypervisor or host. In Ubuntu 18.04, network is managed by netplan utility, whenever we freshly installed Ubuntu 18.04 server then netplan file is created under /etc/netplan/. In most of the hardware and virtualized environment, netplan file name would be “50-cloud-init.yaml” or “01-netcfg.yaml”, to configure static IP and bridge, netplan utility will refer this file.
As of now I have already configured the static IP via this file and content of this file is below:
Let’s add the network bridge definition in this file:
network:
ethernets:
ens33:
addresses: [192.168.0.51/24]
gateway4: 192.168.0.1
nameservers:
addresses: [192.168.0.1]
dhcp4: no
optional: true
version: 2
sudo vi /etc/netplan/50-cloud-init.yamlnetwork:version: 2
ethernets:
ens33:
dhcp4: no
dhcp6: no
bridges:
br0:
interfaces: [ens33]
dhcp4: no
addresses: [192.168.0.51/24]
gateway4: 192.168.0.1
nameservers:
addresses: [192.168.0.1]
As you can see we have removed the IP address from interface(ens33) and add the same IP to the bridge ‘br0‘ and also added interface (ens33) to the bridge br0. Apply these changes using below netplan command,
sudo netplan applyIf you want to see the debug logs then use the below command,
sudo netplan --debug applyNow Verify the bridge status using following methods:
sudo networkctl status -aifconfigCreating Virtual machine with virt-manager
There are two ways to create virtual machine:
- virt-manager (GUI utility)
- virt-install command (cli utility)
Start the virt-manager by executing the beneath command,
sudo virt-manager- Create a new virtual machine
- Click on forward and select the ISO file, in my case I am using RHEL 7.3 iso file.
- Click on Forward
- In the next couple of windows, you will be prompted to specify the RAM, CPU and disk for the VM.
- Now Specify the Name of the Virtual Machine and network,
- Click on Finish
Now follow the screen instruction and complete the installation,
Creating Virtual machine from CLI using virt-install command
Use the below virt-install command to create a VM from terminal, it will start the installation in CLI, replace the name of the VM, description, location of ISO file and network bridge as per your setup.
sudo virt-install -n DB-Server --description "Test VM for Database" --os-type=Linux --os-variant=rhel7 --ram=1096 --vcpus=1 --disk path=/var/lib/libvirt/images/dbserver.img,bus=virtio,size=10 --network bridge:br0 --graphics none --location /home/linuxtechi/rhel-server-7.3-x86_64-dvd.iso --extra-args console=ttyS0
Installing NUT (Network UPS Tools) on Ubuntu 18.04 LTS
Original How-To URL: https://zackreed.me/installing-nut-on-ubuntu/
Install Nut
apt-get install nutEdit /etc/nut/ups.conf
vi /etc/nut/ups.confPaste the foollowing at the bottom. Mine’s an APC-1500, so I’ve set it to a recognizable name (apc-1500)
[apc-1500]
driver = usbhid-ups
port = auto
Create the following directories and reboot machine
mkdir /var/run/nutchown root:nut /var/run/nutchmod 770 /var/run/nutStart NUT
upsdrvctl startShould give the following output
Network UPS Tools - UPS driver controller 2.4.3
Network UPS Tools - Generic HID driver 0.34 (2.4.3)
USB communication driver 0.31
Using subdriver: APC HID 0.95
Setup NUT to listen on Port 3493
vi /etc/nut/upsd.confAdd the following lines where <IPADDRESS> is the IP of your machine
LISTEN 127.0.0.1 3493
LISTEN ::1 3493
LISTEN <IPADDRESS> 3493
Set the mode
Edit /etc/nut/nut.conf:
vi /etc/nut/nut.confEnter the following:
MODE=netserverStart the network data server
upsdCheck the status
upsc apc-1500@localhost ups.statusShould output the following
OLOL means your system is running On Line power. If you want to see all the info, try this instead
upsc apc-1500@localhostShould output the following
...

battery.charge: 100

battery.charge.low: 10

battery.charge.warning: 50

battery.date: 2054/00/39

battery.mfr.date: 2008/10/20

---
Disable the beeper if needed
upscmd apc beeper.disableSetup users to access the info and make changes.
vi /etc/nut/upsd.usersAdd monitor master user and a monitor slave user for remote machines
[monuser]

        password = PASSWORD_REPLACE

        actions = SET FSD

        instcmds = ALL

        upsmon master

        # or upsmon slave

[monuserslave]

        password = slave

        upsmon slave
Reload upsd
upsd -c reloadSetup upsmon for our machine
vi /etc/nut/upsmon.confPaste the following
MONITOR apc-1500@localhost 1 local_mon PASSWORD_REPLACE masterSetup Nut in standalone mode
vi /etc/nut/nut.confPaste the following
MODE=standalone
Start NUT
service nut start
Setting up a Client (Slave) Computer
Install NUT
apt-get install nutEdit /etc/nut/nut.conf
vi /etc/nut/nut.conf
Paste the following
MODE=netclient
Set your upsmon.conf to match the setup for your monuserslave above and the ip address of your master nut-server
vi /etc/nut/upsmon.conf
Paste the following where <IPADDRESS> is the ip of your NUT Server and <PASSWORD> is the password of your monuserslave password from above
MONITOR apc-1500@<IPADDRESS> 1 monuserslave <PASSWORD> slave
Restart your nut-client
service nut-client restart
Test with the following command where <IPADDRESS> is the IP of your NUT server
upsc apc-1500@<IPADDRESS>
Should output the following
Init SSL without certificate database
battery.charge: 100
battery.charge.low: 10
battery.charge.warning: 50
battery.date: 2054/00/39
battery.mfr.date: 2008/10/20
battery.runtime: 156
battery.runtime.low: 360
battery.type: PbAc
battery.voltage: 26.7
battery.voltage.nominal: 24.0
device.mfr: American Power Conversion
device.model: Back-UPS RS 1500 LCD
device.serial: 8B0843R44379
device.type: ups
driver.name: usbhid-ups
driver.parameter.pollfreq: 30
driver.parameter.pollinterval: 2
driver.parameter.port: auto
driver.version: 2.6.4
driver.version.data: APC HID 0.95
driver.version.internal: 0.37
input.sensitivity: medium
input.transfer.high: 139
input.transfer.low: 88
input.voltage: 122.0
input.voltage.nominal: 120
ups.beeper.status: disabled
ups.delay.shutdown: 20
ups.firmware: 839.H7 .D
ups.firmware.aux: H7
ups.load: 29
ups.mfr: American Power Conversion
ups.mfr.date: 2008/10/20
ups.model: Back-UPS RS 1500 LCD
ups.productid: 0002
ups.realpower.nominal: 865
ups.serial: 8B0843R44379
ups.status: OL LB
ups.test.result: No test initiated
ups.timer.reboot: 0
ups.timer.shutdown: -1
ups.vendorid: 051d
Upgrade php 7.3 Ubuntu 18.04 LTS
Since Ubuntu 18.04 comes with php 7.2, you must install from the ppa:ondrej repository:
sudo add-apt-repository ppa:ondrej/php
sudo apt update
sudo apt install php7.3
Install all the existing php 7.2 modules on php 7.3:
sudo apt install $(apt list --installed | grep php7.2- | cut -d'/' -f1 | sed -e 's/7.2/7.3/g')Remove old PHP version:
apt purge php7.2 php7.2-commonIf running Apache disable existing Apache php7.2 mod:
a2dismod php7.2Enable Apache php7.3 mod:
a2enmod php7.3Restart Apache:
systemctl restart apache2
Setup NTP Server using NTPd on Ubuntu 20.04/18.04
Credit: cr00t
In this tutorial, you will learn how to install and setup NTP server using NTPd on Ubuntu 20.04/18.04. Network Time Protocol is a networking protocol that is used to synchronize system clocks on a network. NTP uses clock stratum scheme to enable access to correct time sources. The stratums are numbered from 0 to 15, where the devices at stratum 0 are highly accurate time-keeping hardware devices and the latter is true. The stratums usually have NTP clients. An NTP client can also be configured as a server in a customized environment.
This guide will cover on how to install and setup NTP server using NTPd on ubuntu 20.04/18.04. NTP daemon ( ntpd ) is an NTP client program.
NTP client employs a server-client architecture where NTP clients synchronize time from NTP server(s).
Setup NTP Server using NTPd on Ubuntu 20.04/18.04
Run System Update
Before you can install and setup NTP Server using NTPd on Ubuntu 20.04/18.04, you need to update your package cache in order to install the latest version of ntp.
sudo apt update -yInstall NTPd on Ubuntu 20.04/18.04
Once the update is done, proceed to install NTP daemon on Ubuntu 20.04/18.04. The ntpd daemon is provided by the ntp package.
To check if ntp package is installed on Ubuntu 18.04/20.04 run the command:
dpkg -l ntpIf the package is not installed you will get output similar to:
dpkg-query: no packages found matching ntpThe ntp package is available on the default Ubuntu 18.04 and Ubuntu 20.04 repositories.
Install ntp on Ubuntu 20.04/18.04 by running the command:
sudo apt install ntp -yVerify that that ntp package has been installed successfully by checking the version number:
sntp --versionOutput:
sntp 4.2.8p12@1.3728-o (1)Running NTPd on Ubuntu 20.04/18.04
After installation NTP is started and enabled to start at boot time:
systemctl status ntp● ntp.service - Network Time Service
Loaded: loaded (/lib/systemd/system/ntp.service; enabled; vendor preset: e>
Active: active (running) since Sun 2020-10-11 20:09:21 EAT; 55min ago
Docs: man:ntpd(8)
Main PID: 567 (ntpd)
Tasks: 2 (limit: 585)
Memory: 1.5M
CGroup: /system.slice/ntp.service
└─567 /usr/sbin/ntpd -p /var/run/ntpd.pid -g -u 127:133
Onk 11 20:10:28 computers-VirtualBox ntpd[567]: Soliciting pool server 162.159.>
Onk 11 20:10:29 computers-VirtualBox ntpd[567]: Soliciting pool server 160.119.>
Onk 11 20:10:29 computers-VirtualBox ntpd[567]: Soliciting pool server 162.159.>
Onk 11 20:10:29 computers-VirtualBox ntpd[567]: Soliciting pool server 162.159.>
...Setup NTP Server using NTPd on Ubuntu 20.04/18.04
Configure NTP Server on Ubuntu 20.04/18.04
NTP daemon (ntpd) main configuration file is /etc/ntp.conf. The file is configured to enable NTP server to fetch the correct time from NTP servers of higher stratum such as pool.ntp.org. The pool directive in the file enables setting of NTP time servers (pool) to use.
sudo vim /etc/ntp.conf
# Specify one or more NTP servers.

# Use servers from the NTP Pool Project. Approved by Ubuntu Technical Board
# on 2011-02-08 (LP: #104525). See http://www.pool.ntp.org/join.html for
# more information.
pool 0.ubuntu.pool.ntp.org iburst
pool 1.ubuntu.pool.ntp.org iburst
pool 2.ubuntu.pool.ntp.org iburst
pool 3.ubuntu.pool.ntp.org iburst

# Use Ubuntu's ntp server as a fallback.
pool ntp.ubuntu.com
By default NTP on Ubuntu 20.04/18.04 uses ubuntu pool time servers from the NTP servers pool.ntp.org as seen from the above output. A list of time servers can be found at NTP Public Pool Time Servers where one can choose which timeserver to use according to their timezone. For example to use ke.pool.ntp.org pool:
First comment out the default ubuntu pool timeservers:
...
# more information.
#pool 0.ubuntu.pool.ntp.org iburst
#pool 1.ubuntu.pool.ntp.org iburst
#pool 2.ubuntu.pool.ntp.org iburst
#pool 3.ubuntu.pool.ntp.org iburst

# Use Ubuntu's ntp server as a fallback.
#pool ntp.ubuntu.com
...
To add up servers from the ke.pool.ntp.org pool add the following entry on the configuration file:
...
#Use kenyan pool
pool 0.ke.pool.ntp.org iburst
pool 1.ke.pool.ntp.org iburst
pool 2.ke.pool.ntp.org iburst
pool 3.ke.pool.ntp.org iburst
...
TIP: Setting the pool as pool.ntp.org allows the system to determine the nearest time servers to use.
iburst option in the configuration file changes the initial interval of polls to a NTP server in order to speed up the initial synchronization.
Configure Access Control for NTP Server (Optional)
NTP server can optionally be configured to only allow specific NTP client connections to query them using the restrict directive in the /etc/ntp.conf configuration file which uses the syntax:
restrict address [mask mask] [other options]This access control can be used to limit access to NTP service to particular LAN. For instance to only allow connections from the network 192.168.56.0/24, define the network address by appending the line:
restrict 192.168.56.0 mask 255.255.255.0 nomodify notrapWhere:
- nomodify options prevents any changes to the configuration.
- notrap option prevents ntpdc control message protocol traps.
More about restrict and other command options can be read on man ntp.conf.
Save the configuration file and restart NTP server for the changes to take effect.
sudo systemctl restart ntpCheck the status of NTP service
systemctl status ntpOutput:
 ntp.service - Network Time Service
     Loaded: loaded (/lib/systemd/system/ntp.service; enabled; vendor preset: enabled)
     Active: active (running) since Tue 2020-10-20 19:05:15 EAT; 1min 0s ago
       Docs: man:ntpd(8)
    Process: 8428 ExecStart=/usr/lib/ntp/ntp-systemd-wrapper (code=exited, status=0/SUCCESS)
   Main PID: 8446 (ntpd)
      Tasks: 2 (limit: 1111)
     Memory: 1.0M
     CGroup: /system.slice/ntp.service
             └─8446 /usr/sbin/ntpd -p /var/run/ntpd.pid -g -u 127:133
Onk 20 19:05:20 null1-VirtualBox ntpd[8446]: Soliciting pool server 162.159.200.123
Onk 20 19:05:21 null1-VirtualBox ntpd[8446]: Soliciting pool server 162.159.200.1
Onk 20 19:05:22 null1-VirtualBox ntpd[8446]: Soliciting pool server 160.119.216.206
Onk 20 19:05:23 null1-VirtualBox ntpd[8446]: Soliciting pool server 160.119.216.197
Onk 20 19:05:24 null1-VirtualBox ntpd[8446]: Soliciting pool server 160.119.216.202
Onk 20 19:05:29 null1-VirtualBox ntpd[8446]: Soliciting pool server 160.119.216.197
Onk 20 19:05:29 null1-VirtualBox ntpd[8446]: Soliciting pool server 2606:4700:f1::1
Onk 20 19:05:37 null1-VirtualBox ntpd[8446]: Soliciting pool server 91.189.94.4
Confirm NTP service is set to start at boot time:
sudo systemctl is-enabled ntpenabledIf disabled, enable it by running the command below;
sudo systemctl enable ntpdVerify System time
Check NTP time after afew seconds.
ntptime Output:
tp_gettime() returns code 0 (OK)
  time e3398bfb.b241700c  Tue, Oct 20 2020 19:16:59.696, (.696311693),
  maximum error 78688 us, estimated error 5216 us, TAI offset 37
ntp_adjtime() returns code 0 (OK)
  modes 0x0 (),
  offset 251.894 us, frequency -11.169 ppm, interval 1 s,
  maximum error 78688 us, estimated error 5216 us,
  status 0x2001 (PLL,NANO),
  time constant 6, precision 0.001 us, tolerance 500 ppm,
Configure Firewall
If Ubuntu UFW is enabled allow UDP port 123. NTP clients connect to NTP server on that particular port.
sudo ufw allow from any to any port 123 proto udpYou can as well allow NTP queries from specific Network;
sudo ufw allow from 192.168.56.0/24 to any port 123 proto udpVerify NTP Time Service
Verify NTP server by checking the NTP server connection to NTP peers by running the command;
ntpq -p remote refid st t when poll reach delay offset jitter
==============================================================================
0.ke.pool.ntp.o .POOL. 16 p - 64 0 0.000 0.000 0.000
1.ke.pool.ntp.o .POOL. 16 p - 64 0 0.000 0.000 0.000
2.ke.pool.ntp.o .POOL. 16 p - 64 0 0.000 0.000 0.000
3.ke.pool.ntp.o .POOL. 16 p - 64 0 0.000 0.000 0.000
ntp.ubuntu.com .POOL. 16 p - 64 0 0.000 0.000 0.000
-time.cloudflare 10.45.8.5 3 u 122 256 377 54.091 8.013 63.504
-time.cloudflare 10.45.8.5 3 u 153 256 161 54.158 8.587 40.443
+ntp0.icolo.io 160.119.216.202 3 u 8 128 377 16.850 4.389 0.586
*ntp1.icolo.io 146.64.8.7 2 u 82 128 375 16.379 4.501 1.584
+ntp2.icolo.io 146.64.8.7 2 u 65 128 377 16.524 4.709 0.742Synchronizing Client’s Time with NTP Server
Now that the NTP server is configured, it is high time to configure clients to synchronize their clocks with the NTP server.
Synchronizing using systemd timesyncd NTP
In an Ubuntu system, an NTP Client, systemd-timesyncd.service, is running by default which can be used to set NTPd as a NTP client.
Edit the file /etc/systemd/timesyncd.conf and add the address for your NTP server by adding such an entry at the end of the file:
vim /etc/systemd/timesyncd.confNTP=192.168.56.103Where 192.168.56.103 is the IP address of configured NTP server.
Restart systemd-timesyncd NTP client service:
sudo systemctl status systemd-timesyncdConfirm the status of status that it is now synchronized with the configured NTP server.
systemctl status systemd-timesyncdOutput:
  Loaded: loaded (/lib/systemd/system/systemd-timesyncd.service; enabled; vendor preset: enabled)
   Active: active (running) since Tue 2020-10-20 20:02:49 EAT; 3s ago
     Docs: man:systemd-timesyncd.service(8)
 Main PID: 4466 (systemd-timesyn)
   Status: "Synchronized to time server 192.168.56.103:123 (ntp.kifarunix.com)."
    Tasks: 2 (limit: 667)
   CGroup: /system.slice/systemd-timesyncd.service
           └─4466 /lib/systemd/systemd-timesyncd

...
Using ntpdate to Synchronize Client Systems’ Time
Optionally the ntpdate command can be used to manually synchronize client system time with NTP server. This guide uses Ubuntu 18.04 as the client.
Step 1: Install ntpdate
Install ntpdate package, if not already installed.
sudo apt install ntpdate -yNOTE: Ensure that Client and NTP Server can communicate. You can use nc command to verify NTP server port connection.
Step 2: Use ntpdate Command to Query Time Service
The ntpdate command can be uses to query time service from an NTP server by running the command:
sudo ntpdate 192.168.56.103The output shows the time offset between the two systems.
20 Oct 20:31:54 ntpdate[5053]: adjust time server 192.168.56.103 offset 0.001313 secSynchronize time Automatically Using NTP
NTP client can automatically be configured to query NTP server by using the NTPd daemon.
Step 1: Install NTP
sudo apt install ntp -yConfigure NTPd Client
On Ubuntu 18.04 NTP service is set to run by default after installation. First check if the client is synchronized with NTP:
timedatectlThe output will show if the system clock is synchronized or not.
 Local time: Qib 2020-10-20 19:41:59 EAT
                  Universal time: Qib 2020-10-20 16:41:59 UTC
                        RTC time: Qib 2020-10-20 16:35:32
                       Time zone: Africa/Nairobi (EAT, +0300)
       System clock synchronized: yes
systemd-timesyncd.service active: no
                 RTC in local TZ: no
If the system time is synchronized, disable the time synchronization by running the command:
sudo timedatectl set-ntp offTIP: To toggle time synchronization back on: sudo timedatectl set-ntp on
To configure the NTP client to synchronize time from your NTP server, edit the ntp configuration file:
sudo vim /etc/ntp.conf Replace public NTP pool servers with your server.
#pool 0.ubuntu.pool.ntp.org iburst
#pool 1.ubuntu.pool.ntp.org iburst
#pool 2.ubuntu.pool.ntp.org iburst
#pool 3.ubuntu.pool.ntp.org iburst

pool 192.168.56.103 iburst
Ideally the server can be added without commenting out the default NTP servers by making it the preferred reference clock using the prefer option:
pool 192.168.56.103 prefer iburstSave the configuration file and restart ntp.
sudo systemctl restart ntpThe client is now successfully configured to sychronize system time with NTP server. This can be verified by running the command:
ntpq -p remote refid st t when poll reach delay offset jitter
==============================================================================
192.168.56.103 .POOL. 16 p - 64 0 0.000 0.000 0.000
*192.168.56.103 160.119.216.202 3 u 24 64 1 0.768 16.118 1.355From the output we can see NTP server (192.168.56.103) as the time synchronization host/source in the queue.
Confirm NTP service is set to start at boot time:
systemctl is-enabled ntpTo enable NTP service to start at boot time, just in case is not enabled, then you would run the command:
systemctl enable ntpGreat, your NTP Clients should now be able to query the time services from your NTP Server. This brings us to the end of the guide on how install and setup NTP Server using NTPd on Ubuntu 20.04/18.04.
Ubuntu Add and Delete Users
Add User
Enter the following command:
sudo adduser jsmoeYou will be prompted to create a Unix Password:
Enter new UNIX password:
Retype new UNIX password:
Next, you will be prompted to provide user information, you can either enter the information or press Enter to bypass:
Changing the user information for jsmoe
Enter the new value, or press ENTER for the default
        Full Name []: Joe Smoe
        Room Number []:
        Work Phone []:
        Home Phone []:
        Other []:
Next, you will be prompted to verify the provided information is correct, press y to save:
Is the information correct? [Y/n] yGive User Root Access
Enter the following command:
sudo usermod -G sudo jsmoeDelete User
Enter the following command to delete user:
sudo deluser jsmoeEnter the following command to delete user and user home directory:
sudo deluser --remove-home jsmoeInstall and Configure xmrig for Monero XMR Crypto Mining
Ensure you have created and activated an account on https://minergate.com. You will need your minergate.com UserID before proceeding.
Install and Configure xmrig
Create a directory for xmrig under /opt:
mkdir /opt/xmrigDownload attached xmrig-linux.zip and extract to the /opt/xmrig directory you created above:
unzip xmrig-linux.zip -d /opt/xmrigEdit /opt/xmrig/config.json file and under the following section:
"pools": [
        {
            "algo": null,
            "coin": null,
            "url": "xmr.pool.minergate.com:45700",
            "user": "12345678",
            "pass": "x",
            "rig-id": null,
            "nicehash": false,
            "keepalive": false,
            "enabled": true,
            "tls": false,
            "tls-fingerprint": null,
            "daemon": false,
            "socks5": null,
            "self-select": null
        }
    ],
set the 123456 in the "user": "12345678" section to your Minergate.com UserID.
Make /opt/xmrig/xmrig executable:
chmod +x /opt/xmrig/xmrigMove the xmrig.service file that was included in the xmrig-linux.zip file to /etc/systemd/system:
mv /opt/xmrig/xmrig.service /etc/systemd/system/Configure CPU Quota
Adjust the CPU Quota that xmrig will use on your system by editing the /etc/systemd/system/xmrig.service file:
vi /etc/systemd/system/xmrig.serviceInsert the following line:
CPUQuota=50%after the following line:
ExecStart=/opt/xmrig/xmrig --config=/opt/xmrig/config.json --log-file=/opt/xmrig/xmrig.logSo the whole service looks like below:
[Unit]
Description=XMRig Monero Miner
After=network.target

[Service]
User=xmrig
Group=xmrig

StandardOutput=journal
StandardError=journal

ExecStart=/opt/xmrig/xmrig --config=/opt/xmrig/config.json --log-file=/opt/xmrig/xmrig.log
CPUQuota=50%

Restart=always

[Install]
WantedBy=multi-user.target
Adjust the percentage from the default 50% to a level appropriate for your system.
Save the /etc/systemd/system/xmrig.service file.
Create User for xmrig
Create a user for xmrig:
sudo adduser xmrigSet a password for the xmrig user and answer the resultant prompts
Give xmrig user root privileges:
usermod -G sudo xmrigConfigure Logging
Create /opt/xmrig/xmrig.log file:
touch /opt/xmrig/xmrig.logSet /opt/xmrig/xmrig.log file permissions:
chmod 664 /opt/xmrig/xmrig.logSet /opt/xmrig/xmrig.log file owner to the xmrig user created earlier:
chown xmrig:xmrig /opt/xmrig/xmrig.logEnable and Start xmrig Service
Enable the xmrig service:
sudo systemctl enable --now xmrigStart the xmrig service:
sudo systemctl restart xmrigEnsure xmrig service has started:
systemctl status xmrigIf the service is started, the output should be similar to below:
● xmrig.service - XMRig Monero Miner
   Loaded: loaded (/etc/systemd/system/xmrig.service; enabled; vendor preset: enabled)
   Active: active (running) since Fri 2021-02-19 21:17:30 UTC; 11min ago
 Main PID: 7516 (xmrig)
    Tasks: 14 (limit: 4915)
   CGroup: /system.slice/xmrig.service
           └─7516 /opt/xmrig/xmrig --config=/opt/xmrig/config.json --log-file=/opt/xmrig/xmrig.log
View xmrig service logs:
journalctl -u xmrigView xmrig logs:
tail -f /opt/xmrig/xmrig.log
Upgrade Ubuntu 20.04 Linux Kernel
Verify Installed Kernel Version
Type the following command in command line to view currently installed Kernel version:
sudo uname -rShould output output similar to below:
5.4.0-80-genericDownload latest Kernel Version
Figure 1
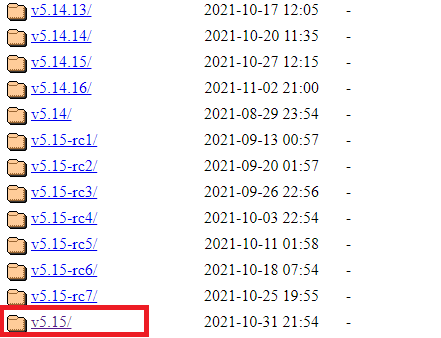
Next click on your platform version (most likely amd64) (Figure 2).
Figure 2
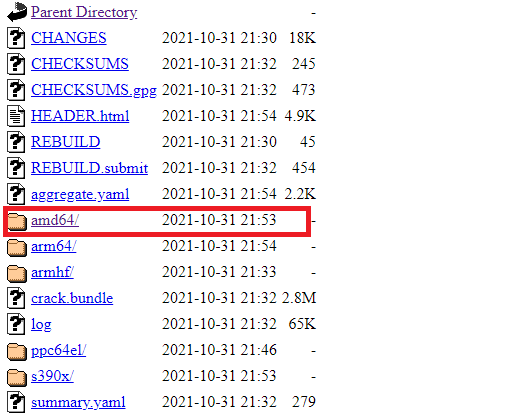
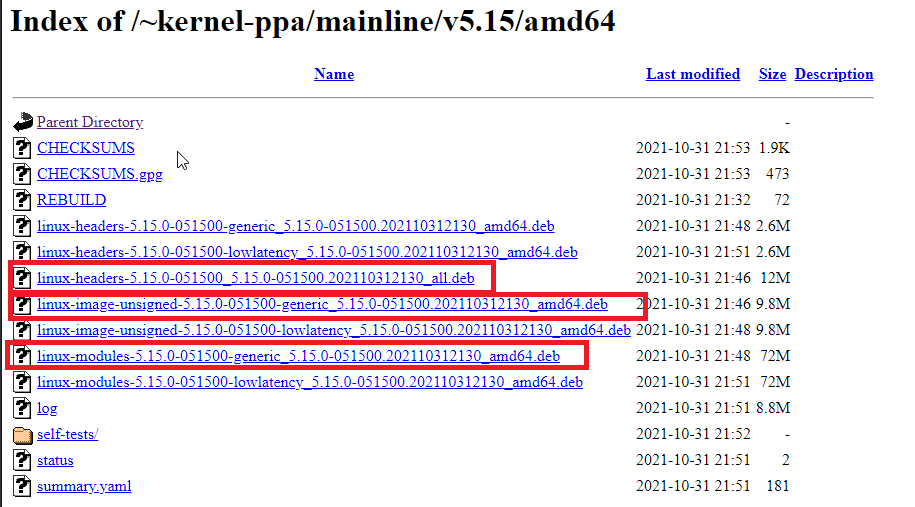
Using wget download the following files (adjust file names to your version and date) (Figure 3):
wget linux-headers-<VERSION-NO>_<VERSION-NO.<DATE>_all.deb
wget linux-image-unsigned-<VERSION-NO>-generic_<VERSION-NO>.<DATE>_amd64.deb
wget linux-modules-<VERSION-NO>-generic_<VERSION-NO>.<DATE>_amd64.deb
Figure 3
Install latest Kernel version
From the directory where you downloaded all the Kernel .deb files from above, run the following command:
sudo dpkg -i *.debOnce installation is finished, reboot your computer and check that the Kernel has been upgraded by running the following command again:
sudo uname -r
Freeing Inode Usage
Credit Michat Dabrowski
Introduction
In Unix-like systems, inodes are data structures that describe files and directories. The number of possible inodes is limited and set during partition creation. That means we can run out of them and be unable to create any new files, even if we have space on the device. In this tutorial, we’ll learn how to prevent this situation and how to deal with it if it happens.
Why inodes Are Limited
Each inode contains crucial information about its file, like its attributes and disk block locations. This data is necessary for the system to use the file. In file systems from the family of extended file systems, the default for Linux-based systems, inodes are stored in a fixed-sized table. The size of this table is decided upon the creation of the partition and can’t be changed later.
Other file systems (for example, APFS used on macOS) don’t use fixed-sized tables but, instead, use other data structures like B-trees. Thus, the number of possible inodes is much more flexible. It’s still limited by how big an index can be stored in a 64-bit integer (or 32-bit on older file systems), but that’s a limit that’s hard to hit.
Check and Free inodes
We can check the available inodes using the df command:
$ df -i
Filesystem     512-blocks      Used  Available Capacity iused      ifree %iused  Mounted on
/dev/disk1s5s1  489620264  46865488   34089872    58%  568975 2447532345    0%   /
/dev/disk2s1   1953456384 727555584 1225900800    38% 2842014    4788675   37%   /Volumes/T7
The “iused” column tells us the number of used inodes, “ifree” gives us the number of free inodes, and the “%iused” column tells us the percentage of used inodes.
Unfortunately, there is no way to free inodes other than deleting files we don’t need. The problem is that we sometimes don’t know where to look for files that drain the inode limit. One way to tackle this is to sort directories by the number of files in them. By doing so, we can quickly locate problematic directories.
We can achieve that by listing all the files, selecting only the first directory in the path, and then counting how many occurrences of each directory we have:
$ sudo find . -xdev -type f | cut -d "/" -f 2 | sort | uniq -c | sort -n
...
1585 Documents
6979 Downloads
7168 Pictures
113659 .nvm
669666 Library
980996 Projects
As we can see, we store the highest number of files in the “Projects” directory. At this moment, we can decide to investigate further or take some action like deleting files or moving that directory to some other drive.
Install and Configure SSTP Client Ubuntu 22.04
Introduction
This guide is tailored to connect Ubuntu 22.04 using SSTP VPN client to SoftEther SSTP clone server. It may work for Windows SSTP VPN Server but it hasn't been tested on that.
Install SSTP client on Gnome based Ubuntu
Ensure your package repo is up-to-date:
apt-get install update
Install SSTP client and the SSTP Network Manager extension:
apt-get install network-manager-sstp sstp-client
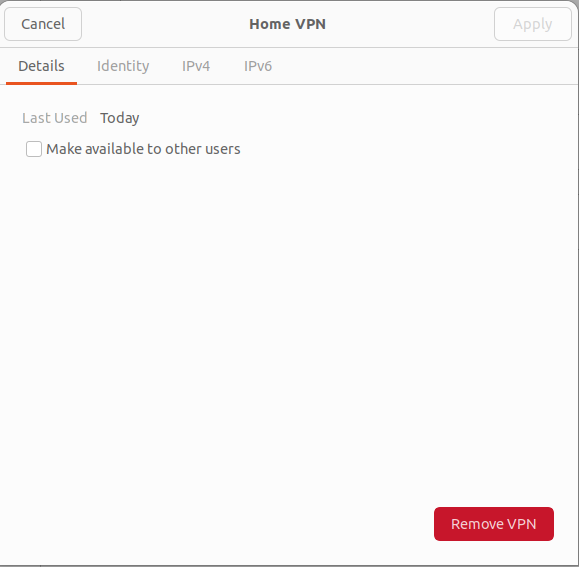
Configure SSTP Client
On the upper-right hand corner of your screen, click on the
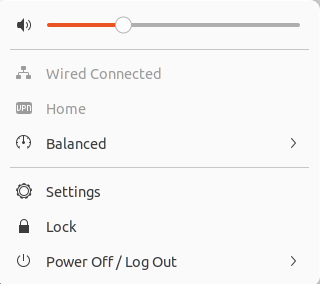
Start the network manger by either typing the following command in the CLI:
nm-connection-editor

[connection]
id=Home
uuid=0ab361d5-a0d2-4e6f-9083-e58bfbf8e18c
type=vpn
autoconnect=false
permissions=user:dedwards:;
timestamp=1736267330
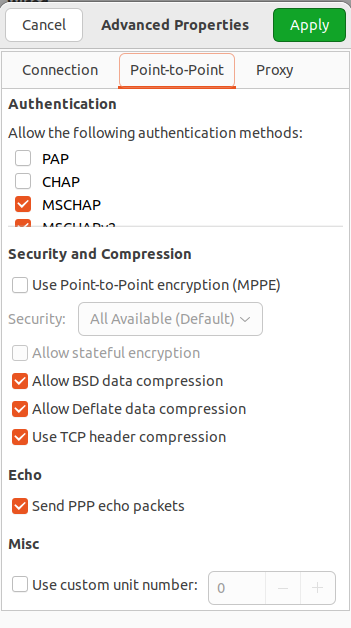
[vpn]
connection-type=password
gateway=homevpn.deeztek.com
ignore-cert-warn=yes
lcp-echo-failure=5
lcp-echo-interval=30
password-flags=1
refuse-chap=yes
refuse-eap=no
refuse-mschap=no
refuse-mschapv2=no
refuse-pap=yes
tls-ext=yes
tls-verify-key-usage=no
user=dedwards
service-type=org.freedesktop.NetworkManager.sstp
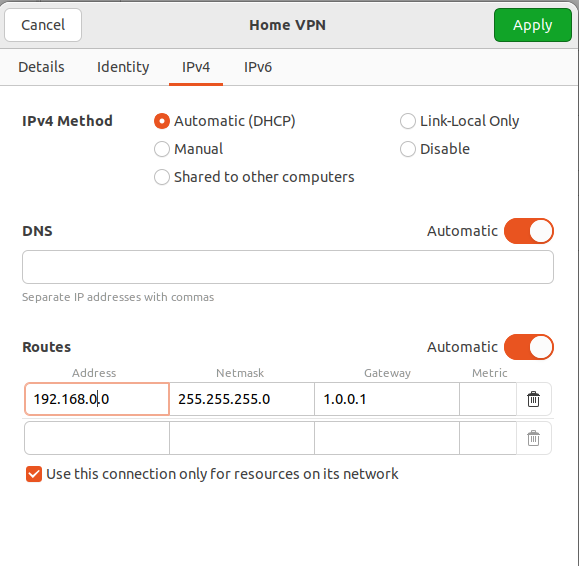
[ipv4]
method=auto
never-default=true
route1=192.168.30.0/24,1.0.0.1
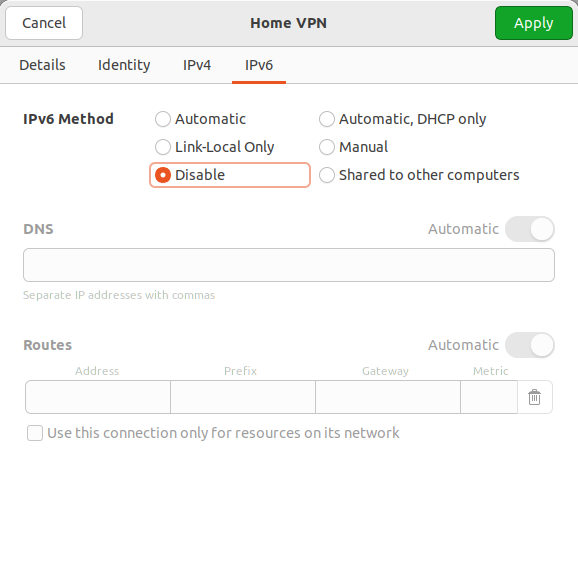
[ipv6]
addr-gen-mode=stable-privacy
method=disabled
[proxy]
Switching a Primary User Between ThinLinc and xrdp from SSH
This document describes a practical way to run both ThinLinc and xrdp on the same Ubuntu 24.04 system while using a single primary account. The safest operating model on modern Ubuntu/GNOME is to allow only one graphical session at a time for that user, then switch cleanly from SSH when needed.[cite:46][cite:50][cite:53]
Why session switching is needed
ThinLinc supports multiple sessions per user in general, but Cendio notes that GNOME and some other desktop environments do not work well with multiple simultaneous sessions for the same user.[cite:46][cite:53] xrdp has a similar practical limitation on modern Linux desktops because systemd --user and desktop-session resources do not reliably support multiple full desktop sessions for one UID at the same time.[cite:50] For a primary account on Ubuntu 24.04, the reliable pattern is to terminate the existing remote desktop session before starting the other one.[cite:46][cite:50]
Recommended operating model
Use one account, but only one active GUI session for that account at a time.[cite:46][cite:50] Treat ThinLinc and xrdp as alternate entry points into the same desktop environment rather than as concurrent sessions.[cite:46][cite:53]
Recommended rules:
- Before connecting with xrdp, terminate any active ThinLinc session for that user.[cite:65]
- Before connecting with ThinLinc, terminate or drop any active xrdp session for that user.[cite:58][cite:64]
- If GNOME behaves strangely after switching methods, remove any leftover user-session processes and reconnect using only one method.[cite:46][cite:50]
Terminating ThinLinc sessions from SSH
ThinLinc provides server-side CLI tools for session management, which is the cleanest way to end sessions from SSH.[cite:61][cite:65]
List ThinLinc sessions
tlctl session list
This shows active ThinLinc sessions and is the best first step before terminating one.[cite:65]
Terminate all ThinLinc sessions for the current user
tlctl session terminate -g user "$USER"
This is the preferred method when switching the same Unix account from ThinLinc to xrdp.[cite:65]
Terminate a specific ThinLinc session
tlctl session terminate -s <session_id>
Use this when more than one session exists and only one should be removed.[cite:65]
Terminating xrdp sessions from SSH
Ubuntu includes xrdp-sesadmin, but the man page notes that kill:sid is not yet implemented, so the practical approaches are to restart the xrdp service or kill the user-owned session processes directly.[cite:68]
Fastest method: restart xrdp
sudo systemctl restart xrdp
Restarting the xrdp service disconnects active xrdp sessions and is often the fastest way to clear a stuck or unwanted xrdp session on a single-user workstation.[cite:58][cite:64]
Inspect xrdp-related processes for a user
ps -fu "$USER" | egrep 'Xorg|Xvnc|xrdp-chansrv|gnome-session|Xsession'
This helps identify leftover remote-desktop processes tied to the current user before killing them.[cite:58][cite:60]
Kill user-owned xrdp session processes
pkill -u "$USER" -f 'xrdp-chansrv|Xorg|Xvnc|gnome-session|Xsession'
If a session does not clear cleanly, a stronger version can be used:
pkill -9 -u "$USER" -f 'xrdp-chansrv|Xorg|Xvnc|gnome-session|Xsession'
This is more targeted than restarting the entire xrdp service, but it should be used carefully because it force-terminates the user's graphical processes.[cite:58][cite:60]
Switching workflows
ThinLinc to xrdp
- SSH to the Ubuntu host using the same administrative path normally used for server access.
- End the ThinLinc session for the primary account:
tlctl session terminate -g user "$USER"
- If the desktop does not start cleanly afterward, remove leftovers:
pkill -u "$USER" -f 'gnome-session|Xorg|Xvnc|Xsession'
- Start the RDP client and connect through xrdp using the primary account.[cite:65][cite:46][cite:50]
xrdp to ThinLinc
- SSH to the Ubuntu host.
- End the xrdp session with the simplest method:
sudo systemctl restart xrdp
- If necessary, verify that no user-owned GUI leftovers remain:
ps -fu "$USER" | egrep 'Xorg|Xvnc|xrdp-chansrv|gnome-session|Xsession'
- Connect with the ThinLinc client using the same primary account.[cite:58][cite:64][cite:65]
Suggested helper aliases
These aliases make switching faster from SSH shells.[cite:65][cite:64]
Add the following to ~/.bashrc or ~/.zshrc:
alias end-thinlinc='tlctl session terminate -g user "$USER"'
alias end-xrdp='sudo systemctl restart xrdp'
alias rdp-leftovers='ps -fu "$USER" | egrep "Xorg|Xvnc|xrdp-chansrv|gnome-session|Xsession"'
alias kill-rdp-leftovers='pkill -u "$USER" -f "xrdp-chansrv|Xorg|Xvnc|gnome-session|Xsession"'
Reload the shell:
source ~/.bashrc
These shortcuts are intentionally simple and fit a single-user workstation workflow better than heavier multi-user session management.[cite:58][cite:64][cite:65]
Operational notes
- Restarting
xrdpaffects all xrdp sessions on the host, so it is best suited to a workstation or lightly shared system.[cite:64] - ThinLinc's own session management commands are preferable to manual process killing because they preserve ThinLinc's internal session state more cleanly.[cite:61][cite:65]
- If the system is using GNOME, occasional odd behavior after repeated switching is usually a sign that multiple per-user graphical resources were left behind; clearing the old session before starting the new one is the key stability measure.[cite:46][cite:50][cite:53]
Enable passwordless sudo for user
echo 'someuser ALL=(ALL) NOPASSWD:ALL' | sudo tee /etc/sudoers.d/someuser-nopasswd
sudo chmod 440 /etc/sudoers.d/someuser-nopasswd
sudo visudo -c    # sanity-check sudoers syntax