This guide was inspired by [Marcus Rath](https://blog.matrixpost.net/set-up-wireguard-site-to-site-vpn-on-pfsense/)
### Introduction This guide will walk you through setting up a WireGuard site to site VPN tunnel on pfsense 2.7.2. For this guide we assume **Site A** with a **network subnet of 192.168.1.0/24**, **Site B with a network subnet of 192.168.24.0/24** and a **Tunnel Subnet of 10.10.12.0/30**. Obviously adjust these settings to your specific needs.Ensure that the **Tunnel Subnet** you choose does NOT overlap with any other network subnets currently in use in your network environment.
### Install WireGuard Package on Both Sites On **BOTH** site pfsense installations, install the **WireGuard package from System ---> Package Manager ---> Available Package**s. Enter **Wireguar**d in the **Search term** field, click search and then click on the **Install** button next to WireGuard package (**Figure 1**). **Figure 1** [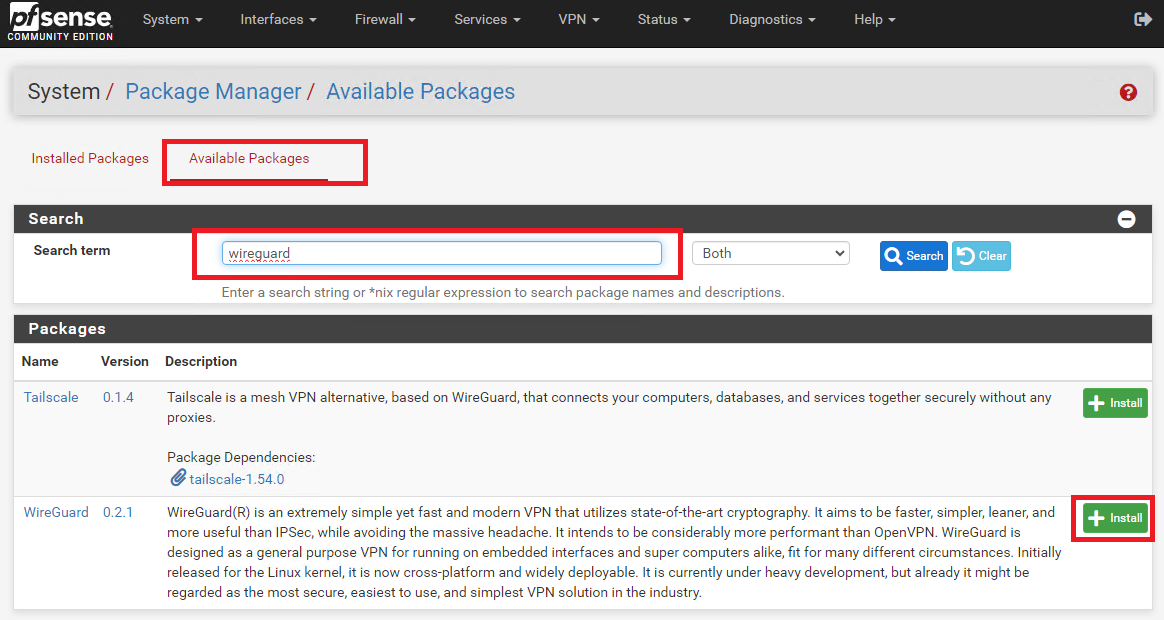](https://docs.deeztek.com/uploads/images/gallery/2024-01/image.png) ### Create Tunnel on Site A On **Site A**, refresh the pfsense web GUI and navigate to **VPN ---> Wireguard,** click on the **Tunnels** tab and then click on **Add Tunnel** button (**Figure 2**). **Figure 2** [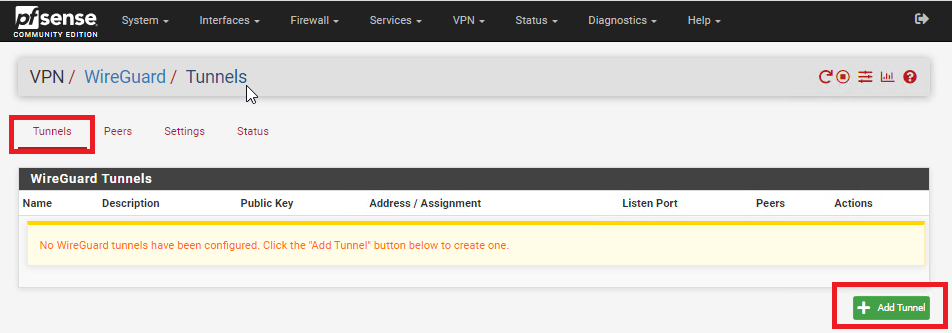](https://docs.deeztek.com/uploads/images/gallery/2024-01/tGIimage.png) In the **Tunnel Configuration** fill/set in the following fields (**Figure 3**): - **Enable:** Checked - **Description:** Optionally, describe the purpose of this tunnel (Ex: Tunnel to Site B) - **Listen Port:** Leave blank to use port UDP/51820 or enter a specific port number you with to use - **Interface Keys:** click the **Generate** button to create a new Private/Public key pair and copy the **Public Key** that's generated in order to enter it in the Public Key field on Site B. - Click the **Save Tunnel** button **Figure 3** [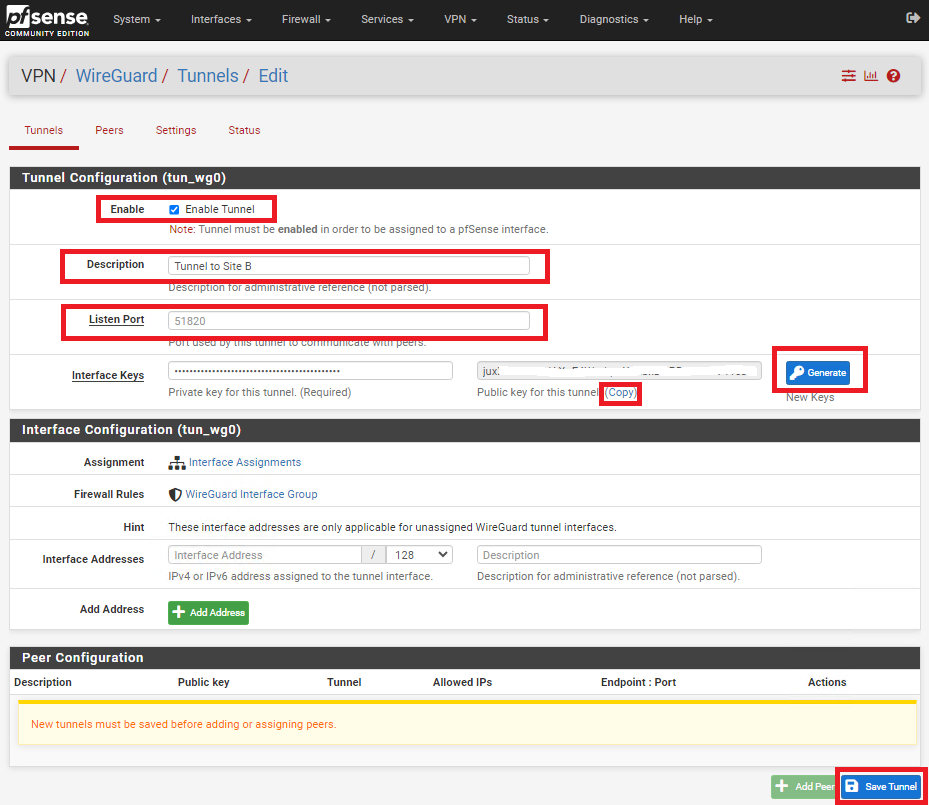](https://docs.deeztek.com/uploads/images/gallery/2024-01/hRSimage.png) ### Create Tunnel on Site B On **Site B**, refresh the pfsense web GUI and navigate to **VPN ---> Wireguard,** click on the **Tunnels** tab and then click on **Add Tunnel** button (**Figure 4**). **Figure 4** [](https://docs.deeztek.com/uploads/images/gallery/2024-01/tGIimage.png) In the **Tunnel Configuration** fill/set in the following fields (**Figure 5**): - **Enable:** Checked - **Description:** Optionally, describe the purpose of this tunnel(Ex: Tunnel to Site A) - **Listen Port:** Leave blank to use port UDP/51820 or enter a specific port number you with to use - **Interface Keys:** click the **Generate** button to create a new Private/Public key pair and copy the **Public Key** that's generated in order to enter it in the Public Key field on Site B. - Click the **Save Tunnel** button **Figure 5** [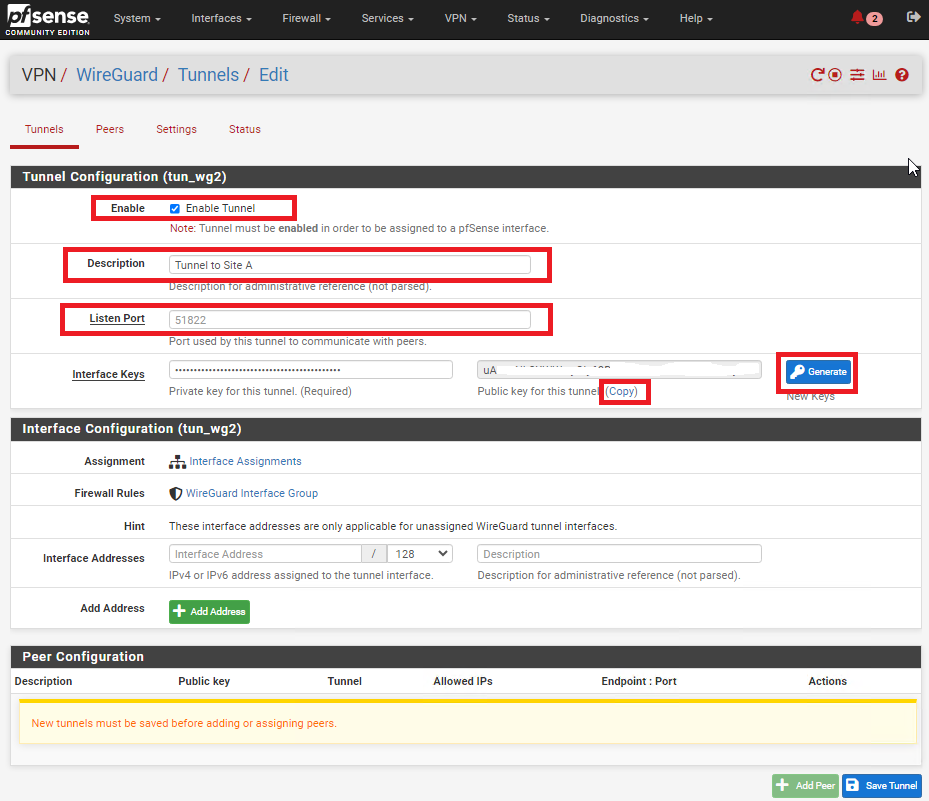](https://docs.deeztek.com/uploads/images/gallery/2024-01/H1eimage.png) ### Enable WireGuard on Both Sites On **BOTH** sites, navigate to **VPN ---> WireGuard**, click on the **Settings** tab and click on the **Enable WireGuard** checkbox, select **Only Unassigned Tunnels** on the **Interface Group Membership** drop-down and then click on the **Save** button (**Figure 6**). **Figure 6** [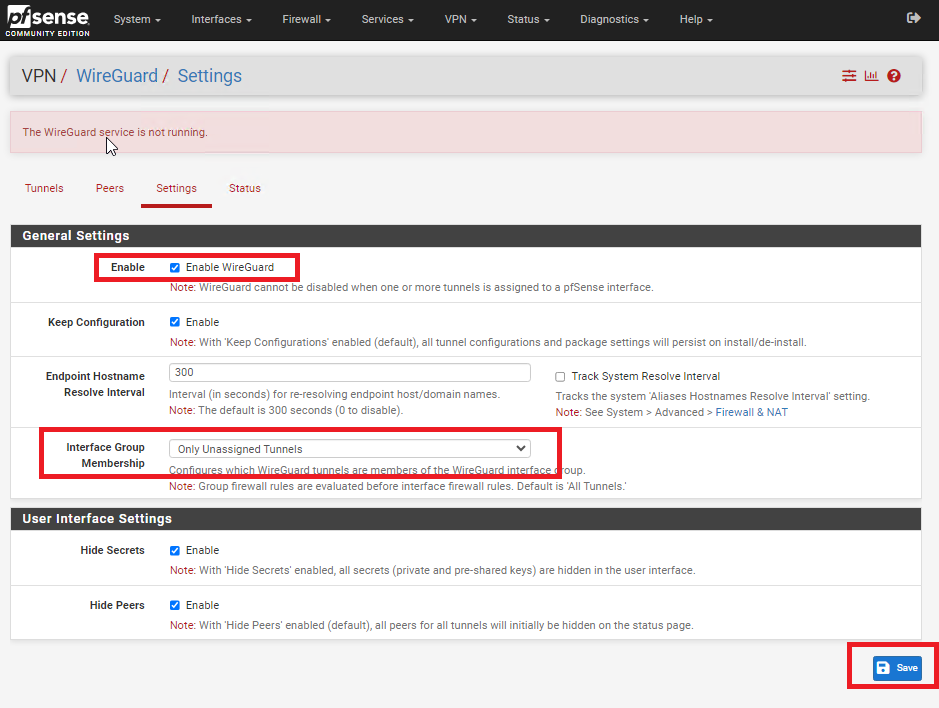](https://docs.deeztek.com/uploads/images/gallery/2024-01/4h3image.png) ### Add Peer on Site A On **Site A**, navigate to **VPN ---> WireGuard**, click on the **Peers** tab and then click on the **Add Peer** button (**Figure 7**). **Figure 7** [](https://docs.deeztek.com/uploads/images/gallery/2024-01/biLimage.png) In the **Peer Configuration** fill/set in the following fields (**Figure 8**): - **Enable:** Checked - **Tunnel**: Select the Tunnel previously configured from the drop-down list - **Description:** Optionally, describe the purpose of this Peer (Ex: Peer to Site B) - **Dynamic Endpoint:** Unchecked - **Endpoint**: Fill in the Internet IP or Hostname as well as the port number for **Site B** - **Public Key**: Paste the previously copied **Public Key** from the **Tunnel** on **Site B** - **Pre-shared Key:** Click the Generate button to generate a new pre-shared key and copy it in order to paste in the Peer configuration of **Site B** - **Allowed IPs**: Enter an **UNUSED** Network address (Example: 10.10.12.0) with a CIDR of **30** (For a total of two IPs) in the first field, click the **Add Allowed IP** and then enter the Network Address and corresponding CIDR of the subnet for **Site B** - Click the **Save Peer** button **Figure 8** [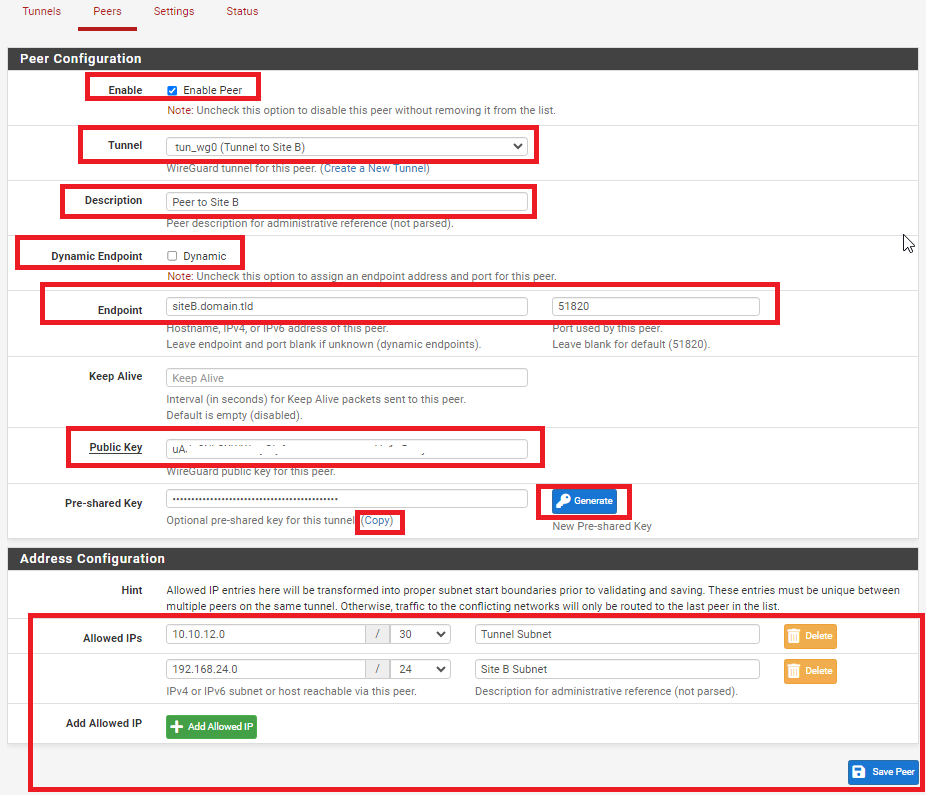](https://docs.deeztek.com/uploads/images/gallery/2024-01/RhJimage.png) ### Add Peer on Site B On **Site B**, navigate to **VPN ---> WireGuard**, click on the **Peers** tab and then click on the **Add Peer** button (**Figure 9**). **Figure 9** [](https://docs.deeztek.com/uploads/images/gallery/2024-01/biLimage.png) In the **Peer Configuration** fill/set in the following fields (**Figure 10**): - **Enable:** Checked - **Tunnel**: Select the Tunnel previously configured from the drop-down list - **Description:** Optionally, describe the purpose of this Peer (Ex: Peer to Site A) - **Dynamic Endpoint:** Unchecked - **Endpoint**: Fill in the Internet IP or Hostname as well as the port number for **Site A** - **Public Key**: Paste the previously copied **Public Key** from the **Tunnel** on **Site A** - **Pre-shared Key:** Paste the previously copied **Pre-Shared key** from the **Peer** on **Site A** - **Allowed IPs**: Enter the **SAME** **Tunnel Subnet Network address and CIDR** you set on the **Peer** on **Site A**, click the **Add Allowed IP** and then enter the Network Address and corresponding CIDR of the subnet for **Site A** - Click the **Save Peer** button **Figure 10** [](https://docs.deeztek.com/uploads/images/gallery/2024-01/RhJimage.png) ### Configure Interface for Site A On **Site A**, navigate to **Interfaces ---> Assignments** and under **Available network ports** drop-down select the WireGuard tunnel you previously created and click the **Add** button (**Figure 11**). **Figure 11** [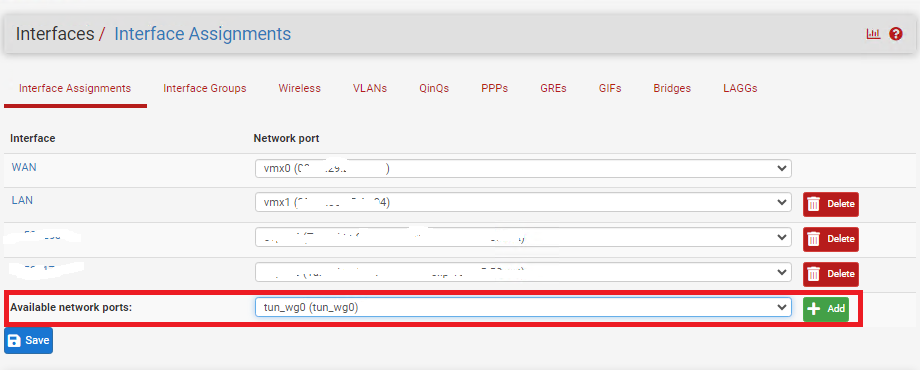](https://docs.deeztek.com/uploads/images/gallery/2024-01/Ic2image.png) Click on the new **OPT(X)** interface that was just created (**Figure 12**). **Figure 12** [](https://docs.deeztek.com/uploads/images/gallery/2024-01/z7rimage.png) In the **General Configuration** page fill/set the following fields (**Figure 13**): - **Enable:** Checked - **Description:** Optionally, describe the purpose of this Interface (Ex: Tunnel to Site B) - **IPv4 Configuration Type:** Static IPv4 - **IPv4 Address:** Enter an IP address for **Site A**. The IP address you enter here will be one of two possible IP addresses you can use from the /30 Tunnel Subnet you chose earlier. For this example, we used the Subnet Tunnel of **10.10.12.0/30** which gives us **10.10.12.1** and **10.10.12.2** as the only two usable IPs for this subnet. So, for this example we will use **10.10.12.1 for Site A**. - Click the **Save** button and then click the **Apply Changes** button. **Figure 13** [](https://docs.deeztek.com/uploads/images/gallery/2024-01/yMOimage.png) ### Configure Interface for Site B On **Site B**, navigate to **Interfaces ---> Assignments** and under **Available network ports** drop-down select the WireGuard tunnel you previously created and click the **Add** button (**Figure 14**). **Figure 14** [](https://docs.deeztek.com/uploads/images/gallery/2024-01/Ic2image.png) Click on the new **OPT(X)** interface that was just created (**Figure 15**). **Figure 15** [](https://docs.deeztek.com/uploads/images/gallery/2024-01/z7rimage.png) In the **General Configuration** page fill/set the following fields (**Figure 16**): - **Enable:** Checked - **Description:** Optionally, describe the purpose of this Interface (Ex: Tunnel to Site A) - **IPv4 Configuration Type:** Static IPv4 - **IPv4 Address:** Enter an IP address for **Site B**. The IP address you enter here will be one of two possible IP addresses you can use from the /30 Tunnel Subnet you chose earlier. For this example, we used the Subnet Tunnel of **10.10.12.0/30** which gives us **10.10.12.1** and **10.10.12.2** as the only two usable IPs for this subnet. So, for this example we will use **10.10.12.2 for Site B**. - Click the **Save** button and then click the **Apply Changes** button. **Figure 16** [](https://docs.deeztek.com/uploads/images/gallery/2024-01/q4jimage.png) ### Create Gateway and Route on Site A On **Site A** navigate to **System ---> Routing** and under the **Gateways** tab click the **Add** button (**Figure 17**). **Figure 17** [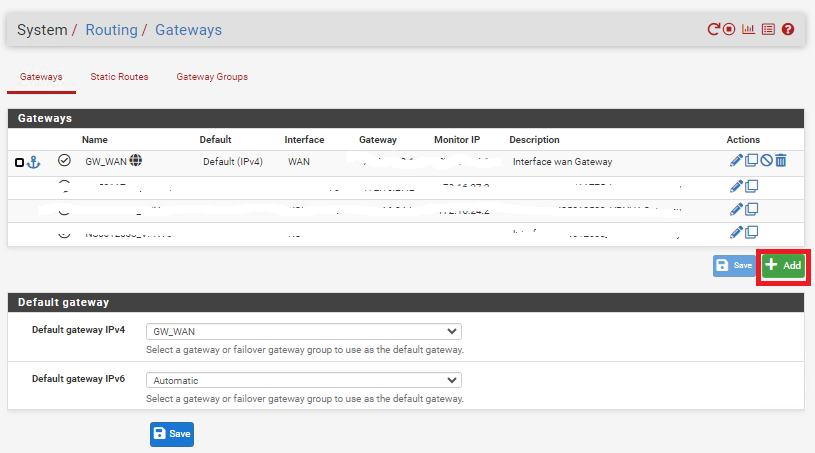](https://docs.deeztek.com/uploads/images/gallery/2024-01/Kofimage.png) In the **Edit Gateway** page fill/set the following fields (**Figure 18**): - **Disabled:** Unchecked - **Interface:** Select the interface for **Site A** you created earlier - **Name:** Enter a name for this gateway (Ex: WG\_GW\_Site\_B) - **Gateway:** Enter the **Tunnel Subnet IP** address for **Site B**. For this example we used **10.10.12.2** for **Site B**. - **Description:** Optionally, enter a description (Ex: Wireguard Gateway to Site B) - Click the **Save** button and then click the **Apply Changes** button. **Figure 18** [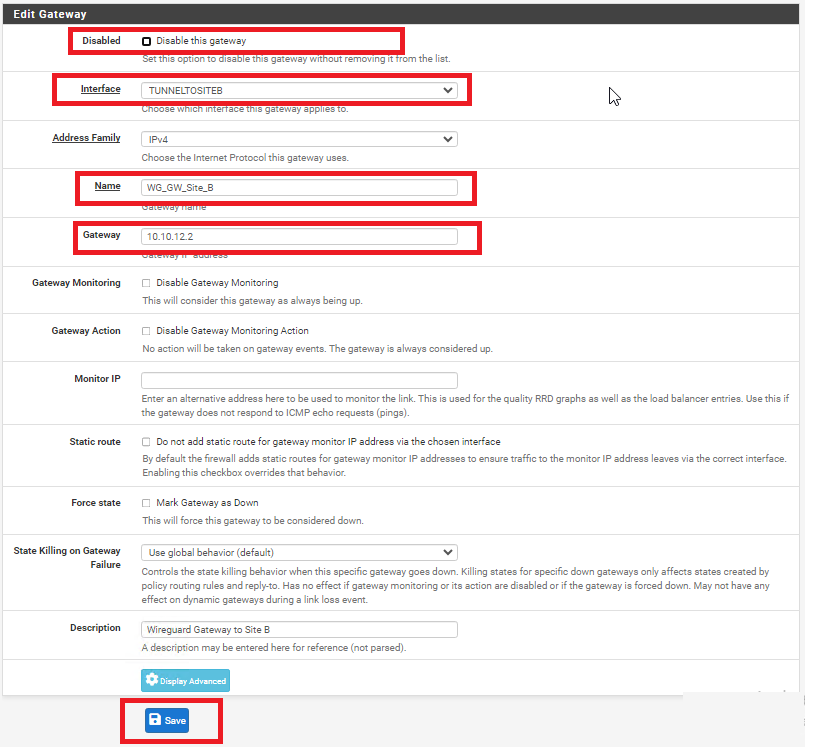](https://docs.deeztek.com/uploads/images/gallery/2024-01/mSvimage.png) Next, on **Site A** navigate to **System ---> Routing** and under the **Static Routes** tab click the **Add** button (**Figure 19**). **Figure 19** [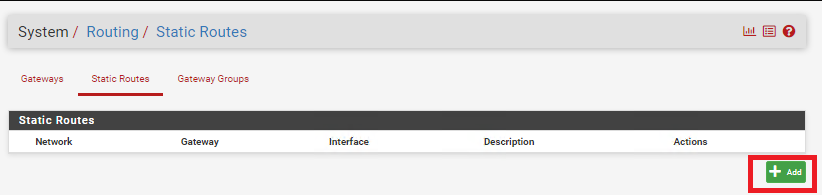](https://docs.deeztek.com/uploads/images/gallery/2024-01/WGnimage.png) In the **Edit Route Entry** page, fill/set the following fields (**Figure 20**): - **Destination network:** Enter the network subnet for **Site B** (**NOT the tunnel subnet**). In this example, the network subnet we used for Site B was **192.168.24.0/24**. - **Gateway:** Select the Gateway to **Site B** you created earlier - **Description:** Optionally, enter a description (Ex: Route to Site B) - Click the **Save** button and then click the **Apply Changes** button. **Figure 20** [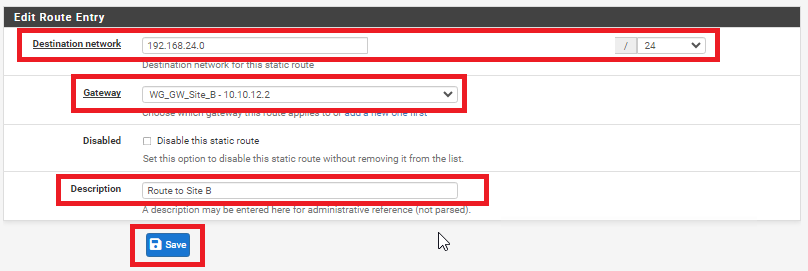](https://docs.deeztek.com/uploads/images/gallery/2024-01/Rk5image.png) ### Create Gateway and Route on Site B On **Site B** navigate to **System ---> Routing** and under the **Gateways** tab click the **Add** button (**Figure 21**). **Figure 21** [](https://docs.deeztek.com/uploads/images/gallery/2024-01/Kofimage.png) In the **Edit Gateway** page fill/set the following fields (**Figure 22**): - **Disabled:** Unchecked - **Interface:** Select the interface for **Site** **A** you created earlier - **Name:** Enter a name for this gateway (Ex: WG\_GW\_Site\_A) - **Gateway:** Enter the **Tunnel Subnet IP** address for **Site A**. For this example we used **10.10.12.1** for **Site A**. - **Description:** Optionally, enter a description (Ex: Wireguard Gateway to Site A) - Click the **Save** button and then click the **Apply Changes** button. **Figure 22** [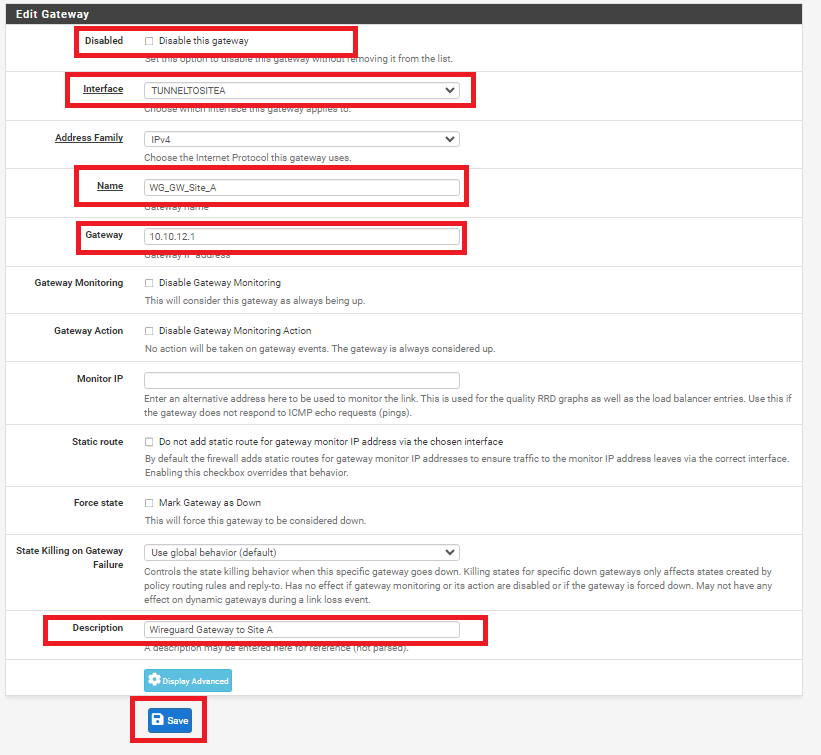](https://docs.deeztek.com/uploads/images/gallery/2024-01/io0image.png) Next, on **Site B** navigate to **System ---> Routing** and under the **Static Routes** tab click the **Add** button (**Figure 23**). **Figure 23** [](https://docs.deeztek.com/uploads/images/gallery/2024-01/WGnimage.png) In the **Edit Route Entry** page, fill/set the following fields (**Figure 24**): - **Destination network:** Enter the network subnet for **Site A** (**NOT the tunnel subnet**). In this example, the network subnet we used for **Site A** was **192.168.1.0/24**. - **Gateway:** Select the Gateway to **Site A** you created earlier - **Description:** Optionally, enter a description (Ex: Route to Site A) - Click the **Save** button and then click the **Apply Changes** button. **Figure 24** [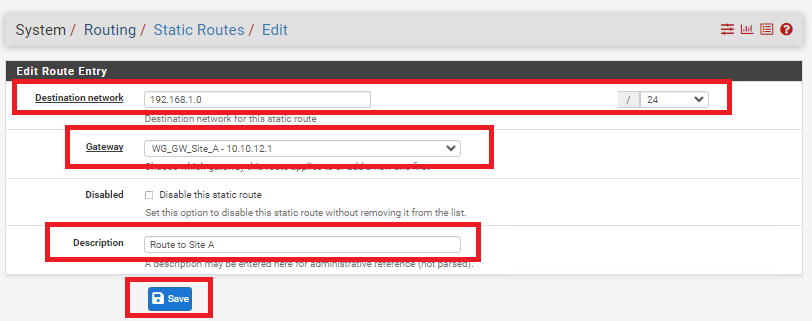](https://docs.deeztek.com/uploads/images/gallery/2024-01/BQ4image.png) ### Add Firewall Rules on BOTH Firewalls On **BOTH** firewalls, navigate to **Firewall ---> Rules** and under the **WAN** tab, click the **Add** button. In the **Edit Firewall Rule** page, fill/set the following fields (**Figure 25**). - **Action:** Pass - **Interface:** WAN - **Address Family:** IPv4 - **Protocol:** UDP - **Source:** Any - **Destination:** WAN address - **Destination Port Range:** (other) 51820 to (other) 51820 - **Log:** Optionally, check to Log packets that are handled by this rule - **Description:** Optionally, enter a description (Ex: Wireguard Site A and Site B) - Click the **Save** button and then click the **Apply Changes** button. **Figure 25** [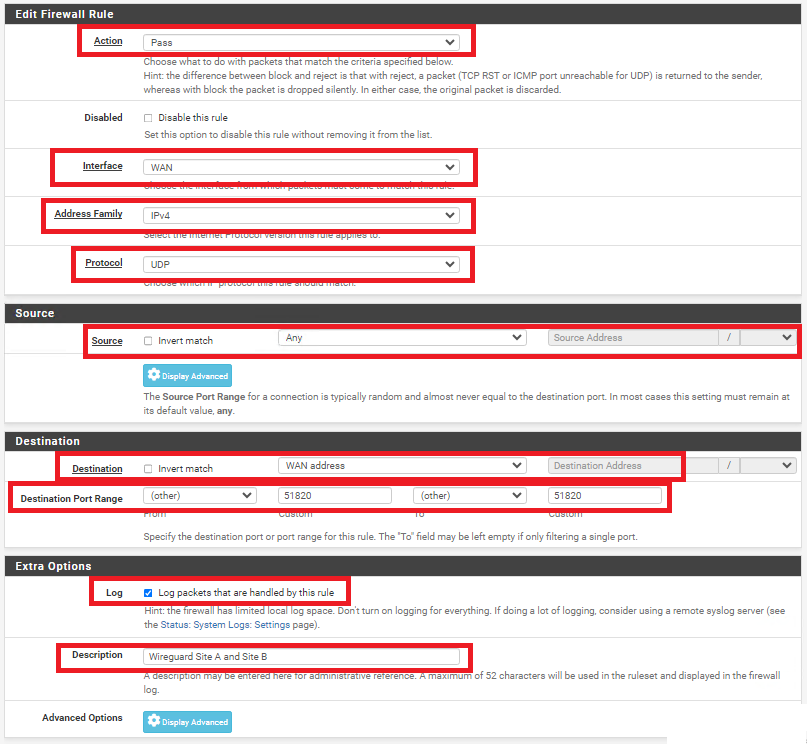](https://docs.deeztek.com/uploads/images/gallery/2024-01/azXimage.png) On **BOTH** firewalls, navigate to **Firewall ---> Rules** and under the **TUNNELTOSITE(X)** tab, click the **Add** button. In the **Edit Firewall Rule** page, fill/set the following fields (**Figure 25**). - **Action:** Pass - **Interface:** Ensure the interface you created earlier for each site is already selected - **Address Family:** IPv4 - **Protocol:** Any (Start with **Any** and then you can tighten the rules further after you ensure tunnel is working properly) - **Source:** Any (Start with **Any** and then you can tighten the rules further after you ensure tunnel is working properly) - **Destination:** Any (Start with **Any** and then you can tighten the rules further after you ensure tunnel is working properly) - **Destination Port Range:** Any (Start with **Any** and then you can tighten the rules further after you ensure tunnel is working properly) - **Log:** Optionally, check to Log packets that are handled by this rule - **Description:** Optionally, enter a description (Ex: Wireguard Traffic Site A and Site B) - Click the **Save** button and then click the **Apply Changes** button. **Figure 25** [](https://docs.deeztek.com/uploads/images/gallery/2024-01/azXimage.png) ### Check the Wireguard Status On **BOTH** firewalls navigate to **Status ---> Wireguard**, locate the WireGuard tunnel you created, expand it and ensure the Peers are connected on BOTH firewalls (**Figure 26**). **Figure 26** [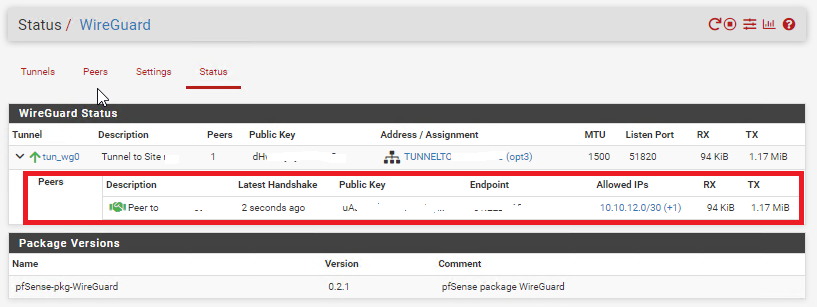](https://docs.deeztek.com/uploads/images/gallery/2024-01/VJ9image.png) Additionally, ensure you can ping and access resources on each remote network from the corresponding site.