# How to send/receive encrypted email from Microsoft Outlook

<p class="callout success"><span class="text-4505230f--TextH400-3033861f--textContentFamily-49a318e1">Guide has been updated for Outlook for Office 365/Outlook 2019</span></p>

### <span class="text-4505230f--TextH400-3033861f--textContentFamily-49a318e1">Introduction</span>

<span class="text-4505230f--TextH400-3033861f--textContentFamily-49a318e1"><span data-key="e12586c86fa445cb812e5158a50d1f86">This guide will help you with configuring Outlook to send encrypted e-mail using **S/MIME**.</span></span>

<span class="text-4505230f--TextH400-3033861f--textContentFamily-49a318e1"><span data-key="e12586c86fa445cb812e5158a50d1f86">For the purposes of this guide, an **external user** is someone who has their email hosted **outside the domain and control of the Hermes Secure Email Gateway**. For example, an external user would have their email hosted with an email service like Gmail, yahoo etc. Typically, this external user has the need to send/receive encrypted email with an **internal user** i.e. someone who is **inside the domain and consequently the control of the Hermes Secure Email Gateway**.</span></span>

### <span class="text-4505230f--TextH400-3033861f--textContentFamily-49a318e1">Assumptions</span>

<span class="text-4505230f--TextH400-3033861f--textContentFamily-49a318e1"><span data-key="df5a4fd2b5b6480d850abedc8a309081">This guide assumes you have already received an email with an attached **.pfx** file. A **.pfx** file is nothing more than a password protected certificate that you have to install into your Outlook email client. In order to install the certificate, you must have the password which should had been given to you separately.</span></span>

### <span class="text-4505230f--TextH400-3033861f--textContentFamily-49a318e1"><span data-key="df5a4fd2b5b6480d850abedc8a309081">Instructions</span></span>

- <span class="text-4505230f--TextH400-3033861f--textContentFamily-49a318e1"><span data-key="4ba416fa617b4ef2bbc10148920e640d">Open the email with the subject **Your PFX Certificate File** with the attached **.pfx** file (**Figure 1**)</span></span>

<span class="text-4505230f--TextH400-3033861f--textContentFamily-49a318e1"><span data-key="87755dcbc0b841cdb718f16e5536dc70">**Figure 1**</span></span>

[![image-1620300232559.png](https://docs.deeztek.com/uploads/images/gallery/2021-05/scaled-1680-/image-1620300232559.png)](https://docs.deeztek.com/uploads/images/gallery/2021-05/image-1620300232559.png)

- <span class="text-4505230f--TextH400-3033861f--textContentFamily-49a318e1"><span data-key="d0b6f26fe58344559d18edc999b026bc">Double-click on the attached **key.pfx** file. If you get an opening attachment warning, click the **Open** button (**Figure 2**)</span></span>

<span class="text-4505230f--TextH400-3033861f--textContentFamily-49a318e1"><span data-key="7db31edb0599461ea73377f721efb981">**Figure 2**</span></span>

[![image-1620300314384.png](https://docs.deeztek.com/uploads/images/gallery/2021-05/scaled-1680-/image-1620300314384.png)](https://docs.deeztek.com/uploads/images/gallery/2021-05/image-1620300314384.png)

- <span class="text-4505230f--TextH400-3033861f--textContentFamily-49a318e1"><span data-key="25dd0774472c4f2e818b8ee7ce8dd6a4">
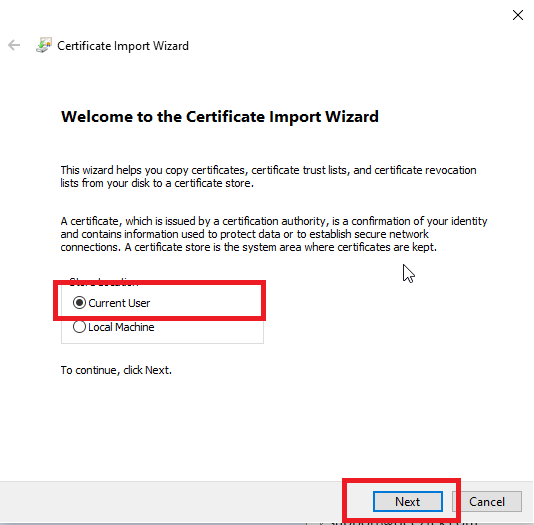
On the **Certificate Import Wizard** window, ensure **Current User** is selected and click the **Next** button (**Figure 3**)</span></span>

<span class="text-4505230f--TextH400-3033861f--textContentFamily-49a318e1"><span data-key="77571ca0d94c4dad8dfcb81860492251">**Figure 3**</span></span>

<div data-key="aa5a77935447403487205c9a0b03a161" data-slate-void="true" id="bkmrk--1"><div data-key="aa5a77935447403487205c9a0b03a161" data-slate-void="true"><div></div></div></div>[![image-1620300376871.png](https://docs.deeztek.com/uploads/images/gallery/2021-05/scaled-1680-/image-1620300376871.png)](https://docs.deeztek.com/uploads/images/gallery/2021-05/image-1620300376871.png)

- <span class="text-4505230f--TextH400-3033861f--textContentFamily-49a318e1"><span data-key="211b4fce6c1d43d386434d9fa4278965">
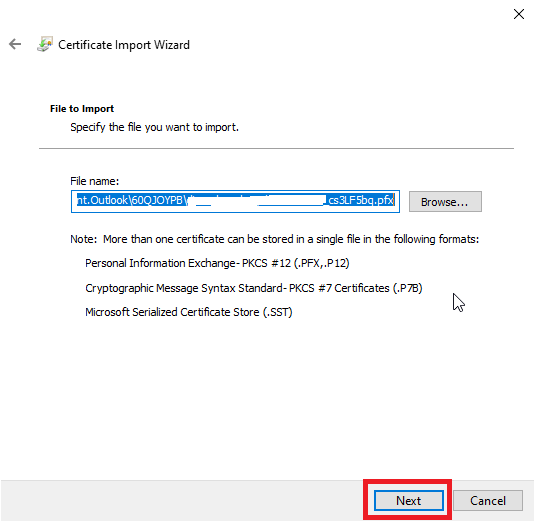
On the **File to Import** window, simply click the **Next** button again (**Figure 4**)</span></span>

<span class="text-4505230f--TextH400-3033861f--textContentFamily-49a318e1"><span data-key="a58bda797b064094b88b744b74588061">**Figure 4**</span></span>

[![image-1620300472600.png](https://docs.deeztek.com/uploads/images/gallery/2021-05/scaled-1680-/image-1620300472600.png)](https://docs.deeztek.com/uploads/images/gallery/2021-05/image-1620300472600.png)

- <span class="text-4505230f--TextH400-3033861f--textContentFamily-49a318e1"><span data-key="3b56f2d1b7744732a8fe059b84380e93">
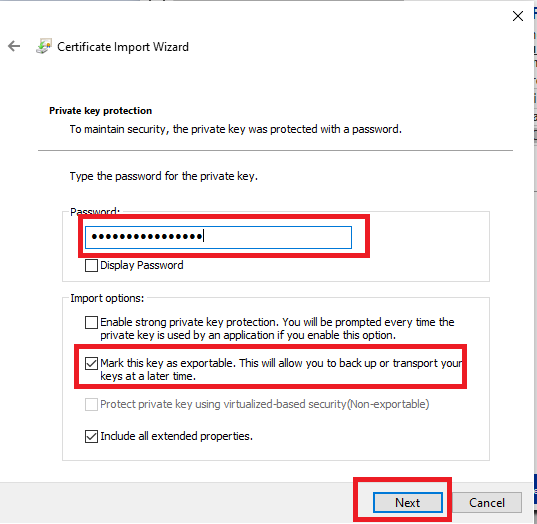
On the **Private key protection** window, enter the certificate password you were provided in the **Password** field, ensure **Mark this key as exportable** options is **checked and** click the **Next** button (**Figure 5**)</span></span>

<span class="text-4505230f--TextH400-3033861f--textContentFamily-49a318e1"><span data-key="64fc38f98a6948ec81eb679cb3225292">**Figure 5**</span></span>

[![image-1620300584903.png](https://docs.deeztek.com/uploads/images/gallery/2021-05/scaled-1680-/image-1620300584903.png)](https://docs.deeztek.com/uploads/images/gallery/2021-05/image-1620300584903.png)

- <span class="text-4505230f--TextH400-3033861f--textContentFamily-49a318e1"><span data-key="22866226a7f546b5a1d30007dbb75da9">
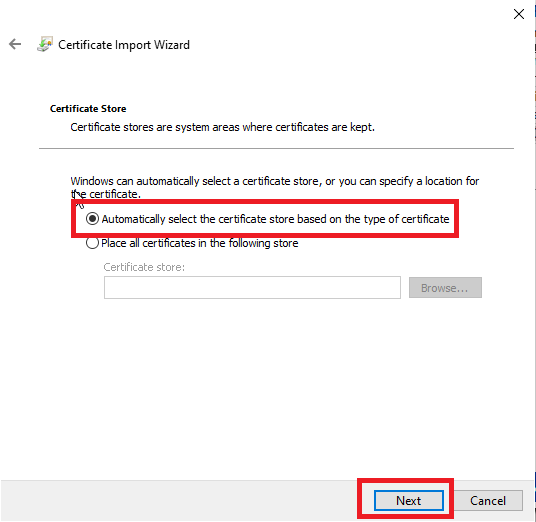
On the **Certificate Store** window ensure that **Automatically select the certificate store based on the type of certificate** is selected and click the **Next** button (**Figure 6**)</span></span>

<span class="text-4505230f--TextH400-3033861f--textContentFamily-49a318e1"><span data-key="00e6e58eb8ac48b395714e6e63455db2">**Figure 6**</span></span>

[![image-1620300748772.png](https://docs.deeztek.com/uploads/images/gallery/2021-05/scaled-1680-/image-1620300748772.png)](https://docs.deeztek.com/uploads/images/gallery/2021-05/image-1620300748772.png)

- <span class="text-4505230f--TextH400-3033861f--textContentFamily-49a318e1"><span data-key="74e455df8cab4079b7082386e1a6fc64">On the final **Completing the Certificate Import Wizard** window simply click the **Finish** button (**Figure 7**)</span></span>

<span class="text-4505230f--TextH400-3033861f--textContentFamily-49a318e1"><span data-key="8ccbf8bbd7174a5ab1f81e9fdddc907e">**Figure 7**</span></span>

[![image-1620300799954.png](https://docs.deeztek.com/uploads/images/gallery/2021-05/scaled-1680-/image-1620300799954.png)](https://docs.deeztek.com/uploads/images/gallery/2021-05/image-1620300799954.png)

- <span class="text-4505230f--TextH400-3033861f--textContentFamily-49a318e1"><span data-key="c0689d1c6bd04d0faebccb2a226737d2">
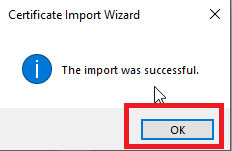
You should get a **The Import was successful** window. Click **OK** to close that window (**Figure 8**)</span></span>

<span class="text-4505230f--TextH400-3033861f--textContentFamily-49a318e1"><span data-key="19fbd34bee4c4ab79907a55ce8ce09a4">**Figure 8**</span></span>

[![image-1620300839975.png](https://docs.deeztek.com/uploads/images/gallery/2021-05/scaled-1680-/image-1620300839975.png)](https://docs.deeztek.com/uploads/images/gallery/2021-05/image-1620300839975.png)

- <span class="text-4505230f--TextH400-3033861f--textContentFamily-49a318e1"><span data-key="078d7f42310e4be38a24826672970176">
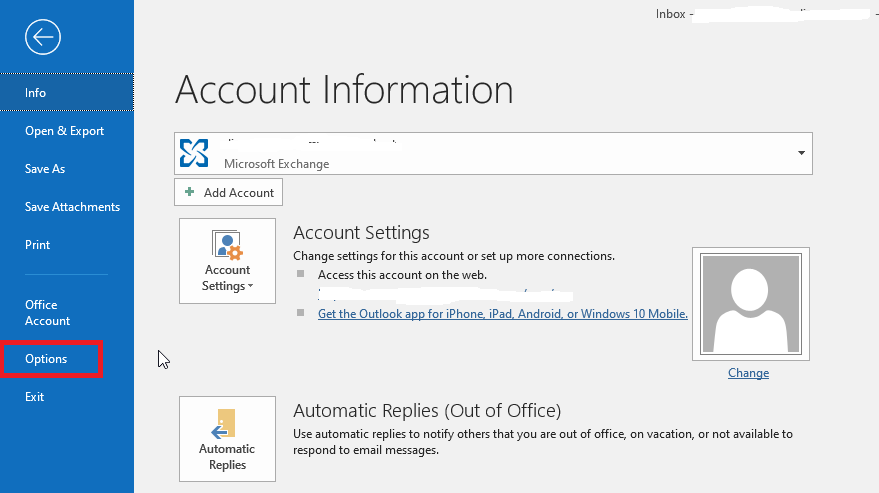
Next, back in your Outlook, click on **File --&gt; Options**  (**Figure 9**)</span></span>

<span class="text-4505230f--TextH400-3033861f--textContentFamily-49a318e1"><span data-key="5228bbe30fb54cdeb7e31d646d544033">**Figure 9**</span></span>

[![image-1620300984331.png](https://docs.deeztek.com/uploads/images/gallery/2021-05/scaled-1680-/image-1620300984331.png)](https://docs.deeztek.com/uploads/images/gallery/2021-05/image-1620300984331.png)

- <span class="text-4505230f--TextH400-3033861f--textContentFamily-49a318e1"><span data-key="2b3ad81add174d84b37469e470089367">
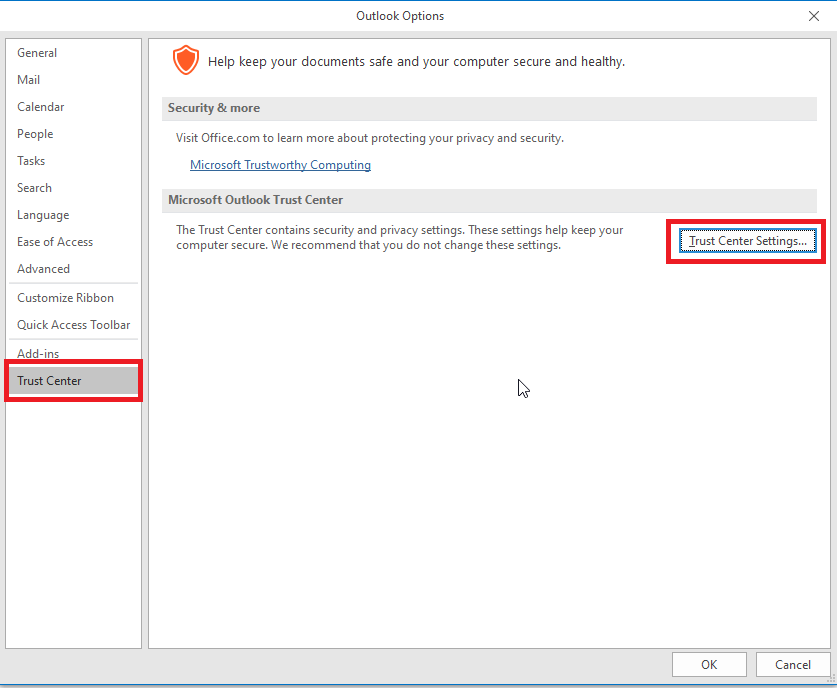
In the **Outlook Options** window, click on the **Trust Center** option on the left and then click on the Trust Center Settings button (**Figure 10**).</span></span>

<span class="text-4505230f--TextH400-3033861f--textContentFamily-49a318e1"><span data-key="f4a0459fb6c94607b09bbb670827534c">**Figure 10**</span></span>

[![image-1620301198279.png](https://docs.deeztek.com/uploads/images/gallery/2021-05/scaled-1680-/image-1620301198279.png)](https://docs.deeztek.com/uploads/images/gallery/2021-05/image-1620301198279.png)

- <span class="text-4505230f--TextH400-3033861f--textContentFamily-49a318e1"><span data-key="9d2d761372ac4ed9a7292c2244787c56">
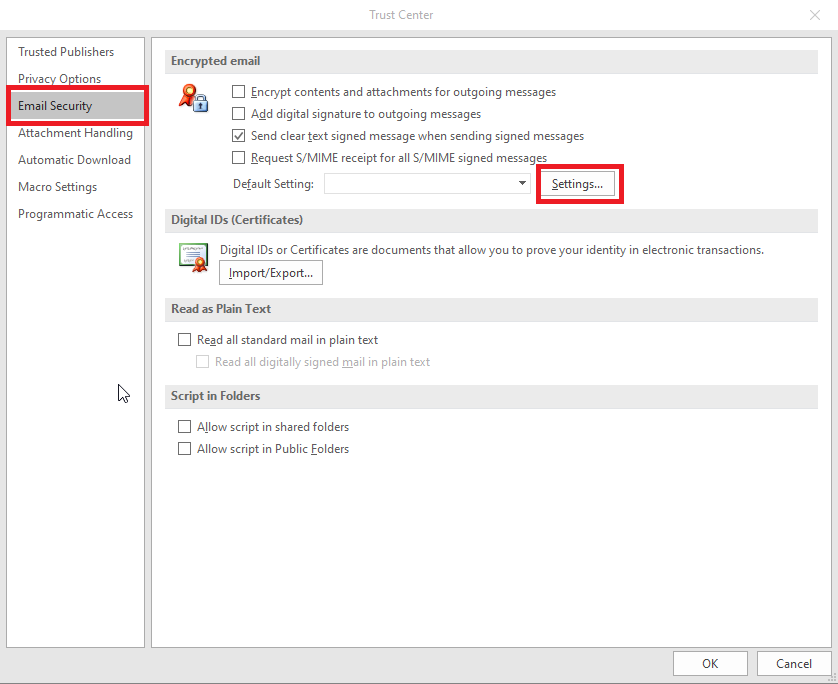
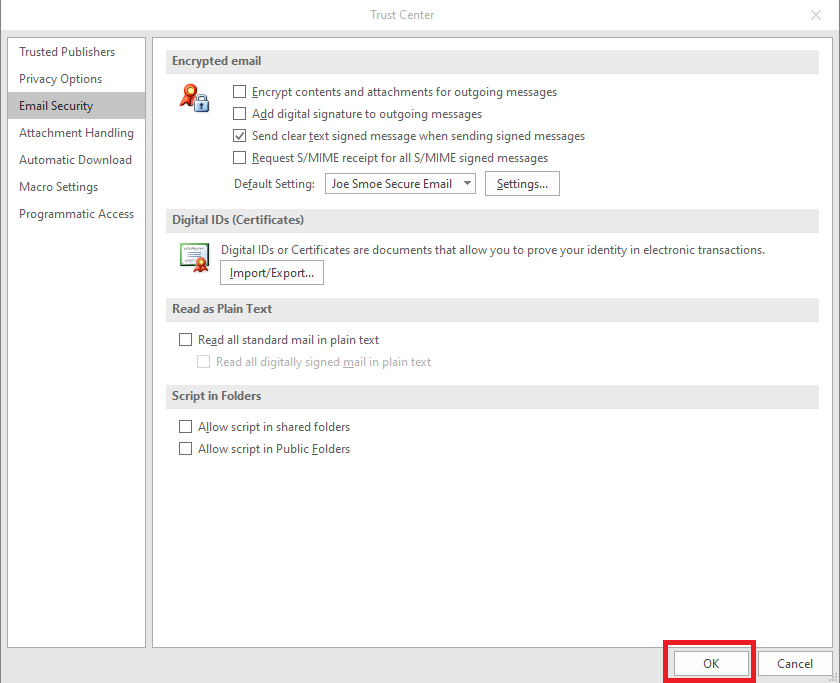
In the Trust Center window, click on Email Security a under Encrypted email section click the Settings button (**Figure 11**)</span></span>

<span class="text-4505230f--TextH400-3033861f--textContentFamily-49a318e1"><span data-key="1f1f38cf876e4b7ca24b89078754756f">**Figure 11**</span></span>

[![image-1620302910234.png](https://docs.deeztek.com/uploads/images/gallery/2021-05/scaled-1680-/image-1620302910234.png)](https://docs.deeztek.com/uploads/images/gallery/2021-05/image-1620302910234.png)

- In the **Change Security Settings** window, enter a friendly name of your choosing in the **Security Settings Name** field (**Figure 12**).

**Figure 12**

[![image-1620303101074.png](https://docs.deeztek.com/uploads/images/gallery/2021-05/scaled-1680-/image-1620303101074.png)
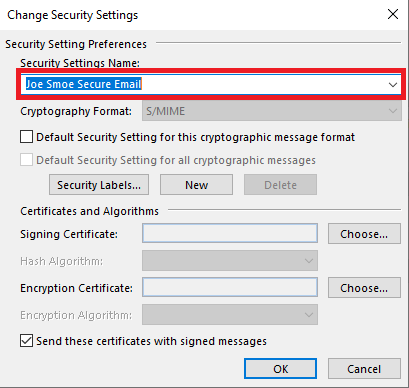
](https://docs.deeztek.com/uploads/images/gallery/2021-05/image-1620303101074.png)

- <span class="text-4505230f--TextH400-3033861f--textContentFamily-49a318e1"><span data-key="cf8e9c4e7ed84d9da546ca7885311ded">Next, click on the **Choose** button on the **Signing Certificate** section (**Figure 13**).</span></span>

**<span class="text-4505230f--TextH400-3033861f--textContentFamily-49a318e1">Figure 13</span>**

[![image-1620303241656.png](https://docs.deeztek.com/uploads/images/gallery/2021-05/scaled-1680-/image-1620303241656.png)](https://docs.deeztek.com/uploads/images/gallery/2021-05/image-1620303241656.png)

- <span class="text-4505230f--TextH400-3033861f--textContentFamily-49a318e1">
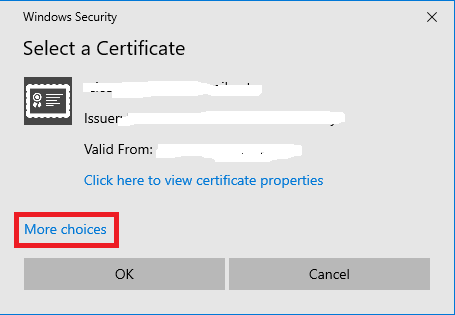
On the **Select a Certificate** window, click on **More choices** (**Figure 14**).</span>

**<span class="text-4505230f--TextH400-3033861f--textContentFamily-49a318e1">Figure 14</span>**

[![image-1620303444269.png](https://docs.deeztek.com/uploads/images/gallery/2021-05/scaled-1680-/image-1620303444269.png)](https://docs.deeztek.com/uploads/images/gallery/2021-05/image-1620303444269.png)

<span class="text-4505230f--TextH400-3033861f--textContentFamily-49a318e1">
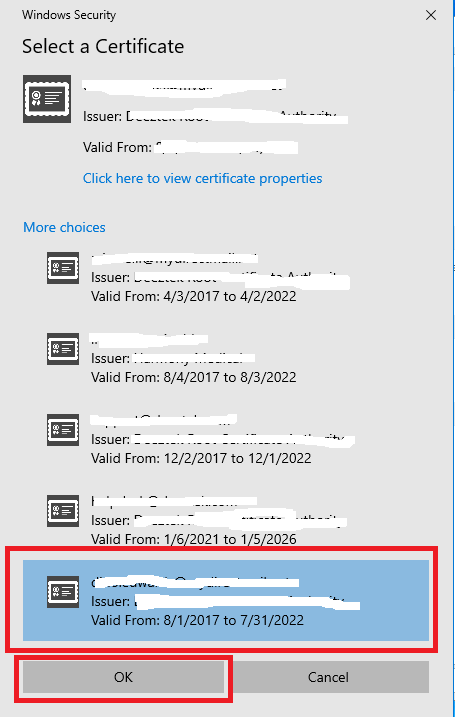
On the **More choices** list of certificates, select the certificate with your e-mail address, ensuring the **Valid From** field has an end date in the future and then click on the **OK** button (**Figure 15**). It's possible you have more than one certificate installed in your machine, so you must ensure you select the correct certificate. If you are unsure, ask your for help with your IT department.</span>

**<span class="text-4505230f--TextH400-3033861f--textContentFamily-49a318e1">Figure 15</span>**

[![image-1620303744752.png](https://docs.deeztek.com/uploads/images/gallery/2021-05/scaled-1680-/image-1620303744752.png)](https://docs.deeztek.com/uploads/images/gallery/2021-05/image-1620303744752.png)

<div data-key="78d69eba95444da1bb8364c578f73574" data-slate-void="true" id="bkmrk--15"></div>- <span class="text-4505230f--TextH400-3033861f--textContentFamily-49a318e1"><span data-key="6d96002b9bd64023a960421df8c1521d">
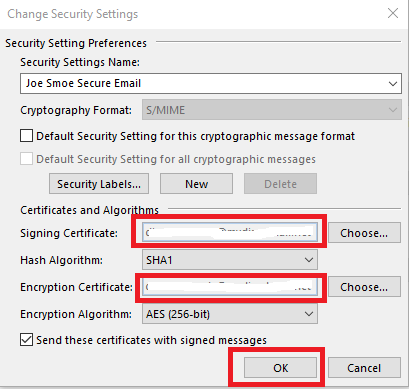
Next, back in the **Change Security Settings** window, the **Signing Certificate** and the **Encryption Certificate** sections should be filled in with your e-mail address. Click the **OK** button (**Figure 16**).</span></span>

<span class="text-4505230f--TextH400-3033861f--textContentFamily-49a318e1"><span data-key="465f7bb760cc4a1caab53041e42f8713">**Figure 16**</span></span>

[![image-1620304076999.png](https://docs.deeztek.com/uploads/images/gallery/2021-05/scaled-1680-/image-1620304076999.png)](https://docs.deeztek.com/uploads/images/gallery/2021-05/image-1620304076999.png)

Next, back in the **Trust Center** window, click the **OK** button to return back to Outlook **(Figure 17**).

**Figure 17**

[![image-1620304276429.png](https://docs.deeztek.com/uploads/images/gallery/2021-05/scaled-1680-/image-1620304276429.png)](https://docs.deeztek.com/uploads/images/gallery/2021-05/image-1620304276429.png)

- <span class="text-4505230f--TextH400-3033861f--textContentFamily-49a318e1"><span data-key="dfbc62df28af4492bf4d93a85737307b">
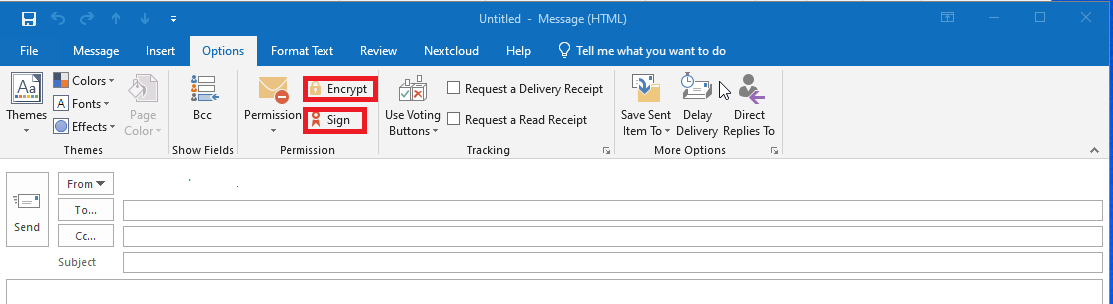
Next, back in Outlook Home window, click **New Email** to compose a new email message. In the compose message window, click on **Options** and note the **Encrypt** and **Sign** buttons </span><span data-key="3a78588725e54e30864cbaf25208c91b">(**Figure 18**). </span></span>

<span class="text-4505230f--TextH400-3033861f--textContentFamily-49a318e1"><span data-key="b7f0ad7b323749399e463eed35a0670e">**Figure 18**</span></span>

[![image-1620304646799.png](https://docs.deeztek.com/uploads/images/gallery/2021-05/scaled-1680-/image-1620304646799.png)](https://docs.deeztek.com/uploads/images/gallery/2021-05/image-1620304646799.png)

- <span class="text-4505230f--TextH400-3033861f--textContentFamily-49a318e1"><span data-key="45c5efc6005b4bcb939c53678c761040">In order to send an encrypted message to someone, you must first have that person's **public** **key**. That's usually accomplished by having that person send you a **signed** e-mail message which you can then import that person and their **public** key into your Outlook contacts. </span></span>
- <span class="text-4505230f--TextH400-3033861f--textContentFamily-49a318e1"><span data-key="45c5efc6005b4bcb939c53678c761040">
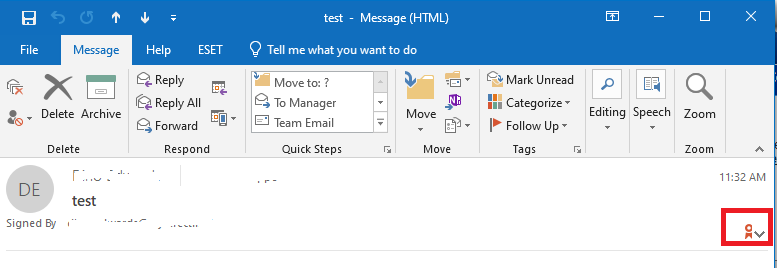
Once you receive a signed e-mail message, **double-click it** to open that message and ensure a the digital signature icon on the top-right hand corner of the message </span></span><span class="text-4505230f--TextH400-3033861f--textContentFamily-49a318e1"><span data-key="45c5efc6005b4bcb939c53678c761040">(**Figure 19**).</span></span>

<span class="text-4505230f--TextH400-3033861f--textContentFamily-49a318e1"><span data-key="2140c04de4ec462d9373d7105d9e98a5">**Figure 19**</span></span>

[![image-1620317785780.png](https://docs.deeztek.com/uploads/images/gallery/2021-05/scaled-1680-/image-1620317785780.png)](https://docs.deeztek.com/uploads/images/gallery/2021-05/image-1620317785780.png)

- <span class="text-4505230f--TextH400-3033861f--textContentFamily-49a318e1"><span data-key="844aeb33600945b19d8921112b823bf7">
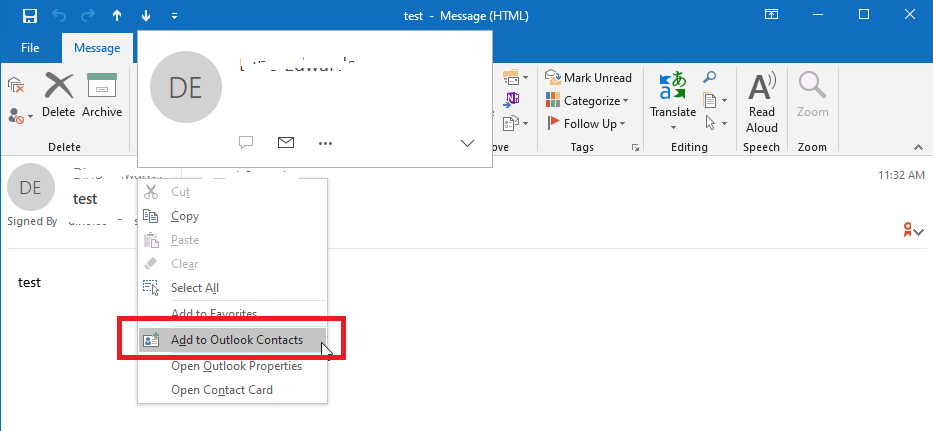
Next, right-click on the name of the sender on the message and on the resultant drop-down menu click on **Add to Outlook Contacts** (**Figure 20**)</span></span>

<span class="text-4505230f--TextH400-3033861f--textContentFamily-49a318e1"><span data-key="b7ecb411f21e468cacc4d7c0e744c4e2">**Figure 20**</span></span>

[![image-1620318144399.png](https://docs.deeztek.com/uploads/images/gallery/2021-05/scaled-1680-/image-1620318144399.png)](https://docs.deeztek.com/uploads/images/gallery/2021-05/image-1620318144399.png)

- <span class="text-4505230f--TextH400-3033861f--textContentFamily-49a318e1"><span data-key="e00d4e9735194657a6002435e5f17316">Next, in the **Contact** window, click on the **Certificates** button (**Figure 21**)</span></span>

<span class="text-4505230f--TextH400-3033861f--textContentFamily-49a318e1"><span data-key="3aba0fe6a9d54e32baff012f6b5d0788">**Figure 21**</span></span>

[![image-1620318336031.png](https://docs.deeztek.com/uploads/images/gallery/2021-05/scaled-1680-/image-1620318336031.png)
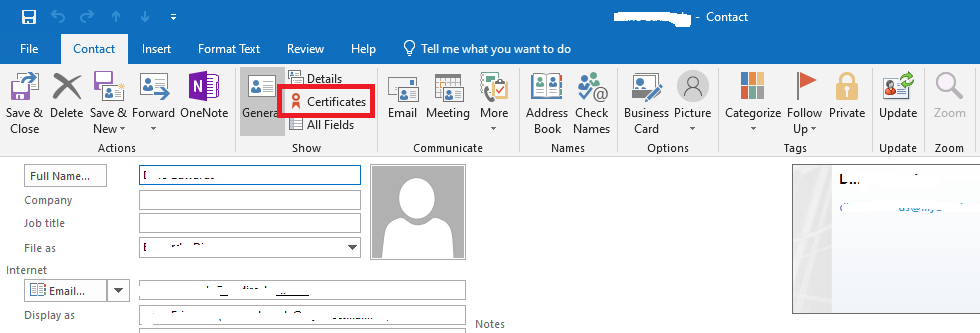
](https://docs.deeztek.com/uploads/images/gallery/2021-05/image-1620318336031.png)

- <span class="text-4505230f--TextH400-3033861f--textContentFamily-49a318e1"><span data-key="30f1880ec54e4323b7469594b9df49de"> Ensure that a certificate (**public key**) appears under the **Certificates (Digital IDs)** section and click the **Save &amp; Close** button to save the contact in your Outlook Contacts (**Figure 22**).</span></span>

**<span class="text-4505230f--TextH400-3033861f--textContentFamily-49a318e1">Figure 22</span>**

[![image-1620318575337.png](https://docs.deeztek.com/uploads/images/gallery/2021-05/scaled-1680-/image-1620318575337.png)
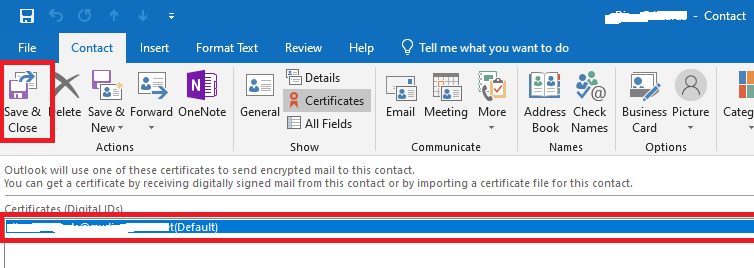
](https://docs.deeztek.com/uploads/images/gallery/2021-05/image-1620318575337.png)

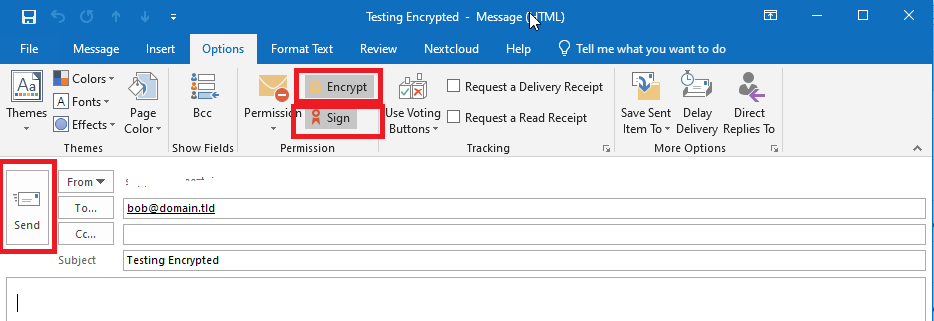
- Since we now have the person's public key, we can now send encrypted e-mails to them. From the Outlook **Home** screen, click **New Email** to compose a new message to that person. In the **To** field, enter the person's e-mail address or select the previously saved contact from your Outlook contacts, click on **Option**s and ensure **Encrypt** is selected and optionally the **Sign** button is selected (Sign is not required in order to send an encrypted e-mail) and then click the **Send** button (**Figure 23**).

**Figure 23**

[![image-1620319133264.png](https://docs.deeztek.com/uploads/images/gallery/2021-05/scaled-1680-/image-1620319133264.png)](https://docs.deeztek.com/uploads/images/gallery/2021-05/image-1620319133264.png)

- If you did not get an error from Outlook about sending an encrypted e-mail, then you configuration has worked.