# E-mail
# Change Hosted Mail Mailbox Password
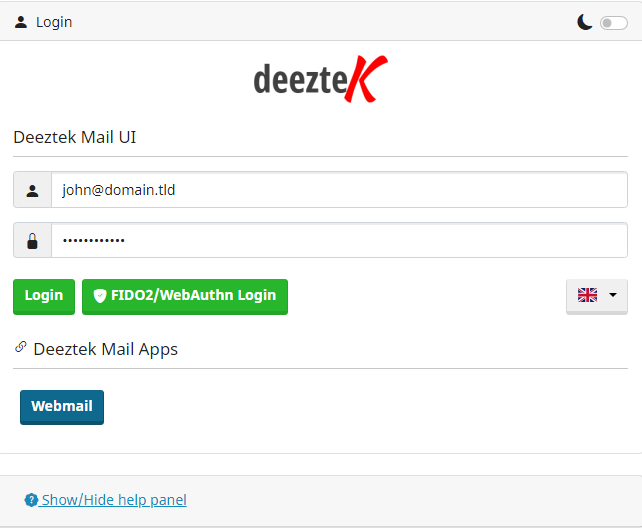
- Navigate to the Deeztek Mail UI at [https://mail.hosting.deeztek.com](https://mail.hosting.deeztek.com/SOGo/)
- Enter your current mailbox username and password and click the **Login** button (**Figure 1**).**Figure 1**
[](https://docs.deeztek.com/uploads/images/gallery/2023-07/image.png)
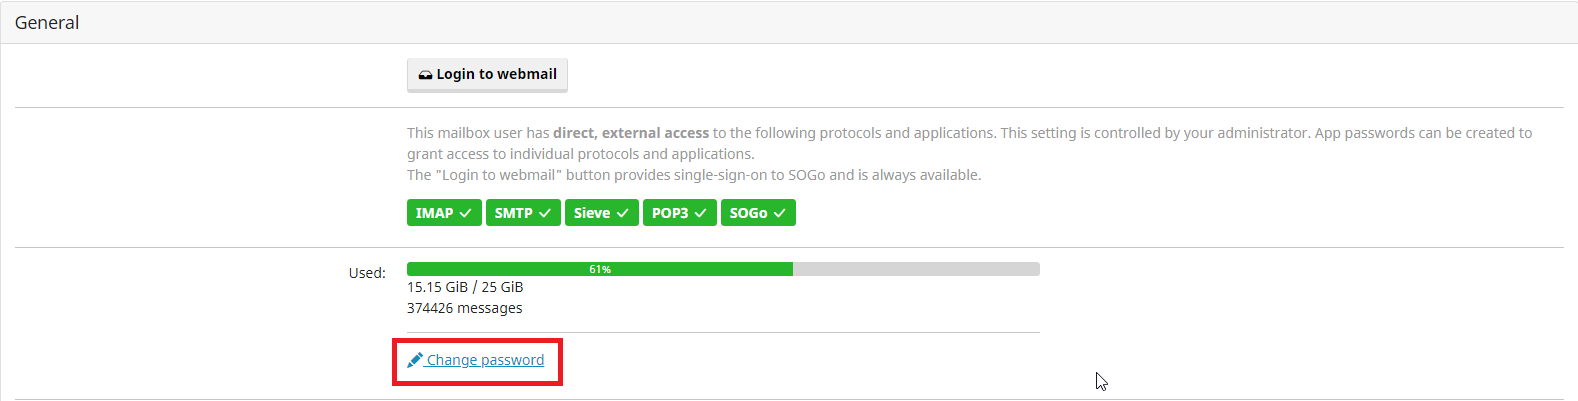
- Under the General section, click on the **Change password** link (**Figure 2**).**Figure 2**
[](https://docs.deeztek.com/uploads/images/gallery/2023-07/qsqimage.png)
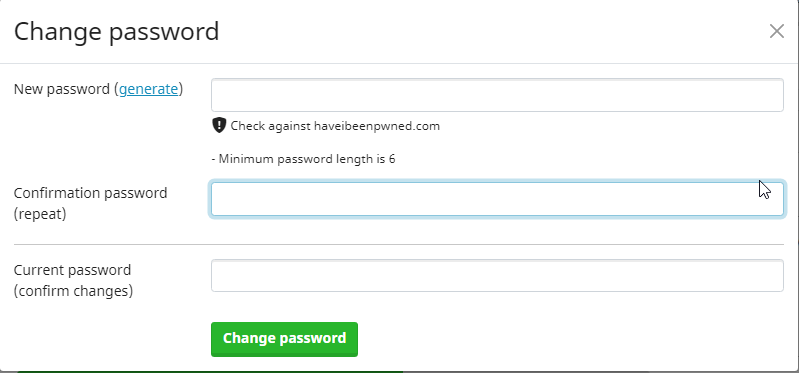
- In the **Change Password** window enter your NEW password in the first field, repeat the NEW password in the second field, enter your OLD password in the third field and click the **Change password** button. It's highly recommended to click on **Check against haveibeenpwned.com** after you entered your password in order to ensure the password you are attempting to use has not been compromised in previous data breaches. Alternatively instead of specifying your own password you can click on the **generate** link and have the system generate a password for you (**Figure 3**).**Figure 3**
[](https://docs.deeztek.com/uploads/images/gallery/2023-07/Tpsimage.png)
# Change Hosted Exchange Mailbox Password
1. Access Outlook Web at [https://ex.mail.ovh.ca](https://ex.mail.ovh.ca)
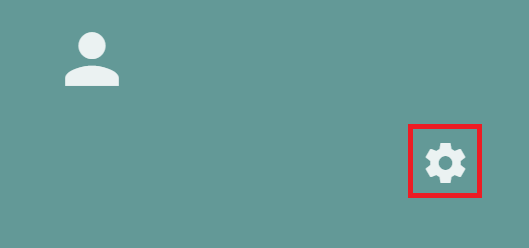
2. After succesful logon, click on the  icon on the top right-hand corner.
3. On the resultant menu, click on **Options** (**Figure 1**).**Figure 1**
1. In the **Change password** page, enter your current password in the **Current password** field, enter the new password in the **New password** field, re-type the new password in the **Confirm new password** field and click the **Save** button (**Figure 3**).**Important:** Your password must be at least 8 characters, it must contain at least 1 number and 1 special character.**Figure 3**
# Create Signature in Hosted Mail Webmail
- Login to your webmail and click the [ ](https://docs.deeztek.com/uploads/images/gallery/2021-03/image-1617225753967.png)icon on the top left (**Figure 1**):
**Figure 1**
[](https://docs.deeztek.com/uploads/images/gallery/2021-03/image-1617224950833.png)
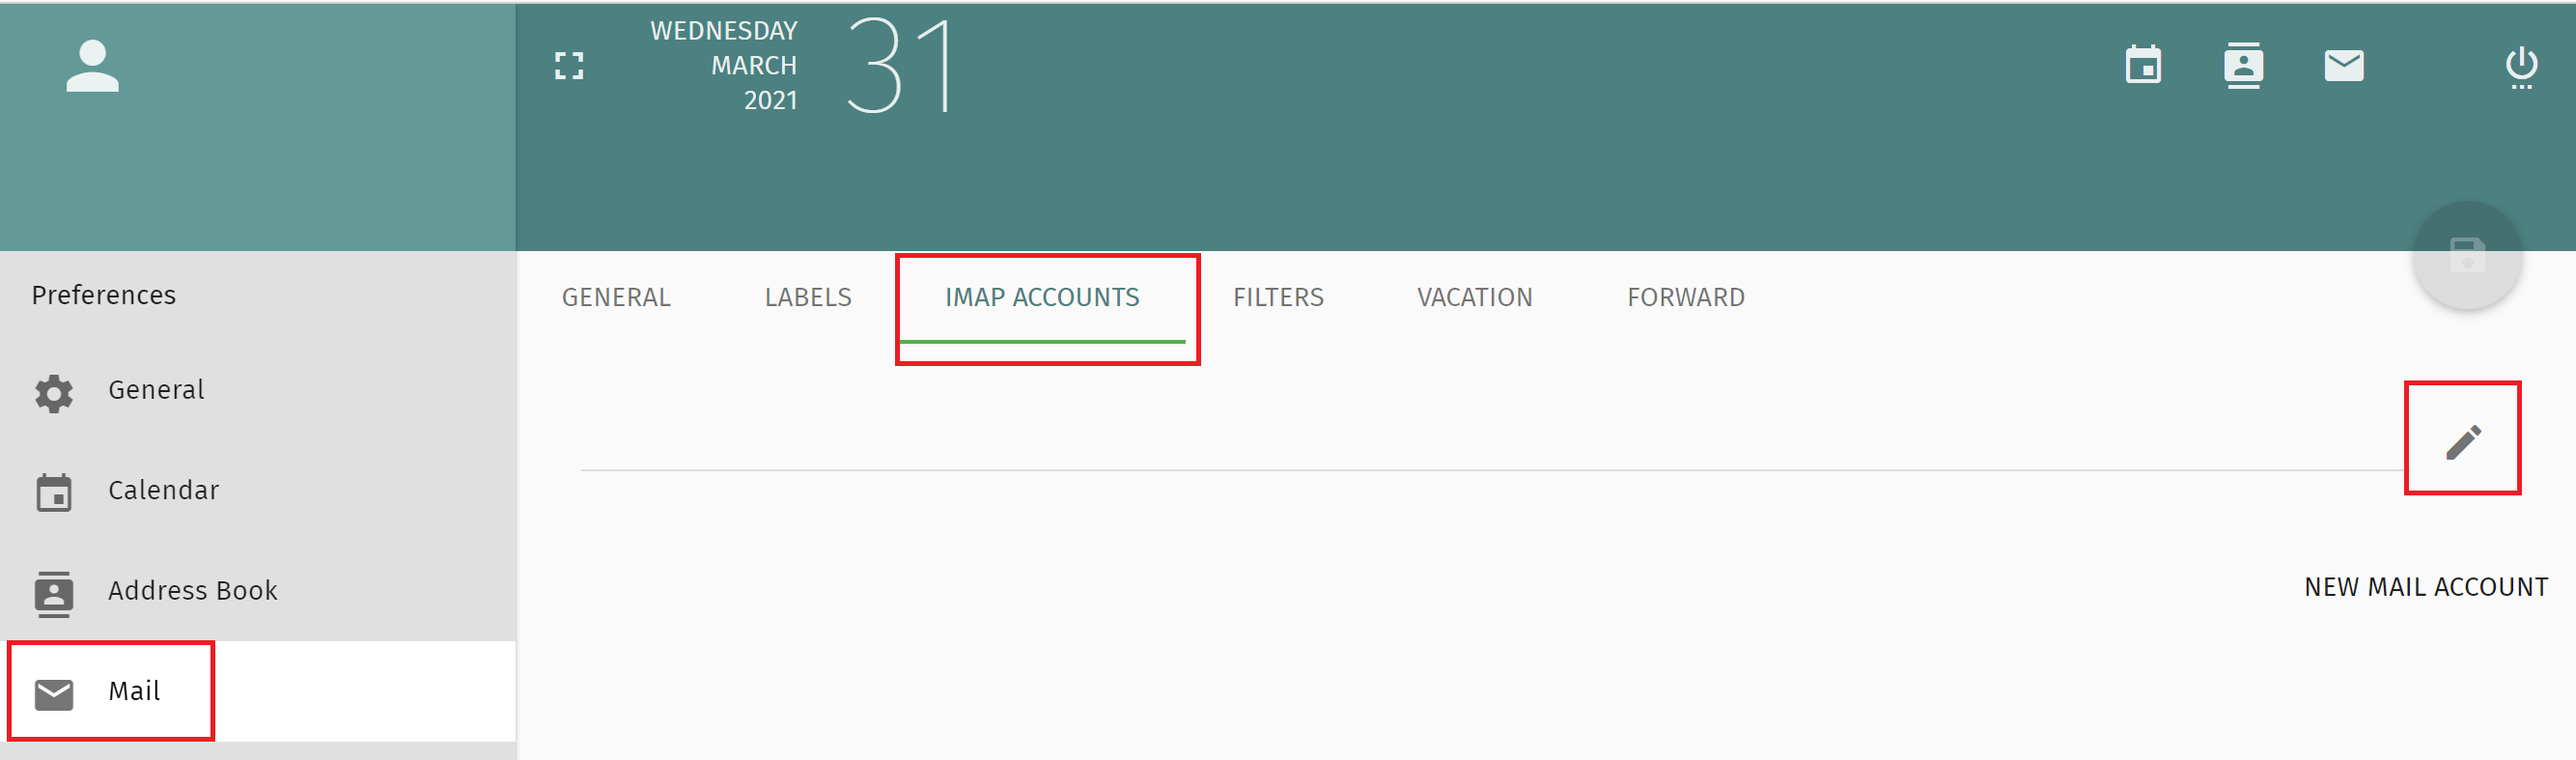
- Next, click on **Mail -**-> **IMAP Accounts** --> and click the icon (**Figure 2**):
**Figure 2**
[](https://docs.deeztek.com/uploads/images/gallery/2021-03/image-1617225349713.png)
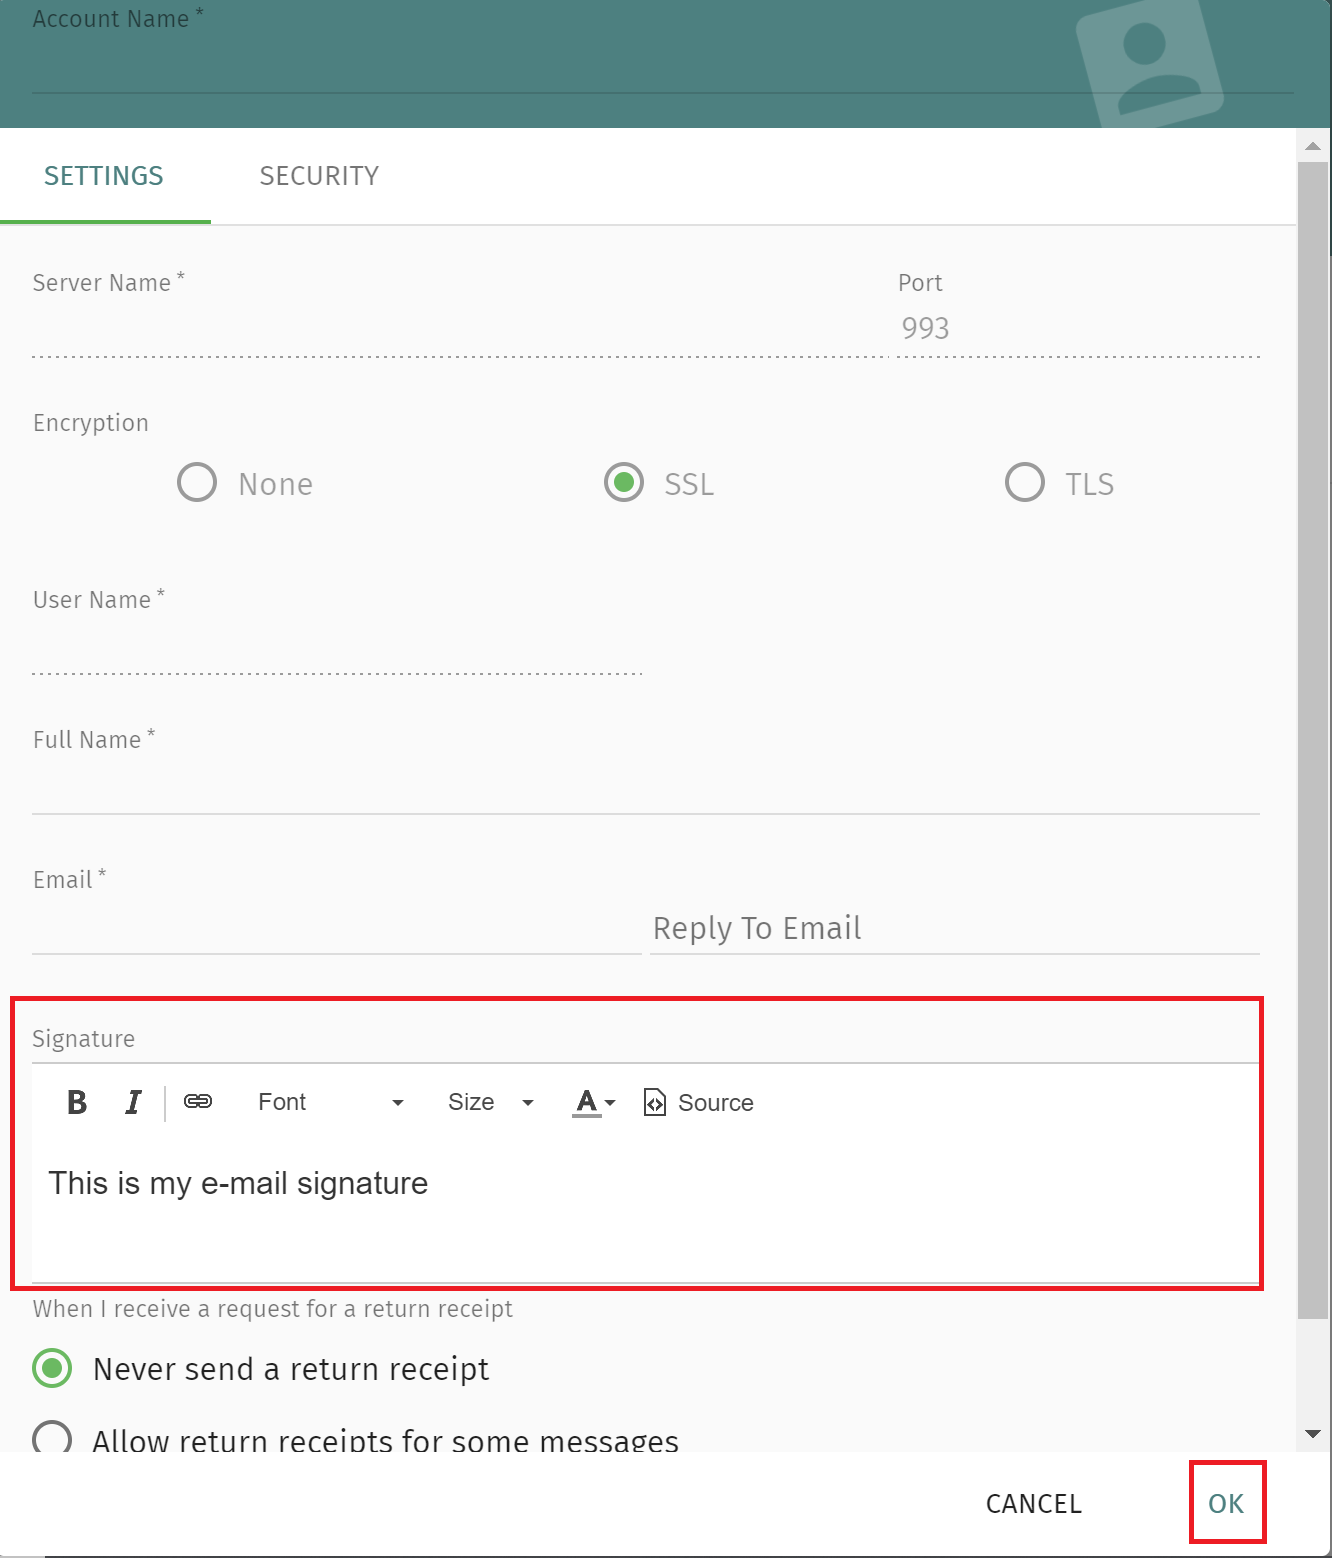
Enter your custom signature in the Signature section and then click the **OK** button at the bottom of the page (**Figure 3**):
**Figure 3**
[](https://docs.deeztek.com/uploads/images/gallery/2021-03/image-1617225577645.png)
# Opening an Encrypted PDF Email in the Secure Email Portal
### IntroductionWhen you receive an Encrypted PDF email, the email has a **Password Protected** **PDF file** attached to it. **The actual encrypted content is contained inside the attached PDF file**. In order to open the attached PDF and read the encrypted content, a password for that PDF file must first be generated in the Secure Email Portal and then pasted in your favorite PDF reader when prompted for the password. It's important to understand that in order to generate the password to the attached PDF file, **you must first successfully authenticate to the Secure Email Portal.** If this is the first time receiving and Encrypted PDF Email, please follow the instructions in the section titled "[**Opening an Encrypted PDF Email for the First Time**](https://docs.deeztek.com/books/hosted/page/opening-an-encrypted-pdf-email-in-the-secure-email-portal#bkmrk-opening-an-encrypted)" which will guide you through creating a Secure Email Portal password and then generating the password to open the attached PDF file.If this is **NOT** the first time opening an Encrypted PDF Email, please follow the instructions in the section titled "[**Opening an Encrypted PDF Email**](https://docs.deeztek.com/books/hosted/page/opening-an-encrypted-pdf-email-in-the-secure-email-portal#bkmrk-opening-an-encrypted-0)" which will guide you through authenticating to the Secure Email Portal with a previously set Secure Email Portal password and then generating the password to open the attached PDF file.
### Opening an Encrypted PDF Email for the First TimeWhen opening an Encrypted PDF Email for the first time, you must first create a Secure Email Portal password and then generate the password to actually open the Encrypted PDF that's attached to the email.
1. Once you receive the Encrypted PDF Email, locate and click on the link below Step 1 on the email body under the section "**Click the link below. You will be directed to our secure email portal.**" (**Figure 1**).**Figure 1**
1. Clicking the link will direct you to the **Secure Email** **Portal sign up** page. Choose a new password and then enter it in the **New password** field, verify that password in the **Repeat password** field and then click on the **Apply** button. Ensure you securely record the portal password you chose for future use. If you receive an encrypted PDF email in the future, the system will ask you to enter the password you just chose in order to authenticate to the Secure Email Portal (**Figure 2**).**Figure 2**
1. After creating a password, the system will automatically authenticate you and direct you to the **Generate one time passowrd for the encrypted PDF** page. Click on the **Generate password** button on the bottom of the page (**Figure 3**).**Figure 3**
1. After you click the **Generate password** button, the system will create a new pop-up window with a new password. Select the entire password and copy to your computer's clipboard by either clicking the **CTRL** and the **C** keys on your keyboard or right-clicking and selecting Copy (**Figure 4**).**Figure 4**
1. Next, go back to the received Encrypted PDF email and open the attached PDF file with your favorite PDF Reader (Adobe Reader, Foxit Reader etc.). You will be prompted for a password to open the PDF file. Paste the password you copied from **Step 4** into the password fild and click **OK** (**Figure 5**).**Figure 5**
1. If you wish to reply to the sender of the email, click on the .png) button on the top right. You will be directed to the Secure Email Portal to the **Compose a reply message** page where you will be able to reply as well as add any attachments (**Figure 7**).**Figure 7**
###
### Opening an Encrypted PDF EmailWhen opening an Encrypted PDF Email, you must first authenticate to the Secure Email Portal with a password you previously set and then generate the password to actually open the Encrypted PDF that's attached to the email.
1. Once you receive the Encrypted PDF Email, locate and click on the link below Step 1 on the email body under the section "**Click the link below. You will be directed to our secure email portal.**" (**Figure 8**).**Figure 8**
1. Clicking the link will direct you to the **Secure Email** **Portal login** page. The Email field will already be pre-filled with your email address. Enter the password you previously set to access the Secure Email Portal in the **Password** field and click the **Login** button (**Figure 9**). **If you forgot the Secure Email Portal password, please inform the sender of the email that you need your Secure Email Portal password reset.****Figure 9**
1. After succesfully authenticating to the Secure Email Portal, the system will automatically direct you to the **Generate one time passowrd for the encrypted PDF** page. Click on the **Generate password** button on the bottom of the page (**Figure 10**).**Figure 10**
1. After you click the **Generate password** button, the system will create a new pop-up window with a new password. Select the entire password and copy to your computer's clipboard by either clicking the **CTRL** and the **C** keys on your keyboard or right-clicking and selecting Copy (**Figure 11**).**Figure 11**
1. Next, go back to the received Encrypted PDF email and open the attached PDF file with your favorite PDF Reader (Adobe Reader, Foxit Reader etc.). You will be prompted for a password to open the PDF file. Paste the password you copied from **Step 4** into the password fild and click **OK** (**Figure 12**).**Figure 12**
1. If you wish to reply to the sender of the email, click on the .png) button on the top right. You will be directed to the Secure Email Portal to the **Compose a reply message** page where you will be able to reply as well as add any attachments (**Figure 14**).**Figure 14**
# How to send/receive encrypted email from Microsoft Outlook
Guide has been updated for Outlook for Office 365/Outlook 2019
### IntroductionThis guide will help you with configuring Outlook to send encrypted e-mail using **S/MIME**.For the purposes of this guide, an **external user** is someone who has their email hosted **outside the domain and control of the Hermes Secure Email Gateway**. For example, an external user would have their email hosted with an email service like Gmail, yahoo etc. Typically, this external user has the need to send/receive encrypted email with an **internal user** i.e. someone who is **inside the domain and consequently the control of the Hermes Secure Email Gateway**.
### AssumptionsThis guide assumes you have already received an email with an attached **.pfx** file. A **.pfx** file is nothing more than a password protected certificate that you have to install into your Outlook email client. In order to install the certificate, you must have the password which should had been given to you separately.
### Instructions
- Open the email with the subject **Your PFX Certificate File** with the attached **.pfx** file (**Figure 1**)**Figure 1**
[](https://docs.deeztek.com/uploads/images/gallery/2021-05/image-1620300232559.png)
- Double-click on the attached **key.pfx** file. If you get an opening attachment warning, click the **Open** button (**Figure 2**)**Figure 2**
[](https://docs.deeztek.com/uploads/images/gallery/2021-05/image-1620300314384.png)
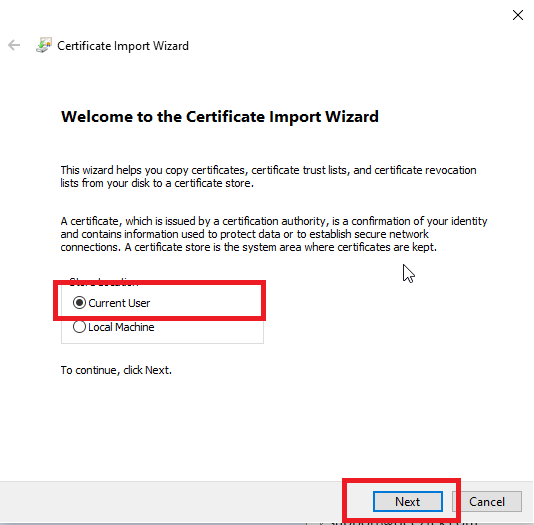
- On the **Certificate Import Wizard** window, ensure **Current User** is selected and click the **Next** button (**Figure 3**)**Figure 3**
[](https://docs.deeztek.com/uploads/images/gallery/2021-05/image-1620300376871.png)
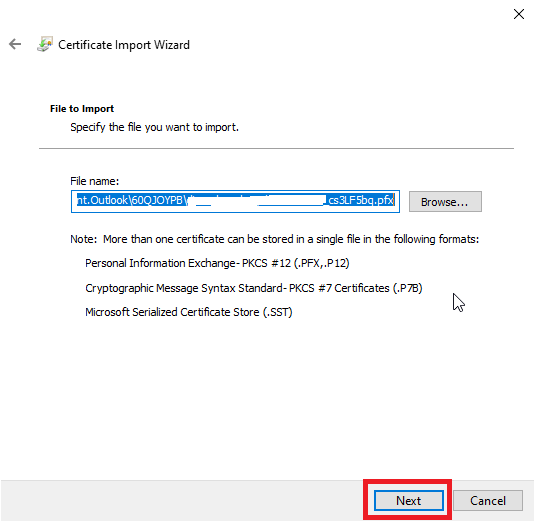
- On the **File to Import** window, simply click the **Next** button again (**Figure 4**)**Figure 4**
[](https://docs.deeztek.com/uploads/images/gallery/2021-05/image-1620300472600.png)
- On the **Private key protection** window, enter the certificate password you were provided in the **Password** field, ensure **Mark this key as exportable** options is **checked and** click the **Next** button (**Figure 5**)**Figure 5**
[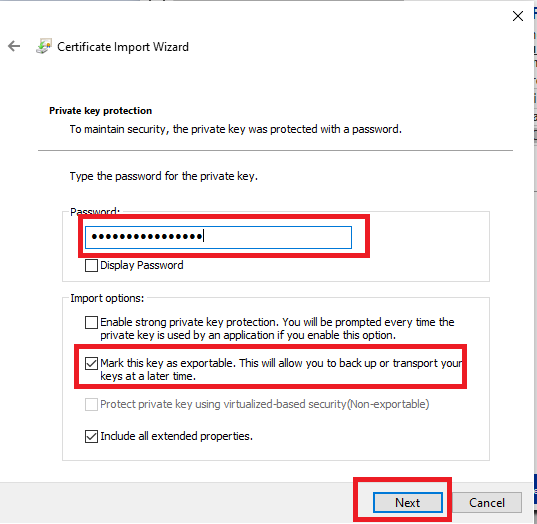](https://docs.deeztek.com/uploads/images/gallery/2021-05/image-1620300584903.png)
- On the **Certificate Store** window ensure that **Automatically select the certificate store based on the type of certificate** is selected and click the **Next** button (**Figure 6**)**Figure 6**
[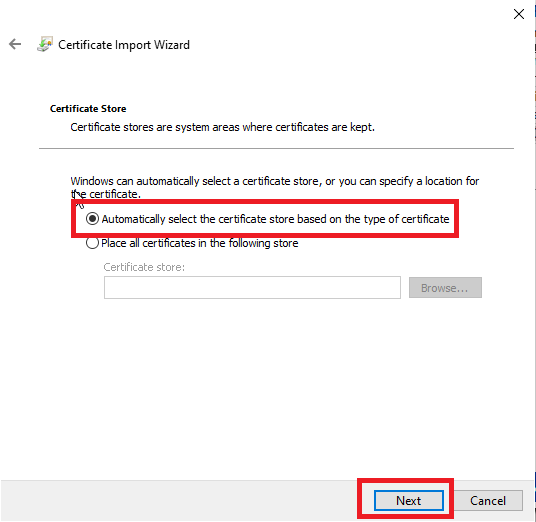](https://docs.deeztek.com/uploads/images/gallery/2021-05/image-1620300748772.png)
- On the final **Completing the Certificate Import Wizard** window simply click the **Finish** button (**Figure 7**)**Figure 7**
[](https://docs.deeztek.com/uploads/images/gallery/2021-05/image-1620300799954.png)
- You should get a **The Import was successful** window. Click **OK** to close that window (**Figure 8**)**Figure 8**
[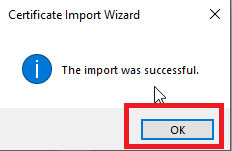](https://docs.deeztek.com/uploads/images/gallery/2021-05/image-1620300839975.png)
- Next, back in your Outlook, click on **File --> Options** (**Figure 9**)**Figure 9**
[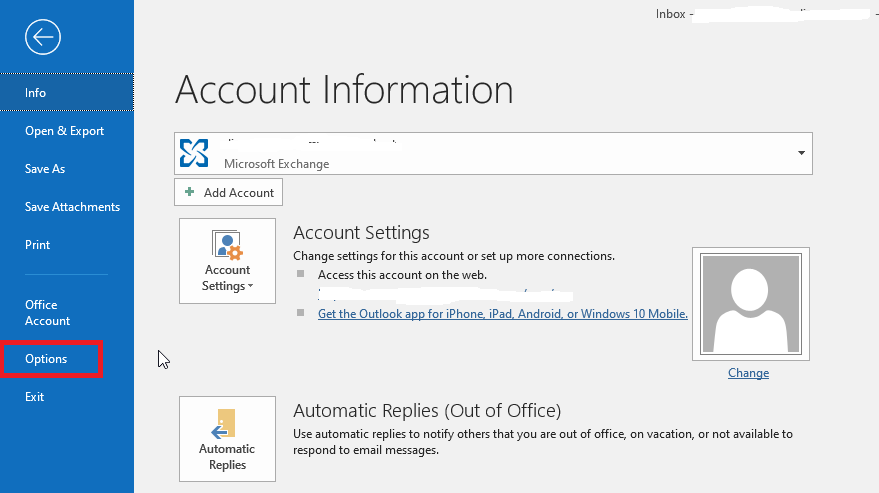](https://docs.deeztek.com/uploads/images/gallery/2021-05/image-1620300984331.png)
- In the **Outlook Options** window, click on the **Trust Center** option on the left and then click on the Trust Center Settings button (**Figure 10**).**Figure 10**
[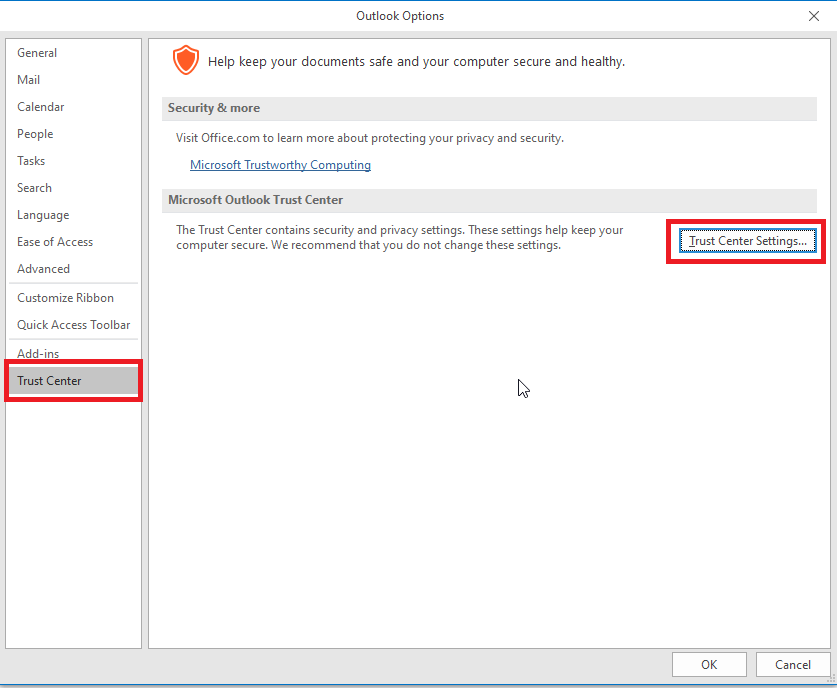](https://docs.deeztek.com/uploads/images/gallery/2021-05/image-1620301198279.png)
- In the Trust Center window, click on Email Security a under Encrypted email section click the Settings button (**Figure 11**)**Figure 11**
[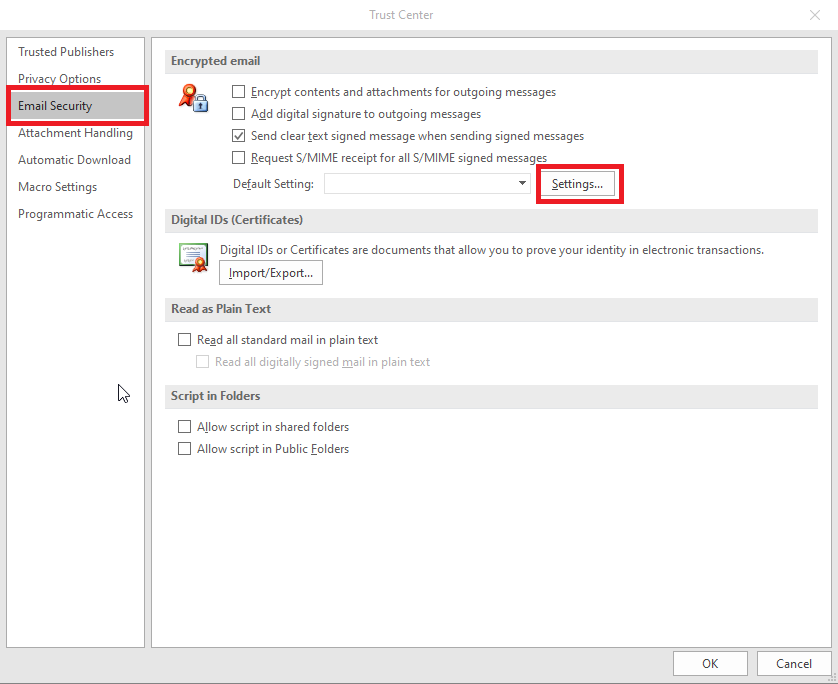](https://docs.deeztek.com/uploads/images/gallery/2021-05/image-1620302910234.png)
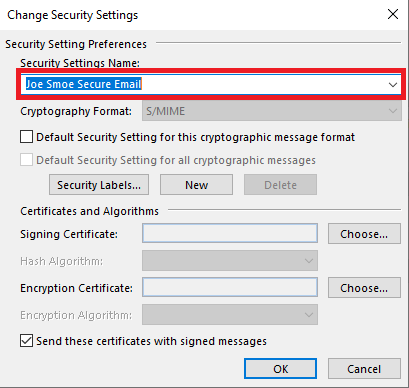
- In the **Change Security Settings** window, enter a friendly name of your choosing in the **Security Settings Name** field (**Figure 12**).
**Figure 12**
[](https://docs.deeztek.com/uploads/images/gallery/2021-05/image-1620303101074.png)
- Next, click on the **Choose** button on the **Signing Certificate** section (**Figure 13**).
**Figure 13**
[](https://docs.deeztek.com/uploads/images/gallery/2021-05/image-1620303241656.png)
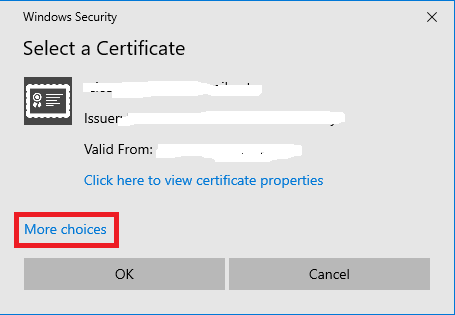
- On the **Select a Certificate** window, click on **More choices** (**Figure 14**).
**Figure 14**
[](https://docs.deeztek.com/uploads/images/gallery/2021-05/image-1620303444269.png)
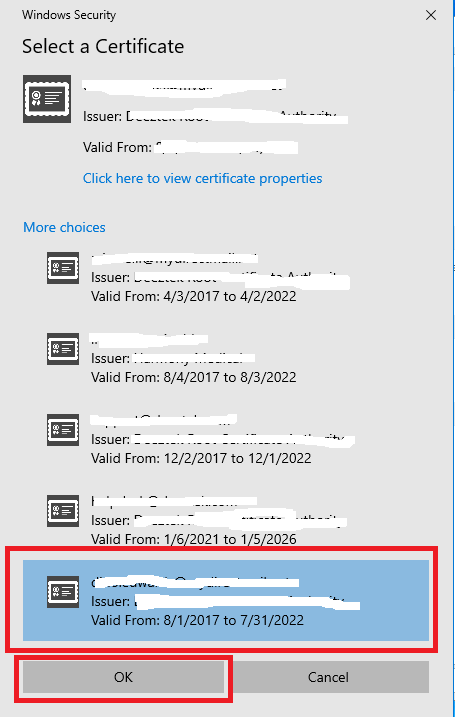
On the **More choices** list of certificates, select the certificate with your e-mail address, ensuring the **Valid From** field has an end date in the future and then click on the **OK** button (**Figure 15**). It's possible you have more than one certificate installed in your machine, so you must ensure you select the correct certificate. If you are unsure, ask your for help with your IT department.
**Figure 15**
[](https://docs.deeztek.com/uploads/images/gallery/2021-05/image-1620303744752.png)
- Next, back in the **Change Security Settings** window, the **Signing Certificate** and the **Encryption Certificate** sections should be filled in with your e-mail address. Click the **OK** button (**Figure 16**).**Figure 16**
[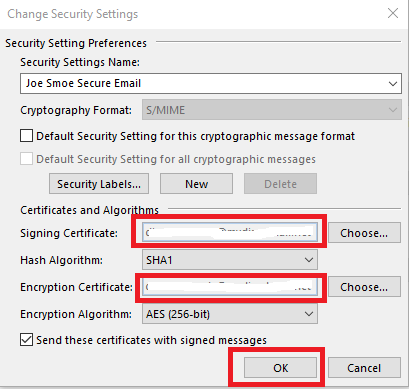](https://docs.deeztek.com/uploads/images/gallery/2021-05/image-1620304076999.png)
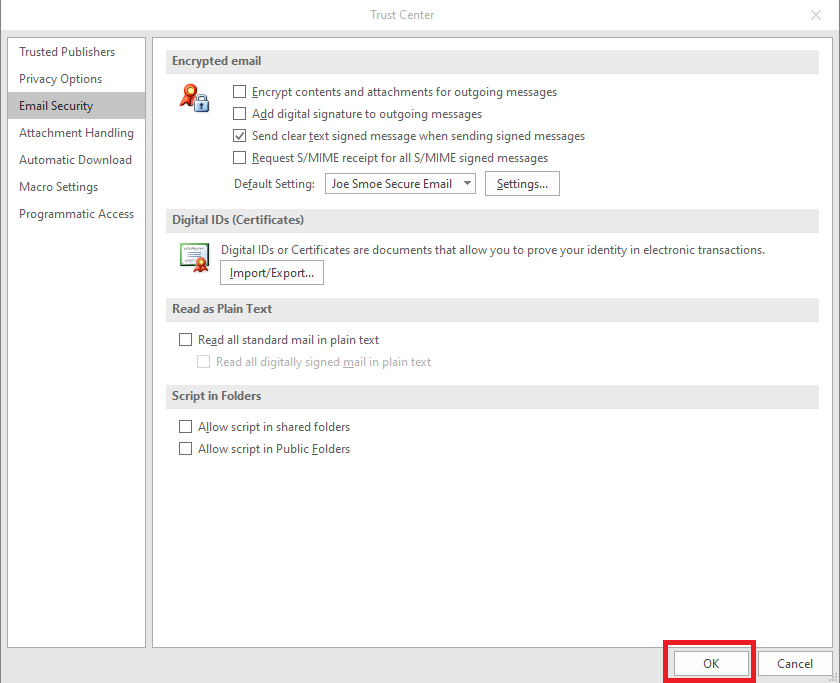
Next, back in the **Trust Center** window, click the **OK** button to return back to Outlook **(Figure 17**).
**Figure 17**
[](https://docs.deeztek.com/uploads/images/gallery/2021-05/image-1620304276429.png)
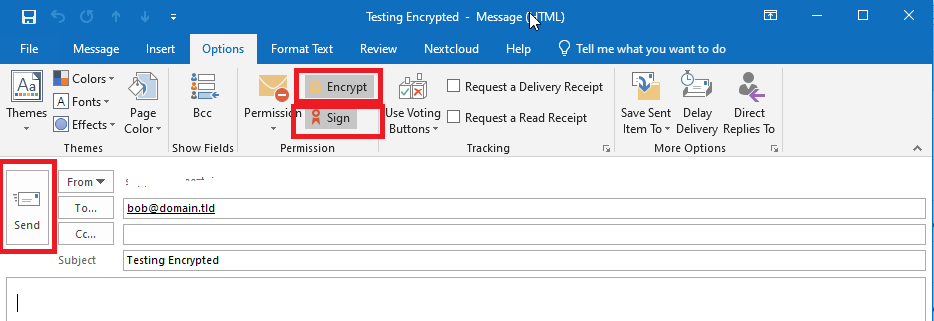
- Next, back in Outlook Home window, click **New Email** to compose a new email message. In the compose message window, click on **Options** and note the **Encrypt** and **Sign** buttons (**Figure 18**). **Figure 18**
[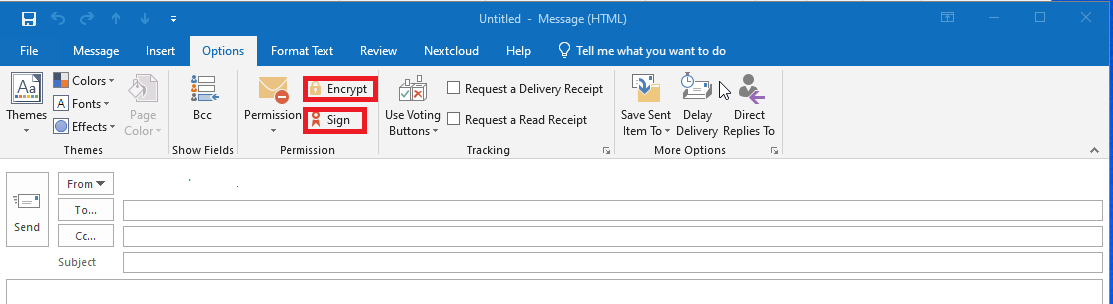](https://docs.deeztek.com/uploads/images/gallery/2021-05/image-1620304646799.png)
- In order to send an encrypted message to someone, you must first have that person's **public** **key**. That's usually accomplished by having that person send you a **signed** e-mail message which you can then import that person and their **public** key into your Outlook contacts.
- Once you receive a signed e-mail message, **double-click it** to open that message and ensure a the digital signature icon on the top-right hand corner of the message (**Figure 19**).**Figure 19**
[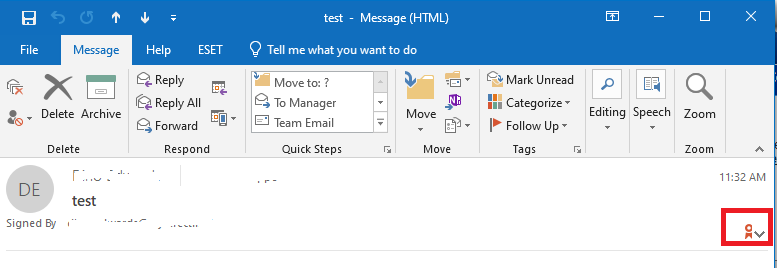](https://docs.deeztek.com/uploads/images/gallery/2021-05/image-1620317785780.png)
- Next, right-click on the name of the sender on the message and on the resultant drop-down menu click on **Add to Outlook Contacts** (**Figure 20**)**Figure 20**
[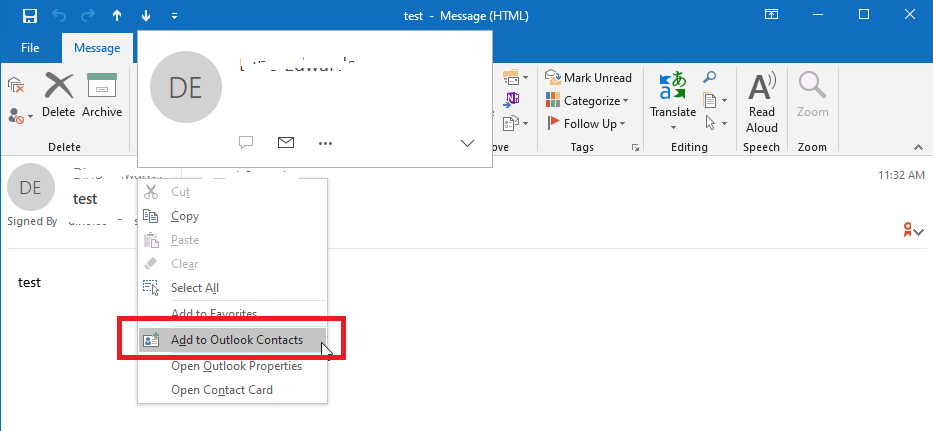](https://docs.deeztek.com/uploads/images/gallery/2021-05/image-1620318144399.png)
- Next, in the **Contact** window, click on the **Certificates** button (**Figure 21**)**Figure 21**
[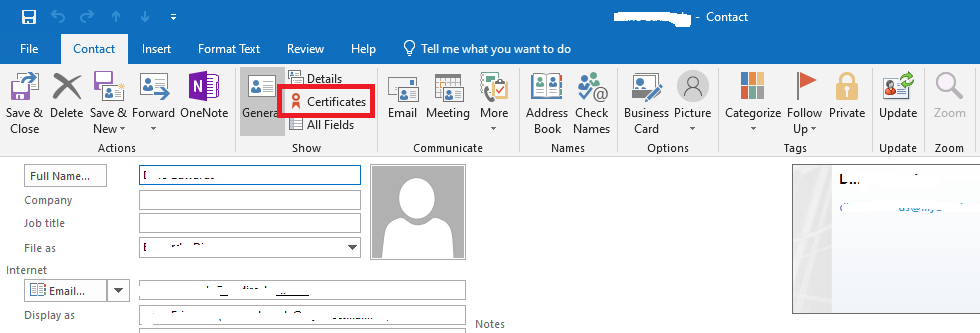](https://docs.deeztek.com/uploads/images/gallery/2021-05/image-1620318336031.png)
- Ensure that a certificate (**public key**) appears under the **Certificates (Digital IDs)** section and click the **Save & Close** button to save the contact in your Outlook Contacts (**Figure 22**).
**Figure 22**
[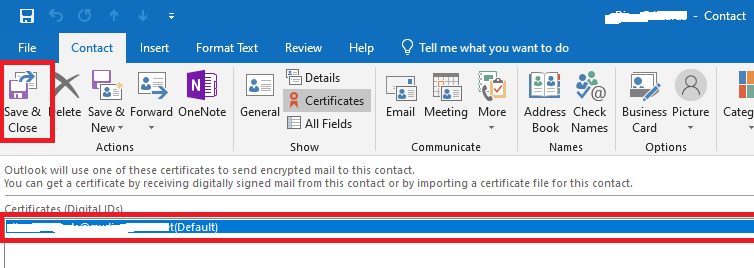](https://docs.deeztek.com/uploads/images/gallery/2021-05/image-1620318575337.png)
- Since we now have the person's public key, we can now send encrypted e-mails to them. From the Outlook **Home** screen, click **New Email** to compose a new message to that person. In the **To** field, enter the person's e-mail address or select the previously saved contact from your Outlook contacts, click on **Option**s and ensure **Encrypt** is selected and optionally the **Sign** button is selected (Sign is not required in order to send an encrypted e-mail) and then click the **Send** button (**Figure 23**).
**Figure 23**
[](https://docs.deeztek.com/uploads/images/gallery/2021-05/image-1620319133264.png)
- If you did not get an error from Outlook about sending an encrypted e-mail, then you configuration has worked.
# How to Create a Spam Report Button in Outlook
### E-mail Spam Definition
***"Spam is any kind of unwanted, unsolicited digital communication, often an email, that gets sent out in bulk."***
The main takeaway from the definition above is the word "**unsolicited**". This means that any bulk e-mail that you receive from an entity that you have signed up with and have given them your e-mail address is generally **not** considered Spam. In those cases, simply **unsubscribing** from their e-mail lists/newsletters usually stops the e-mails.
### IntroductionWhen you receive an e-mail that you believe should had been quarantined or marked as **\[SUSPECTED SPAM\]**, you can typically forward that e-mail as an attachment to our team at [spam@deeztek.com](mailto:%20spam@deeztek.com). This usually involves selecting the e-mail in question, clicking on **More** in the **Respond** Outlook ribbon toolbar, selecting **Forward as Attachment** (**Figure 1**) filling out the **To** field with **spam@deeztek.com** and clicking **Send** (**Figure 2**).**Figure 1**
While this is not very time consuming, you can simplify this process by creating a **SPAM** button in Outlook to speed up the process.
### Create a Spam Report ButtonIn the Outlook **Quick Steps** ribbon toolbar, click on **Create New** (**Figure 3**).**Figure 3**
****Click on **Show Options**, in the **Subject:** field enter **\[REPORT SPAM\]: <subject>** and check the **Automatically send after 1 minute delay** checkbox (**Figure 7**).**Figure 7**
# How to Create a Not Spam Report Button in Outlook
### Introduction
When you receive an e-mail that you believe should not had been marked as **\[SUSPECTED SPAM\]**, you can typically forward that e-mail as an attachment to our team to [ham@deeztek.com](mailto:ham@deeztek.com). This usually involves selecting the e-mail in question, clicking on **More** in the **Respond** Outlook ribbon toolbar, selecting **Forward as Attachment** (**Figure 1**) filling out the **To** field with **ham@deeztek.com** and clicking **Send** (**Figure 2**).**Figure 1**
While this is not very time consuming, you can simplify this process by creating a **NOT SPAM** button in Outlook to speed up the process.
### Create a Not Spam Report ButtonIn the Outlook **Quick Steps** ribbon toolbar, click on **Create New** (**Figure 3**).**Figure 3**
****Click on **Show Options**, in the **Subject:** field enter **\[REPORT HAM\]: <subject>** and check the **Automatically send after 1 minute delay** checkbox (**Figure 7**).**Figure 7**
# How to create a rule to move [SUSPECTED SPAM] messages to Junk Folder
- Login to your webmail and click the [ ](https://docs.deeztek.com/uploads/images/gallery/2021-03/image-1617225753967.png)icon on the top left (**Figure 1**):
**Figure 1**
[](https://docs.deeztek.com/uploads/images/gallery/2021-08/image-1629814354163.png)
- Next, click on **Mail -**-> **Filters** --> and then click on **CREATE FILTER** (**Figure 2**):
**Figure 2**
[](https://docs.deeztek.com/uploads/images/gallery/2021-08/image-1629814183168.png)
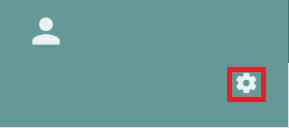
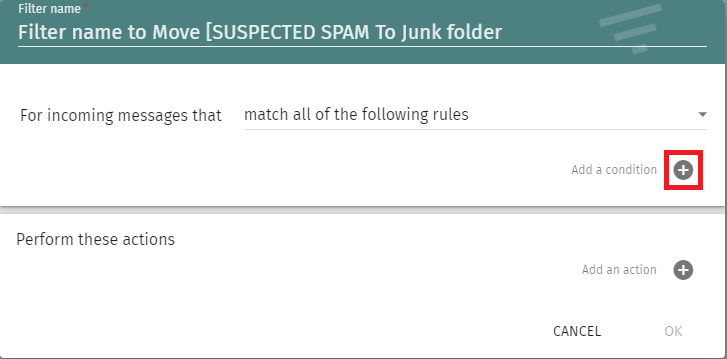
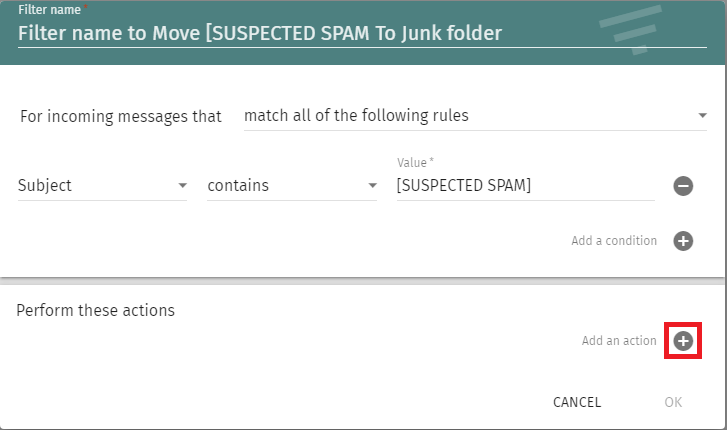
- In filter window, set the **Filter name** to **Move \[SUSPECTED SPAM To Junk folder** and click the [ ](https://docs.deeztek.com/uploads/images/gallery/2021-08/image-1629817047889.png)icon next to Add a condition (**Figure 3**):
**Figure 3**
[](https://docs.deeztek.com/uploads/images/gallery/2021-08/image-1629817134650.png)
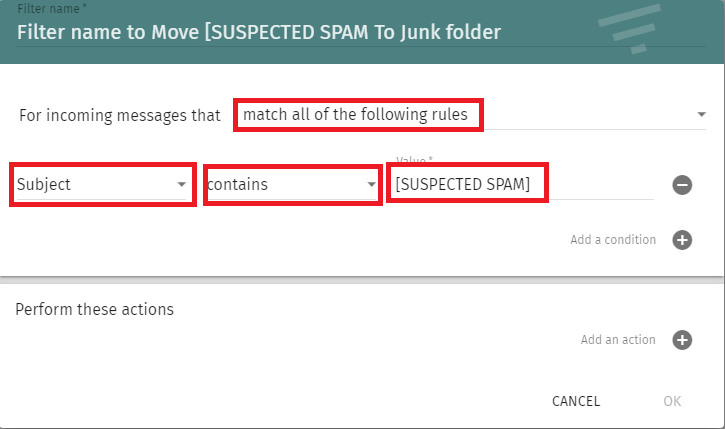
- Ensure you set the rule to **Subject** --> **contains** and set the value to **\[SUSPECTED SPAM\]** (**Figure 4**):
**Figure 4**
[](https://docs.deeztek.com/uploads/images/gallery/2021-08/image-1629817447359.png)
- Next, click on the [](https://docs.deeztek.com/uploads/images/gallery/2021-08/image-1629817047889.png) icon next to **Add an action** (**Figure 5**):
**Figure 5**
[](https://docs.deeztek.com/uploads/images/gallery/2021-08/image-1629817586804.png)
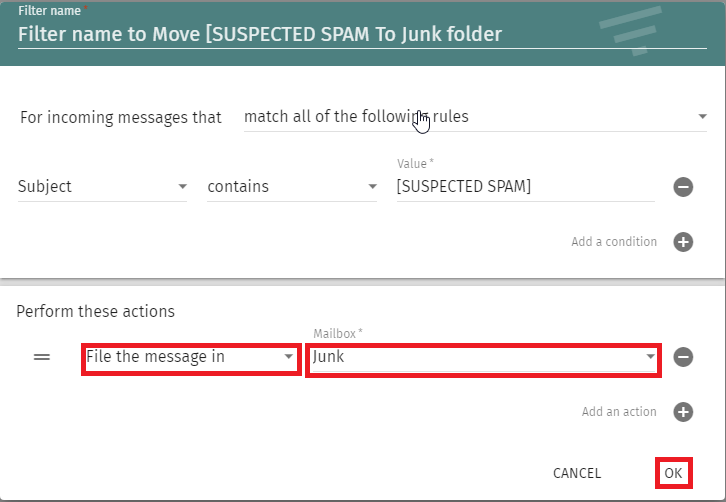
- Under the **Perform these actions** section, set the action drop-down to **File the message** in and the **Mailbox** drop-down to **Junk** and click the OK button (**Figure 6**):
**Figure 6**
[](https://docs.deeztek.com/uploads/images/gallery/2021-08/image-1629817959479.png)
- Back in the **FILTERS** section, ensure you click on the [ ](https://docs.deeztek.com/uploads/images/gallery/2021-08/image-1629818135865.png)icon to save the filter (**Figure 7**):
**Figure 7**
[](https://docs.deeztek.com/uploads/images/gallery/2021-08/image-1629818257662.png)
# Configure Outlook for Hosted Mail using ActiveSync
### Outlook 2016 or higher from Office 365 on Windows
If you installed **Outlook 2016**, **Outlook 2019** or **Outlook for Office 365** from Office 365 (i.e. downloaded and installed from Office 365), please be advised that those versions of Outlook have an issue with autodiscover. Because of this, you must first disable the **Simplified Account Creation wizard** in order to setup your mailbox with our Hosted Mail.
#### Disable Simplified Account Creation wizard
You can [disable the Simplified Account Creation](https://support.microsoft.com/en-us/topic/how-to-disable-simplified-account-creation-in-outlook-2016-outlook-2019-and-outlook-for-office-365-662bf4f8-c357-dbc8-53b3-ff8f445e8247) wizard by following the instructions outlined at the link below:
[https://support.microsoft.com/en-us/topic/how-to-disable-simplified-account-creation-in-outlook-2016-outlook-2019-and-outlook-for-office-365-662bf4f8-c357-dbc8-53b3-ff8f445e8247](https://support.microsoft.com/en-us/topic/how-to-disable-simplified-account-creation-in-outlook-2016-outlook-2019-and-outlook-for-office-365-662bf4f8-c357-dbc8-53b3-ff8f445e8247)
Alternatively, you can download and import the [disable\_simplified\_account\_creation\_wizard.reg](https://docs.deeztek.com/attachments/8) to your computer.
#### Configure Outlook
Start Outlook
**If this is the first time starting Outlook**, the **Auto Account Setup** window will automatically launch.
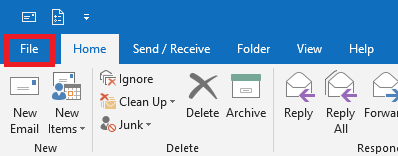
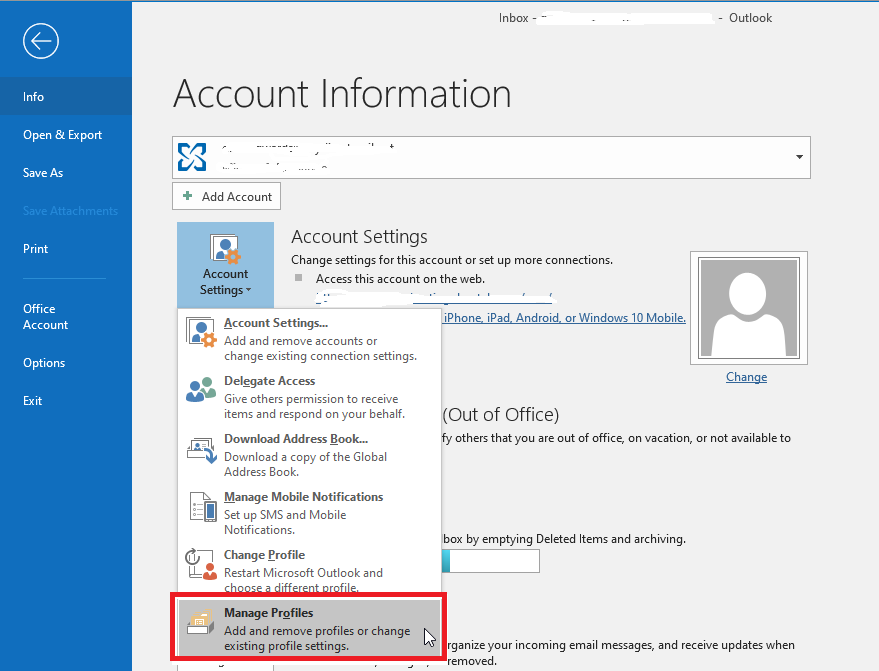
**If this is NOT the fist time starting Outlook**, click on **File** on the upper left-hand corner (**Figure 1**).
**Figure 1**
[](https://docs.deeztek.com/uploads/images/gallery/2021-04/image-1617536122873.png)
Click on **Account Settings**, and then click **Manage Profiles** **(Figure 2**).
**Figure 2**
[](https://docs.deeztek.com/uploads/images/gallery/2021-04/image-1617541060379.png)
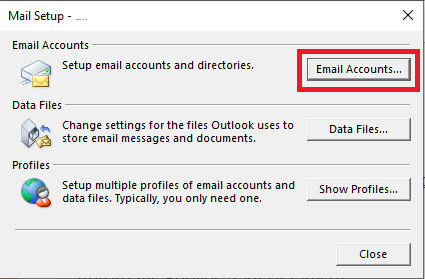
In the Mail Setup window, click on **Email Accounts...** (**Figure 3**)
**Figure 3**
[](https://docs.deeztek.com/uploads/images/gallery/2021-04/image-1617541155179.png)
In the **Email Accounts** window, click on **New...** (**Figure 4**).
**Figure 4**
[](https://docs.deeztek.com/uploads/images/gallery/2021-04/image-1617536491140.png)
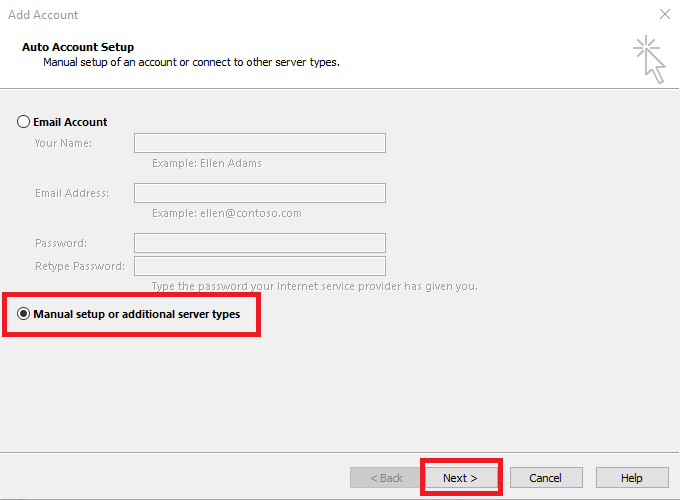
In the **Auto Account Setup** window, select **Manual setup or additional server types** and click **Next** (**Figure 5**).
**Figure 5**
[](https://docs.deeztek.com/uploads/images/gallery/2021-04/image-1617534986763.png)
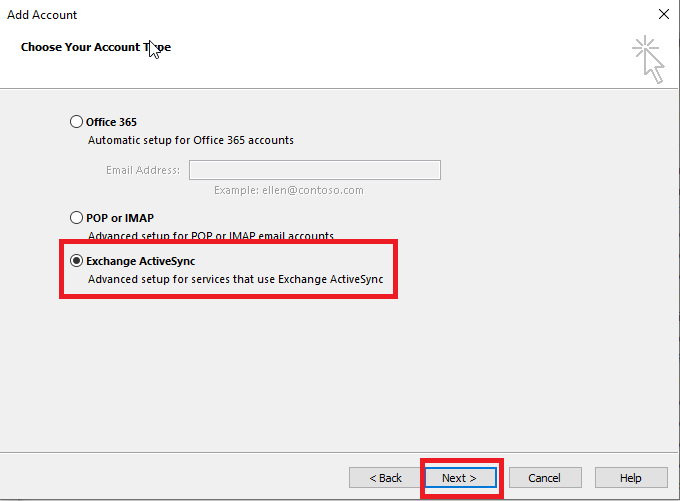
On the **Choose Your Account Type** window, select **Exchange ActiveSync** and click **Next** (**Figure 6**).
**Figure 6**
[](https://docs.deeztek.com/uploads/images/gallery/2021-04/image-1617535065207.png)
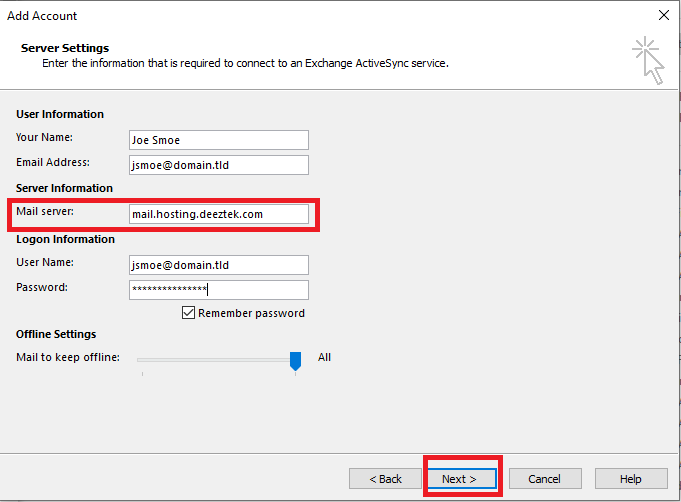
On the **Server Settings** window, fill out the all fields ensuring you set the **Mail server** field to **mail.hosting.deeztek.com** and click **Next** (**Figure 7**):
**Figure 7**
[](https://docs.deeztek.com/uploads/images/gallery/2021-04/image-1617535505851.png)
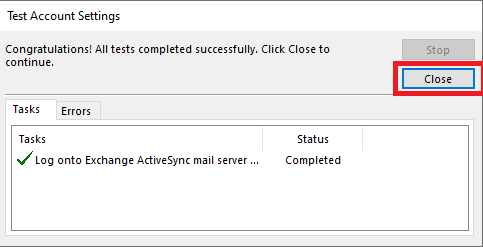
If everything went well, you should see the following window indicating that Outlook connected successfully to our mail server. Click the **Close** button to continue (**Figure 8**).
**Figure 8**
[](https://docs.deeztek.com/uploads/images/gallery/2021-04/image-1617535723306.png)
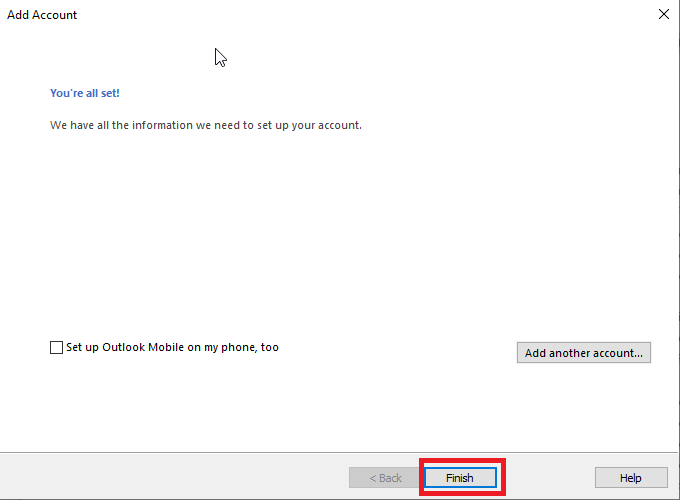
On the following window, click the Finish button (**Figure 9**).
**Figure 9**
[](https://docs.deeztek.com/uploads/images/gallery/2021-04/image-1617535820240.png)
# Configure Outlook for Hosted Mail using IMAP and CalDav Synchronizer
### Outlook 2016 or higher from Office 365 on Windows
If you installed **Outlook 2016**, **Outlook 2019** or **Outlook for Office 365** from Office 365 (i.e. downloaded and installed from Office 365), please be advised that those versions of Outlook have an issue with autodiscover. Because of this, you must first disable the **Simplified Account Creation wizard** in order to setup your mailbox with our Hosted Mail.
#### Disable Simplified Account Creation wizard
You can [disable the Simplified Account Creation](https://support.microsoft.com/en-us/topic/how-to-disable-simplified-account-creation-in-outlook-2016-outlook-2019-and-outlook-for-office-365-662bf4f8-c357-dbc8-53b3-ff8f445e8247) wizard by following the instructions outlined at the link below:
[https://support.microsoft.com/en-us/topic/how-to-disable-simplified-account-creation-in-outlook-2016-outlook-2019-and-outlook-for-office-365-662bf4f8-c357-dbc8-53b3-ff8f445e8247](https://support.microsoft.com/en-us/topic/how-to-disable-simplified-account-creation-in-outlook-2016-outlook-2019-and-outlook-for-office-365-662bf4f8-c357-dbc8-53b3-ff8f445e8247)
Alternatively, you can download and import the [disable\_simplified\_account\_creation\_wizard.reg](https://docs.deeztek.com/attachments/8) to your computer.
#### Download and install the latest version of CalDav Synchronizer
Navigate to [CalDav Synchronizer](https://caldavsynchronizer.org) page at [https://caldavsynchronizer.org/download-2/ ](https://caldavsynchronizer.org/download-2/)and download the latest version of CalDav Synchronizer (As of the writing of this guide, the latest version was 4.0.0).
Extract the downloaded zip and then install CalDav synchronizer using the included **setup.exe**.
#### Configure Outlook
Start Outlook
**If this is the first time starting Outlook**, the **Auto Account Setup** window will automatically launch.
**If this is NOT the fist time starting Outlook**, click on **File** on the upper left-hand corner (**Figure 1**).
**Figure 1**
[](https://docs.deeztek.com/uploads/images/gallery/2021-05/image-1620577743134.png)
Click on **Account Settings**, and then click **Manage Profiles** **(Figure 2**).
**Figure 2**
[](https://docs.deeztek.com/uploads/images/gallery/2021-05/image-1620577763634.png)
In the Mail Setup window, click on **Email Accounts...** (**Figure 3**)
**Figure 3**
[](https://docs.deeztek.com/uploads/images/gallery/2021-05/image-1620577865772.png)
In the **Email Accounts** window, click on **New...** (**Figure 4**).
**Figure 4**
[](https://docs.deeztek.com/uploads/images/gallery/2021-05/image-1620577947339.png)
In the **Auto Account Setup** window, select **Manual setup or additional server types** and click **Next** (**Figure 5**).
**Figure 5**
[](https://docs.deeztek.com/uploads/images/gallery/2021-05/image-1620577981845.png)
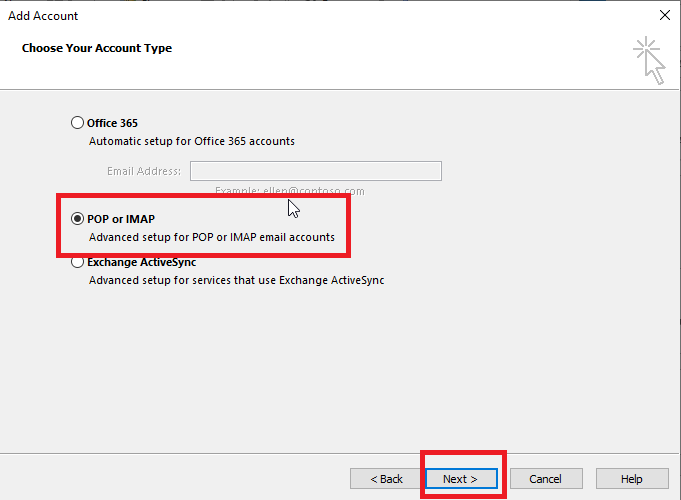
On the **Choose Your Account Type** window, select **POP or IMAP** and click **Next** (**Figure 6**).
**Figure 6**
[](https://docs.deeztek.com/uploads/images/gallery/2021-05/image-1620578071320.png)
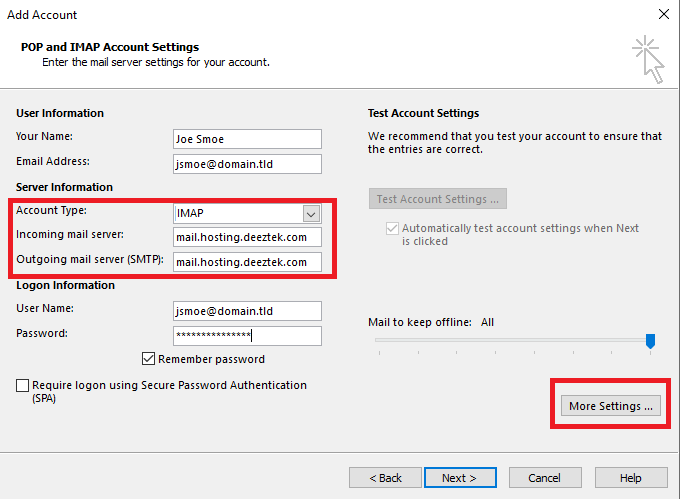
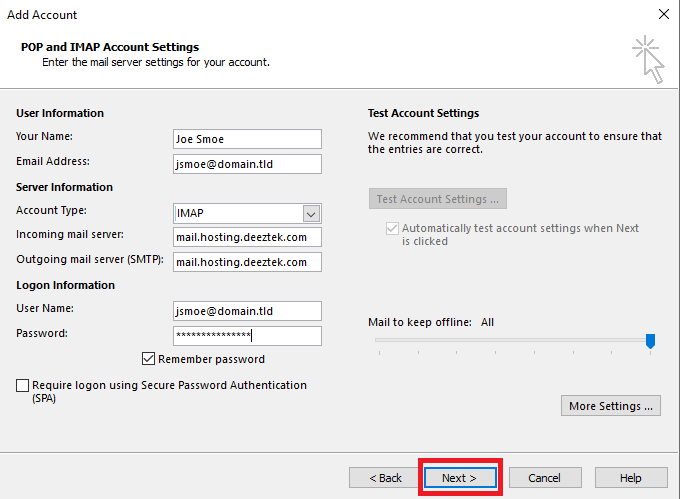
On the **POP and IMAP Account Settings** window, fill out the all fields ensuring you set the the **Account Type** drop-down to **IMAP**, the **Incoming mail server** and the **Outgoing mail server (SMTP)** fields to **mail.hosting.deeztek.com** and click the **More Settings ...** button (**Figure 7**):
**Figure 7**
[](https://docs.deeztek.com/uploads/images/gallery/2021-05/image-1620578389975.png)
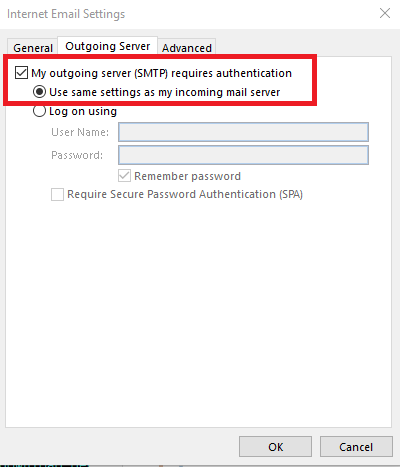
On the **Internet Email Settings** window, click on the **Outgoing Server** tab, place a check mark on **My ougoing server (SMTP) requires authentication** and ensure **Use same settings as my incoming mail server** (**Figure 8**).
**Figure 8**
[](https://docs.deeztek.com/uploads/images/gallery/2021-05/image-1620578537634.png)
Next, click on the **Advanced** tab, and in the **Incoming server (IMAP)** field enter **993**, on the **Use the following type of encrypted connection** drop-down select **SSL/TLS**, on the **Outgoing server (SMTP)** field, enter **587**, on the **Use the following type of encrypted connection** drop-down select **STARTTLS** and then click the **OK** button (**Figure 9**).
**Figure 9**
[](https://docs.deeztek.com/uploads/images/gallery/2021-05/image-1620578827460.png)
Back on the **POP and IMAP Account Settings** window, click the **Next** button (**Figure 10**).
**Figure 10**
[](https://docs.deeztek.com/uploads/images/gallery/2021-05/image-1620579131831.png)
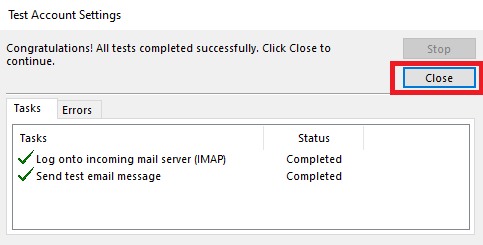
Outlook will test the incoming mail server and attempt to send a test email message. If everything goes well, you should see the following **Test Account Settings** window with checkmarks for each successful test. Click the **Close** button (**Figure 11**).
**Figure 11**
[](https://docs.deeztek.com/uploads/images/gallery/2021-05/image-1620579301683.png)
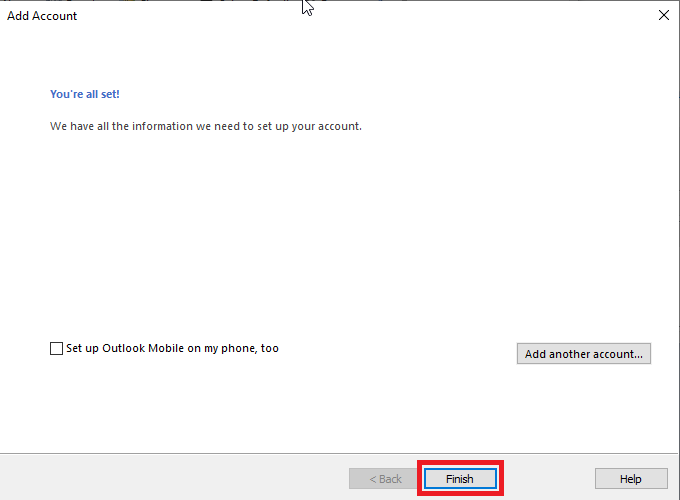
On the following window, click the **Finish** button (**Figure 12**).
**Figure 12**
[](https://docs.deeztek.com/uploads/images/gallery/2021-05/image-1620579441696.png)
#### Configure CalDav Synchronizer
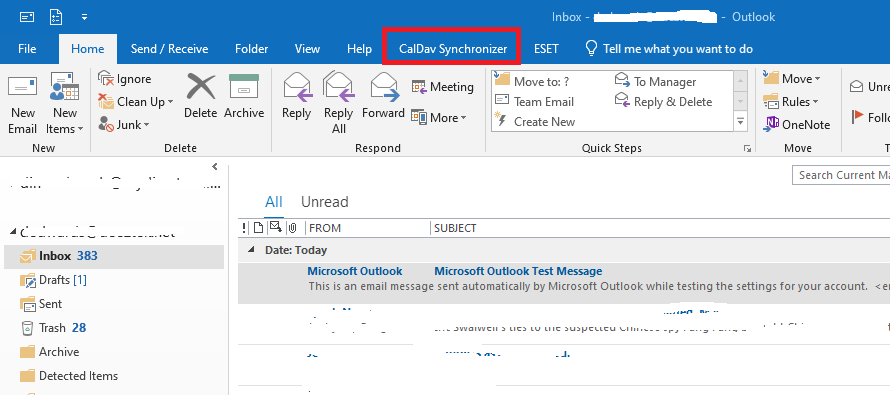
From the Outlook main window, click on **CalDav Synchronize**r from the top menu (**Figure 13**).
**Figure 13**
[](https://docs.deeztek.com/uploads/images/gallery/2021-05/image-1620580142446.png)
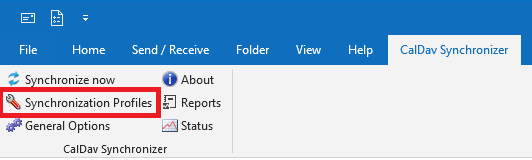
Next, click on **Synchronization** **Profile**s button (**Figure 14**).
**Figure 14**
[](https://docs.deeztek.com/uploads/images/gallery/2021-05/image-1620580252704.png)
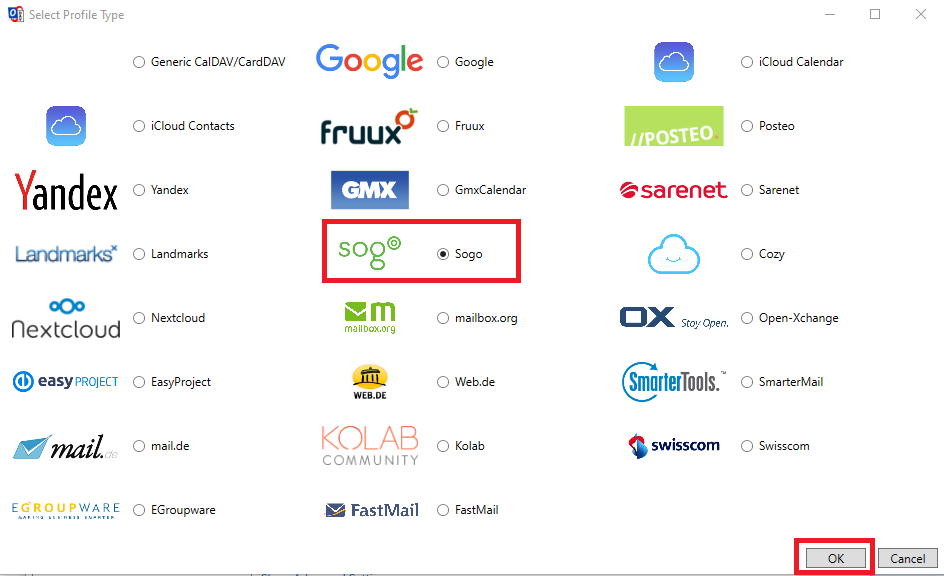
In the CalDav **Options** window, click the [ ](https://docs.deeztek.com/uploads/images/gallery/2021-05/image-1620640470840.png)(Add multiple profies) button and in the **Select Profile Type** window, select **Sogo** and click **OK** (**Figure 15**).
**Figure 15**
[](https://docs.deeztek.com/uploads/images/gallery/2021-05/image-1620640565549.png)
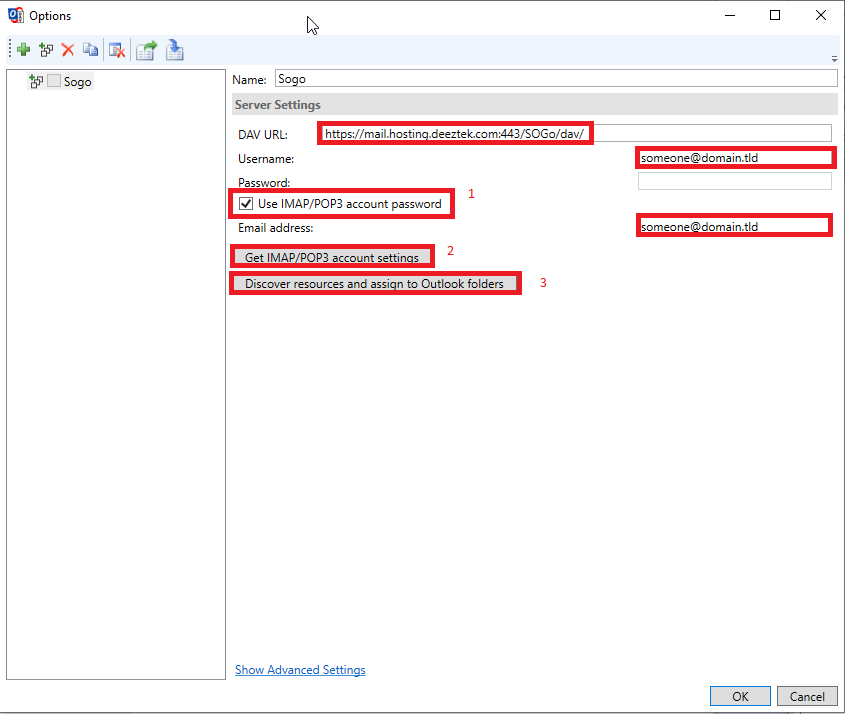
Back in the **Options** window under **Server Settings** section, place a checkbox on **Use IMAP/POP3 account** **password** (**1**) and then click the **Get IMAP/POP3 account settings** button (**2**). It should automatically fill in the **DAV URL**, **Username** and **Email address** fields. Next, click on the **Discover resources and assign to Outlook folders** button (**3**) (**Figure 16**).
**Figure 16**
[](https://docs.deeztek.com/uploads/images/gallery/2021-05/image-1620641640218.png)
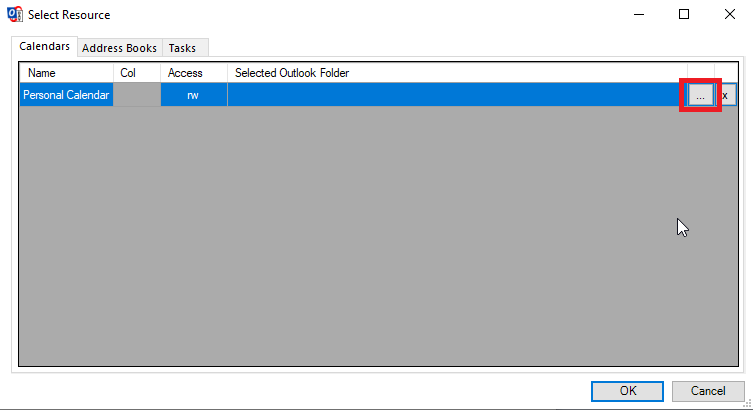
In the **Select Resource** window, in the **Calendars** tab, click the [ ](https://docs.deeztek.com/uploads/images/gallery/2021-05/image-1620641737725.png)button to the right of the **Personal Calendar** (**Figure 17**).
**Figure 17**
[](https://docs.deeztek.com/uploads/images/gallery/2021-05/image-1620641883378.png)
In the **Select Folder** window, click the **New...** button (**Figure 18**).
**Figure 18**
[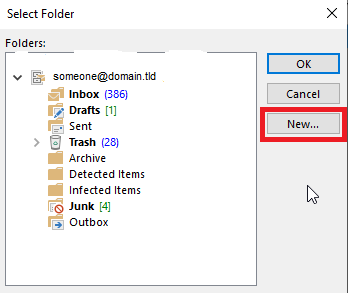](https://docs.deeztek.com/uploads/images/gallery/2021-05/image-1620642213244.png)
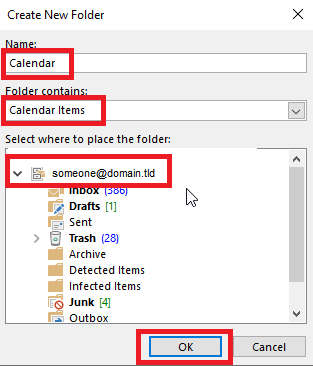
In the **Create New Folder** window, under the **Name** field enter **Calendar**, under the **Folder contains** drop-down select **Calendar Items** ensure you have selected the correct e-mail account under the **Select where to place the folder** section and click the **OK** button (**Figure 19**).
**Figure 19**
[](https://docs.deeztek.com/uploads/images/gallery/2021-05/image-1620642933039.png)
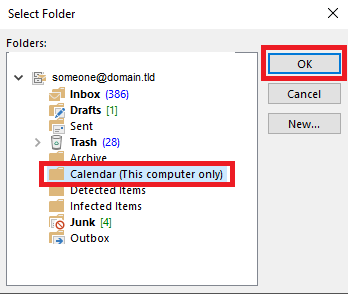
Back in the **Select Folder** window, you should have a new folder named **Calendar (This computer only)**, select it and click the **OK** button (**Figure 20**).
**Figure 20**
[](https://docs.deeztek.com/uploads/images/gallery/2021-05/image-1620643209005.png)
Back, in the **Select Resource** window, click the **Address Books** tab and click the [ ](https://docs.deeztek.com/uploads/images/gallery/2021-05/image-1620641737725.png)button to the right of the **Personal Address Book** (**Figure 21**).
**Figure 21**
[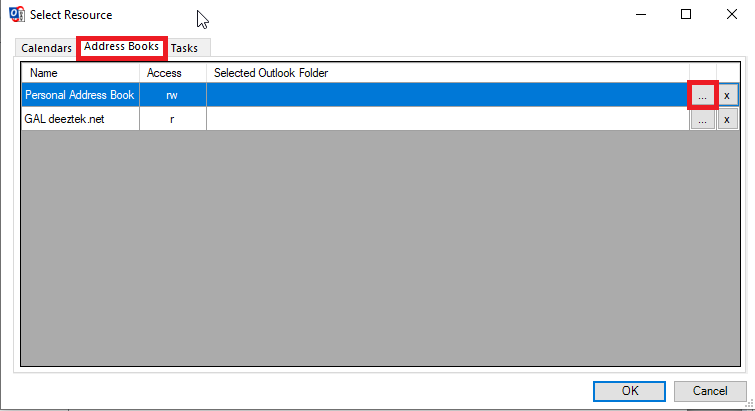](https://docs.deeztek.com/uploads/images/gallery/2021-05/image-1620643467704.png)
In the **Select Folder** window, click the **New...** button (**Figure 22**).
**Figure 22**
[](https://docs.deeztek.com/uploads/images/gallery/2021-05/image-1620642213244.png)
In the **Create New Folder** window, under the **Name** field enter **Contacts**, under the **Folder contains** drop-down select **Contact Items** ensure you have selected the correct e-mail account under the **Select where to place the folder** section and click the **OK** button (**Figure 23**).
**Figure 23**
[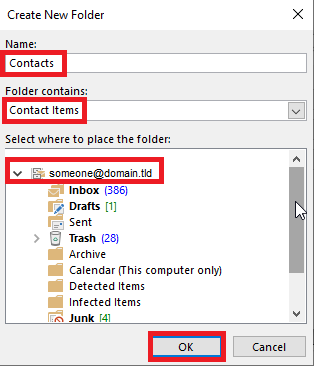](https://docs.deeztek.com/uploads/images/gallery/2021-05/image-1620643694519.png)
Back in the **Select Folder** window, you should have a new folder named **Contacts (This computer only)**, select it and click the **OK** button (**Figure 24**).
**Figure 24**
[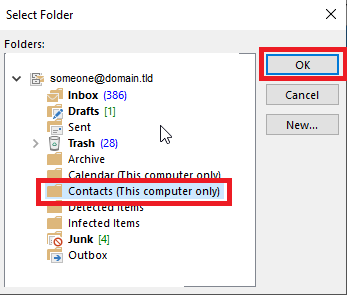](https://docs.deeztek.com/uploads/images/gallery/2021-05/image-1620643920710.png)
Back, in the **Select Resource** window, click the **OK** button (**Figure 25**).
**Figure 25**
[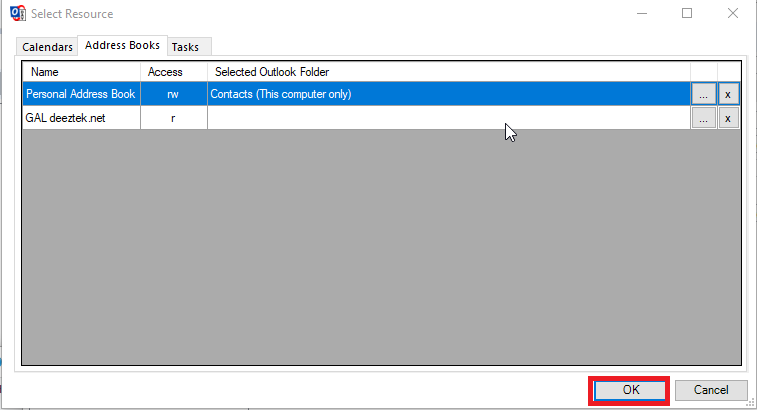](https://docs.deeztek.com/uploads/images/gallery/2021-05/image-1620644166275.png)
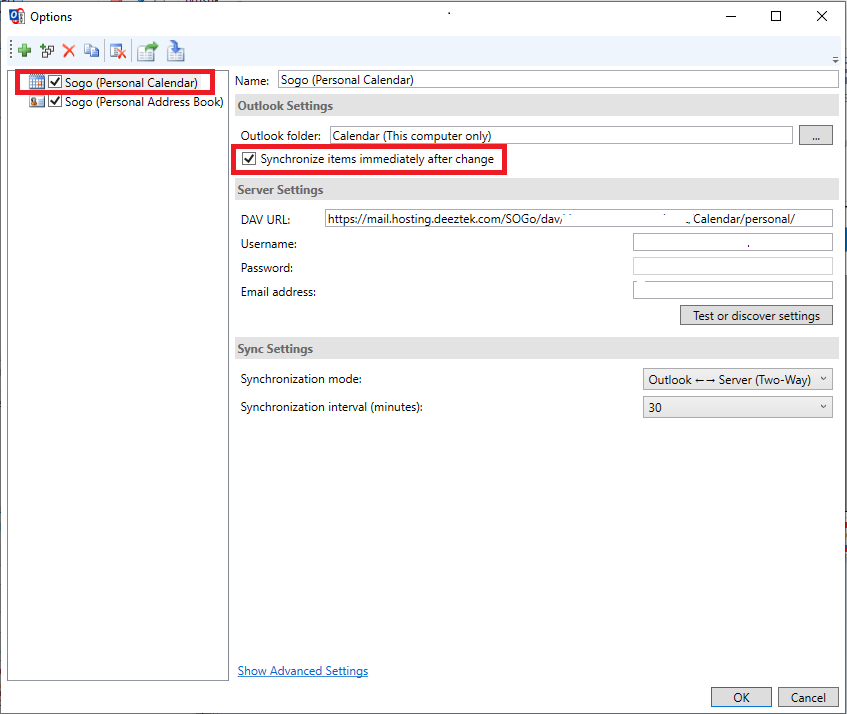
Back in the **Options** window, select **Sogo (Personal Calendar)** on the left-hand pane and ensure you place a check mark on **Synchronize items immediately after change** on the right-hand pane (**Figure 26**).
**Figure 26**
[](https://docs.deeztek.com/uploads/images/gallery/2021-05/image-1620644462100.png)
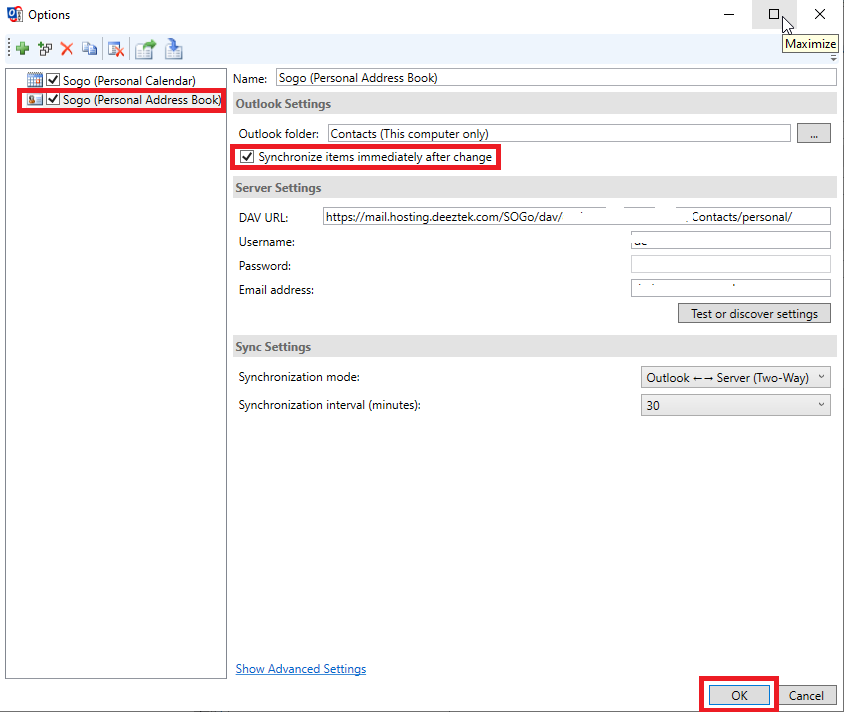
Next, select **Sogo (Personal Address Book)** on the left-hand pane and ensure you place a check mark on **Synchronize items immediately after change** on the right-hand pane and click the OK button (**Figure 27**).
Figure 27
[](https://docs.deeztek.com/uploads/images/gallery/2021-05/image-1620644636616.png)
# Configure Thunderbird for Hosted Mail
This guide assumes you are configuring Thunderbird for the first time.
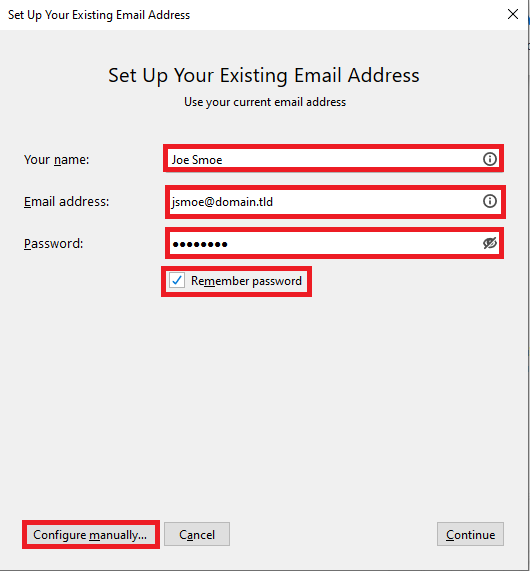
In the **Set Up Your Existing Email Address** window, enter your full name in the **Your name** field, your e-mail address in the **Email address** field and your password in the **Password** field, ensure **Remember password** is checked and click the **Configure manually..** button (**Figure 1**).
**Figure 1**
[](https://docs.deeztek.com/uploads/images/gallery/2021-05/image-1620671570860.png)
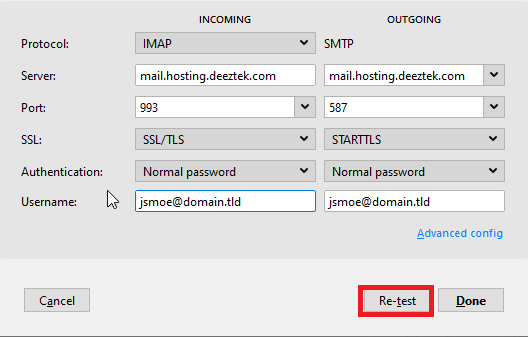
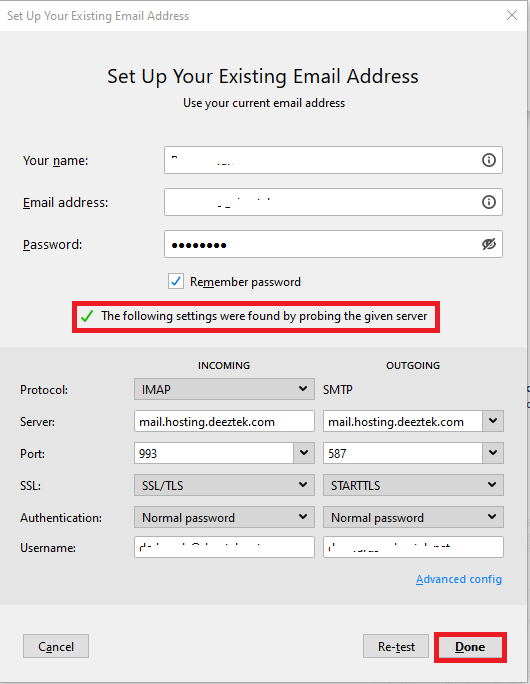
Under the **INCOMING**, in the **Protocol** drop-down, ensure **IMAP** is selected, in the Server field enter **mail.hosting.deeztek.com**, in the **Port** drop-down ensure **993** is selected, in the **SSL** drop-down ensure **SSL/TLS** is selected, in the **Authentication** drop-down ensure **Normal password** is selected.
Under the **OUTGOING** section, in the **Port** drop-down ensure **587** is selected, in the **SSL** drop-down ensure **STARTTLS** is selected, in the **Authentication** drop-down ensure **Normal password** is selected and click the **Re-test** button. (**Figure 2**).
**Figure 2**
[](https://docs.deeztek.com/uploads/images/gallery/2021-05/image-1620672200768.png)
If you entered the correct settings above, Thunderbird will attempt to probe the mail server and upon success will output **The following settings were found by probing the given server**. Click the **Done** button (**Figure 2**).
**Figure 2**
[](https://docs.deeztek.com/uploads/images/gallery/2021-05/image-1620672420537.png)
From the main Thunderbird window, **right-click** to the right of the **Quick Filter** icon and on the resultant menu, select **Menu Bar** (**Figure 3**).
**Figure 3**
[](https://docs.deeztek.com/uploads/images/gallery/2021-05/image-1620678854836.png)
Thunderbird should now have a top menu bar (**Figure 4**).
**Figure 4**
[](https://docs.deeztek.com/uploads/images/gallery/2021-05/image-1620678986029.png)
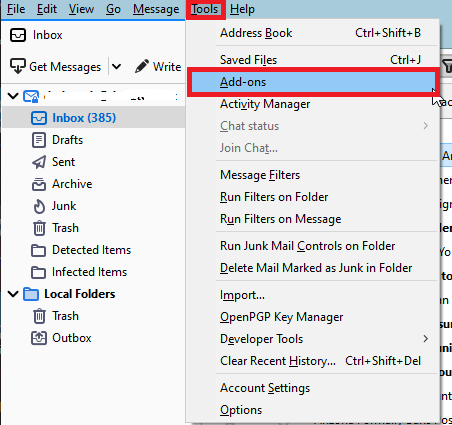
From the top menu bar, click on **Tools --> Add-ons** (**Figure 4**).
**Figure 4**
[](https://docs.deeztek.com/uploads/images/gallery/2021-05/image-1620679275024.png)
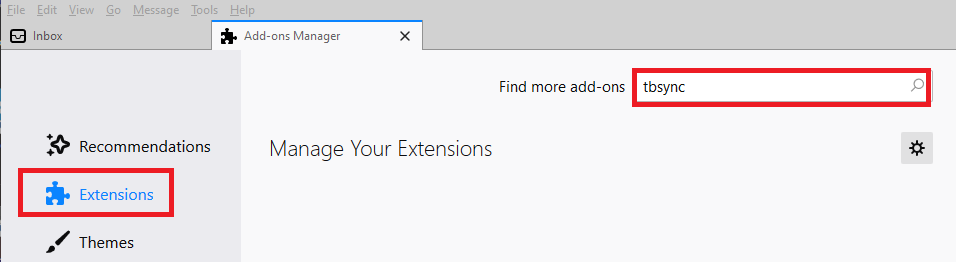
In the **Add-ons Manager**, ensure **Extensions** is selected on the left-hand pane and in the **Find more add-ons** search field, enter **tbsync** and click the[](https://docs.deeztek.com/uploads/images/gallery/2021-05/image-1620679393013.png)icon to perform the search (**Figure 5**).
**Figure 5**
[](https://docs.deeztek.com/uploads/images/gallery/2021-05/image-1620679458434.png)
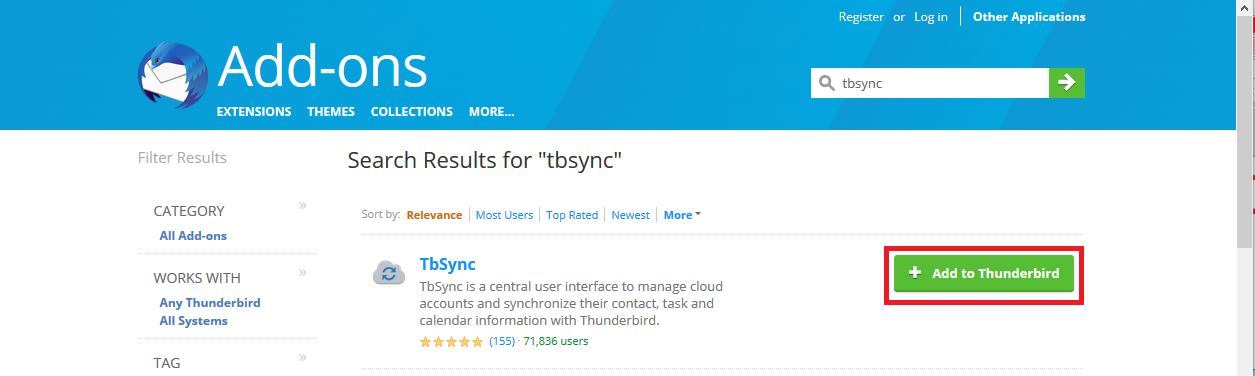
In the **Search Results for "tbsync"** window, click on the **Add to Thunderbird** button to the right of **TbSync** (**Figure 6**).
**Figure 6**
[](https://docs.deeztek.com/uploads/images/gallery/2021-05/image-1620679574344.png)
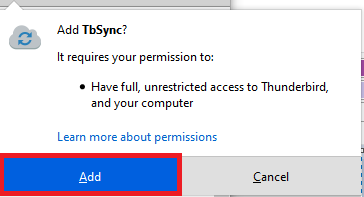
In the **Add TbSync?** confirmation window on the top-right, click the **Add** button (**Figure 7**).
**Figure 7**
[](https://docs.deeztek.com/uploads/images/gallery/2021-05/image-1620679722048.png)
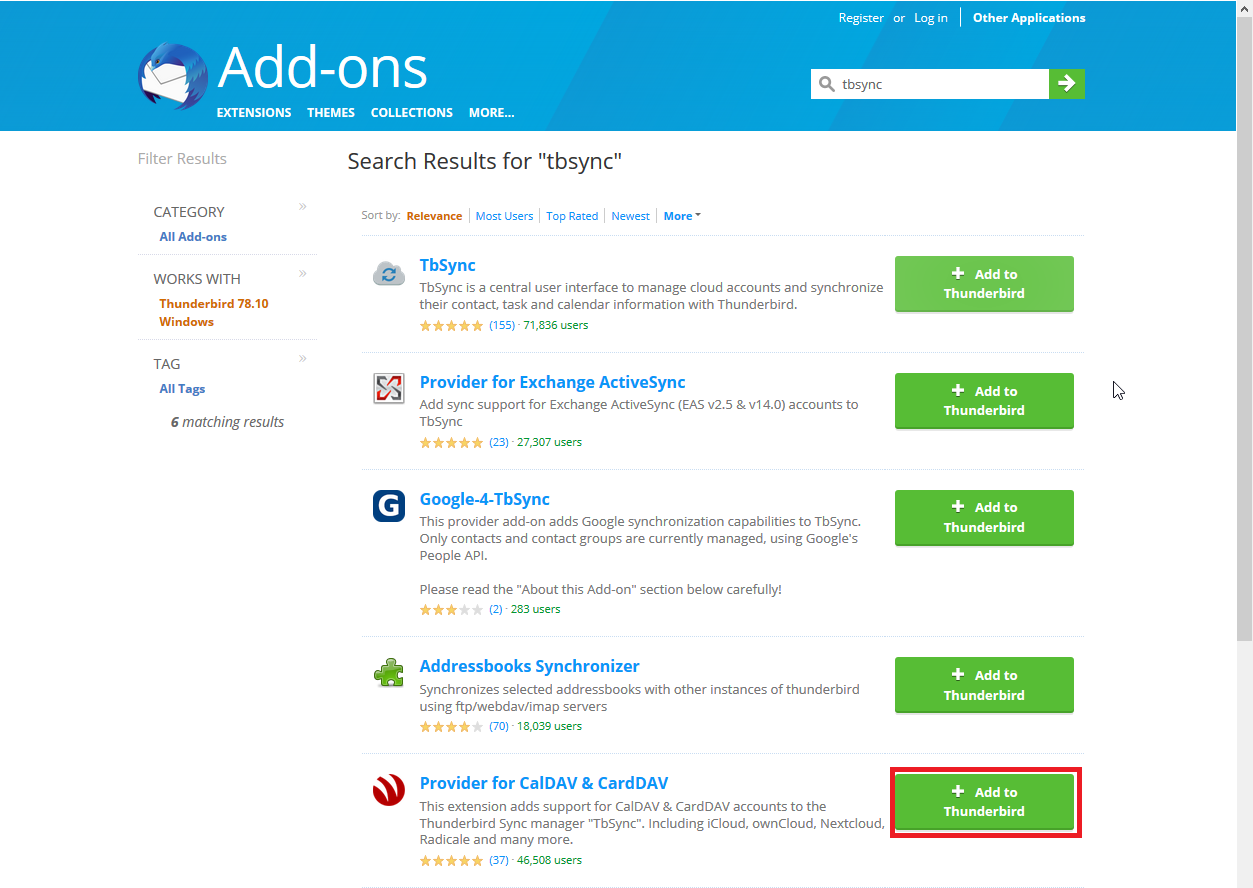
Back the **Search Results for "tbsync"** window, scroll down the results and locate **Provider for CalDAV & CardDAV** and click on the **Add to Thunderbird** button to the right of **Provider for CalDAV & CardDAV** (**Figure 8**).
**Figure 8**
[](https://docs.deeztek.com/uploads/images/gallery/2021-05/image-1620730855549.png)
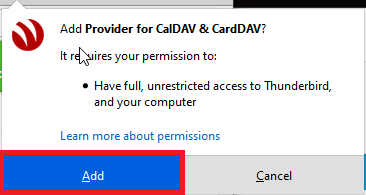
In the **Add Provider for CalDAV & CardDAV?** confirmation window on the top-right, click the **Add** button (**Figure 9**).
**Figure 9**
[](https://docs.deeztek.com/uploads/images/gallery/2021-05/image-1620730986580.png)
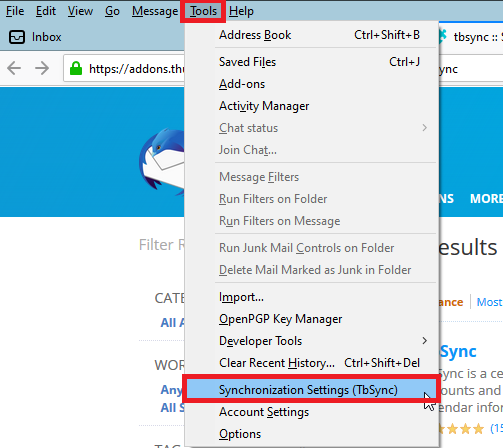
Next, click on **Tools --> Synchronization Settings (TbSync)** (**Figure 10**).
**Figure 10**
[](https://docs.deeztek.com/uploads/images/gallery/2021-05/image-1620679863159.png)
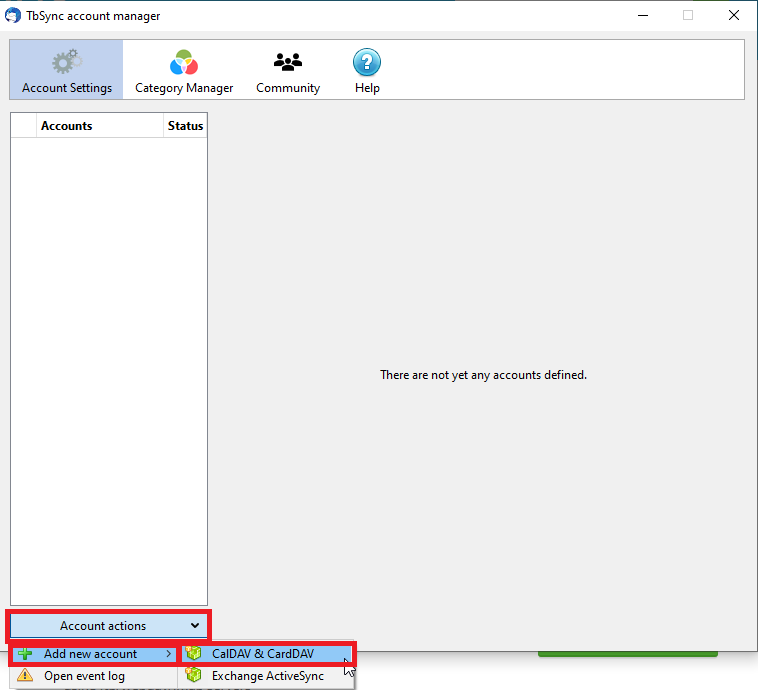
In the **TbSync account manager** window, click on the **Account actions --> Add new account --> CalDAV & CardDAV** (**Figure 11**).
**Figure 11**
[](https://docs.deeztek.com/uploads/images/gallery/2021-05/image-1620680102481.png)
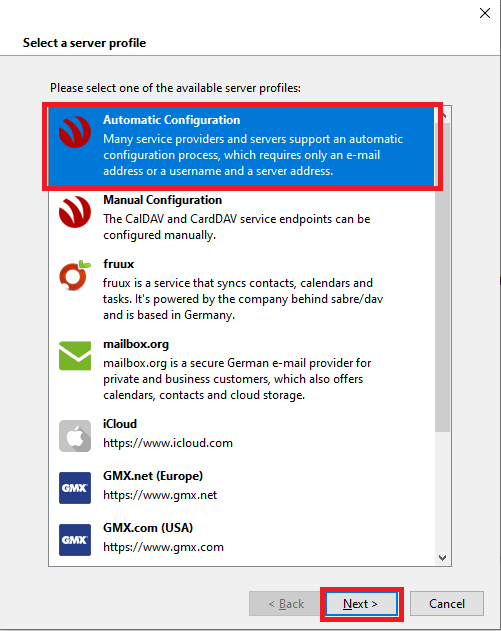
In the **Select a server profile** window, select **Automatic Configuration** and click the **Next** button (**Figure 12**).
**Figure 12**
[](https://docs.deeztek.com/uploads/images/gallery/2021-05/image-1620731236070.png)
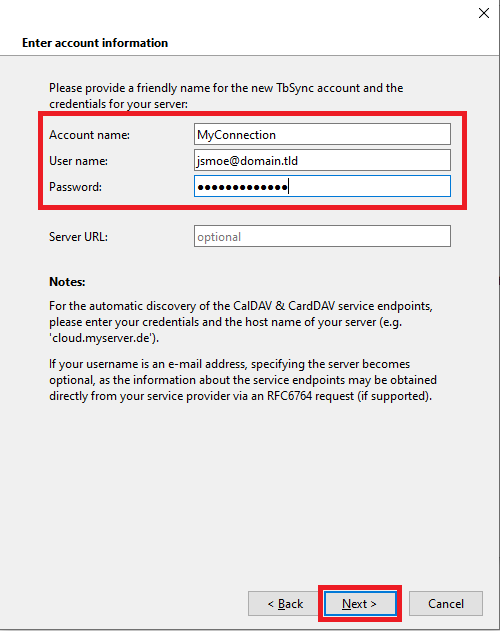
In the **Enter account information** window, enter a friendly name in the **Account name** field, your e-mail address in the **User name** field, your password in the **Password** field and clickl the **Next** button (**Figure 13**).
**Figure 13**
[](https://docs.deeztek.com/uploads/images/gallery/2021-05/image-1620731453726.png)
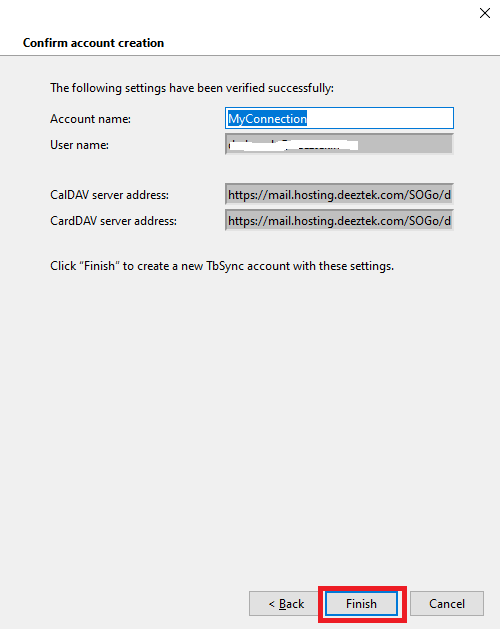
In the Confirm account creation window, click the Finish button (Figure 14).
Figure 14
[](https://docs.deeztek.com/uploads/images/gallery/2021-05/image-1620731657583.png)
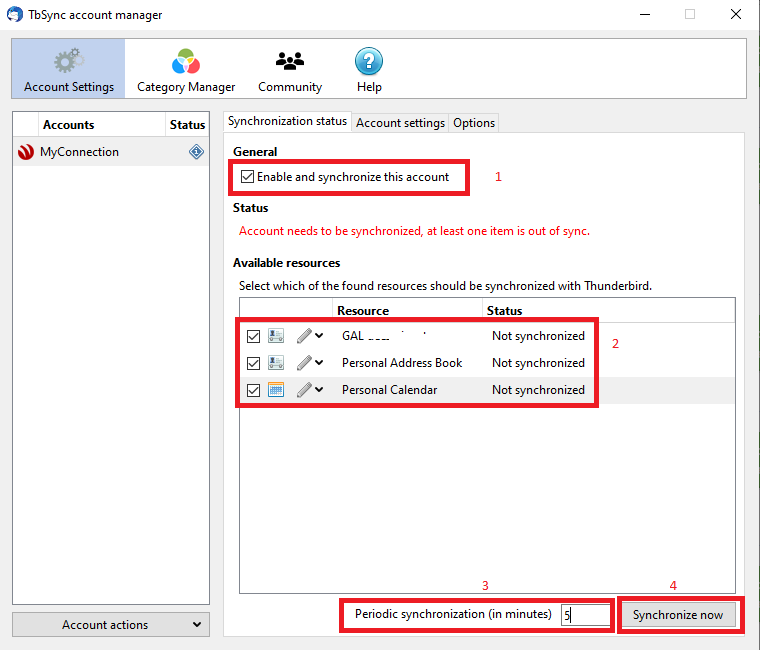
Back in the **TbSync account manager** window, place a check mark on **Enable and synchronize this account** **(1)**, under **Available resources**, place a checkmark on **GAL, Personal Address Book, Personal Calendar (2)**, set the **Periodic synchronization (in minutes)** to **5** minutes **(3)** and click the **Synchronize now** **(4)** button (**Figure 15**).
**Figure 15**
[](https://docs.deeztek.com/uploads/images/gallery/2021-05/image-1620732291871.png)
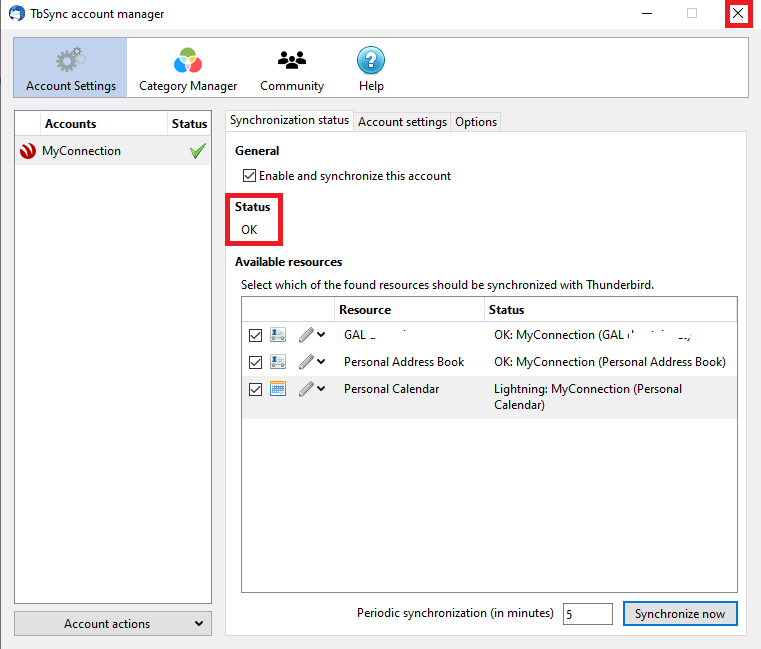
If everything goes well, you should get an **OK** under **Status**. Then you can close the **TbSync account manager** window (**Figure 16**).
**Figure 16**
[](https://docs.deeztek.com/uploads/images/gallery/2021-05/image-1620732460986.png)
# Disable All Junk Filtering in Thunderbird
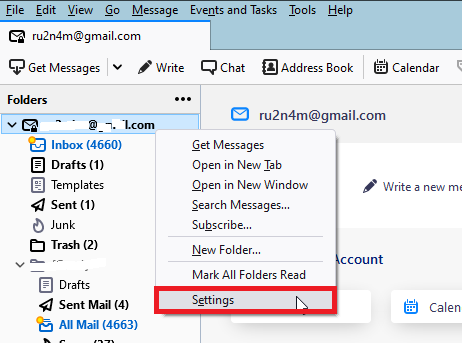
- In Thunderbird, right-click on your account e-mail address and in the resultant menu, click on **Settings** (**Figure 1**):
**Figure 1**
[](https://docs.deeztek.com/uploads/images/gallery/2022-01/image-1643655188068.png)
- In **Account Settings**, **uncheck** the **Enable adaptive junk mail control for this account** (**Figure 2**):
**Figure 2**
[](https://docs.deeztek.com/uploads/images/gallery/2022-01/image-1643655333021.png)
# Configure iPhone for Hosted Mail
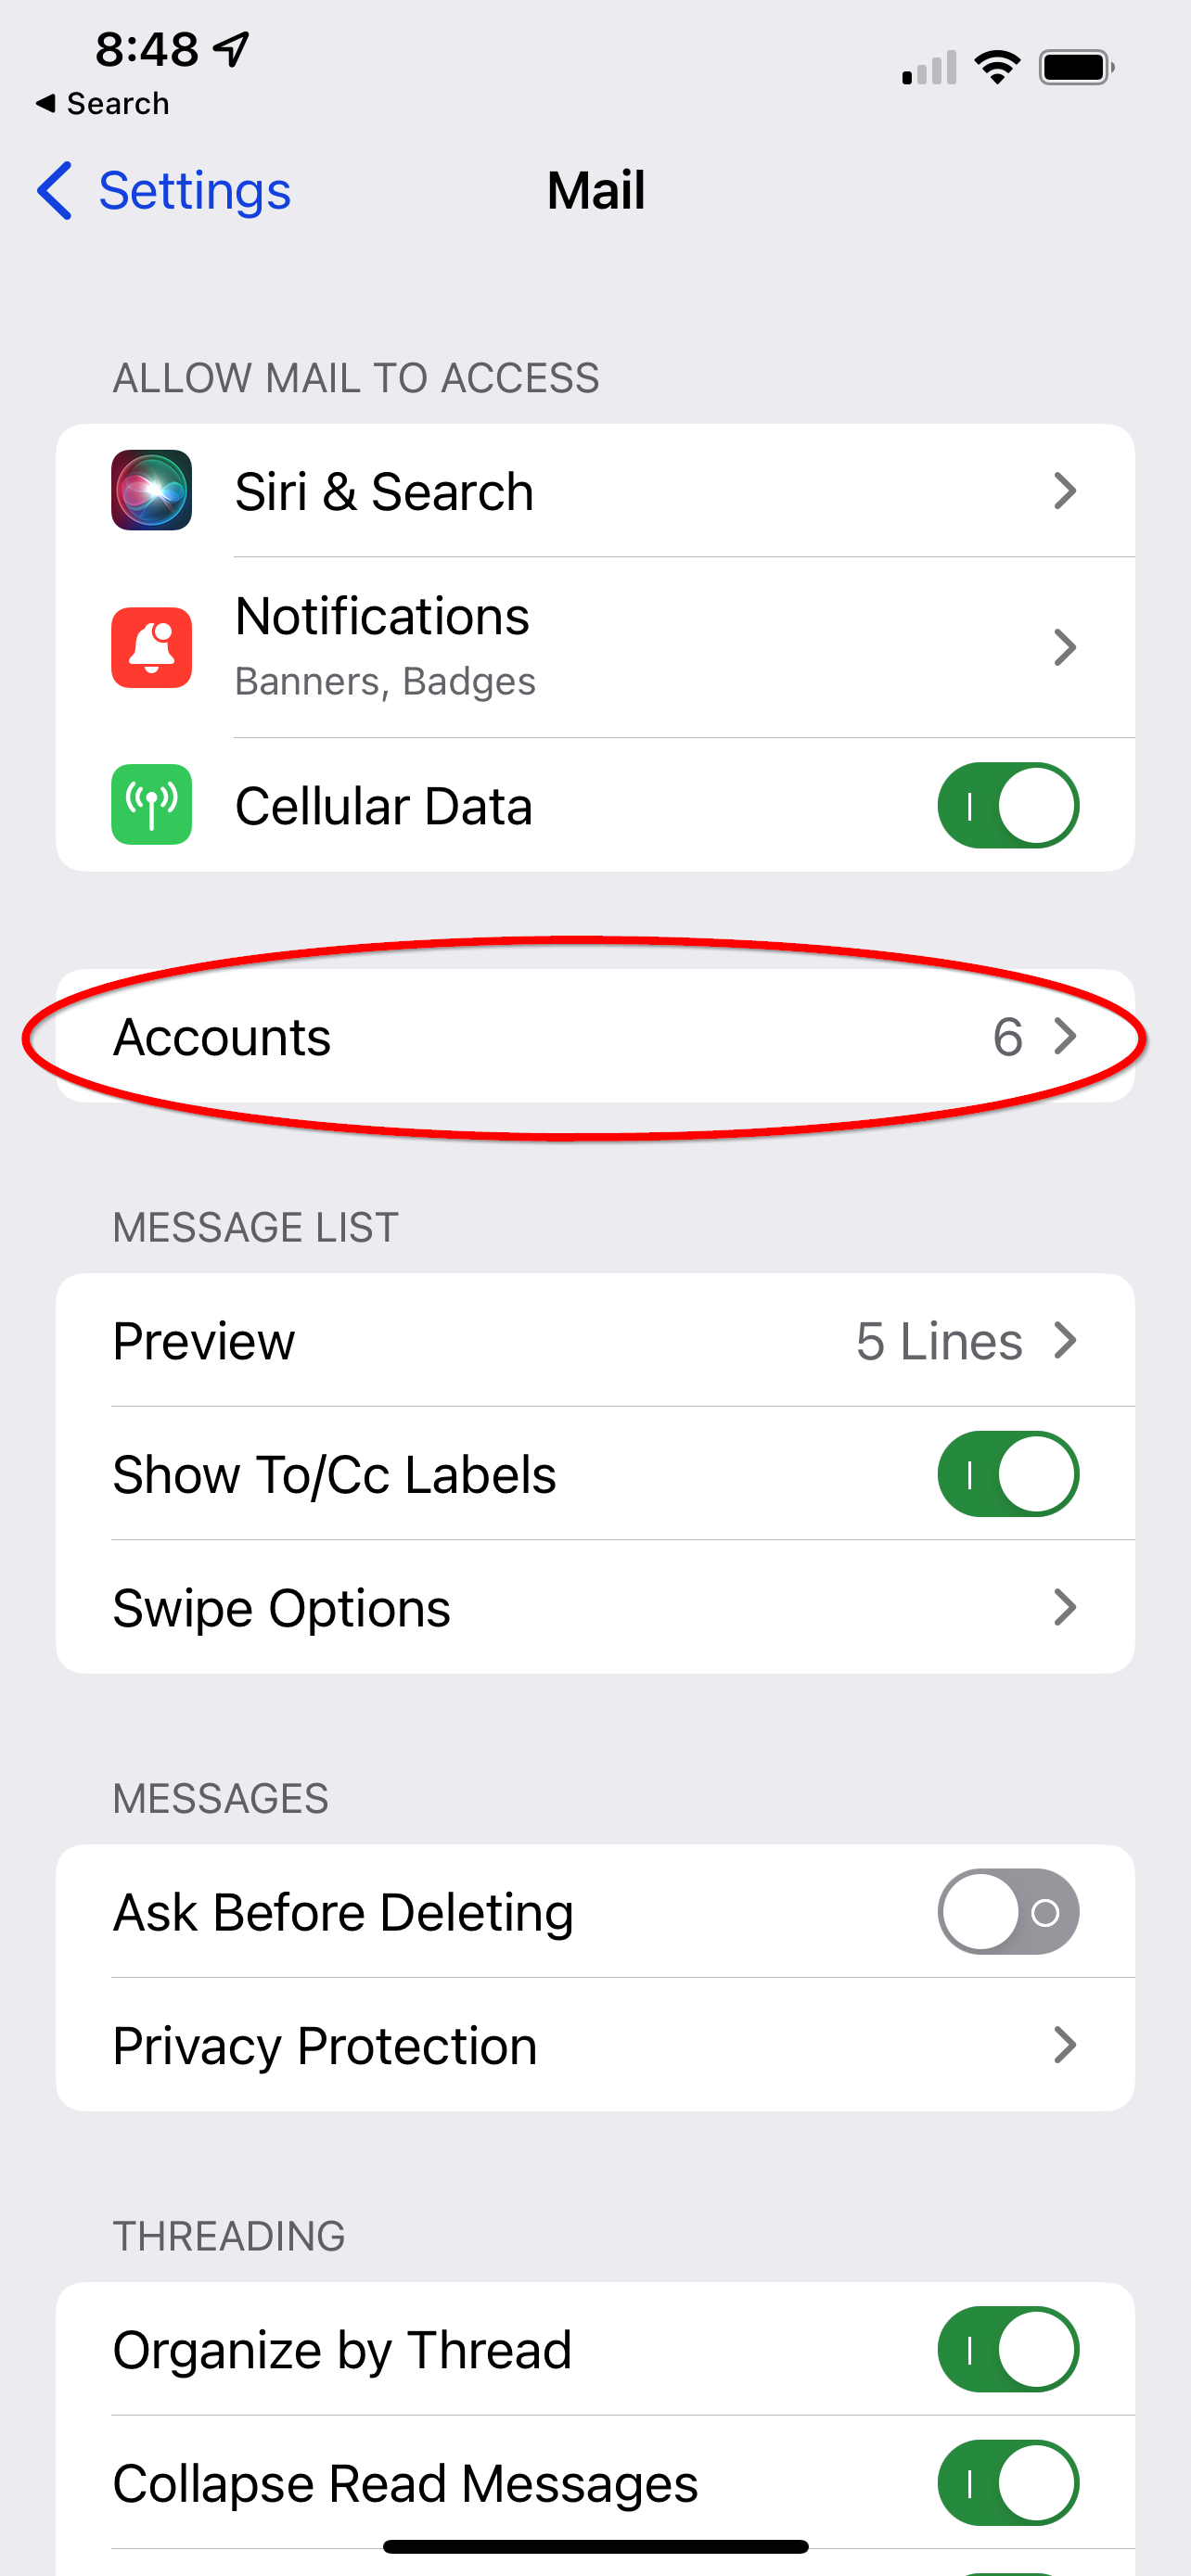
#### **Navigate to the "Settings" application and select "Mail" as pictured:**
[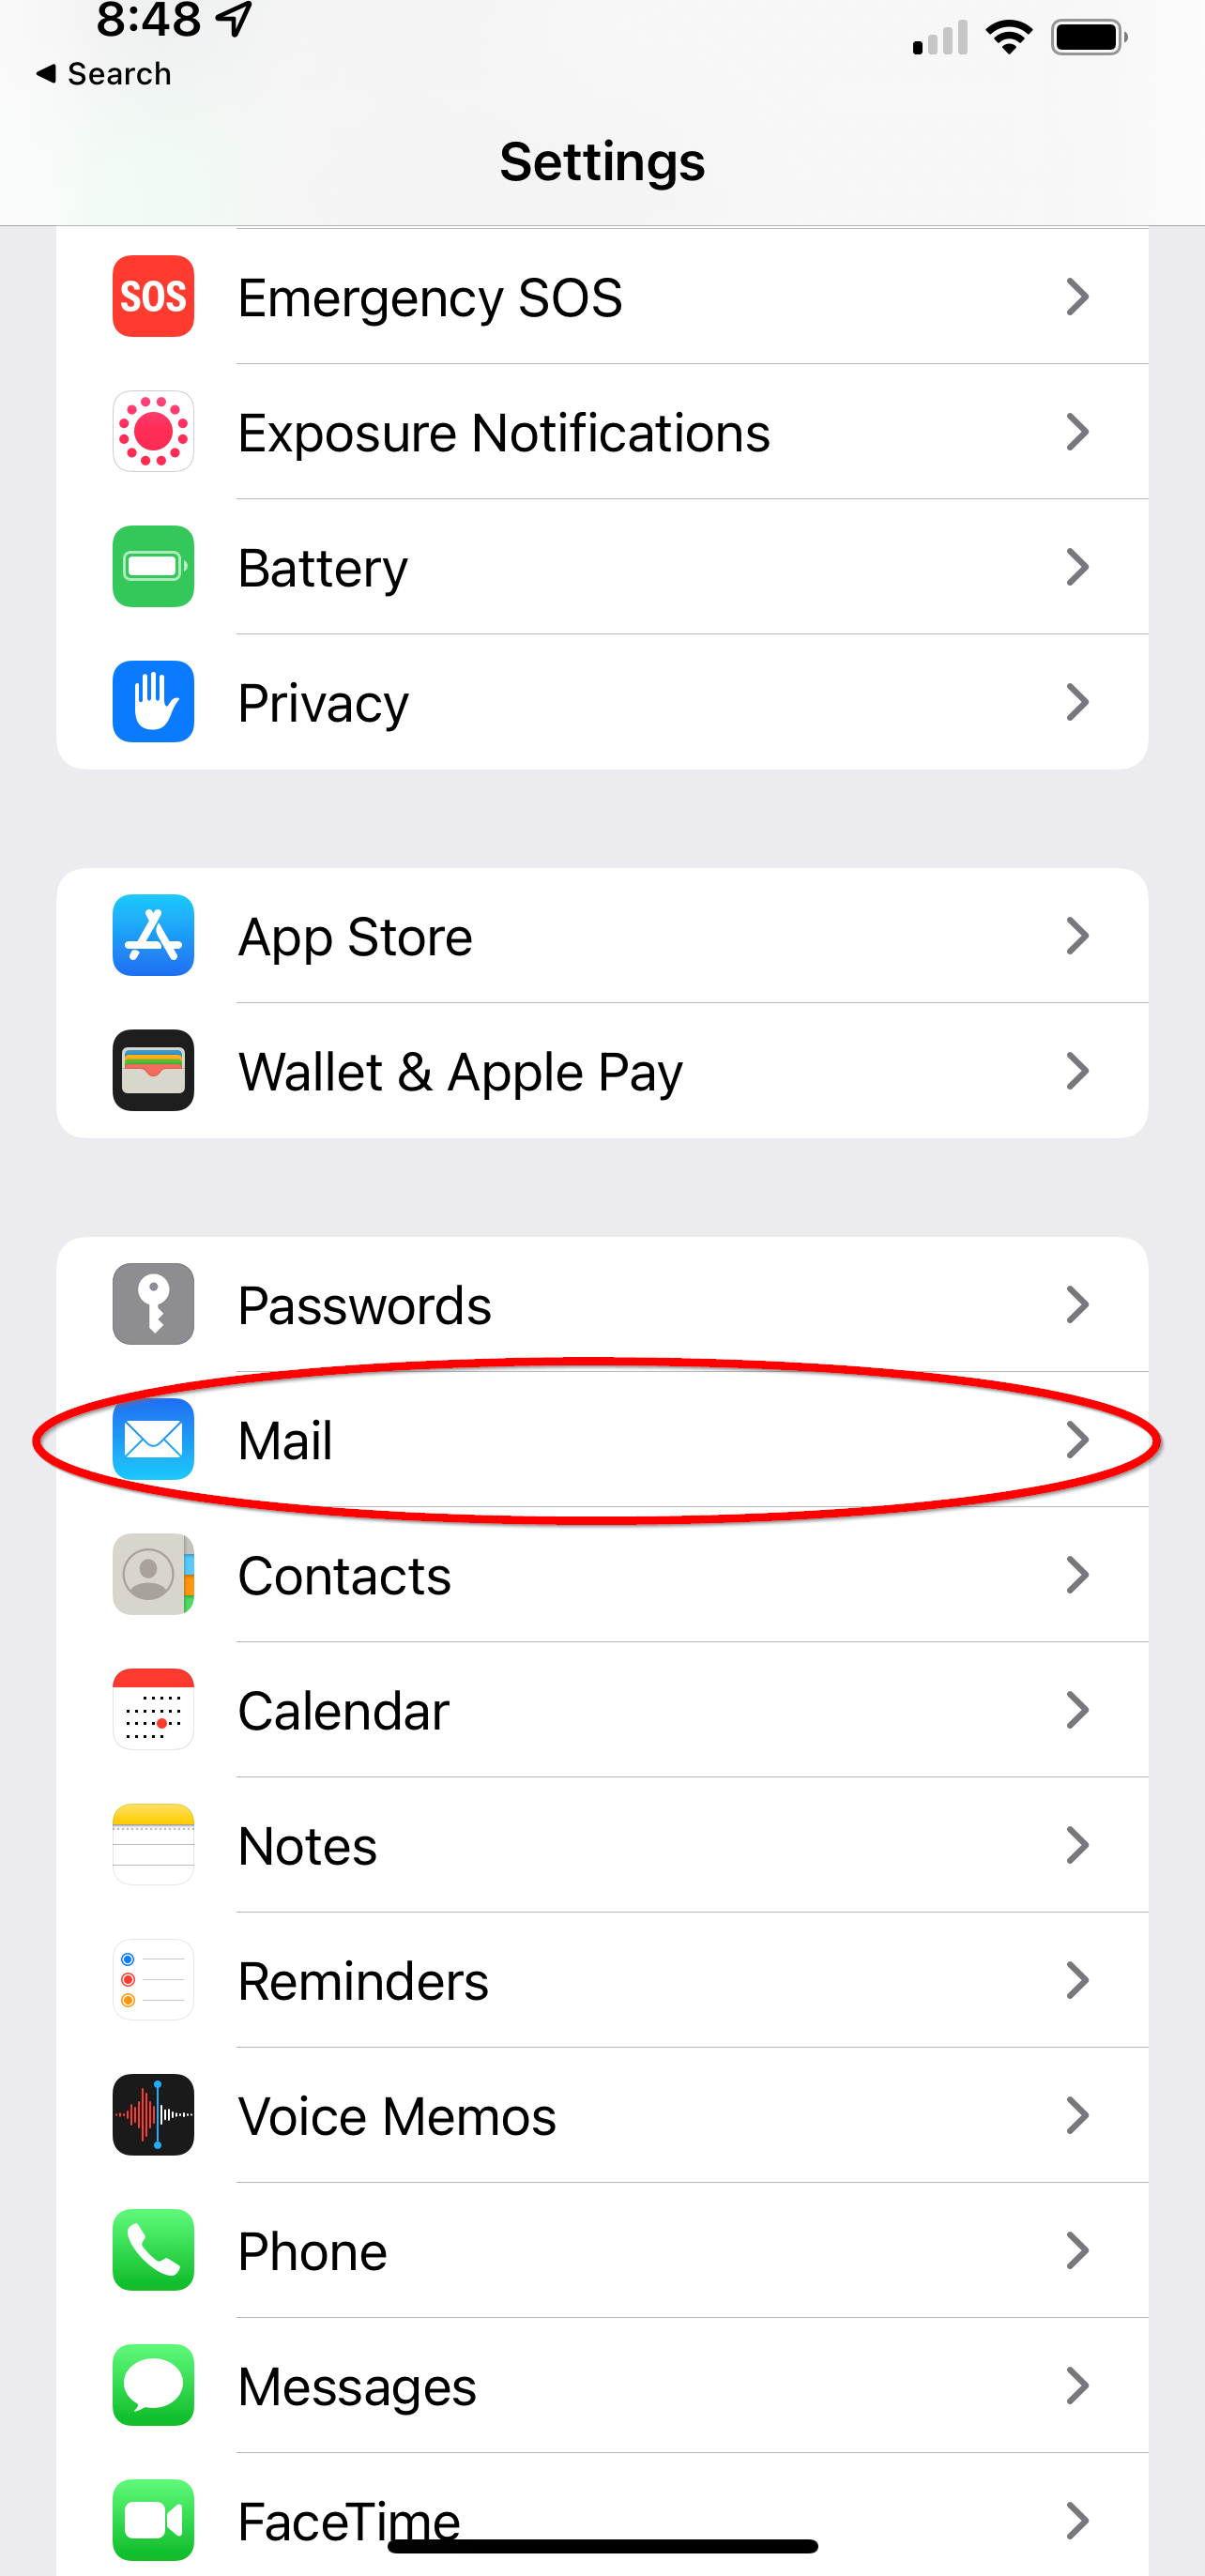](https://docs.deeztek.com/uploads/images/gallery/2022-02/1.png)
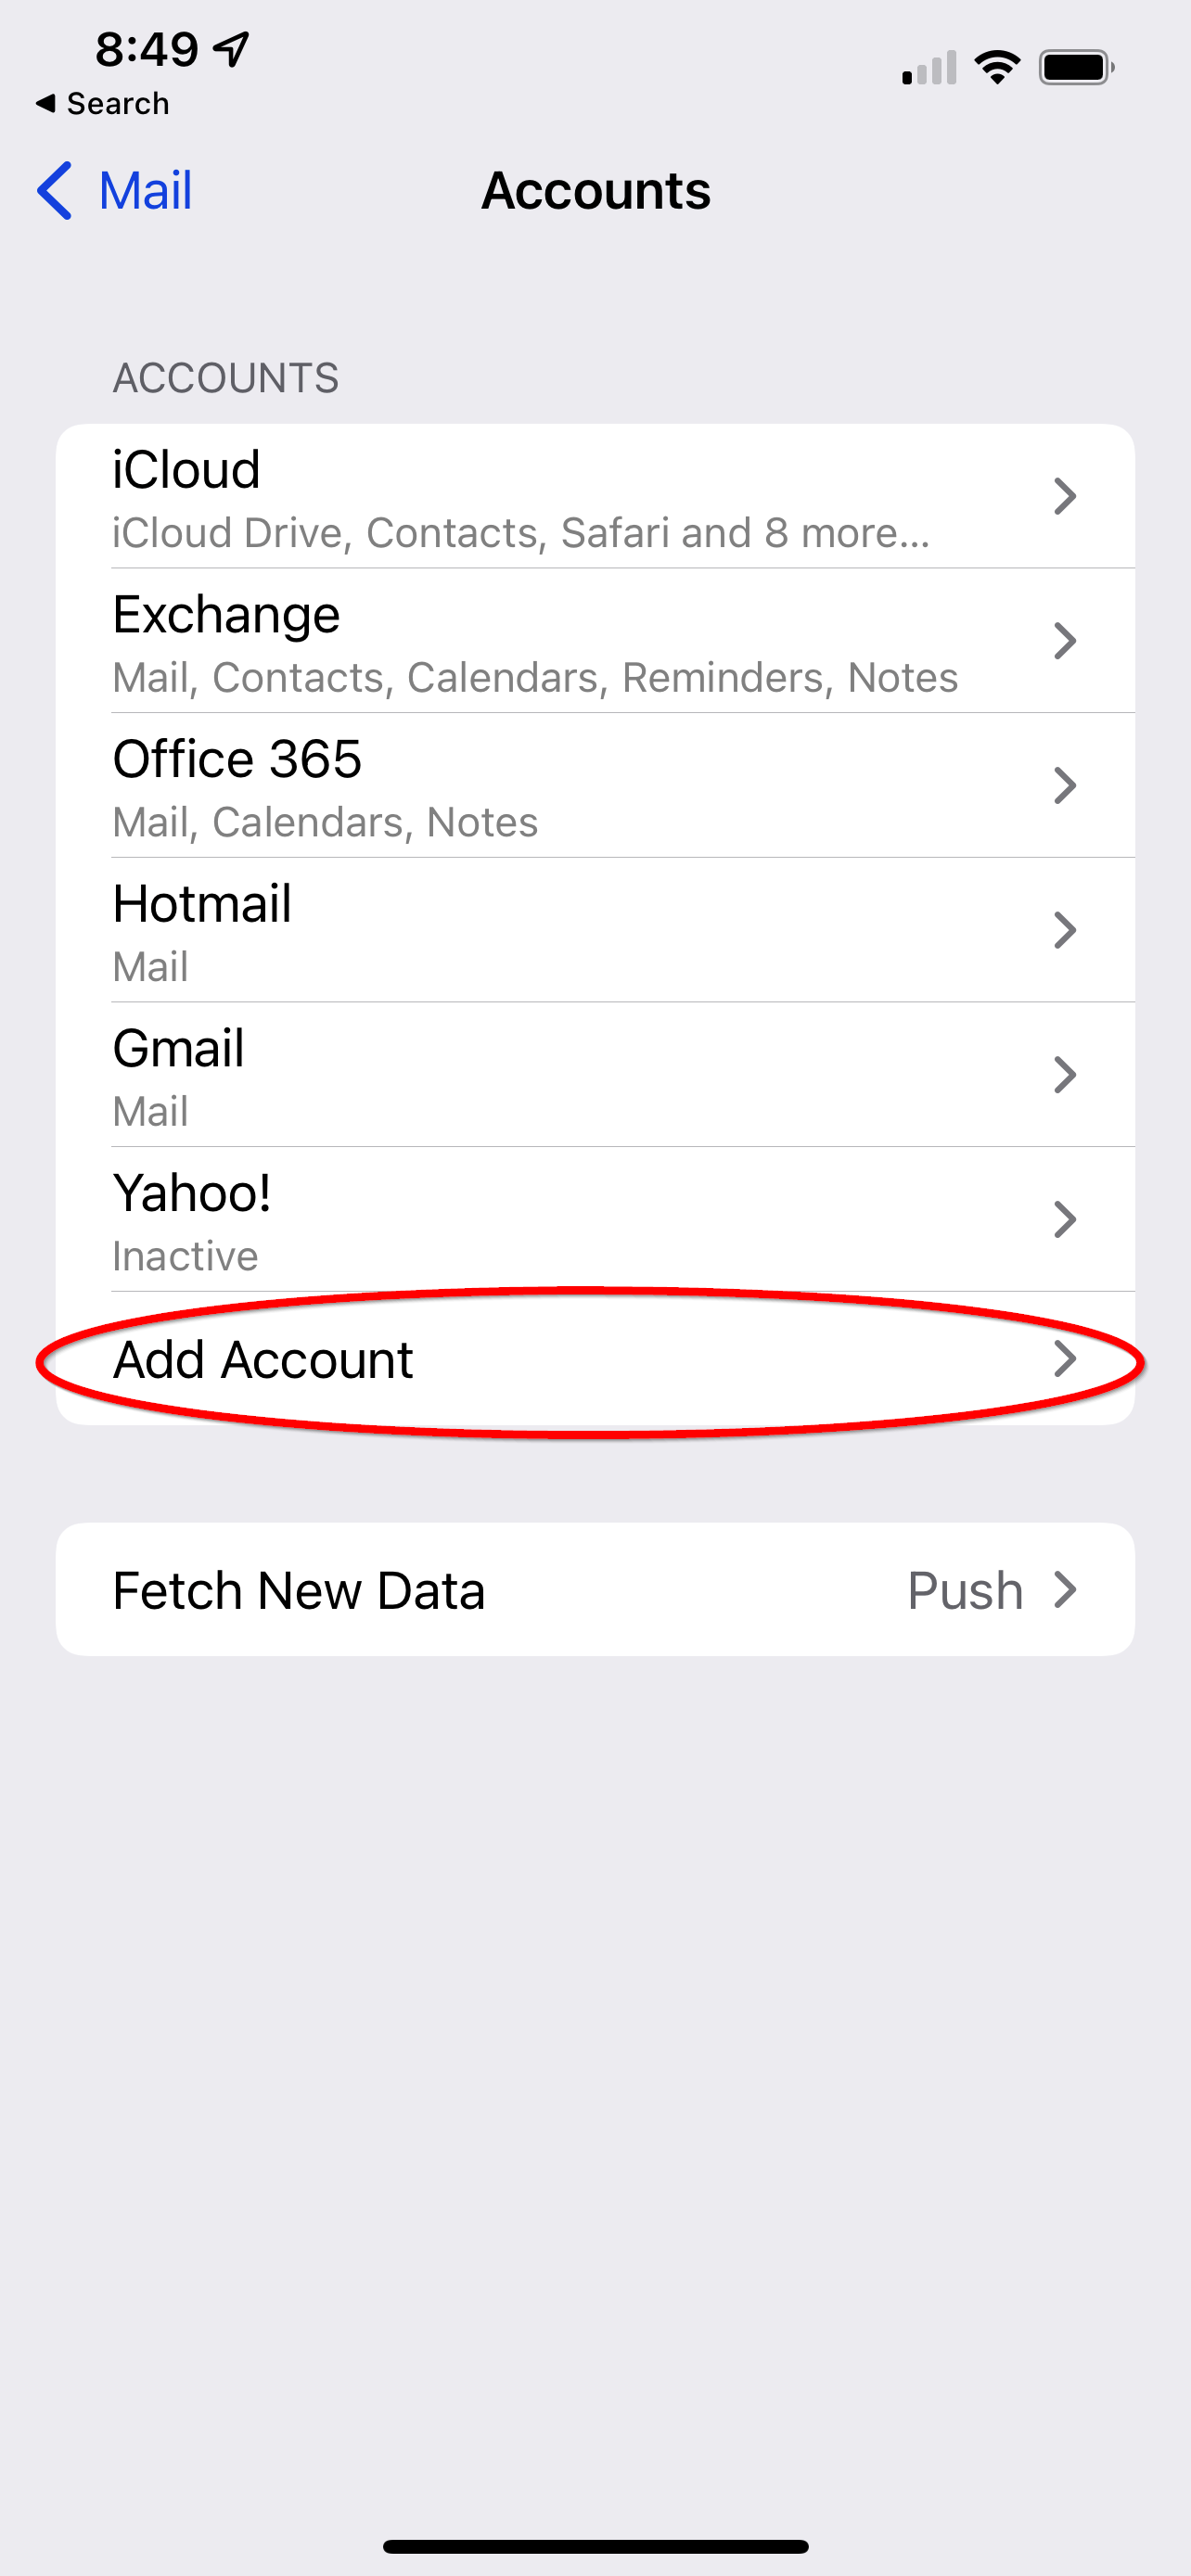
#### **From the "Mail" options select "Accounts" as pictured:**
**[](https://docs.deeztek.com/uploads/images/gallery/2022-02/2.png)**
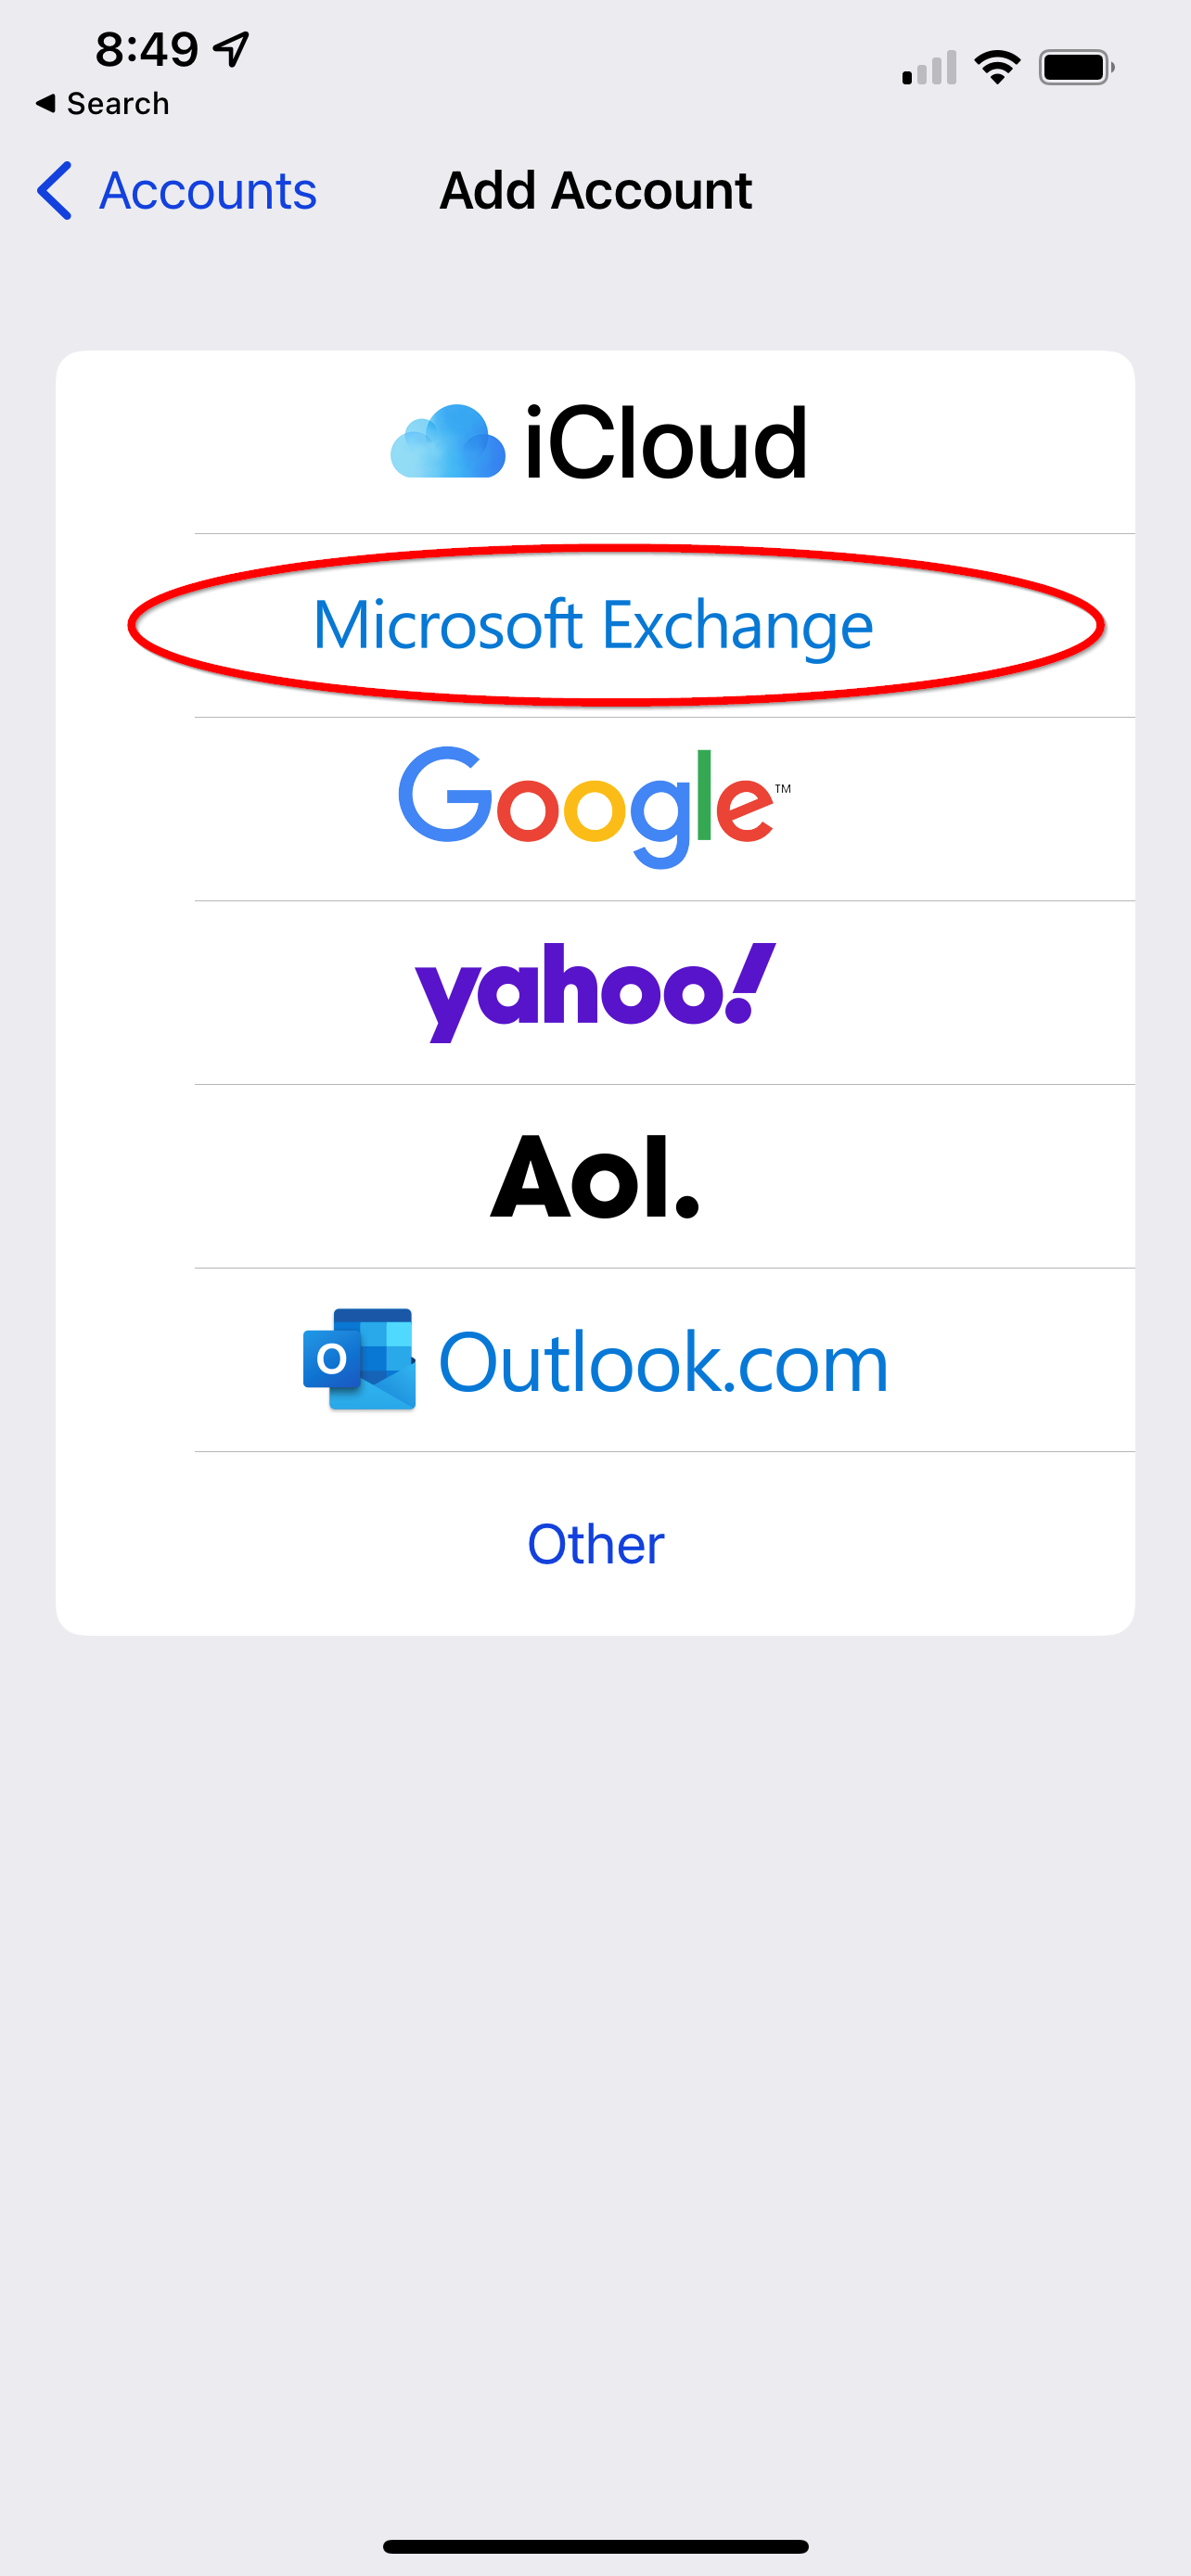
#### **Select the "Add Account" option:**
**[](https://docs.deeztek.com/uploads/images/gallery/2022-02/3.png)**
#### **Select the "Microsoft Exchange" option:**
**[](https://docs.deeztek.com/uploads/images/gallery/2022-02/4.png)**
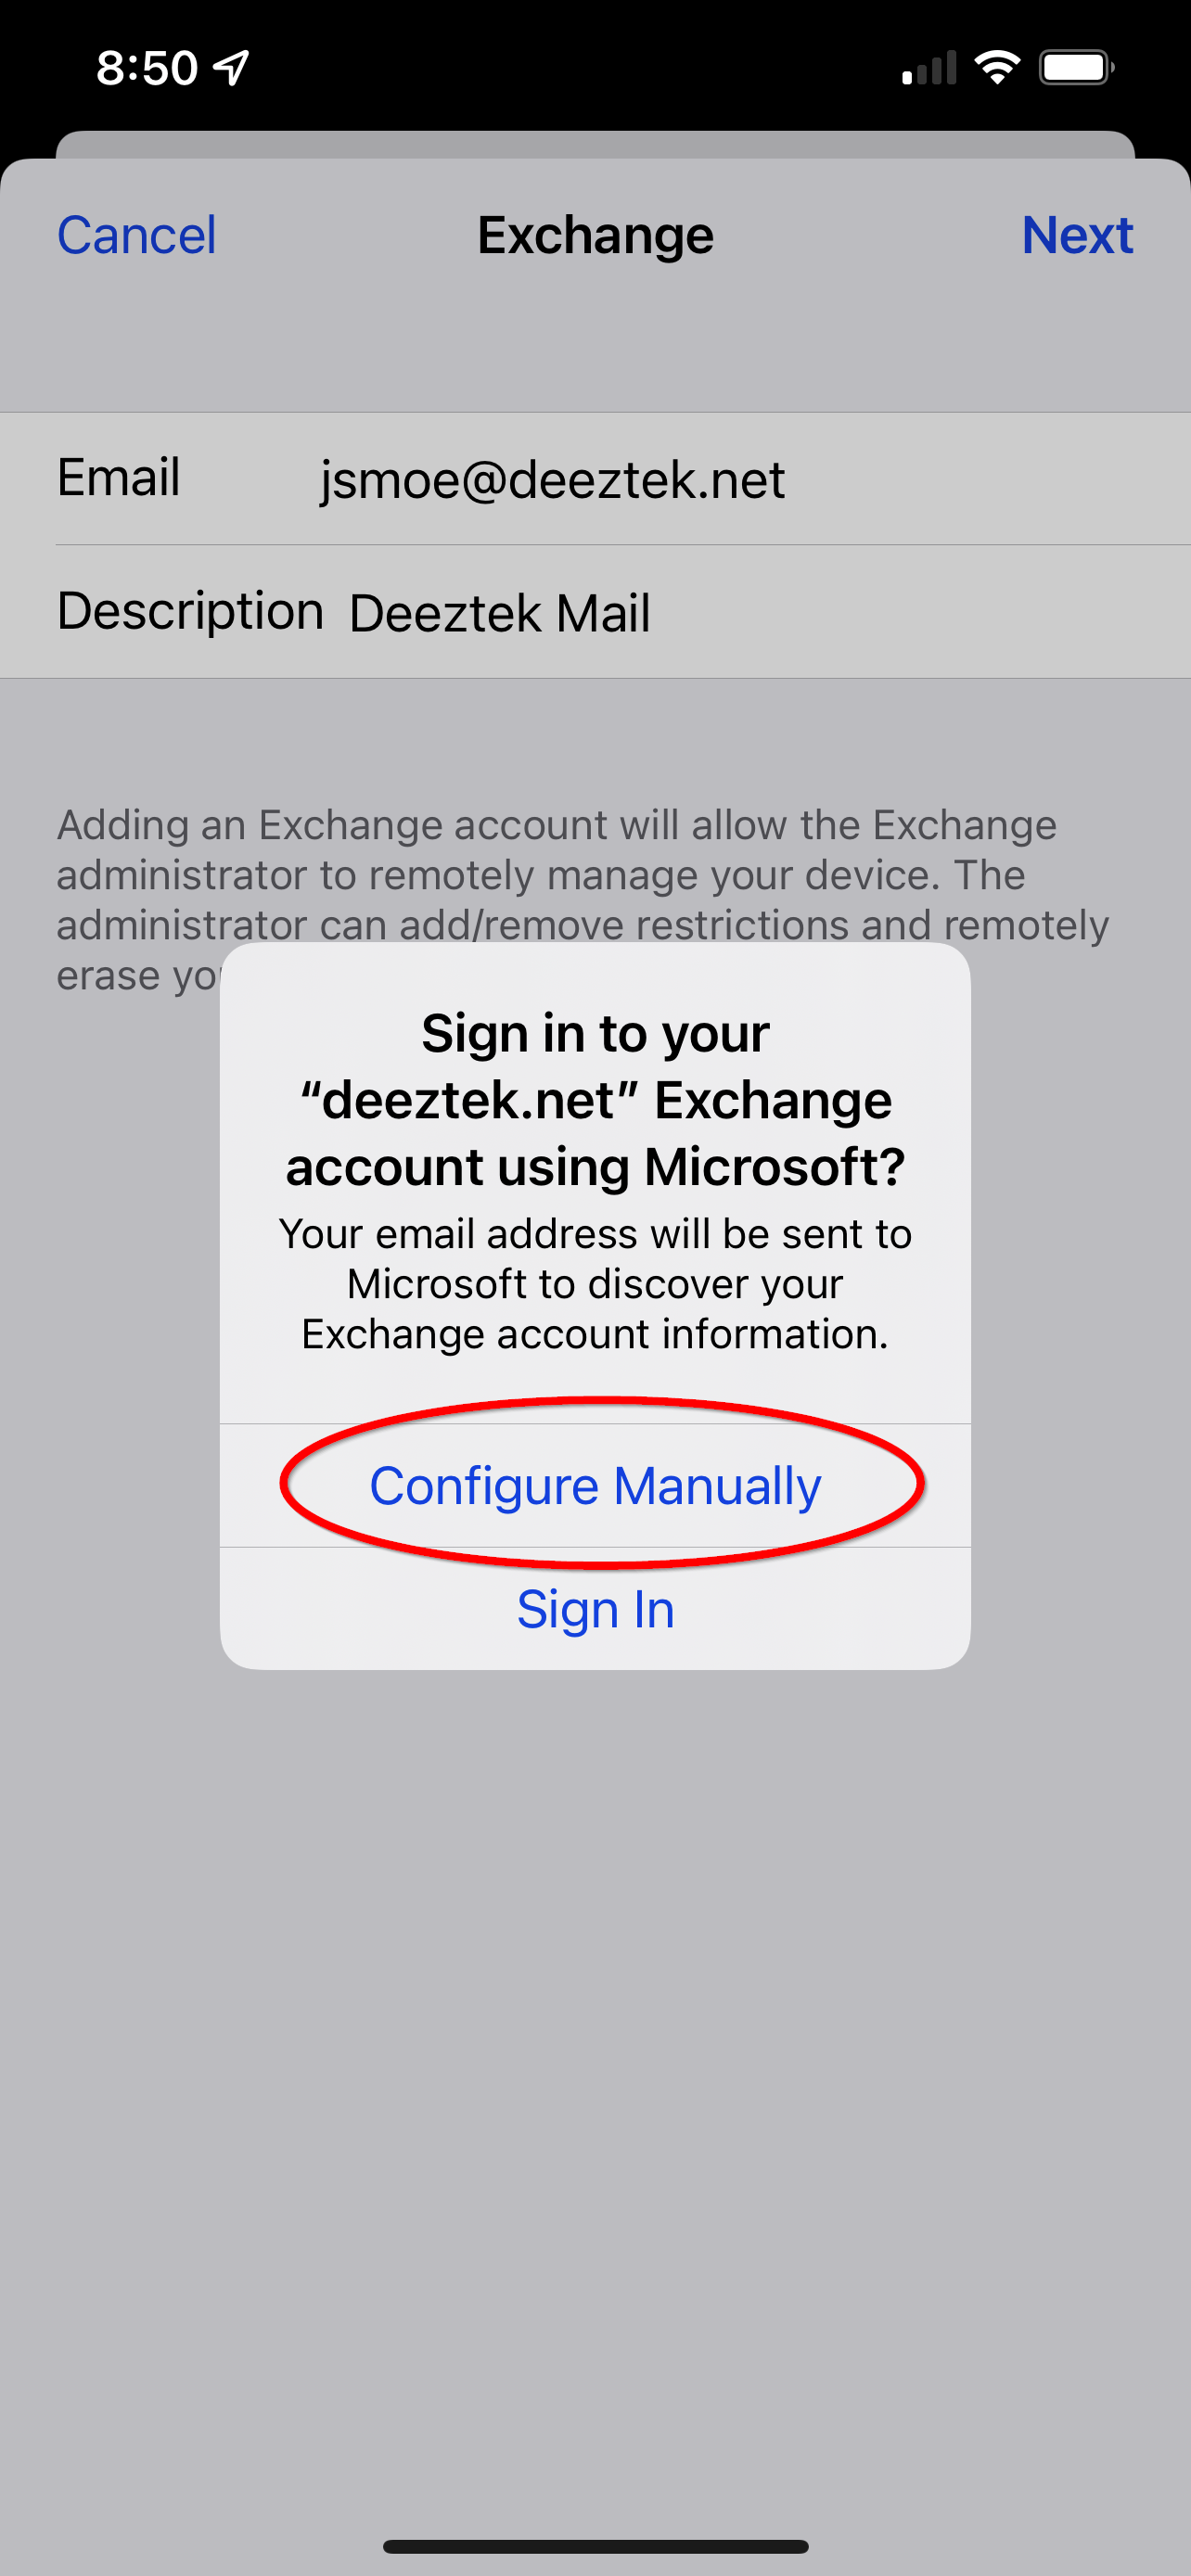
#### **Input your account email address and a friendly description (this can be anything like like to help you remember the purpose of this account), when finished select "Next":**
**[](https://docs.deeztek.com/uploads/images/gallery/2022-02/5.png)**
#### **Select the "Configure Manually" option when prompted:**
**[](https://docs.deeztek.com/uploads/images/gallery/2022-02/6.png)**
#### **Confirm your account email address and description then input your account password into the appropriate field. When finished select "Next."**
**[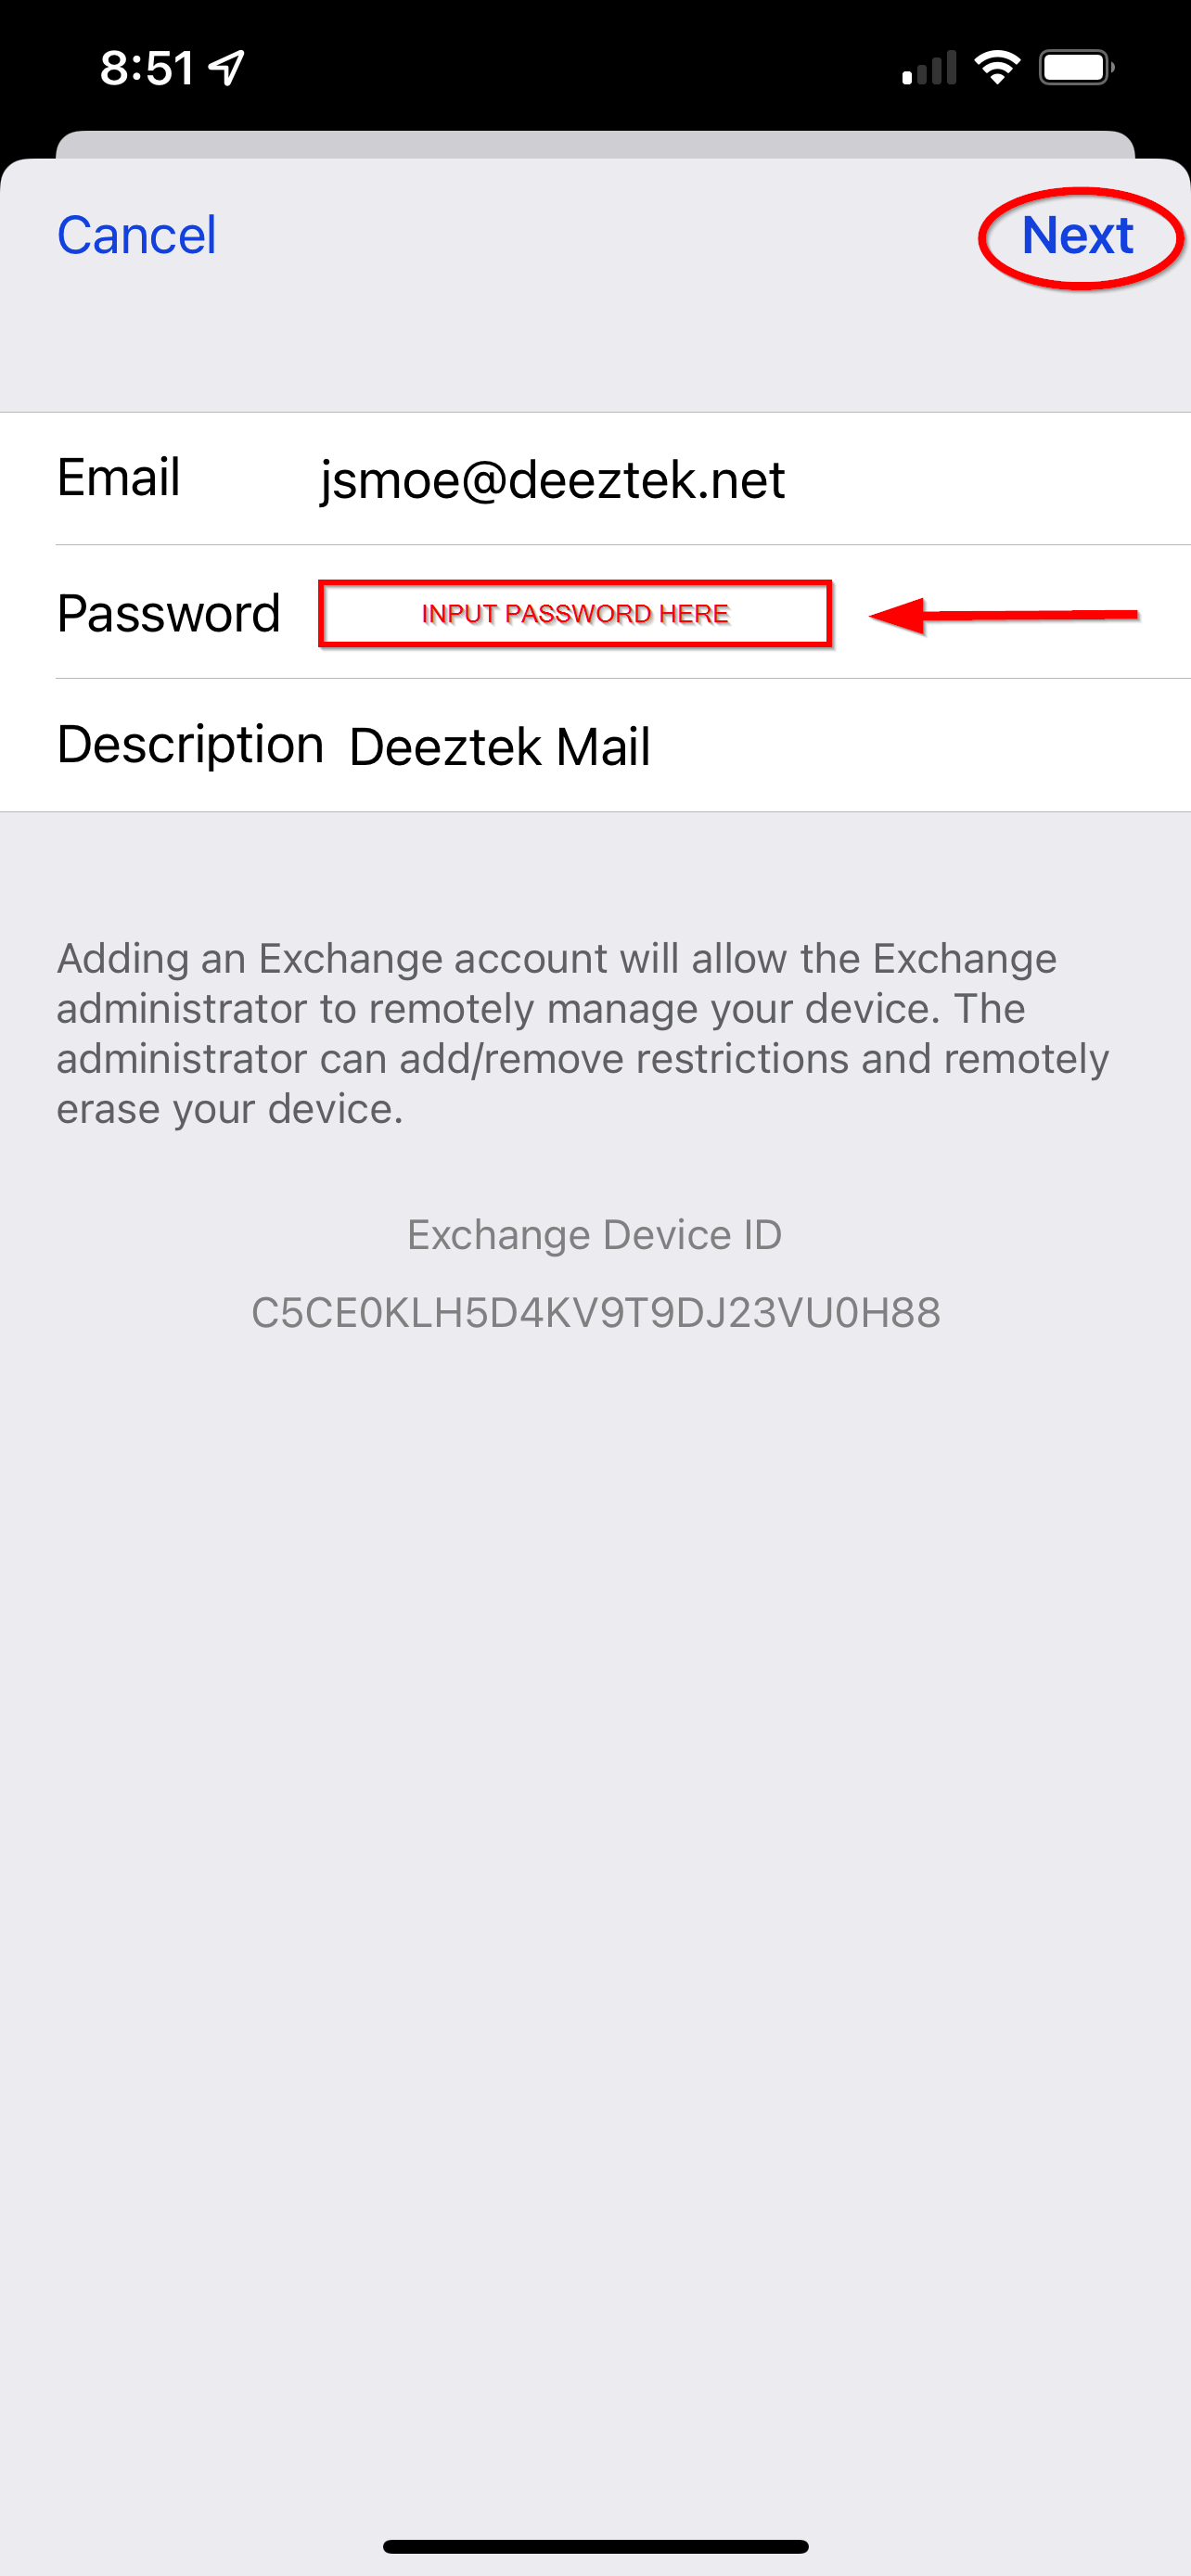](https://docs.deeztek.com/uploads/images/gallery/2022-02/7.png)**
#### **If you receive the below warning please select "Continue."**
**[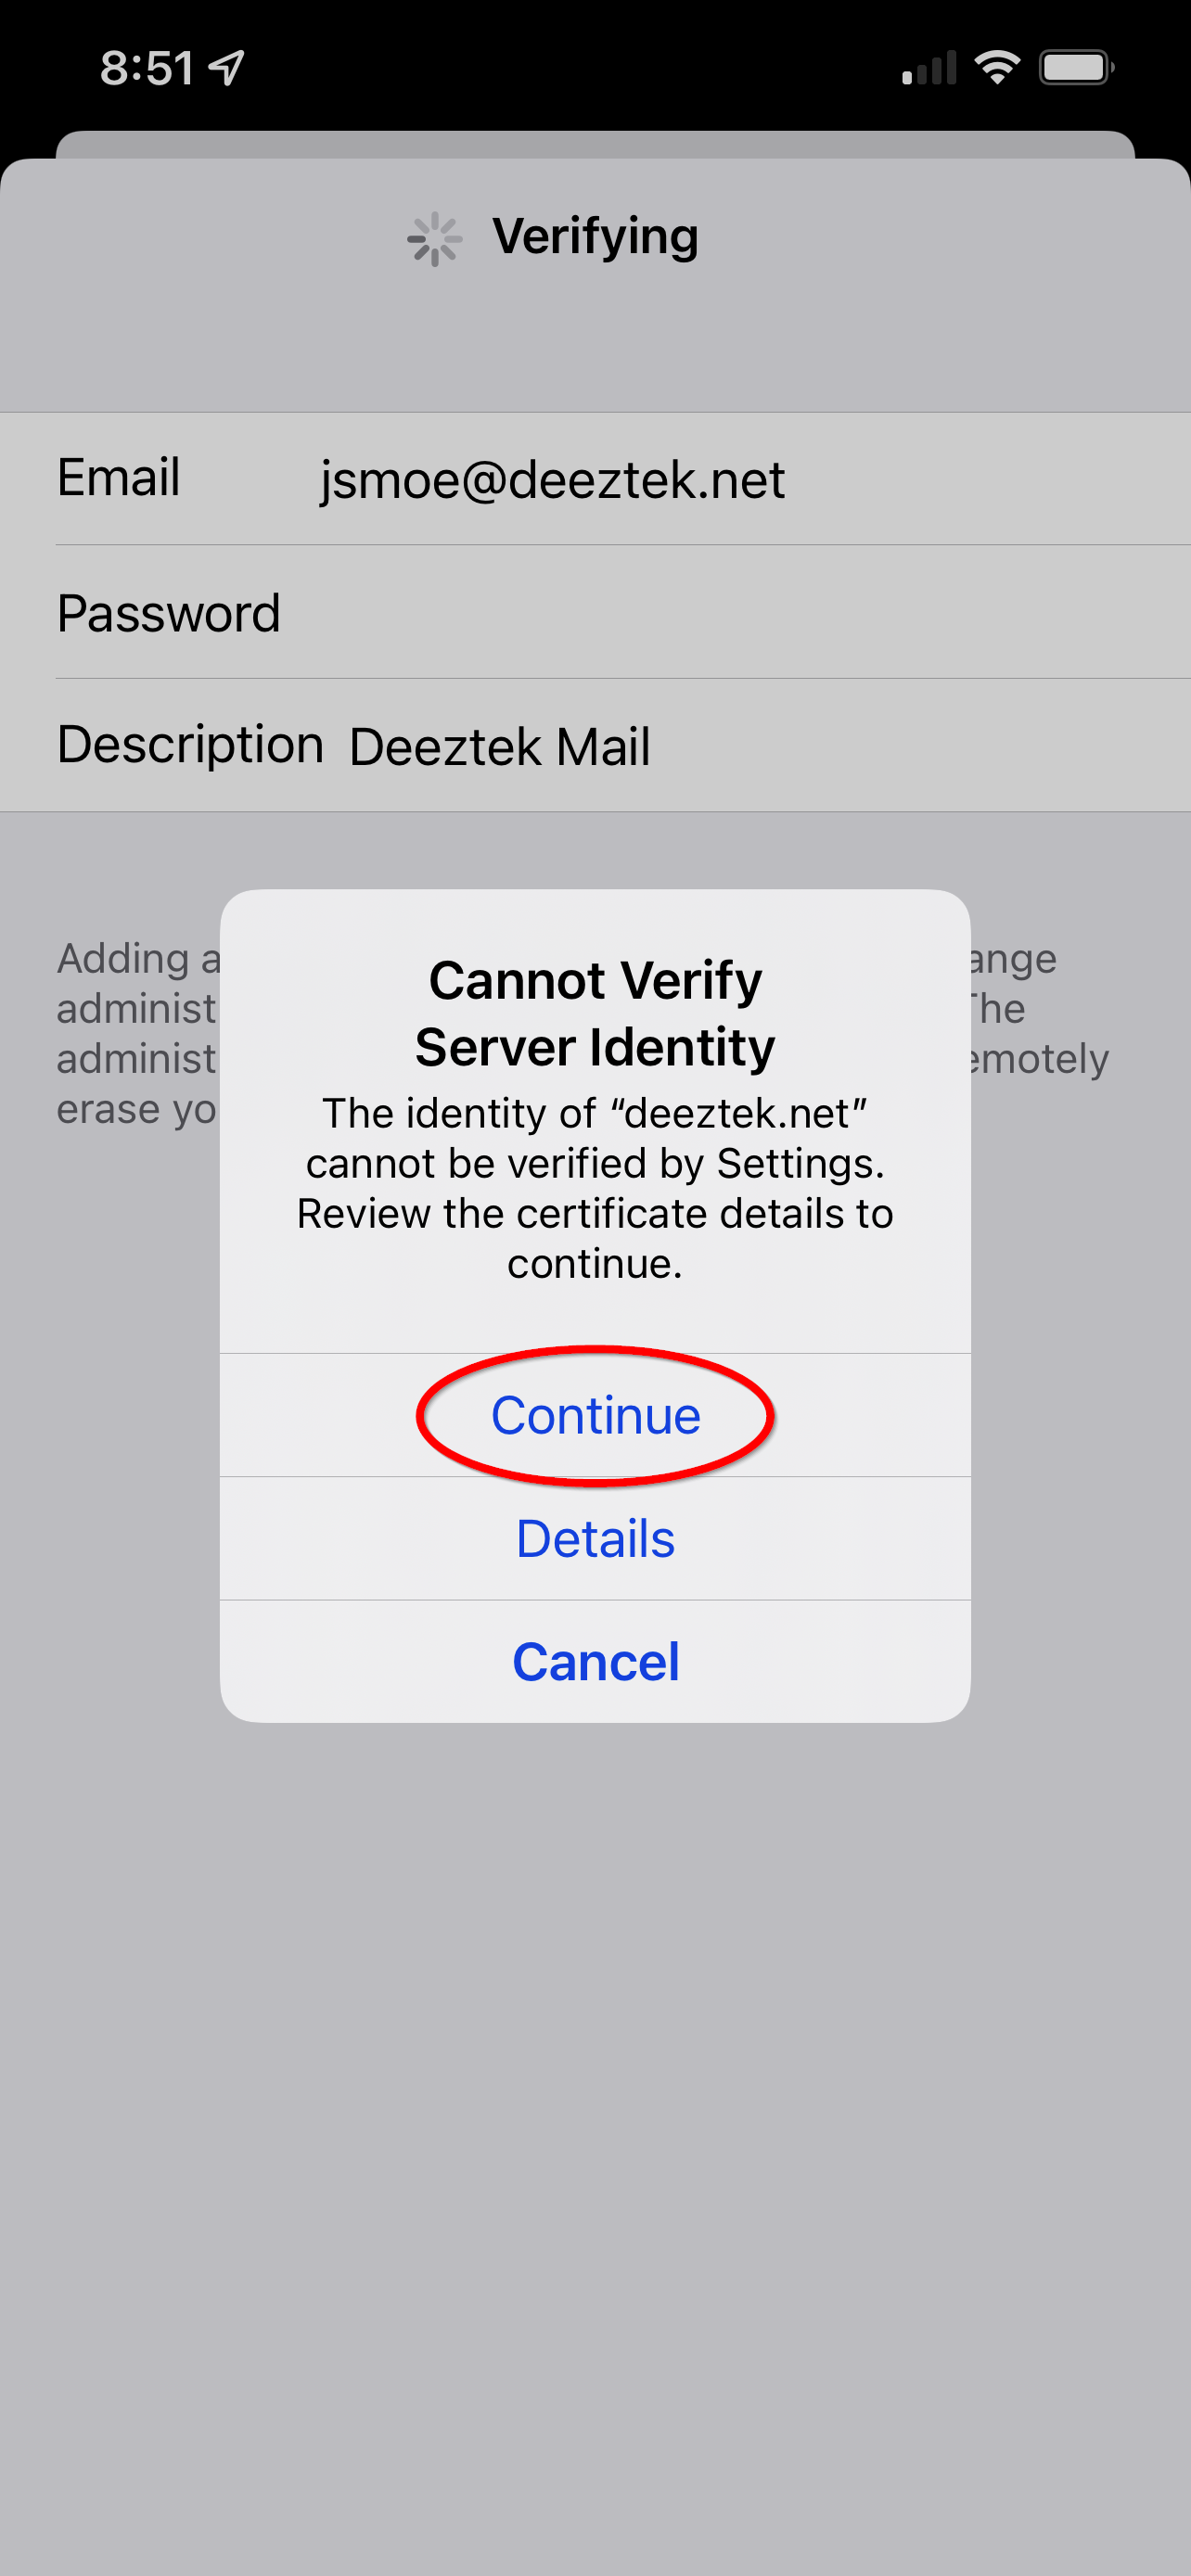](https://docs.deeztek.com/uploads/images/gallery/2022-02/8.png)**
#### **Input the address as shown in the "Server" field and verify that other account details are correct as configured so far, if the "Password" field is blank you will need to input your password again. We finished select "Next":**
**[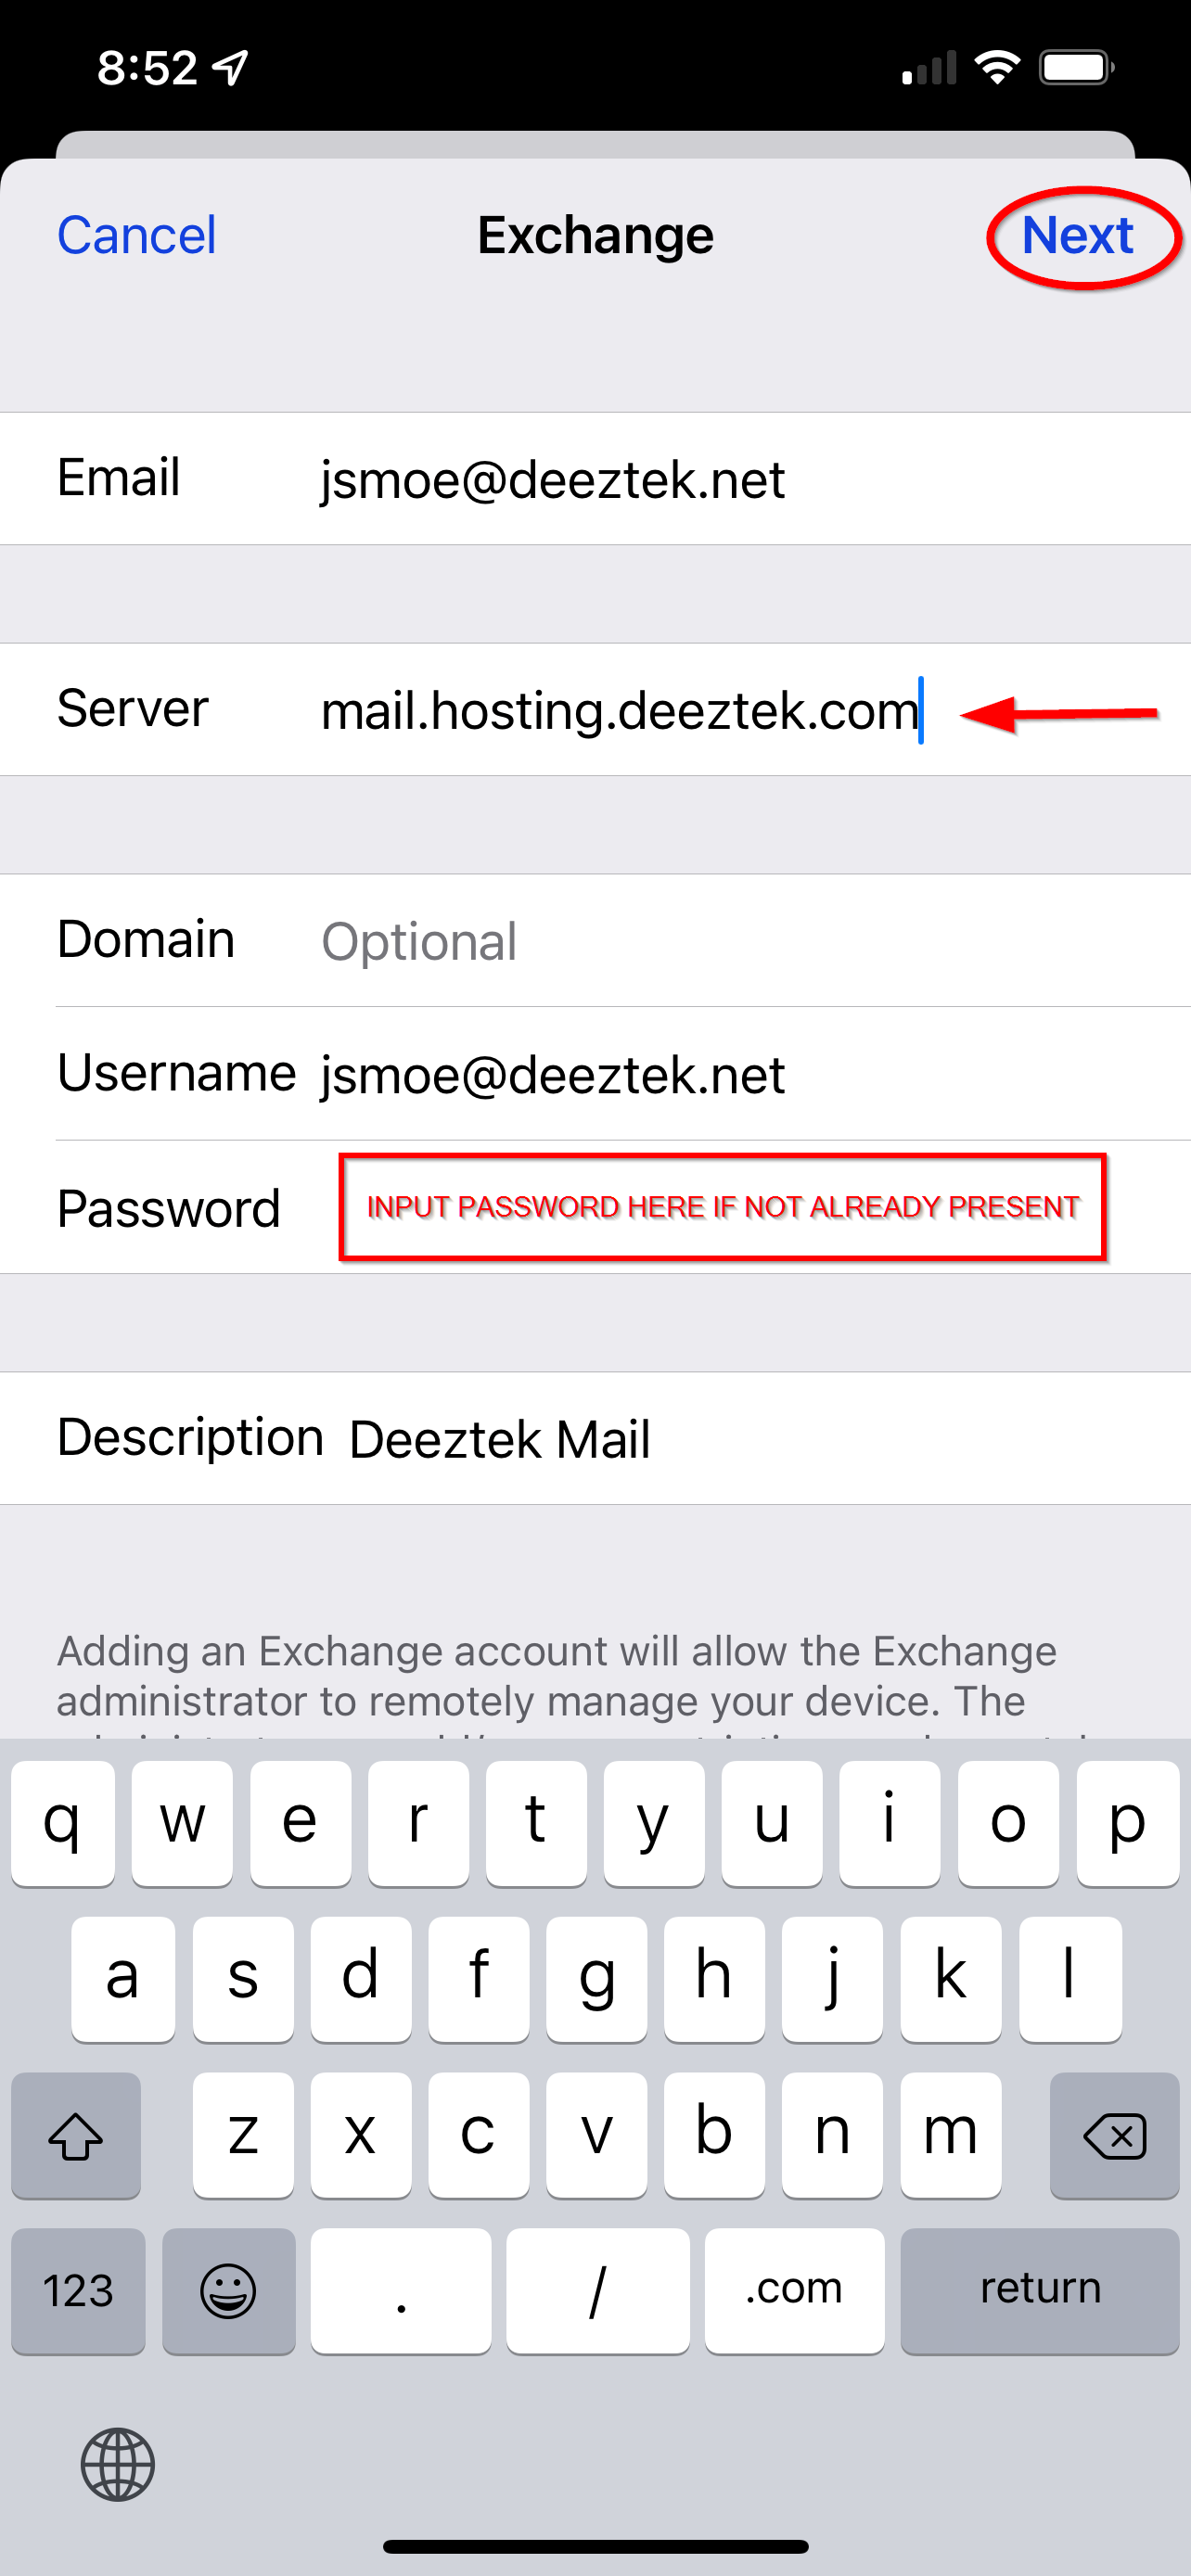](https://docs.deeztek.com/uploads/images/gallery/2022-02/9.png)**
#### **Move the sliders to on or off for each item your would like to synchronize for this mail account. When finished select "Save" and your account setup is complete:**
**[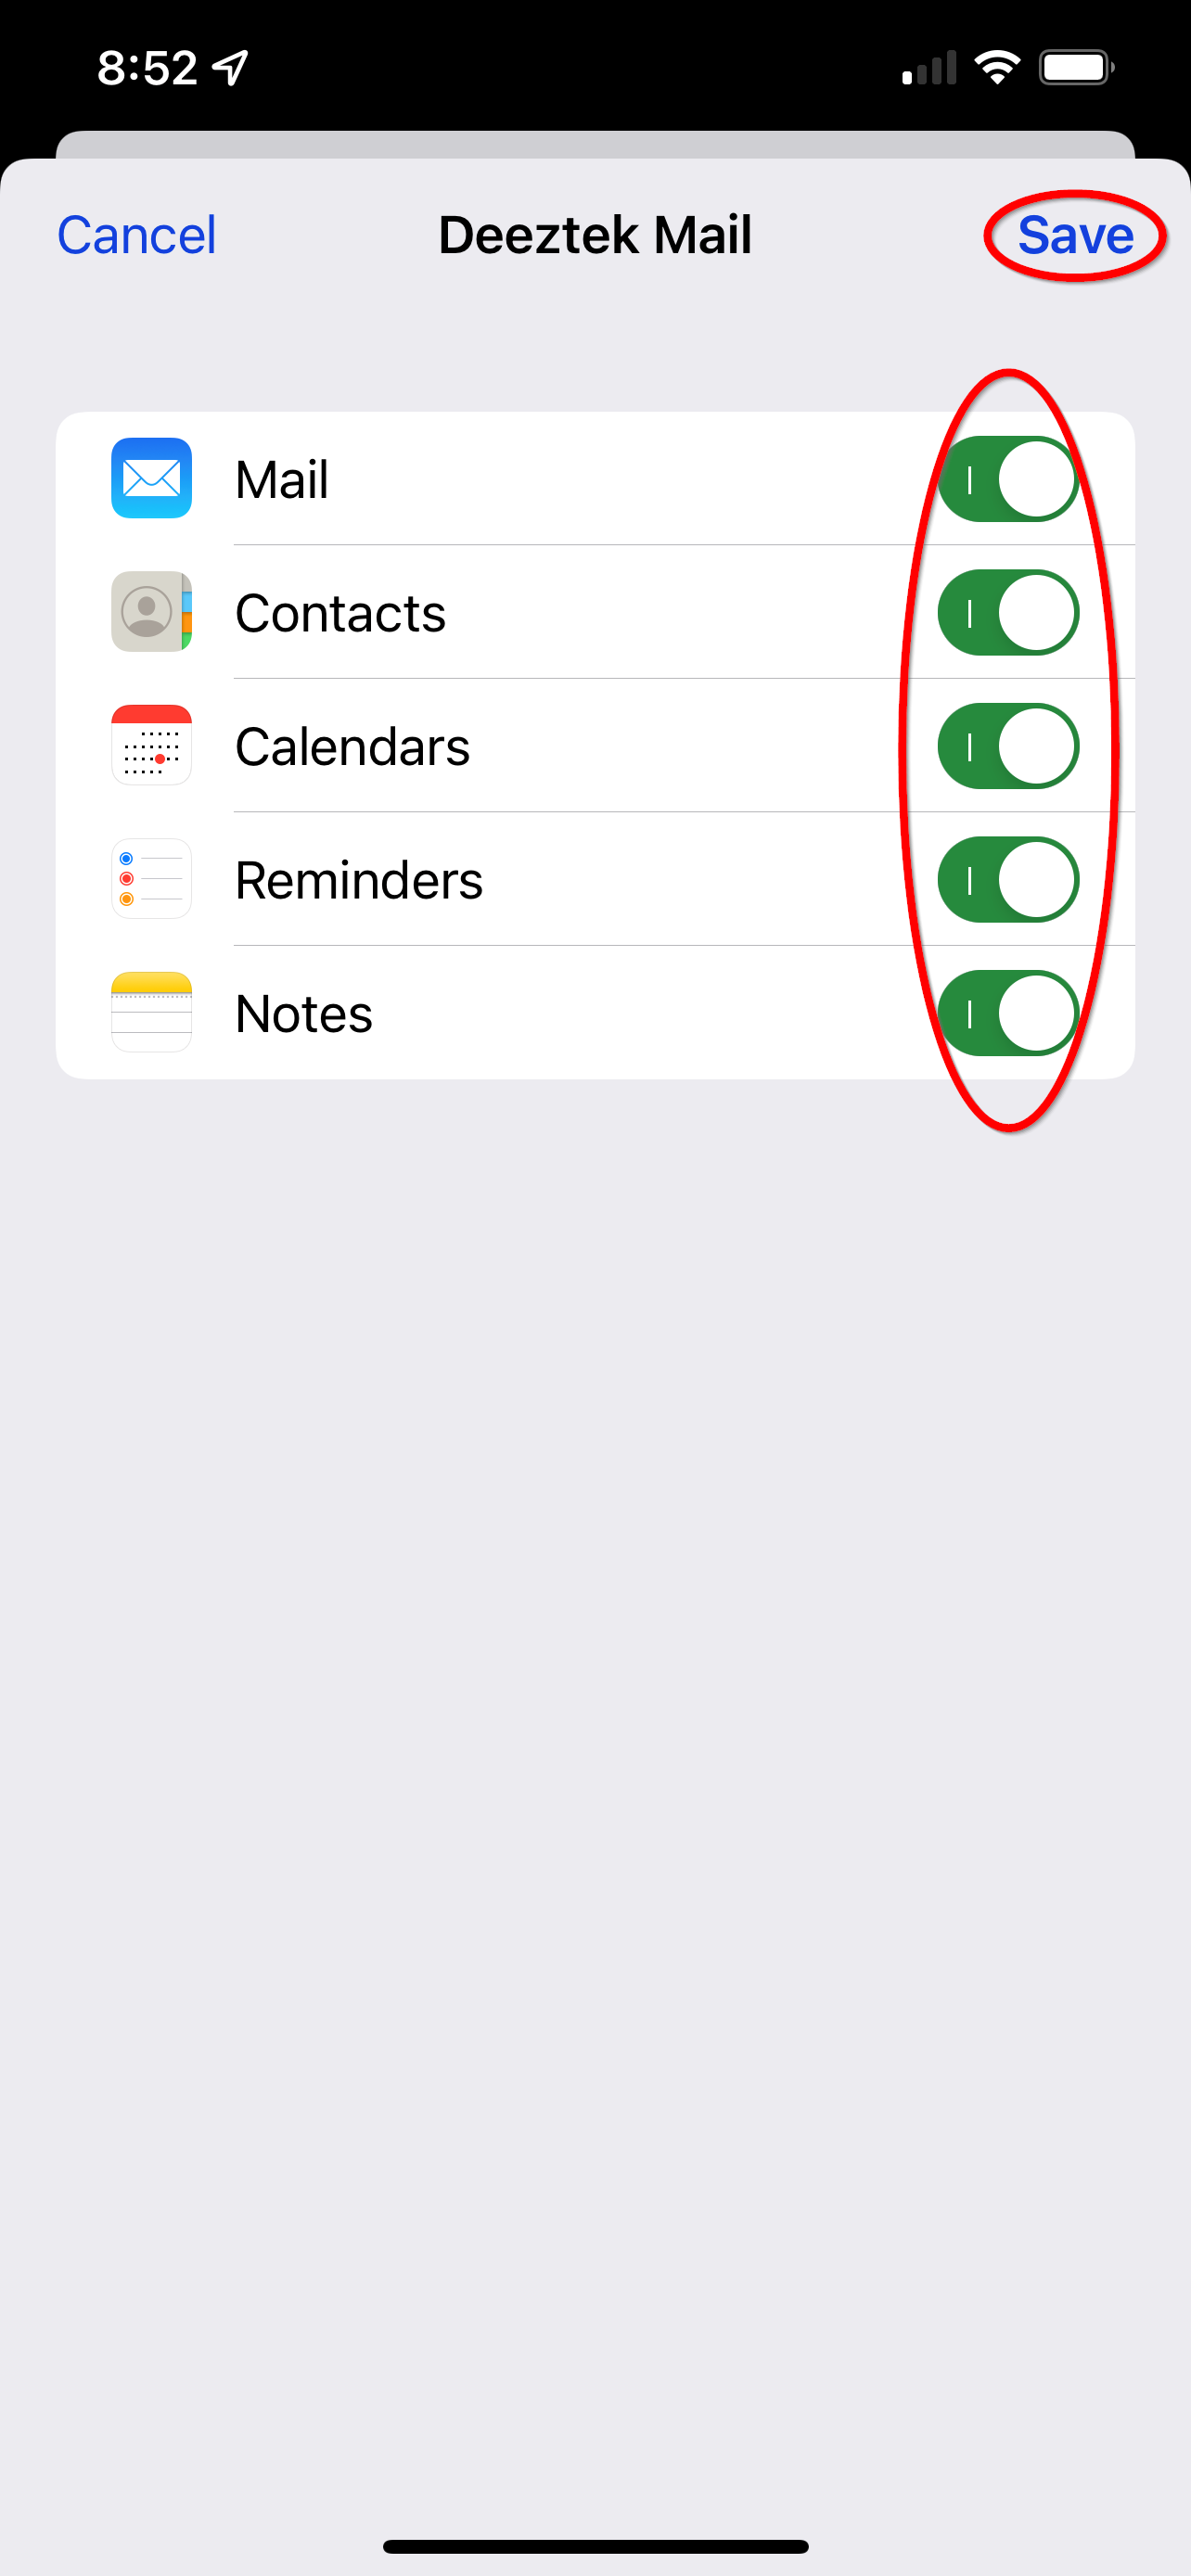](https://docs.deeztek.com/uploads/images/gallery/2022-02/10.png)**
# Configure Samsung Android Phone for Hosted Mail
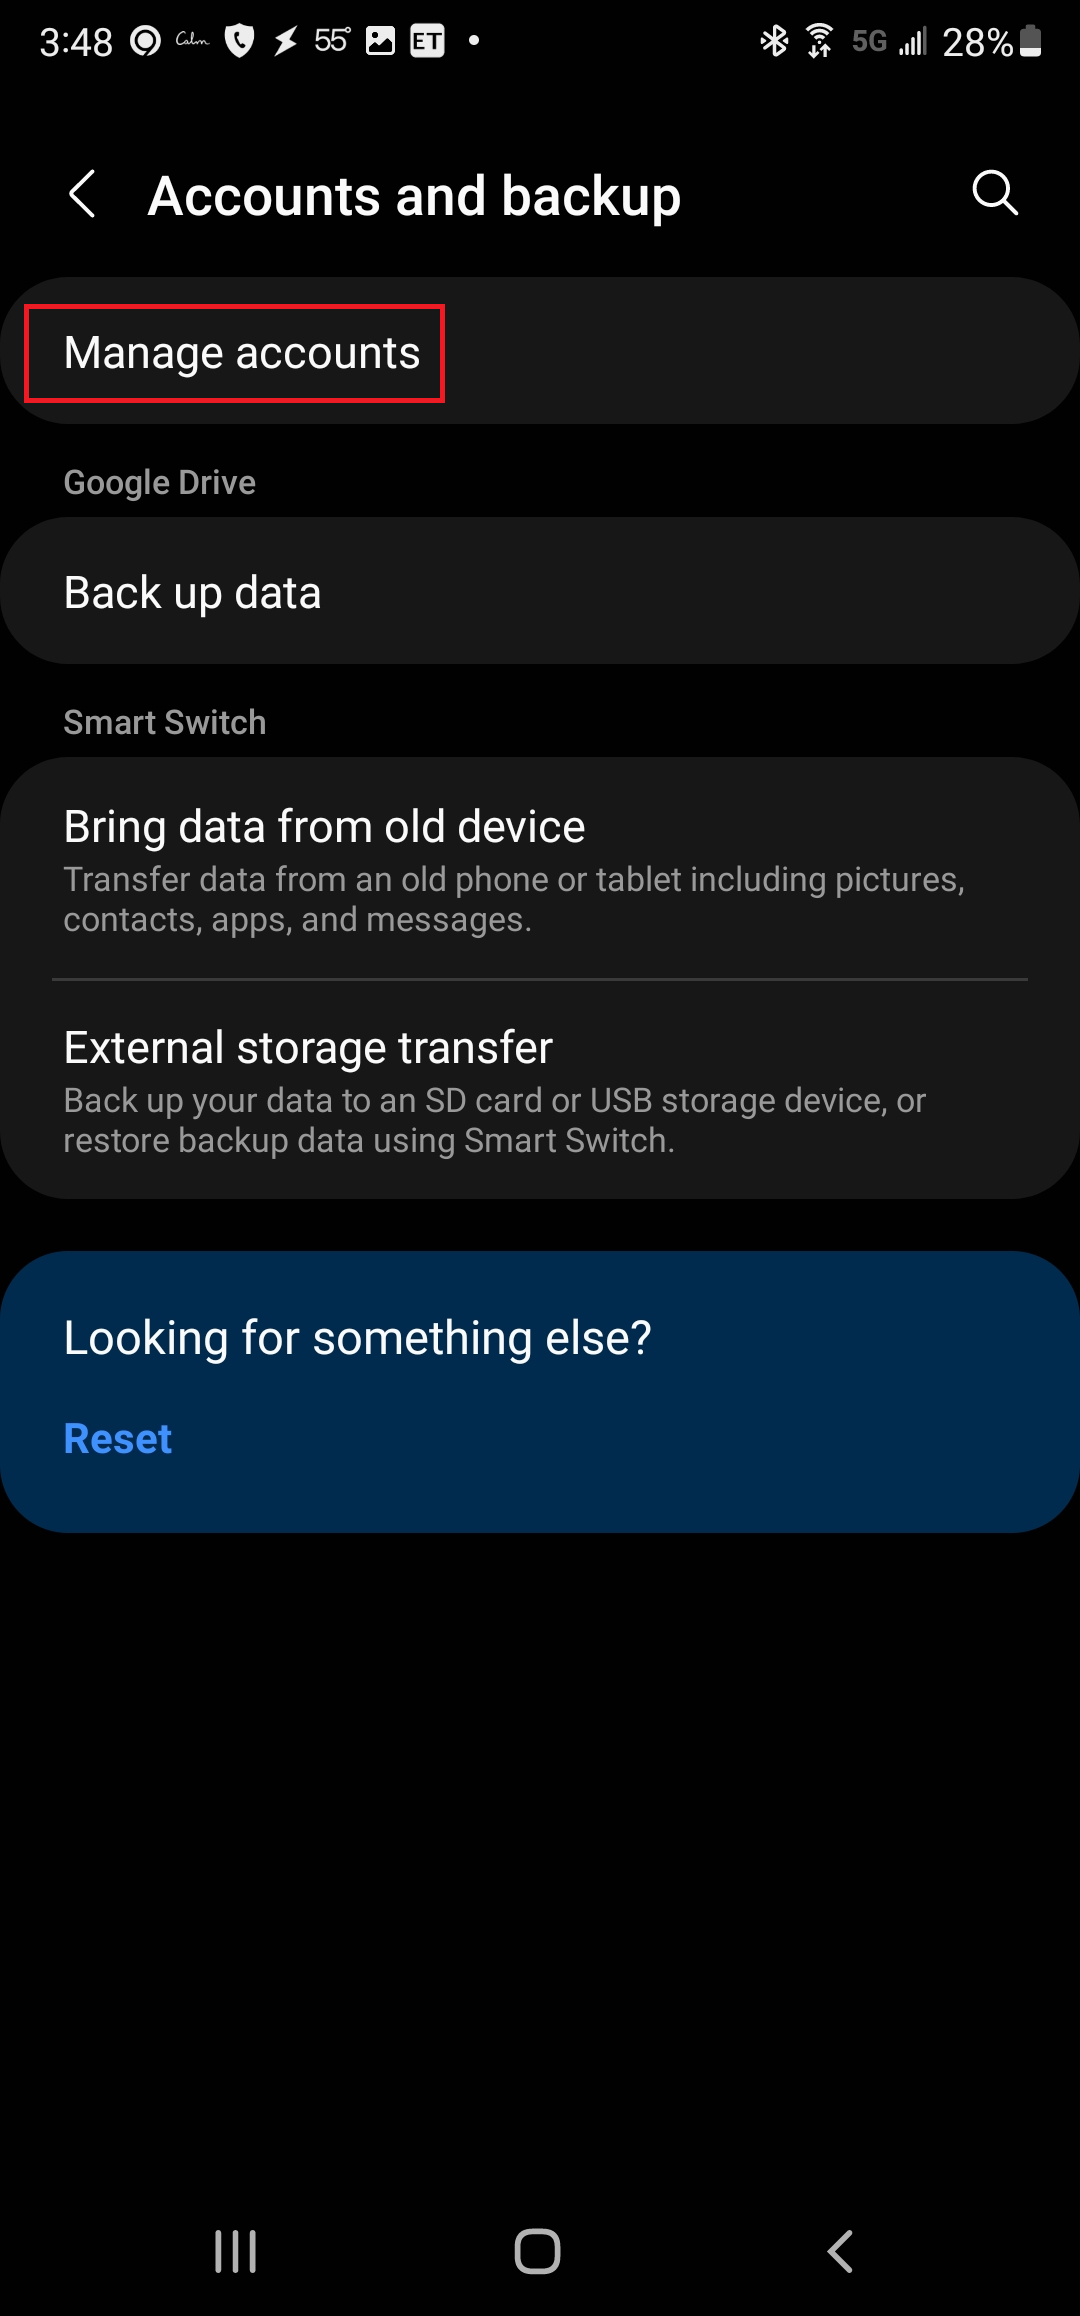
- Navigate to **Settings --> Accounts and backup** (**Figure 1**):
**Figure 1**
[](https://docs.deeztek.com/uploads/images/gallery/2022-02/image-1644525970571.png)
- Select **Manage accounts** (**Figure 2**):
**Figure 2**
[](https://docs.deeztek.com/uploads/images/gallery/2022-02/image-1644526177232.png)
- Select **Add account** (**Figure 3**):
**Figure 3**
[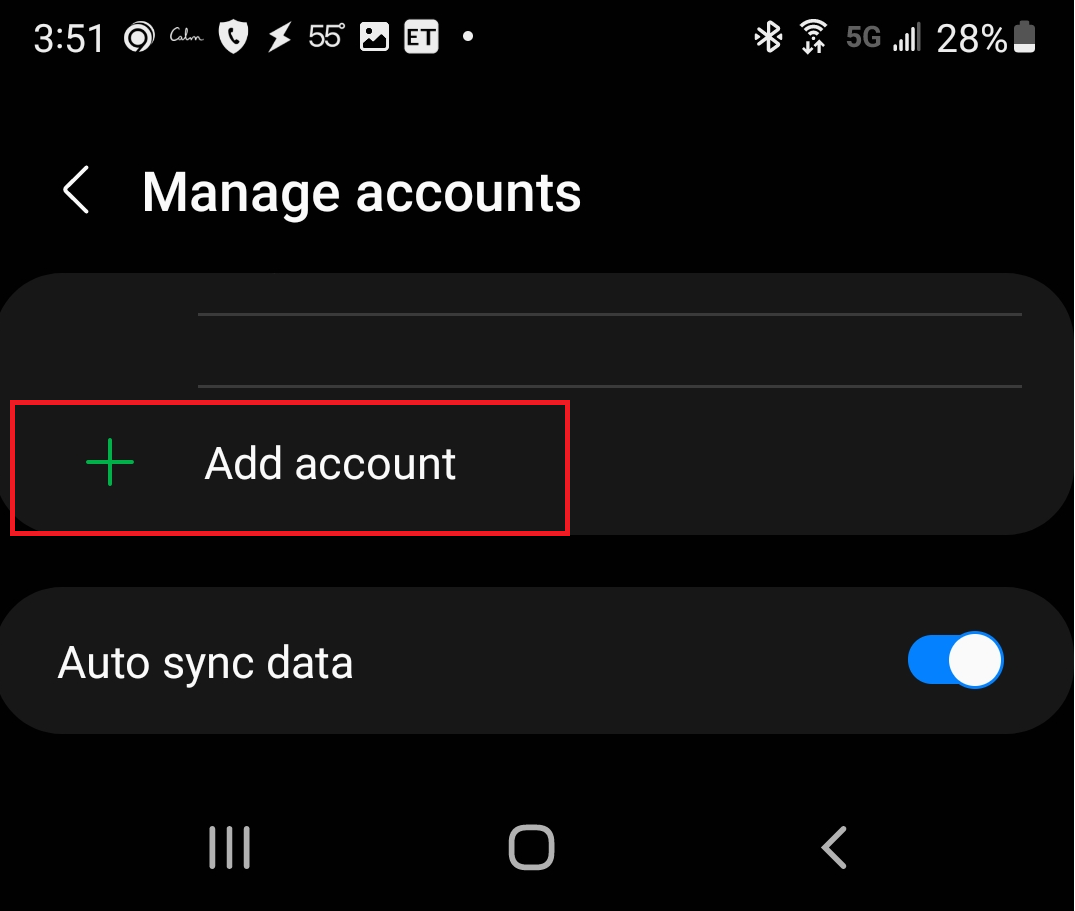](https://docs.deeztek.com/uploads/images/gallery/2022-02/image-1644526542166.png)
- Select **Exchange** (**Figure 4**):
**Figure 4**
[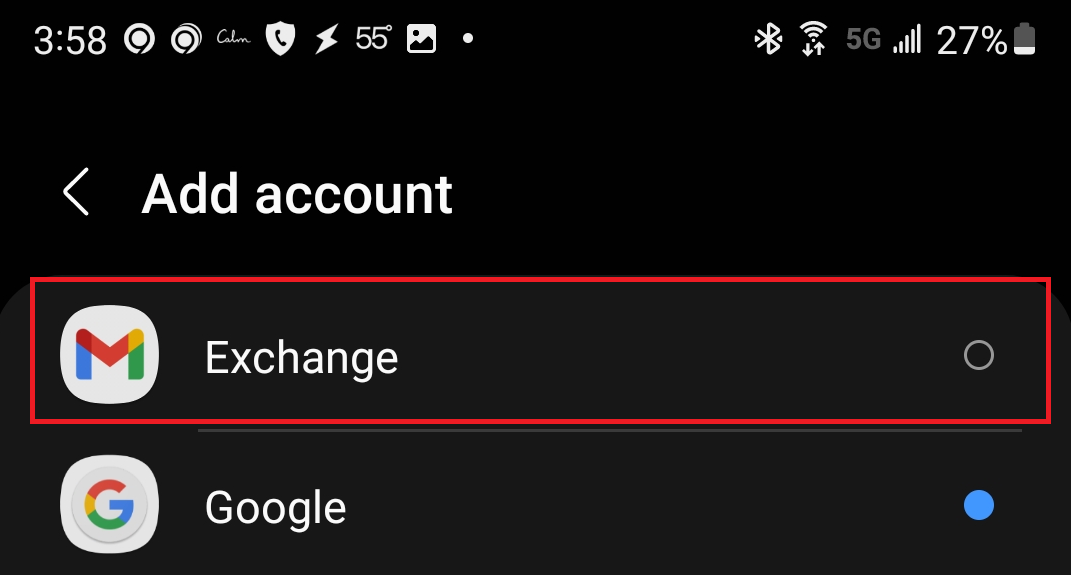](https://docs.deeztek.com/uploads/images/gallery/2022-02/image-1644526818952.png)
- Enter your email address in the **Email** field (substitute the with your e-mail address, and then select **Set up manually.** (**Figure 5**):
**Figure 5**
[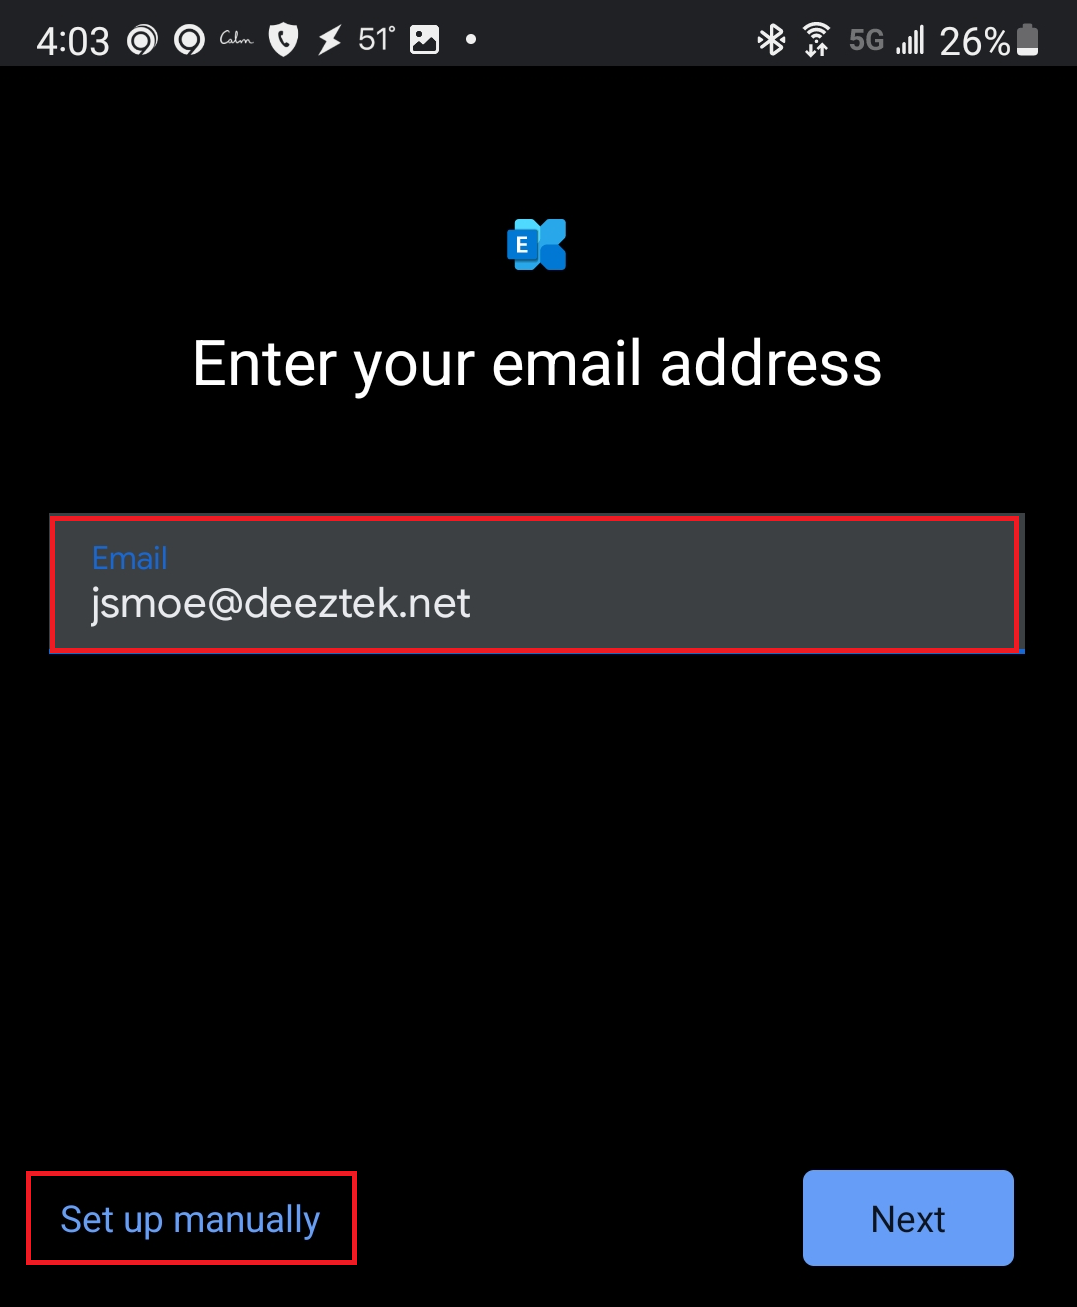](https://docs.deeztek.com/uploads/images/gallery/2022-02/image-1644527096095.png)
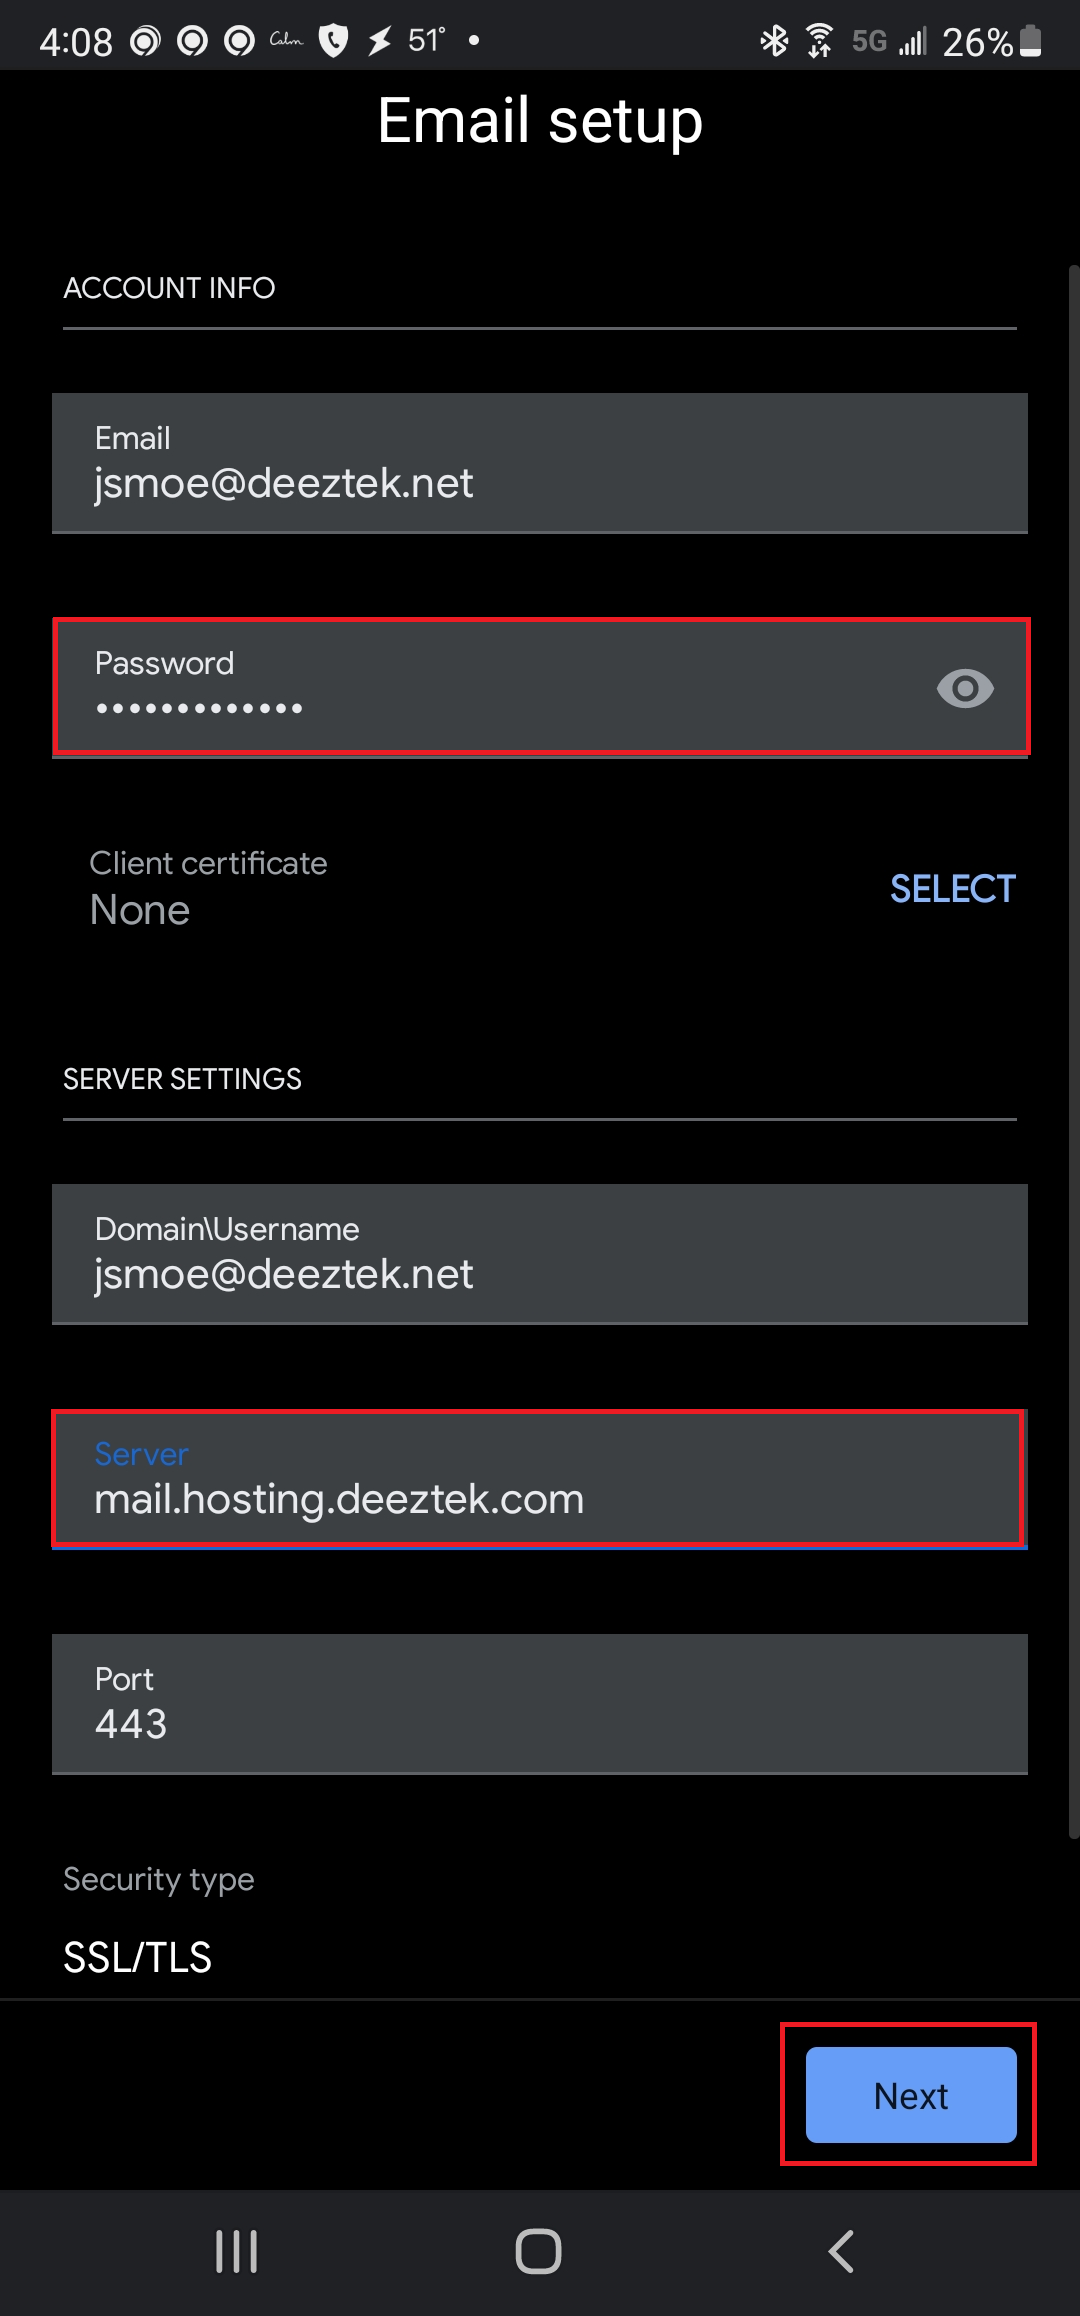
- Enter your password in the **Password** field, enter **mail.hosting.deeztek.com** in the **Server** field, leave the **Port** field set to **443** , leave **Security type** set to **SSL/TLS** and select **Next** (**Figure 6**):
**Figure 6**
[](https://docs.deeztek.com/uploads/images/gallery/2022-02/image-1644527481815.png)
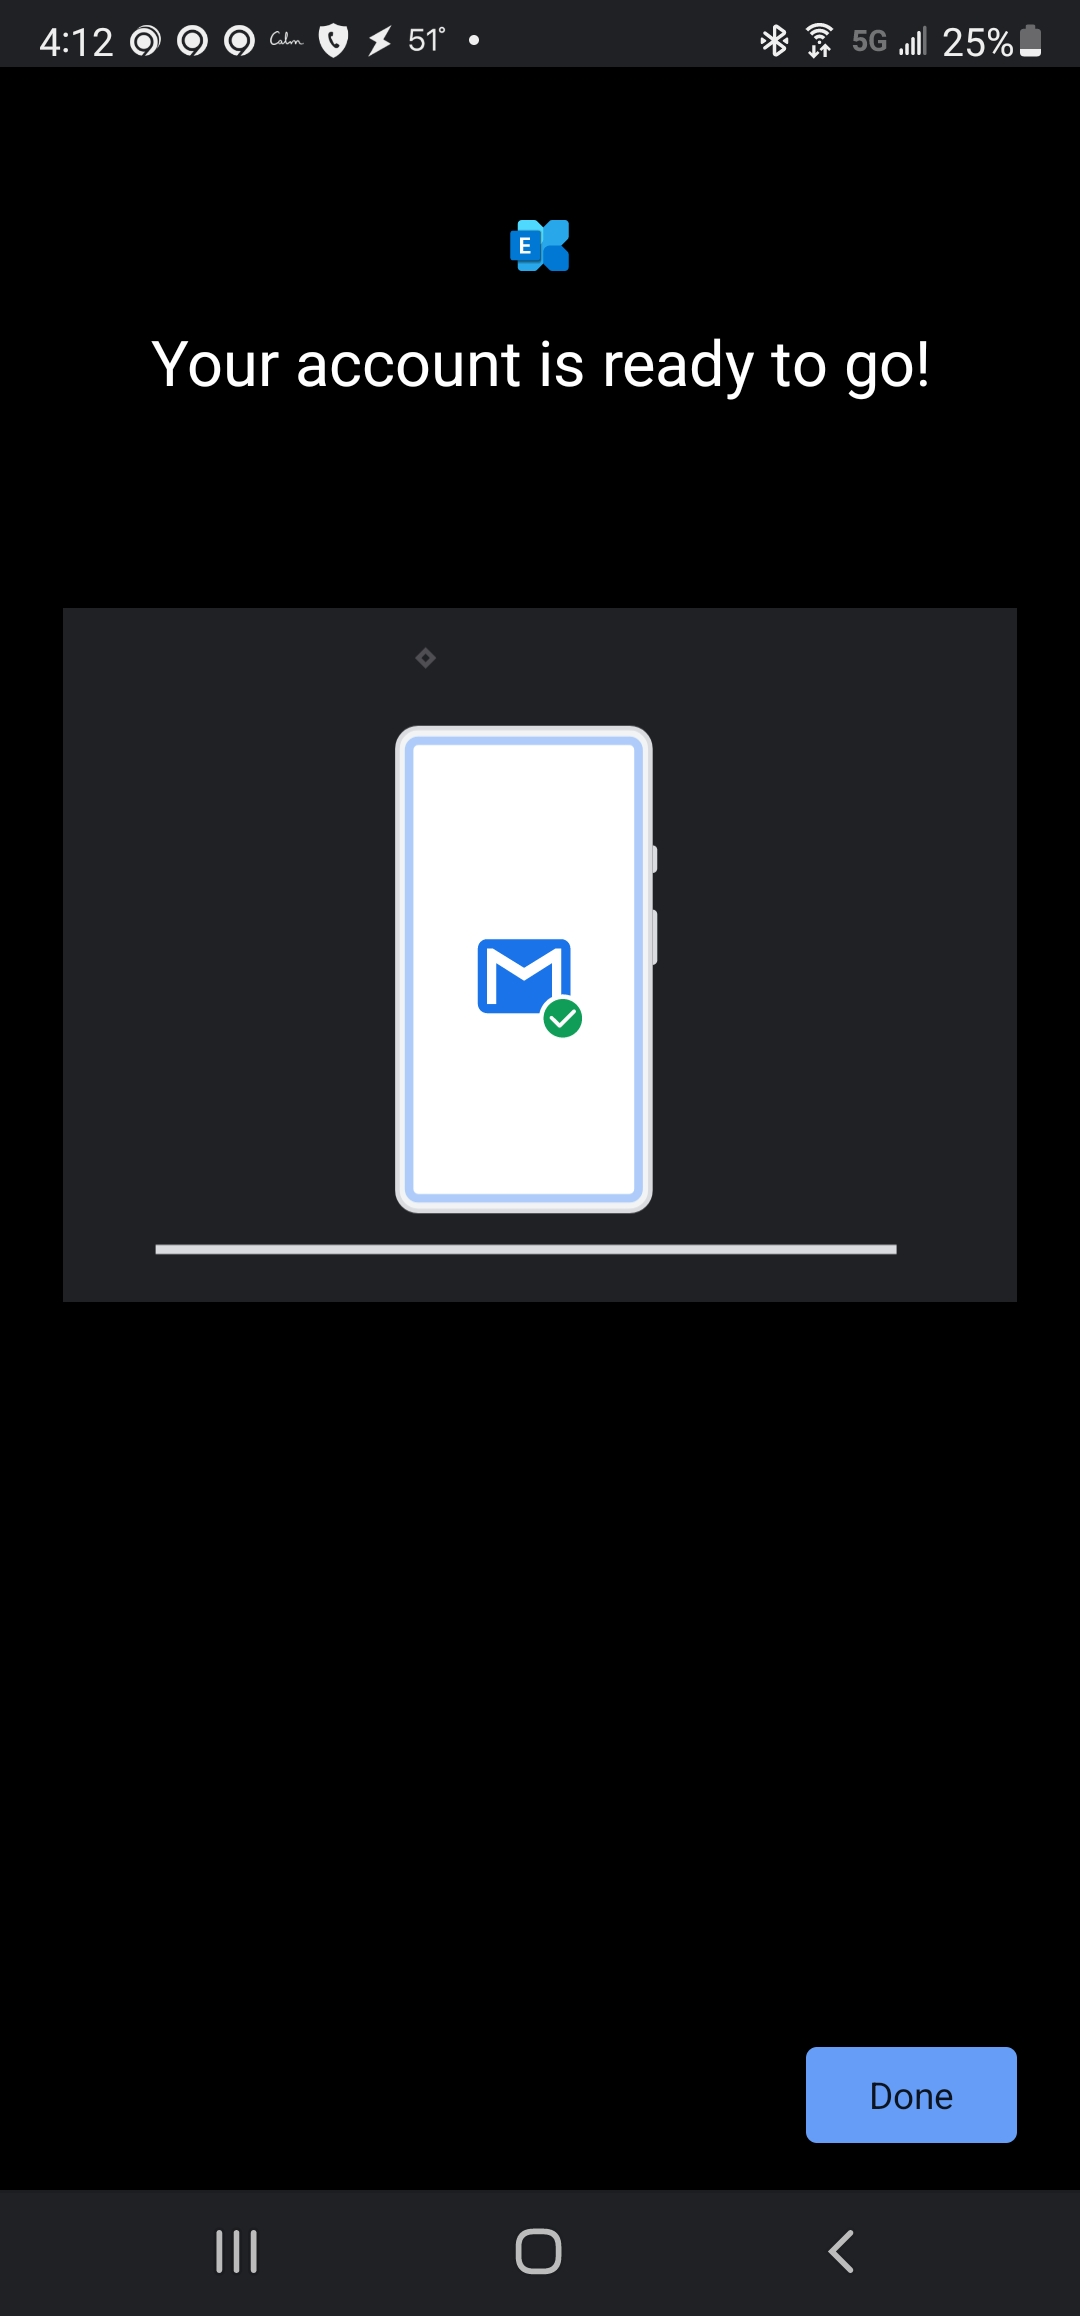
- If you typed everything correctly, you should get the **Your Account is ready to go!** message. Select **Done** (**Figure 7**)
**Figure 7**
[](https://docs.deeztek.com/uploads/images/gallery/2022-02/image-1644527672394.png)
# Enable Automatic E-mail Check and Desktop Notifications
- Login to your webmail and click the [ ](https://docs.deeztek.com/uploads/images/gallery/2021-03/image-1617225753967.png)icon on the top left (**Figure 1**):
**Figure 1**
[](https://docs.deeztek.com/uploads/images/gallery/2021-03/image-1617224950833.png)
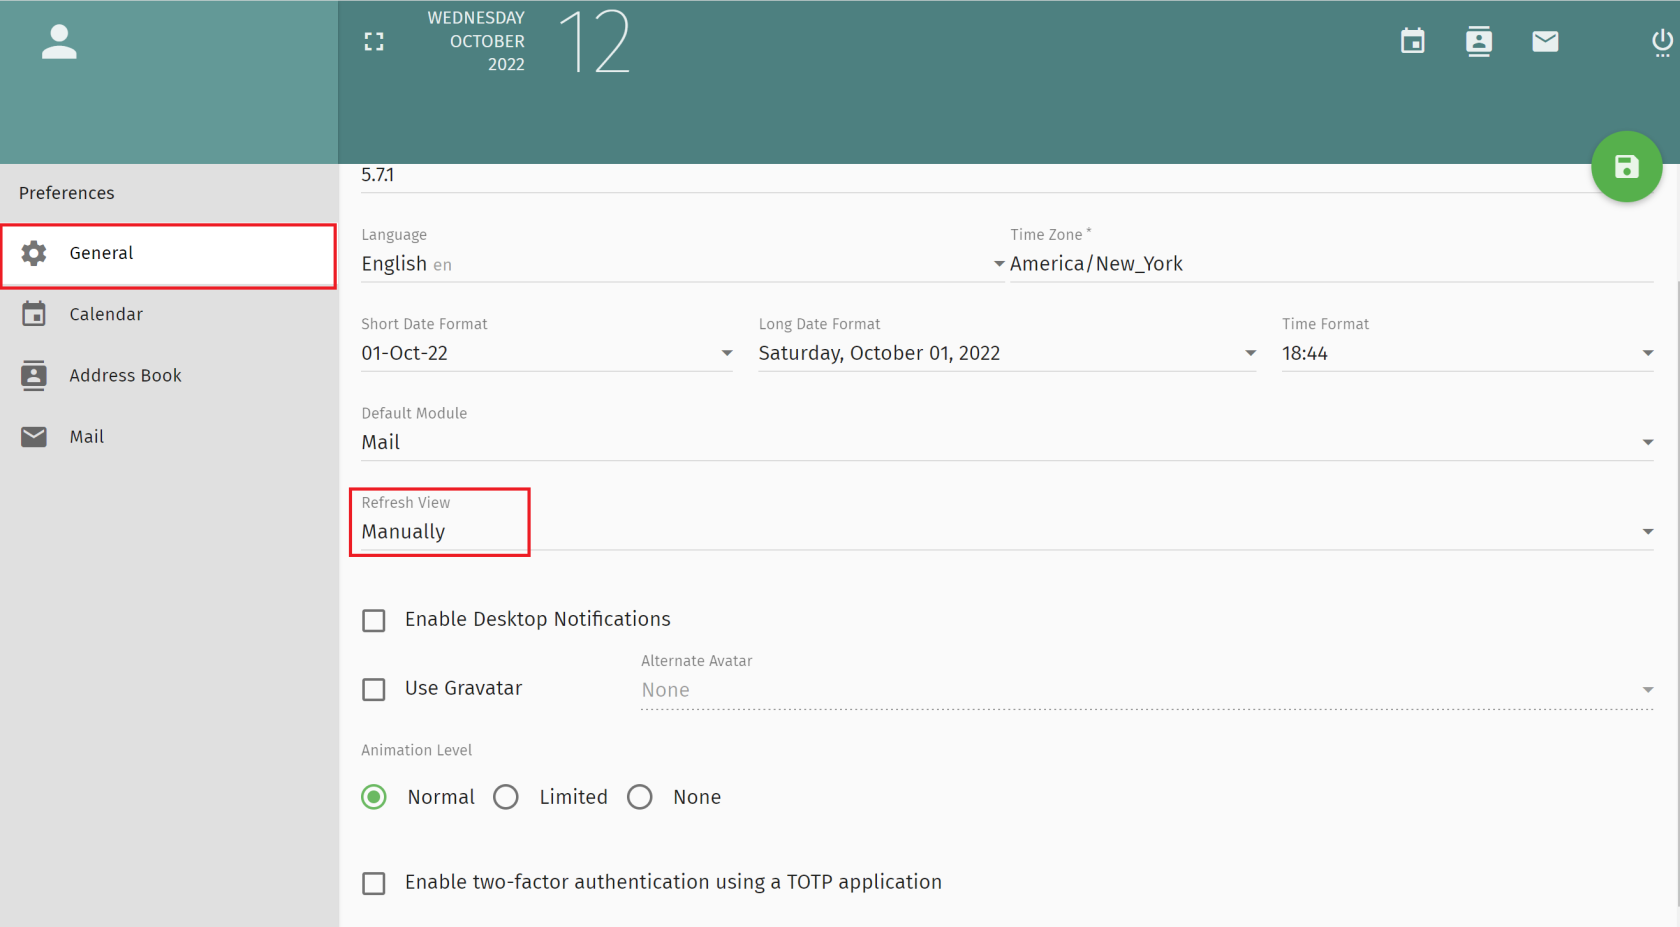
- Under the **General** section, click on the **Refresh View** drop-down (**Figure 2**).
**Figure 2**
[](https://docs.deeztek.com/uploads/images/gallery/2022-10/9cdimage.png)
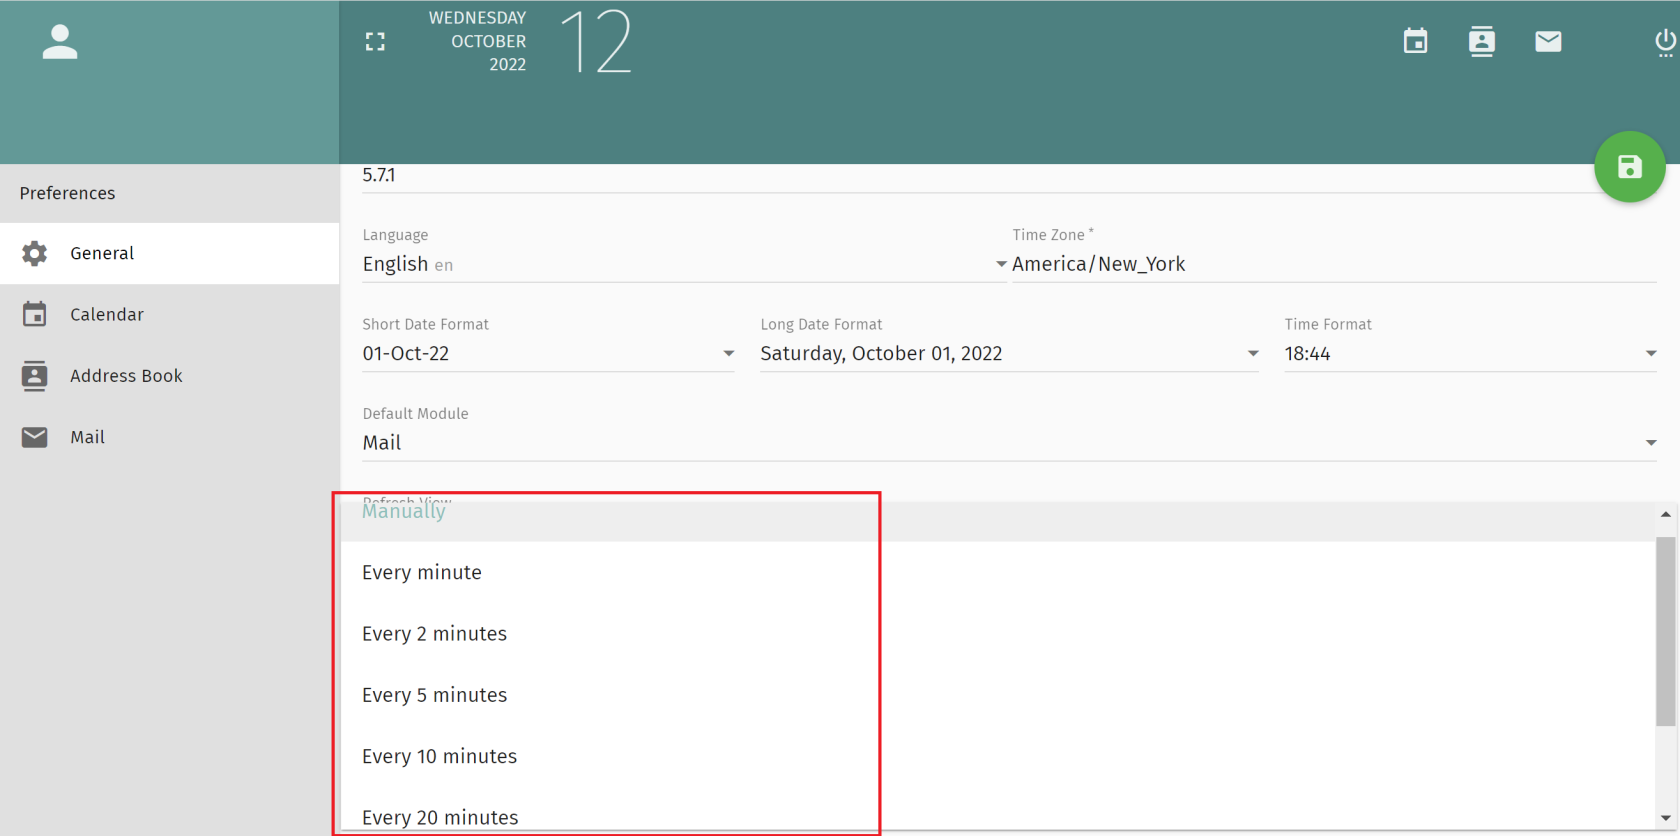
- On the resultant menu, select how often you would like the browser to automatically refresh and check for new e-mail (**Figure 3**).
**Figure 3**
[](https://docs.deeztek.com/uploads/images/gallery/2022-10/X1Gimage.png)
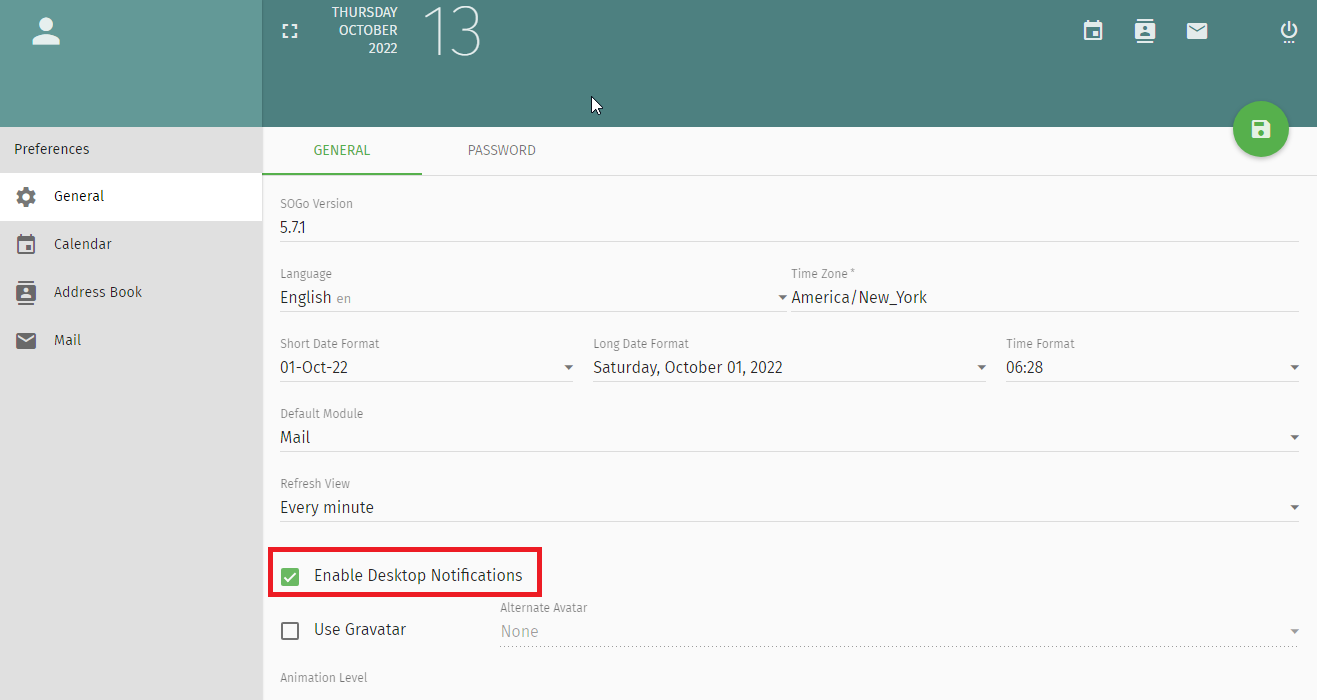
- Place a checkmark on the **Enable Desktop Notifications** checkbox field (**Figure 4**).
**Figure 4**
[](https://docs.deeztek.com/uploads/images/gallery/2022-10/hD8image.png)
- Click the save button on the upper-right of your screen to save your changes (**Figure 5**).
**Figure 5**
[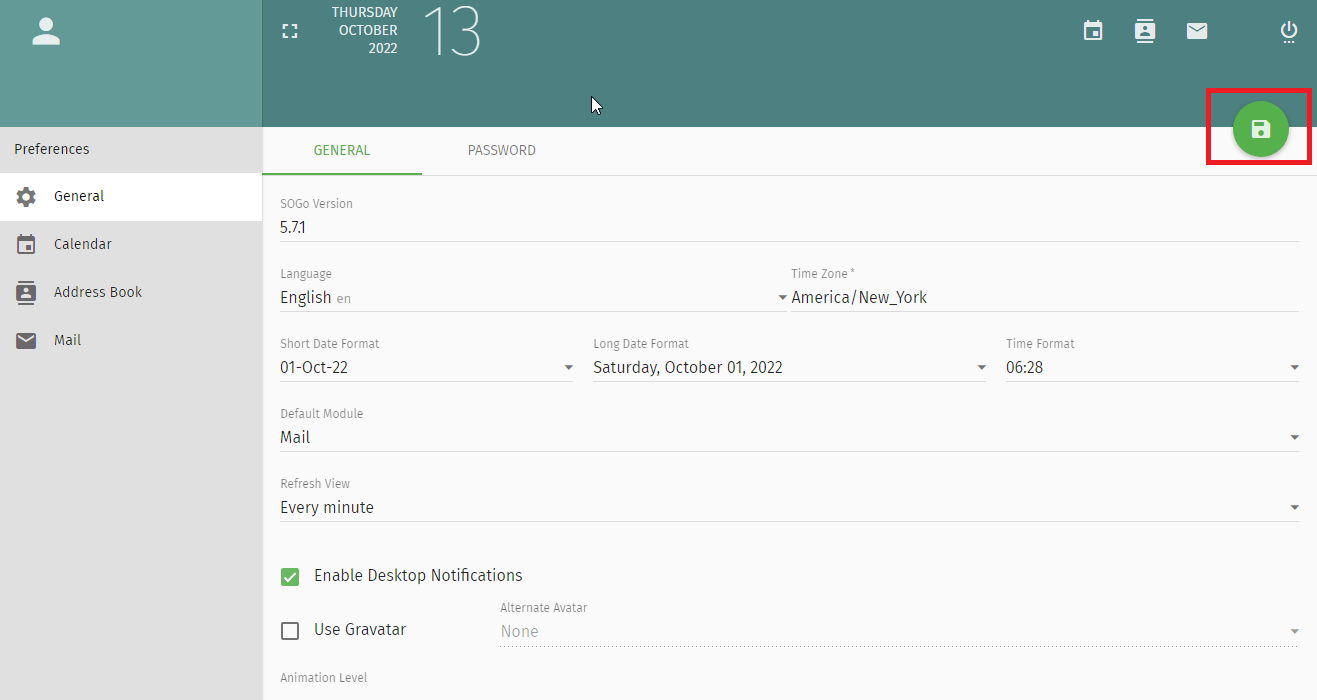](https://docs.deeztek.com/uploads/images/gallery/2022-10/O9Pimage.png)
# Deeztek Hosted Mail DNS entries
The following entries must be set in customer's domain DNS records in order for Hosted Mail to function correctly. The name **domain\_tld** refers to the customer domain but instead of a . (dot) to separate the Top Level domain (TLD), substitute with a \_ (underscore). For example, if domain is **mycompany.com** then the entry should be **mycompany\_com**.
# Connect Google Calendar to Hosted Mail
- Navigate to **Google app passwords** at [https://myaccount.google.com/apppasswords](https://myaccount.google.com/apppasswords).
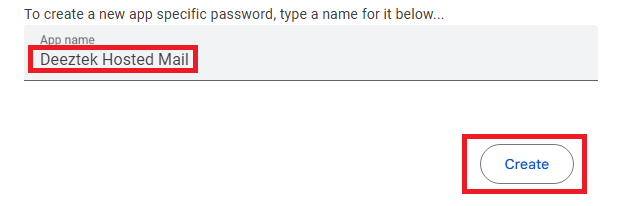
- In the **App name** field enter a name to identify the app (Ex: Deeztek Hosted Mail) and then click on the **Create** button (Figure 1).
**Figure 1**
[](https://docs.deeztek.com/uploads/images/gallery/2024-06/Lgkimage.png)
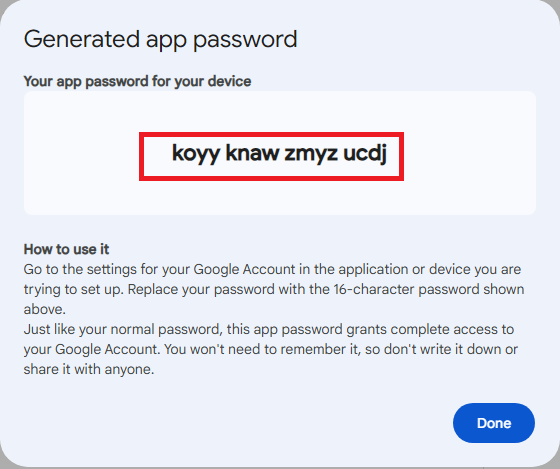
- On the **Generated app password** window, ensure you take note of the generated password (Figure 2).
**Figure 2**
[](https://docs.deeztek.com/uploads/images/gallery/2024-06/2Euimage.png)
- Login to your Hosted Mail mailbox at [https://mail.hosting.deeztek.com/Sogo ](https://mail.hosting.deeztek.com/Sogo)and and click on the Calendar icon on top-right (Figure 3).
**Figure 3**
[](https://docs.deeztek.com/uploads/images/gallery/2024-06/image.png)
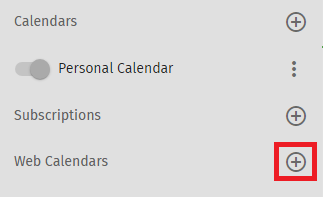
- Under Calendars, click on the **+** icon to the right of **Web Calendars** (Figure 4).
**Figure 4**
[](https://docs.deeztek.com/uploads/images/gallery/2024-06/WPkimage.png)
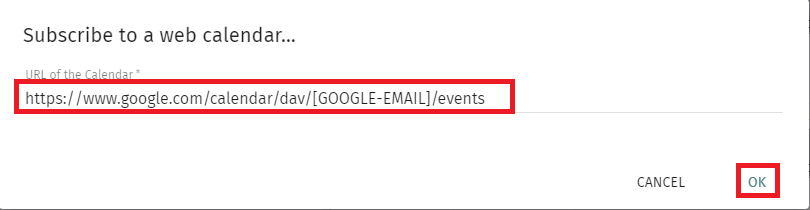
- On the **Subscribe to a web calendar** window, enter the following address on the **URL of the Calendar** field: [https://www.google.com/calendar/dav/\[GOOGLE-EMAIL\]/events](https://www.google.com/calendar/dav/%5bGOOGLE-EMAIL%5d/events) and set **\[GOOGLE-EMAIL\]** to your google e-mail address and click **OK** (Figure 5).
**Figure 5**
[](https://docs.deeztek.com/uploads/images/gallery/2024-06/6gTimage.png)
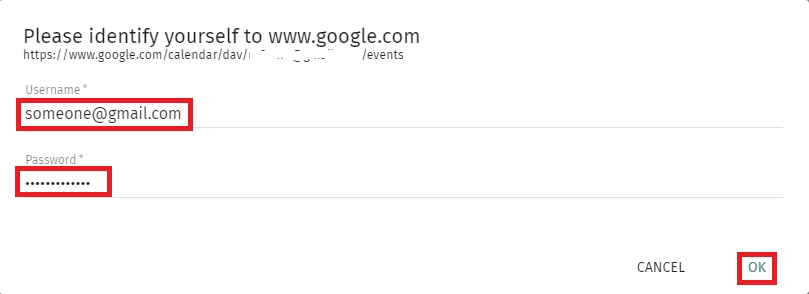
- After a few seconds you will get a **Please identity yourself to [www.google.com](https://www.google.com)** window. In the **Username** field enter your Google e-mail address, in the **Password** field enter the password that was generated for you from above and click the **OK** button (Figure 6).
**Figure 6**
[](https://docs.deeztek.com/uploads/images/gallery/2024-06/WELimage.png)
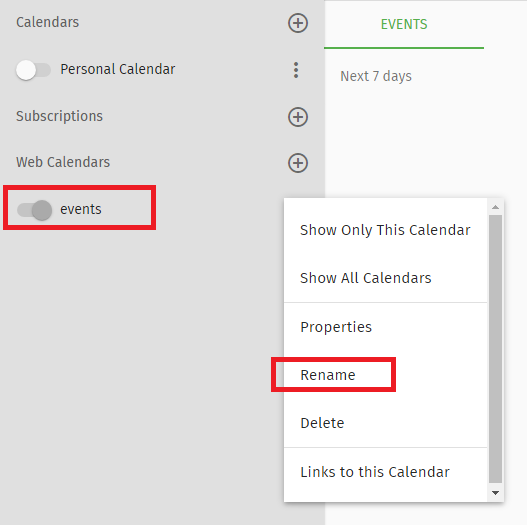
- Next, you should see a new calendar called **events** under **Web Calendars**. Click on the 3 vertical dots to the right of the calendar and on the resultant window, click on **Rename** and then rename the calendar to something more descriptive (Ex: Google Calendar) (Figure 7).
**Figure 7**
[](https://docs.deeztek.com/uploads/images/gallery/2024-06/uvhimage.png)
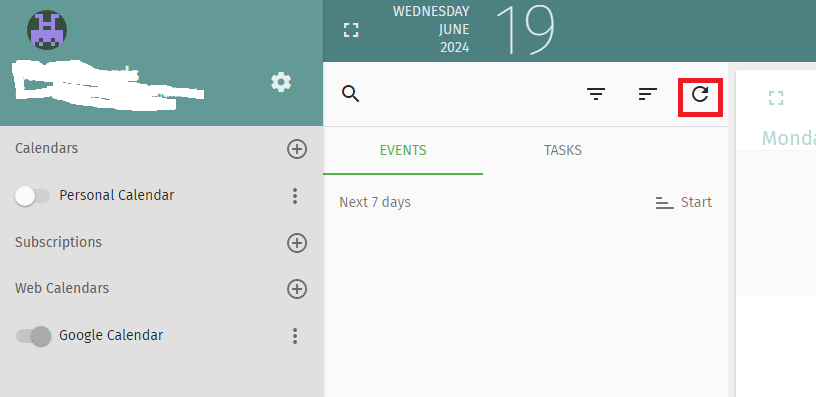
- Next, click on the refresh icon and if everything went well, your Google Calendar should populate with your events (Figure 8).
**Figure 8**
[](https://docs.deeztek.com/uploads/images/gallery/2024-06/XV6image.png)