The **hermes\_bulk\_import\_delete\_recipients.sh** assumes that the first line of the .csv file will contain a column header and it's already setup to skip the first line during import. If the first line contains an e-mail address that must be imported, then that e-mail address will be skipped.
You must have the domain for each recipient to be imported/deleted already configured under '**Gateway --> Relay Domains**' before attempting to run the **hermes\_bulk\_import\_delete\_recipients.sh** script below.
Run the hermes\_bulk\_import\_delete\_recipients.sh script by running the command below: ``` bash hermes_bulk_import_delete_recipients.sh ``` If the domains for every recipient to be imported/deleted are already configured in Hermes SEG under **Gateway --> Relay** Domains, enter **1** to continue in the following prompt (**Figure 1**): **Figure 1** [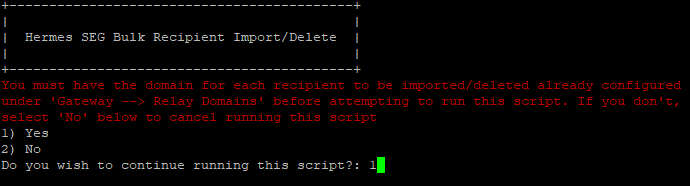](https://docs.deeztek.com/uploads/images/gallery/2021-01/image-1612117430354.png) In the following prompt enter the MySQL(MariaDB) root password (**Figure 2**): **Figure 2** [](https://docs.deeztek.com/uploads/images/gallery/2021-01/image-1612117484215.png) In the following prompt enter the full path and filename to your .csv file (**Figure 3**): **Figure 3** [](https://docs.deeztek.com/uploads/images/gallery/2021-01/image-1612117546168.png) In the following prompt enter **1** if you are performing bulk import or enter **2** if you are performing bulk delete (**Figure 4**): **Figure 4** [](https://docs.deeztek.com/uploads/images/gallery/2021-01/image-1612117600214.png) If the operation was successful, you should get an output similar to below depending on the operation you chose above (**Figure 5**): **Figure 5** [](https://docs.deeztek.com/uploads/images/gallery/2021-01/image-1612117684714.png) Navigate to **Gateway --> Internal Recipients** in the Hermes SEG **Administration Console** Web GUI. If you selected **Import**, you should have a listing of the e-mail addresses contained in your .csv file under the **Internal Recipients to be added** section (**Figure 6**) **Figure 6** [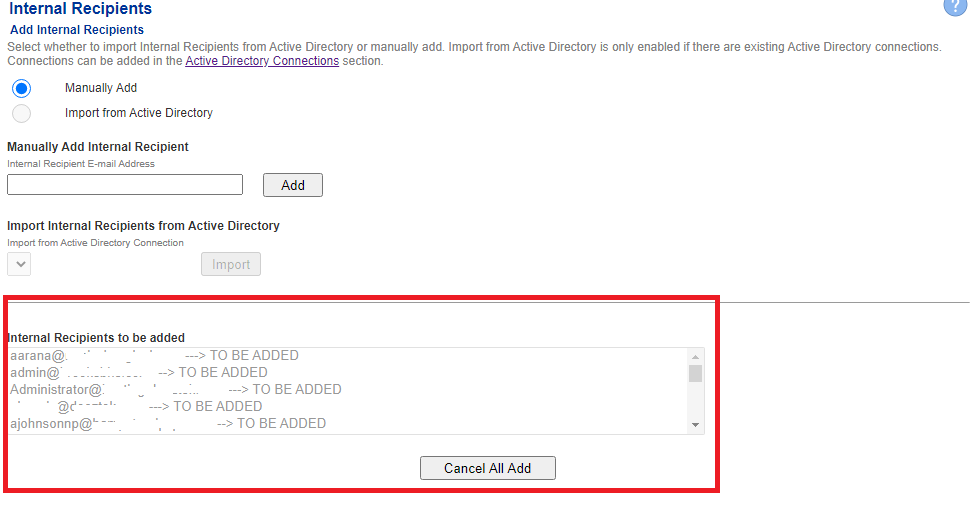](https://docs.deeztek.com/uploads/images/gallery/2021-01/image-1612106468716.png) If you selected **Delete**, you should have a listing of the e-mail addresses contained in your .csv file highlighted in **bold** **red **under the **Existing Internal Recipients** section (**Figure 7**): **Figure 7** [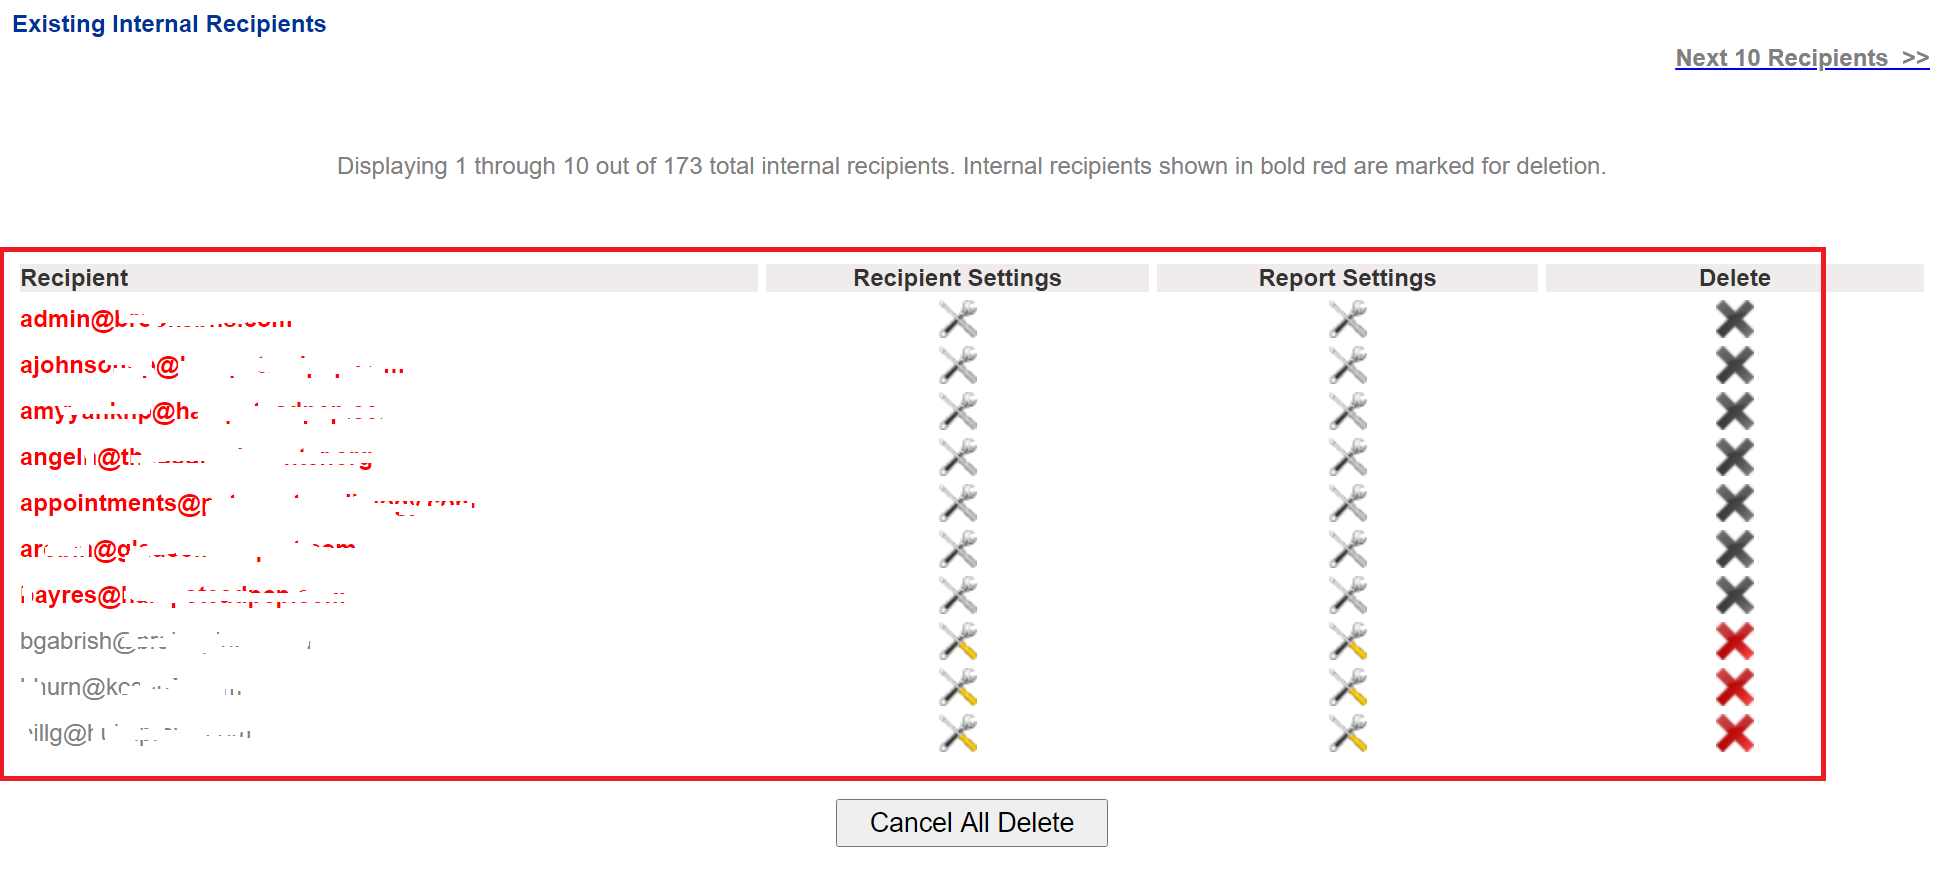](https://docs.deeztek.com/uploads/images/gallery/2021-02/image-1612826907629.png) Verify that the e-mail address listing is correct and then click on the **Apply Settings** button at the bottom of the page to finish (**Figure 8**): **Figure 8** [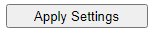](https://docs.deeztek.com/uploads/images/gallery/2021-01/image-1612106664256.png)If you are performing a bulk delete and you are deleting a lot of e-mail addresses, the operation can take a very long time to complete after you click the **Apply Settings** button. Please be patient and do NOT navigate away from Internal Recipients page until the operation has finished.
### Support Support can be obtained by visiting our [Community Discussions](https://github.com/deeztek/Hermes-Secure-Email-Gateway/discussions/) on Github. # Bulk Update Recipient Report Settings On a SSH/Command prompt enter the following command: ``` mysql -u root -p ``` At the **Enter password** prompt enter the MySQL root password you set during initial setup. On the **MariaDB \[(none)\]>** prompt enter the following: ``` use hermes; ``` You will get the following output: ``` Reading table information for completion of table and column names You can turn off this feature to get a quicker startup with -A Database changed ``` On the **MariaDB \[hermes\]>** prompt enter the following: **Enable Report Only if Quarantined Messages Exist** ``` update user_settings set report_enabled = 'YES'; ``` **Enable Report Regardless if Quarantined Messages Exist** ``` update user_settings set report_enabled = 'ALL'; ``` **Disable Quarantine Reports** ``` update user_settings set report_enabled = 'NO'; ``` At the **MariaDB \[hermes\]>** prompt enter the following: ``` exit ``` # Take Action on E-mail Based on Headers in Hermes SEG Creating message rules to take actions based on e-mail headers is not yet implemented in the Hermes SEG Web GUI. However, this can be accomplished in the command line fairly easily. In the example below, we will redirect e-mail destined for an e-mail address to another e-mail address of our choice using the **To:** header. Login to Hermes SEG appliance via console or SSH and edit the following file: ``` sudo vi /etc/postfix/regexp_header_checks ``` Add the following line at the end of the file where **We are NOT responsible for any issues that may arise from upgrading Ciphermail on your own. Any Ciphermail specific issues should be raised with Ciphermail support.
### Download Ciphermail Packages - Navigate to [https://www.ciphermail.com/downloads.html](https://www.ciphermail.com/downloads.html) and click on **Gateway distributions.** - Copy the URLs for the latest **Back-end** (djigzo\_X.X.X-X\_all.deb) and the latest **Web GUI** (djigzo-web\_X.X.X-X\_all.deb) packages where **X.X.X-X** is the latest version of the Ciphermail gateway packages . - From a Hermes SEG command prompt, issue the following commands to download the **Back-end** and **Web GUI** packages where X.X.X-X is the latest version of the packages: ``` wget https://www.ciphermail.com/downloads/djigzo-release-X.X.X-X/djigzo_X.X.X-X_all.deb wget https://www.ciphermail.com/downloads/djigzo-release-X.X.X-X/djigzo-web_X.X.X-X_all.deb ``` ### Stop Services - From a Hermes SEG command prompt issue the following commands to stop Postfix, Ciphermail: ``` sudo service postfix stop sudo service djigzo stop ``` - If you are running **Hermes SEG 12.04** or **Hermes SEG 14.04** issue the following command to stop Tomcat: ``` sudo service tomcat6 stop ``` - If you are running **Hermes SEG 16.04** issue the following command to stop Tomcat: ``` sudo service tomcat7 stop ``` ### Upgrade Packages From a Hermes SEG command prompt issue the following commands to upgrade the packages you downloaded earlier where X.X.X-X is the latest version of the packages : ``` sudo dpkg -i djigzo_X.X.X-X_all.deb sudo dpkg -i djigzo-web_X.X.X-X_all.deb ``` ### Clear Tomcat Cache - If you are running **Hermes SEG 12.04** or **Hermes SEG 14.04** issue the following command to clear the Tomcat cache: ``` sudo rm -r /var/cache/tomcat6/Catalina/localhost/djigzo ``` - If you are running **Hermes SEG 16.04** issue the following command to clear the Tomcat cache: ``` rm -r /var/cache/tomcat7/Catalina/localhost/ciphermail ``` ### Restart Services - If you are running **Hermes SEG 12.04** or **Hermes SEG 14.04** issue the following command to restart Tomcat and Ciphermail and Postfix: ``` sudo service tomcat6 restart sudo service djigzo restart sudo service postfix restart ``` - If you are running **Hermes SEG 16.04** issue the following command to restart Tomcat, Ciphermail and Postfix: ``` sudo service tomcat7 restart sudo service djigzo restart sudo service postfix restart ``` ### Verify Ciphermail was Upgraded Successfully - If you are running **Hermes SEG 12.04** or **Hermes SEG 14.04** browse to the following URL where 192.168.XXX.XXX is the IP address of the Hermes SEG appliance and login: [https://192.168.XXX.XXX:9080/djigzo/](https://192.168.xxx.xxx:9080/djigzo/) - If you are running **Hermes SEG 16.04** browse to the following URL where 192.168.XXX.XXX is the IP address of the Hermes SEG appliance and login : [https://192.168.XXX.XXX:9080/ciphermail/](https://192.168.xxx.xxx:9080/ciphermail/) - After logging in, click on the  icon on the top right of the screen and you will be re-directed to the **About CipherMail Email Encryption Gateway** page. - Verify the version is the same version of the ciphermail software you installed earlier.Note: Java Version 10 is not currently supported on Hermes SEG. Hermes SEG has only been tested with Java 8.
1. Login to console or SSH session. 2. Install JDK ``` sudo add-apt-repository -y ppa:webupd8team/java sudo apt-get update echo debconf shared/accepted-oracle-license-v1-1 select true | sudo debconf-set-selections echo debconf shared/accepted-oracle-license-v1-1 seen true | sudo debconf-set-selections sudo apt-get -y install oracle-java8-installer java -version ``` 3. Stop Lucee ``` sudo service lucee_ctl stop ``` 4. Remove JAVA\_HOME and JRE\_HOME from the lucee\_ctl init script ``` sudo sed -i -e 's/^\(JRE\|JAVA\)/#\1/g' /etc/init.d/lucee_ctl ``` 5. Add the following to /opt/lucee/tomcat/bin/setenv.sh ``` sudo sed -i -e 's#CATALINA_OPTS#JAVA_HOME=/usr/lib/jvm/java-8-oracle\nexport CATALINA_OPTS#' /opt/lucee/tomcat/bin/setenv.sh ``` 6. Start Lucee ``` sudo service lucee_ctl start ``` 7. Verify it works ``` java -version 2>&1 | head -n 1 | awk -F '"' '{print $2}' ``` should output the latest Java version you installed above ``` 1.8.0_181 ``` # Install Java JCE Unlimited Strength Jurisdiction Policy Files Hermes SEG does NOT come pre-loaded with the Java JCE Unlimited Strength Jurisdiction Policy files. Hermes SEG takes advantage of the Java JCE Unlimited Strength Jurisdiction Policy files for various functionality throughout the system. You must install the Java JCE Unlimited Strength Jurisdiction Policy files before you can configure the system. Please follow the directions below: 1. Download the [Java JCE Unlimited Strength Jurisdiction Policy files](http://www.oracle.com/technetwork/java/javase/downloads/jce8-download-2133166.html) **jce\_policy-8.zip** file and save to your computer. 2. Extract the **jce\_policy-8.zip** file. 3. Login to Hermes SEG via SSH. 4. Stop Lucee: ``` /etc/init.d/lucee_ctl stop ``` 5. Make a backup of the following files: ``` /bin/mkdir /home/hermes/jarbkup /bin/mv /opt/lucee/jdk/jre/jre/lib/security/local_policy.jar /home/hermes/jarbkup /bin/mv /opt/lucee/jdk/jre/jre/lib/security/US_export_policy.jar /home/hermes/jarbkup ``` 6. Copy the **local\_policy.jar** and the **US\_export\_policy.jar** files from the extracted **jce\_policy-8.zip** you downloaded from **Step 1** to Hermes SEG **/home/hermes** directory via **scp** if you are using Linux, **pscp** or **WinSCP** if you are using Windows**.** Example pscp command for Windows where 192.168.XXX.XXX is the IP address of your Hermes SEG machine: ``` pscp C:\tmp\UnlimitedJCEPolicyJDK8\local_policy.jar hermes@192.168.XXX.XXX:/home/hermes pscp C:\tmp\UnlimitedJCEPolicyJDK8\US_export_policy.jar hermes@192.168.XXX.XXX:/home/hermes ``` 7. Copy the newly copied files from the **/home/hermes** directory to the **/opt/lucee/jdk/jre/jre/lib/security** directory: ``` /bin/cp /home/hermes/local_policy.jar /opt/lucee/jdk/jre/jre/lib/security /bin/cp /home/hermes/US_export_policy.jar /opt/lucee/jdk/jre/jre/lib/security ``` 8. Start Lucee: ``` /etc/init.d/lucee_ctl start ``` 9. Login in to the Hermes SEG Administrator Console and Navigate to **System --> System Settings**, fill out the fields as required and click on the **Save Settings** button. If you do NOT get an error then the Java JCE Unlimited Strength Jurisdiction Policy files were succesfully installed. Remove the temp directory you created earlier: ``` /bin/rm -rf /home/hermes/jarbkup/ ``` # Disable Windows Kernel case-insensitivity You can disable Windows kernel case-insensitivity by clearing the following registry key to 0: **HKLM\\SYSTEM\\CurrentControlSet\\Control\\Session Manager\\kernel** **DWORD “obcaseinsensitive” (Figure 1)** **Figure 1** [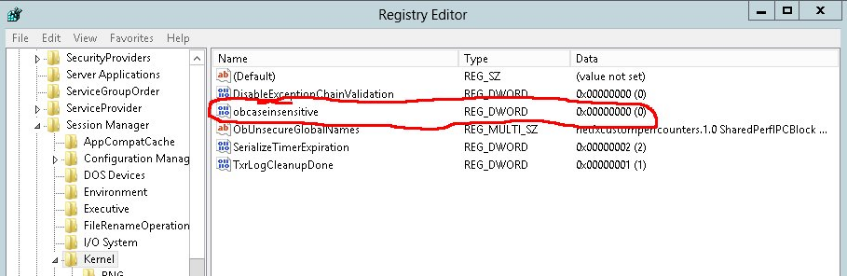](https://docs.deeztek.com/uploads/images/gallery/2020-12/image-1609330257021.png) # Integrate Sophos Antivirus with Amavis in Hermes SEG This guide will walk you through installing, configuring and integrating Sophos Antivirus for Linux with Amavis to be used in conjunction with ClamAV. #### Install Sophos Antivirus for Linux First, download Sophos Antivirus for Linux from the link below. As of this writing, the file is named sav-linux-free-9.tgz.: [https://www.sophos.com/en-us/products/free-tools/sophos-antivirus-for-linux.aspx](https://www.sophos.com/en-us/products/free-tools/sophos-antivirus-for-linux.aspx) Extract the file: ``` tar -xvzf sav-linux-free-9.tgz ``` This will create a sophos-av directory. Switch to that directory: ``` cd sophos-av ``` Run install.sh and follow the default options to install Sophos: ``` ./install.sh ``` *NOTE: When prompted for the type of auto-update you want, select Sophos NOTE: When prompted for the version you want, select Free NOTE: By default Sophos will update itself autoatically every 60-minutes as long as your server is connected to the Internet* #### Install SAVDI (Sophos Antivirus Dynamic Interface) SAV Dynamic Interface will be used as the interface between Sophos Antivirus and Amavis using the SOPHIE protocol that Amavis already supports instead of the SPPP protocol that Amavis version 2.6.5 which comes with Ubuntu 12.04 LTS does not support. Before you install SAV Dynamic Interface (SAVDI) on a server running Sophos Anti-Virus for Unix/Linux Version 9 you need to perform some additional steps before and after the install. First, you must create symbolic links for libsavi.so.3 and libssp.so.0. You need to create those links so that SAVDI can locate these libraries during installation. **32-bit Servers ONLY** If you are using a 32-bit version of Ubuntu you only need to create a link for libssp.so.0 since the link for libsavi.so.3 is already created when you install Sophos Antivirus 9. Issue the following command: ``` ln -s /opt/sophos-av/lib/libssp.so.0 /usr/local/lib/libssp.so.0 ``` *Note: If you have installed Sophos Anti-Virus to a non-default location then change the source path to this location.* **64-bit Servers ONLY** If you are using a 64-bit version of Ubuntu, you need to create links for both libssp.so.0 and libsavi.so.3 as follows: ``` ln -s /opt/sophos-av/lib64/libsavi.so.3 /usr/local/lib/libsavi.so.3 ln -s /opt/sophos-av/lib64/libssp.so.0 /usr/local/lib/libssp.so.0 ``` *Note: If you have installed Sophos Anti-Virus to a non-default location then change the source path to this location.* Now it's time to install SAVDI. Download SAVDI from https://www.sophos.com/en-us/support/downloads/standalone-installers/sav-dynamic-interface.aspx. Please note that you must have a Sophos username and password in order to dowload it. Extract the .tar file (As of this writing, SAVDI was version 2.3) ``` tar -xvf savdi-23-linux-32bit.tar ``` This creates a savdi-install directory. Go to that directory: ``` cd savdi-install ``` Run savdi\_install.sh: ``` ./savdi_install.sh ``` After installation, you will get the following warning because the virus data is detected in a non-default directory, it's ok to ignore: ``` Warning: Virus data found at /opt/sophos-av/lib/sav ``` Make a copy of /usr/local/savdi/savdid.conf file for backup just in case: ``` cp /usr/local/savdi/savdid.conf /usr/local/savdi/savdid.backup ``` Edit /usr/local/savdi/savdid.conf: ``` vi /usr/local/savdi/savdid.conf ``` Locate the below entries: ``` #virusdatadir: /var/sav/vdbs #idedir: /var/sav/vdbs ``` Change these to: ``` virusdatadir: /opt/sophos-av/lib/sav idedir: /opt/sophos-av/lib/sav ``` *Note: The '#' comment character needs to be removed from each entry* Locate the following entry and delete everything underneath that line: ``` # Define a IP channel for localhost ``` Next, insert the following underneath the above line: ``` channel { commprotocol { type: UNIX socket: /var/run/savdid/savdid.sock user: amavis group: amavis requesttimeout: 120 sendtimeout: 2 recvtimeout: 5 } scanprotocol { type: SOPHIE allowscandir: SUBDIR maxscandata: 500000 maxmemorysize: 250000 tmpfilestub: /tmp/savid_tmp } scanner { type: SAVI inprocess: YES maxscantime: 3 maxrequesttime: 10 deny: /dev deny: /home savigrp: GrpArchiveUnpack 0 savigrp: GrpInternet 1 savists: Xml 1 } } ``` Save the file In order to start savdid on system startup, you must create a script in /etc/init.d/ directory: ``` vi /etc/init.d/savdid ``` Enter the following in that file: ``` #! /bin/sh # # savdid /etc/init.d/ initscript for savdid # # # How this thing works: # ${START} must be only what is needed for start-stop-daemon, DO NOT # ADD ANY PARAMETERS HERE! we might use it for --test, for example. # ${STOP} works just like ${START}, --signal is used with it. # # ${PARAMS} are the parameters to give the daemon when really starting # it. ### BEGIN INIT INFO # Provides: savdid # Required-Start: $syslog $network $local_fs $remote_fs # Required-Stop: $syslog $network $local_fs $remote_fs # Should-Start: # Should-Stop: # Default-Start: 2 3 4 5 # Default-Stop: 0 1 6 # Short-Description: Starts savdid AntiVirus # Description: Launches the savdid AntiVirus daemon ### END INIT INFO PATH=/sbin:/bin:/usr/sbin:/usr/bin DAEMON=/usr/local/bin/savdid NAME=savdid DAEMONNAME=savdid DESC=savdid PIDFILE=/var/run/savdid/${NAME}.pid . /lib/lsb/init-functions test -f ${DAEMON} || exit 0 set -e START="--start --quiet --pidfile $PIDFILE --exec ${DAEMON}" STOP="--stop --quiet --pidfile $PIDFILE" PARAMS="-d" case "$1" in start) echo -n "Starting $DESC: " mkdir -p /var/run/savdid if start-stop-daemon ${START} -- ${PARAMS} >/dev/null ; then echo "savdid." else if start-stop-daemon --test ${START} >/dev/null 2>&1; then echo "(failed)." exit 1 else echo "(already running)." exit 0 fi fi ;; stop) echo -n "Stopping $DESC: " if start-stop-daemon ${STOP} --retry 10 >/dev/null ; then echo "savdid." else if start-stop-daemon --test ${START} >/dev/null 2>&1; then echo "(not running)." exit 0 else echo "(failed)." exit 1 fi fi ;; restart|force-reload) $0 stop exec $0 start ;; status) status_of_proc -p $PIDFILE $DAEMON $NAME && exit 0 || exit $? ;; *) N=/etc/init.d/savdid echo "Usage: $N {start|stop|restart|force-reload|status}" >&2 exit 1 ;; esac exit 0 ``` Save the file and make it executable: ``` chmod +x /etc/init.d/savdid ``` Next, we need to make sure the service we just created will start during system startup. First, install chkconfig: ``` apt-get install chkconfig ``` Next, run chkconfig savdid: ``` chkconfig savdid ``` You should get the following output: ``` savdid off ``` So, we need to activate the savdid service. Run the following command: ``` chkconfig savdid on ``` In my system, running the command above gave me the following error: ``` /sbin/insserv: No such file or directory ``` This can be easily resolved by creating the following link: ``` ln -s /usr/lib/insserv/insserv /sbin/insserv ``` and then run the "chkconfig savdid on" command again. After the command completes running, run the following command again: ``` chkconfig savdid ``` Should output the following: ``` savdid on ``` Now, start the savdid service: ``` service savdid start ``` Next, edit /etc/amavis/conf.d/15-av\_scanners: ``` vi /etc/amavis/conf.d/15-av_scanners ``` Locate the @av\_scanners line, uncomment the 'Sophie' entry and make it look like below (Note how we point it to the savdid socket file with /var/run/savid/savdid.sock: ``` ['Sophie', \&ask_daemon, ["{}/\n", '/var/run/savdid/savdid.sock'], qr/(?x)^ 0+ ( : | [\000\r\n]* $)/m, qr/(?x)^ 1 ( : | [\000\r\n]* $)/m, qr/(?x)^ [-+]? \d+ : (.*?) [\000\r\n]* $/m ], ``` Save the file & Restart Amavis: ``` service amavis restart ``` Look for the following lines in /var/log/mail.log: ``` smtp amavis[5181]: Using primary internal av scanner code for Sophie smtp amavis[5181]: Using primary internal av scanner code for ClamAV-clamd smtp amavis[5181]: Found secondary av scanner ClamAV-clamscan at /usr/bin/clamscan ``` Test Sophos integration is working by monitoring the /var/tmp/savdi/log/xxxxxx.log file where xxxxxx is today's date (Note any errors with savdid will be logged in this file as well): ``` tail -f /var/tmp/savdi/log/160325.log ``` Send the EICAR virus test file to one of your recipients and ensure an entry similar to the one below is logged in the /var/tmp/savdi/log/xxxxxx.log file: ``` 160325:070020 [56F510E6/1] 00030405 Threat found Identity: 'EICAR-AV-Test' "/var/lib/amavis/tmp/amavis-20160325T062724-05186/parts/p001" ``` Finally, reboot your system and ensure the savdid service has started by running the followoing command: ``` ps -A|grep savdid ``` If the service started, you should see a message similar to below: ``` 2201 ? 00:00:00 savdid 2203 ? 00:00:05 savdid ``` That's it! Enjoy your server with additional protection from Sophos AV. This guide was possible thanks to the invaluable contributions of Peter Kieser https://peterkieser.com/. # Hermes Secure Email Gateway Pro End User License Agreement (EULA)License is also available as a PDF. Click here to [download.](https://docs.deeztek.com/attachments/9)
#### Hermes Secure Email Gateway Pro End User License Agreement (EULA) Copyright © Dionyssios Edwards. All rights reserved. THIS END USER LICENSE AGREEMENT ("AGREEMENT")IS A LEGAL UNILATERAL CONTRACT BETWEEN YOU THE END USER (AS AN INDIVIDUAL PERSON OR SINGLE ENTITY) ("YOU") AND DIONYSSIOS EDWARDS. READ IT CAREFULLY BEFORE ACCEPTING, INSTALLING OR USING THE SOFTWARE. IT PROVIDES A LICENSE TO USE THE SOFTWARE AND CONTAINS WARRANTY INFORMATION AND LIABILITY DISCLAIMERS. BY ACCEPTING, INSTALLING AND USING THE SOFTWARE, YOU THE END USER ARE CONFIRMING ACCEPTANCE OF THE SOFTWARE AND AGREEING TO BECOME BOUND BY THE TERMS OF THIS AGREEMENT. IF YOU THE END USER DOES NOT WISH TO DO SO, DO NOT ACCEPT, INSTALL OR USE THE SOFTWARE. **1. Definitions** (a)"Dionyssios Edwards" mean Dionyssios Edwards and its licensors, if any. (b) "Products" means the set of products, comprising Software, Code, Documentation, training and dissemination resources, and other defined objects, which has been developed by or for Dionyssios Edwards. (c) "Software" means Dionyssios Edwards programs, associated executable and data files, code, and report template files in any or all language editions supplied by DIONYSSIOS EDWARDS herewith, and any and all version upgrades and maintenance updates thereto. (d) "Documentation" means the documents comprising all Dionyssios Edwards software in their final published form. The documentation includes any and all data files associated with any and all language editions of the electronic documents, and any derived hardcopy and softcopy renditions thereof. (e) "End-User Product" means a data storage or output file generated by you using Dionyssios Edwards Products. Examples of End-User Products include databases, data export files, reports saved in export file formats, and any hardcopy or softcopy renditions thereof and the like. (f) "License" means an agreement between you and Dionyssios Edwards, which gives you permission to use the Software under defined conditions and limitations. (g) "License Period" means the amount of time you are entitled to use the Software under the License limitations. The License Period shall be defined as ONE calendar year UNLESS OTHERWISE SPECIFIED IN WRITING by Dionyssios Edwards. (h) "Computer Seat" means up to ONE instance of the Software issued under a License installed on a single computer. **2. License** This Agreement allows you to: (a) Install and use the Software as one Computer Seat, in accordance with the License limitations, and make one copy of the Software in machine-readable form solely for backup purposes. You must reproduce on any such copy all copyright notices and any other proprietary legends on the original copy of the Software. (b) Install the Software on a storage device, such as a network server, and run the Software on an internal network and/or external network, provided the number of concurrent users does not exceed the limitations of the computer and/or the Software. (c) Use the Software for a period as set forth by the License Period unless otherwise specified in writing by Dionyssios Edwards. The License Period starts at the date of delivery and it will be evidenced in your receipt. At the end of the License Period, you are required to purchase a license renewal in order to continue using the software. CONTINUING TO USE THE SOFTWARE BEYOND THE SPECIFIED LICENSE PERIOD IS A VIOLATION OF THIS AGREEMENT AND YOU WILL BE SUBJECT TO LEGAL ACTION. **3. License Restrictions** Other than as set forth in Section 2, you may not make or distribute copies of the Software, or electronically transfer the Software from one computer to another or over a network. You may not decompile, reverse engineer, disassemble, or otherwise reduce the Software to a human-perceivable form. You may not rent, lease or sub-License the Software. You may not modify the Software. You may not create derivative works based upon the Software, EXCEPT BY PERMISSION FROM Dionyssios Edwards, GIVEN IN WRITING. **4. Upgrades** If this copy of the Software is an upgrade from an earlier version of the Software, it is provided to you on a License exchange basis. You agree by your installation and use of this copy of the Software to voluntarily terminate your earlier end-user License and that you will not continue to use the earlier version of the Software nor transfer it to another. By having a License to use the software, you are automatically entitled to unlimited upgrades of the Software provided that it falls within the License Period. **5. Ownership** The foregoing License gives you limited rights to use the Software. Although you own the media on which the Software is recorded, you do not become the owner of, and Dionyssios Edwards retains title to, the Software, the Documentation, any and all other DIONYSSIOS EDWARDS Products, and all copies thereof. All rights not specifically granted in this Agreement, including International Copyrights, are reserved by Dionyssios Edwards. Any software, software component, document, publication or other related intellectual work produced by any person in violation of the terms and conditions of this Agreement becomes immediately the absolute and sole property of Dionyssios Edwards. **6. Transfer of License** This License is NOT transferable. **7. Support** Support for Software will be given via e-mail and/or phone at DIONYSSIOS EDWARDS’s sole discretion during normal business hours as defined by DIONYSSIOS EDWARDS. **8. Training** This License entitles you to ONE FREE OF CHARGE Initial Training Session on the features and usability of Software to be performed no later than THIRTY (30) calendar days after delivery as indicated by your receipt. The Initial Training Session will be performed during a time and place that both DIONYSSIOS EDWARDS and you agree upon and it shall NOT exceed in length a period of FOUR (4) hours. After the THIRTY (30) days, an hourly fee will be charged for a training session. Additional training sessions beyond the free Initial Training Session will assess an hourly fee. The hourly fee will be determined by DIONYSSIOS EDWARDS and it will not exceed the fair market value of such. **9. Limited Warranties** Dionyssios Edwards warrants that, for a period of thirty (30) days from the date of delivery (as evidenced by a copy of your receipt): (i) when used with a recommended hardware configuration, the Software will perform in conformance with the documentation supplied with the Software; and (ii) that the media on which the Software is furnished will be free from defects in materials and workmanship under normal use. EXCEPT AS SET FORTH IN THE FOREGOING LIMITED WARRANTY, DIONYSSIOS EDWARDS DISCLAIMS ALL OTHER WARRANTIES OR CONDITIONS, EITHER EXPRESS OR IMPLIED, INCLUDING THE WARRANTIES OR CONDITIONS OF QUALITY, MERCHANTABILITY, FITNESS FOR A PARTICULAR PURPOSE AND NONINFRINGEMENT OF THIRD PARTY RIGHTS. IF APPLICABLE LAW IMPLIES ANY WARRANTIES WITH RESPECT TO THE SOFTWARE, ALL SUCH WARRANTIES ARE LIMITED IN DURATION TO THIRTY (30) DAYS FROM THE DATE OF DELIVERY. DIONYSSIOS EDWARDS DISCLAIMS ANY WARRANTY OF TITLE OR OTHER WARRANTIES FOR ANY THIRD PARTY OFFERINGS OR PRODUCTS. ALL SUCH WARRANTIES AND REPRESENTATIONS ARE EXCLUDED. WITHOUT LIMITATION, NO WARRANTY IS GIVEN THAT THE DIONYSSIOS EDWARDS PRODUCTS ARE ERROR FREE. No oral or written information or advice given by DIONYSSIOS EDWARDS, its dealers, distributors, agents or employees shall create a warranty or in any way increase the scope of this warranty. **10. Exclusive Remedy** Your exclusive remedy under Section 9 is to return the Software to the place you acquired it, with a copy of your receipt and a description of the problem. DIONYSSIOS EDWARDS or its distributors will use reasonable commercial efforts to supply you with a replacement copy of the Software that substantially conforms to the documentation and/or provide a replacement for defective media. Refunds are not given at any time under any circumstances. DIONYSSIOS EDWARDS shall have no responsibility if the Software has been altered in any way, if the media has been damaged by accident, abuse or misapplication, or if the failure arises out of use of the Software with other than a recommended hardware configuration. **11. Limitations of Damages** DIONYSSIOS EDWARDS, ITS LICENCORS, DISTRIBUTORS AND AGENTS SHALL NOT BE LIABLE FOR: (A) ANY DIRECT, INDIRECT, SPECIAL, INCIDENTAL OR CONSEQUENTIAL DAMAGES (INCLUDING BUT NOT LIMITED TO DAMAGES FOR LOSS OF BUSINESS, LOSS OF PROFITS, FAILURE TO REALISE EXPECTED SAVINGS OR THE LIKE), (B) ANY CLAIM AGAINST YOU BY ANY OTHER PARTY, (C) ANY CLAIM THAT YOUR USE OF DIONYSSIOS EDWARDS PRODUCTS AND/OR RELATED PRODUCTS THAT WE PROVIDE INFRINGES ANY THIRD PARTY'S INTELLECTUAL RIGHTS, (D) ANY CLAIM BY YOU, OR (E) ANY DAMAGES ARISING FROM YOUR FAILURE TO PERFORM YOUR RESPONSIBILITIES IN CONNECTION WITH THIS AGREEMENT, OR ARISING FROM ANY CAUSE OUTSIDE OF OUR CONTROL, INCLUDING BUT NOT LIMITED TO DELAY IN THE PERFORMANCE OF OUR OBLIGATIONS, OR MISUSE OF YOUR SOFTWARE LICENSE KEY. THESE LIMITATIONS APPLY TO ALL CLAIMS IRRESPECTIVE OF THE CAUSE OF ACTION UNDERLYING THE CLAIM, INCLUDING, BUT NOT LIMITED TO BREACH OF CONTRACT, TORT (INCLUDING BUT NOT LIMITED TO NEGLIGENCE OR MISREPRESENTATION), PRODUCT LIABILITY OR OTHERWISE, EVEN IF DIONYSSIOS EDWARDS OR ITS REPRESENTATIVES HAVE BEEN ADVISED OF THE POSSIBILITY OF SUCH DAMAGES AND EVEN IF A REMEDY SET FORTH HEREIN IS FOUND TO HAVE FAILED OF ITS ESSENTIAL PURPOSE. DIONYSSIOS EDWARDS’S TOTAL LIABILITY TO YOU FOR ACTUAL DAMAGES FOR ANY CAUSE WHATSOEVER WILL BE LIMITED TO THE GREATER OF $200 U.S. EQUIVALENT OR THE AMOUNT PAID BY YOU FOR THE SOFTWARE THAT CAUSED SUCH DAMAGE. **11. Basis of Bargain** The limited warranty, exclusive remedies and limited liability set forth above are fundamental elements of the basis of the agreement between DIONYSSIOS EDWARDS and you. DIONYSSIOS EDWARDS would not be able to provide the Software on an economic basis without such limitations. **12. Severability** If any part of this Agreement is found void and unenforceable, it will not affect the validity of the balance of the Agreement, which shall remain valid and enforceable according to its terms. **13. Termination** Without prejudice to any other rights, DIONYSSIOS EDWARDS may terminate this Agreement if you fail to comply with its terms and conditions. In such event you must destroy all copies of the Software and all of its component parts. **14. Variation to this Agreement** This Agreement may be modified only in writing signed by an authorized agent of DIONYSSIOS EDWARDS. DIONYSSIOS EDWARDS may vary the terms of this Agreement in connection with the licensing of any upgrades or updates to you. **15. General** The laws of the state of Delaware shall govern this Agreement. This Agreement contains the complete agreement between the parties with respect to the subject matter hereof, and supersedes all prior or contemporaneous agreements or understandings, whether oral or written. # Hermes SEG Build 211019 Update**This is a MAJOR update that introduces many breaking changes.** This update will install and configure Nginx HTTP server which will enable the Admin and User Consoles to be accessible over Ports **80** and **443** in lieu of Apache HTTP sever over port 9080.
This update will install new packages from the Ubuntu repositories. Ensure your appliance has access to the Internet before proceeding. It's important to understand that after this update is installed, Hermes SEG wil no longer be accessible over port 9080. You must instead access Hermes SEG over port 80 and 443. You must adjust any port forwards you may have in your firewall from port 9080 to port 80 and 443 and completely disable access to port 9080. When the update has finished installing, it will prompt you to reboot your system. The normal method of going to **System --> System Reboot & Shutdown** will not work for this update. You must instead reboot your system by using the command console and typing the following command: ``` sudo reboot ``` After the system reboots, you must access the Hermes SEG Admin console by using the following address where **<SYSTEM\_IP>** is your system IP address (Do NOT use port 9080): ``` https://