SVF Policies
SVF (Spam/Virus/File) Policies contain settings that determine the behavior of Hermes SEG in terms of spam, viruses and attached files of incoming email. SVF Policies get assigned on a per Internal Recipient basis.
Hermes SEG already comes pre-configured with five System SVF policies.
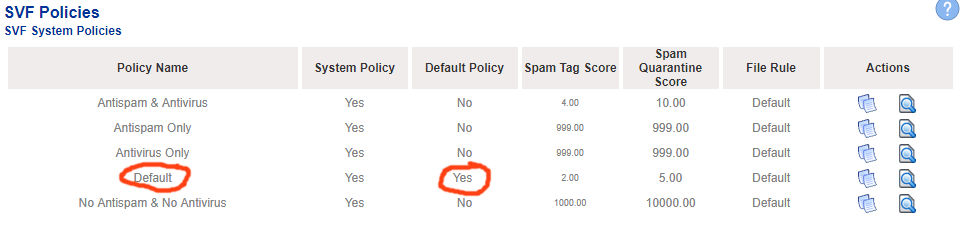
By default, the Default SVF System Policy is the policy which automatically gets assigned to newly added Internal Recipients (Figure 1). This behavior can be changed by editing an existing System Policy or by creating a Custom Policy and assigning that policy as the Default Policy.
All SVF System polcies exist as templates. The SVF System Policies cannot be edited, they can only be viewed or copied in order to be used as a starting point in creating SVF Custom Policies (Figure 1).
Figure 1
View Default SVF System Policy
- Under the SVF System Policies section click on the
 icon under the Actions column of the Default SVF System Policy.
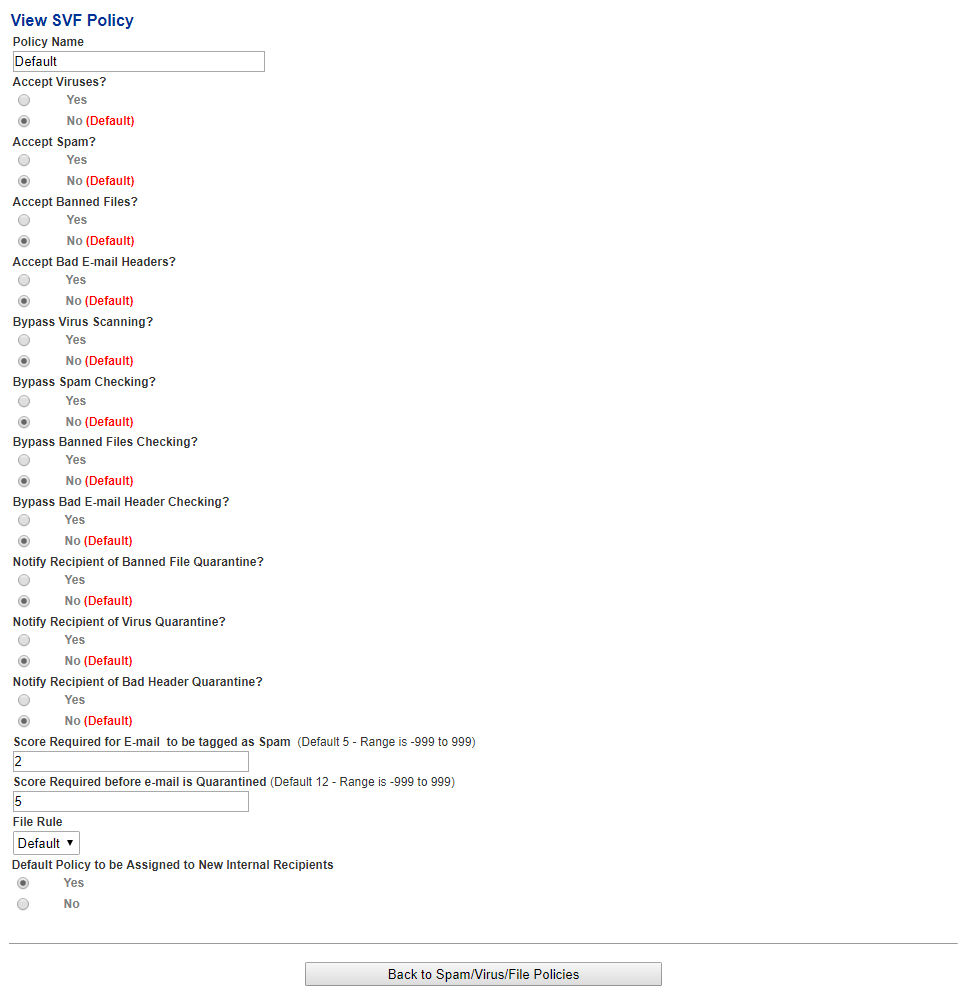
 - On the View SVF Policy page, you will see all the settings can be set with a SVF policy. Note, the that the Default File Rule is associated with the Default SVF Policy (Figure 2):

Figure 2
- Click on the Back to Spam/Virus/file Policies button on the bottom of the page to return to the SVF Policies page (Figure 3).
Figure 3

Create SVF Custom Policy by copying the Default SVF Policy or any SVF Custom Policy
This method will allow you to copy the Default SVF Policy or any SVF Custom Policy (assuming there are existing custom SVF Policies) and using it as a starting point for a new custom SVF policy.
- Under the SVF System Policies section or the SVF Custom Policies (if there are already existing SVF custom policies) section, click on the
 icon under the Actions column of the policy you wish to copy. You will be redirected to the Copy SVF Policy page in order to create and customize a new SVF Custom Policy based on the existing SVF Policy you choose.
 - Under the Policy Name field enter a unique name.
- Under the Accept Viruses field, select Yes to accept virus infected email or No if you do not want to accept virus infected email. The default setting for this field is No.
- Under the Accept Spam field, select Yes to accept spam email or No if you do not want to accept spam email. The default setting for this field is No.
- Under the Accept Banned Files field, select Yes to accept email with banned file attachments or No if you do not want to accept email with banned file attachments. The default setting for this field is No.
- Under the Accept Bad Headers field, select Yes to accept email with bad headers or No if you do not want to accept email with bad headers. The default setting for this field is No.
- Under the Bypass Virus Checks field, select Yes to bypass checks for virus email attachments or No if you do not want to bypass checks for virus email attachments. Note that if this setting is set to Yes, the Accept Viruses setting from Step 3 will not have any effect. The default setting for this field is No.
- Under the Bypass Spam Checks field, select Yes to bypass checks for spam email or No if you do not want to bypass checks for spam email. Note that if this setting is set to Yes, the Accept Spam setting from Step 4 will not have any effect. The default setting for this field is No.
- Under the Bypass Banned Files Checks field, select Yes to bypass checks for banned file attachments in email or No if you do not want to bypass checks for banned file attachments in email. Note that if this setting is set to Yes, the Accept Banned Files setting from Step 5 will not have any effect. The default setting for this field is No.
- Under the Bypass Bad Header Checks field, select Yes to bypass checks for bad headers in email or No if you do not want to bypass checks for bad headers in email. Note that if this setting is set to Yes, the Accept Bad Headers setting from Step 6 will not have any effect. The default setting for this field is No.
- Under the Notify Recipient of Banned File Quarantine field, select Yes to to configure the system to send a notification to the intended recipient every time an email with a banned file attachment is quarantined or No if you do not want a notification sent. The default setting for this field is No.
- Under the Notify Recipient of Virus Quarantine field, select Yes to to configure the system to send a notification to the intended recipient every time an email with a virus is quarantined or No if you do not want a notification sent. The default setting for this field is No.
- Under the Notify Recipient of Bad Header Quarantine field, select Yes to to configure the system to send a notification to the intended recipient every time an email with a bad header is quarantined or No if you do not want a notification sent. The default setting for this field is No.
- Under the Score Required for E-mail to be tagged as Spam field, enter the score that an incoming email needs to hit in order for the system to tag it as spam and still deliver to the user . The default setting for this field is 5.
- Under the Score Required before e-mail is Quarantined field, enter the score that an incoming email needs to hit in order for the system to tag it as spam but NOT deliver to the user and instead quarantine it . The default setting for this field is 12.
- Under the File Rule drop-down field, select an existing file rule that you want to associate with this SVF policy.
- Under the Default Policy to be Assigned to New Internal Recipients field, select Yes or No depending on your requirements.
- Click the Submit button on the bottom of the page to create your new policy.
- You will be redirected back to the SVF Policies page. Your new policy will now be listed under the SVF Custom Policies section . (Figure 4).

Figure 4

Edit SVF Custom Policy
Note: ONLY SVF Custom Policies can be edited.
- Under the SVF Custom Policies section, click on the
 icon under the Actions column of the policy you wish to edit. You will be redirected to the Edit SVF Policy page.
 - Under the Policy Name field change the policy name as required.
- Under the Accept Viruses field, select Yes to accept virus infected email or No if you do not want to accept virus infected email. The default setting for this field is No.
- Under the Accept Spam field, select Yes to accept spam email or No if you do not want to accept spam email. The default setting for this field is No.
- Under the Accept Banned Files field, select Yes to accept email with banned file attachments or No if you do not want to accept email with banned file attachments. The default setting for this field is No.
- Under the Accept Bad Headers field, select Yes to accept email with bad headers or No if you do not want to accept email with bad headers. The default setting for this field is No.
- Under the Bypass Virus Checks field, select Yes to bypass checks for virus email attachments or No if you do not want to bypass checks for virus email attachments. Note that if this setting is set to Yes, the Accept Viruses setting from Step 3 will not have any effect. The default setting for this field is No.
- Under the Bypass Spam Checks field, select Yes to bypass checks for spam email or No if you do not want to bypass checks for spam email. Note that if this setting is set to Yes, the Accept Spam setting from Step 4 will not have any effect. The default setting for this field is No.
- Under the Bypass Banned Files Checks field, select Yes to bypass checks for banned file attachments in email or No if you do not want to bypass checks for banned file attachments in email. Note that if this setting is set to Yes, the Accept Banned Files setting from Step 5 will not have any effect. The default setting for this field is No.
- Under the Bypass Bad Header Checks field, select Yes to bypass checks for bad headers in email or No if you do not want to bypass checks for bad headers in email. Note that if this setting is set to Yes, the Accept Bad Headers setting from Step 6 will not have any effect. The default setting for this field is No.
- Under the Notify Recipient of Banned File Quarantine field, select Yes to to configure the system to send a notification to the intended recipient every time an email with a banned file attachment is quarantined or No if you do not want a notification sent. The default setting for this field is No.
- Under the Notify Recipient of Virus Quarantine field, select Yes to to configure the system to send a notification to the intended recipient every time an email with a virus is quarantined or No if you do not want a notification sent. The default setting for this field is No.
- Under the Notify Recipient of Bad Header Quarantine field, select Yes to to configure the system to send a notification to the intended recipient every time an email with a bad header is quarantined or No if you do not want a notification sent. The default setting for this field is No.
- Under the Score Required for E-mail to be tagged as Spam field, enter the score that an incoming email needs to hit in order for the system to tag it as spam and still deliver to the user . The default setting for this field is 5.
- Under the Score Required before e-mail is Quarantined field, enter the score that an incoming email needs to hit in order for the system to tag it as spam but NOT deliver to the user and instead quarantine it . The default setting for this field is 12.
- Under the File Rule drop-down field, select an existing file rule that you want to associate with this SVF policy.
- Under the Default Policy to be Assigned to New Internal Recipients field, select Yes or No depending on your requirements.
- Click the Save Changes button on the bottom of the page to save the policy.
- If you are done making changes to the policy, click the Back to SpamVirus/File Policies button to return to the SVF Policies page.

Delete SVF Custom Policy
Note: ONLY SVF Custom Policies that are NOT associated with with Internal Recipients can be deleted. When deleting a SVF Custom Policy, the system will NOT prompt you to confirm, it will be deleted immediately.
- Under the SVF Custom Policies section, click on the
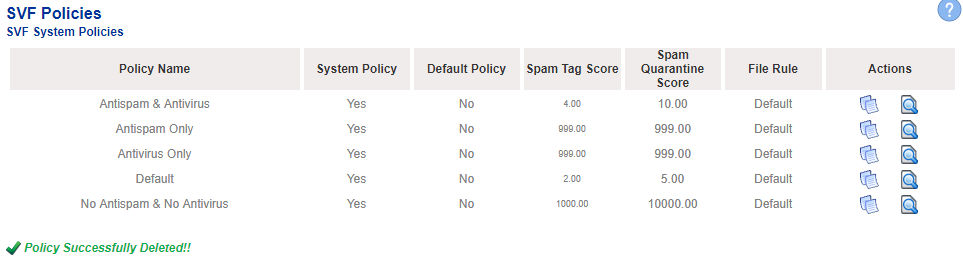
 icon under the Actions column of the policy you wish to delete.
 - The system will delete the SVF Custom Policy and re-direct you back to the SVF Policies page (Figure 5) .

Figure 5
Filter Internal Recipients to Policies Mappings
Setting a filter will assist you in narrowing down specific recipients by email address or domain in order to manage the assigned policies easily.
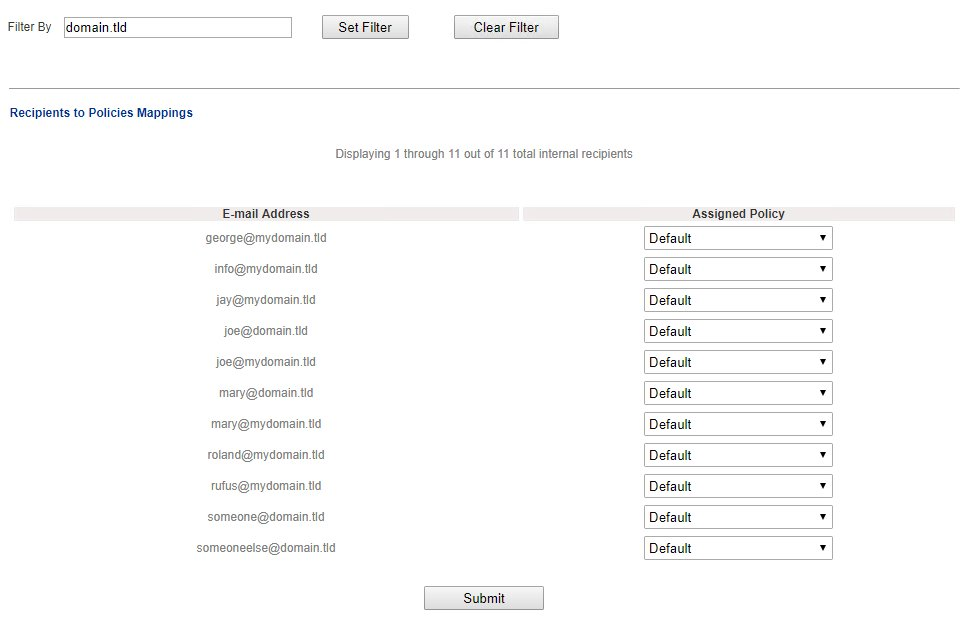
- In the Filter By field, enter a complete or partial email address or domain and click the Set Filter button. If any matches are found, the Recipients to Policies Mappings listing will be populated with only the entries matching the filter you set (Figure 6.
Figure 6
- You can clear a filter you set by clicking the Clear Filter button at any time.
Assign Internal Recipients to Policies
Note: The Default SVF System Policy is the policy which automatically gets assigned to newly added Internal Recipients. SVF Policies whether System or Custom can be assigned on a per Internal Recipient basis. Additionally, if the Recipients to Policies Mappings listing contains more than 50 entries, the system will paginate the listings automatically. However, if you assign policies to recipients on a specific page and then click either on the Next 50 Recipients or the Previous 50 Recipients links on that page without clicking the Submit button on the bottom of the page, your changes will be lost.
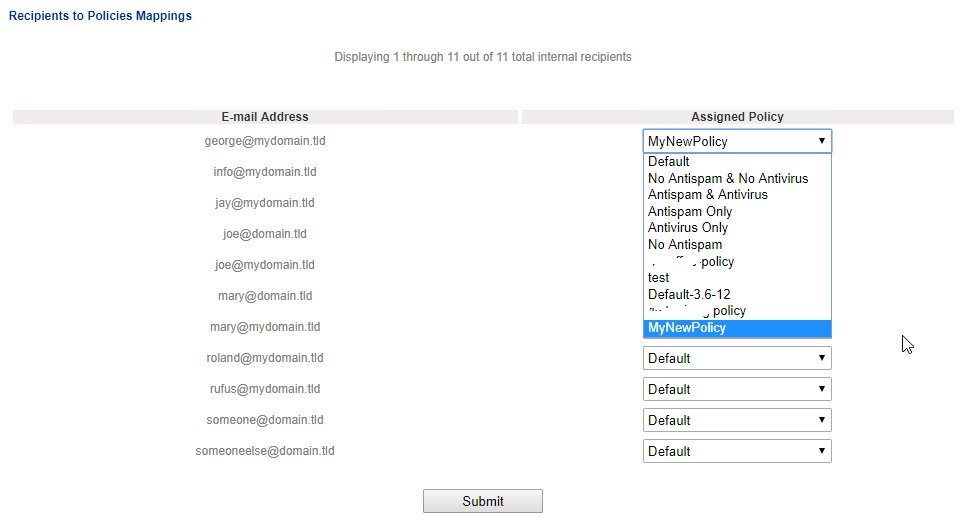
- Under the Recipients to Policies Mappings section, you will see a listing of all the Internal Recipients and the assigned policy assigned to each recipient (Figure 7).
Figure 7


- Under the Assigned Policy column of the recipient you wish to modify, select the new policy you wish to assign from the drop-down box (Figure 8).
Figure 8
- Continue modifying recipient policies as needed. When finished, click on the Submit button to save your changes.
![]()