Disabling DKIM will also automatically disable DKIM if enabled.
#### Body Canonicalization The canonicalization method for the message body used when DKIM signing messages. The recommended setting is **Relaxed**. #### Headers Canonicalization The canonicalization method for the message headers used when DKIM signing messages. The recommended setting is **Relaxed**. #### Default Message Action This is the default action to take when an incoming message DKIM signature fails to validate. The recommended setting is **Accept**. This action is processed before all the other actions below so it's best to be set to Accept and then set any overrides below. #### Bad Signature Action This is the default action to take when an incoming message DKIM signature fails to validate. The recommended setting is **Accept**. #### DNS Error Action This is the default action to take when a DNS error occurs during the DKIM validation of an incoming message . The recommended setting is **Temp Fail**. #### Internal Error Action This is the default action to take when a system internal occurs during the DKIM validation of an incoming message . The recommended setting is **Quarantine**. #### No Signature Action This is the default action to take when an incoming message has no DKIM signature . The recommended setting is **Accept**. #### Security Concern Action This is the default action to take when an incoming message contains properties that maybe of a security concern . The recommended setting is **Quarantine**. #### Signature Algorithm This settings sets the DKIM signature algorithm used when signing outgoing DKIM messages . The recommended setting is **RSA-SHA-256**. (**Figure 1**). **Figure 1** [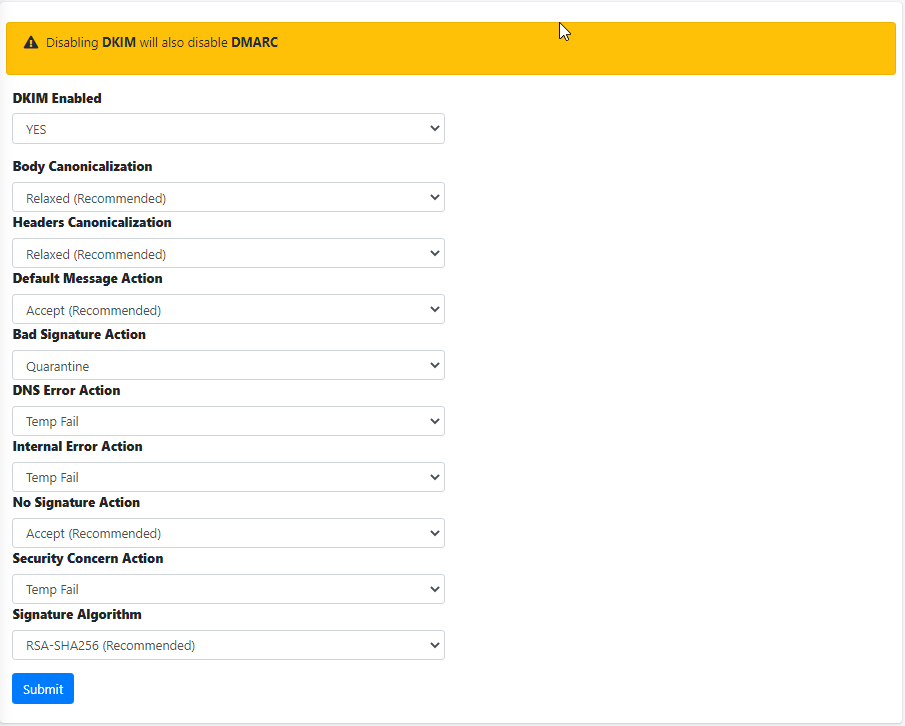](https://docs.deeztek.com/uploads/images/gallery/2022-06/image-1656442045156.png) #### Add Whitelisted Domain(s) Adding entries in the Whitelisted Domain(s) will allow Hermes SEG to skip DKIM checks for those entries. Click the **Add Whitelisted Domain(s)** button and in the resultant menu enter the entries the **Domain(s)** field (You can add multiple entries each in its own line), enter an optional note in the **Note** field and click the **Submit** button (**Figure** **2).** **Figure 2** [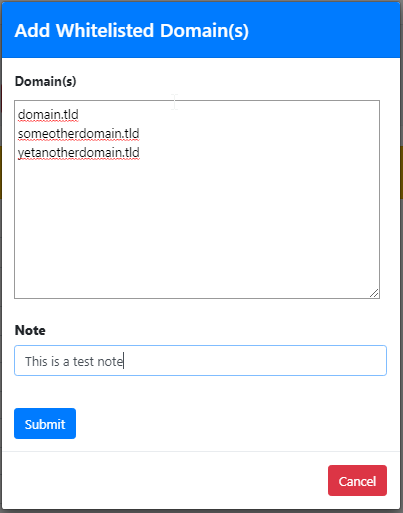](https://docs.deeztek.com/uploads/images/gallery/2022-06/image-1656442323170.png) #### Add Trusted Host(s) Adding entries in Trusted Host(s) enables those hosts to send DKIM signed e-mail through Hermes SEG. Trusted Host(s) can be IPs, Network Address(es) and FQDNs. Click the **Add Trusted Host(s)** button and in the resultant menu enter the entries the **Trusted Host(s)** field (You can add multiple entries each in its own line), enter an optional note in the **Note** field and click the **Submit** button (**Figure** **3).** **Figure 3** [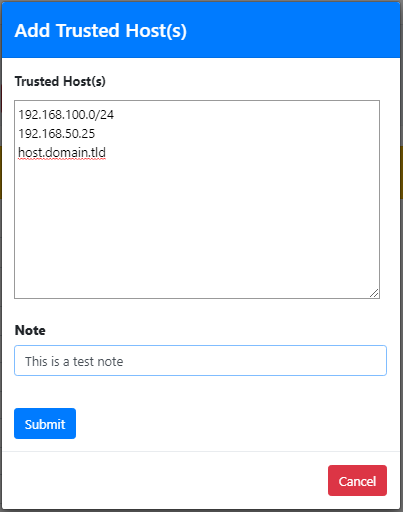](https://docs.deeztek.com/uploads/images/gallery/2022-06/image-1656442533239.png) #### Delete Whitelisted Domain(s) or Trusted Host(s) Entries Select the entries you wish to delete by checking their checkboxes and click the **Delete** button on top of the page (**Figure 4**). **Figure 4** [](https://docs.deeztek.com/uploads/images/gallery/2022-06/image-1656442742794.png) #### Edit Whitelisted Domain or Trusted Host Entry Click the [ ](https://docs.deeztek.com/uploads/images/gallery/2022-06/image-1656441062730.png)icon next to the entry you wish to edit. In the resultant window, make changes as necessary and click the **Submit** button (**Figure 5**). **Figure 5** [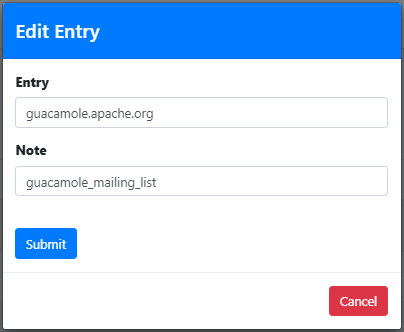](https://docs.deeztek.com/uploads/images/gallery/2022-06/image-1656442860519.png)