If you have recently rebooted your system, you may get a **500 Internal Server Error** when attempting to access the **Hermes SEG Administrator Console**. This usually means that the Authentication Server has not initialized yet. This error usually goes away on its own. Wait a couple of minutes and try refreshing your browser again.
Login with the following default credentials - **Username:** admin - **Password:** ChangeMe2! #### Set Network Settings - Navigate to **System --> Network Settings.** - Set the **Network Mode** drop-down to **Static**. - Fill in the **Host Name** field. Ensure you enter only the name without the domain part. For example, if the FQDN of your Hermes SEG appliance is going to be **smtp.domain.tld**, then in the **Host Name** field you will simply enter **smtp** without the domain part. - Fill in the **Primary Domain Name** field. For example, if the FQDN of your Hermes SEG appliance is going to be **smtp.domain.tld**, then in the **Primary Domain Name** field you will simply enter **domain.tld**. - Fill in the Hermes SEG appliance **IP Address**, select the appropriate **Subnet Mask** for your network, fill in the **Gateway** and **DNS1**. If applicable, fill in **DNS2** and **DNS3** fields. - Click on the **Submit** button. Once the settings are saved, they will not take effect until you click on the **Apply Settings** button. - Click on the **Apply Settings** button (**Figure 2**). **Figure 2** [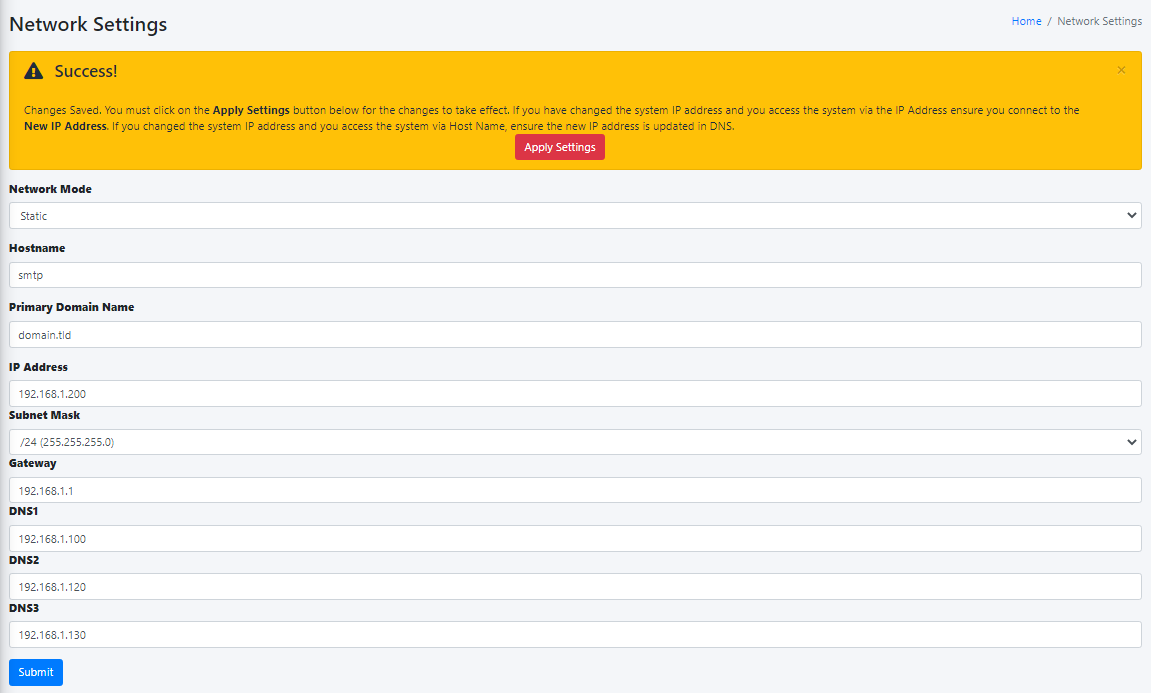](https://docs.deeztek.com/uploads/images/gallery/2021-12/image-1638453135015.png) - If you changed Hermes SEG IP Address, your browser will most likely time out. Remember, to access the Hermes SEG Administrator Console Web GUI at [https://<NEW\_IP\_ADDRESS/admin/](https://Before requesting **Acme Certificates** ensure that **BOTH** ports **TCP 80** and **TCP 443** are open to Hermes SEG from the Internet and the domain you are requesting the certificate is pointing to the Internet accessible IP address of your Hermes SEG machine. We recommend that you test using the **Acme Staging** server first to ensure the request works before attempting to use **Acme Production**. The reason we initially **Request Acme Certificate** utilizing the **Acme Staging** server is because Lets Encrypt is much more lenient with rate limits with failed requests in their staging environment than their production environment, click [here](https://letsencrypt.org/docs/staging-environment/) for details.
- Click the **Request Acme Certificate** button, enter a friendly name in the **Certificate Name** field, enter the FQDN (domain name) you wish to request a certificate, enter a valid e-mail address in the **Notifications E-mail address** field, leave the **Acme Server** drop-down field set to **Acme Staging** and click the **Request** button (**Figure 4**): **Figure 4** [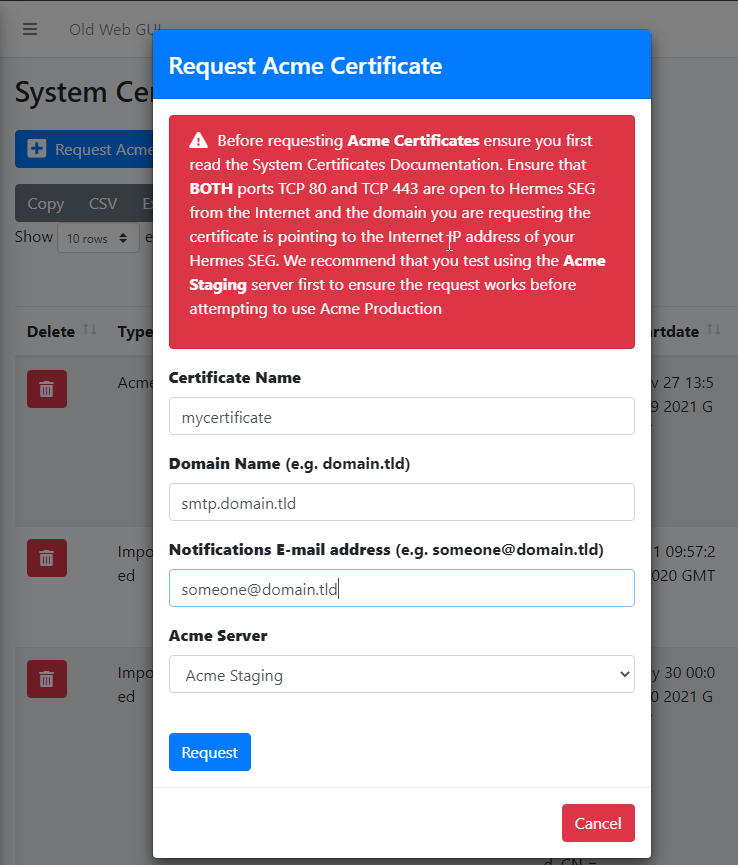](https://docs.deeztek.com/uploads/images/gallery/2022-01/image-1642890261401.png) - If the Acme Certificate Request fails, double-check that the FQDN (domain name) points to the Internet accessible IP of your Hermes SEG machine and that BOTH ports TCP/80 (HTTP) and TCP/443 (HTTPS) are allowed through your firewall and try again. - If the Acme Certificate Request succeeds, locate the newly created certificate in your certificate list, click the [ ](https://docs.deeztek.com/uploads/images/gallery/2022-01/image-1642946754752.png)icon and on the resultant **Delete Certificate** confirmation click on **Yes** (**Figure 5**): **Figure 5** [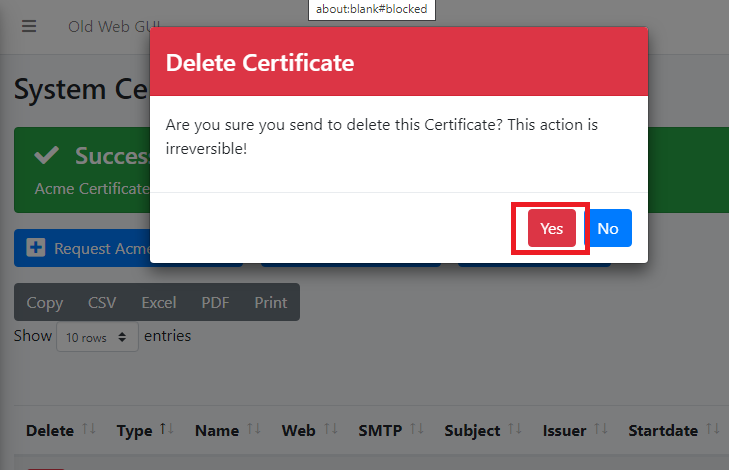](https://docs.deeztek.com/uploads/images/gallery/2022-01/image-1642946921688.png) - Click the **Request Acme Certificate** button again, enter a friendly name in the **Certificate Name** field, enter the FQDN (domain name) you wish to request a certificate, enter a valid e-mail address in the **Notifications E-mail address** field, this time set the **Acme Server** drop-down field set to **Acme Production** and click the **Request** button (**Figure 6**): **Figure 6** [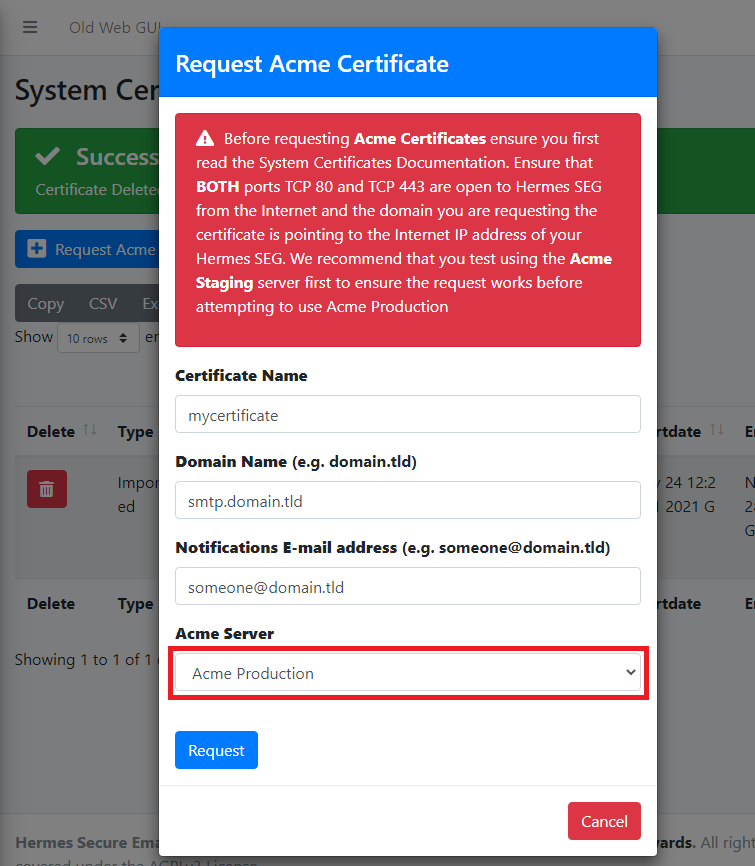](https://docs.deeztek.com/uploads/images/gallery/2022-01/image-1642947557037.png) #### Set Console Settings The Hermes SEG **Console Settings** sets the method you wish to access Hermes SEG machine which includes the Admin Console, User Console and the Ciphermail Console. By default, the **Console Mode** is set to **IP Address**, however, an IP address is not contusive to using SSL certificates. Therefore, if you plan to use a SSL certificate to access the Hermes SEG machine without getting certificate errors, you must set the Console Mode to **Host Name**. The Host Name you set does **NOT** necessarily have to the the same **Host Name** you set in **Network Settings** above. The **Host Name** and **Primary Domain Name** you set in the Network settings is used for SMTP transactions such as **SMTP TLS** and it's not related to Hermes SEG console access. - Navigate to **System --> Console Settings**. - Set the **Console Mode drop-down to **Host Name** and in the resultant **Host Name** field that appears, fill in the desired host name you wish to use (**Figure 7**): **Figure 7** [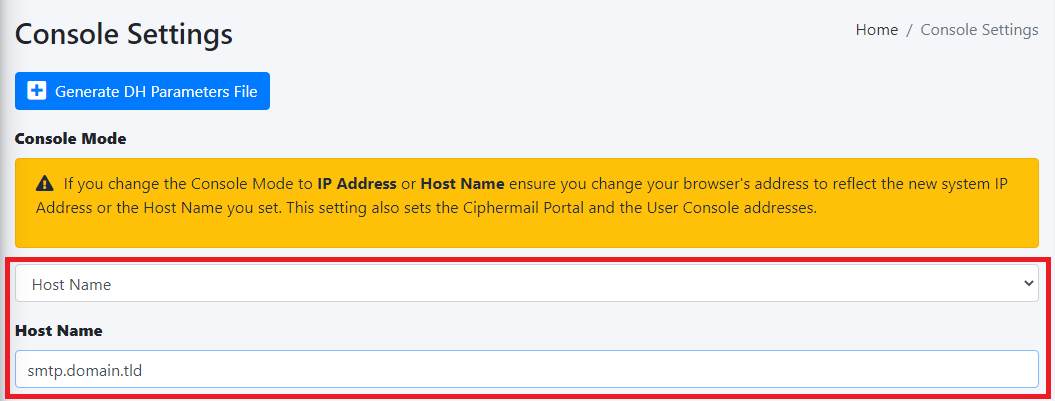](https://docs.deeztek.com/uploads/images/gallery/2022-01/image-1642868434350.png) - The **Console Certificate** field is pre-populated with the **system-self-signed** certificate. If you wish to use a SSL certificate you previously set in the **Set System Certificates** section above, simply delete the **system-self-signed** entry and start typing the friendly name of the certificate you setup previously that matches the host name. The system will locate the certificate and display it in a drop-down list. Click on the certificate and the system will automatically populate all the rest of the Certificate fields such as the Subject, Issuer, Serial and Type (**Figure 8**): **Figure 8** [](https://docs.deeztek.com/uploads/images/gallery/2022-01/image-1642948341819.png) - We highly recommend that you enable **HTTP Strict Transport Security (HSTS)**, **Online Certificate Status Protocol (OCSP) Stapling, Online Certificate Status Protocol (OCSP) Stapling Verify** and click the **Submit** button (**Figure 9**): **Figure 9** [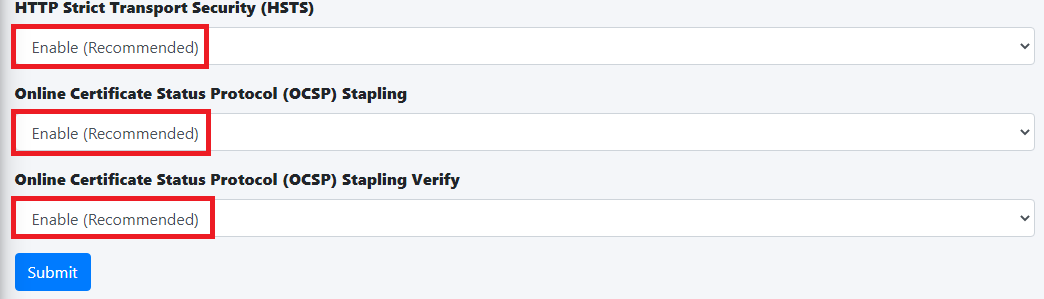](https://docs.deeztek.com/uploads/images/gallery/2022-01/image-1642948755741.png)After clicking the **Submit** button and you changed the Console Mode from IP Address to Host Name, your browser will **NOT** automatically redirect you to the new console address. Ensure you enter the new address in your browser as **[https://<HOST\_NAME>/admin/](https://
Before you can set **SMTP TLS**, you must first have either imported or requested a SSL Certificate in the **Set System Certificates** section above for the **Hostname** and **Primary Domain Name** you set in the **Set Network Settings** above.
- Navigate to **Gateway --> SMTP TLS Settings**. - Set the **SMTP TLS Mode** drop-down to **Opportunistic TLS**. - The **SMTP TLS Certificate** field is pre-populated with the **system-self-signed** certificate. If you wish to use a SSL certificate you set in the **Set System Certificates** section above, simply delete the **system-self-signed** entry and start typing the friendly name of the certificate you setup previously that matches the **Hostname** and **Primary Domain Name** you set in the **Set Network Settings** above. The system will locate the certificate and display it in a drop-down list. Click on the certificate and the system will automatically populate all the rest of the Certificate fields such as the Subject, Issuer, Serial and Type (**Figure 13**): **Figure 13** [](https://docs.deeztek.com/uploads/images/gallery/2022-01/image-1642971499398.png) - Click the **Submit** button (**Figure 14**): **Figure 14** [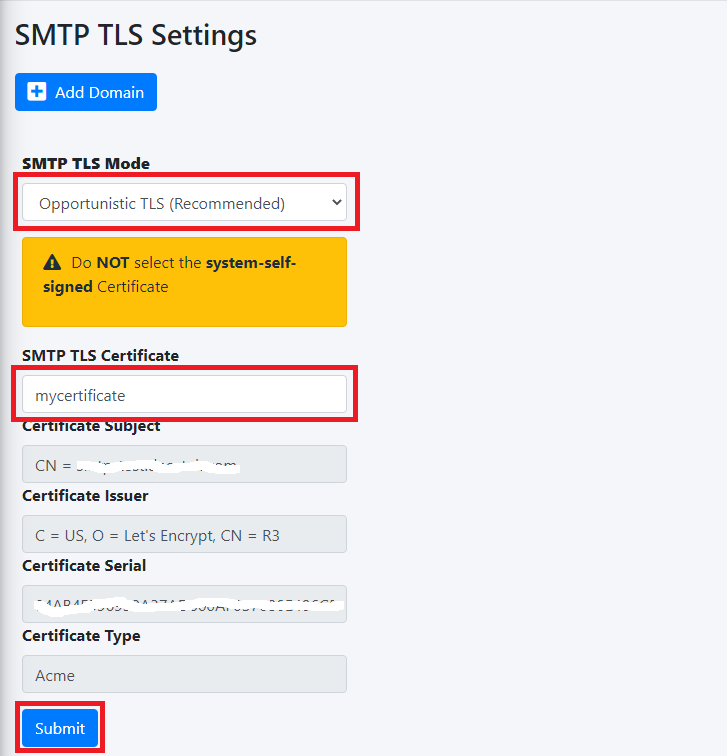](https://docs.deeztek.com/uploads/images/gallery/2022-01/image-1642971616360.png) #### Change admin System Account Password - Navigate to **System --> System Users.** - In the **System Users** screen, click the [](https://docs.deeztek.com/uploads/images/gallery/2021-12/image-1638464378563.png) icon next to the **admin** Username (**Figure 15**). **Figure 15** [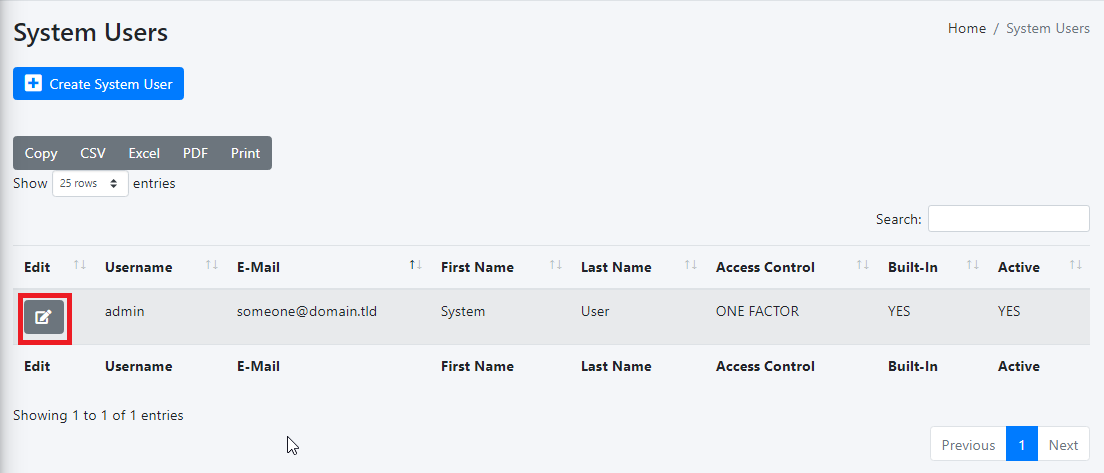](https://docs.deeztek.com/uploads/images/gallery/2021-12/image-1638464625312.png) - In the **Edit System User** screen, set the **Set User Password** drop-down to **YES**, enter a new password in the **User Password** field that appears and click the **Submit** button (**Figure 16**). **Figure 16** [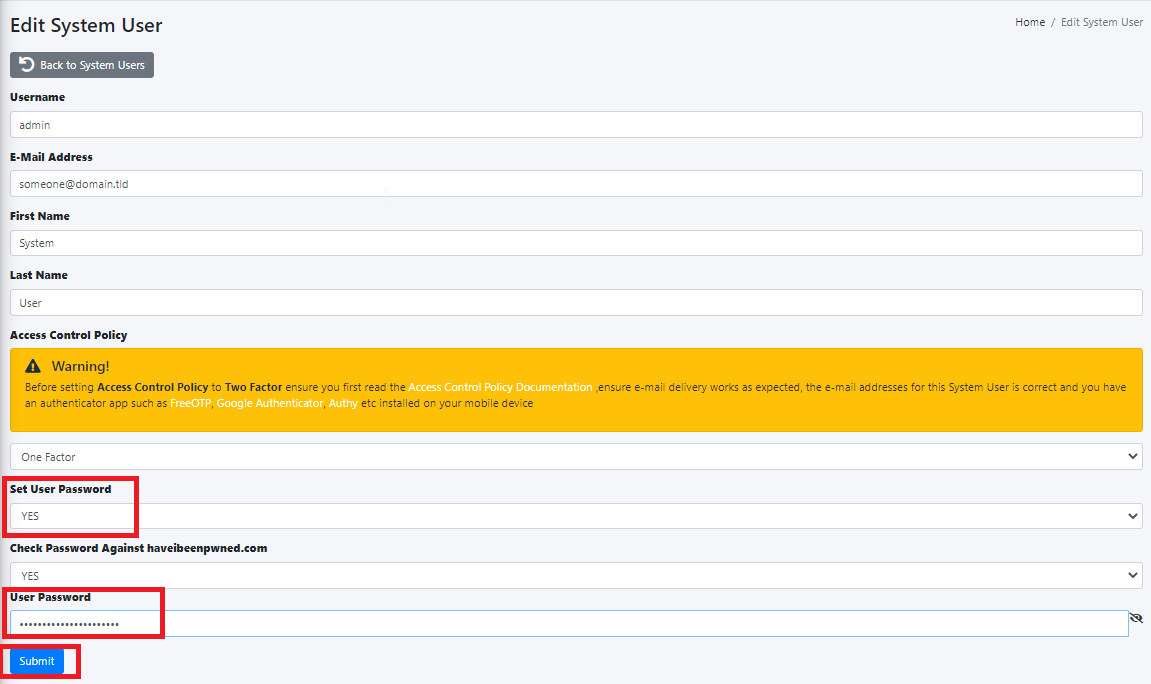](https://docs.deeztek.com/uploads/images/gallery/2021-12/image-1638464785188.png) - We highly recommend that you also set **Two Factor** authentication (2FA) for the **System User** account by following the instructions on the **System Users** [documentation](https://docs.deeztek.com/books/hermes-seg-administrator-guide/page/system-users#bkmrk-access-control-polic). #### Setup Domains In order for Hermes SEG to deliver email, you must first set the domain(s) that Hermes SEG will process email for along with their corresponding destination email server(s). You can add as many domains and destination email servers as required. An email server can be configured as an IP address or a Host Name as long as the Hermes SEG can reach it over the TCP port you set. Multiple domains can be pointed to the same email server if necessary. - Navigate to **Gateway --> Domains**. - Click the **Create Domain** button (**Figure 17**): **Figure 17** [](https://docs.deeztek.com/uploads/images/gallery/2022-04/image-1651055813253.png) - The system will generate a temporary Domain Name, Destination Address and redirect you to the **Edit Domain** page. - Adjust the pre-populated Domain Name field to the actual domain name you are using. - Set the **Delivery Method** field to **SMTP** if you wish to have Hermes SEG relay e-mail for that domain or set it to **NONE** if you wish Hermes SEG to discard and silently drop any received e-mail for that domain. Note that setting the **Delivery Method** to **NONE** will disable all other fields. - Set the **Recipient Delivery** field to **ANY** if you wish to have Hermes SEG relay e-mail for any recipients regardless if those recipients are added in **Gateway --> Internal Recipients** or **Gateway --> Virtual Recipients**. This method relies on the destination e-mail server to reject e-mail for non-existent recipients. Note that this method has the potential of adding extra load on the destination e-mail server but offers more flexibility because it doesn't require you to add Internal or Virtual recipients before hand. Alternatively, set the **Recipient Delivery** to **SPECIFIED** if you wish to have Hermes SEG relay e-mail only for recipients that have been added in **Gateway --> Internal Recipients** or **Gateway --> Virtual Recipients**. This method will reject any e-mail for non-existent Internal or Virtual recipients by Hermes SEG thus reducing the load on the destination server. - Set the **Destination Address** field to the IP Address or the FQDN of the destination e-mail server you wish to have Hermes SEG relay e-mail. - Set the **Destination Port** field to the TCP port of the destination e-mail server you wish to have Hermes SEG relay e-mail. - Set the **Destination Requires Authentication** field to **NO** if the destination e-mail server does not require authentication or set to **YES** if the destination e-mail server requires authentication. Setting to YES will add a Destination Username field and a Destination Password field which will have to be filled with a destination e-mail server username and password. Note that if **Gateway --> Relay Host** is Enabled, Hermes SEG will not allow you to save a domain with **Destination Requires Authentication** field set to **YES**. You must first set **Gateway --> Relay Host** to **Disabled**. - Set the **Destination Use MX Lookup** to **NO** if you do not wish to have Hermes SEG perform MX lookups to relay e-mail for the domain you are adding. This will prevent e-mail loops if Hermes SEG is the primary MX host for the domain and it's usually the most common configuration. Set the **Destination MX Lookup** to **YES** if you wish to have Hermes SEG perform MX lookups to relay e-mail for the domain are adding. Please note that the **Destination Use MX Lookup** field is not available if the **Destination Requires Authentication** field is set to **YES** (**Figure 18**). - Click the **Submit** button to save your changes. **Figure 18** [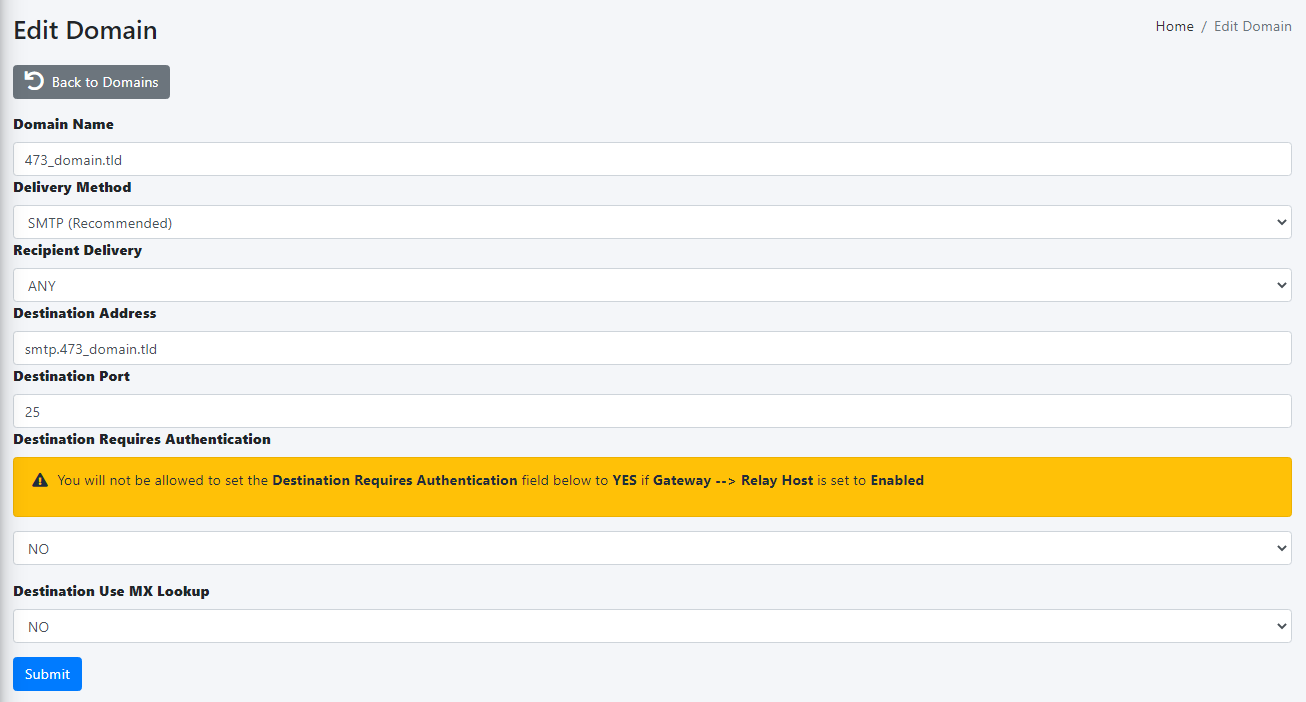](https://docs.deeztek.com/uploads/images/gallery/2022-04/image-1651058901781.png) #### Add Internal Recipients If you have setup any domains in the **Setup Domains** section above with the **Recipient Delivery** field set to **SPECIFIED**, then you **MUST** add either **Internal Recipients** or **Virtual Recipients** in order to process incoming e-mail and relay that email to the correct recipient mailboxes which are located on the destination email server(s) for the domain(s) you setup in the **Setup Domains** section above. This section will guide you with adding **Internal Recipients**. - Navigate to **Gateway --> Internal Recipients**. - Click the **Create Recipient(s)** button (**Figure 19**): **Figure 19** [](https://docs.deeztek.com/uploads/images/gallery/2021-12/image-1638454933344.png) In the **Add Internal Recipient(s)** page, in the **Recipient(s)** field, enter an e-mail address each in each own line, select the appropriate options in the **SVF Policy to Assign**, **Quarantine Reports**, **Quarantine Report Frequency**, **Train Bayes Filter from User Portal**, **Download Messages from User Portal**, **PDF encryption**, **S/MIME Encryption**, **S/MIME SIGNATURE**, **PGP Encryption** drop-downs and click the **Submit** button (**Figure 20**): **Figure 20** [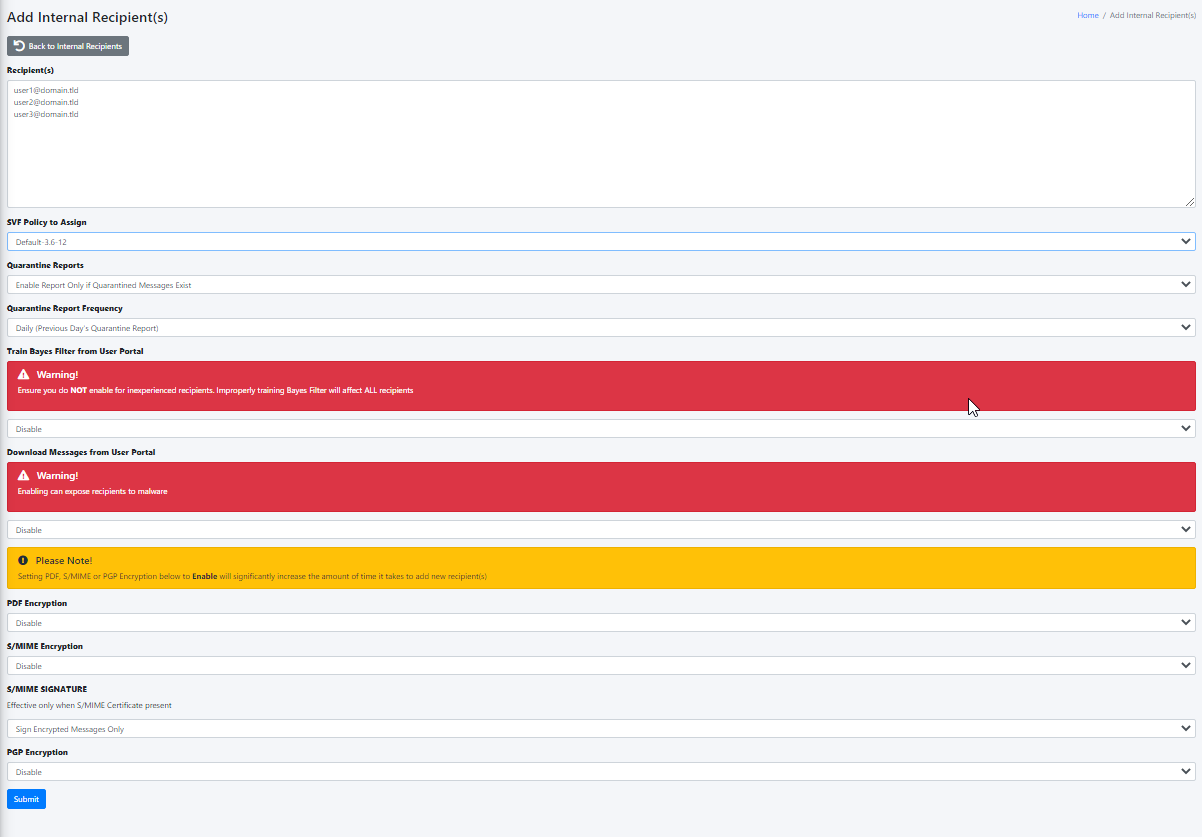](https://docs.deeztek.com/uploads/images/gallery/2021-12/image-1638455551356.png) #### #### Set Postmaster, Admin E-mail Address and TimeZone - Navigate to **System --> System Settings.** - Fill in **Postmaster E-mail Address** field with an email belonging to a **Relay Domain** you setup above. - Fill in the **Admin E-mail Address** field with an email of domain outside of the system (i.e. a domain that the system does not relay email Ex: [someone@hotmail.com)](mailto:someone@hotmail.com)). - Delete the **America/New\_York** default **TimeZone** entry and start typing your continent and a drop-down with the available **TimeZones** for that continent will appear where you can select the appropriate one for your location (**Figure 21**). **Figure 21** [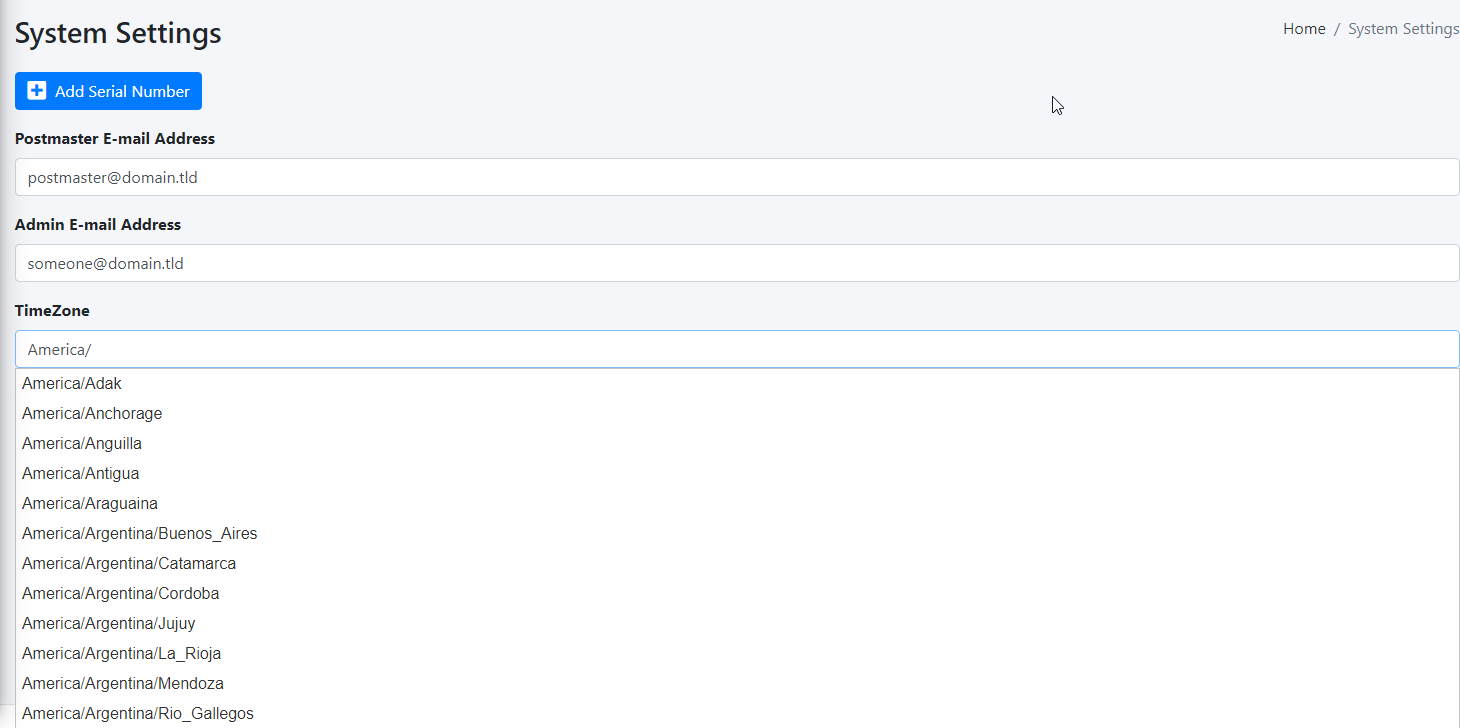](https://docs.deeztek.com/uploads/images/gallery/2022-06/image-1654430781791.png) - Click the **Submit** button. #### Set Relay Networks In addition to inbound email, if the email server(s) you added will also be sending outbound email through the Hermes SEG (recommended), you must allow their IP address(es) to send (relay) email through the Hermes SEG. - Navigate to **Gateway --> Relay Networks**. - Ensure **IP Address** is selected and the under the **IP Address** field enter the IP Address of the email server that you want to allow to send email through the Hermes SEG, under the **Note** field, enter a short description identifying the email server (ensure that you don't use any spaces or special characters in the Note field) and click the **Add** button (**Figure 22**) **Figure 22**Ensure that you have a **recent and valid** backup of your Hermes SEG installation before attempting any of the steps below. **These instructions are offered with absolutely no warranty or guarantee of any kind. We cannot be held liable for any damage that my occur to your system by following the instructions below!**
#### Install the latest updates and patches on Ubuntu Server 18.04 LTS - Before you install the latest updates and patches it's a good idea to reboot your system in order for any automatic security updates that may have previously installed to take effect. - Login to a console prompt as a user in the admin group (it's not recommended to attempt to perform the upgrade from a SSH session) and become root by running the following command and then typing your password when prompted: ```bash sudo su ``` - Run the following command to update the repositories, run the latest updates and remove any obsolete packages: ```bash apt-get update && apt-get dist-upgrade -y && apt-get auto-remove -y ``` - After the updates have been successfully installed reboot your system. #### Perform a release upgrade of Ubuntu Server 18.04 LTS to Ubuntu Server 20.04 LTS - In a console prompt as root, run the following command to begin the upgrade: ``` do-release-upgrade ``` - You will be prompted to continue with a message regarding disabled third party entries in your sources.list. Press **\[ENTER\]** to continue: ```bash Third party sources disabled Some third party entries in your sources.list were disabled. You can re-enable them after the upgrade with the 'software-properties' tool or your package manager. To continue please press [ENTER] ``` - Before any changes are made, you will be prompted with a summary of the upgrade before proceeding. enter **y** to continue: ```bash Do you want to start the upgrade? 18 installed packages are no longer supported by Canonical. You can still get support from the community. 20 packages are going to be removed. 190 new packages are going to be installed. 752 packages are going to be upgraded. You have to download a total of 616 M. This download will take about 2 minutes with your connection. Installing the upgrade can take several hours. Once the download has finished, the process cannot be canceled. Continue [yN] Details [d] ``` - During the upgrade you will be repeatedly prompted to install the newer package configuration files. **It's highly recommended that you always pick the default option by either pressing ENTER or N always keep the currently-installed version**: **Figure 1** [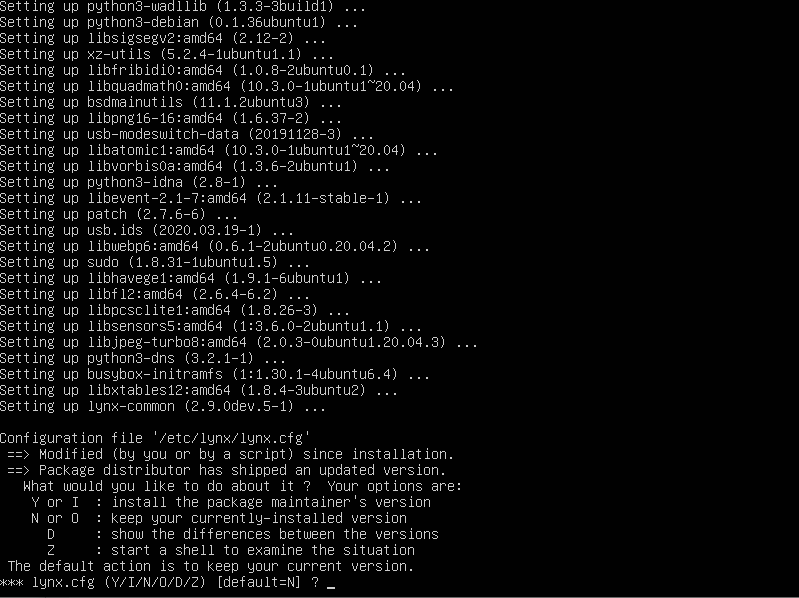](https://docs.deeztek.com/uploads/images/gallery/2023-05/image.png) - On the **Configuring lxd** prompt, ensure you select the **4.0** LXD snap track to continue: **Figure 2** [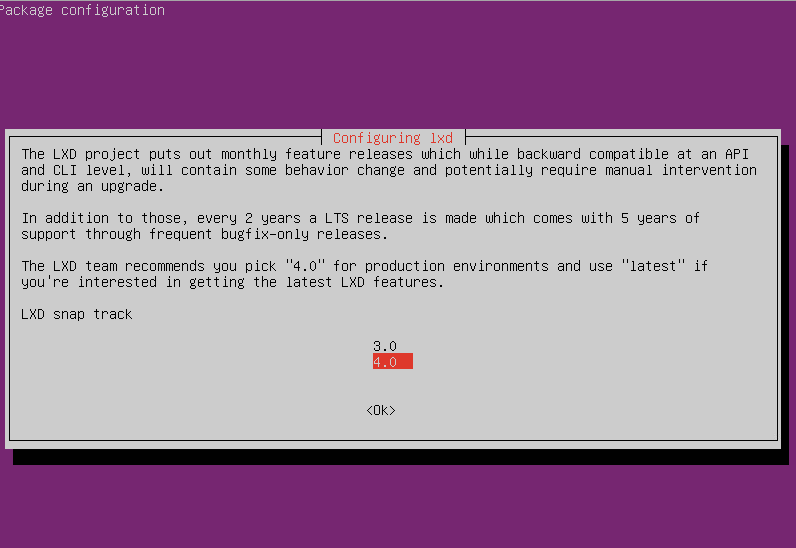](https://docs.deeztek.com/uploads/images/gallery/2023-05/4OUimage.png) - Once the upgrade has completed successfully, reboot your system. #### Run the Hermes SEG Migrate 18.04 to 20.04 Script During the release upgrade, several obsolete packages are removed including packages that Hermes SEG requires to operate correctly. You must run the Hermes SEG Migrate 18.04 to 20.04 script in order to install newer versions of those packages and migrate the necessary settings. - In a console prompt as root, remove any existing Hermes-Secure-Email-Gateway repositories from your system by running the command below: ```bash rm -rf Hermes-Secure-Email-Gateway/ ``` - Git clone a fresh copy of the Hermes SEG Github repository by running the command below: ```bash git clone https://github.com/deeztek/Hermes-Secure-Email-Gateway.git ``` - Change to the newly created Hermes-Secure-Email-Gateway directory: ```bash cd Hermes-Secure-Email-Gateway/ ``` - Make the hermes\_migrate\_1804\_2004.sh script executable: ```bash chmod +x hermes_migrate_1804_2004.sh ``` - Run the hermes\_migrate\_1804\_2004.sh script: ```bash ./hermes_migrate_1804_2004.sh ``` - Follow the prompts to proceed with installation. Once the script has ran successfully, reboot your system. - Ensure your system is operating successfully i.e. sending/receiving unencrypted/encrypted e-mail, the Hermes SEG admin/user consoles are working etc. - Ensure that Ciphermail Web-GUI is operational and you can login successfully by navigating to [https://\[HERMES-SEG\]/ciphermail](https://HERMES-SEG/ciphermail) where **\[HERMES-SEG\]** is the IP or FQDN of your Hermes SEG machine.**Hermes SEG Pro installations will display an INVALID license after the release upgrade due to a mismatch in the device ID. Please send your serial number to [support@deeztek.com ](mailto:support@deeztek.com)and we can help you re-activate it.**
#### Issues If you run into any issues with the upgrade, you can post your question on our [Github Issues](https://github.com/deeztek/Hermes-Secure-Email-Gateway/issues) page or our [Matrix Community Chat channel](https://matrix.to/#/#hermesseg:matrix.org). # Requirements and Recommendations - Hermes SEG should be behind a network perimeter firewall for best security. - Network Firewall rule to allow inbound traffic to Hermes SEG IP address over TCP/25 (SMTP), TCP/80 (HTTP) and TCP/443 (HTTPS) - Network Firewall rule to allow the Hermes SEG IP address outbound Internet access over the following Ports: - UDP/53 (DNS) - TCP/53 (DNS) - TCP/80 (HTTP) - TCP/443 (HTTPS) - TCP/25 (SMTP) - TCP/2703 (Cloudmark) - UDP/6277 (DCC Antispam) - TCP/123 (NTP) - UDP/123 (NTP) - TCP/873 (Rsync) - UDP/873 (Rsync) - TCP/24441 (Pyzor) - TCP/2703 (Razor) - 8 GB of RAM and at least 4 CPUs - At least 275 GB of storage space on virtual host. Hermes SEG Appliance hard drives are thin provisioned. The 275 GB of storage will be needed once the email archive starts filling up. The rate the archive fills up greatly depends on the amount of email traffic. For low to medium email traffic a 5 year email retention is not out of the question. - Your e-mail users will inevitably use the **Junk** and **Not Junk** buttons in their Outlook to report Spam and Ham to Microsoft. This is undesirable because it will create frustration with your users since no action will be taken with those reports as it relates to Hermes SEG. The best way to deal with this problem is to create rules in Hermes SEG to intercept e-mails destined for the following Microsoft e-mail addresses: 1.**NOTE: This feature is only available with Hermes SEG Pro License.**
Hermes SEG requires a listing of **Internal Recipients** in order to process incoming email and deliver that email to the correct recipient mailboxes located on an email server(s) that are specified under the **Gateway --> Relay Domains** part of the system. Hermes SEG allows you to connect to Active Directory in order to automatically import the SMTP email addresses of your Active Directory users without having to manually input each one. The system will create Internal Recipients from each SMTP address it imports automatically. The import process can also be set to run at a scheduled interval so user additions or deletions will automatically be handled by Hermes SEG without manual intervention. In order to import Internal Recipients via Active Directory you must first create an AD connection. - Click the **Create Connection** button on top of the page (**Figure 1**) **Figure 1** [](https://docs.deeztek.com/uploads/images/gallery/2021-10/image-1634654352652.png) - Under the **Connection Name** field, enter a descriptive name for the connection - Under the **Domain Controller** field, enter the IP or the FQDN of a domain controller or simply enter the FQDN of your domain so you don't bind the connection to just one domain controller. - Under the **Distinguished Name** field, enter the DN of the recipients locations, or you can simply enter the DN of the entire domain. For example, if your domain is east.domain.tld, your DN should be DC=east, DC=domain, DC=tld. Ask your Administrator if you have any questions - Under the **Object Class** drop-down field, select **user, organizationalPerson, person or top** depending on the **objectClass** you wish to use to filter your AD users - Under the **Netbios Domain Name** enter your domain Netbios name. For example, if your domain is domain.tld, your netbios domain could simply be DOMAIN. Ask your Administrator if you have any questions - Under the **Domain User Username** field enter a username that has access to enumerate user objects in your domain - Under the **Domain User Password** field, enter the password for the username that has access to enumerate user objects in your domain - If you wish to schedule the automatic import of Internal Recipients on a specified interval, ensure you select **Yes** from the **Schedule SMTP Address Import** **from AD** drop-down, select the interval form the **Schedule Import Frequency** drop-down and click the **Submit** button (**Figure 2**) **Figure 2** [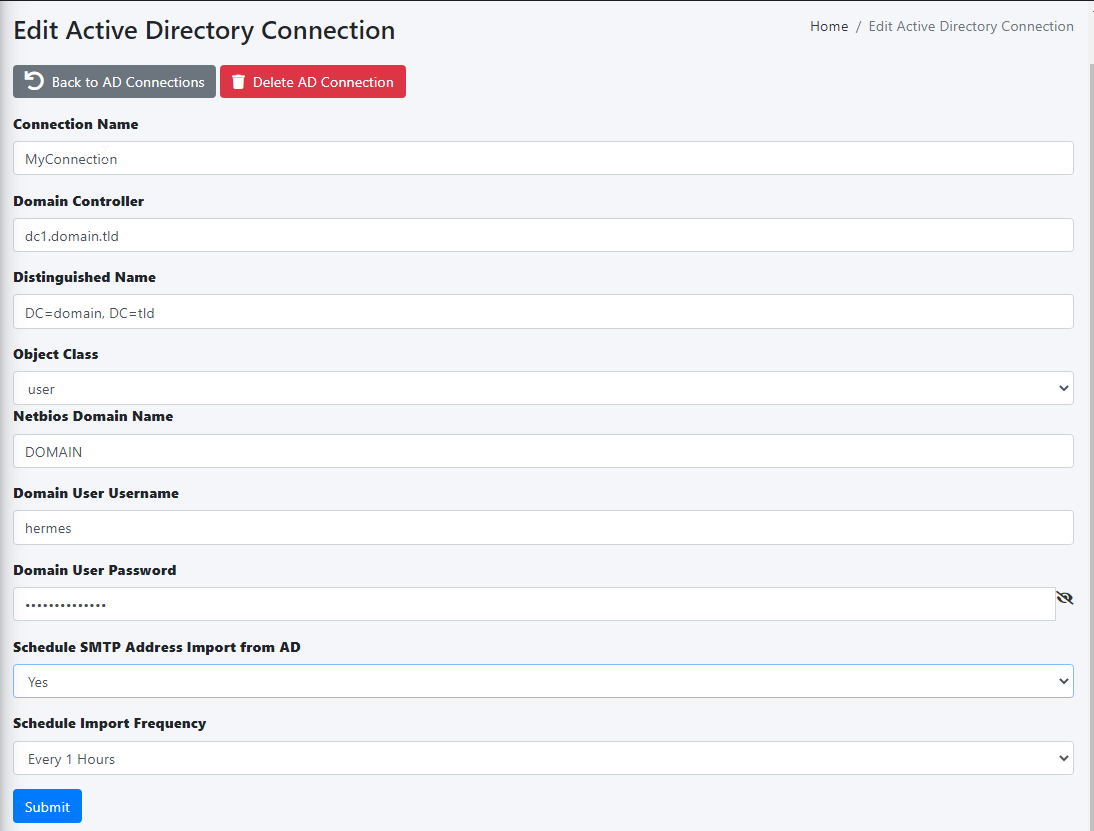](https://docs.deeztek.com/uploads/images/gallery/2021-10/image-1634655085483.png) If you entered the correct information, you will get a **Success!** **Changes saved** message on top of the page, otherwise you will get a specific error message on top of the page depending on the error encountered (**Figure 3**) **Figure 3** [](https://docs.deeztek.com/uploads/images/gallery/2021-10/image-1634655278674.png) Click on the **Back to AD Connections** button and back in the **AD Integration** page, you should see the newly created AD connection (**Figure 4**) **Figure 4** [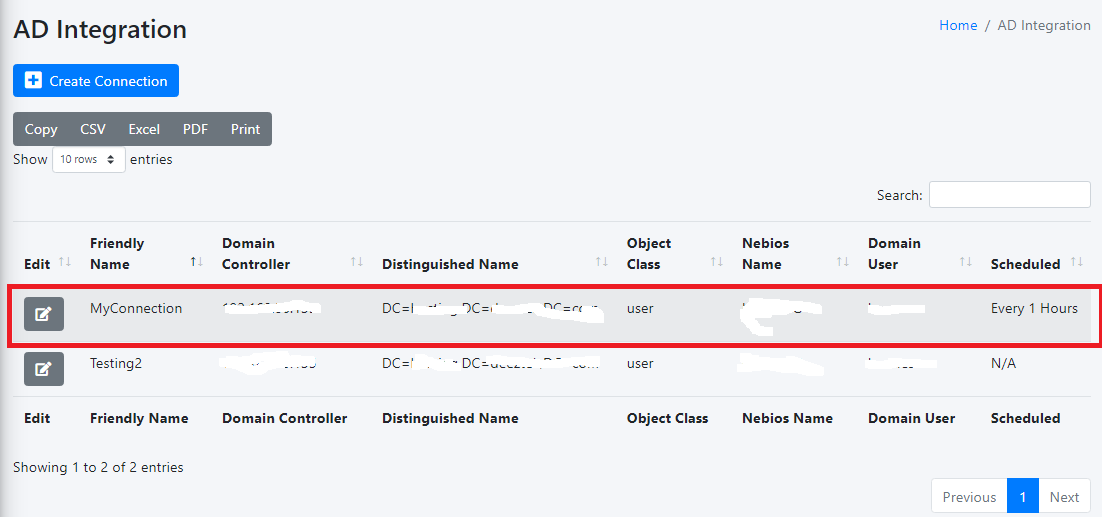](https://docs.deeztek.com/uploads/images/gallery/2021-10/image-1634655507695.png) Clicking on the [ ](https://docs.deeztek.com/uploads/images/gallery/2021-10/image-1634655633147.png)button on an AD connection, will take you back to the **Edit Active Directory Connection** page which will allow you to edit or delete the connection # Admin Authentication Hermes SEG utilizes [Authelia](https://www.authelia.com) Authentication Server for controlling access to the the Hermes SEG Administration Console. The **Authentication Settings** page allows you to change many Authelia settings to suit your needs. #### JWT Secret The JWT Secret is used to craft JWT tokens by the identity verification process. Hermes SEG randomly generates a 32-character alphanumeric string at the time of installation. It's usually not necessary to change this field. However, if you wish to change it, click the [](https://docs.deeztek.com/uploads/images/gallery/2021-11/image-1637357351697.png) button and the system will generate a new one (**Figure 1**). **Figure 1** [](https://docs.deeztek.com/uploads/images/gallery/2021-11/image-1637357479566.png) If you wish to generate your own, Hermes SEG will accept a **minimum 32-character** and a **maximum 64-character** alphanumeric string only. #### Storage Encryption Key The Storage Encryption Key is used to encrypt data in the database. Hermes SEG randomly generated a 32-character alphanumeric string at the time of installation. It's usually not necessary to change this field unless the key gets compromised. if you wish to change it, click the [](https://docs.deeztek.com/uploads/images/gallery/2021-11/image-1637357351697.png) button and the system will generate a new one (**Figure 2**). **Figure 2** [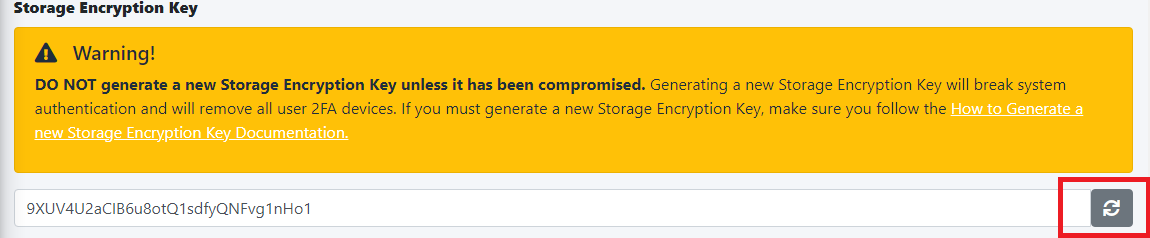](https://docs.deeztek.com/uploads/images/gallery/2023-06/7uTimage.png) If you wish to generate your own, Hermes SEG will accept a **minimum 32-character** and a **maximum 64-character** alphanumeric string only.Please note that if you generate a new Storage Encryption Key, it will break authentication for System Users that utilize 2FA devices.
Before generating a new Storage Encryption Key, ensure you first delete any 2FA devices for each System User by navigating to **System --> System Users --> Edit,** click the **Delete 2FA Devices** button in the **Edit System User** page and set the **Access Control Policy** to **One Factor**. After generating a new Storage Encryption Key, you can go back and set the **Access Control Policy** to **Two Factor** and have the users re-register their 2FA authentication devices. (**Figure 3**). **Figure 3** [](https://docs.deeztek.com/uploads/images/gallery/2023-06/y1cimage.png) [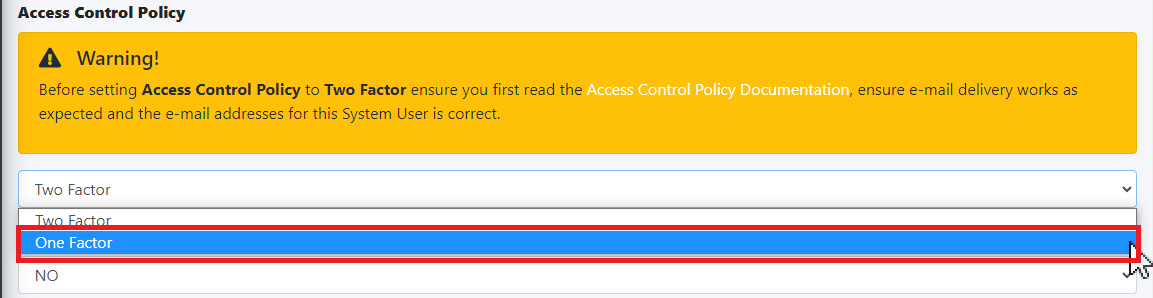](https://docs.deeztek.com/uploads/images/gallery/2023-06/0tsimage.png) #### Reset Password Function The **Reset Password Function** field allows to you switch between **Enable** (Default) which enables the **Reset password** link and functionality in the **Sign in** screen and **Disable** which disables the link and functionality in the **Sign in** screen (**Figure 2**). The **Reset Password Function** only works if the System Users have valid e-mail addresses assigned to them. E-mail addresses can be assigned to System Users by navigating to **System --> System Users**. **Figure 2** [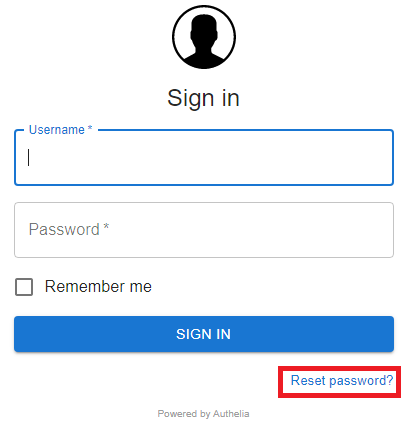](https://docs.deeztek.com/uploads/images/gallery/2021-10/image-1635455903437.png) #### Session Name The Session Name field specified the name of the session cookie which by default it's set to hermes\_session. It's usually not necessary to change this field. If you with to change it, it must be an alphanumeric string with undescores (\_) or dashes (-) in the name. #### Session Secret The Session Secret field is a string that is used to encrypt session data with Redis. Hermes SEG randomly generates a 20-character alphanumeric string at the time of installation. It's usually not necessary to change this field. However, if you wish to change it, click the [](https://docs.deeztek.com/uploads/images/gallery/2021-11/image-1637357351697.png) button and the system will generate a new one (**Figure 3**). **Figure 3** [](https://docs.deeztek.com/uploads/images/gallery/2021-11/image-1637357708269.png) If you wish to generate your own, Hermes SEG will accept a **minimum 12-character** and a **maximum 20-character** alphanumeric string only. #### Session Expiration The **Session Expiration** field specifies the amount of time (in seconds) before the cookie expires and the session is destroyed. By default it's set to **3600** (1 Hour). This can be overridden by clicking on the **Remember me** checkbox on the **Sign in** screen (**Figure 4**). **Figure 4** [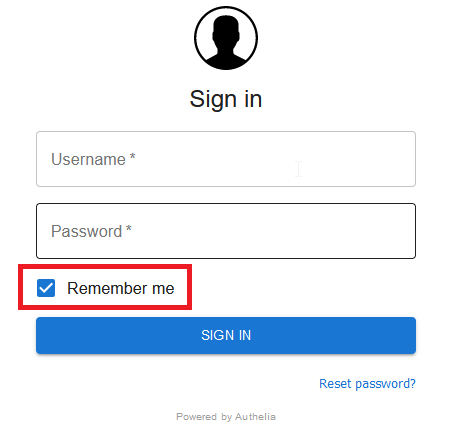](https://docs.deeztek.com/uploads/images/gallery/2021-10/image-1635456643671.png) #### Session Inactivity The **Session Inactivity** field specifies the amount of time (in seconds) the user can be inactive before the session is destroyed. By default it's set to **3600** (1 Hour). #### SMTP Host The **SMTP Host** field specifies the IP/Host Name of the e-mail server that Authelia will use to send out various notifications such password resets, 2FA notifications etc. By default it's set to the Hermes SEG appliance loopback address **\[127.0.0.1\]**. It's normally not necessary to change this field. #### SMTP Port The **SMTP Port** field specifies the port number of the e-mail server that Authelia will use to send out various notifications such password resets, 2FA notifications etc. By default it's set to the Hermes SEG internal port **10026**. It's normally not necessary to change this field. #### SMTP From Address The **SMTP From Address** field is the e-mail address that Authelia will use to send out various notifications such password resets, 2FA notifications etc. It should be set to a valid e-mail address for a domain Hermes SEG relays. #### SMTP E-mail Subject The **SMTP E-mail Subject** field specifies the subject format all Authelia outgoing e-mails will have. By default it's set to **\[Hermes SEG\] {title\]**. The **{title}** is a variable authelia uses for various functions and should be left intact. #### No of Login Failures Before User is Banned The **No of Login Failures Before User is Banned** field specified how many times a system user is allowed to fail authentication before that user is banned and not able to login. By default it's set to **5**. #### Time Between Failed Logins The **Time Between Failed Logins** field specifies the period of time (in seconds) Authelia will search for failed login attempts to count them as failed logins before banning a user. By default it's set to **120** (2 minutes). #### Banned Time The **Banned Time** field specifies the amount of time (in seconds) a user will be banned after failing authentication. By default it's set to **300** (5 minutes). #### Log Level The **Log Level** field specifies the log level used by Authelia. It can be set to **Trace, Debug, Info, Warn or Error**. Setting the Log Level to Trace will expose the **/debug/vars** and **/debug/pprof** endpoints which should never be enabled unless absolutely necessary during troubleshooting. By default it's set to **Debug**. #### Log Format The **Log Format** field specified the log type used by Authelia. It can be set to **JSON** or **Text**. By default it's set to **Text**. #### Duo Security Duo Security allows you to configure 2FA utilizing Duo mobile push. By default, Duo Security is set to disabled. In order to enable and configure Duo Security you must have an existing Duo account. If you don't already have one, you can easily set one up for free at [https://www.duo.com](https://www.duo.com). - In your Duo **Dashboard**, click on on **Applications --> Protect an Application** (**Figure 5**). **Figure 5** [](https://docs.deeztek.com/uploads/images/gallery/2023-06/zW9image.png) - In the **Protect an Application** screen, search for "partner auth api" and then click on the **Protect** button (**Figure 6**). **Figure 6** [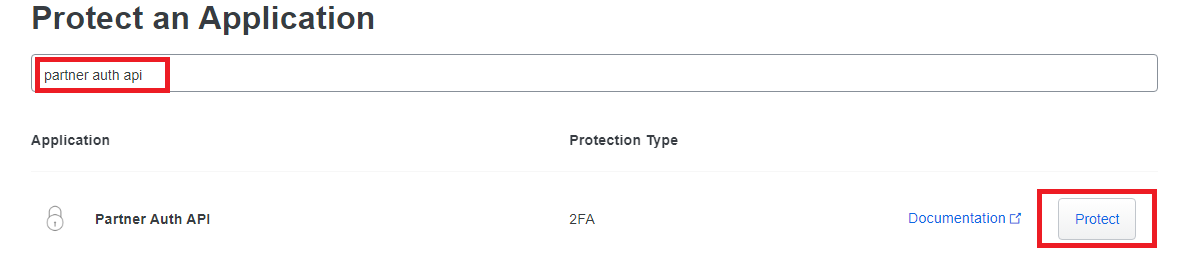](https://docs.deeztek.com/uploads/images/gallery/2023-06/jcuimage.png) - In the **Partner Auth API** screen in the **Details** section, take a note of the Integration key, Secret key and the API hostname (**Figure 7**). **Figure 7** [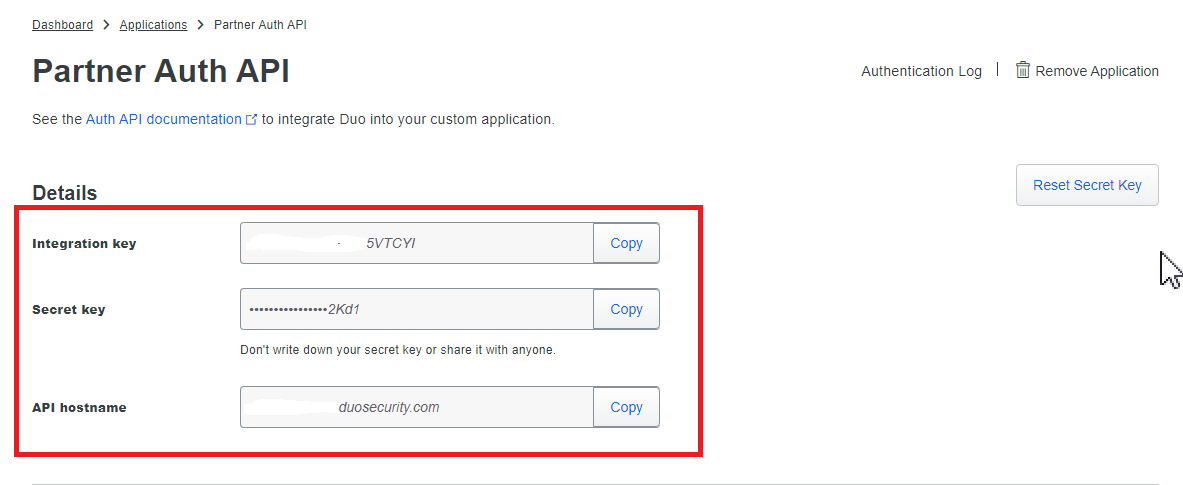](https://docs.deeztek.com/uploads/images/gallery/2023-06/x0uimage.png) - In the **Partner Auth API** screen in the **Settings** section, change the Name field to **Hermes SEG** or whatever name makes sense to you and click the Save button (**Figure 8**). **Figure 8** [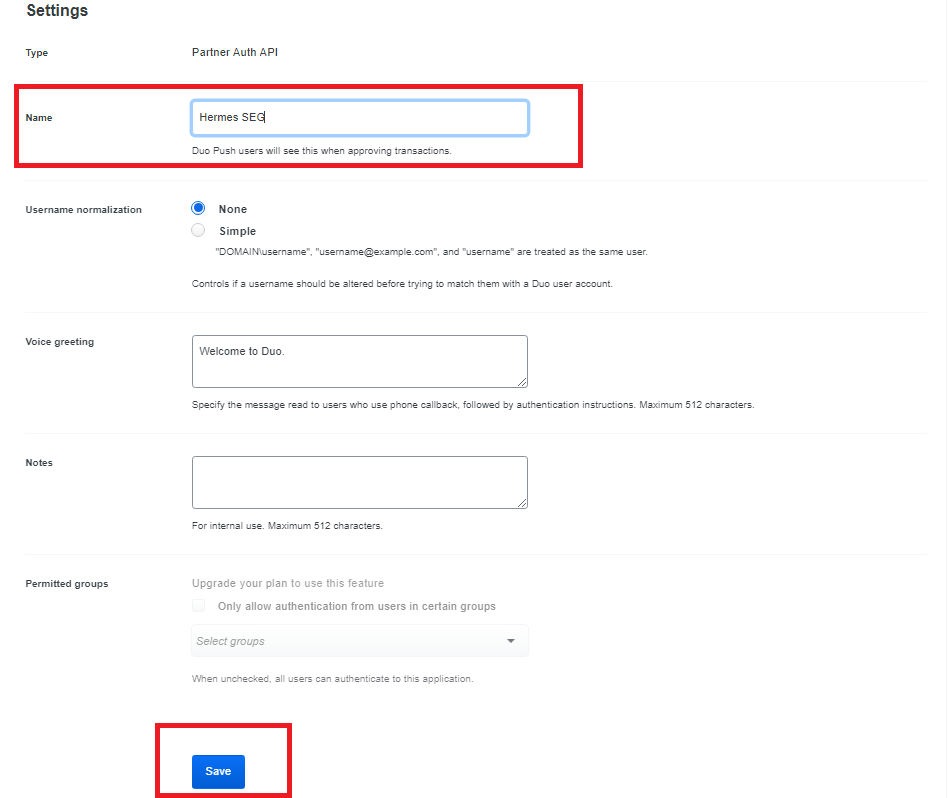](https://docs.deeztek.com/uploads/images/gallery/2023-06/Qmaimage.png) - In your Duo **Dashboard**, click on on **Users --> Add User** (**Figure 9**). **Figure 9** [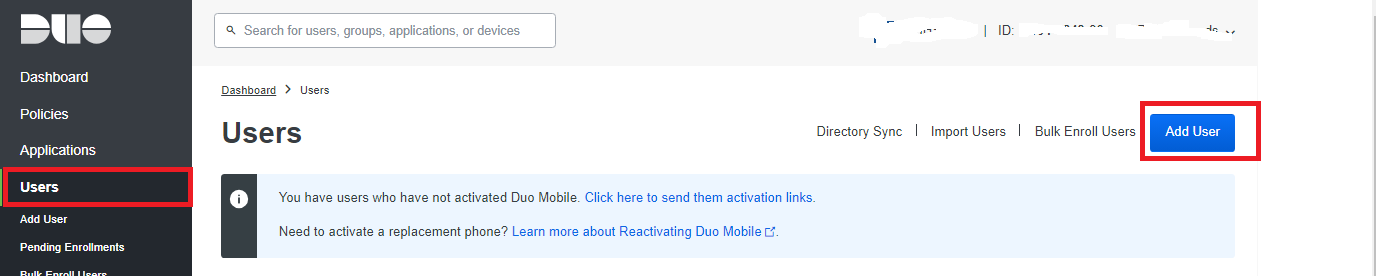](https://docs.deeztek.com/uploads/images/gallery/2023-06/KWfimage.png) - In the **Add User** screen, in the **Username** field, ensure you add a username that matches a system user username that's **already added** in the Hermes SEG **Admin Console --> System -->** **System User** and has **TWO FACTOR** authentication enabled and click the **Add User** button. (**Figure 10** and **Figure 11**). **Figure 10** [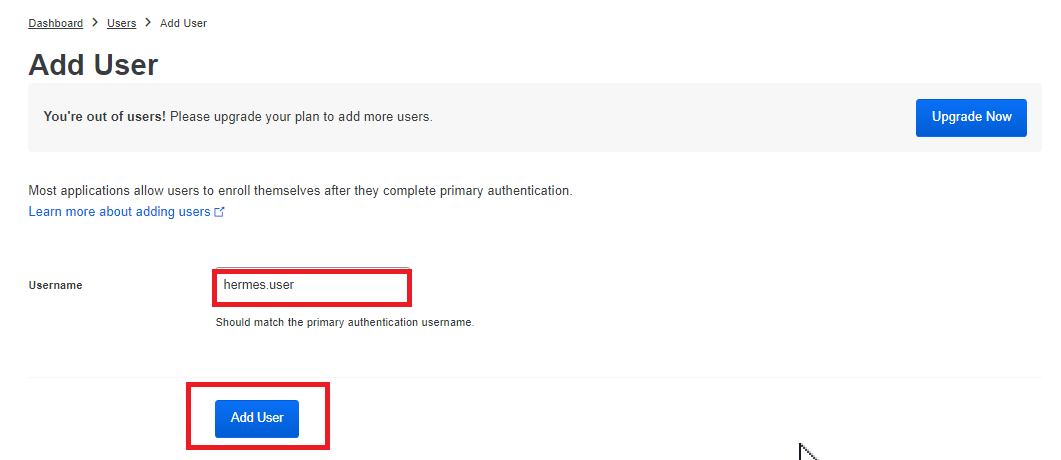](https://docs.deeztek.com/uploads/images/gallery/2023-06/dbqimage.png) **Figure 11** [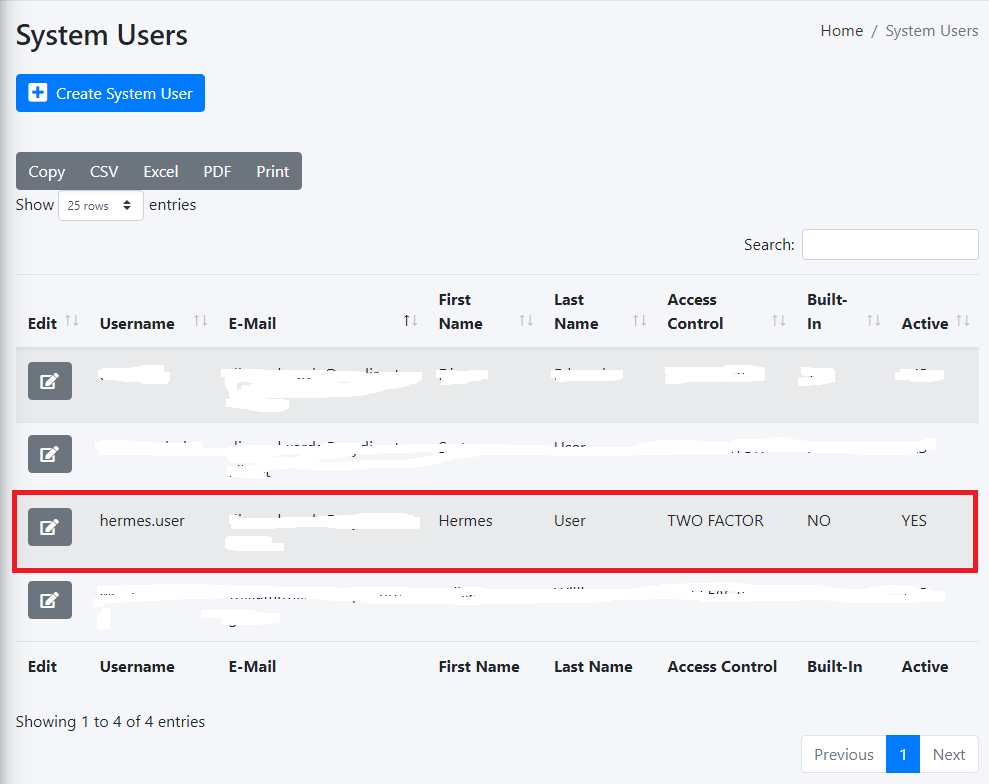](https://docs.deeztek.com/uploads/images/gallery/2023-06/yN4image.png) - In the Hermes SEG Admin Console, navigate back to **System --> Admin Authentication**, toggle the **Duo Security** drop-down from Disabled to **Enabled** and in the fill in the **Duo Hostname, Duo Integration Key, Duo Secret Key** with the values you got from the Duo Dashboard earlier, leave the **Duo Self-Enrollment** drop-down to **Enabled** (Recommended) and click the **Submit** button (**Figure 11**).If you set the **Duo Self Enrollment** drop-down to **Disabled** then your user's 2FA device must be already pre-enrolled in the Duo Dashboard. This guide does not cover that process.
**Figure 11** [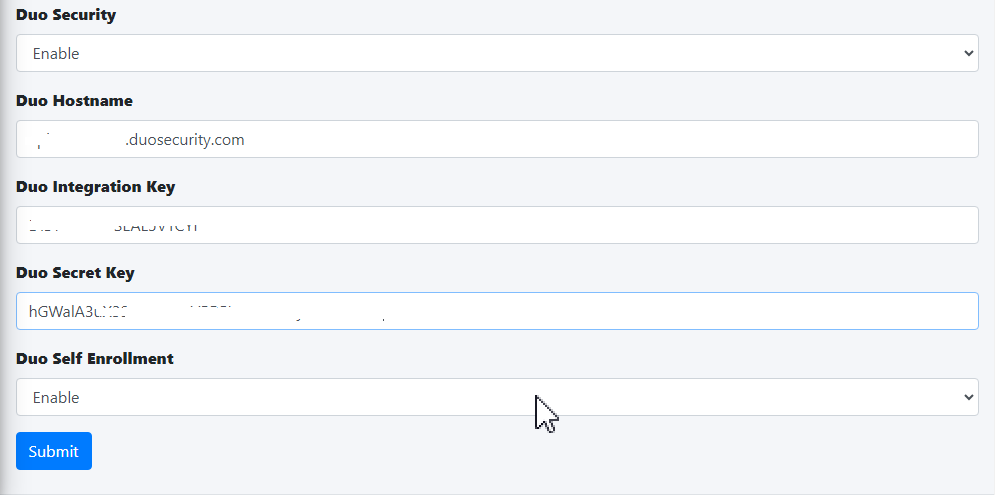](https://docs.deeztek.com/uploads/images/gallery/2023-06/6Llimage.png) - If this is your first time logging into Hermes SEG, 2FA defaults to TOTP (Timed One-Time Password). In order to utilize Duo Security ensure you have already installed on your device the **Duo Mobile** app from your Google Play store or Apple App Store and click on the **METHODS** link in the **One-Time Password** screen. (**Figure 12**). **Figure 12** [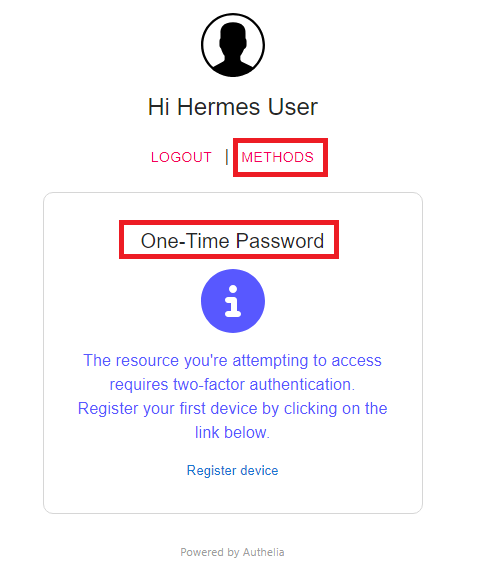](https://docs.deeztek.com/uploads/images/gallery/2023-06/vkrimage.png) - On the following screen, click on the **PUSH NOTIFICATION** button (**Figure 13**). **Figure 13** [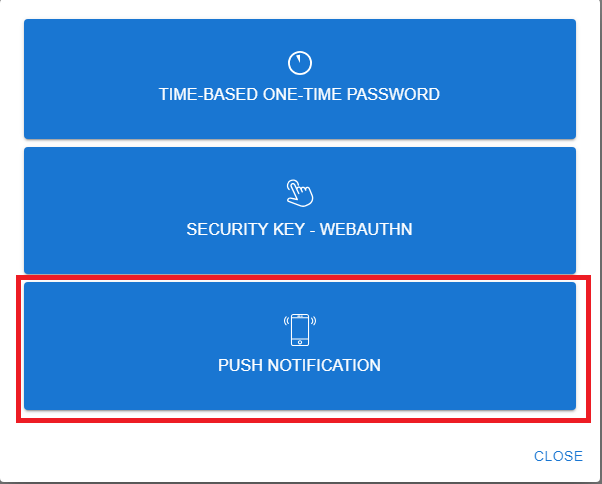](https://docs.deeztek.com/uploads/images/gallery/2023-06/euSimage.png) - On the **Push Notification** screen, click on the **Register device** link (**Figure 14**). **Figure 14** [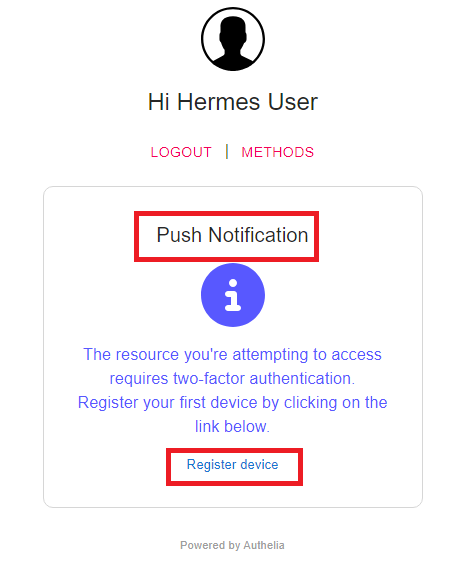](https://docs.deeztek.com/uploads/images/gallery/2023-06/Ahmimage.png) - Your browser will be redirected to the Duo Security self enrollment portal. Click the **Next** button until you reach the **Select an option** screen and select the **Duo Mobile** option and proceed to enroll you device as instructed. (**Figure 15**). **Figure 15** [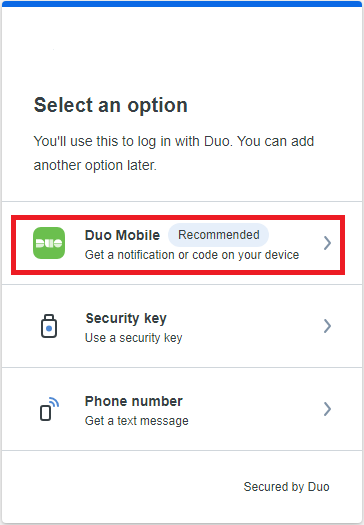](https://docs.deeztek.com/uploads/images/gallery/2023-06/9vmimage.png) - Once you have successfully enrolled your device with Duo, go back to the Hermes SEG Admin Console login screen, logout and re-login and if everything was setup correctly you should get a push notification on your device and upon approval you should be able to successfully login to Hermes SEG Admin Console. # Admin Console FirewallThis feature is only available with Hermes SEG Pro License.
The Admin Console Firewall allows you to specify IP Address(es) that will be allowed access to the **Hermes Admin Console (/admin/** and the **Ciphermail Admin Console (/ciphermail/).** The Firewall does NOT affect the User Console (/users/). By default, all IP Addresses are allowed access to the Admin and the Ciphermail Admin consoles. For best security, it's recommended that you enable the Admin Console Firewall to restrict access only to specified IP addresses. **Note:** In order to prevent a lockout of the Administration Console, the system will not allow you to enable the Administration Console Firewall unless the IP address that you are accessing the the Administration Console from is in the list of Allowed IP Addresses. Additionally, it will not allow you to Delete the IP address you are accessing the Administration Console from from the list of Allowed IP Addresses. - Before the system will allow you to enable the firewall, you must first add the IP Address that you are accessing the Admin Console from, which can be found on the top right corner of the by hovering over the[](https://docs.deeztek.com/uploads/images/gallery/2022-01/image-1643039940957.png)icon (**Figure 1**): **Figure 1** [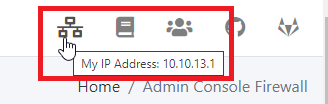](https://docs.deeztek.com/uploads/images/gallery/2022-01/image-1643039855923.png) - Click on the **Add IP Address** button and in the resultant window enter your IP address and set the **Allow to Hermes Admin** and optionally **Allow to Ciphermail Admin** drop-downs to **YES**, enter a note in the **Note** field for your own use and click the **Submit** button (**Figure 2**): **Figure 2** [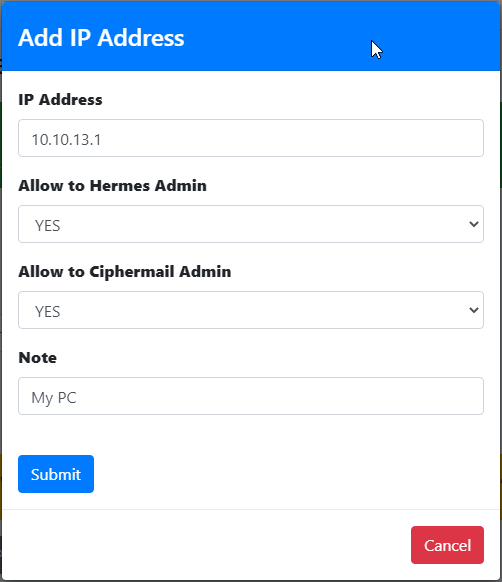](https://docs.deeztek.com/uploads/images/gallery/2022-01/image-1643040850454.png) - Repeat the procedure to add any additional IPs as necessary. - As you add each IP address, they will show up under the **Allowed IP Addresses** section (**Figure 3**): **Figure 3** [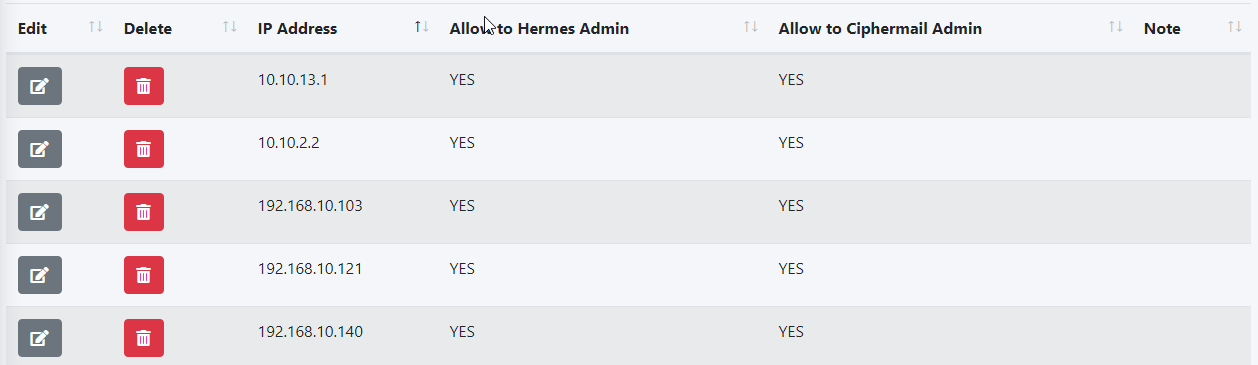](https://docs.deeztek.com/uploads/images/gallery/2022-01/image-1643040227272.png) - Once you are finished adding IP address(es), set the **Firewall Status** drop-down to **Enabled** and click the **Submit** button (**Figure 4**): **Figure 4** [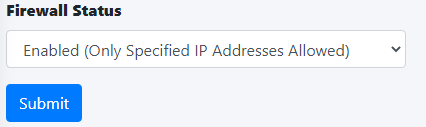](https://docs.deeztek.com/uploads/images/gallery/2022-01/image-1643040335743.png) Click the **Apply Settings** button to apply the changes to the firewall (**Figure 5**): **Figure 5** [](https://docs.deeztek.com/uploads/images/gallery/2022-01/image-1643040501619.png) - Test your firewall by attempting to access the **Admin Console** at **https://<ipaddress>/admin/** where **<ipaddress>** is the IP address or the hostname of your Hermes SEG from an IP Address that you did **NOT** allow in Admin Console Firewall. You should a **403 Forbidden** message (**Figure 5**) **Figure 5** [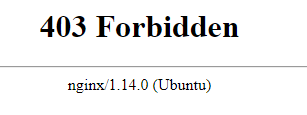](https://docs.deeztek.com/uploads/images/gallery/2022-01/image-1643040669051.png)The The **Host Name** and **Primary Domain Name** you set in this section is used for SMTP transactions such as SMTP TLS as well as system functions such as OS hostname.
- Set the **Network Mode** drop-down to **Static**. - Fill in the **Host Name** field. Ensure you enter only the name without the domain part. For example, if the FQDN of your Hermes SEG appliance is going to be **smtp.domain.tld**, then in the **Host Name** field you will simply enter **smtp** without the domain part. - Fill in the **Primary Domain Name** field. For example, if the FQDN of your Hermes SEG appliance is going to be **smtp.domain.tld**, then in the **Primary Domain Name** field you will simply enter **domain.tld**. - Fill in the Hermes SEG appliance **IP Address**, select the appropriate **Subnet Mask** for your network, fill in the **Gateway** and **DNS1**. If applicable, fill in **DNS2** and **DNS3** fields. - Click on the **Submit** button. Once the settings are saved, they will not take effect until you click on the **Apply Settings** button. - Click on the **Apply Settings** button (**Figure 1**). **Figure 1** [](https://docs.deeztek.com/uploads/images/gallery/2021-12/image-1638453135015.png)After clicking the **Submit** button and you changed the Console Mode from IP Address to Host Name, your browser will **NOT** automatically redirect you to the new console address. Ensure you enter the new address in your browser as **[https://<HOST\_NAME>/admin/](https://
Deleting messages from the queue should be carefully considered. If users were expecting those emails to be delivered, removing them from the queue will ensure that they will never get delivered.
**Figure 4** [](https://docs.deeztek.com/uploads/images/gallery/2022-06/image-1656414974817.png) #### Search Messages Enter a search term in the **Search** field and the system will automatically filter messages matching the term you entered. You can enter multiple search terms separated by a space (**Figure 5**). **Figure 5** [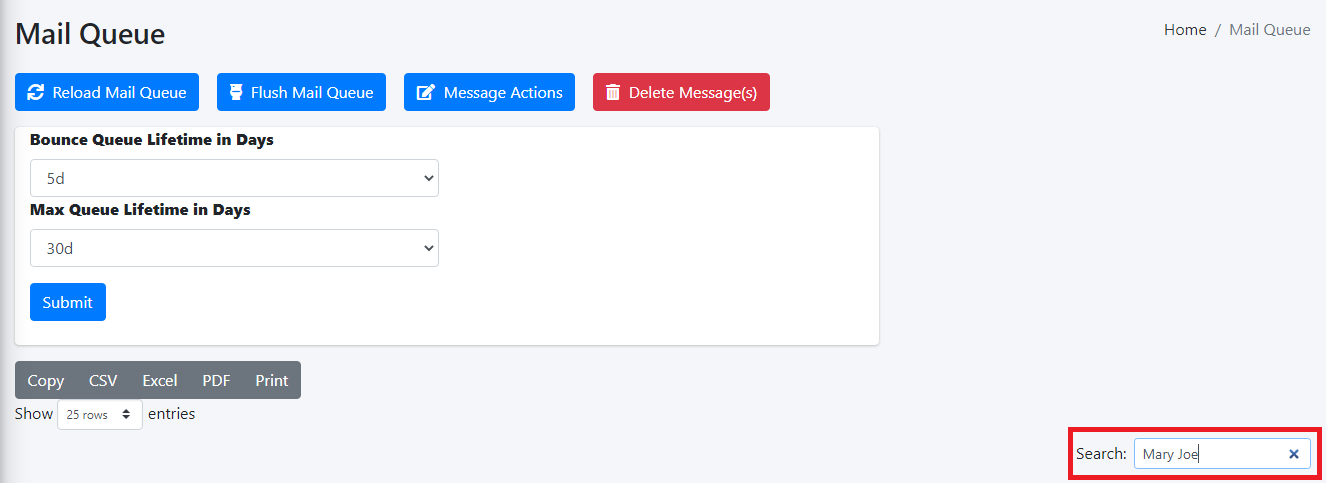](https://docs.deeztek.com/uploads/images/gallery/2022-06/image-1656417335908.png) #### Bounce Queue Lifetime and Max Queue Lifetime The **Bounce Queue Lifetime** determine how long a MAILER-DAEMON messages stays in the queue before it's considered undeliverable. **This setting strictly controls non-delivery messages** generated by the SMTP server. Once the lifetime expires the MAILER-DAEMON messages are automatically removed from the queue by the system. **The default is 5 Days**. If this is set to 0 Days, delivery will be tried only once and then removed from the queue. The **Max Queue Lifetime** determines how long all other messages stay in the queue before the SMTP server considers them undeliverable and sends a bounce message back to the sender. This setting controls how long the system will hold on and try to deliver messages to other mail servers. Ideally, this setting should be set high enough so that the system holds on to messages as long as possible before bouncing them. This is especially important if you are relaying messages to external email servers that may go down for long periods of time. **The default is 14 days**. If this is set to 0 days, delivery will be tried only once and then a bounce message will be sent to the sender (Not recommended). 1. Select the **Bounce Queue Lifetime** setting you wish from the drop-down. 2. Select the **Max Queue Lifetime** setting you wish from the drop-down. 3. Click the **Submit** button (**Figure 6**). **Figure 6** [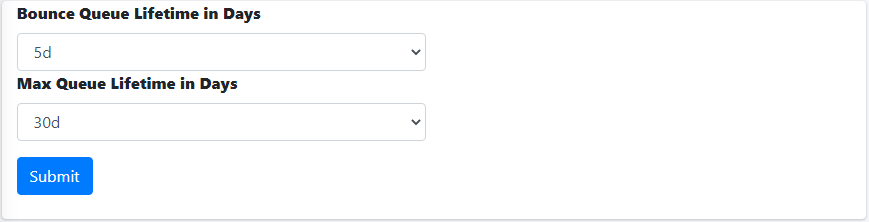](https://docs.deeztek.com/uploads/images/gallery/2022-06/image-1656412437533.png) #### View Messages Viewing a message reveals detailed information which can assist in determining why the message is stuck in the mail queue. 1. Click on the [ ](https://docs.deeztek.com/uploads/images/gallery/2022-06/image-1656415192491.png)icon of the message you wish to to view. 2. You will be directed to the **View Mail Queue Message** page where you will be able to view all the detailed information about the message. 3. Click the [ ](https://docs.deeztek.com/uploads/images/gallery/2022-06/image-1656416657322.png)icon to go back to the Mail Queue. 4. Click the [ ](https://docs.deeztek.com/uploads/images/gallery/2022-06/image-1656416695599.png)icon to print the message contents (**Figure 7**). **Figure 7** [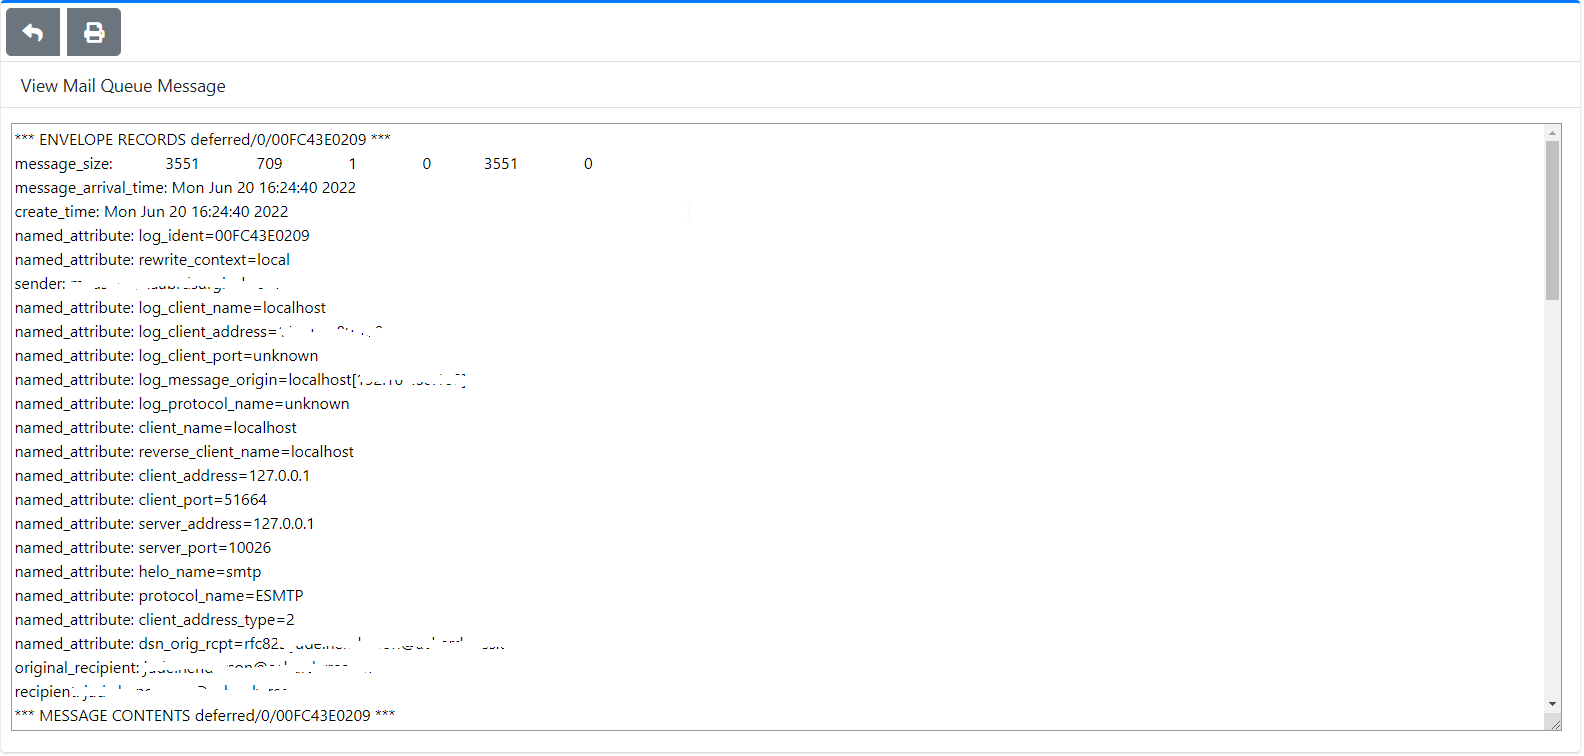](https://docs.deeztek.com/uploads/images/gallery/2022-06/image-1656416591478.png) # System Logs System Logs allows you to set the Log Retention period, fetch system logs by date range/time and search. #### Log Retention By default Hermes SEG stores logs up to **30 days** before automatically purging older entries. This setting can be adjusted by selecting **30 Days, 60 Days, 90 Days, 120 Days or 180 Days** intervals and clicking the the **Submit** button (**Figure 1**) **Figure 1** [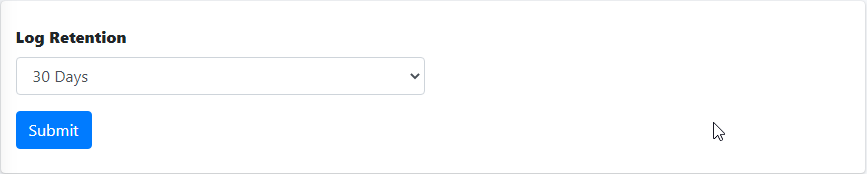](https://docs.deeztek.com/uploads/images/gallery/2022-06/image-1656417444120.png) #### Fetch Logs by Date Range/Time Click the [](https://docs.deeztek.com/uploads/images/gallery/2022-06/image-1656419218858.png) icon on the or manually enter date/time in the format **yyyy-mm-dd hh:mm:ss** in **Start Date/Time** and the **End Date/Time** fields to select a Date/Time range and click the Fetch Logs button to search for logs matching your criteria (**Figure 2**). **Figure 2** [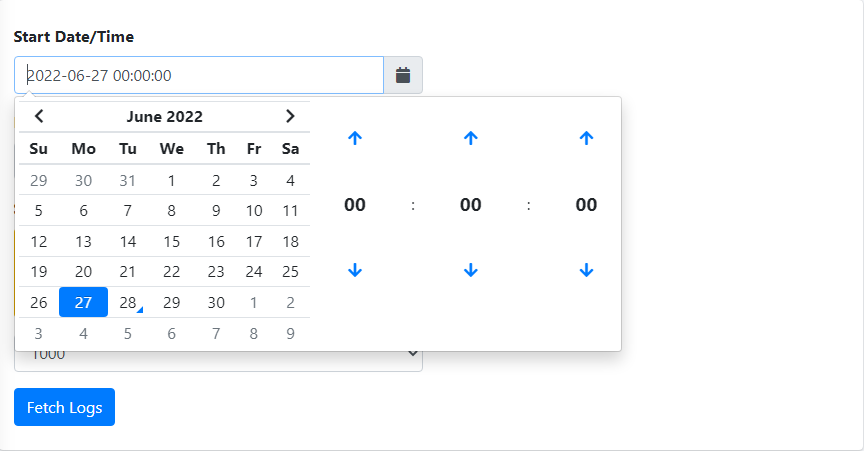](https://docs.deeztek.com/uploads/images/gallery/2022-06/image-1656419300960.png) #### Search Logs Enter a search term in the **Search** field and the system will automatically filter logs matching the term you entered. You can enter multiple search terms separated by a space (**Figure 3**). **Figure 3** [](https://docs.deeztek.com/uploads/images/gallery/2022-06/image-1656419659171.png) # System Backup and Restore **System Backup** and **System Restore** are configured and ran in the CLI as root. There is a Backup script located at **/opt/hermes/scripts/system\_backup.sh** and a Restore script located at **/opt/hermes/scripts/system\_restore.sh**. These scripts should not be moved/copied to other locations. System Backups should be scheduled via Cron or other mechanism to point to **/opt/hermes/scripts/system\_backup.sh**. Before scheduling **system\_backup.sh**, it's highly recommended that you run it manually to ensure proper operation before scheduling it. The backups can be stored to any mount that you have previously configured in your system such as local, SMB, NFS etc... ### System Backup The **/opt/hermes/scripts/system\_backup.sh** script accepts several flags with corresponding values enclosed in single quotes in order to configure its behavior. - The **-D** flag sets the number of days of backups to retain. For example, **-D '7'** would configure it to delete any backups older than **7** days. - The **-P** flag sets the path to store the backups WITHOUT the trailing slash. For example **-P '/mnt/backups'** configures the backup to store all backups in the **/mnt/backups** path. **Please note that backup logs are also automatically stored in that path.** - The **-E** flag sets the recipient to send backup success/failure notifications. For example, **-E 'to@domain.tld'** configures the backup to send notifications to **[to@domain.tld](mailto:someone@domain.tld)**. - The **-F** flag sets the sender where the backup success/failure notifications would come from. For example, -**F ' 'from@domain.tld'** configures the backup to send notications from **[from@domain.tld](mailto:sender@domain.tld)**. - The **-B** flag sets the backup mode. The backup mode can be either **system** (backs up all Hermes related files and databases EXCLUDING the e-mail archive), **archive** (backs up ONLY the e-mail archive) or **all** (backups all Hermes related files including the databases as well as the e-mail archive). For example, **-B 'system'** sets the backup mode to back up all Hermes related files and databases. - The **-R** flag sets the MySQL root password that the backup will need in order to back up all the Hermes databases. For example, **- R 'supersercretpass'** sets the MySQL root password to **supersercretpass.** Putting it all together, if you wanted to run an **all** backup, you can run a command similar to below: ``` /opt/hermes/scripts/system_backup.sh -D '7' -P '/mnt/backups' -E 'to@domain.tld' -F 'from@domain.tld' -B 'all' -R 'supersercretpass' ```Please note that depending on what Backup Mode you use, the system will store an appropriately named backup file in the backup location. For example, **hermes-system-220410-08-16-2024-0920.tar.gz** backup file is system backup as noted by the word **system** in its name. In case of an **all** Backup Mode, the system will generate two backup files, one backup file will contain the system backup and the other backup file will contain the e-mail archive backup. In addition to the type of backup, the backup file also includes the build number (in this case **220410**) as well as the date/time the backup was created. The build number becomes very important when you attempt to perform a System Restore.
### System RestoreSystem Restore **WILL NOT** install any programs, therefore, it requires that you have an already existing and fully updated **Ubuntu 20.04 LTS Server** plain "vanilla" machine with a **/mnt/data** directory for database and email archive storage. Then, you install the same build of Hermes SEG as the build number of the backup file you are attempting to restore.
#### System PreparationPlease note that Hermes SEG will NOT run in a LXC Environment
##### Required Information Ensure you have that information available before you begin: - MySQL(MariaDB) root user password you wish to use - MySQL(MariaDB) username you wish to use with the hermes database (Example: hermes) - MySQL(MariaDB) password you wish to use with the hermes database user - MySQL(MariaDB) username you wish to use with the Syslog database (Example: rsyslog) - MySQL(MariaDB) password you wish to use with the Syslog database user - MySQL(MariaDB) username you wish to use with the cipermail database (Example: ciphermail) - MySQL(MariaDB) password you wish to use with the ciphermail database user - MySQL(MariaDB) username you wish to use with the opendmarc database (Example: opendmarc) - MySQL(MariaDB) password you wish to use with the opendmarc database user - Lucee Server and Web Administrator password you wish to use - System Mailname (Example: smtp.domain.tld) The **Configure /mnt/data partition** directions below assume you have a 250GB secondary drive which you will partition, format and mount as /mnt/data. Technically a secondary drive for the /mnt/data directory is not a requirement but it's highly recommended for performance reasons. If you don't wish to use a secondary drive for the /mnt/data directory, simply create a /mnt/data directory in your system. ##### Configure /mnt/data partition ``` sudo mkdir /mnt/data ``` ``` sudo fdisk -l ``` Look for 250 GB drive you created earlier device ID, usually /dev/sdb. Ensure you select correct device ID before running the commands below) Create partition: ``` sudo fdisk /dev/sdb ``` - Hit "n" to add new partition - Hit "p" for primary partition - Hit "Enter" for partition 1 - Hit "Enter" for default first sector - Hit "Enter" for default last sector - Hit "w" to write changes to disk and exit Format Partition: ``` sudo mkfs.ext4 /dev/sdb1 ``` Mount Partition to /mnt/data: ``` sudo mount /dev/sdb1 /mnt/data ``` Get disk UUID: ``` ls -l /dev/disk/by-uuid ``` Edit /etc/fstab: ``` sudo vi /etc/fstab ``` Add the following in /etc/fstab where DEVICE\_ID is the UUID from the command above: ``` UUID=DEVICE_ID /mnt/data ext4 errors=remount-ro 0 1 ``` Verify drive is mounted: ``` sudo df -h ``` Should yield output similar to below: ``` Filesystem Size Used Avail Use% Mounted on udev 1.9G 0 1.9G 0% /dev tmpfs 395M 1.1M 394M 1% /run /dev/sda2 79G 5.5G 69G 8% / tmpfs 2.0G 0 2.0G 0% /dev/shm tmpfs 5.0M 0 5.0M 0% /run/lock tmpfs 2.0G 0 2.0G 0% /sys/fs/cgroup /dev/loop0 87M 87M 0 100% /snap/core/4917 /dev/loop1 90M 90M 0 100% /snap/core/8039 tmpfs 395M 0 395M 0% /run/user/1000 /dev/sdb1 246G 61M 233G 1% /mnt/data ```The instructions below have ONLY been tested on Hermes SEG **build-220410** and above. Do not use on any builds lower than build-220410.
Identify the build number from the restore file you wish to restore. For example, the build number for restore file **hermes-system-220410-08-16-2024-0920.tar.gz** is **220410**. After identifying the build number, from the CLI as root git clone the desired build using the following command where **build-220410** is the desired build: ``` git clone --depth 1 --branch build-220410 https://github.com/deeztek/Hermes-Secure-Email-Gateway ``` This will clone the repository into directory **Hermes-Secure-Email-Gateway**. Change to the **Hermes-Secure-Email-Gateway** directory: ``` cd Hermes-Secure-Email-Gateway/ ```If you are installing Hermes Build **220410** and below, download **ubuntu\_hermes\_old\_install.sh** and overwrite existing one. **Do NOT run the command below if you are installing Hermes Build 231130 and above**:
``` wget https://raw.githubusercontent.com/deeztek/Hermes-Secure-Email-Gateway/master/ubuntu_hermes_old_install.sh -O ubuntu_hermes_install.sh ``` Make script executable: ``` sudo chmod +x ubuntu_hermes_install.sh ``` Run the script as root and follow the prompt to install Hermes SEG: ``` sudo ./ubuntu_hermes_install.sh ``` Once installation is complete, reboot your computer, ensure everything is running and then continue below to perform a System Restore. #### Perform a RestoreBefore you can perform a restore, you must have already mounted the location where all you backup files are stored accessible to the **/opt/hermes/scripts/system\_restore.sh** script. Additionally, be aware that once you restore a backup, all existing Hermes SEG credentials including the database credentials will be replaced by the credentials in the backup.
If you have a Hermes SEG Pro installation with a valid license, please be aware that your license will have to be re-installed and re-activated in the restored system. Please send the serial number to
The recommended order of restoring backups is to first perform a system restore and once that completes, reboot your computer and then perform an archive restore. Archive restores can take a very long time to complete depending on the size of the data being restored, thus it's best to have your system already up and running and processing e-mail while the archive restore is running. This method will minimize down time.
The **/opt/hermes/scripts/system\_restore.sh** script accepts several flags with corresponding values enclosed in single quotes in order to configure its behavior. - The **-F** flag sets the full path to the backup file you wish to restore. For example, **-F**Before requesting **Acme Certificates** ensure that **BOTH** ports **TCP 80** and **TCP 443** are open to Hermes SEG from the Internet and the domain you are requesting the certificate is pointing to the Internet accessible IP address of your Hermes SEG machine. We recommend that you test using the **Acme Staging** server first to ensure the request works before attempting to use **Acme Production**. The reason we initially **Request Acme Certificate** utilizing the **Acme Staging** server is because Lets Encrypt is much more lenient with rate limits with failed requests in their staging environment than their production environment, click [here](https://letsencrypt.org/docs/staging-environment/) for details.
- Click the **Request Acme Certificate** button, enter a friendly name in the **Certificate Name** field, enter the FQDN (domain name) you wish to request a certificate, enter a valid e-mail address in the **Notifications E-mail address** field, leave the **Acme Server** drop-down field set to **Acme Staging** and click the **Request** button (**Figure 4**): **Figure 4** [](https://docs.deeztek.com/uploads/images/gallery/2022-01/image-1642890261401.png) - If the Acme Certificate Request fails, double-check that the FQDN (domain name) points to the Internet accessible IP of your Hermes SEG machine and that BOTH ports TCP/80 (HTTP) and TCP/443 (HTTPS) are allowed through your firewall and try again. - If the Acme Certificate Request succeeds, locate the newly created certificate in your certificate list, click the [ ](https://docs.deeztek.com/uploads/images/gallery/2022-01/image-1642946754752.png)icon and on the resultant **Delete Certificate** confirmation click on **Yes** (**Figure 5**): **Figure 5** [](https://docs.deeztek.com/uploads/images/gallery/2022-01/image-1642946921688.png) - Click the **Request Acme Certificate** button again, enter a friendly name in the **Certificate Name** field, enter the FQDN (domain name) you wish to request a certificate, enter a valid e-mail address in the **Notifications E-mail address** field, this time set the **Acme Server** drop-down field set to **Acme Production** and click the **Request** button (**Figure 6**): **Figure 6** [](https://docs.deeztek.com/uploads/images/gallery/2022-01/image-1642947557037.png) # System Settings - The **Postmaster E-mail Address** MUST BE on a domain that the system currently delivers email for and the **Admin E-mail Address** SHOULD BE an email address for a domain that Hermes SEG does NOT deliver email for. Even though the system will allow you to enter an Admin E-mail Address for a domain that Hermes SEG deliver email for, it's not recommended. The **Admin E-mail Address** should be an external to the system e-mail address. - The system will automatically create virtual addresses for **postmaster**, **abuse** and **root** based on the **Postmaster E-mail Address** you set. For example, if your Postmaster E-mail Address is **postmaster@domain.tld** and your Admin E-mail Address is **someone@otherdomain.tld**, the system will automatically create the following virtual address: - **postmaster@domain.tld** ---> **someone@otherdomain.tld** - The system will also create the following two virtual addresses and related mappings based on the postmaster e-mail address domain part: - **abuse@domain.tld** ---> **someone@otherdomain.tld** - **root@domain.tld** ---> **someone@otherdomain.tld** - The virtual address the system creates can be viewed under **Gateway ---> Virtual Recipients**. - Adding a Serial Number is not required. However, if you are going to add a Serial Number, ensure Hermes SEG has access to the Internet over ports **TCP/80** and **TCP/443**. Serial Numbers are validated over the Internet with our activation service). - If you have a Serial Number, click the **Add Serial Number** button and in the resultant window enter it in the **Serial Number** field, check the license convert checkbox and click the **Submit** button (**Figure 1**). **Figure 1** [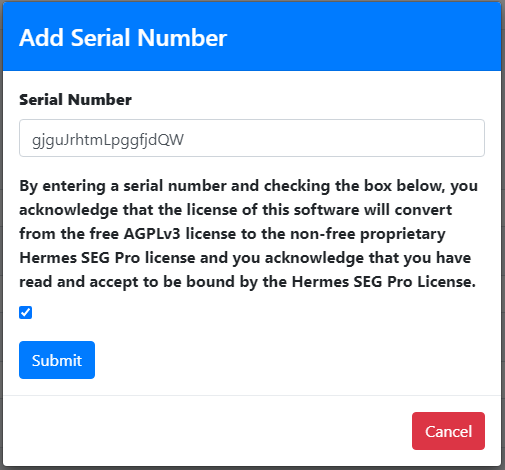](https://docs.deeztek.com/uploads/images/gallery/2022-06/image-1656410867375.png) - In the **Postmaster E-mail Address** field enter the email address you want to use - In the **Admin E-mail Address** field enter the email address you want to use - In the **TimeZone** field, set your local timezone by deleting the default **America/New\_York** and start typing the name of your continent. The system will automatically display a drop-down with all the relevant timezones for your continent (**Figure 2**). **Figure 2** [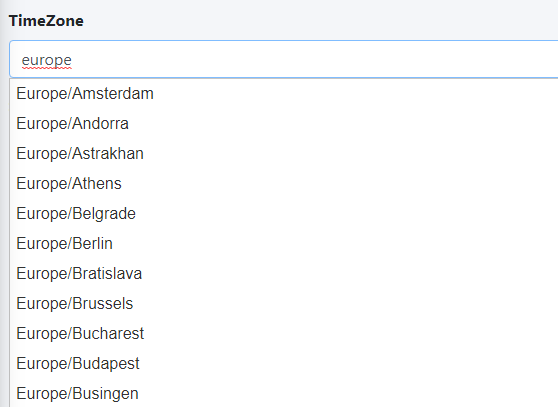](https://docs.deeztek.com/uploads/images/gallery/2022-06/image-1656411073214.png) - If you have activated a Hermes SEG Pro Serial Number, the **Daily Update Check** field will be available for you to **Enable/Disable**. If you enable the **Daily Update Check**, the system will automatically check for Hermes SEG updates on a daily basis and if it finds one, it will send an e-mail to the postmaster E-mail Address you set above. - In the **Telemetry** field, set to **Enabled** (By default it's enabled) if you wish to allow the sending of anonymized data to our servers in order to improve Hermes SEG and our services. **Rest assured, that we do NOT share or sell this data and it's strictly used for internal purposes**. Please see the list below for the data we collect: - Hermes SEG unique system ID - The total number of Internal Recipients (NOT the actual internal recipients) - The total number of Domains (NOT the actual domains) - The total number of Virtual Recipients (NOT the actual virtual recipients) - Hermes SEG version - Hermes SEG build - Hermes SEG timezone - Hermes SEG edition - Whether or not you use the internal build-in certificate for the Console or SMTP (NOT the actual certificate) - The total number of Clean messages (NOT the actual messages) - The total number of Spam messages (NOT the actual messages) - The total number of Virus messages (NOT the actual messages) - Your IP address (ONLY used to determine your Geo location) - Click the **Submit** button to save your changes (**Figure 3**). **Figure 3** [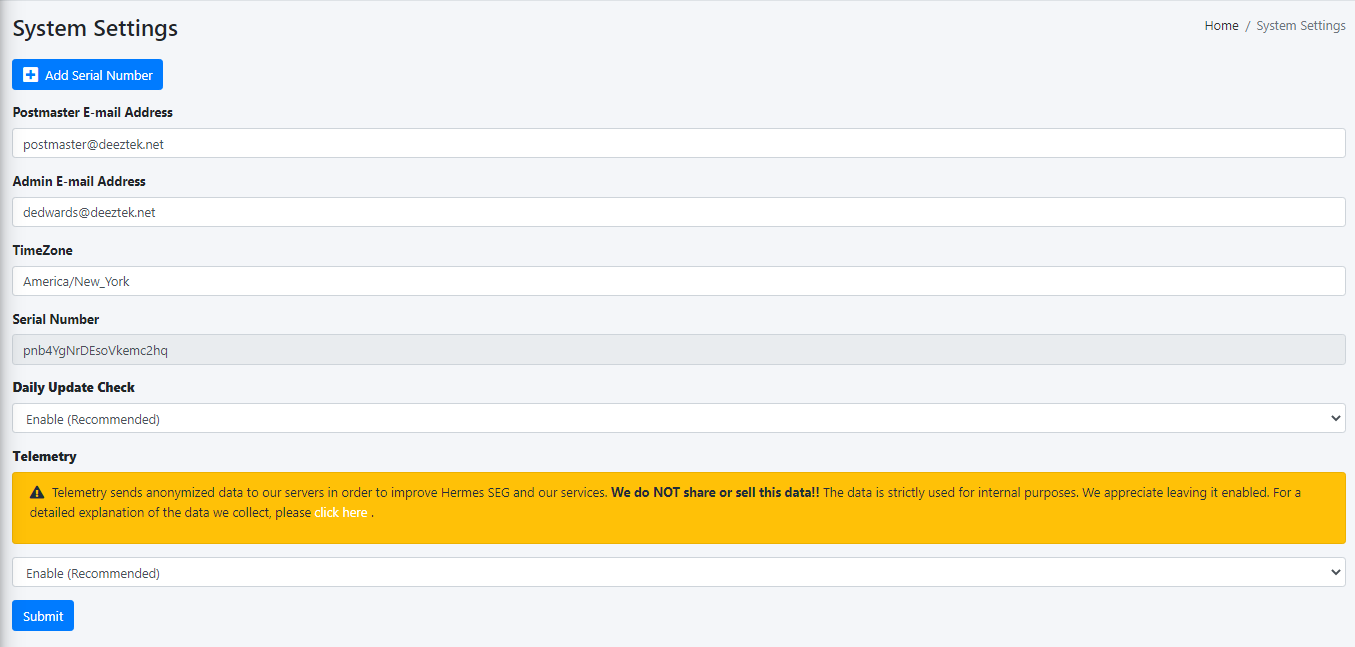](https://docs.deeztek.com/uploads/images/gallery/2023-06/image.png) # System Status System Status displays the following information: - Version - Build - Edition - Uptime - System IP - License Status (Hermes SEG Pro Only) - If system needs to be rebooted to install OS Updates - If there is a Hermes SEG Update (Hermes SEG Pro Only) - CPU Utilization - Memory Utilization - Root FileSystem Utilization - Date FileSystem Utilization [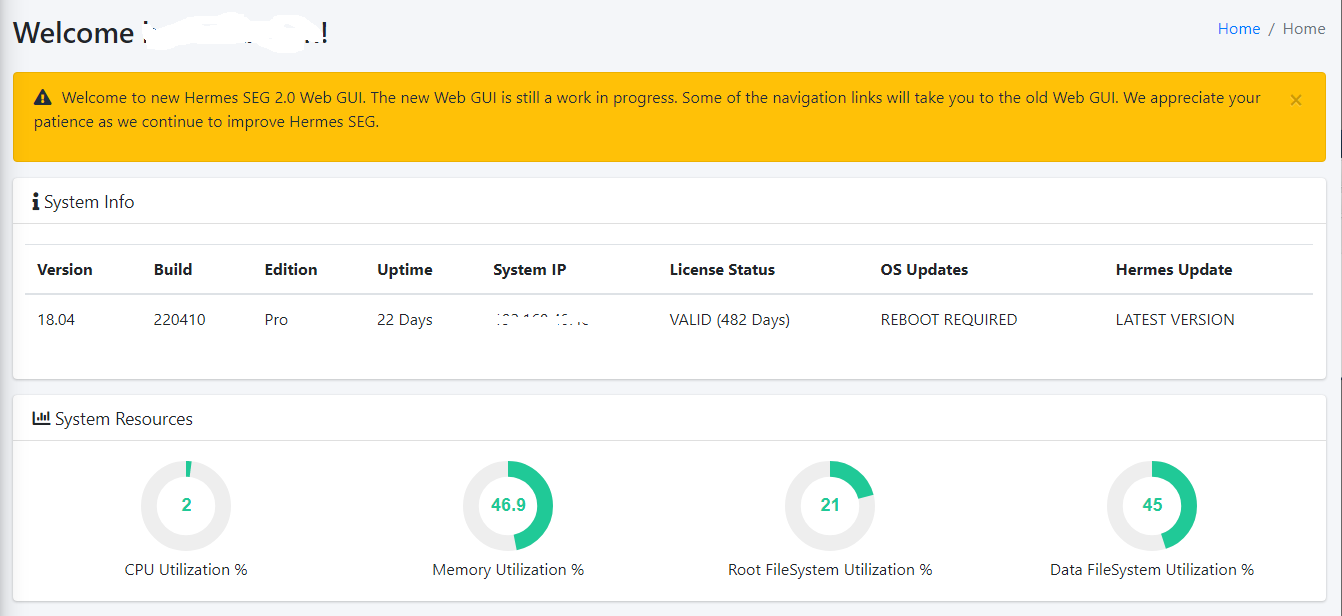](https://docs.deeztek.com/uploads/images/gallery/2022-06/image-1656412195117.png) # System Update**Hermes SEG requires outbound TCP/80 and TCP/443 access to our update servers in order to check and download updates.**
**Ensure you have a recent and valid backup of your system before installing updates.**
**Updates may contain breaking changes and/or additional steps that must be taken after the update gets installed, therefore ensure you check out the Release Notes for each update BEFORE installing. Updates are provided with absolutely no guarantees or warranties of any kind explicitly or implied and we are not liable for any damage that may occur to your system, service, cat, dog, car, house etc.. Simply stated, you are installing updates at your own risk.**
**Hermes SEG updates are installed in order of release, in other words, System Update will not allow you to skip updates. If your system is behind more than one update, each update will have to be downloaded and installed individually.**
System Update has moved from Hermes SEG Pro Edition to Hermes SEG Community Edition. A valid license is no longer a requirement to run System Update. Hermes SEG installations **build-221211** or **build-231130** must now manually download the **system\_update.sh** script and perform a system update. Hermes SEG installations **build-240815** or higher already include the **system\_update.sh** script thus there is no need to manually download.
Each time you run the **/opt/hermes/scripts/system\_update.sh** script, it will check for newer versions of itself as well as other required files. If new versions of the files are needed, it will download them automatically and exit. You must then restart **/opt/hermes/scripts/system\_update.sh** in order to proceed with the update. The script will initially ask you whether to to check for DEV updates. You should always answer NO to this prompt unless support has instructed you to check for DEV updates as part of troubleshooting. **Installing DEV updates without support guidance will most likely break your system.** Next, the script will ask you for the MariaDB/MySQL root password. You must provide the correct password before the update will proceed. #### Hermes SEG build-221211 or build-231130 installations From the CLI as root run the following command to download the system\_update.sh script: ``` wget https://gitlab.deeztek.com/dedwards/hermes-seg-18.04/-/raw/master/dirstructure/opt/hermes/scripts/system_update.sh?ref_type=heads -O /opt/hermes/scripts/system_update.sh ``` Make it executable: ``` chmod +x /opt/hermes/scripts/system_update.sh ``` Run the script and follow the prompts to install the latest update: ``` /opt/hermes/scripts/system_update.sh ``` #### Hermes SEG build-240815 and above installations From the CLI as root run the update script: ``` /opt/hermes/scripts/system_update.sh ``` # System Users The **System Users** screen allows you to create, add and delete System Users (**Figure 1**). **Figure 1** [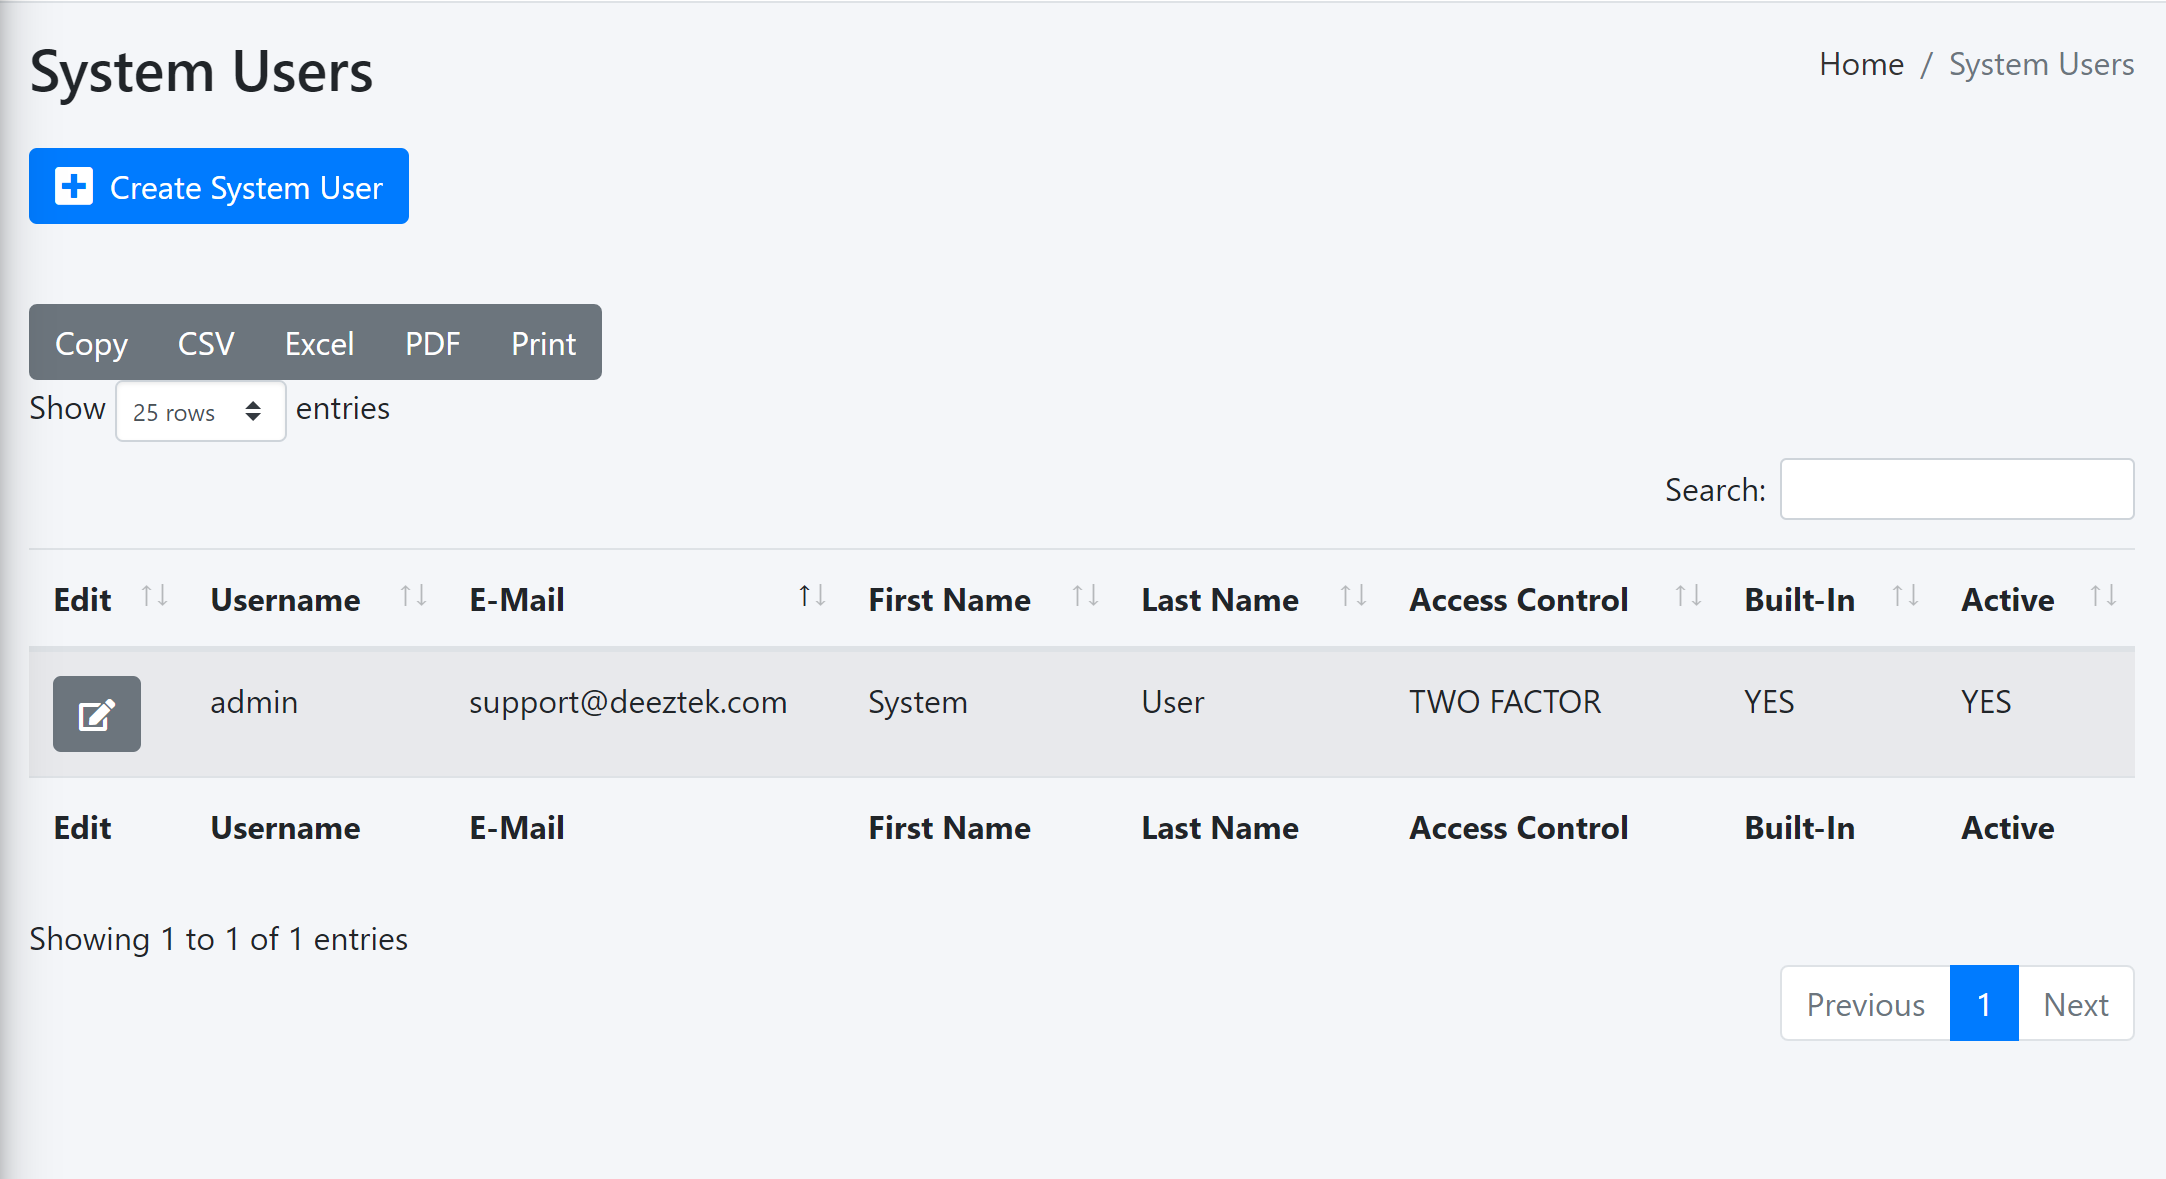](https://docs.deeztek.com/uploads/images/gallery/2021-11/image-1637977280616.png) By default, Hermes SEG comes pre-configured with the the **System User** account with the following default credentials: - **Username:** admin - **Password:** ChangeMe2! #### Create System User If you wish to create a new System User, click the **Create System User** button on top of the screen (**Figure 2**). **Figure 2** [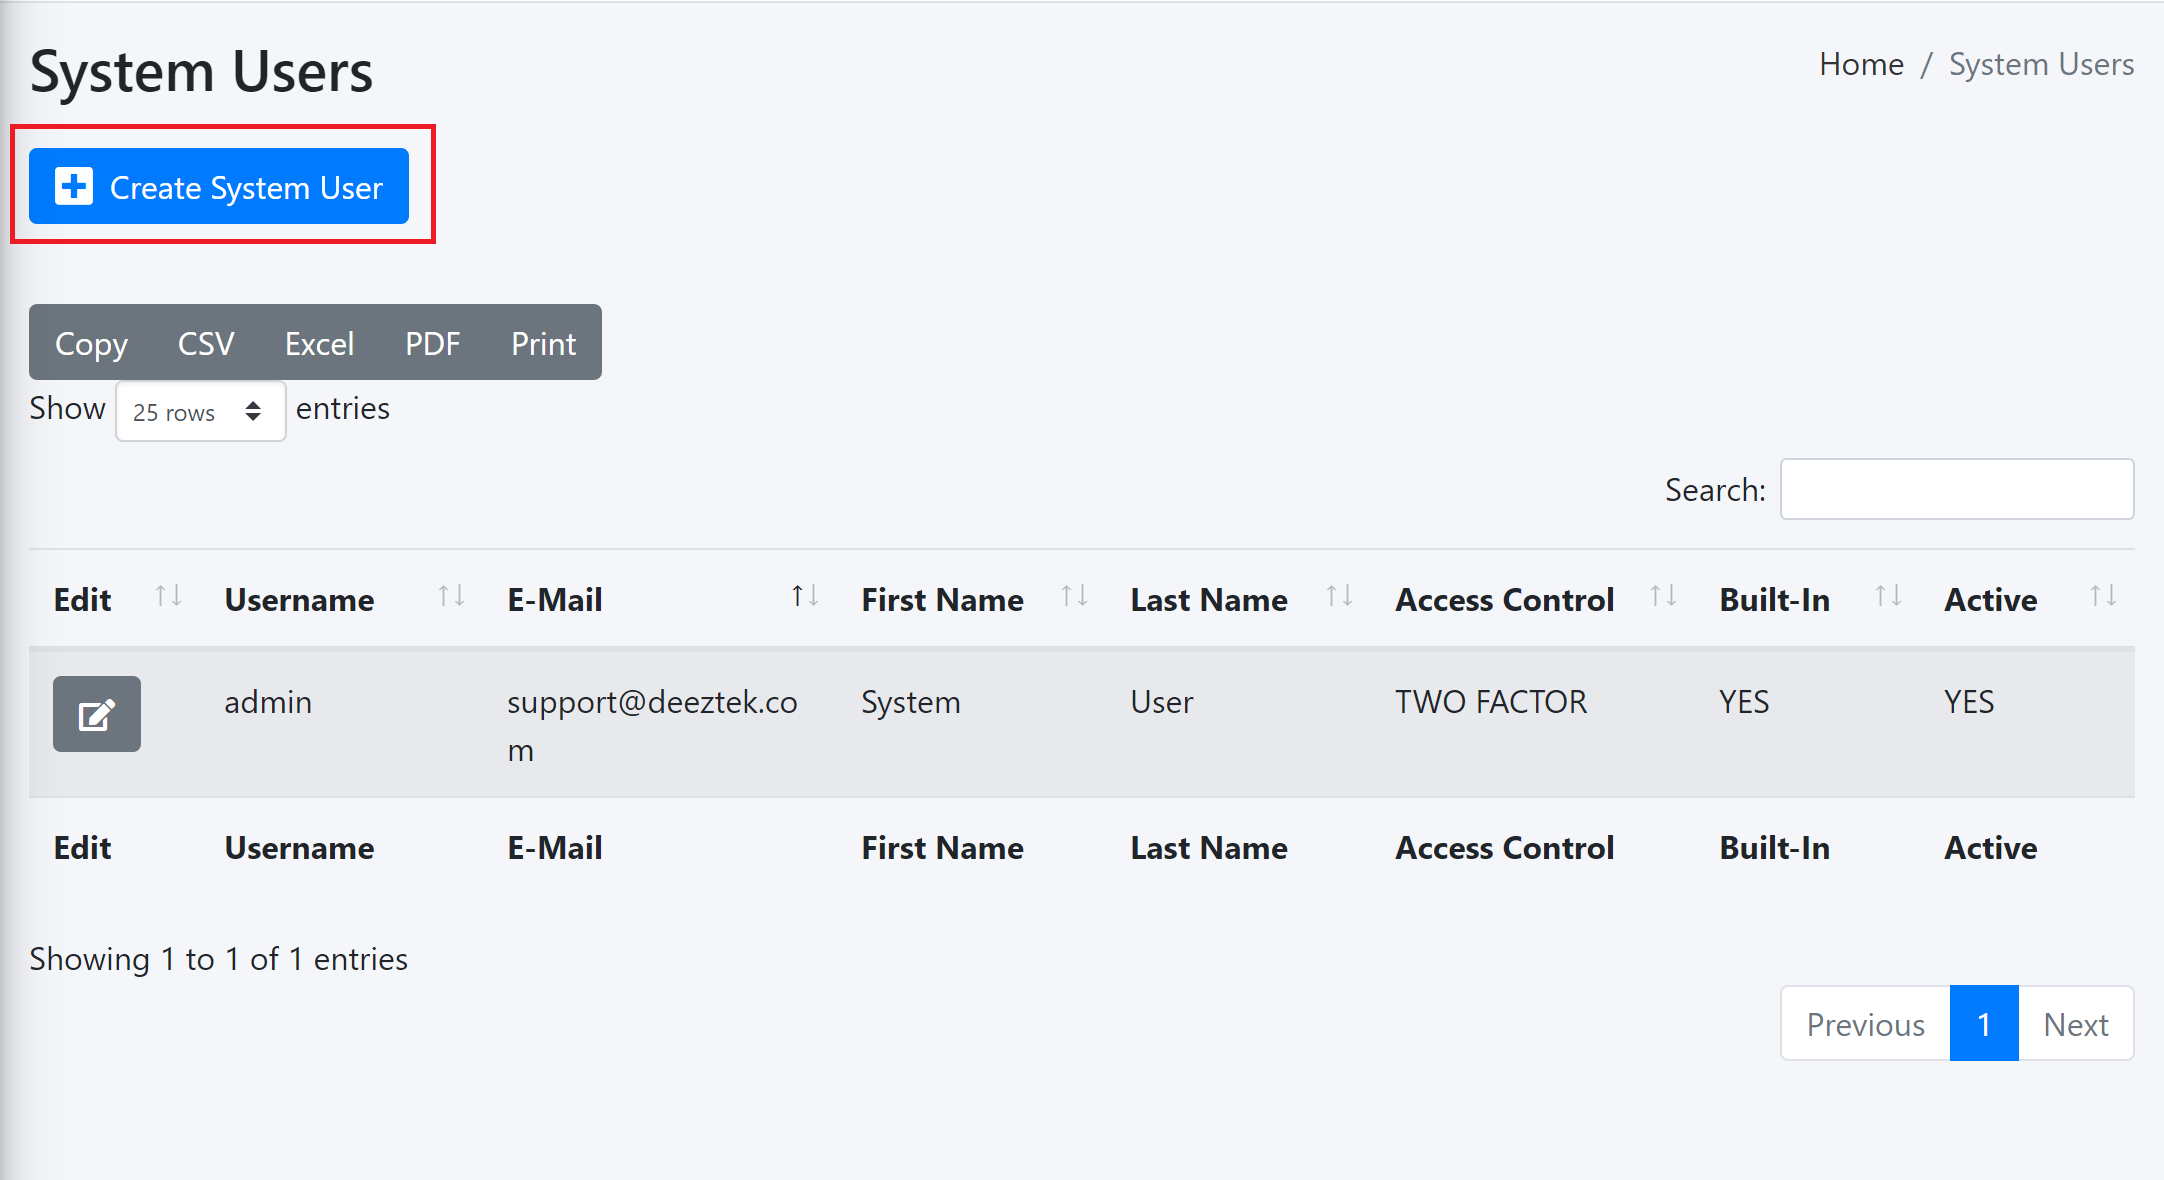](https://docs.deeztek.com/uploads/images/gallery/2021-11/image-1637977567602.png) You will be directed to the **Edit System User** screen where the system has already pre-filled the **Username**, **E-Mail Address**, **First Name** and **Last Name** fields. The **Access Control Policy** field has been set to **One Factor**, the **Set User Password** field has been set to **YES** and the **Check Password Against haveibeenpwned.com** has been set to **YES**. Adjust fields as necessary, enter a password in the **User Password** field and click the **Submit** button (**Figure 3**). **Figure 3** [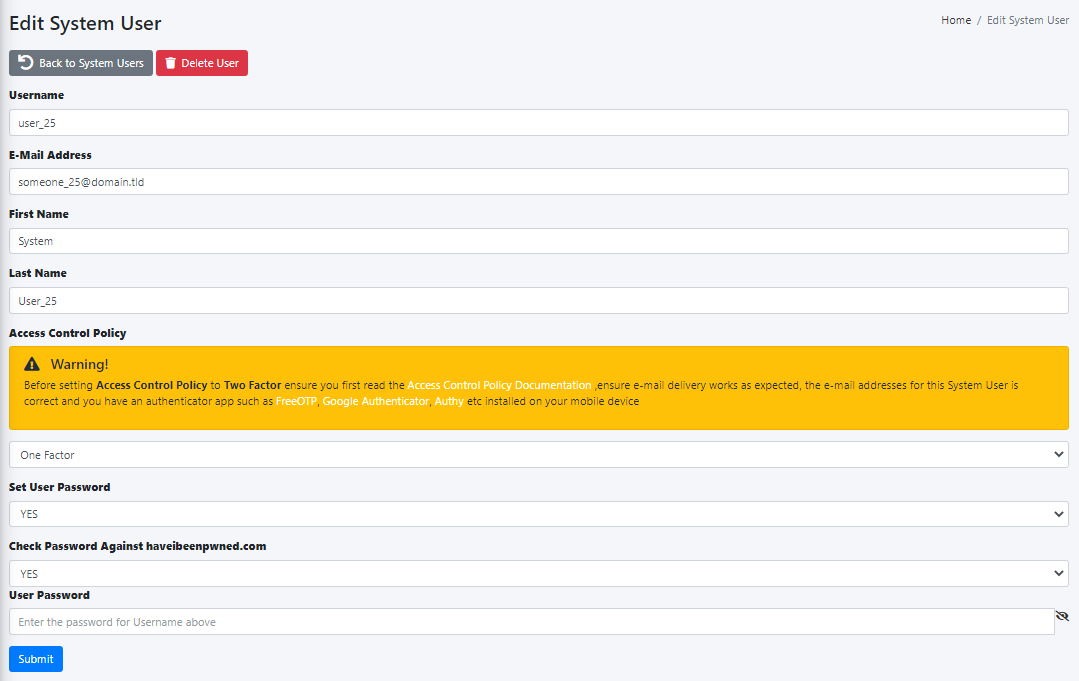](https://docs.deeztek.com/uploads/images/gallery/2021-11/image-1638020865501.png) #### Access Control Policy The Access Control Policy field allows you to switch between **One Factor** Authentication (1FA) which consists of Username and Password authentication (Default) OR **Two Factor** Authentication (2FA) which consists of Username and Password AND an additional **Timed One Time Password** (TOTP) generated on your mobile device for additional security. Two Factor requires the following pre-requisites before enabling: - Hermes SEG Outbound E-mail Flow must be working correctly - The System User Account you enable Two Factor authentication must have a valid e-mail address. - You must have an Authenticator app installed on your mobile device such as [FreeOTP](https://freeotp.github.io), [Google Authenticator](https://play.google.com/store/apps/details?id=com.google.android.apps.authenticator2), [Authy](https://authy.com/download/) etc. Once you set the **Access Control Policy** to **Two Factor** and click the **Submit** button, logout and then log back in with the same System User you enabled Two Factor authentication. After successfully authenticating, the system will prompt to register your mobile device. Click the **Register device** link on the One-Time Password screen (**Figure 4**). **Figure 4** [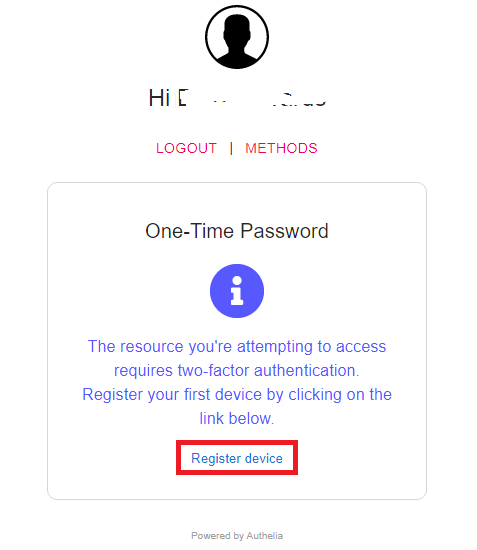](https://docs.deeztek.com/uploads/images/gallery/2021-10/image-1635449972196.png) The system will display **An email has been sent to your address to complete the process** on the upper right-hand corner of the screen (**Figure 5**). **Figure 5** [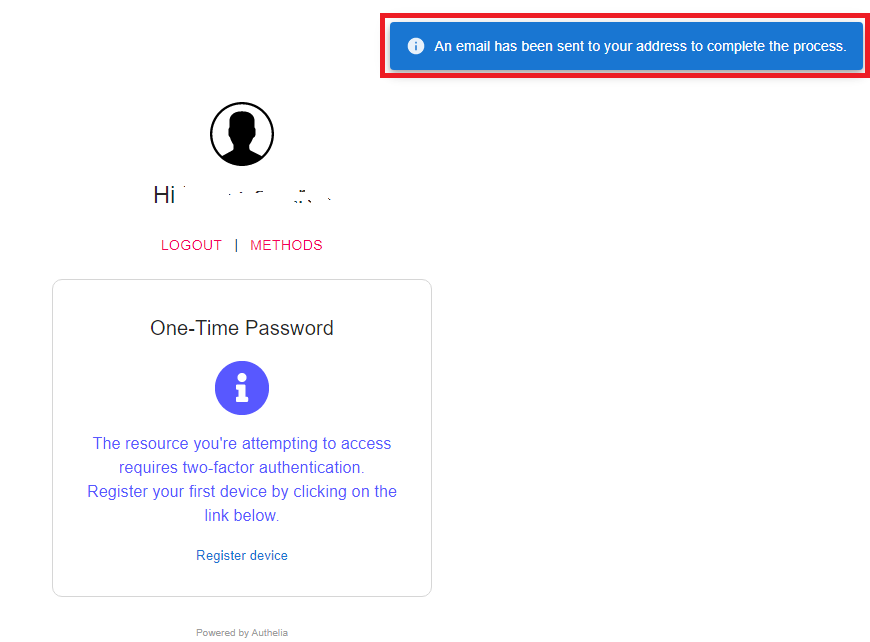](https://docs.deeztek.com/uploads/images/gallery/2021-10/image-1635450273072.png) Check the mailbox of the e-mail address associated with your account and look for an e-mail that contains the subject **Register your mobile** and click the **Register** button at the bottom of the e-mail (**Figure 6**). **Figure 6** [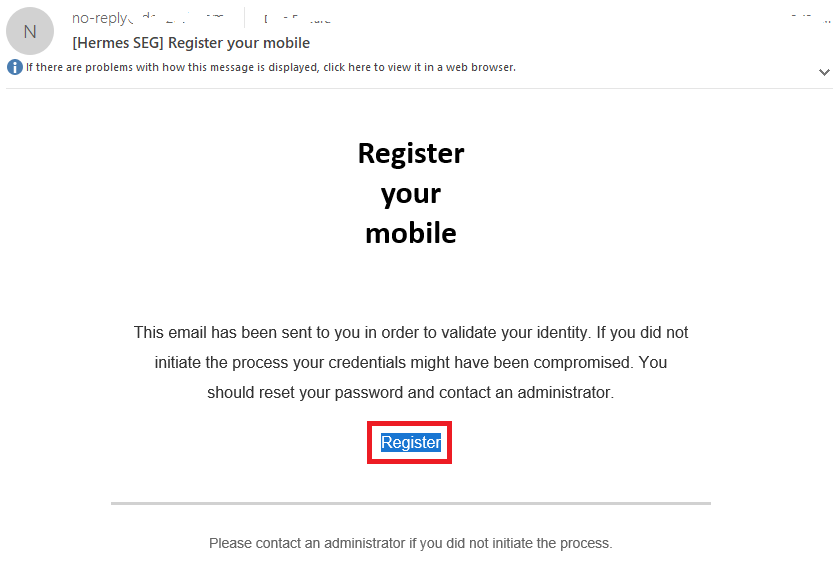](https://docs.deeztek.com/uploads/images/gallery/2021-10/image-1635450744160.png) You will be taken to the **Scan QR Code** page. Using the Authenticator app you previously downloaded and installed on your mobile device, scan the QR Code from the page and click the **DONE** button (**Figure 7**). **Figure 8** [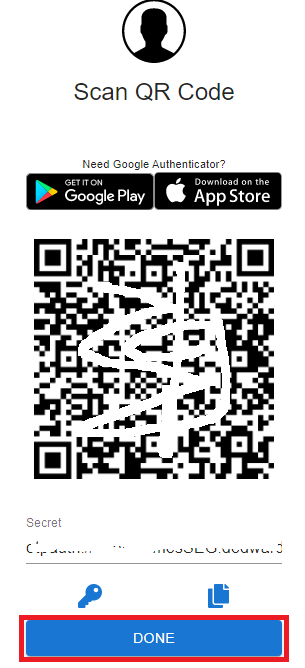](https://docs.deeztek.com/uploads/images/gallery/2021-10/image-1635451176940.png) On the following **One-Time Password** screen enter the passcode generated by your authenticator app (**Figure 9**). **Figure 9** [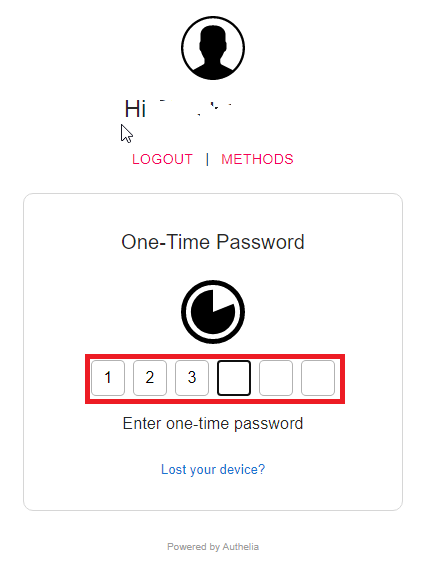](https://docs.deeztek.com/uploads/images/gallery/2021-10/image-1635452032741.png) If everything goes well and you typed in the correct passcode within the allotted time, you should be able to successfully login to **Hermes SEG Administration Console**. If you run into a problem and the Two Factor authentication did not work for any reason, you can reset authentication back to One Factor by running the following script from the console with root privileges: ``` /opt/hermes/scripts/disable_authelia_2fa.sh ``` #### Passwords Hermes SEG implements the following [NIST 800-63](https://pages.nist.gov/800-63-3/sp800-63-3.html) Password Guidelines: - 8 character minimum password. - 64 character maximum password. - Able to check against known breached passwords via the use of the [haveibeenpwned.com](https://haveibeenpwned.com) API. - Implementation of Multifactor Authentication via the use of [Time-Based One-Time Password (TOTP)](https://infogalactic.com/info/Time-based_One-time_Password_Algorithm) , [Duo Security](https://duo.com) and [Webauthn](https://www.yubico.com/authentication-standards/webauthn/) Security Keys. - Passwords are hashed with the [Argon2 KDF](https://infogalactic.com/info/Argon2). # Email Archive In this section will be able to configure a scheduled archive jobs for your Hermes SEG. An Email Archive Job will create a separate email archive on external storage by creating a directory named **/mnt** on that share, copying all the emails stored on the appliance to that directory, verifying that the emails copied correctly and then delete them from the appliance local storage in order to free up space. Archived emails can still be viewed and downloaded form the Hermes SEG Administration Console or User Self-Service Console as long as the external storage is mounted on the appliance. **However, archived emails cannot be released to user mailboxes.** In addition to archiving the email on the appliance to external storage, an archive job will also allow you to create a compressed 7-zip snapshot of the latest archive on the external storage . The 7-zip snapshot is useful for having multiple backup copies of the e-mail archive. Each time an Email Archive Job runs, it creates a detailed log of each and every message that is moved and deleted from the appliance local storage. At the end of the job, this log is compressed as a 7-zip file and then moved to the external archive storage. For Email Archive Jobs configured **without** a compressed 7-zip snapshot of the latest archive, the system will automatically prune logs older than **14-days** by default. For Email Archive Jobs configured **with** a compressed 7-zip snapshot of the latest archive, the system will automatically prune logs following the **Compressed 7-zip Snapshot Retention Period** setting of the job. Hermes SEG requires a CIFS (Windows Share) share to an external storage in order to perform scheduled email archives. Shares have to be successfully validated first before an Archive Job can be saved. **Only one Archive Job can be created.** **Note: It is highly recommended that you archive email to an external deduplicating storage**. **Note: Windows Server 2012 and above has support for deduplication, however if you are planning on utilizing Windows Server deduplication, you must disable [Windows Kernel Case Insensitivity](https://www.deeztek.com/documentation/hermes-seg-documentation/hermes-secure-email-gateway-general-documentation/disable-windows-kernel-case-insensitivity/) and you must NEVER use Windows file tools to manage the email archive because case sensitivity will not be preserved and the appliance will not able to access the archived emails.** **Note: Email Archive Jobs can be a very time consuming process depending on the number of emails stored on the appliance. The initial Archive Job can take days or even weeks to complete.** ### Validate Share By default, when creating a new Archive Job, the **Archive Job Create Mode** field is automatically set to **Validate Share** and the **Save Archive Job** field is **disabled**. The Save Archive Job field only gets enabled when a share is succesfully validated. 1. Enter a friendly name under the **Archive Job Name** field 2. Enter an IP Address or a FQDN Host name of the server hosting the share under the **Server** field 3. Enter the name of the share under the **Share Name** field 4. Enter the name of a directory under the share if applicable under the **Directory Name** field 5. Enter domain name under the **Domain** field 6. Enter the username who has access to that share under the **Username** field 7. Enter the password for the username from Step 6 under the **Password** field 8. Enter a valid email address in order to get success or failure notifications from the backup job under the **Notification E-mail Address** field 9. Select the number of days to archive email older than in the **Archive Emails Older Than** drop-down box. For instance, if you want to have 3 months worth of archive emails stored on the appliance and archive the rest, you would select 90 Days from the drop-down box. 10. Select **Yes** on the **Create Compressed 7-zip Snapshot** field if you want the system to create **Compressed 7-zip format** snapshots of the email archive stored on the share. If you select Yes, after all the emails have been archived on the share, the system will additionally create a 7-zip compressed archive of all the emails on the share. This is useful for having multiple copies of the email archive for retention purposes. 11. Select the number of days to retain Compressed 7-zip Snapshot files on the **Compressed 7-zip Snapshot Retention Period** drop-down field. Available options are, **7 Days, 14 Days, 21 Days and 28 Days**. The system will use the **Compressed 7-zip Snapshot Retention Period** you selected to automatically delete older snapshot files so that your external storage doesn't get filled up. 12. Select the job frequency from the **Frequency** drop-down field. Available options are **Daily, Weekly and Monthly**. 13. Enter a date for the archive job to start by either selecting a date by clicking the calendar button or by manually entering a date in the form of **mm/dd/yyyy** in the **Start Date** field. 14. Select a time for the archive job to start by selecting a time from the **Start Time** drop-down field 15. Click the **Submit** button to validate the share (**Figure 1**) **Figure 1** [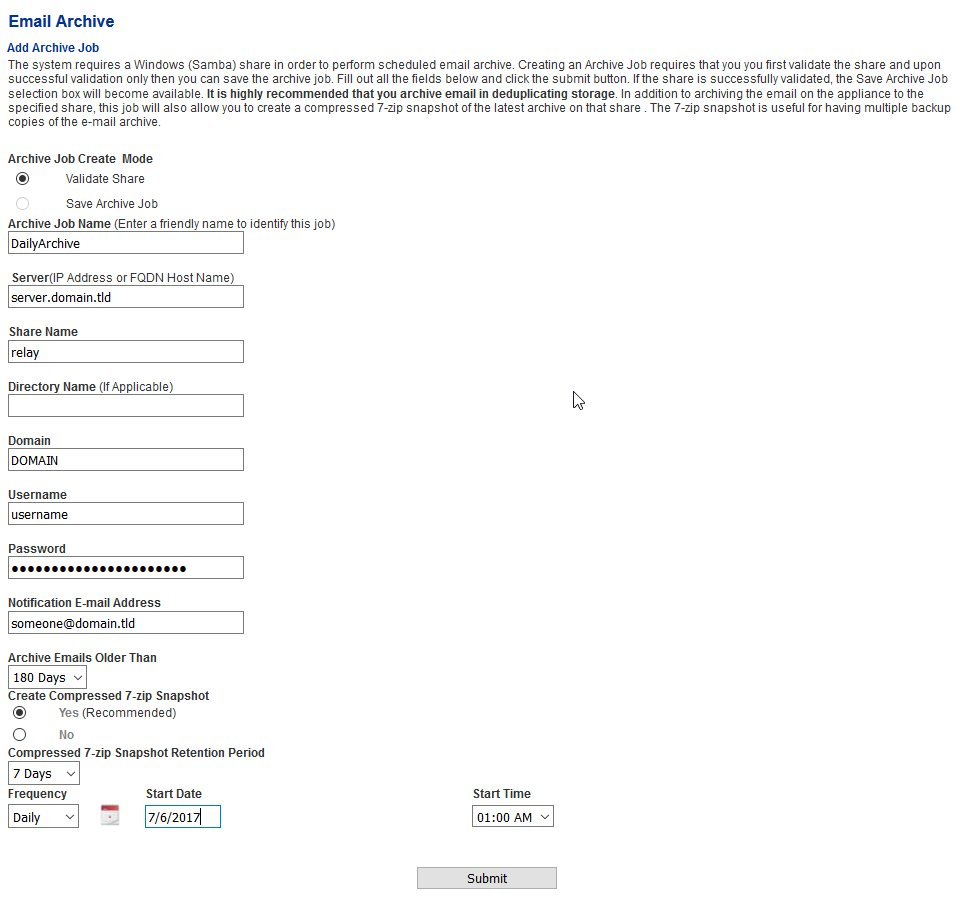](https://docs.deeztek.com/uploads/images/gallery/2020-11/image-1606157719854.png) ### Share Validation Succesful If the validation is succesful, you will receive the following message (**Figure 2**) **Figure 2** [](https://docs.deeztek.com/uploads/images/gallery/2020-11/image-1606157730027.png) You will also notice that the **Save Archive Job** option will be enabled under the **Archive Job Create Mode** on top of the page. Select the **Save Archive Job** option and click the **Submit** button to save the job (Figure 3). **Figure 3** [](https://docs.deeztek.com/uploads/images/gallery/2020-11/image-1606157737507.png) The job will be saved under the **Existing Archive Job** section on the bottom of the page (**Figure 4**) **Figure 4** [](https://docs.deeztek.com/uploads/images/gallery/2020-11/image-1606157746508.png) ### Share Validation Unsuccessful If the validation is unsuccesful, you will receive the following message (**Figure 5**). **Figure 5** [](https://docs.deeztek.com/uploads/images/gallery/2020-11/image-1606157756338.png) Check the information supplied and share permissions and try validating the share again. ### Manually Run Archive Job The saved archive job will run according to the schedule you set. Alternatively if you wish to run it immediately: 1. Click on the green arrow button  under the **Run/Stop** column to run the job immediately (**Figure 6)** **Figure 6** [](https://docs.deeztek.com/uploads/images/gallery/2020-11/image-1606157925805.png) 2. In the **Confirmation Window**, click the **Yes** button (**Figure 7**). Clicking **No**, will take you back to the Email Archive page. **Figure 7** [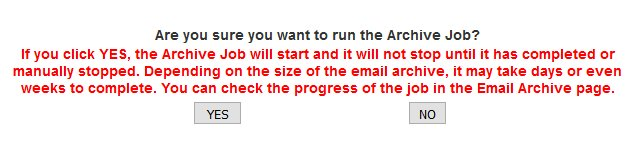](https://docs.deeztek.com/uploads/images/gallery/2020-11/image-1606157948521.png) If the Archive Job is in progress, the button under the **Run/Stop** column will become a red square  (**Figure 8**) **Figure 8** [](https://docs.deeztek.com/uploads/images/gallery/2020-11/image-1606157959520.png) ### Stop an Active Archive Job If you wish to stop an active Archive Job: 1. Click on the red square button  under the **Run/Stop** column (**Figure 9)** **Figure 9** [](https://docs.deeztek.com/uploads/images/gallery/2020-11/image-1606157968600.png) 2. In the **Confirmation Window**, click the **Yes** button (**Figure 10**). Clicking **No**, will take you back to the Email Archive page. **Figure 10** [](https://docs.deeztek.com/uploads/images/gallery/2020-11/image-1606157977295.png) ### Delete Archive Job If you wish to delete the existing Archive Job and the job is NOT running: 1. Click on the red X  under the Delete column (**Figure 11**) **Figure 11** [](https://docs.deeztek.com/uploads/images/gallery/2020-11/image-1606158010278.png) 2. In the Confirmation Window, click the **Yes** button (**Figure 12**). Clicking **No**, will take you back to the Email Archive page. **Figure 12** [](https://docs.deeztek.com/uploads/images/gallery/2020-11/image-1606158036697.png) ### Remount Archive Share If the Archive Share becomes dismounted and you or your users are not able to view or download archived emails from the **Message History & Archive**, you can click on the button on the **Remount Share** column to attempt to remount the Archive share (**Figure 13**). **Note: You cannot remount the Archive share if the Archive Job is in progress.** **Figure 13** [](https://docs.deeztek.com/uploads/images/gallery/2020-11/image-1606158046782.png) ### Restore External Storage Archive from Compressed 7-zip Snapshot File As mentiond above, if you are storing your email archive on an external storage share on a Windows server, you must NEVER use Windows file tools to manage the email archive because case sensitivity will not be preserved and the appliance will not able to access the archived emails. This includes, attempting to restore the email archive from a Compressed 7-zip Snapshot file. The restore process should always be done from the Hermes SEG appliance. 1. Login to Hermes SEG via SSH or the virtual console and become root and then type the hermes account password when prompted: ``` sudo su ``` 2. Ensure the email archive share is mounted: ``` df -h ``` 3. Look for the /mnt/hermesemail\_archive mount (**Figue 14**) **Figure 14**  [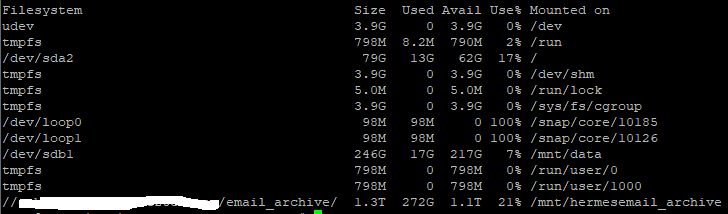](https://docs.deeztek.com/uploads/images/gallery/2020-11/image-1606158146714.png) 4. Change to the /mnt/hermesemail\_archive directory: ``` cd /mnt/hermesemail_archive ``` 5. List files in that directory ``` ls ``` 6. If the share is mounted succesfully you should get a listing similar to below (in this example, note the presense of the the various **Compressed 7-zip Snapshot** files): ``` hermesemail_archive_07-06-2017-0224.7z hermesemail_archive_07-11-2017-0303.7z hermesemail_archive_07-07-2017-0201.7z hermesemail_archive_07-12-2017-0304.7z hermesemail_archive_07-08-2017-0153.7z hermesemail_archive_07-13-2017-0246.7z hermesemail_archive_07-09-2017-0313.7z hermesemail_archive_07-14-2017-0149.7z hermesemail_archive_07-10-2017-0315.7z mnt ``` ### If the mnt directory exists Change to that directory: ``` cd mnt/ ``` ### If the mnt directory does NOT exist Create the directory: ``` mkdir mnt ``` Change to that directory: ``` cd mnt/ ``` 7. Restore the email archive to the share by running the following command where **hermesemail\_archive\_mm-dd-yyyy-hhmm.7z** is the name of the Compressed 7-zip Snapshot file from the listing in **Step 6**: ``` 7za x ../hermesemail_archive_mm-dd-yyyy-hhmm.7z ``` # System Reboot & Shutdown ### Reboot System 1. Click on the **Reboot System** button and wait for the system to finish the reboot process (**Figure 1**). **Figure 1** [](https://docs.deeztek.com/uploads/images/gallery/2020-11/image-1606158378832.png) ### Shutdown System 1. Click on the **Shutdown** System button. Please note that manual intervention will be required in order to turn the system back on (**Figure 2**). **Figure 2** [](https://docs.deeztek.com/uploads/images/gallery/2020-11/image-1606158385830.png) # Gateway # SMTP TLS Settings It's important to set SMTP TLS in order to transmit e-mail messages between your Hermes SEG machine and other e-mail servers with TLS encryption. By default, SMTP TLS support in Hermes SEG is disabled. In this section you can enable Hermes SEG TLS support as well as associate the SSL certificate you previously imported or requested. Hermes SEG supports two SMTP TLS methods: ##### Opportunistic TLS In this mode, any time a remote SMTP server makes a connection, Hermes SEG announces that it supports STARTTLS, however it does not require TLS encryption. This mode, is the recommended mode if you need TLS encryption. ##### Mandatory TLS In this mode, any time a remote SMTP server makes a connection, Hermes SEG announces STARTTLS and it will NOT accept email without TLS encryption. **This mode should NEVER be used on a public Internet facing Hermes SEG**.Before you can set **SMTP TLS**, you must first have either imported or requested a SSL Certificate in the **System -->** **System Certificates** section for the **Hostname** and **Primary Domain Name** you set in the **System -->** **Network Settings**.
- Set the **SMTP TLS Mode** drop-down to **Opportunistic TLS or** or **Mandatory TLS** as required. - The **SMTP TLS Certificate** field is pre-populated with the **system-self-signed** certificate. If you wish to use a SSL certificate you set in the **System Certificates** section above, simply delete the **system-self-signed** entry and start typing the friendly name of the certificate you setup previously that matches the **Hostname** and **Primary domain Name** you set in the **Network Settings**. The system will locate the certificate and display it in a drop-down list. Click on the certificate and the system will automatically populate all the rest of the Certificate fields such as the Subject, Issuer, Serial and Type (**Figure 1**): **Figure 1** [](https://docs.deeztek.com/uploads/images/gallery/2022-01/image-1642971499398.png) - Click the **Submit** button (**Figure 2**): **Figure 2** [](https://docs.deeztek.com/uploads/images/gallery/2022-01/image-1642971616360.png) #### Verify TLS Encryption and Certificate The easiest way to verify whether or not your Hermes SEG TLS encryption is working correcly as well as verify the certificates you installed, is to go to [https://www.checktls.com/TestReceiver](https://www.checktls.com/TestReceiver) and run the TestReceiver test. #### TLS Encryption Policies Hermes SEG allows you to create a policy to force TLS encryption when sending/receiving email from specific remote domains. TLS encryption along with S/MIME, PDF or PGP encryption will allow for the absolute best security. - Before attempting to force TLS encryption for a specific remote domain, you must first ensure that the remote domain's SMTP hosts are able to support TLS encryption. - Send a test email to a recipient on the remote domain. - Navigate to **System --> System Logs**. - In the **Simple Search** section, under the **Search Text** field, enter the email address of the recipient and press the **Go** button. - In the search results, look for a line similar to the one below where **smtp.remotedomain.tld** is the remote smtp server hostname: ``` 1872E41D60: to=**Any email destined for a virtual recipient are NOT checked by the spam filter.**
### Create Virtual Recipient(s) - Click on the **Create Recipient(s)** button (**Figure 1**). **Figure 1** [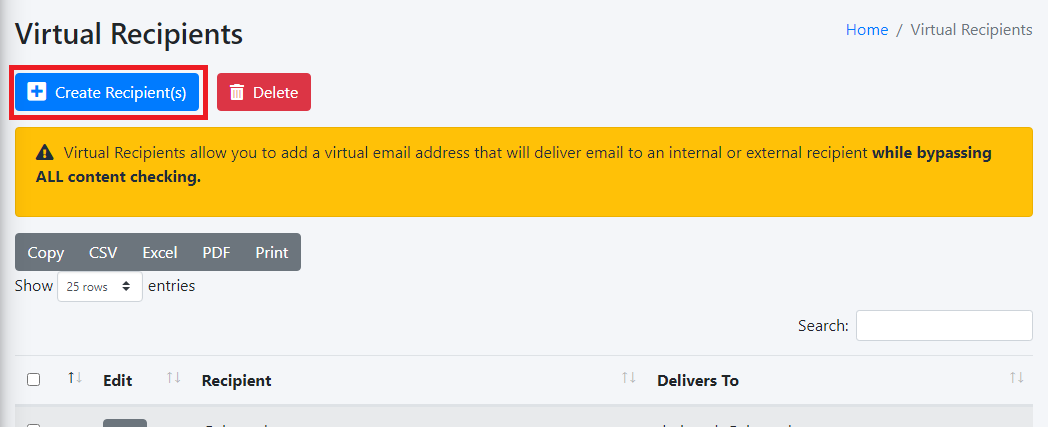](https://docs.deeztek.com/uploads/images/gallery/2022-04/image-1649069023132.png) - On the **Add Virtual Recipient(s)** page, under the **Local-Part(s)** field, enter as many local-part(s) as required each in its own line (part before the @symbol of an e-mail address). You can also leave the **Local-Part(s)** field empty if you wish to forward an entire domain. - Under the @**Domain** drop-down field, select the domain you wish to use. - Under the **Delivers to** field, start typing the e-mail address of an existing **Internal Recipient** and the system will show a drop-down listing of Internal Recipients matching the e-mail address you are typing or enter an external email address. - Click the **Submit** button (**Figure 2**). **Figure 2** [](https://docs.deeztek.com/uploads/images/gallery/2022-04/image-1649070095512.png) ### Edit Virtual Recipient - On the **Virtual Recipients** page, locate the virtual recipient you wish to edit by typing any part of the e-mail address in the **Search:** field and then click the [ ](https://docs.deeztek.com/uploads/images/gallery/2022-04/image-1649070479512.png)button next to the virtual recipient (**Figure 3**).[ ](https://docs.deeztek.com/uploads/images/gallery/2022-04/image-1649070446201.png) **Figure 3** [](https://docs.deeztek.com/uploads/images/gallery/2022-04/image-1649070420418.png) On the **Edit Virtual Recipient** page, make the necessary changes and click the **Submit** button (**Figure 4**). **Figure 4** [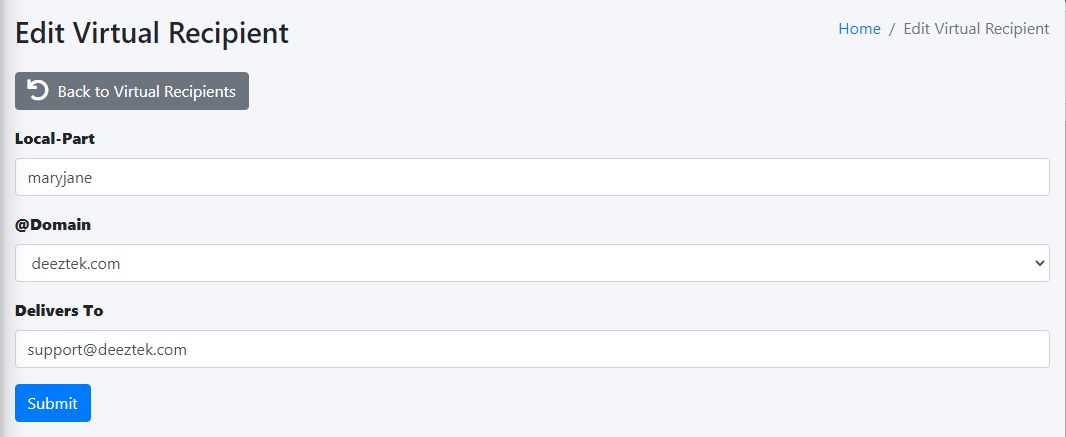](https://docs.deeztek.com/uploads/images/gallery/2022-04/image-1649070665136.png) ### Delete Virtual Recipient(s) - On the **Virtual Recipients** page, locate the virtual recipient(s) you wish to delete by typing any part of the e-mail address(es) in the **Search:** field, place a checkmark on the checkbox next to the virtual recipient and then click the **Delete** button on top of the page (**Figure 5**).[ ](https://docs.deeztek.com/uploads/images/gallery/2022-04/image-1649070446201.png) **Figure 5** [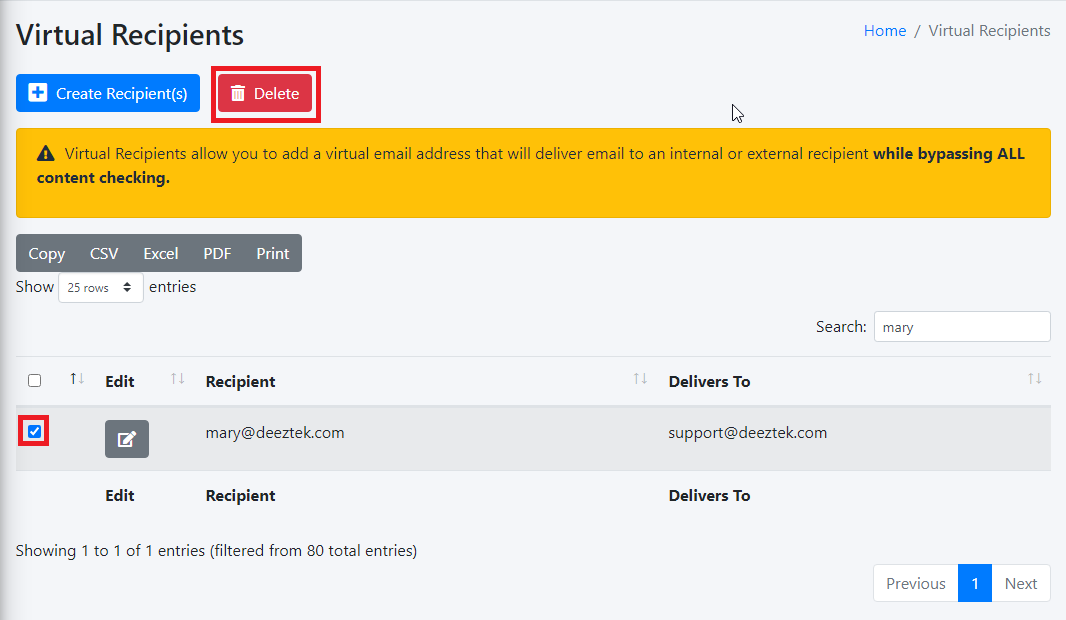](https://docs.deeztek.com/uploads/images/gallery/2022-04/image-1649070920070.png) On the **Delete Recipient(s)** confirmation page, click the **Yes** button to delete the recipient or **No** to cancel (**Figure 6**) **Figure 6** [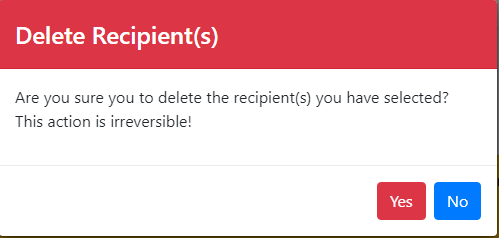](https://docs.deeztek.com/uploads/images/gallery/2022-04/image-1649071064926.png) # Content Checks # Perimeter Checks The Hermes SEG Perimeter Checks page allows you to set settings for any incoming email before they are even processed by the SMTP server or the rest of the subsystems such as the virus and spam filters . You can think of perimeter checks as a type of "front door" checks before they are processed by the system. **NOTE: This section requires any changes to be applied by clicking the Apply Settings button on the bottom of the page.** ### Inititial Connection Deep Protocol Tests The Initital Connection Deep Protocol Tests are comprised of the following 3 tests: - **Pipeline Detection** - Detects senders that send multiple commands, instead of sending one command at a time and waiting for Hermes SEG to reply. - **Non SMTP Commands Detection** - Detects senders that try to use non-SMTP commands - **Bare New Line Detection** - Detects usage of newline that are not proceded by carriage returns, e.g., a bare line. If they are all enabled they are very useful in refusing SMTP connections by zombie senders. However, this setting introduces a delay (graylisting) in email delivery and certain legitimate but incorrectly configured email servers do not try to reconnect to deliver their email. If you have problems receiving emails from legitimate servers, you should first attempt to permit the sending email server(s) under **Content Checks --> IP & Network Override** which will configure Hermes SEG to bypass Initial Connection Deep Protocol Tests on the server(s) IPs you specify. Hermes SEG comes pre-configured to bypass Initial Connection Deep Protocol Tests on certain email services such as Exchange Online and Outlook.com. ### Require HELO If enabled, this setting requires for the incoming email system to start the SMTP session by first sending the HELO or EHLO command before sending the MAIL FROM or ETRN command. Set this setting to Disabled if it starts creating problems with certain homegrown email systems. Otherwise, it is recommended to be set to Enabled (Figure 2). ### Reject Unauthorized Domain If enabled, this setting will reject any incoming email that is destined for a recipient domain or subdomain thereof that the system does not handle i.e. any domain that is not listed in the Relay Domains (See General Options Above). It is recommended that this settings is set to Enabled. ### Sender Policy Framework (SPF) Checks Enable/Disable SPF checks on the system. When enabled the system will attempt to identify email spam by detecting whether or not the email is spoofed by verifying that the sender IP address is authorized to send email on behalf of the senders domain. ### Reject Invalid HELO Hostname If enabled, this setting will reject any incoming email from a mail server that sends the HELO or EHLO command along with a malformed hostname. It is recommended that this settings is set to Enabled. For best effect of this setting, ensure the Required HELO setting above is also set to Enabled. ### Reject Pipelining If enabled, this setting will reject any incoming email from a mail server that sends SMTP commands where it is not allowed or without waiting for confirmation that the system supports ESMTP commands. This is used by spammers in order to try to speed up delivery of spam email. It is recommended that you set this setting to Enabled. ### Reject Non-FQDN Sender Domain If enabled, this setting will reject any incoming email from a mail server without a FQDN (Fully Qualified Domain Name). Example of a Non-FQDN domain would be: domain.local. It is recommended that you set this setting to Enabled. ### Reject Invalid Sender Domain If enabled, this setting will reject any incoming email from a mail server whose domain as sent in the MAIL FROM command during the SMTP session does not have a DNS A or MX record or has an invalid MX record. It is recommended that you set this setting to Enabled. ### Reject Non-FQDN Recipient If enabled, this setting will reject any incoming email destined for a recipient without a FQDN (Fully Qualified Domain Name) as sent in the RCPT TO command of the SMTP session. It is recommended that you set this setting to Enabled. ### Reject Invalid Recipient Domain If enabled, this setting will reject any incoming email where this system is not the final destination and the email is destined for a recipient domain as specified in the RCPT TO command of the SMTP session that does not have a DNS A or MX Record or an invalid MX record. It is recommended that you set this setting to Enabled. ### Realtime Block/Allow Lists Threshold Score This is the score required for the system to block an incoming mail server’s IP address that has been listed on Real Time Block/Allow List(s). The final outcome of combining the weights of the Real Time Block/Allow Lists must be less than the number specified below in order for the incoming mail server to be allowed to deliver mail to this system. Realtime Block/Allow Lists are configured under **Content Checks --> RBL Configuration**. ### Message Size Limit Enter the maximum message size in MB (Megabytes) to be processed by the system. Please note, the larger the limit the more memory required by the system to process the e-mail. Extremely large message sizes can crash the system. Recommended size is 20 MB or lower. # RBL Configuration A RBL (Real Time Block List) is a mechanism for determining the reputation of a sender IP address by looking up the sender IP through various RBLs that are configured in the system. RBL lookups are performed using DNS. The reputation of an IP is determined by assigning a score to a sender IP address. The higher the score, the lower the reputation. Once a certain score threshold is reached, the sender IP address is not allowed to send email to the system. The RBL threshold score is configured under **Content Checks --> Perimeter Checks --> Realtime Block/Allow Lists Threshold Score**. There are two types of RBLs configured in Hermes SEG; **Block type** and **Allow type**. Block type RBLs are assigned a positive integer for weight and allow type RBLs are assigned a negative integer for weight. Each RBL added to the system is assigned a weight based on the perceived effectiveness of that particular RBL. Each time a sender IP is matched against a RBL, a score is assigned to that IP depending on the weight of that RBL. For example, if a sender IP address matched against a block type RBL with a weight of 3 and also matched against a block type RBL with a weight of 1, but then matched against an allow type RBL with a weight of -1, then the RBL score for that IP address would be 3. So, if the RBL threshold score configured is 4, then that sender IP would be allowed to deliver email since sender IP reputation of 3 is lower than the RBL threshold score of 4. The are many RBLs in existence today varying in degree of effectiveness and reputation. Thus which RBLs you choose to use can make a big difference in the effectiveness of Hermes SEG to identify IPs with poor reputation. The following is a list of RBLs we can recommend: **Block Type RBLs** - zen.spamhaus.org - b.barracudacentral.org --> Requires registration at [http://barracudacentral.org/rbl](http://barracudacentral.org/rbl) - bl.mailspike.net - bl.spamcop.net - dnsbl.sorbs.net - psbl.surriel.com - bl.spameatingmonkey.net **Allow Type RBLs** - list.dnswl.org - wl.mailspike.net ### Add Realtime Block List 1. Under the **Select the type of entry...** ensure **Block List** is selected. 2. Under the **Block List** field, enter the block list host name. 3. Under the **Weight** field enter a **positive integer** to assign as a weight to this RBL (if you do not enter a weight, a weight of 1 will be automatically assigned). 4. Click the **Add** button (**Figure 1**). **Figure 1** [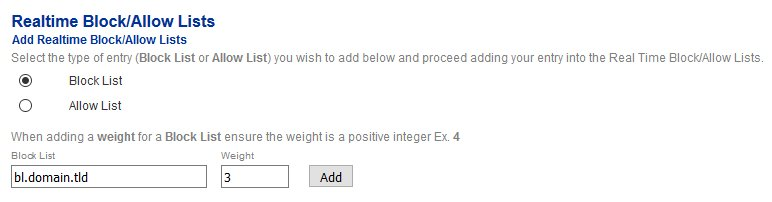](https://docs.deeztek.com/uploads/images/gallery/2021-01/image-1609596069789.png) 5. Each RBL entry you add shows up in the **Realtime Block/Allow List(s) to be added** section (**Figure 2**). **Figure 2** [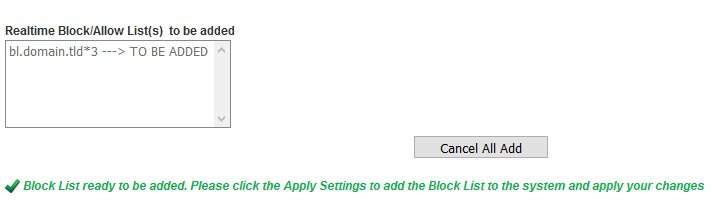](https://docs.deeztek.com/uploads/images/gallery/2021-01/image-1609596086206.png) 6. Continue adding RBL entries as needed. When finished, click on the **Apply Settings** button on the bottom of the page (**Figure 3**). **Figure 3** [](https://docs.deeztek.com/uploads/images/gallery/2021-01/image-1609596099938.png) ### Add Realtime Allow List 1. Under the **Select the type of entry...** ensure **Allow List** is selected. 2. Under the **Allow List** field, enter the allow list host name. 3. Under the **Arguments** field, enter any arguments for the allow list if required. 4. Under the **Weight** field enter a **negative integer** to assign as a weight to this RBL (if you do not enter a weight, a weight of 1 will be automatically assigned which will in effect invalidate the allow list so ensure you enter a negative integer). 5. Click the **Add** button (**Figure 4**). **Figure 4** [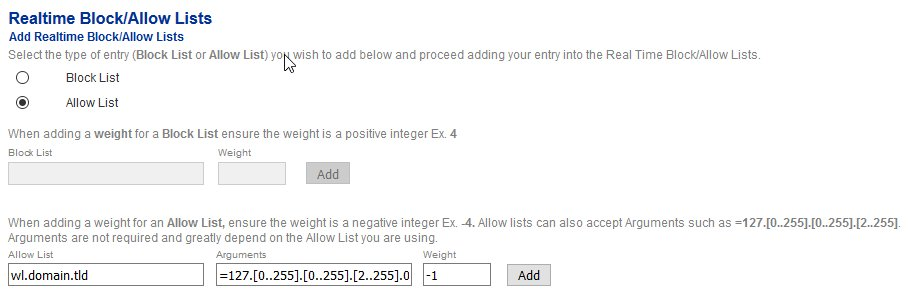](https://docs.deeztek.com/uploads/images/gallery/2021-01/image-1609596108817.png) 6. Each RBL entry you add shows up in the **Realtime Block/Allow List(s) to be added** section (**Figure 5**). **Figure 5** [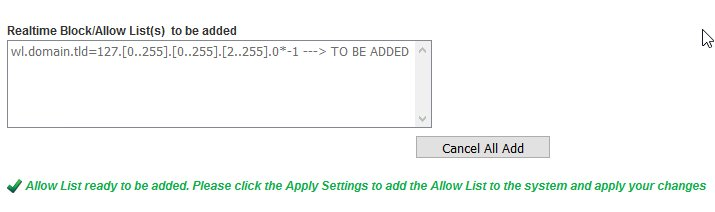](https://docs.deeztek.com/uploads/images/gallery/2021-01/image-1609596115964.png) 7. Continue adding RBL entries as needed. When finished, click on the **Apply Settings** button on the bottom of the page (**Figure 6**). **Figure 6** [](https://docs.deeztek.com/uploads/images/gallery/2021-01/image-1609596124769.png) ### Delete RBL 1. Under the **Delete Realtime Block/Allow Lists** section, select the entry you wish to delete and click the **Delete** button below (**Figure 7**). **Note that only one entry can be selected to be deleted at a time.** **Figure 7** [](https://docs.deeztek.com/uploads/images/gallery/2021-01/image-1609596131706.png) 2. Each entry you select to be deleted shows up in the **Permitted Relay IPs/Network to be deleted** section (**Figure 8**). **Figure 8** [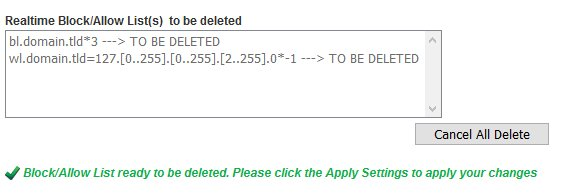](https://docs.deeztek.com/uploads/images/gallery/2021-01/image-1609596138983.png) 3. Continue selecting entries to be deleted as needed. When finished, click on the **Apply Settings** button on the bottom of the page (**Figure 9**). **Figure 9** [](https://docs.deeztek.com/uploads/images/gallery/2021-01/image-1609596145734.png) # Network Block/Allow The IP & Network Override section will allow you to Permit or Deny specific IPs or Networks. The permit or deny action will occur at the perimeter check level. If the action is permit, then the perimeter checks will be effectively bypassed and the email will be allowed to be processed by the rest of the subsystems such as the spam filter and the antivirus engines(s). If the action is deny, then the connection will be immediately dropped by Hermes SEG and no further processing will occur. ### Override an IP Address 1. Ensure **IP Address** is selected. 2. Under the **Note** field, enter a note describing the entry you are adding. 3. Under the **IP** field, enter the IP address of the remote server. 4. Under the **Action** field, select either **Permit** or **Deny**. 5. Click the **Add** button (**Figure 1**). **Figure 1** [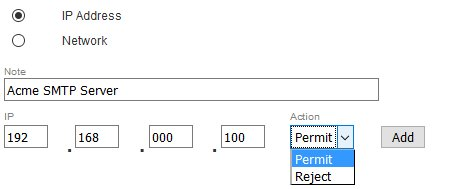](https://docs.deeztek.com/uploads/images/gallery/2021-01/image-1609596199968.png) 6. Each entry you add shows up in the **IP & Network Address(es) to be added** section (**Figure 2**). **Figure 2** [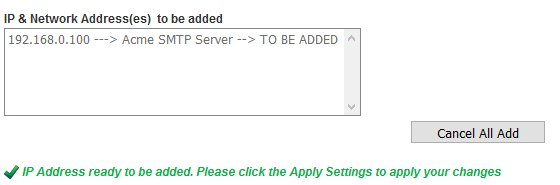](https://docs.deeztek.com/uploads/images/gallery/2021-01/image-1609596207564.png) 7. Continue adding entries as needed. When finished, click on the **Apply Settings** button on the bottom of the page (**Figure 3**). **Figure 3** [](https://docs.deeztek.com/uploads/images/gallery/2021-01/image-1609596214756.png) ### Override a Network Address 1. Ensure **Network** is selected. 2. Under the **Note** field, enter a note describing the entry you are adding. 3. Under the **Network** field, enter the network address you are adding. 4. Under the **Subnet** drop-down field select the subnet mask of the network you are adding. 5. Under the **Action** field, select either **Permit** or **Deny**. 6. Click the **Add** button (**Figure 4**). **Figure 4** [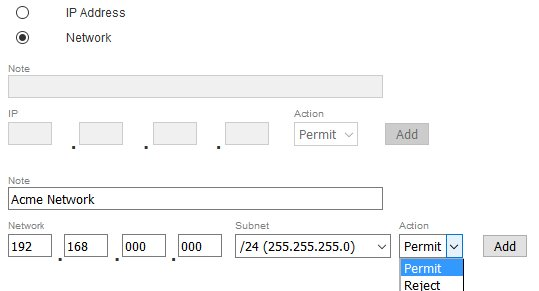](https://docs.deeztek.com/uploads/images/gallery/2021-01/image-1609596222787.png) 6. Each entry you add shows up in the **IP & Network Address(es) to be added** section (**Figure 5**). **Figure 5** [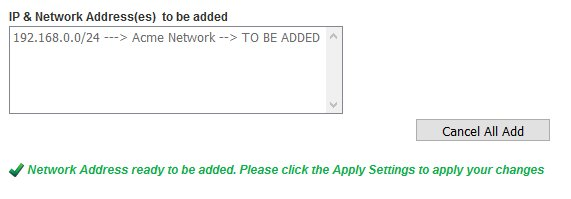](https://docs.deeztek.com/uploads/images/gallery/2021-01/image-1609596230368.png) 7. Continue adding entries as needed. When finished, click on the **Apply Settings** button on the bottom of the page (**Figure 6**). **Figure 6** [](https://docs.deeztek.com/uploads/images/gallery/2021-01/image-1609596237660.png) ### Delete an Override 1. Under the **Delete IP & Network Override** section, select the entry you wish to delete and click the **Delete** button below (**Figure 7**). **Note that only one entry can be selected to be deleted at a time.** **Figure 7** [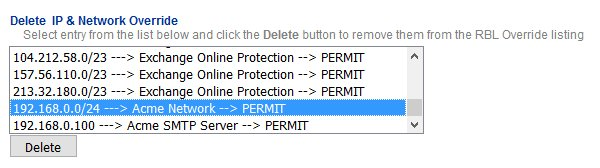](https://docs.deeztek.com/uploads/images/gallery/2021-01/image-1609596244226.png) 2. Each entry you select to be deleted shows up in the **IP & Network Address(es) to be deleted** section (**Figure 8**). **Figure 8** [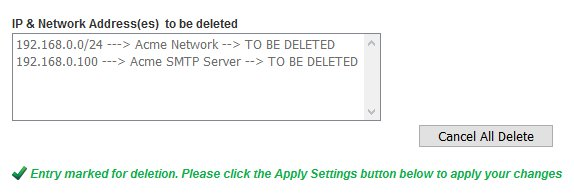](https://docs.deeztek.com/uploads/images/gallery/2021-01/image-1609596250627.png) 3. Continue selecting entries to be deleted as needed. When finished, click on the **Apply Settings** button on the bottom of the page (**Figure 9**). **Figure 9** [](https://docs.deeztek.com/uploads/images/gallery/2021-01/image-1609596257693.png) # Sender to Recipient Block/Allow List The Sender Checks Bypass permits you to either Block or Allow sender email addresses or sender domains to specific **Internal Recipients** or entire **Relay Domains**. It's important to note that the Sender Checks occur **AFTER** the perimeter checks. For example, if you have setup a sender to be allowed but email is still not coming through, it's possible that the sender's IP address is being blocked by the Hermes SEG perimeter checks. When setting up a sender email address or domain to be allowed or blocked for an entire Relay Domain within Hermes SEG, the system will automatically create separate mappings for every Internal Recipient for that Relay Domain at the time of setup. However, if additional Internal Recipients are added after the the bypass was set, those Internal Recipients will not get the previously set bypasses. In those cases, you will have to manually add those bypasses for the new Internal Recipients. ### Add Email Address Sender Check Bypass to Internal Recipient 1. Under the **Sender Domain or Email Address ...** field, enter a sender email address. 2. Under the **Select Internal recipient from the ....** drop-down field, select one of the existing **Internal Recipients** in the system. 3. Under the **Select Action to take below** field, select either a **Block** or **Allow** action. 4. Click the **Add** button (**Figure 1**) **Figure 1** [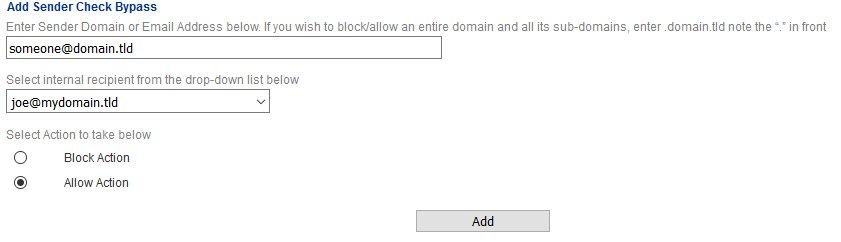](https://docs.deeztek.com/uploads/images/gallery/2021-01/image-1609596314962.png) 5. Each entry you add shows up in the **Block/Allow Sender(s) to be added** section (**Figure 2**). **Figure 2** [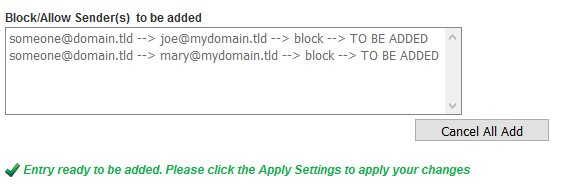](https://docs.deeztek.com/uploads/images/gallery/2021-01/image-1609596323139.png) 6. Continue adding entries as needed. When finished, click on the **Apply Settings** button on the bottom of the page (**Figure 3**). **Figure 3** [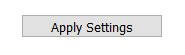](https://docs.deeztek.com/uploads/images/gallery/2021-01/image-1609596330611.png) ### Add Email Address Sender Check Bypass to Relay Domain 1. Under the **Sender Domain or Email Address ...** field, enter a sender email address. 2. Under the **Select Internal recipient from the ....** drop-down field, select one of the existing **Relay Domains** in the system. Relay Domains are annotated by a (**@**) at symbol in front of them. For example, if you have a Relay Domain of **mydomain.tld** then it will appear as **@mydomain.tld** in the drop-down field. 3. Under the **Select Action to take below** field, select either a **Block** or **Allow** action. 4. Click the **Add** button (**Figure 4**) **Figure 4** [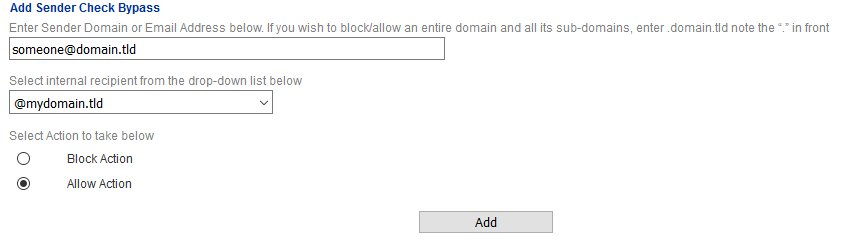](https://docs.deeztek.com/uploads/images/gallery/2021-01/image-1609596344487.png) 5. Since we are mapping an entire **Relay Domain** to a sender, the system will automatically populate the **Block/Allow Sender(s) to be added** section with all the **Internal Recipients** for that domain (**Figure 5**). **Figure 5** [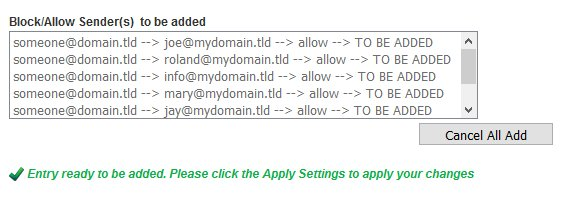](https://docs.deeztek.com/uploads/images/gallery/2021-01/image-1609596351169.png) 6. Continue adding entries as needed. When finished, click on the **Apply Settings** button on the bottom of the page (**Figure 6**). **Figure 6** [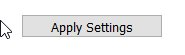](https://docs.deeztek.com/uploads/images/gallery/2021-01/image-1609596359041.png) ### Add Domain Sender Check Bypass to Internal Recipient 1. Under the **Sender Domain or Email Address ...** field, enter a sender domain. If you want to include all the all the sub-domains under a root domain then you would simply enter a (**.**) dot in front of the domain. For example, if you want to include all the sub-domains for **domain.tld**, you would simply enter **.domain.tld** (note the **.** in front of the domain). 2. Under the **Select Internal recipient from the ....** drop-down field, select one of the existing **Internal Recipients** in the system. 3. Under the **Select Action to take below** field, select either a **Block** or **Allow** action. 4. Click the **Add** button (**Figure 7**) **Figure 7** [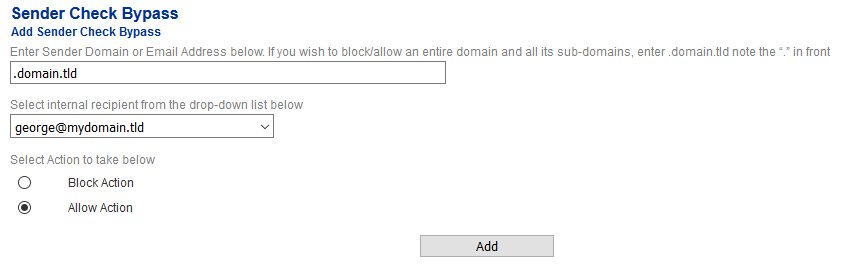](https://docs.deeztek.com/uploads/images/gallery/2021-01/image-1609596366490.png) 5. Each entry you add shows up in the **Block/Allow Sender(s) to be added** section (**Figure 8**). **Figure 8** [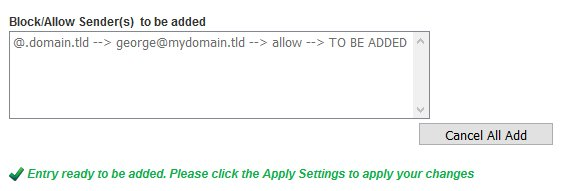](https://docs.deeztek.com/uploads/images/gallery/2021-01/image-1609596373945.png) 6. Continue adding entries as needed. When finished, click on the **Apply Settings** button on the bottom of the page (**Figure 9**). **Figure 9** [](https://docs.deeztek.com/uploads/images/gallery/2021-01/image-1609596380955.png) ### Add Domain Sender Check Bypass to Relay Domain 1. Under the **Sender Domain or Email Address ...** field, enter a sender domain. If you want to include all the all the sub-domains under a root domain then you would simply enter a (**.**) dot in front of the domain. For example, if you want to include all the sub-domains for **domain.tld**, you would simply enter **.domain.tld** (note the **.** in front of the domain). 2. Under the **Select Internal recipient from the ....** drop-down field, select one of the existing **Relay Domains** in the system. Relay Domains are annotated by a (**@**) at symbol in front of them. For example, if you have a Relay Domain of **mydomain.tld** then it will appear as **@mydomain.tld** in the drop-down field. 3. Under the **Select Action to take below** field, select either a **Block** or **Allow** action. 4. Click the **Add** button (**Figure 10**) **Figure 10** [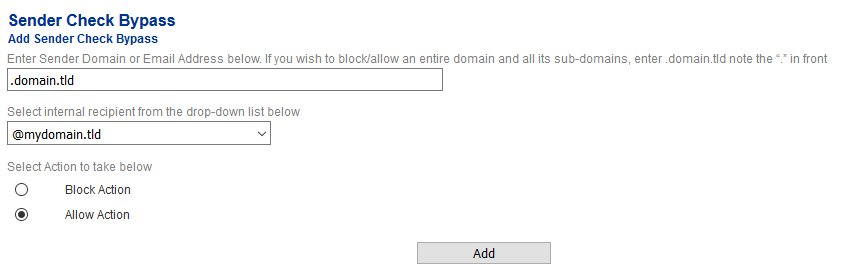](https://docs.deeztek.com/uploads/images/gallery/2021-01/image-1609596388880.png) 5. Since we are mapping an entire **Relay Domain** to a sender, the system will automatically populate the **Block/Allow Sender(s) to be added** section with all the **Internal Recipients** for that domain (**Figure 11**). **Figure 11** [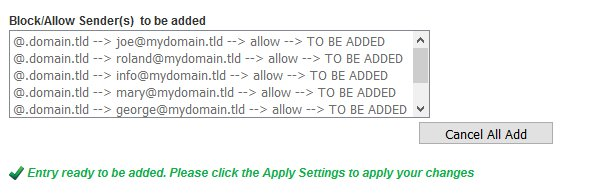](https://docs.deeztek.com/uploads/images/gallery/2021-01/image-1609596395174.png) 6. Continue adding entries as needed. When finished, click on the **Apply Settings** button on the bottom of the page (**Figure 12**). **Figure 12** [](https://docs.deeztek.com/uploads/images/gallery/2021-01/image-1609596405604.png) ### Filter Sender Checks Bypass Entries Setting a filter will assist you in narrowing down Sender Check Bypass Entries by email address or domain in order to manage them easily. 1. In the **Filter By** field, enter a complete or partial email address or domain and click the **Set Filter** button. If any matches are found, the **Delete Sender Check Bypass** listing will be populated with **only the entries matching the filter you set** (**Figure 13**). **Figure 13** [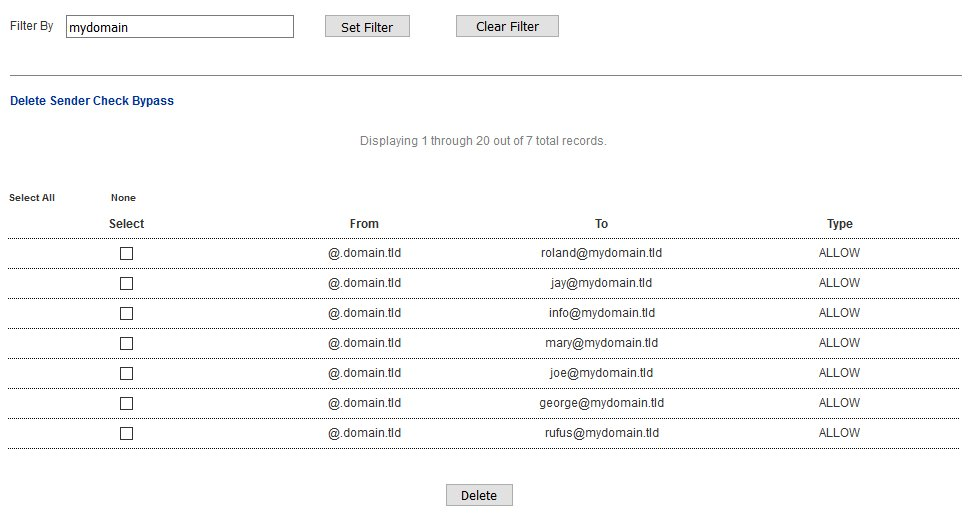](https://docs.deeztek.com/uploads/images/gallery/2021-01/image-1609596414068.png) 2. You can clear a filter you set by clicking the **Clear Filter** button at any time (**Figure 13**). ### Delete Sender Checks Bypass Entries 1. Place a checkmark on the checkbox under the **Select** column of any entries you wish to delete. You can select as many entries as needed. 2. Click the **Delete** button on the bottom (**Figure 14**). **Figure 14** [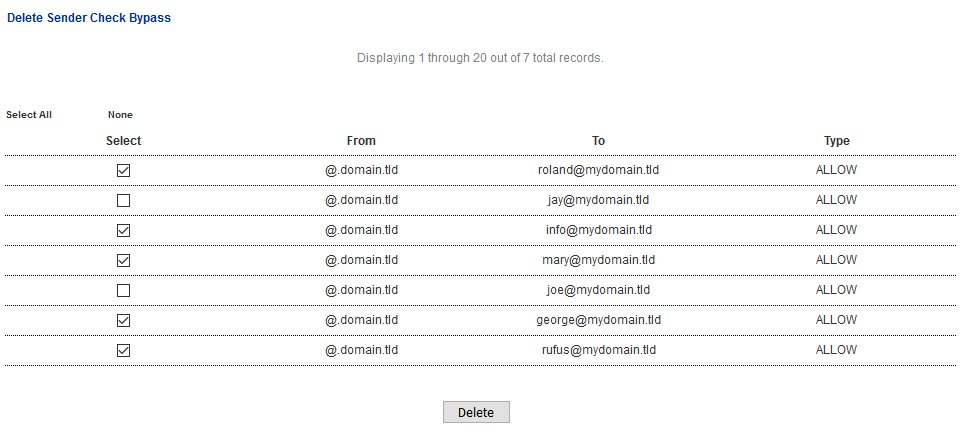](https://docs.deeztek.com/uploads/images/gallery/2021-01/image-1609596425510.png) 3. The entries to be deleted will show up under the **Block/Allow Sender(s) to be deleted** section (**Figure 15**). **Figure 15** [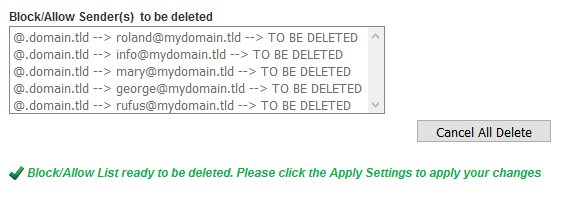](https://docs.deeztek.com/uploads/images/gallery/2021-01/image-1609596433131.png) 4. Click on the **Apply Settings** button to delete the entries from the system (**Figure 16**). **Figure 16** [](https://docs.deeztek.com/uploads/images/gallery/2021-01/image-1609596445206.png) 5. If you make a mistake, click on the **Cancel All Delete** button to cancel (**Figure 17**). **Figure 17** [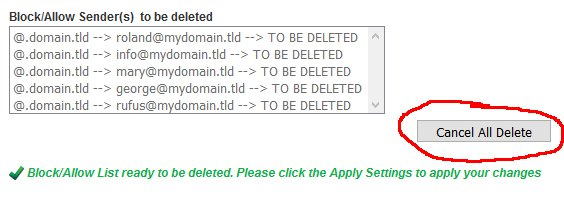](https://docs.deeztek.com/uploads/images/gallery/2021-01/image-1609596452042.png) # Global Sender Block/Allow ListThis page is under construction.
# SPF Settings Sender Policy Framework (**SPF**) is a simple [email](https://infogalactic.com/info/Email "Email")-validation system designed to detect [email spoofing](https://infogalactic.com/info/Email_spoofing "Email spoofing") by providing a mechanism to allow receiving [mail exchangers](https://infogalactic.com/info/Mail_exchanger "Mail exchanger") to check that incoming mail from a domain comes from a host authorized by that domain's administrators.[\[1\]](https://infogalactic.com/info/Sender_Policy_Framework#cite_note-1) The list of authorized sending hosts for a domain is published in the [Domain Name System](https://infogalactic.com/info/Domain_Name_System "Domain Name System") (DNS) records for that domain in the form of a specially formatted [TXT record](https://infogalactic.com/info/List_of_DNS_record_types "List of DNS record types"). [Email spam](https://infogalactic.com/info/Email_spam "Email spam") and [phishing](https://infogalactic.com/info/Phishing "Phishing") often use forged "from" addresses, so publishing and checking SPF records can be considered [anti-spam techniques](https://infogalactic.com/info/Anti-spam_techniques "Anti-spam techniques"). ([See original source](https://infogalactic.com/info/Sender_Policy_Framework)). #### Set SPF Settings - Set **SPF Enabled** field to **YES** or **NO** in order to enable or disable SPF.Disabling SPF will also automatically disable DKIM if enabled.
- Set the **Logging Level** field to a logging level of your choice. By default, it's set to **Level 1**. - **Level 1** logs no debugging messages, just basic policy results and errors generated through the policy server. - **Level 2** adds a log message if no client address (IP address from which the connection was made), Mail From address, or HELO/EHLO name is received by the policy server, and logs SPF results for each Mail From and HELO check. - **Level 3** generates a log message each time the policy server starts and each time it exits, as well as logging a copy of the exact header returned to Postfix to be prepended into the message. Each time the policy server starts. Level 3 also logs the configuration information used by the policy server. - **Level 4** logs the complete data set received by Postfix via the policy interface and when the end of the entry is read. - **Level 5** is used to debug config file processing and, for this purpose, can only be set in code and not via the config file. It also provides additional internal status details generally of interest only to developers. - **Level 0** server logs errors only. - **Disabled** logs nothing, not even error messages. **This setting is NOT recommended**. - Set the Test Mode to Enabled or Disabled. Setting it to Enabled Hermes SEG will NOT block any e-mail and simply generate logs. - Set the **HELO Check Rejection Policy** field to a setting of your choice. By default, it's set to **Reject HELO Fail**. - **Reject HELO Fail** rejects only on HELO Fail. HELO/EHLO is known first in the SMTP dialogue and there is no practical reason to waste resources on Mail From checks if the HELO check will already cause the message to be rejected. This should not cause interoperability problems when used for HELO. - **Reject All** rejects if the SPF result is **Fail, Softfail, Neutral, PermError**. Unlike the **Mail From Checking Policy**, there are no standard e-mail use cases where a HELO check should not Pass if there is an SPF record for the HELO name (transparent forwarding, for example, is not an issue). HELO/EHLO is known first in the SMTP dialogue and there is no practical reason to waste resources on Mail From checks if the HELO check will already cause the message to be rejected. This is not consistent with the RFC 7208 requirement to treat none and neutral the same, but should not cause interoperability problems when used for HELO. - **Reject Softfail** rejects on HELO **Softfail** or **Fail**. HELO/EHLO is known first in the SMTP dialogue and there is no practical reason to waste resources on Mail From checks if the HELO check will already cause the message to be rejected. This should not cause interoperability problems when used for HELO. - **Reject Null** - rejects HELO Fail for Null sender (SPF Classic). This is the approach used by the pre-RFC 4408 reference implementation and many of the pre- RFC specifications. Use of at least this option (SPF\_Not\_Pass or Fail) are preferred) is highly recommended. - **Append Only** does NOT reject on HELO but instead appends a header only which the Spam Filter should detect and assign a Spam Score to it. - **Disable Check** does not check HELO. This is only recommended if you are calling the policy server twice (once for HELO checks and once for Mail From) with two different configuration files. This approach is useful to get both the HELO and Mail From headers prepended to a message. **This setting is NOT recommended and should only be used by VERY experienced users with custom configurations.** - Set the **Mail From Check Rejection Policy** to a setting of your choice. By default it's set to **Reject Mail from Fail**. - **Reject Mail from Fail** rejects on Mail From Fail. - **Reject All** rejects if result not Pass/None/Tempfail. This option is not RFC 7208 compliant since the mail with an SPF Neutral result is treated differently than mail with no SPF record and Softfail results are not supposed to cause mail rejection. Global use of this option is not recommended. Use per-domain if needed (per-domain usage described below). - **Reject Softfail** rejects on Mail From Softfail or Fail. **Use of this option is NOT recommended**. - **Append Only** does NOT reject but instead appends a header only which the Spam Filter should detect and assign a Spam Score to it. - **Disable** never checks Mail From/Return Path. This is only recommended if you are calling the policy server twice (once for HELO checks and once for Mail From) with two different configuration files. This approach is useful to get both the HELO and Mail From headers prepended to a message. It could also be used to do HELO checking only (because HELO checking has a lower false positive risk than Mail From checking), but this approach may not be fully RFC 7208 compliant since the Mail From identity is mandatory if HELO checking does not reach a definitive result. **This setting is NOT recommended and should only be used by VERY experienced users with custom configurations.** - Set the **Permanent Error Policy** to a setting of your choice. By default it's set to **False**. - **False** treats PermError the same as no SPF record at all. This is consistet with the pre-RFC usage (the pre-RFC name for this error was "Unknown"). - **True** rejects the message if the SPF result (for HELO or Mail From) is PermError. This has a higher short-term false positive risk, but does result in senders getting feedback that they have a problem with their SPF record. - Set the **Temporary Error Policy** to a setting of your choice. By default it's set to **False**. - **False** treats TempError the same as no SPF record at all. This is the default to minimize false positive risk. - **True** defers the message if the SPF result (for HELO or Mail From) is TempError. This is the traditional usage and has proven useful in reducing acceptance of unwanted messages. Sometimes spam senders do not retry. Sometimes by the time a message is retried the sending IP has made it onto a DNS RBL and can then be rejected. This is not the default because it is possible for some DNS errors that are classified as "Temporary" per RFC 7208 to be permanent in the sense that they require operator intervention to correct. (**Figure 1**). **Figure 1** [](https://docs.deeztek.com/uploads/images/gallery/2022-06/image-1656440337894.png) #### Add SPF Whitelist Entries Adding entries in the SPF Whitelist will allow Hermes SEG to skip SPF checks for those entries. SPF Whitelist entries can be an IP/Network Address, HELO/EHLO Host Name, Domain Name or PTR Domain. Click the **Add SPF Whitelist Entries** button and in the resultant menu, select the **Entry Type**, enter the entries the **Trusted Host(s)** field (You can add multiple entries each in its own line), enter an optional note in the **Note** field and click the **Submit** button (**Figure** **2).** **Figure 2** [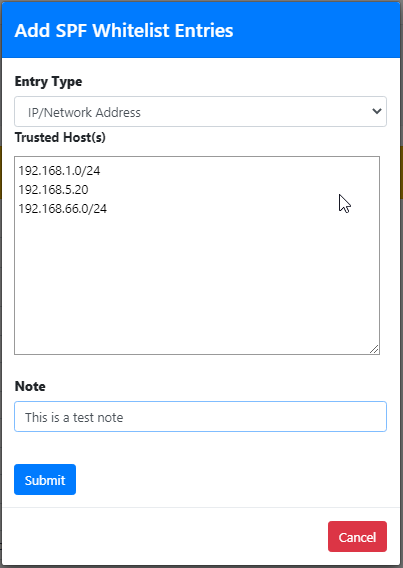](https://docs.deeztek.com/uploads/images/gallery/2022-06/image-1656440690778.png) #### Delete SPF Whitelist Entries Select the entries you wish to delete by checking their checkboxes and click the **Delete** button on top of the page (**Figure 3**). **Figure 3** [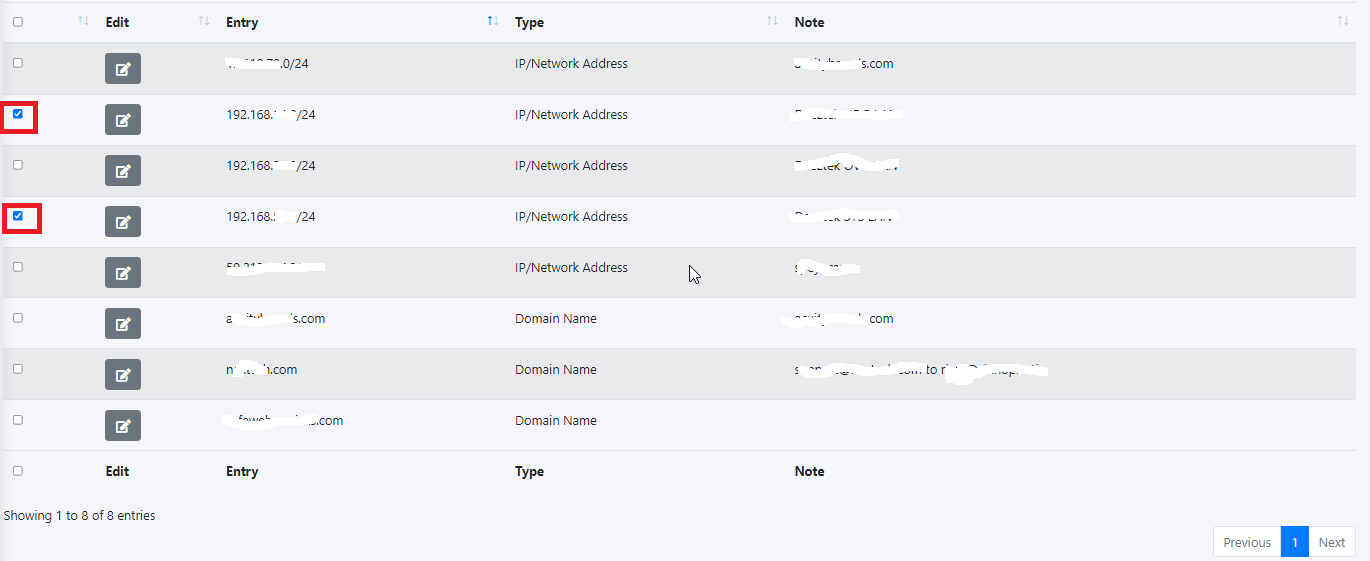](https://docs.deeztek.com/uploads/images/gallery/2022-06/image-1656440974193.png) #### Edit SPF Whitelist Entry Click the [ ](https://docs.deeztek.com/uploads/images/gallery/2022-06/image-1656441062730.png)icon next to the entry you wish to edit. In the resultant window, make changes as necessary and click the **Submit** button (**Figure 4**). **Figure 4** [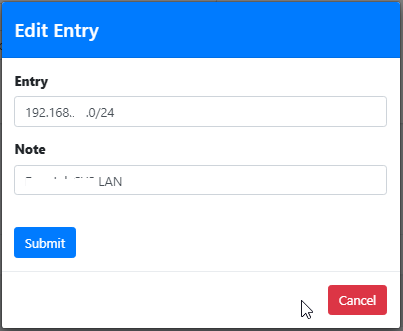](https://docs.deeztek.com/uploads/images/gallery/2022-06/image-1656441187722.png) # DKIM Settings DomainKeys Identified Mail (DKIM) is a protocol that allows verifiable email transmission though the use of cryptographic authentication. This is accomplished through the use of private and public keys. The private key is stored on the sending email server so that hash strings can be generated out of email message using that private key and a public key which is stored in DNS so that recipients can verify those hashes using that public key. #### DKIM Enabled Setting this setting to **YES** will enable DKIM verification of all incoming email and if **DKIM Sign** is enabled for any domains, it will also enable the generation of DKIM keys for all outgoing email for those domains. If DKIM Sign is not enabled for any domains it will ONLY enable DKIM verification of all incoming email.Disabling DKIM will also automatically disable DKIM if enabled.
#### Body Canonicalization The canonicalization method for the message body used when DKIM signing messages. The recommended setting is **Relaxed**. #### Headers Canonicalization The canonicalization method for the message headers used when DKIM signing messages. The recommended setting is **Relaxed**. #### Default Message Action This is the default action to take when an incoming message DKIM signature fails to validate. The recommended setting is **Accept**. This action is processed before all the other actions below so it's best to be set to Accept and then set any overrides below. #### Bad Signature Action This is the default action to take when an incoming message DKIM signature fails to validate. The recommended setting is **Accept**. #### DNS Error Action This is the default action to take when a DNS error occurs during the DKIM validation of an incoming message . The recommended setting is **Temp Fail**. #### Internal Error Action This is the default action to take when a system internal occurs during the DKIM validation of an incoming message . The recommended setting is **Quarantine**. #### No Signature Action This is the default action to take when an incoming message has no DKIM signature . The recommended setting is **Accept**. #### Security Concern Action This is the default action to take when an incoming message contains properties that maybe of a security concern . The recommended setting is **Quarantine**. #### Signature Algorithm This settings sets the DKIM signature algorithm used when signing outgoing DKIM messages . The recommended setting is **RSA-SHA-256**. (**Figure 1**). **Figure 1** [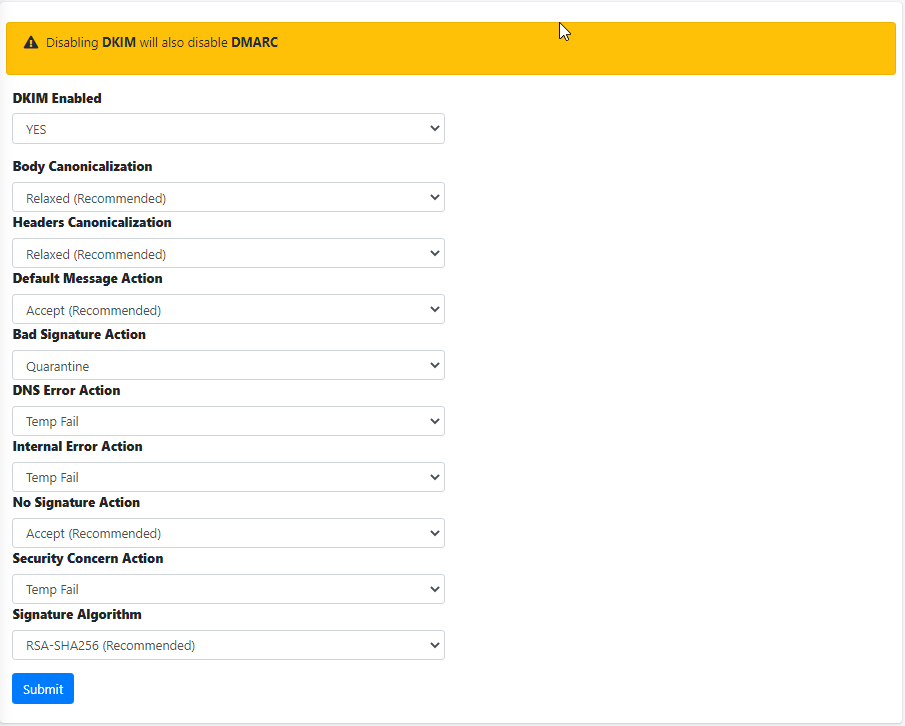](https://docs.deeztek.com/uploads/images/gallery/2022-06/image-1656442045156.png) #### Add Whitelisted Domain(s) Adding entries in the Whitelisted Domain(s) will allow Hermes SEG to skip DKIM checks for those entries. Click the **Add Whitelisted Domain(s)** button and in the resultant menu enter the entries the **Domain(s)** field (You can add multiple entries each in its own line), enter an optional note in the **Note** field and click the **Submit** button (**Figure** **2).** **Figure 2** [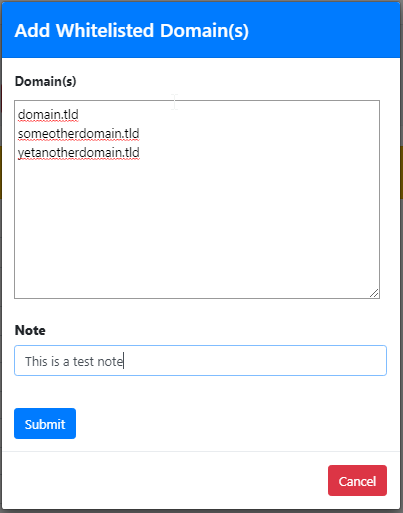](https://docs.deeztek.com/uploads/images/gallery/2022-06/image-1656442323170.png) #### Add Trusted Host(s) Adding entries in Trusted Host(s) enables those hosts to send DKIM signed e-mail through Hermes SEG. Trusted Host(s) can be IPs, Network Address(es) and FQDNs. Click the **Add Trusted Host(s)** button and in the resultant menu enter the entries the **Trusted Host(s)** field (You can add multiple entries each in its own line), enter an optional note in the **Note** field and click the **Submit** button (**Figure** **3).** **Figure 3** [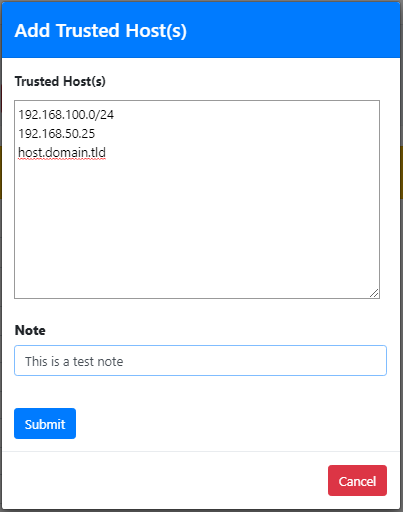](https://docs.deeztek.com/uploads/images/gallery/2022-06/image-1656442533239.png) #### Delete Whitelisted Domain(s) or Trusted Host(s) Entries Select the entries you wish to delete by checking their checkboxes and click the **Delete** button on top of the page (**Figure 4**). **Figure 4** [](https://docs.deeztek.com/uploads/images/gallery/2022-06/image-1656442742794.png) #### Edit Whitelisted Domain or Trusted Host Entry Click the [ ](https://docs.deeztek.com/uploads/images/gallery/2022-06/image-1656441062730.png)icon next to the entry you wish to edit. In the resultant window, make changes as necessary and click the **Submit** button (**Figure 5**). **Figure 5** [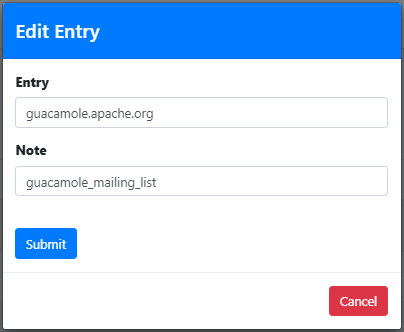](https://docs.deeztek.com/uploads/images/gallery/2022-06/image-1656442860519.png)**NOTE: This section requires any saved changes to be applied by clicking the Apply Settings button on the bottom of the page.**
### User Portal Address This is the address for the users to reach the User Self-Service Portal. This is the address Hermes SEG uses to generate the links in the Daily Quarantine Reports. It should be set to a URL that can be resolved from the Internet and the URL must end with /users/. Example: **https://hermes.domain.tld/users/** ### Spam Filter Uses Distributed Checksum Clearninghouse (DCC) A Distributed Checksum Clearninghouse is a method of sharing checksums of incoming email to a Clearinghouse. The clearinghouse responds with the number of times those checksums have been received by other systems. If the checksums have appeared multiple times, then it's a good chance the incoming email is bulk email. It's recommended that this setting is set to **Enabled**. ### Spam Filter Uses Vipul's Razor V2 Before enabling this setting, you must first have initialized Vipul's Razor by going to **Content Checks --> Initialize Vipul's Razor**. Vipul's Razor is a distributed, collaborative, spam detection and filtering network. Through user contribution, Razor establishes a distributed and constantly updating catalogue of spam in propagation that is consulted by email clients to filter out known spam. Detection is done with statistical and randomized signatures that efficiently spot mutating spam content. User input is validated through reputation assignments based on consensus on report and revoke assertions which in turn is used for computing confidence values associated with individual signatures. It's recommended that this setting is set to **Enabled**. ### Spam Filter Uses Pyzor Before enabling this setting, you must first have initialized Vipul's Razor by going to **Content Checks --> Initialize Pyzor**. Pyzor is a collaborative, networked system to detect and block spam using digests of messages. It's recommended that this setting is set to **Enabled**. ### Spam Message Modified Subject String In Hermes SEG there are two types of Spam emails. Spam emails that get tagged as Spam but still passed to the user mailbox and Spam emails that the system quarantines and does NOT pass to the user mailbox. This is the string that Hermes SEG will append to the subject of an email that it has determined to be Spam and pass to the user mailbox. This setting has no effect on Spam emails that the Hermes SEG quarantines. The default setting is **\[SUSPECTED SPAM\]**. Adjust as necessary to your requiments. ### Virus Messages Action to take This setting configures which action Hermes SEG should take with Virus Emails. The Quarantine Only action will simply quarantine the email and not pass to the user mailbox. The Quarantine & Send DSN to Sender will quarantine the email and send notice back to the sender that the messages was blocked. Normally, it's recommended to NOT send a notice back to the sender that the message was blocked in order to reduce backscatter. It's recommended that this setting is set to **Quarantine Only**. ### Banned File Message Action to take This setting configures which action Hermes SEG should take with emails with banned attachments. The Quarantine Only action will simply quarantine the email and not pass to the user mailbox. The Quarantine & Send DSN to Sender will quarantine the email and send notice back to the sender that the messages was blocked. Normally, it's recommended to NOT send a notice back to the sender that the message was blocked in order to reduce backscatter. It's recommended that this setting is set to **Quarantine Only**. ### Spam Messages Action to take This setting configures which action Hermes SEG should take with Spam emails that the system quarantines. The Quarantine Only action will simply quarantine the email and not pass to the user mailbox. The Quarantine & Send DSN to Sender will quarantine the email and send notice back to the sender that the messages was blocked. Normally, it's recommended to NOT send a notice back to the sender that the message was blocked in order to reduce backscatter. It's recommended that this setting is set to **Quarantine Only**. ### Bad-Header Messages Action to take This setting configures which action Hermes SEG should take with emails with bad-headers that the system quarantines. The Quarantine Only action will simply quarantine the email and not pass to the user mailbox. The Quarantine & Send DSN to Sender will quarantine the email and send notice back to the sender that the messages was blocked. Normally, it's recommended to NOT send a notice back to the sender that the message was blocked in order to reduce backscatter. It's recommended that this setting is set to **Quarantine Only**. ### Bayes Database The Bayes Database tries to identify Spam by looking at words or short character sequences that are commonly found in Spam or Non-Spam email. This settings configures Hermes SEG whether to use or not use the Bayes Database to determine Spam email. Please note, that if this setting was previouly set to Enabled and you created **Custom Antispam Filter Tests**, settings this setting to **Disabled** will clear out all the Custom Antispam Filter Tests you previously set. It's recommended that this setting is set to **Enabled**. ### Bayes Database Auto Learn **Note: This setting will have no effect unless the Bayes Database setting above is set to Enabled.** This feature will configure Hermes SEG to automatically train the Bayes Database with Spam or Non-Spam Emails. In the course of scanning an incoming email, the system will assign a Spam probability score to that email. The higher the score, the higher the probability the email is Spam. This setting will configure the system to automatically train the Bayes Database with the incoming email being Spam or Non-Spam based on the **Bayes Database Auto Learn Spam Threshold Score** and the **Bayes Database Auto Learn Non-Spam Threshold Score** values below. Normally, we do NOT recommend enabling this setting. Allowing the system to automatically train the Bayes Database can exaggerate problems over time, thus we always recommend that the Bayes Database should ONLY be trained by humans under **Content Checks --> Message History & Archive**. It's recommended that this setting is set to **Disabled**. ### Bayes Database Auto Learn Spam Threshold Score **Note: This setting will have no effect unless the Bayes Database Auto Learn setting above is set to Enabled.** This setting configures Hermes SEG to automatically train the Bayes Database with incoming emails that have a score of equal or greater than the value set below as Spam. The default value of this setting is set to **15**. ### Bayes Database Auto Learn Non-Spam Threshold Score **Note: This setting will have no effect unless the Bayes Database Auto Learn setting above is set to Enabled.** This setting configures Hermes SEG to automatically train the Bayes Database with incoming emails that have a score of equal or less than the value set below as Non-Spam. The default value of this setting is set to **-5**. # Custom Antispam Filter Tests This page allows you to customize Spam filter tests scores to fit your needs. If you have problems with certain email getting tagged as Spam or Non-Spam because of a particular test not scoring properly and training the Bayes Database does not yield the results you need, customizing the Spam filter tests scores may be the best option. The tests the Spam filter performs can be found in the headers of incoming emails. For example, take a look at the following headers of an obvious Spam email: ``` X-Spam-Status: Yes, score=14.528 tag=-999 tag2=3.6 kill=12 tests=[BAYES_60=1.5, DCC_CHECK=1.1, DIGEST_MULTIPLE=0.293, HTML_MESSAGE=0.001, RAZOR2_CF_RANGE_51_100=0.5, RAZOR2_CF_RANGE_E8_51_100=1.886, RAZOR2_CHECK=0.922, RCVD_IN_SBL_CSS=3.335, RDNS_NONE=0.793, SPF_HELO_PASS=-0.001, SPF_PASS=-0.001, URIBL_BLACK=1.7, URIBL_DBL_SPAM=2.5] autolearn=disabled ``` As you can see the following tests with their corresponding scores were performed: - BAYES\_60=1.5 - DCC\_CHECK=1.1 - DIGEST\_MULTIPLE=0.293 - HTML\_MESSAGE=0.001 - RAZOR2\_CF\_RANGE\_51\_100=0.5 - RAZOR2\_CF\_RANGE\_E8\_51\_100=1.886 - RAZOR2\_CHECK=0.922 - RCVD\_IN\_SBL\_CSS=3.335 - RDNS\_NONE=0.793 - SPF\_HELO\_PASS=-0.001 - SPF\_PASS=-0.001 - URIBL\_BLACK=1.7 - URIBL\_DBL\_SPAM=2.5 You can take any of those tests and configure the system to either completely disable the test (by setting the value to 0) or adjust the score to your needs. **Note: Customizing Spam Filter Tests can have very bad consequences for your Spam detection, thus it should ONLY be performed by qualified individuals that have a clear understanding of those consequences.** ### Add Custom Spam Filter Test 1. Under the **Add Custom Spam Filter Test** section, under the **Parameter** field, enter the test you wish to customize without the = or the score part. 2. Under the **Value** field, enter the score you wish to assign to that test (Setting the value to 0 will effectively completely disable the test). 3. Under the **Description** field, enter a short description for that test. 4. Click the **Add** button (**Figure 1**). **Figure 1** [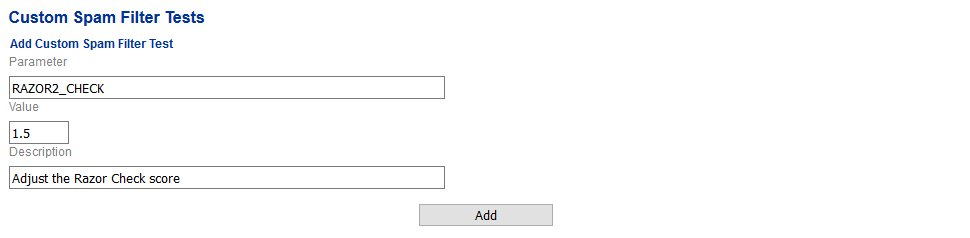](https://docs.deeztek.com/uploads/images/gallery/2021-01/image-1609598189566.png) 5. As you add entries, they will show up under the **Edit/Delete Custom Spam Filter Test(s)** section (**Figure 2**). **Figure 2** [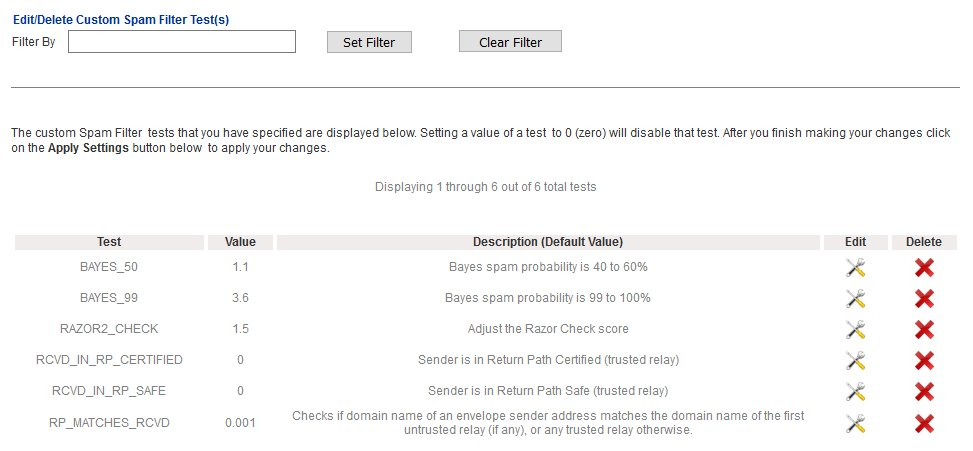](https://docs.deeztek.com/uploads/images/gallery/2021-01/image-1609598196646.png) 6. Continue adding entries as needed. When finished, click on the **Apply Settings** button on the bottom of the page for your changes to take effect (**Figure 3**). **Figure 3** [](https://docs.deeztek.com/uploads/images/gallery/2021-01/image-1609598205243.png) ### Edit Custom Spam Filter Test 1. Under the **Edit/Delete Custom Spam Filter Test(s)** section, click on the[](https://docs.deeztek.com/uploads/images/gallery/2021-01/image-1609598213330.png)icon of the entry you wish to edit. 2. On the Edit Custom Spam Filter Test page, adjust the Parameter, the Value or the Description as needed and click the **Edit** button (**Figure 4**). **Figure 4** [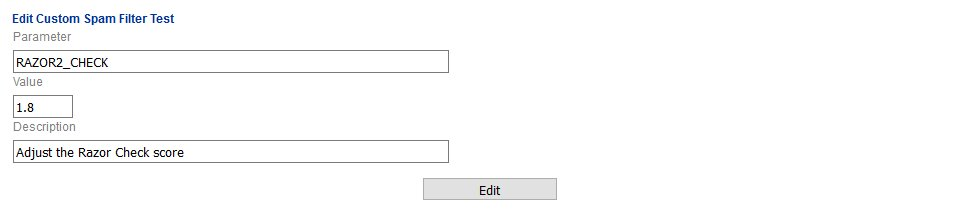](https://docs.deeztek.com/uploads/images/gallery/2021-01/image-1609598227327.png) 3. You will be automatically returned to the **Custom Spam Filter Tests** page. 4. Click on the **Apply Settings** button on the bottom of the page for your changes to take effect (**Figure 5**). **Figure 5** [](https://docs.deeztek.com/uploads/images/gallery/2021-01/image-1609598234558.png) ### Delete Custom Spam Filter Test 1. Under the **Edit/Delete Custom Spam Filter Test(s)** section, click on the[](https://docs.deeztek.com/uploads/images/gallery/2021-01/image-1609598241383.png)icon of the entry you wish to edit. 2. On the delete confirmation page, click on the **Yes** button to delete the entry or press the **No** button to cancel (**Figure 6**). **Figure 6** [](https://docs.deeztek.com/uploads/images/gallery/2021-01/image-1609598254033.png) 3. You will be automatically returned to the **Custom Spam Filter Tests** page. 4. Click on the **Apply Settings** button on the bottom of the page for your changes to take effect (**Figure 7**). **Figure 7** [](https://docs.deeztek.com/uploads/images/gallery/2021-01/image-1609598259537.png) # Initialize Pyzor Pyzor is a collaborative, networked system to detect and block spam using digests of messages.Pyzor must be initialized before Hermes SEG can utilize it. Initialization of Pyzor should only have to be done once per system. Click on the **Initialize Pyzor** button to initialize (**Figure 1**). **Figure 1** [](https://docs.deeztek.com/uploads/images/gallery/2021-01/image-1609598297082.png) # Initialize Vipul's Razor Vipul's Razor is a distributed, collaborative, spam detection and filtering network. Vipul's Razor must be initialized before Hermes SEG can utilize it. Initialization of Vipul's Razor should only have to be done once per system. Clicking the **Initialize Razor** button will create a new Razor configuration and register your server using an automaticaly assigned username/password.**Before attempting to initialize Vipul's Razor, ensure the Hermes SEG has outbound Internet access. Initialization can take a few minutes to complete, so please be patient.**
Click on the **Initialize Razor** button to initialize (**Figure 1**). **Figure 1** [](https://docs.deeztek.com/uploads/images/gallery/2021-01/image-1609598340332.png) # Clear Bayes Database Occasionally, the Bayes Database can become corrupted or poisoned due to bad database training or other factors. Please press the **Clear Database** button to clear your database in order to start fresh training your Bayes Database again (**Figure 1**). **Figure 1** [](https://docs.deeztek.com/uploads/images/gallery/2021-01/image-1609598386750.png) # Custom File Extensions File Extensions are helpful in identifying files contained in incoming email attachments. File extensions are used in File Rules which in turn are used in Spam/Virus/File Policies. Utlimately Spam/Virus/File Policies are assigned to Internal Recipients in order to block or allow incoming email attachments on a per recipient basis. Hermes SEG comes already pre-configured with dozens of file extensions but it's impossible for the existing File Extensions to encompass every possible file in existence. In this page, you can add or delete additional File Extensions as required. ### Add Custom File Extension 1. In the **Add Custom File Entension** section, under the **Enter a File Extension in the box ....** field, enter the file extension you wish to add, ensuring you enter a (**.**) dot in front of the extension. For example, if you were adding the file extension for Microsoft Word document you would enter **.doc**. 2. Under the **Select below whether you want the file extension to be case sensitive or case insensitive ....**select either **Case Insensitive** or **Case Sensitive**. It's recommended that you always select the Case Insensitive option unless you have a specific reason not to. 3. Under the **Select the type of File Extension you are adding in terms of risk...** select either **File Extension** or **High Risk File Extension**. The High Risk File Extension option should be selected for File Extensions that are prone to carrying malware payloads. 4. Under the **Enter a description for your new File Extension...** enter a brief description. 5. Click the **Add** button (**Figure 1**). **Figure 1** [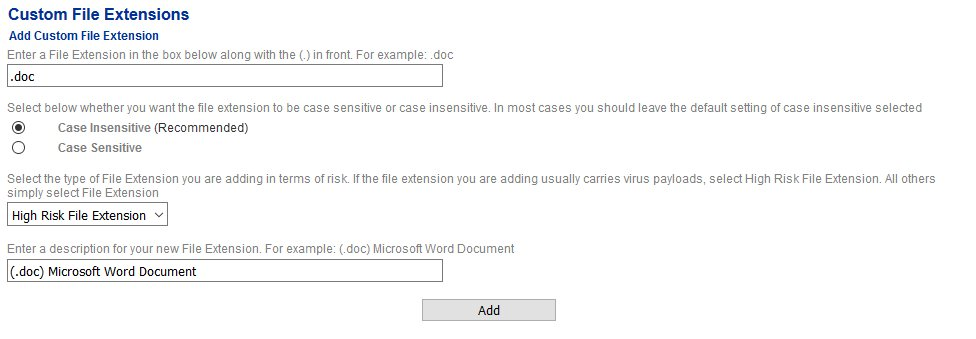](https://docs.deeztek.com/uploads/images/gallery/2021-01/image-1609598427137.png) 6. As you add Custom File Extensions, they will show up under the **Delete Custom File Extensions** section (**Figure 2**). **Figure 2** [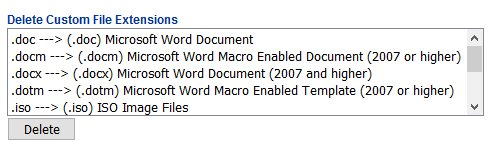](https://docs.deeztek.com/uploads/images/gallery/2021-01/image-1609598434559.png) ### Delete Custom File Extension **Note: If a file extension is part of a file rule, the system will NOT allow you to delete it. If that's the case, the file extension must first be removed from the file rule under Content Checks --> File Rules.** 1. Under the **Delete Custom File Extensions** section, select the File Extension entry you wish to delete and click the **Delete** button (**Figure 3**). **Note that only one entry can be selected at a time.** **Figure 3** [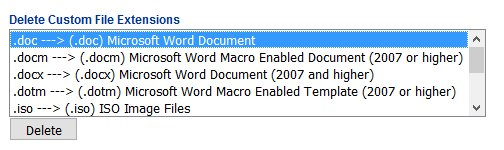](https://docs.deeztek.com/uploads/images/gallery/2021-01/image-1609598441319.png) # Custom File Expressions File Expressions are helpful in identifying files contained in incoming email attachments. File expressions are used in File Rules which in turn are used in Spam/Virus/File Policies. Utlimately Spam/Virus/File Policies are assigned to Internal Recipients in order to block or allow incoming email attachments on a per recipient basis. File Expressions are created utilizing the Regular Expression (regexp) format. A good place to start and test the Regular Expression you create is the [regular expressions 101](https://regex101.com/) website. For example, suppose you want to identify all Microsoft Office Word and Excel files that have the word "invoice" or the word "scan" in their filename. The Regular Expression would look like: **(invoice|scan){1,}.\*(doc|xls|docx|xlsx){1,}**. If you were to test the regexp at the regular expression website 101 you would see that the regexp would match on the "invoice.doc", "invoice 7892.docx" and the "scan for you.xls" files (**Figure 1**). **Figure 1** [](https://docs.deeztek.com/uploads/images/gallery/2021-01/image-1609598480295.png) Regular Expressions can be confusing at first however, there are lots of resources on the Internet to help you along. A good place to start is the [RegexOne](https://regexone.com/) website. ### Add Custom File Expression 1. In the **Add Custom File Expression** section, under the **Enter a File Expression in the box below...** field, enter the Regular Expression you wish to use. 2. Under the **Select below whether you want the file expression to be case sensitive or case insensitive ....**select either **Case Insensitive** or **Case Sensitive**. It's recommended that you always select the Case Insensitive option unless you have a specific reason not to. 3. Under the **Enter a description for your new File Expression...** enter a brief description. 4. Click the **Add** button (**Figure 2**). **Figure 2** [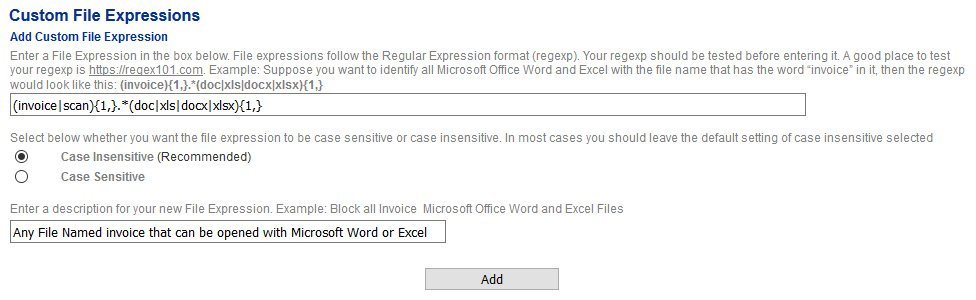](https://docs.deeztek.com/uploads/images/gallery/2021-01/image-1609598487223.png) 1. As you add Custom File Expressions, they will show up under the **Delete Custom File Expressions** section (**Figure 3**). **Figure 3** [](https://docs.deeztek.com/uploads/images/gallery/2021-01/image-1609598495045.png) ### Delete Custom File Expression **Note: If a file expression is part of a file rule, the system will NOT allow you to delete it. If that's the case, the file expresion must first be removed from the file rule under Content Checks --> File Rules.** 1. Under the **Delete Custom File Expressions** section, select the File Expression entry you wish to delete and click the **Delete** button (**Figure 4**). **Note that only one entry can be selected at a time.** **Figure 4** [](https://docs.deeztek.com/uploads/images/gallery/2021-01/image-1609598501796.png) # Message Rules**NOTE: This feature is only available with Hermes SEG Pro License.**
**NOTE: This section requires any saved changes to be applied by clicking the Apply Settings button on the bottom of the page.**
Message Rules are useful is fine tuning the Hermes SEG Spam Filter when the Custom Spam Filter Tests, Sender Checks Bypass, IP & Network Override or Bayes Database training are not sufficient. Message Rules allow you to write completely custom message Regular Expression (Regex) rules to look for strings in the Body or the Headers of messages and assigning positive or negative scores based on them. A sufficiently high positive score will ensure the message is tagged as Spam and a sufficiently low negative score will ensure the message is NOT tagged as Spam. Ensure that you refer to the **Content Checks --> SVF Policies** in order to determine what scores to assign to ensure Spam or No Spam tagging. Note that assigning a score of 0 will effectively disable a rule. The following rule types can be created: - **Body** - Searches the body of a message for a string - **Header** - Searches any message header for a string - **URI** - Searches for text strings in URIs of plain or HTML sections of messages - **Rawbody** - Searches the body of a message looking for HTML tags or HTML comments Hermes SEG comes pre-configured with Message Rule templates for every Message Rule type. These pre-configured rules have a score of 0 assigned to them thus rendering them disabled. Best way to start is by copying one of the pre-configured Message Rules and customizing to your needs. A good resource for testing Regular Expressions is the [RegularExpressions101](https://regex101.com/) website. ### Message Body, URI or Rawbody Rule 1. Under the **Rule Type** field select either **Message Body Rule, URI Rule or Message Rawbody Rule**. 2. Under the **Rule Name** field, enter a name for this rule ensuring that you only use letters, numbers, dashes and underlines only. 3. Under the **Rule Description** field, enter a description for the rule. 4. Under the **Rule Regex** field, enter the Regular Expression for this rule. 5. Under the **Spam Score** field, enter a positive or negative numeric value to assign to the message if the rule matches. 6. Click the **Add Rule** button (**Figure 1**). **Figure 1** [](https://docs.deeztek.com/uploads/images/gallery/2021-01/image-1609598564833.png) 7. As you add rules, they will appear under the **Existing Message Rules** section (**Figure 2**). **Figure 2** [](https://docs.deeztek.com/uploads/images/gallery/2021-01/image-1609598573204.png) 7. Add as many rules as needed. When finished, click on the **Apply Settings** button at the bottom of the page to apply the rules (**Figure 3**). **Figure 3** [](https://docs.deeztek.com/uploads/images/gallery/2021-01/image-1609598580513.png) ### Message Header Rule 1. Under the **Rule Type** field select **Message Header Rule**. Note, that selecting the Message Header Rule type, will enable the Message Header field below. 2. Under the **Rule Name** field, enter a name for this rule ensuring that you only use letters, numbers, dashes and underlines only. 3. Under the **Rule Description** field, enter a description for the rule. 4. Under the **Message Header** field enter the message header you wish this rule to search (subject, from, to, return-path etc.). It can be any legitimate header of a message. 5. Under the **Rule Regex** field, enter the Regular Expression for this rule. 6. Under the **Spam Score** field, enter a positive or negative numeric value to assign to the message if the rule matches. 7. Click the **Add Rule** button (**Figure 3**). **Figure 3** [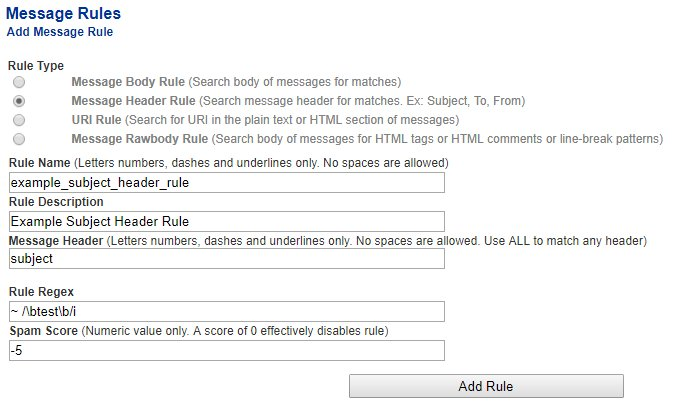](https://docs.deeztek.com/uploads/images/gallery/2021-01/image-1609598588408.png) 7. As you add rules, they will appear under the **Existing Message Rules** section (**Figure 4**). **Figure 4** [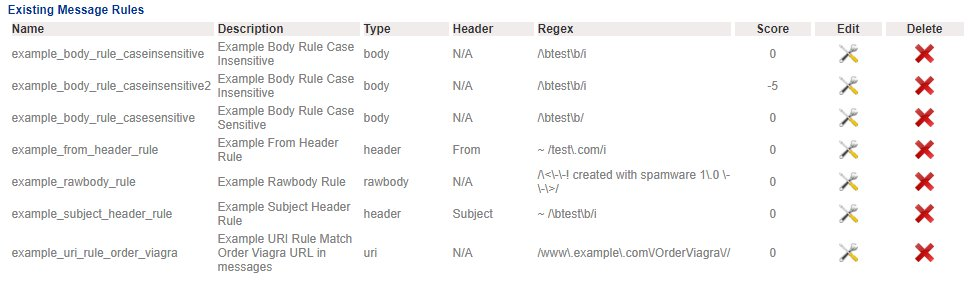](https://docs.deeztek.com/uploads/images/gallery/2021-01/image-1609598596870.png) 7. Add as many rules as needed. When finished, click on the **Apply Settings** button at the bottom of the page to apply the rules (**Figure 5**). **Figure 5** [](https://docs.deeztek.com/uploads/images/gallery/2021-01/image-1609598604521.png) # File Rules File Rules allow you to create rules containing either block or allow actions for file extensions, file types or file expressions. File rules are assigned to Spam/Virus/File Policies which in turn are assigned to Internal Recipients. **Hermes SEG file rules are processed from the top down fashion**. In other words, as a file rule gets processed, block/allow actions on the to of the rule get processed first. If a match is found then the action is taken and all further processing of the rule stops. ### Default System File Rule Hermes SEG already comes pre-configured with a **Default** System File Rule which is assigned to all the system Spam/Virus/File Policies. The Default System File Rule cannot be edited, it can only be viewed or copied in order to be used as a starting point in creating custom file rules (**Figure 1**). **Figure 1** [](https://docs.deeztek.com/uploads/images/gallery/2021-01/image-1609598667051.png) ### View Default File Rule **Note: You cannot make any changes to the Default file rule**. 1. Under the **System File Rules** section click on the[](https://docs.deeztek.com/uploads/images/gallery/2021-01/image-1609598674847.png)icon under the **Actions** column of the **Default** file rule. 2. On the **View File Rule** page, you will see a listing of file types and corresponding actions for those file types (**Figure 2**). **Figure 2** [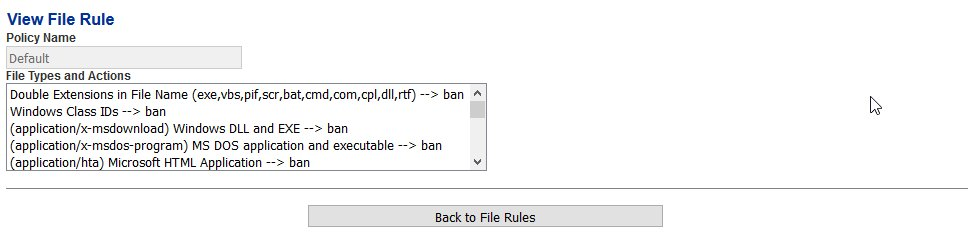](https://docs.deeztek.com/uploads/images/gallery/2021-01/image-1609598685905.png) 3. Click on the **Back to File Rules** button on the bottom of the page to return to the File Rules page (**Figure 3**). **Figure 3** [](https://docs.deeztek.com/uploads/images/gallery/2021-01/image-1609598693114.png) ### Create Custom File Rule by copying Default File Rule or any Custom File Rule This method will allow you to copy the **Default** File Rule or any **Custom File Rule** (assuming there are existing custom file rules) and using it as a starting point for a new custom file rule. 1. Under the **System File Rules** section or the **Custom File Rules** (if there are already existing custom file rules) section, click on the[](https://docs.deeztek.com/uploads/images/gallery/2021-01/image-1609598701594.png)icon under the **Actions** column of the file rule you wish to copy. You will be redirected to the **Copy File Rule** page in order to create and customize a new file rule based on the file rule you choose (**Figure 4**). **Figure 4** [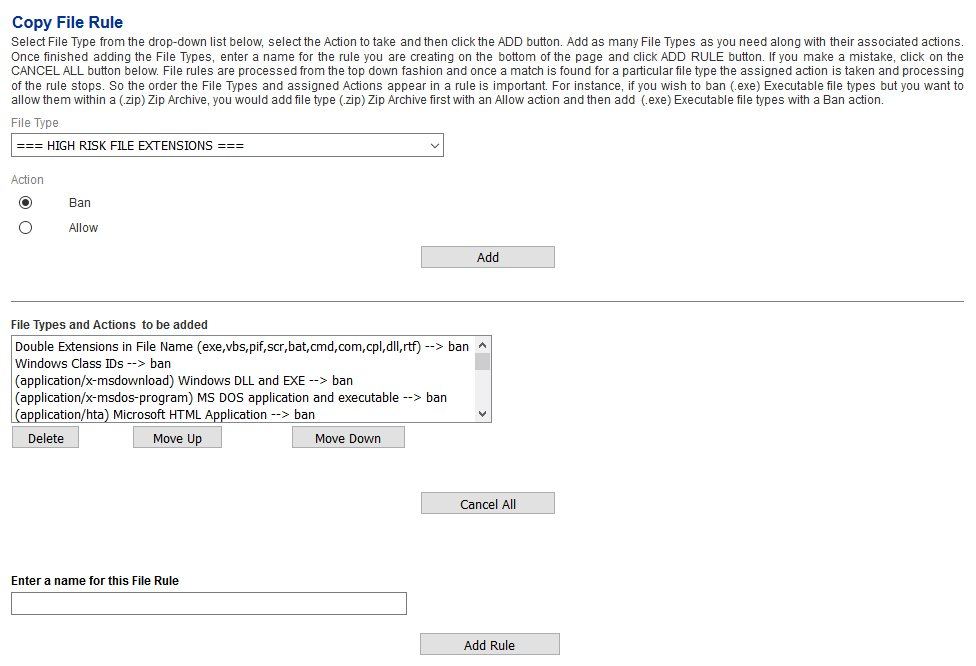](https://docs.deeztek.com/uploads/images/gallery/2021-01/image-1609598713214.png) **Add File Types** 2. On the **Copy File Rule** page, under the **File Type** drop-down field, select a file type. Note that the **File Type** drop-down is organized in sections of HIGH-RISK FILE EXTENSIONS, HIGH RISK FILE TYPES, HIGH RISK MIME TYPES, FILE EXTENSIONS, FILE TYPES, MIME TYPES, OTHER TYPES and CUSTOM-EXPRESSIONS (**Figure 5**). **Figure 5** [](https://docs.deeztek.com/uploads/images/gallery/2021-01/image-1609598724470.png) 3. Under the **Action** field, select either a **Ban** or **Allow** action and then click on the **Add** button (**Figure 6**). **Figure 6** [](https://docs.deeztek.com/uploads/images/gallery/2021-01/image-1609598733741.png) 4. As you add File Types and their associated actions, they show up on the bottom of the **File Types and Actions** to be added section (**Figure 7**). **Figure 7** [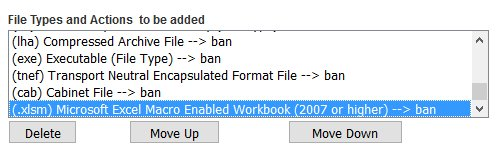](https://docs.deeztek.com/uploads/images/gallery/2021-01/image-1609598740135.png) 5. Continue adding File Types as needed. **Re-order File Types** 6. Under the **File Types and Actions to be added** section, adjust the order the File Types that appear in the file rule by selecting each file type at a time the clicking on the **Move Up** or **Move Down** buttons as necessary to adjust the order (**Figure 8**). **Figure 8** [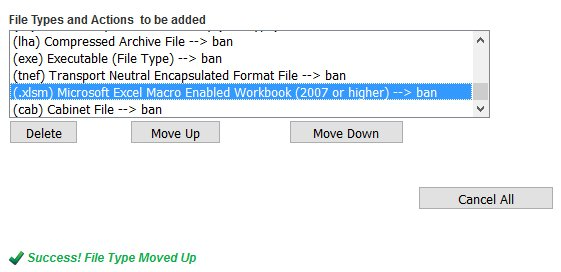](https://docs.deeztek.com/uploads/images/gallery/2021-01/image-1609598747724.png) **Delete File Types** 7. Under the **File Types and Actions to be added** section, delete file types by selecting each file type at a time the clicking on delete button (**Figure 8**). **Create File Rule Name** 8. Under the **Enter a name for this File Rule** field, enter a unique name for this rule and click the **Add Rule** button below (**Figure 9**). You will be redirected back to the **File Rules** page. **Figure 9** [](https://docs.deeztek.com/uploads/images/gallery/2021-01/image-1609598760167.png) 9. Back at the **File Rules** page, the new rule will appear under the **Custom File Rules** section (**Figure 10**). **Figure 10** [](https://docs.deeztek.com/uploads/images/gallery/2021-01/image-1609598768192.png) ### Create Custom File Rule This method will allow you to create a new blank Custom File Rule. 1. Under the **Custom File Rules** section, click on Create Custom File Rule button (**Figure 11**). **Figure 11** [](https://docs.deeztek.com/uploads/images/gallery/2021-01/image-1609598776616.png) 2. You will be redirected to the **Create File Rule** page in order to create and customize a new file rule (**Figure 12**). **Figure 12** [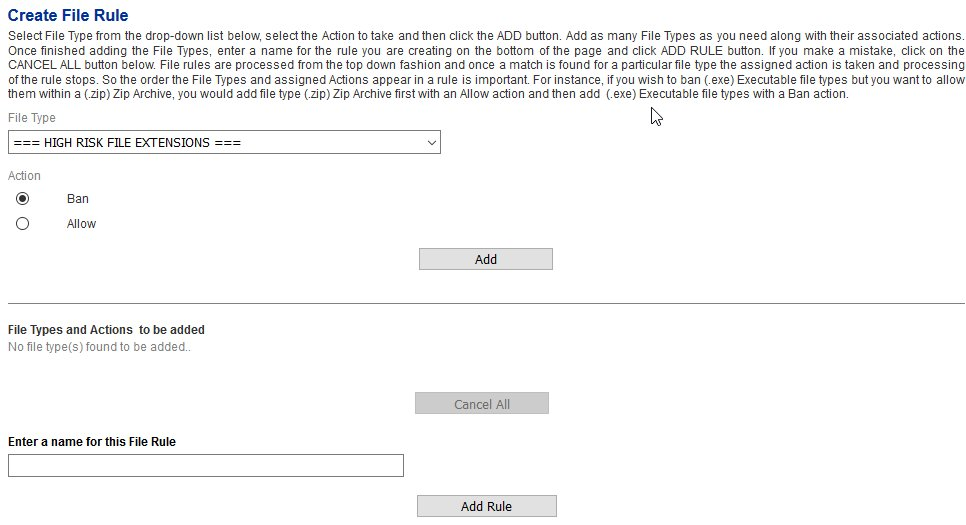](https://docs.deeztek.com/uploads/images/gallery/2021-01/image-1609598783553.png) **Add File Types** 3. On the **Create File Rule** page, under the **File Type** drop-down field, select a file type. Note that the **File Type** drop-down is organized in sections of HIGH-RISK FILE EXTENSIONS, HIGH RISK FILE TYPES, HIGH RISK MIME TYPES, FILE EXTENSIONS, FILE TYPES, MIME TYPES, OTHER TYPES and CUSTOM-EXPRESSIONS (**Figure 13**). **Figure 13** [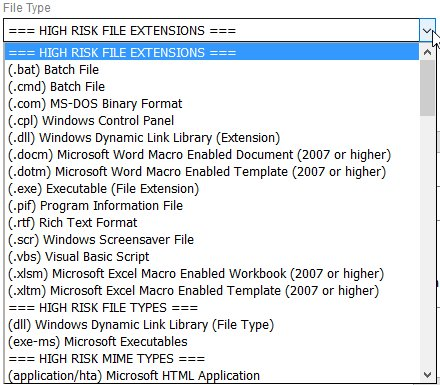](https://docs.deeztek.com/uploads/images/gallery/2021-01/image-1609598793558.png) 4. Under the **Action** field, select either a **Ban** or **Allow** action and then click on the **Add** button (**Figure 14**). **Figure 14** [](https://docs.deeztek.com/uploads/images/gallery/2021-01/image-1609598802692.png) 5. As you add File Types and their associated actions, they show up on the bottom of the **File Types and Actions** to be added section (**Figure 15**). **Figure 15** [](https://docs.deeztek.com/uploads/images/gallery/2021-01/image-1609598810455.png) 6. Continue adding File Types as needed. **Re-order File Types** 7. Under the **File Types and Actions to be added** section, adjust the order the File Types that appear in the file rule by selecting each file type at a time the clicking on the **Move Up** or **Move Down** buttons as necessary to adjust the order (**Figure 16**). **Figure 16** [](https://docs.deeztek.com/uploads/images/gallery/2021-01/image-1609598817185.png) **Delete File Types** 8. Under the **File Types and Actions to be added** section, delete file types by selecting each file type at a time the clicking on delete button (**Figure 16**). **Create File Rule Name** 9. Under the **Enter a name for this File Rule** field, enter a unique name for this rule and click the **Add Rule** button below (**Figure 17**). You will be redirected back to the **File Rules** page. **Figure 17** [](https://docs.deeztek.com/uploads/images/gallery/2021-01/image-1609598826327.png) 10. Back at the **File Rules** page, the new rule will appear under the **Custom File Rules** section (**Figure 18**). **Figure 18** [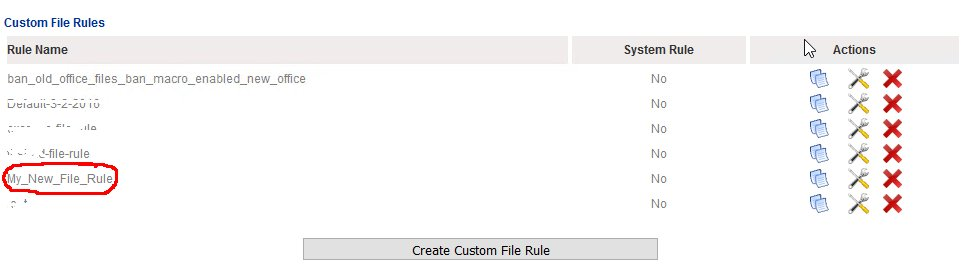](https://docs.deeztek.com/uploads/images/gallery/2021-01/image-1609598832491.png) ### Edit Custom File Rule **Note: ONLY Custom File Rules can be edited.** 1. Under the **Custom File Rules** section, click on the[](https://docs.deeztek.com/uploads/images/gallery/2021-01/image-1609598839739.png)icon of the Custom File Rule you wish to edit. 2. You will be redirected to the **Edit File Rule** page in order to customize the file rule (**Figure 19**). **Figure 19** [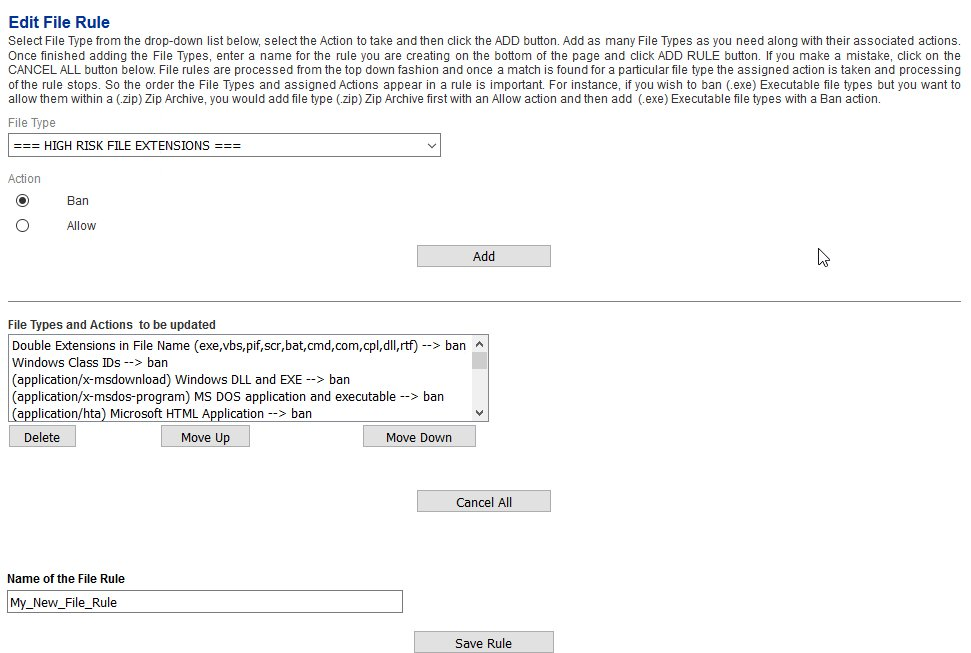](https://docs.deeztek.com/uploads/images/gallery/2021-01/image-1609598852022.png) **Add File Types** 3. On the **Edit File Rule** page, under the **File Type** drop-down field, select a file type. Note that the **File Type** drop-down is organized in sections of HIGH-RISK FILE EXTENSIONS, HIGH RISK FILE TYPES, HIGH RISK MIME TYPES, FILE EXTENSIONS, FILE TYPES, MIME TYPES, OTHER TYPES and CUSTOM-EXPRESSIONS (**Figure 20**). **Figure 20** [](https://docs.deeztek.com/uploads/images/gallery/2021-01/image-1609598864209.png) 4. Under the **Action** field, select either a **Ban** or **Allow** action and then click on the **Add** button (**Figure 21**). **Figure 21** [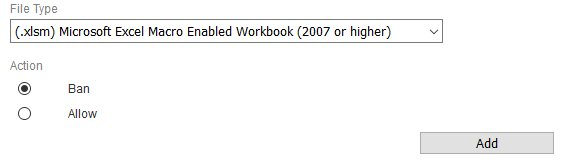](https://docs.deeztek.com/uploads/images/gallery/2021-01/image-1609598870906.png) 5. As you add File Types and their associated actions, they show up on the bottom of the **File Types and Actions** to be added section (**Figure 22**). **Figure 22** [](https://docs.deeztek.com/uploads/images/gallery/2021-01/image-1609598876674.png) 6. Continue adding File Types as needed. **Re-order File Types** 7. Under the **File Types and Actions to be added** section, adjust the order the File Types that appear in the file rule by selecting each file type at a time the clicking on the **Move Up** or **Move Down** buttons as necessary to adjust the order (**Figure 23**). **Figure 23** [](https://docs.deeztek.com/uploads/images/gallery/2021-01/image-1609598884097.png) **Delete File Types** 8. Under the **File Types and Actions to be added** section, delete file types by selecting each file type at a time the clicking on delete button (**Figure 23**). **Edit File Rule Name** 9. Under the **Name of the File Rule** field, enter a unique name for this rule and click the **Save Rule** button below (**Figure 24**). You will be redirected back to the **File Rules** page. **Figure 24** [](https://docs.deeztek.com/uploads/images/gallery/2021-01/image-1609598894060.png) 10. Back at the **File Rules** page, the new rule will appear under the **Custom File Rules** section (**Figure 25**). **Figure 25** [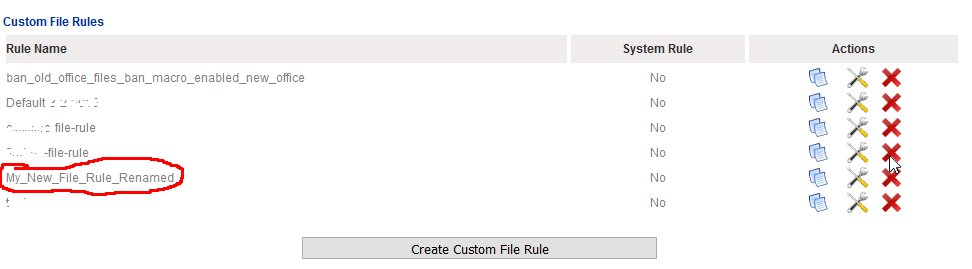](https://docs.deeztek.com/uploads/images/gallery/2021-01/image-1609598900893.png) ### Delete Custom File Rule **Note: ONLY Custom File Rules that are NOT associated with with a File/Virus/Spam Policy can be deleted. When deleting a Custom File Rule, the system will NOT prompt you to confirm, it will be deleted immediately.** 1. Under the **Custom File Rules** section, click on the[](https://docs.deeztek.com/uploads/images/gallery/2021-01/image-1609598915468.png)icon of the Custom File Rule you wish to delete. 2. The system will delete the Custom File Rule and re-direct you back to the File Rules page (**Figure 26**) **Figure 26** [](https://docs.deeztek.com/uploads/images/gallery/2021-01/image-1609598909166.png) # SVF Policies**Note: The Default SVF System Policy is the policy which automatically gets assigned to newly added Internal Recipients. SVF Policies whether System or Custom can be assigned on a per Internal Recipient basis. Additionally, if the Recipients to Policies Mappings listing contains more than 50 entries, the system will paginate the listings automatically. However, if you assign policies to recipients on a specific page and then click either on the Next 50 Recipients or the Previous 50 Recipients links on that page without clicking the Submit button on the bottom of the page, your changes will be lost.**
1. Under the **Recipients to Policies Mappings** section, you will see a listing of all the Internal Recipients and the assigned policy assigned to each recipient (**Figure 7**). **Figure 7**  [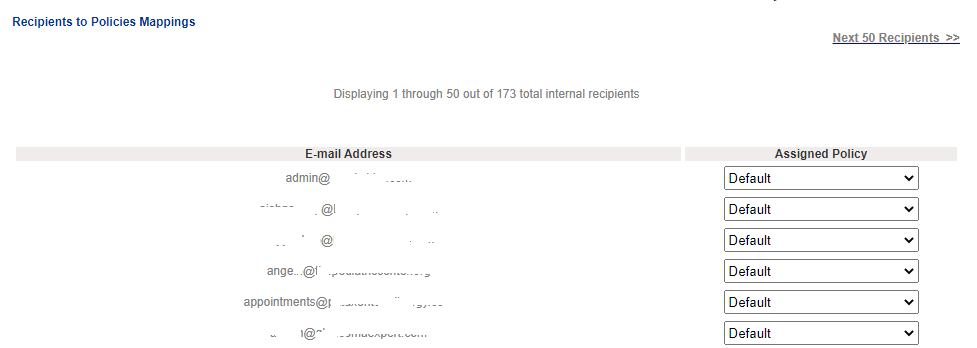](https://docs.deeztek.com/uploads/images/gallery/2021-01/image-1609679967036.png) 2. Under the **Assigned Policy** column of the recipient you wish to modify, select the new policy you wish to assign from the drop-down box (**Figure 8**). **Figure 8** [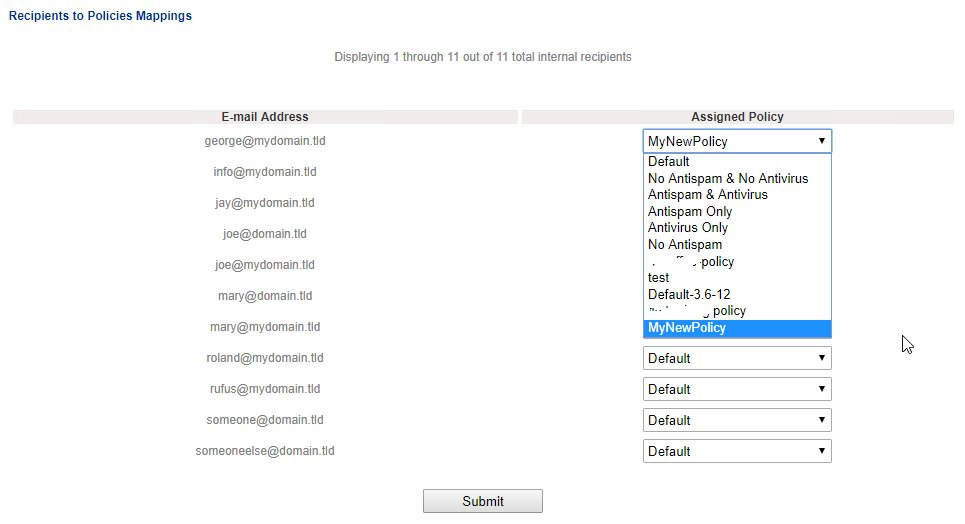](https://docs.deeztek.com/uploads/images/gallery/2021-01/image-1609680059902.png) 3. Continue modifying recipient policies as needed. When finished, click on the **Submit** button to save your changes. **Block Sender(s) and Allow Sender(s) actions do NOT work for Virtual Recipients.**
##### Block Senders This action will create a mapping between the **Return-Path** and the **To** fields and will block (blacklist) any future messages that match that mapping. ##### Allow Senders This action will create a mapping between the **Return-Path** and the **To** fields and bypass **Antispam** checks for any future messages that match that mapping. **Please note that this action will NOT bypass Antivirus, Banned Attachment or Bad-Header checks**. If you wish to completely bypass any type of check for a sender, use **Content Checks --> Global Sender Block/Allow**. ##### Release Message(s) to Recipient This action will force the delivery the selected message(s) to the recipient specified in the **To** field of the message. This is useful for messages that have been quarantined by the system or for message restoration purposes. ##### Train Message(s) as Spam This action will train as Spam the selected message(s) on the Bayes antispam database. ##### Train Message(s) as Ham This action will train as Ham (NOT Spam) the selected message(s) on the Bayes antispam database. ##### Remove Message(s) Previous Training This action will un-train the selected message(s) from the Bayes antispam database. This is useful for undoing any training you may have performed with those messages previously on the Bayes antispam database. #### View MessageAll links in the **View Message** window are active. Clicking on malicious links can infect your computer with malware.
Click the [ ](https://docs.deeztek.com/uploads/images/gallery/2023-03/fftimage.png)icon on the left of a message to view the message contents. In the **View Message** screen, you will be able to **Print** or **Download** the message as an .eml file which can then be opened with an e-mail client such as Outlook. Additionally, you can view the message contents (From, Return-Path, To, CC, Subject, Body) as well as all the message headers (**Figure 6**). **Figure 6** [](https://docs.deeztek.com/uploads/images/gallery/2023-03/Tn6image.png) [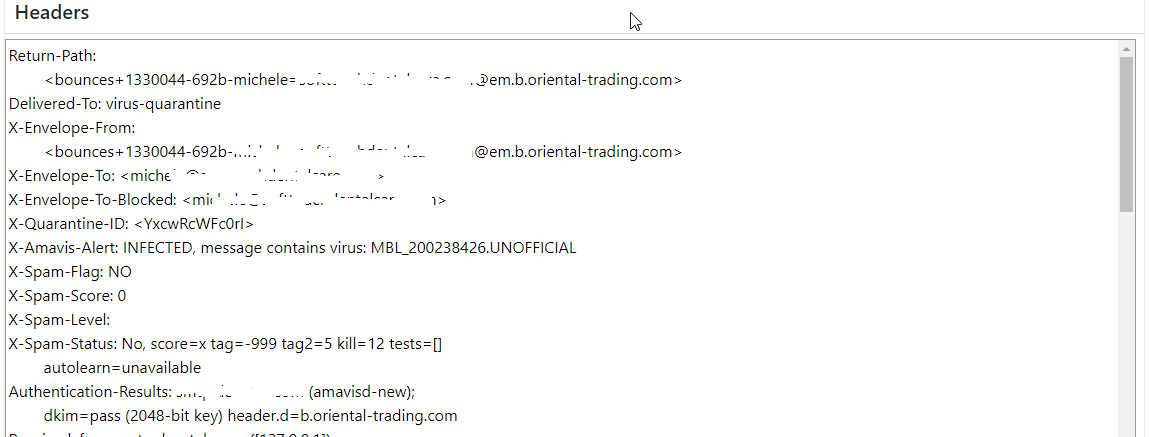](https://docs.deeztek.com/uploads/images/gallery/2023-03/Mkoimage.png) # Encryption # Internal Certificate Authority An Internal Certificate Authority can be used to create certificates for internal and external recipients for the purposes of S/MIME encryption and message signing. The certificate generated by the internal CA are not trusted, therefore you must instruct the external recipients of your messages to trust your Internal CA in their clients. Alternatively, instead of using certificates generated by the internal CA, you can import certificates from a trusted 3rd party Certificate Authority for both internal and external recipients. ### Add Internal Certificate Authority 1. Under the **Certificate Authority Common Name** field, enter the name you wish to assign to the internal CA. 2. Under the **Certificate Authority Certificate Validity in Years** field, select the length of time you wish the Certificate Authority to remain valid. We recommend you leave this setting at the default 5 years. 3. Under the **Certificate Authority Certificate Key Length** select the key length you wish to use. We recommend you leave this setting at the default 4096-bits. 4. Under the **Organization/Company Name** enter the name of your organization. 5. Under the Organization Unit field enter the name of your organization unit. 6. Under the **Organization State/Province** field enter the name of of the organization state/province 7. Under the **Organization Country Code** field enter the two letter code for your organization country. Example, for United States simply enter **US**. 8. Click the checkbox under the **Make Default** field, if you wish to make this Certficate Authority the defalt CA. By default, the first CA that gets created becomes the default CA. 9. Click the **Save Settings** button (**Figure 1**). **Figure 1** [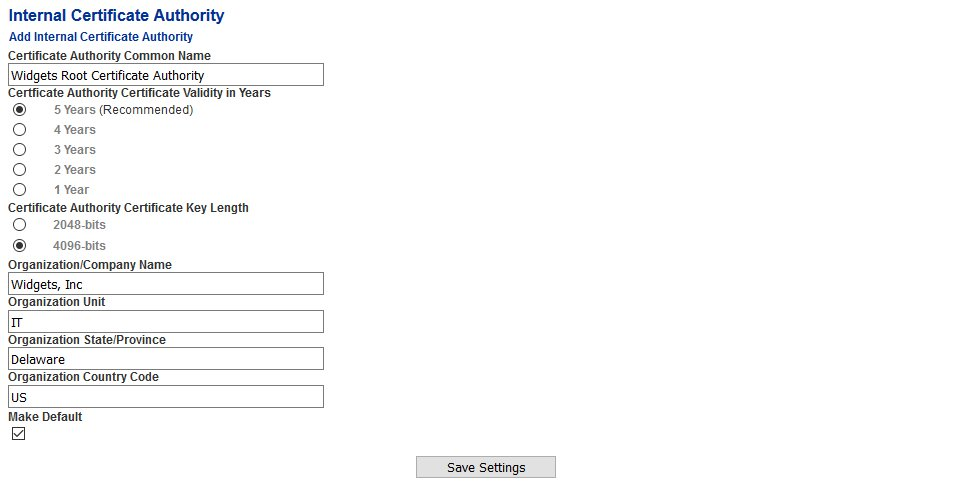](https://docs.deeztek.com/uploads/images/gallery/2021-01/image-1609680670258.png) 10. Each Internal Certificate Authority you add shows up in the **Edit/Delete Existing Internal Certificate Authorities** section (**Figure 2**). **Figure 2** [](https://docs.deeztek.com/uploads/images/gallery/2021-01/image-1609680681186.png) 11. Continue adding Internal Certificate Authorities as needed. ### Set Internal Certificate Authority as Default 1. Under the **Edit/Delete Existing Internal Certificate Authorities** place a checkmark under the Default column of the Internal Certificate Authority you wish to set as default. The system will automatically set the Certificate Authority as the default (**Figure 3**). **Figure 3** [](https://docs.deeztek.com/uploads/images/gallery/2021-01/image-1609680694957.png) ### Delete Internal Certificate Authority Default Internal Certificate Authorities or Internal Certificate Authorities that have been used to issue certificates to Internal or External Recipients cannot be deleted. In those cases you must either set another Internal CA as the default and/or you must first remove the Internal Recipients under **Gateway --> Internal Repients** and the External Recipients under **Encryption --> External Recipient Encryption** which will also remove any certificates assigned to those recipients. Please note, you do not have to remove all internal or external recipients, only the recipients that have certificates assigned to them by the Internal Certificate Authority you wish to delete.If an internal Certificate Authority cannot be deleted, the Delete column of that entry will contain a [](https://docs.deeztek.com/uploads/images/gallery/2021-01/image-1609680708729.png)icon. Otherwise, if it can be deleted, the Delete column of that entry will contain a [ ](https://docs.deeztek.com/uploads/images/gallery/2021-01/image-1609680727704.png)icon.
1. Under the **Edit/Delete Existing Internal Certificate Authorities** click the [ ](https://docs.deeztek.com/uploads/images/gallery/2021-01/image-1609680757812.png)icon of the Internal Certificate Authority you wish to delete. 2. On the confirmation page, click on the **YES** button to delete the Internal CA or click the **NO** button to cancel. **Figure 4** [](https://docs.deeztek.com/uploads/images/gallery/2021-01/image-1609680774135.png) 3. You will be returned to the **Internal Certificate Authority** Page # PGP Key Servers PGP Key Servers section allows you to add/delete public PGP Key Servers to Hermes SEG in order to be able to publish Internal and External Recipient Public PGP Keys to those servers. Hermes SEG by default includes the following public PGP Key Servers: - ha.pool.sks-keyservers.net --> OpenPGP SKS Key Server High Availability - keyserver.ubuntu.com --> Ubuntu SKS OpenPGP Public Key Server ### Add PGP Key Server 1. Under the **Key Server** field, enter the Key Server address. Ensure you do **NOT** include **http://** or **https://** or any port numbers. 2. Under the **Note** field, enter a description for this key server. 3. Click the **Add** button (**Figure 1**) **Figure 1** [](https://docs.deeztek.com/uploads/images/gallery/2021-01/image-1609680828285.png) 4. The server will be added and it will appear under the **Delete PGP Key Server(s)** section below (**Figure 2**) **Figure 2** [](https://docs.deeztek.com/uploads/images/gallery/2021-01/image-1609680836733.png) ### Delete PGP Key Server 1. Under the **Delete PGP Key Server(s)** section, select the Key Server entry you wish to delete (only one entry at a time can be selected) and click the **Delete** button (**Figure 3**). **Figure 3** [](https://docs.deeztek.com/uploads/images/gallery/2021-01/image-1609680846403.png) 2. The Key Server you selected will be immediately deleted and removed from the **Delete PGP Key Server(s)** section. # Encryption Settings 1. The **Trigger encryption by e-mail subject** allows Internal Recipients to encrypt email to any External Recipient by entering a special keyword in the subject of any email. This setting enables or disables this feature. We recommend you set it to **Enabled** (**Figure 1**). **Figure 1** [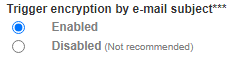](https://docs.deeztek.com/uploads/images/gallery/2021-01/image-1609680981859.png) 2. The **Encryption by e-mail subject keyword** sets the special keyword to be entered in the subject of an email in order to encrypt that email message. Enter a unique keyword that would not normally appear in the subject of a typical email. We recommend you set this field to **\[encrypt\]** or **\[secure\]** ensuring to include the brackets (**Figure 2**). **Figure 2** [](https://docs.deeztek.com/uploads/images/gallery/2021-01/image-1609680998600.png) 3. The **Remove e-mail subject keyword after encryption** field sets the system to automatically remove the special keyword from the subject after the email has been encrypted. We recommend you set it to **Enabled** (**Figure 3**). **Figure 3** [](https://docs.deeztek.com/uploads/images/gallery/2021-01/image-1609681020505.png) 4. The **Secure Portal Address** field sets the address that will be included in PDF encrypted emails that require the recipient to navigate in order to decrypt, view and reply to encrypted PDF emails (**Figure 4**). **Figure 4** [](https://docs.deeztek.com/uploads/images/gallery/2021-01/image-1609681343402.png) 5. The **PDF Reply Sender E-mail** sets the **From** address for when an external recipient replies to an encrypted PDF email from the **Secure Portal** (**Figure 5**). **Figure 5** [](https://docs.deeztek.com/uploads/images/gallery/2021-01/image-1609681357968.png) 6. The **Server Secret Keyword, Client Secret Keyword** and **Mail Secret Keyword** are used to protect external resources against tampering. For example if an external user replies to an encrypted PDF email, the **Server Secret Keyword** ensures that the user can only reply to to a message generated by this server. If you followed the [Getting Started](https://www.deeztek.com/documentation/hermes-seg-documentation/hermes-seg-administrator-guide/getting-started/) guide, you should had generated new Server Secret Keyword, Client Secret Keyword and Mail Secret Keyword. If not, ensure you generate one by clicking on the [ ](https://docs.deeztek.com/uploads/images/gallery/2021-01/image-1609681075547.png)icon next to each which will automatically generate a keyword and enter it in each respective field (**Figure 6**). **Figure 6** [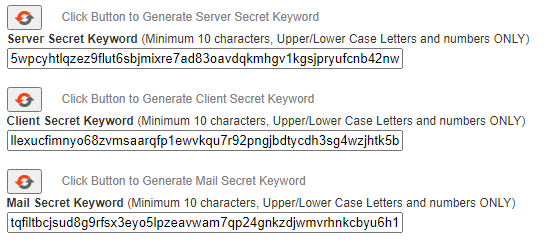](https://docs.deeztek.com/uploads/images/gallery/2021-01/image-1609681276095.png) 7. Click on the **Save Settings** button to save your settings. # Internal Recipients EncryptionIf Internal Recipients have not been added in your system under **Gateway --> Internal Recipients**, this page will not show a recipient listing.
By default, When Internal Recipients are added into Hermes SEG, they are NOT configured with the ability to send encrypted email. Each Internal Recipient must be individually configured for the type of encryption you wish for them to use. On this page, a listing of only previously added Internal Recipients will appear. Note, that under the **Encryption Status** section the **PDF** and **S/MIME** and **PGP** columns are set to **No**. Additionally, under the **S/MIME Cert(s)** section, the certificate[](https://docs.deeztek.com/uploads/images/gallery/2021-01/image-1609681511189.png)icons are disabled indicating that no S/MIME Certificates are present, and under the **PGP Keyring(s)** section the keyring[](https://docs.deeztek.com/uploads/images/gallery/2021-01/image-1609681527764.png)icons are disabled indicating that no PGP Keyrings are present **(Figure 1**). **Figure 1** [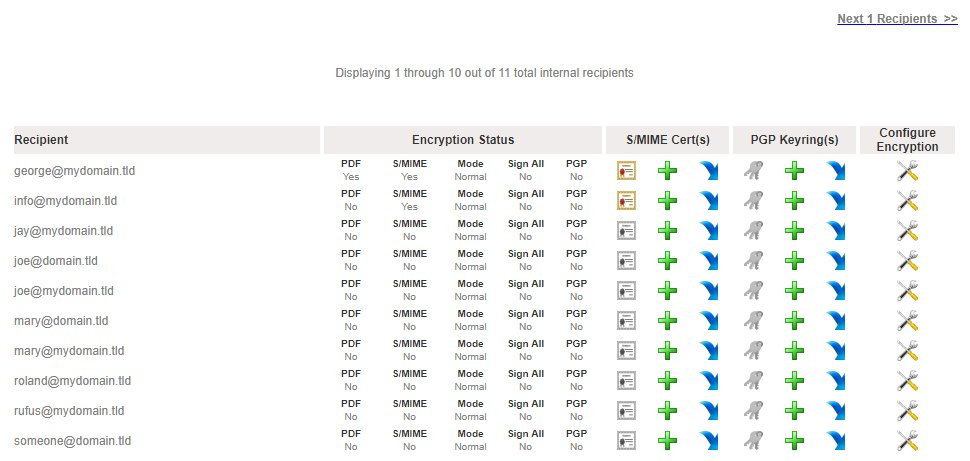](https://docs.deeztek.com/uploads/images/gallery/2021-01/image-1609681541466.png) ### Filter Internal Recipients Encryption Setting a filter will assist you in narrowing down specific recipients by email address or domain in order to manage encryption settings easier. 1. In the Filter By field, enter a complete or partial email address or domain and click the **Set Filter** button. If any matches are found, the **Internal Recipients** **Encryption** listing will be populated with **only the entries matching the filter you set** (**Figure 2**). **Figure 2** [](https://docs.deeztek.com/uploads/images/gallery/2021-01/image-1609681552196.png) 2. You can clear a filter you set by clicking the **Clear Filter** button at any time. ### Configure Internal Recipients Encryption 1. Under the C**onfigure Encryption** column of the Internal Recipient you wish to configure, click on the[](https://docs.deeztek.com/uploads/images/gallery/2021-01/image-1609681570492.png)icon. 2. In the **Edit Internal Recipient Encryption** page, under the **PDF Encryption** field, select Enabled if you wish to enable PDF Encryption for this recipient. 3. Under the **S/MIME Encryption** field, select Enabled if you wish to enable S/MIME Encryption for this recipient. Please note, that if you enable S/MIME Encryption, you must also create or import a S/MIME Certificate for this recipient. 4. Under the **Digital Signature** field, select **Digitally Sign ALL Outgoing Messages** if you wish to have all outgoing messages from this recipient to be digitally signed by S/MIME Certificate regardless if the messsage is encrypted or not. Otherwise, leave selected the default setting of **Digitally Sign ONLY Encrypted Outgoing Messages** which will ONLY digitally sign outgoing messages that have been encrypted. Please note, Digital Signature requires a S/MIME certificate to be created or imported before any messages can be digitally signed. 5. Under the **PGP Encryption** field, select Enabled if you wish to enable PGP Encryption for this recipient. Please note, that if you enable PGP Encryption, you must also create or import a PGP Keyring for this recipient. 6. Click on the **Save and Apply Changes** button (**Figure 3**). **Figure 3** [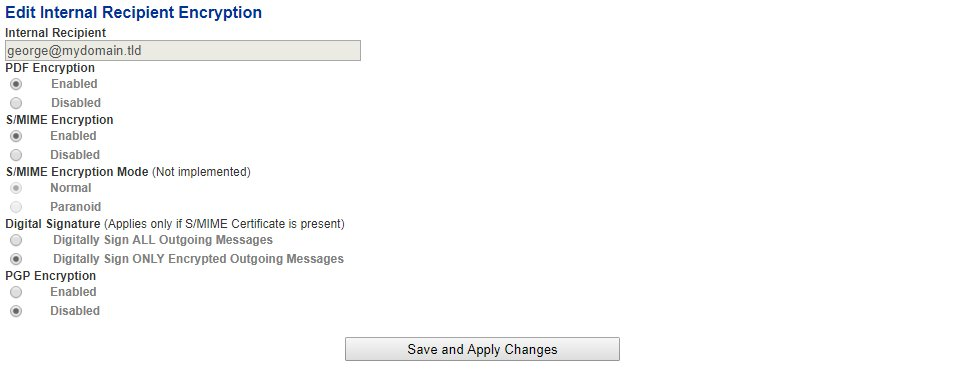](https://docs.deeztek.com/uploads/images/gallery/2021-01/image-1609681584848.png) 6. The button will display a status of **Saving and Apply Changes, please wait...**(**Figure 4**). **Figure 4** [](https://docs.deeztek.com/uploads/images/gallery/2021-01/image-1609681592985.png) 7. Configuring encryption can be a time consuming process. Please wait for a Success message from the system before clicking the **Back to Internal Recipients Encryption** button at the bottom of the page (**Figure 5**). **Figure 5** [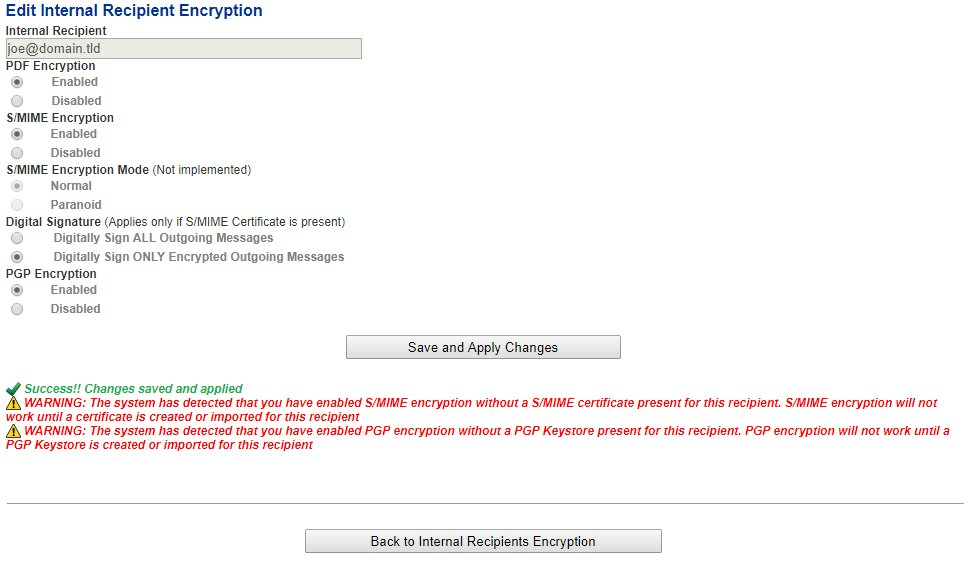](https://docs.deeztek.com/uploads/images/gallery/2021-01/image-1609681604978.png) ### Generate Internal Recipient S/MIME Certificate **Do not attempt to generate a S/MIME Certificate for an Internal Recipient unless you have already enabled S/MIME encryption on that recipient.** 1. Under the **S/MIME Certificate(s)** section of the Internal Recipient you wish to generate a certificate, click on the[](https://docs.deeztek.com/uploads/images/gallery/2021-01/image-1609681614972.png)icon. 2. You will be re-directed to the **Add Recipient S/MIME Certificate** page. 3. Assuming you have previously created an Internal Certificate Authority, under the **Certificate Authority** field, select the Internal Certificate Authority you wish to use to generate the S/MIME certificate. 4. Under the **S/MIME Certificate Validity Period**, select the number of years you wish this S/MIME Certificate to be valid. The default setting of 5 Years is recommended. 5. Under the **S/MIME Certificate Encryption Length**, select the length of the certificate. The default setting of 4096-bits is recommended. 6. Under the **S/MIME Certificate Algorithm**, select the algorithm you wish to generate the certificate. The default setting of RSA-SHA-512 is recommended. 7. Under the **Auto-Generate S/MIME Certificate and Private Key PFX password** field, select **Yes** to have the systtem automatically generate a password for the PFX file or select **No** if you wish to specify your own password. When generating a certificate, the system will also create a PFX file (Personal Information Exchange) and assign a password to it for security. A PFX file will contain both the public AND the private key of the generated certificate. The PFX file is used by the system for sending both the private and public key to the recipient that the certificate is being generated for for backup purposes or for configuring an email client. It's recommended that you allow the system to generate a PFX file password. 8. If you selected No in the **Auto-Generate S/MIME Certificate and Private Key PFX password**, enter the password you wish to use under the **S/MIME Certificate and Private Key PFX password** and enter the same password under the **Verify S/MIME Certificate and Private Key PFX password** field. 9. Click on the **Create Certificate** button (**Figure 6**). Please note that clicking the **Create Certificate** button will not change the button status and the system may appear unresponsive. Please wait until the certificate get created and the system re-directs you back to the **Internal Recipients Encryption** page. **Figure 6** [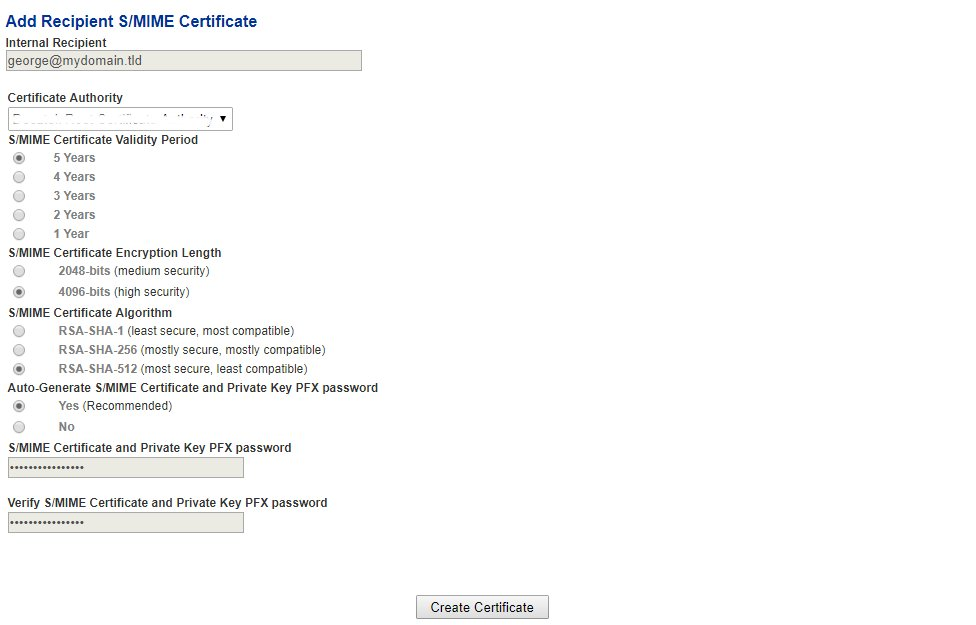](https://docs.deeztek.com/uploads/images/gallery/2021-01/image-1609681629583.png) 10. The system will generate the certificate and automatically redirect you back to the **Internal Recipients Encryption** page. 11. Under the Internal Repients listing on the S/MIME Cert(s) section of the recipient you just generated a certificate, you will note the[](https://docs.deeztek.com/uploads/images/gallery/2021-01/image-1609681647880.png)icon which will now be enabled and clickable indicating that there are certificates present (**Figure 7**). **Figure 7** [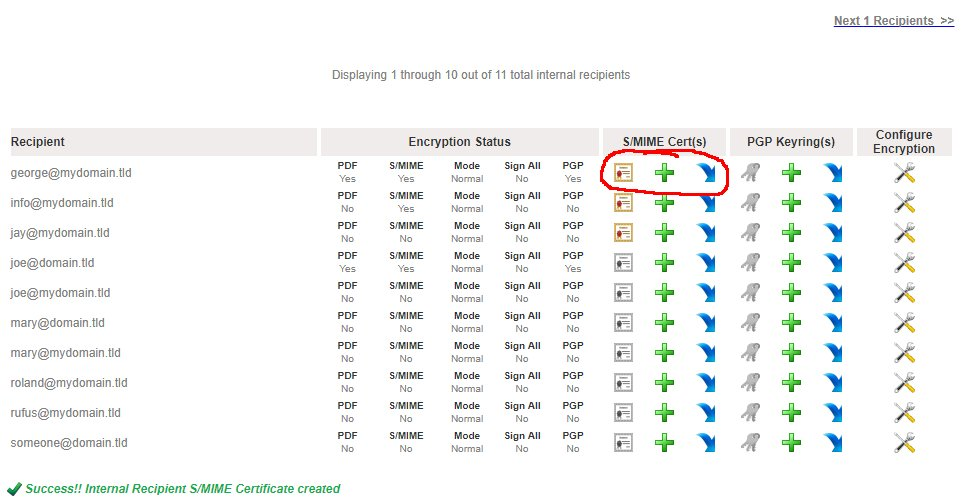](https://docs.deeztek.com/uploads/images/gallery/2021-01/image-1609681659089.png) ### Import Internal Recipient S/MIME Certificate **Do not attempt to import a S/MIME Certificate for an Internal Recipient unless you have already enabled S/MIME encryption on that recipient.** **Hermes SEG ONLY supports importing S/MIME certificates from PFX (Personal Information Exchange) files. Ensure that you have a PFX file which will contain both the certificate and the private key along with the password of the PFX file before proceeding.** 1. Under the **S/MIME Cert(s)** section of the Internal Recipient you wish to import a certificate, click on the[](https://docs.deeztek.com/uploads/images/gallery/2021-01/image-1609681669236.png)icon. 2. You will be re-directed to the **Import Recipient S/MIME Certificate** page. 3. Under the **Select PFX File** section, click on the **Choose File** button. 4. Browse to the location of the PFX file, select the file and click the **Open** button (**Figure 8**). **Figure 8** [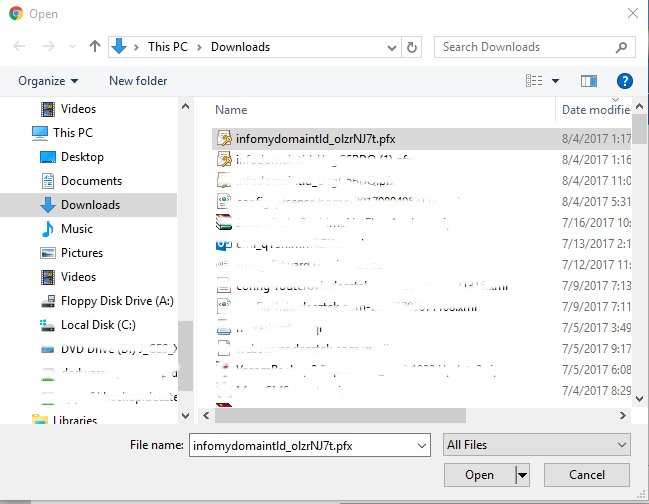](https://docs.deeztek.com/uploads/images/gallery/2021-01/image-1609681683343.png) 5. The name of the PFX file you chose will appear next to the **Choose File** button (**Figure 9**). **Figure 9** [](https://docs.deeztek.com/uploads/images/gallery/2021-01/image-1609681693427.png) 6. Under the **PFX file password** field, enter the password to the PFX file (**Figure 10**). **Figure 10** [](https://docs.deeztek.com/uploads/images/gallery/2021-01/image-1609681700633.png) 7. Under the **Add to Certificate Trust List** field, select **Yes** to add the certificate to the system Certificate Trust List. **Selecting Yes is always recommended** unless you have a specific reason not to trust the certificate you are importing. In that case, select No (**Figure 10**). **Figure 10** [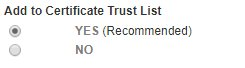](https://docs.deeztek.com/uploads/images/gallery/2021-01/image-1609681707879.png) 8. Click the **Import Certificate** button (**Figure 11**). **Figure 11** [](https://docs.deeztek.com/uploads/images/gallery/2021-01/image-1609681716057.png) 9. After a succesful import, click on the **Back to Internal Recipients Encryption** button on the bottom of the page (**Figure 12**). **Figure 12** [](https://docs.deeztek.com/uploads/images/gallery/2021-01/image-1609681724264.png) 10. Back at the **Internal Recipients Encryption** page, under the Internal Repients listing on the S/MIME Cert(s) section of the recipient you just imported a certificate, you will note the[](https://docs.deeztek.com/uploads/images/gallery/2021-01/image-1609681735000.png)icon which will now be enabled and clickable indicating that there are certificates present (**Figure 13**). **Figure 13** [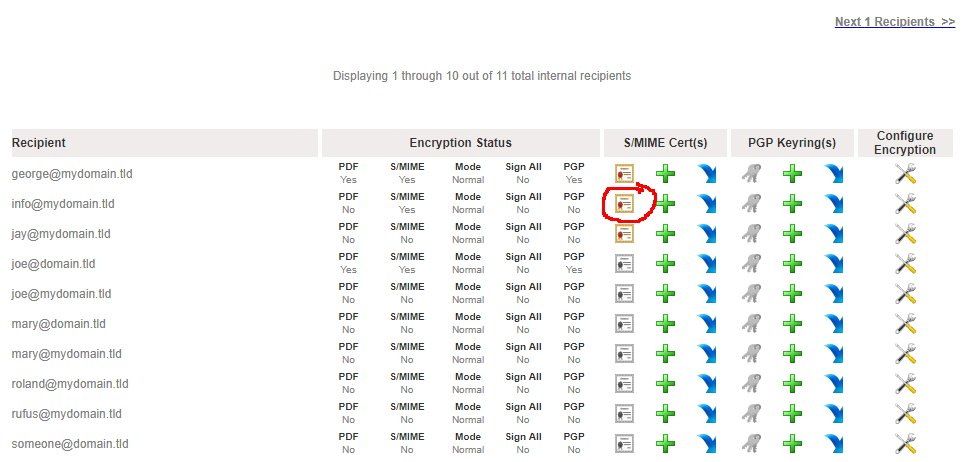](https://docs.deeztek.com/uploads/images/gallery/2021-01/image-1609681747069.png) ### Download or Send PFX File **Hermes SEG will allow you to download or send to the Internal Recipient the password protected PFX file containing the certificate and private key.** 1. At the **Internal Recipients Encryption** page, under the **S/MIME Cert(s)** section, click on the[](https://docs.deeztek.com/uploads/images/gallery/2021-01/image-1609681756705.png)icon of the recipient you want to download or send the PFX file. You will be re-directed to the **View Recipient S/MIME Certificates** page (**Figure 14**). **Figure 14** [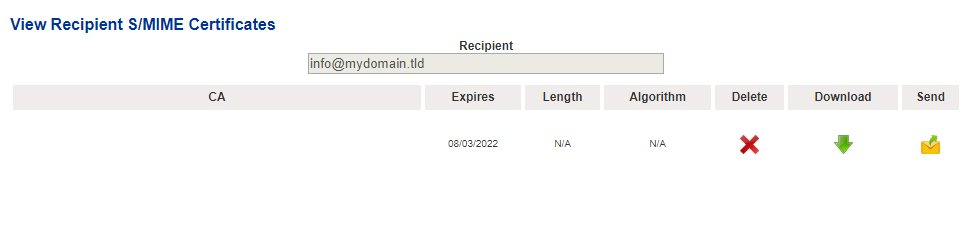](https://docs.deeztek.com/uploads/images/gallery/2021-01/image-1609681772173.png) **Download PFX File** **NEVER share PFX File passwords via unsecured means such as unencrypted email, SMS text etc.** 1. Click on the[](https://docs.deeztek.com/uploads/images/gallery/2021-01/image-1609681783491.png)icon of the certificate you wish to download. Your browser will immediately start downloading the PFX file. 2. If you wish to view the PFX password, click on the[ ](https://docs.deeztek.com/uploads/images/gallery/2021-01/image-1609681796269.png)icon. You will be re-directed to the **Send Recipient PFX Certificate File & Password** page, where you will be able to view the PFX file password under the **PFX Certificate File Password** field (**Figure 15**). **Figure 15** [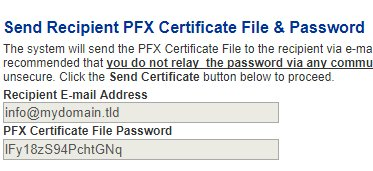](https://docs.deeztek.com/uploads/images/gallery/2021-01/image-1609681810036.png) **Send PFX File** **NEVER share PFX File passwords via unsecured means such as unencrypted email, SMS text etc.** **Hermes SEG will send the PFX file ONLY to the recipient email address that the certiciate was generated/imported for.** 1. Click on the[](https://docs.deeztek.com/uploads/images/gallery/2021-01/image-1609681817414.png)icon of the certificate you wish to send. 2. You will be re-directed to the **Send Recipient PFX Certificate File & Password** page. 3. Click on the **Send Certificate** button (**Figure 16**). **Figure 16** [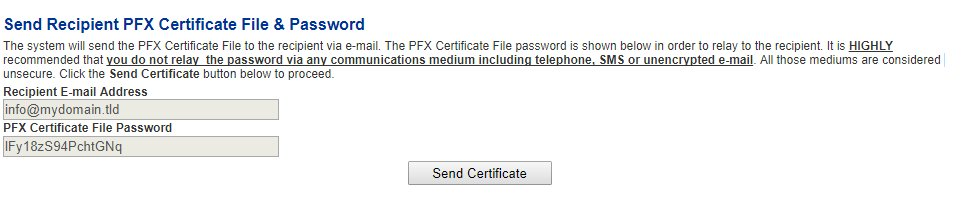](https://docs.deeztek.com/uploads/images/gallery/2021-01/image-1609681830409.png) 4. If necessary, provide the password to the PFX file to the recipient via secured means. ### Generate Internal Recipient PGP Keyring **Do not attempt to generate a PGP Keyring for an Internal Recipient unless you have already enabled PGP encryption on that recipient.** 1. Under the **PGP Keyring(s)** section of the Internal Recipient you wish to generate a PGP Keyring, click on the[](https://docs.deeztek.com/uploads/images/gallery/2021-01/image-1609681840135.png)icon. 2. You will be re-directed to the **Add Recipient PGP Keyring** page. 3. Under the **Recipient Real Name** section, enter the recipient's First and Last Name. 4. Under the **PGP Keyring Size**, select the size of the keyring. The default setting of 4096-bits is recommended. 5. Under the **Auto-Generate PGP Secret Key Password** field, select **Yes** to have the systtem automatically generate a password for the Secret Key or select **No** if you wish to specify your own password. It's recommended that you allow the system to generate a Secret Key password. 6. If you selected No in the **Auto-Generate PGP Seccret Key password**, enter the password you wish to use under the **PGP Secret Key Password** and enter the same password under the **Verify PGP Secret Key Password** field below the first one. 7. Click on the **Create Keyring** button (**Figure 17**). Please note that clicking the **Create Keyring** button will not change the button status and the system may appear unresponsive. Please wait until the keyring get created and the system re-directs you back to the **Internal Recipients Encryption** page. **Figure 17** [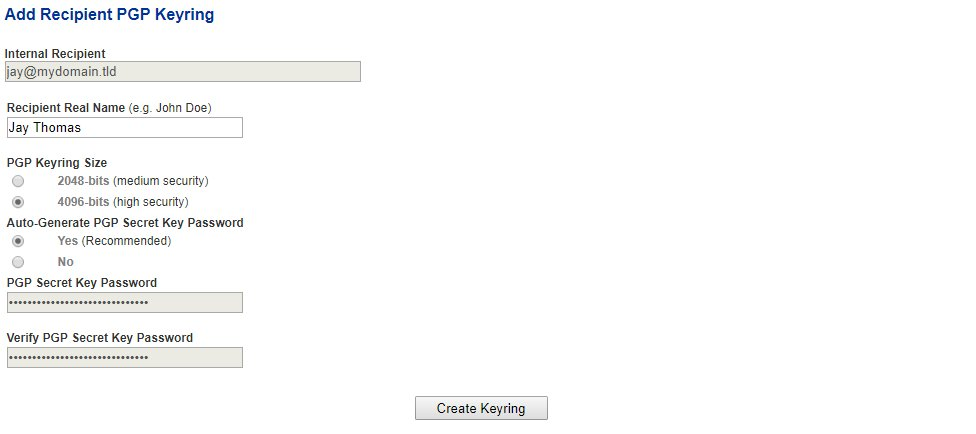](https://docs.deeztek.com/uploads/images/gallery/2021-01/image-1609681853742.png) 10. The system will generate the keyring and automatically redirect you back to the **Internal Recipients Encryption** page. 11. Under the Internal Repients listing on the **PGP Keyring(s)** section of the recipient you just generated a keystore, you will note the[](https://docs.deeztek.com/uploads/images/gallery/2021-01/image-1609681862499.png)icon which will now be enabled and clickable indicating that there are keyrings present (**Figure 18**). **Figure 18** [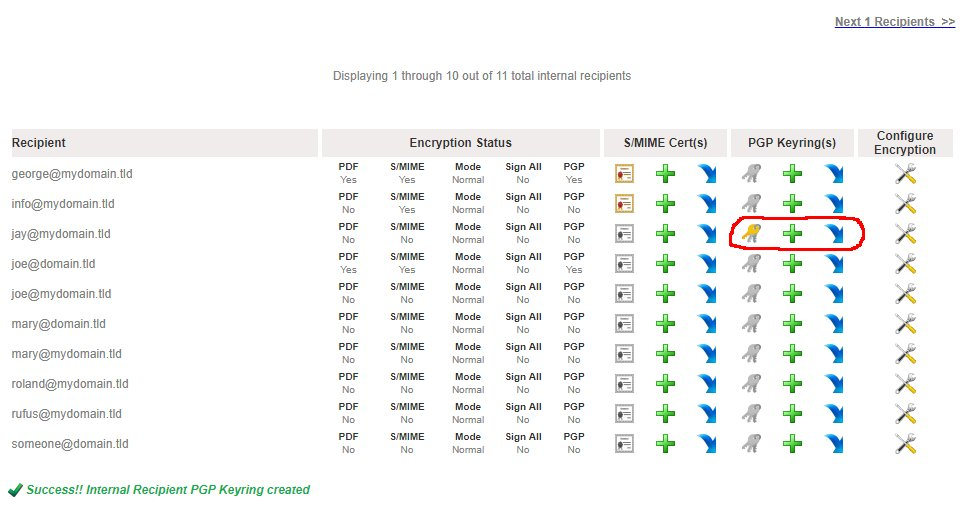](https://docs.deeztek.com/uploads/images/gallery/2021-01/image-1609681875758.png) ### Import Internal Recipient PGP Keyring **Do not attempt to import a PGP Keyring for an Internal Recipient unless you have already enabled PGP encryption on that recipient.** 1. Under the **PGP Keystore(s)** section of the Internal Recipient you wish to import a keystore, click on the[](https://docs.deeztek.com/uploads/images/gallery/2021-01/image-1609681888101.png)icon. 2. You will be re-directed to the **Import Recipient PGP Key** page. 3. Under the **PGP Key Type** field, select whether you will be importing a **Public** or a **Private** Key type. If you select a **Private** PGP Key Type, the **Private PGP Key Password** field below will become enabled. 4. If you selected a **Private** PGP Key Type above, enter the private key password in the **Private PGP Key Password** field. 5. Under the **Select PGP Key File** section, click on the **Choose File** button. 6. Browse to the location of the PGP key file, select the file and click the **Open** button (**Figure 19**). **Figure 19** [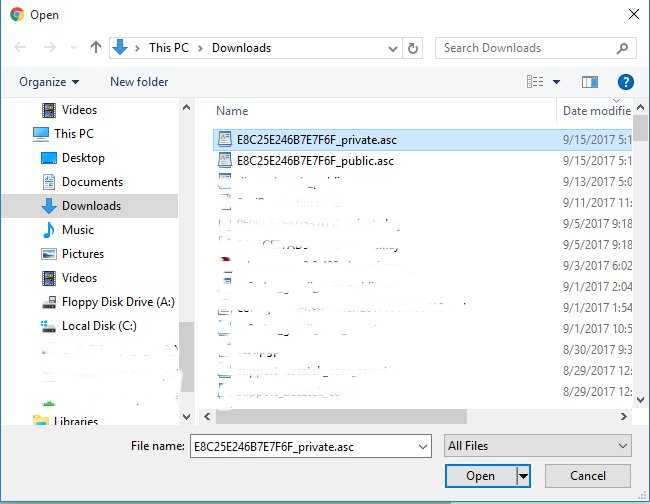](https://docs.deeztek.com/uploads/images/gallery/2021-01/image-1609681901975.png) 5. The name of the PGP Key file you chose will appear next to the **Choose File** button (**Figure 20**). **Figure 20** [](https://docs.deeztek.com/uploads/images/gallery/2021-01/image-1609681911068.png) 6. Click the **Import Key** button (**Figure 21**). **Figure 21** [](https://docs.deeztek.com/uploads/images/gallery/2021-01/image-1609681917473.png) 9. After a succesful import, click on the **Back to Internal Recipients Encryption** button on the bottom of the page (**Figure 12**). **Figure 22** [](https://docs.deeztek.com/uploads/images/gallery/2021-01/image-1609681924310.png) 10. Back at the **Internal Recipients Encryption** page, under the Internal Repients listing on the **PGP Keyring(s)** section of the recipient you just imported a certificate, you will note the[](https://docs.deeztek.com/uploads/images/gallery/2021-01/image-1609681931865.png)icon which will now be enabled and clickable indicating that there are keystores present (**Figure 23**). **Figure 23** [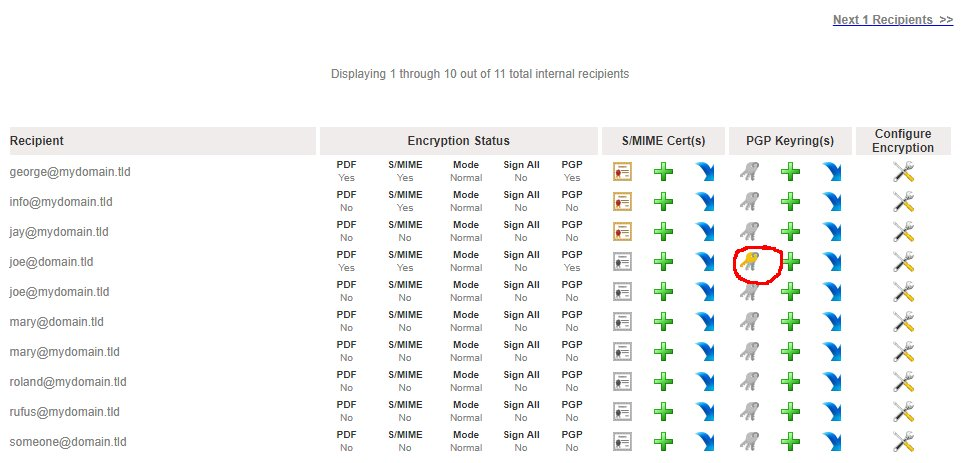](https://docs.deeztek.com/uploads/images/gallery/2021-01/image-1609681944363.png) ### Delete Key, Download Public Key, Download Private Key, View Private Key Password and Publish Public Key 1. At the **Internal Recipients Encryption** page, under the **PGP Keystore(s)** section, click on the[](https://docs.deeztek.com/uploads/images/gallery/2021-01/image-1609681952987.png)icon of the recipient. You will be re-directed to the **View Recipient PGP Keyrings** page (**Figure 24**). **Figure 24** [](https://docs.deeztek.com/uploads/images/gallery/2021-01/image-1609681965377.png) **Delete Key** 1. Click on the[](https://docs.deeztek.com/uploads/images/gallery/2021-01/image-1609681973148.png)icon of the key you wish to delete. You will be re-directed to the **Delete Recipient PGP Key** page (**Figure 25**). **Figure 25** [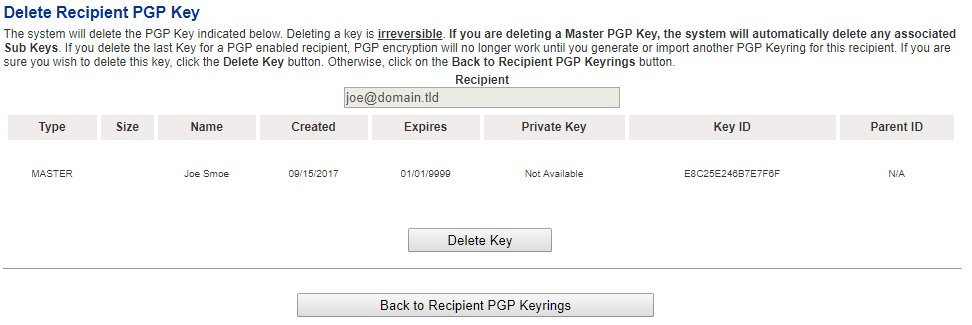](https://docs.deeztek.com/uploads/images/gallery/2021-01/image-1609681986666.png) 2. Click the **Delete** Key button. Please note that if you are deleting the **Master** Key, the system will automatically delete both the Master and any associated Sub Keys. If you are deleting a **Sub** Key, the system will only delete the Sub Key you selected to delete. If you wish to cancel, click on the **Back to Recipient PGP Keyrings** button. 3. Clicking the **Delete** button will delete the key and re-direct you back to the **Internal Recipients Encryption** page (**Figure 26**). **Figure 26** [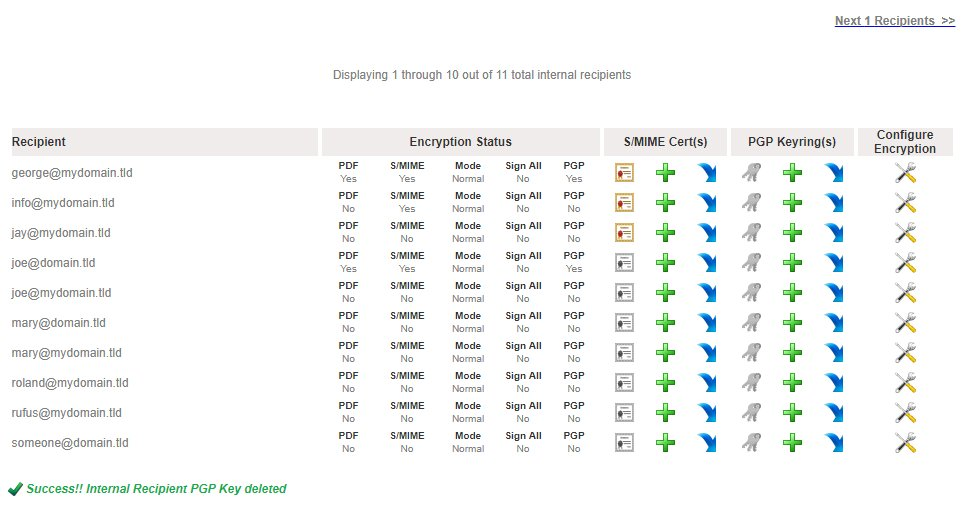](https://docs.deeztek.com/uploads/images/gallery/2021-01/image-1609681996852.png) **Download Public Key or Private Key** Downloading the Public and Private Keys is useful for importing those keys in 3rd party PGP applications such as Enigma, Kleopatra etc. 1. Click on the[](https://docs.deeztek.com/uploads/images/gallery/2021-01/image-1609682007409.png)icon under the **Download Public** or the **Download Private** column of the key you wish to download. Your browser will automatically begin downloading the key you clicked in **ASCII armor** format. **View Private Key Password** **This feature is useful in determining the Private Key password that the system automatically generates when generating a PGP Keyring. NEVER share Private Key passwords via unsecured means such as unencrypted email, SMS text etc.** 1. Click on the[](https://docs.deeztek.com/uploads/images/gallery/2021-01/image-1609682021264.png)icon under the **View Password** column of the key you wish to view the private key password. 2. You will be re-directed to the **View Recipient PGP Private Key** **Password** page (**Figure 27**). **Figure 27** [](https://docs.deeztek.com/uploads/images/gallery/2021-01/image-1609682140278.png) **Publish Public PGP Key** This feature is helpful with publishing recipient Public PGP Keys to Public PGP Key Servers. Public PGP Key Servers act as central repositories for public keys in order to assist in PGP cryptography.Please note that if no PGP Key Servers are defined under **Encryption --> PGP Key Servers** the icons under the Publish Key column of every key will be disabled[](https://docs.deeztek.com/uploads/images/gallery/2021-01/image-1609682188837.png).
1. Click on the[](https://docs.deeztek.com/uploads/images/gallery/2021-01/image-1609682219443.png)icon under the **Publish Key** column of the key you wish to publish. 2. You will be re-directed to the **Publish Recipient PGP Public Key** page (**Figure 28**). **Figure 28** [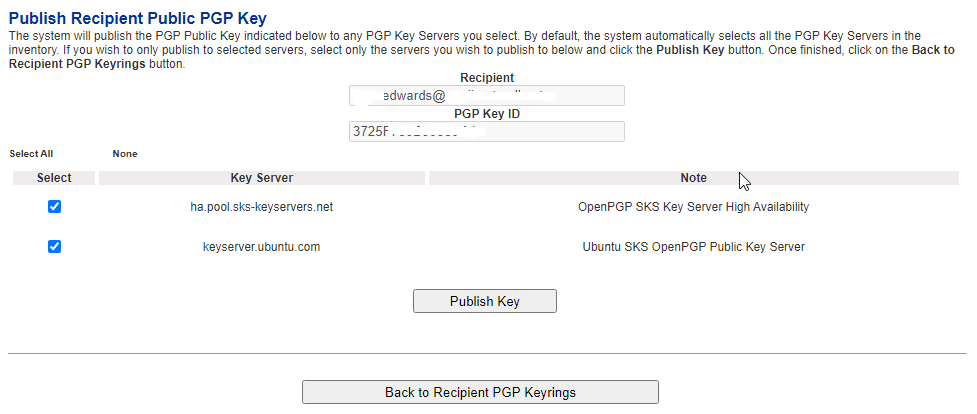](https://docs.deeztek.com/uploads/images/gallery/2021-01/image-1609682314479.png) 3. By default all the configured Public PGP Key Servers are selected. If desired, uncheck any key servers from the list that you do not wish to publish the public key and click the **Publish Key** button. 4. When finished, click, on the **Back to Recipient PGP Keyrings** button on the bottom of the page.Please note that if no PGP Key Servers are defined under **Encryption --> PGP Key Servers** the icons under the Publish Key column of every key will be disabled[](https://docs.deeztek.com/uploads/images/gallery/2021-01/image-1609689330247.png).
1. Click on the[](https://docs.deeztek.com/uploads/images/gallery/2021-01/image-1609689351573.png)icon under the **Publish Key** column of the key you wish to publish. 2. You will be re-directed to the **Publish Recipient PGP Public Key** page (**Figure 39**). **Figure 39** [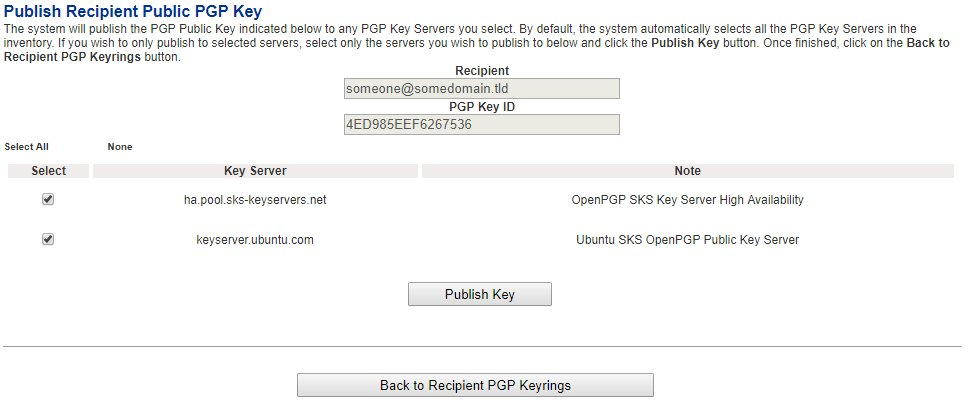](https://docs.deeztek.com/uploads/images/gallery/2021-01/image-1609689373352.png) 3. By default all the configured Public PGP Key Servers are selected. If desired, uncheck any key servers from the list that you do not wish to publish the public key and click the **Publish Key** button. 4. When finished, click, on the **Back to Recipient PGP Keyrings** button on the bottom of the page.