System
- AD Integration
- Admin Authentication
- Admin Console Firewall
- Network Settings
- Console Settings
- Mail Queue
- System Logs
- System Backup and Restore
- System Certificates
- System Settings
- System Status
- System Update
- System Users
- Email Archive
- System Reboot & Shutdown
AD Integration
NOTE: This feature is only available with Hermes SEG Pro License.
Hermes SEG requires a listing of Internal Recipients in order to process incoming email and deliver that email to the correct recipient mailboxes located on an email server(s) that are specified under the Gateway --> Relay Domains part of the system.
Hermes SEG allows you to connect to Active Directory in order to automatically import the SMTP email addresses of your Active Directory users without having to manually input each one. The system will create Internal Recipients from each SMTP address it imports automatically. The import process can also be set to run at a scheduled interval so user additions or deletions will automatically be handled by Hermes SEG without manual intervention.
In order to import Internal Recipients via Active Directory you must first create an AD connection.
- Click the Create Connection button on top of the page (Figure 1)
Figure 1

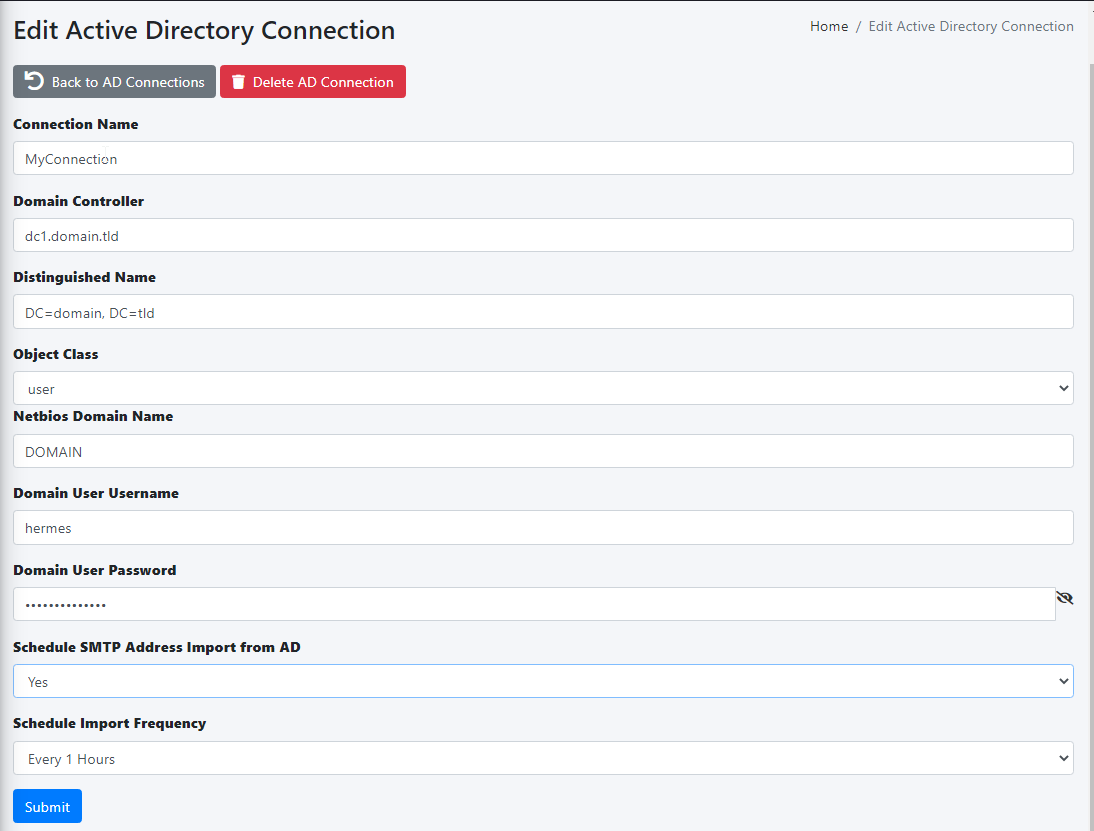
- Under the Connection Name field, enter a descriptive name for the connection
- Under the Domain Controller field, enter the IP or the FQDN of a domain controller or simply enter the FQDN of your domain so you don't bind the connection to just one domain controller.
- Under the Distinguished Name field, enter the DN of the recipients locations, or you can simply enter the DN of the entire domain. For example, if your domain is east.domain.tld, your DN should be DC=east, DC=domain, DC=tld. Ask your Administrator if you have any questions
- Under the Object Class drop-down field, select user, organizationalPerson, person or top depending on the objectClass you wish to use to filter your AD users
- Under the Netbios Domain Name enter your domain Netbios name. For example, if your domain is domain.tld, your netbios domain could simply be DOMAIN. Ask your Administrator if you have any questions
- Under the Domain User Username field enter a username that has access to enumerate user objects in your domain
- Under the Domain User Password field, enter the password for the username that has access to enumerate user objects in your domain
- If you wish to schedule the automatic import of Internal Recipients on a specified interval, ensure you select Yes from the Schedule SMTP Address Import from AD drop-down, select the interval form the Schedule Import Frequency drop-down and click the Submit button (Figure 2)
Figure 2
If you entered the correct information, you will get a Success! Changes saved message on top of the page, otherwise you will get a specific error message on top of the page depending on the error encountered (Figure 3)
Figure 3

Click on the Back to AD Connections button and back in the AD Integration page, you should see the newly created AD connection (Figure 4)
Figure 4
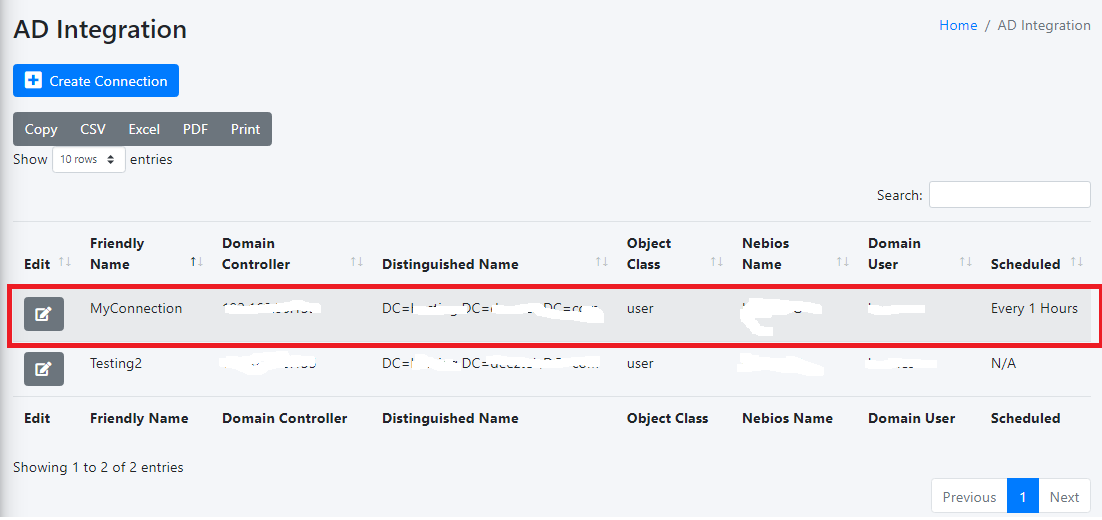
Clicking on the  button on an AD connection, will take you back to the Edit Active Directory Connection page which will allow you to edit or delete the connection
Admin Authentication
Hermes SEG utilizes Authelia Authentication Server for controlling access to the the Hermes SEG Administration Console. The Authentication Settings page allows you to change many Authelia settings to suit your needs.
JWT Secret
The JWT Secret is used to craft JWT tokens by the identity verification process. Hermes SEG randomly generates a 32-character alphanumeric string at the time of installation. It's usually not necessary to change this field. However, if you wish to change it, click the ![]() button and the system will generate a new one (Figure 1).
button and the system will generate a new one (Figure 1).
Figure 1

If you wish to generate your own, Hermes SEG will accept a minimum 32-character and a maximum 64-character alphanumeric string only.
Storage Encryption Key
The Storage Encryption Key is used to encrypt data in the database. Hermes SEG randomly generated a 32-character alphanumeric string at the time of installation. It's usually not necessary to change this field unless the key gets compromised. if you wish to change it, click the ![]() button and the system will generate a new one (Figure 2).
button and the system will generate a new one (Figure 2).
Figure 2
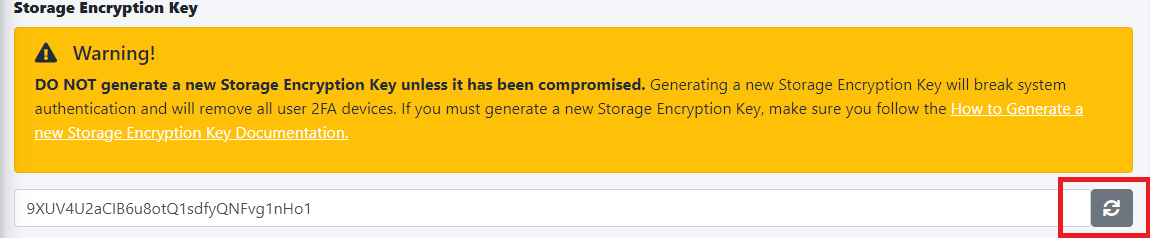
If you wish to generate your own, Hermes SEG will accept a minimum 32-character and a maximum 64-character alphanumeric string only.
Please note that if you generate a new Storage Encryption Key, it will break authentication for System Users that utilize 2FA devices.
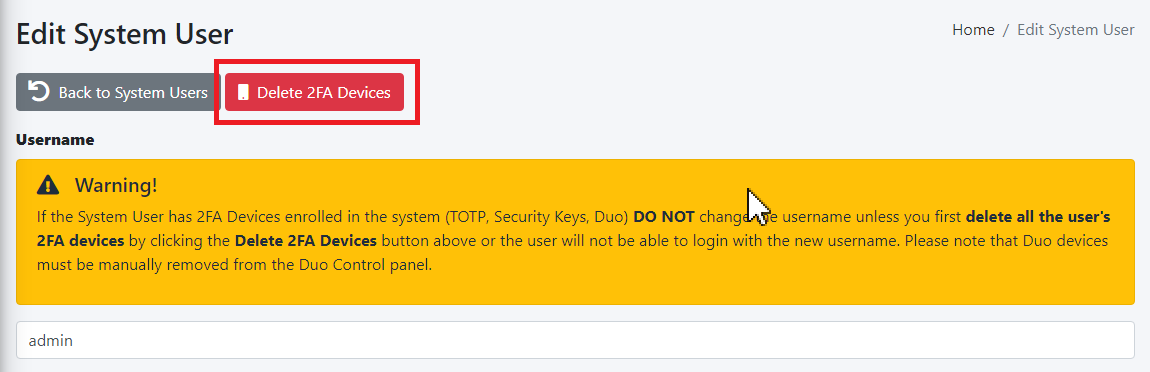
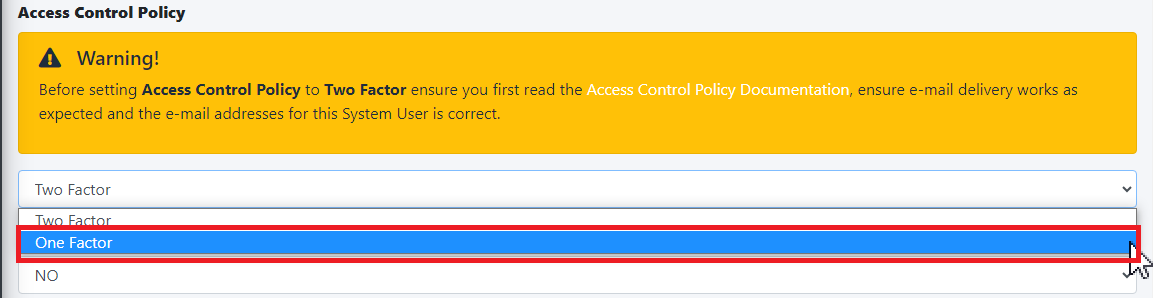
Before generating a new Storage Encryption Key, ensure you first delete any 2FA devices for each System User by navigating to System --> System Users --> Edit, click the Delete 2FA Devices button in the Edit System User page and set the Access Control Policy to One Factor. After generating a new Storage Encryption Key, you can go back and set the Access Control Policy to Two Factor and have the users re-register their 2FA authentication devices. (Figure 3).
Figure 3
Reset Password Function
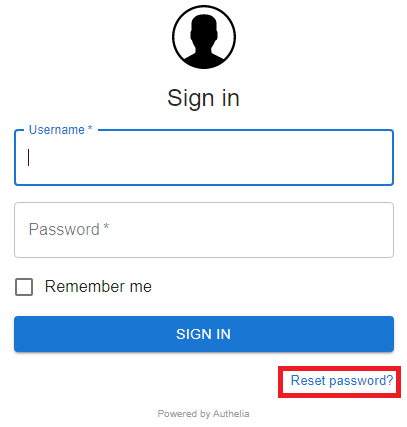
The Reset Password Function field allows to you switch between Enable (Default) which enables the Reset password link and functionality in the Sign in screen and Disable which disables the link and functionality in the Sign in screen (Figure 2). The Reset Password Function only works if the System Users have valid e-mail addresses assigned to them. E-mail addresses can be assigned to System Users by navigating to System --> System Users.
Figure 2
Session Name
The Session Name field specified the name of the session cookie which by default it's set to hermes_session. It's usually not necessary to change this field. If you with to change it, it must be an alphanumeric string with undescores (_) or dashes (-) in the name.
Session Secret
The Session Secret field is a string that is used to encrypt session data with Redis. Hermes SEG randomly generates a 20-character alphanumeric string at the time of installation. It's usually not necessary to change this field. However, if you wish to change it, click the ![]() button and the system will generate a new one (Figure 3).
button and the system will generate a new one (Figure 3).
Figure 3

If you wish to generate your own, Hermes SEG will accept a minimum 12-character and a maximum 20-character alphanumeric string only.
Session Expiration
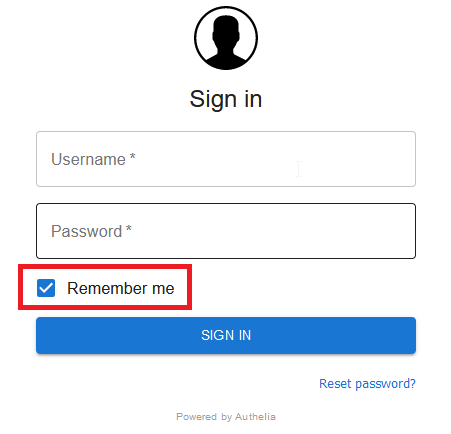
The Session Expiration field specifies the amount of time (in seconds) before the cookie expires and the session is destroyed. By default it's set to 3600 (1 Hour). This can be overridden by clicking on the Remember me checkbox on the Sign in screen (Figure 4).
Figure 4
Session Inactivity
The Session Inactivity field specifies the amount of time (in seconds) the user can be inactive before the session is destroyed. By default it's set to 3600 (1 Hour).
SMTP Host
The SMTP Host field specifies the IP/Host Name of the e-mail server that Authelia will use to send out various notifications such password resets, 2FA notifications etc. By default it's set to the Hermes SEG appliance loopback address [127.0.0.1]. It's normally not necessary to change this field.
SMTP Port
The SMTP Port field specifies the port number of the e-mail server that Authelia will use to send out various notifications such password resets, 2FA notifications etc. By default it's set to the Hermes SEG internal port 10026. It's normally not necessary to change this field.
SMTP From Address
The SMTP From Address field is the e-mail address that Authelia will use to send out various notifications such password resets, 2FA notifications etc. It should be set to a valid e-mail address for a domain Hermes SEG relays.
SMTP E-mail Subject
The SMTP E-mail Subject field specifies the subject format all Authelia outgoing e-mails will have. By default it's set to [Hermes SEG] {title]. The {title} is a variable authelia uses for various functions and should be left intact.
No of Login Failures Before User is Banned
The No of Login Failures Before User is Banned field specified how many times a system user is allowed to fail authentication before that user is banned and not able to login. By default it's set to 5.
Time Between Failed Logins
The Time Between Failed Logins field specifies the period of time (in seconds) Authelia will search for failed login attempts to count them as failed logins before banning a user. By default it's set to 120 (2 minutes).
Banned Time
The Banned Time field specifies the amount of time (in seconds) a user will be banned after failing authentication. By default it's set to 300 (5 minutes).
Log Level
The Log Level field specifies the log level used by Authelia. It can be set to Trace, Debug, Info, Warn or Error. Setting the Log Level to Trace will expose the /debug/vars and /debug/pprof endpoints which should never be enabled unless absolutely necessary during troubleshooting. By default it's set to Debug.
Log Format
The Log Format field specified the log type used by Authelia. It can be set to JSON or Text. By default it's set to Text.
Duo Security
Duo Security allows you to configure 2FA utilizing Duo mobile push. By default, Duo Security is set to disabled. In order to enable and configure Duo Security you must have an existing Duo account. If you don't already have one, you can easily set one up for free at https://www.duo.com.
- In your Duo Dashboard, click on on Applications --> Protect an Application (Figure 5).
Figure 5

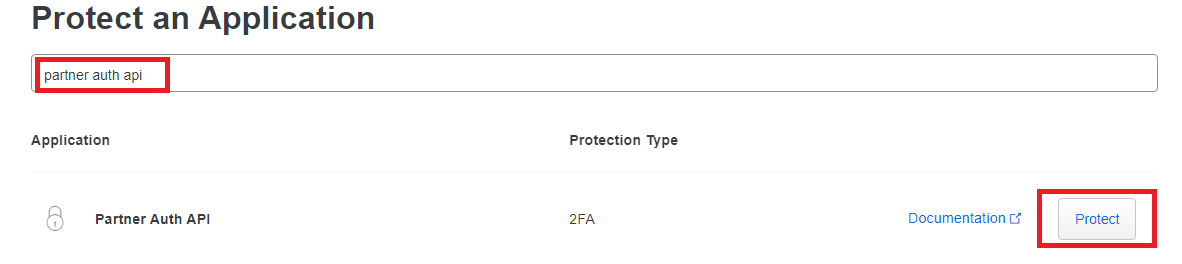
- In the Protect an Application screen, search for "partner auth api" and then click on the Protect button (Figure 6).
Figure 6
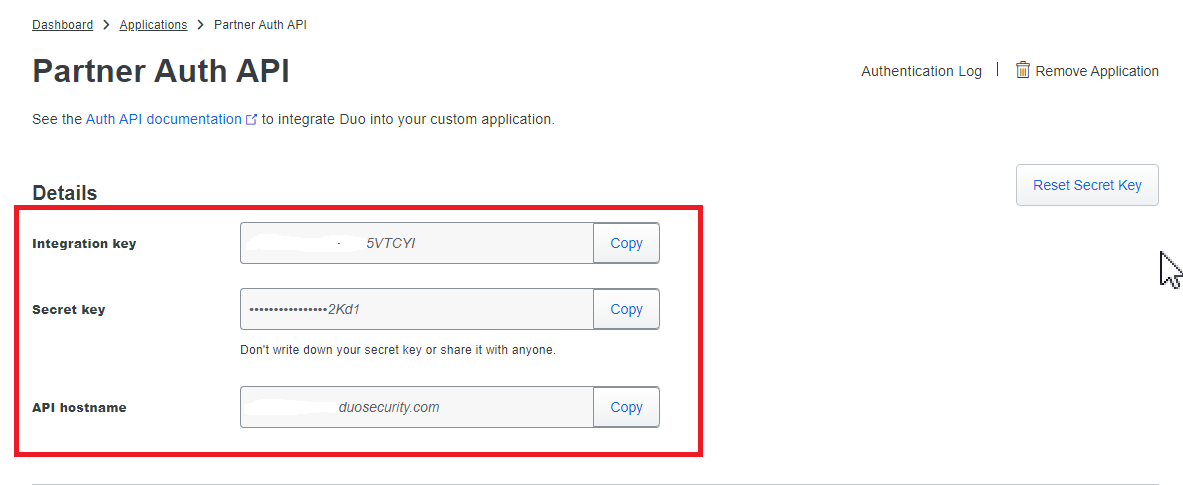
- In the Partner Auth API screen in the Details section, take a note of the Integration key, Secret key and the API hostname (Figure 7).
Figure 7
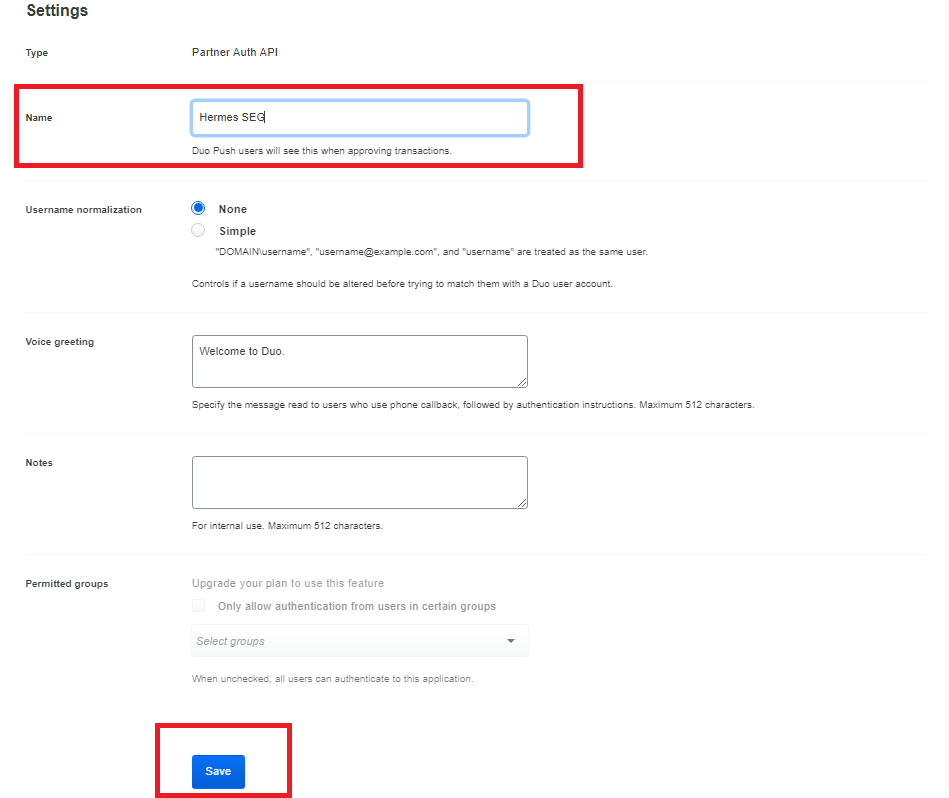
- In the Partner Auth API screen in the Settings section, change the Name field to Hermes SEG or whatever name makes sense to you and click the Save button (Figure 8).
Figure 8
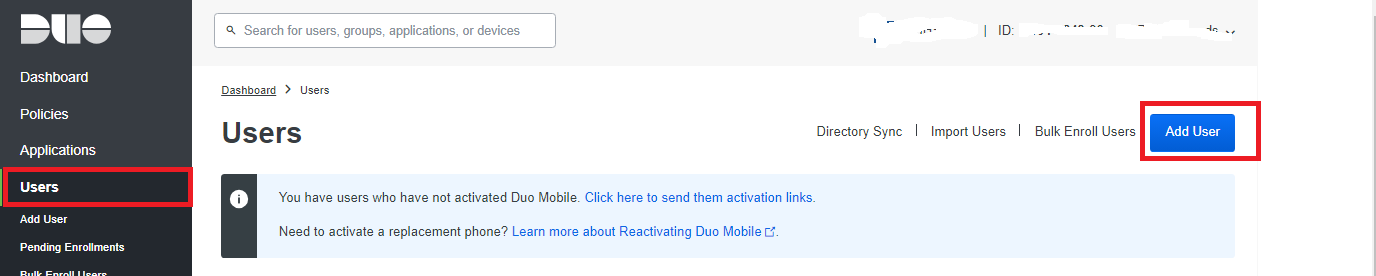
- In your Duo Dashboard, click on on Users --> Add User (Figure 9).
Figure 9
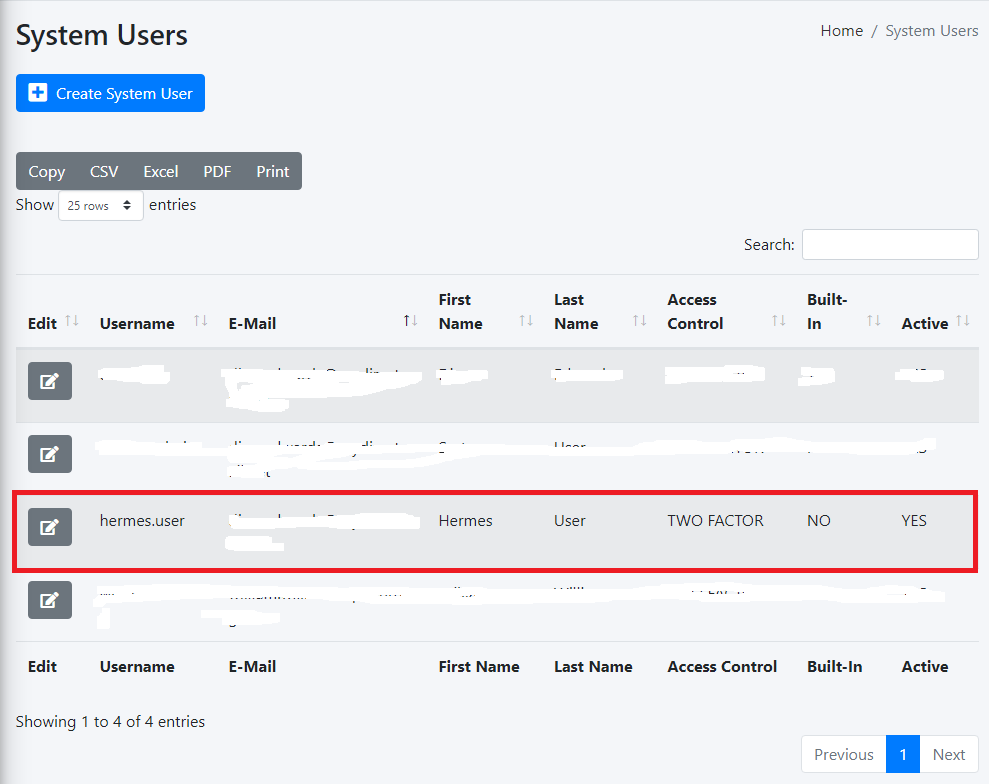
- In the Add User screen, in the Username field, ensure you add a username that matches a system user username that's already added in the Hermes SEG Admin Console --> System --> System User and has TWO FACTOR authentication enabled and click the Add User button. (Figure 10 and Figure 11).
Figure 10
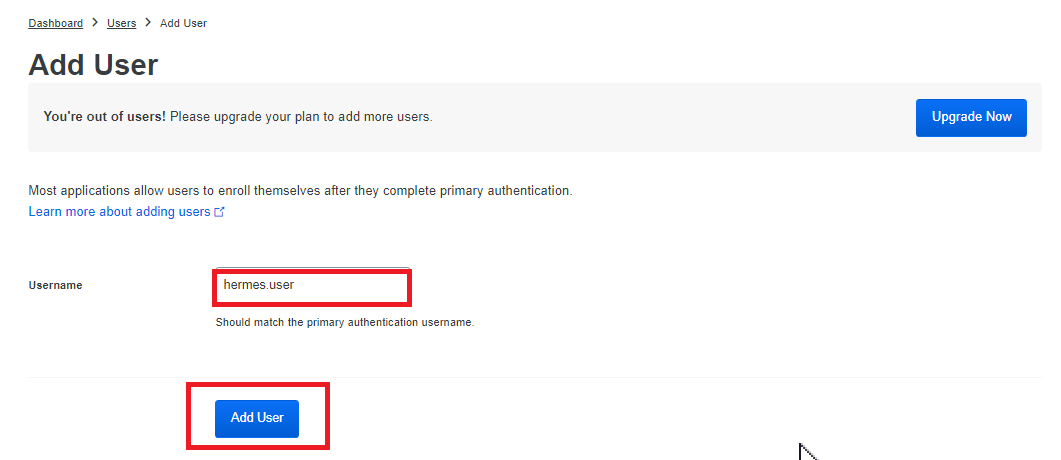
Figure 11
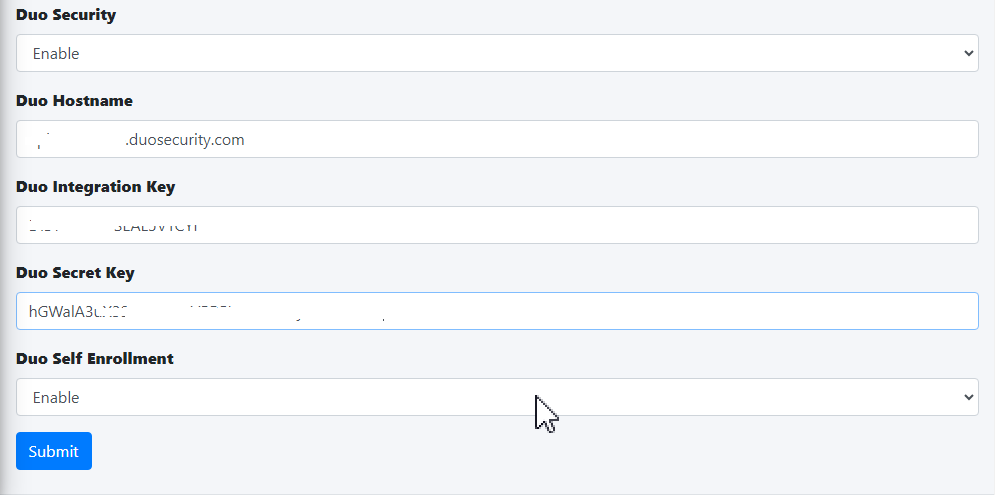
- In the Hermes SEG Admin Console, navigate back to System --> Admin Authentication, toggle the Duo Security drop-down from Disabled to Enabled and in the fill in the Duo Hostname, Duo Integration Key, Duo Secret Key with the values you got from the Duo Dashboard earlier, leave the Duo Self-Enrollment drop-down to Enabled (Recommended) and click the Submit button (Figure 11).
If you set the Duo Self Enrollment drop-down to Disabled then your user's 2FA device must be already pre-enrolled in the Duo Dashboard. This guide does not cover that process.
Figure 11
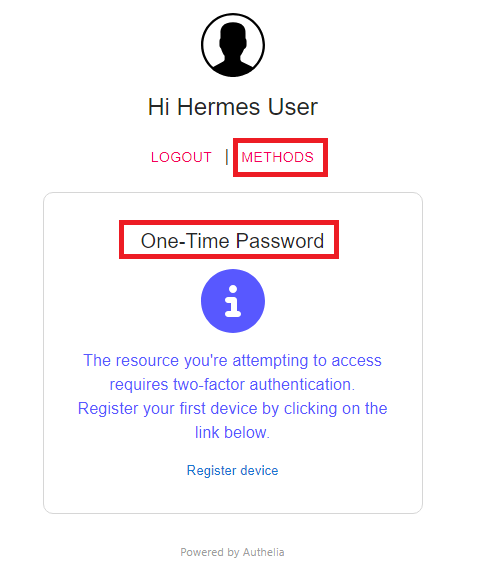
- If this is your first time logging into Hermes SEG, 2FA defaults to TOTP (Timed One-Time Password). In order to utilize Duo Security ensure you have already installed on your device the Duo Mobile app from your Google Play store or Apple App Store and click on the METHODS link in the One-Time Password screen. (Figure 12).
Figure 12
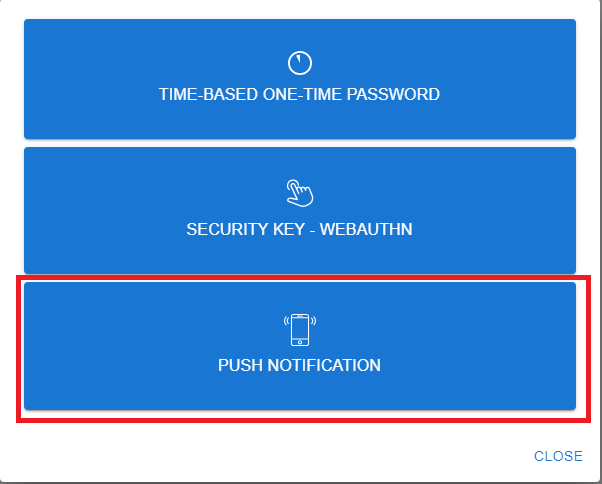
- On the following screen, click on the PUSH NOTIFICATION button (Figure 13).
Figure 13
- On the Push Notification screen, click on the Register device link (Figure 14).
Figure 14

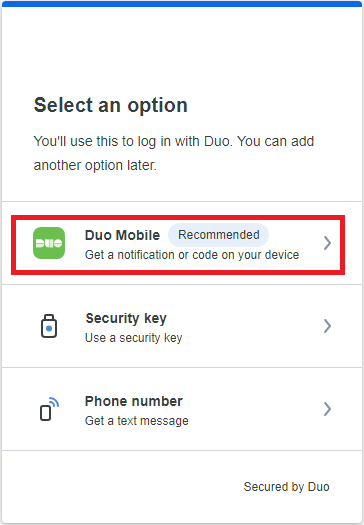
- Your browser will be redirected to the Duo Security self enrollment portal. Click the Next button until you reach the Select an option screen and select the Duo Mobile option and proceed to enroll you device as instructed. (Figure 15).
Figure 15
- Once you have successfully enrolled your device with Duo, go back to the Hermes SEG Admin Console login screen, logout and re-login and if everything was setup correctly you should get a push notification on your device and upon approval you should be able to successfully login to Hermes SEG Admin Console.
Admin Console Firewall
This feature is only available with Hermes SEG Pro License.
The Admin Console Firewall allows you to specify IP Address(es) that will be allowed access to the Hermes Admin Console (/admin/ and the Ciphermail Admin Console (/ciphermail/). The Firewall does NOT affect the User Console (/users/). By default, all IP Addresses are allowed access to the Admin and the Ciphermail Admin consoles.
For best security, it's recommended that you enable the Admin Console Firewall to restrict access only to specified IP addresses.
Note: In order to prevent a lockout of the Administration Console, the system will not allow you to enable the Administration Console Firewall unless the IP address that you are accessing the the Administration Console from is in the list of Allowed IP Addresses. Additionally, it will not allow you to Delete the IP address you are accessing the Administration Console from from the list of Allowed IP Addresses.
- Before the system will allow you to enable the firewall, you must first add the IP Address that you are accessing the Admin Console from, which can be found on the top right corner of the by hovering over the
 icon (Figure 1):
Figure 1

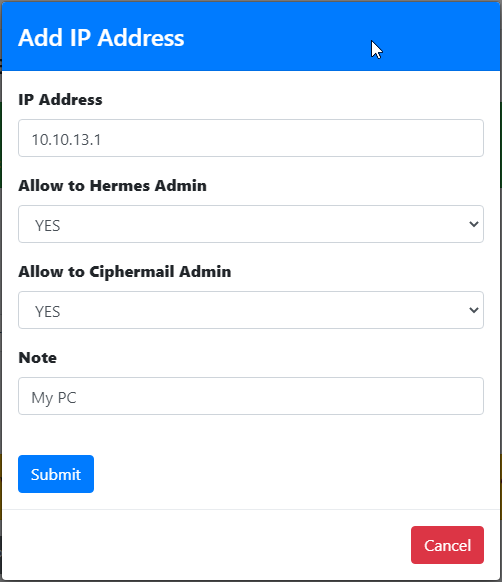
- Click on the Add IP Address button and in the resultant window enter your IP address and set the Allow to Hermes Admin and optionally Allow to Ciphermail Admin drop-downs to YES, enter a note in the Note field for your own use and click the Submit button (Figure 2):
Figure 2
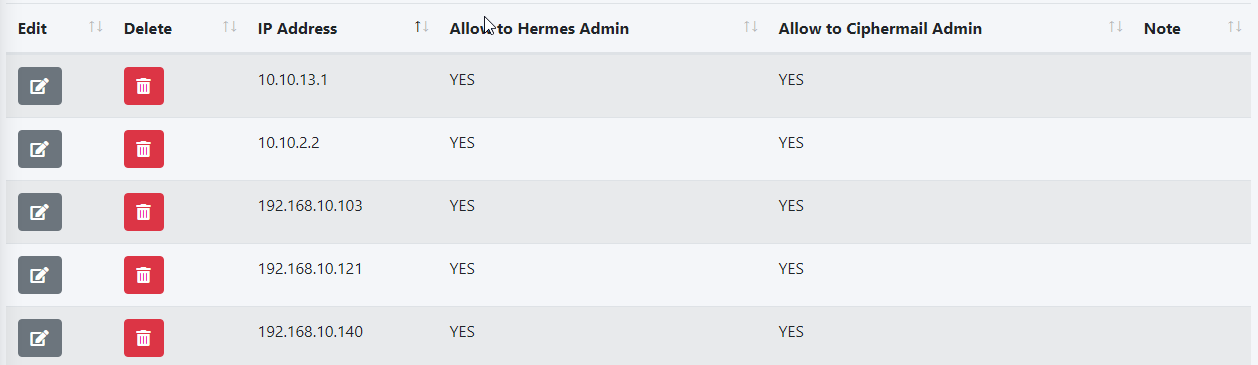
- Repeat the procedure to add any additional IPs as necessary.
- As you add each IP address, they will show up under the Allowed IP Addresses section (Figure 3):
Figure 3
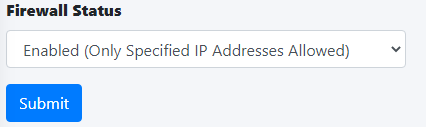
- Once you are finished adding IP address(es), set the Firewall Status drop-down to Enabled and click the Submit button (Figure 4):
Figure 4
Click the Apply Settings button to apply the changes to the firewall (Figure 5):
Figure 5

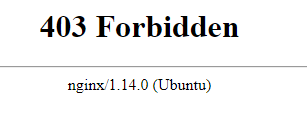
- Test your firewall by attempting to access the Admin Console at https://<ipaddress>/admin/ where <ipaddress> is the IP address or the hostname of your Hermes SEG from an IP Address that you did NOT allow in Admin Console Firewall. You should a 403 Forbidden message (Figure 5)
Figure 5
Network Settings
In this section you can setup the Hermes SEG network settings such as Hostname, IP address, Subnet, DNS and gateway. It's highly recommended that the Network Mode be set to Static.
The The Host Name and Primary Domain Name you set in this section is used for SMTP transactions such as SMTP TLS as well as system functions such as OS hostname.
Figure 1
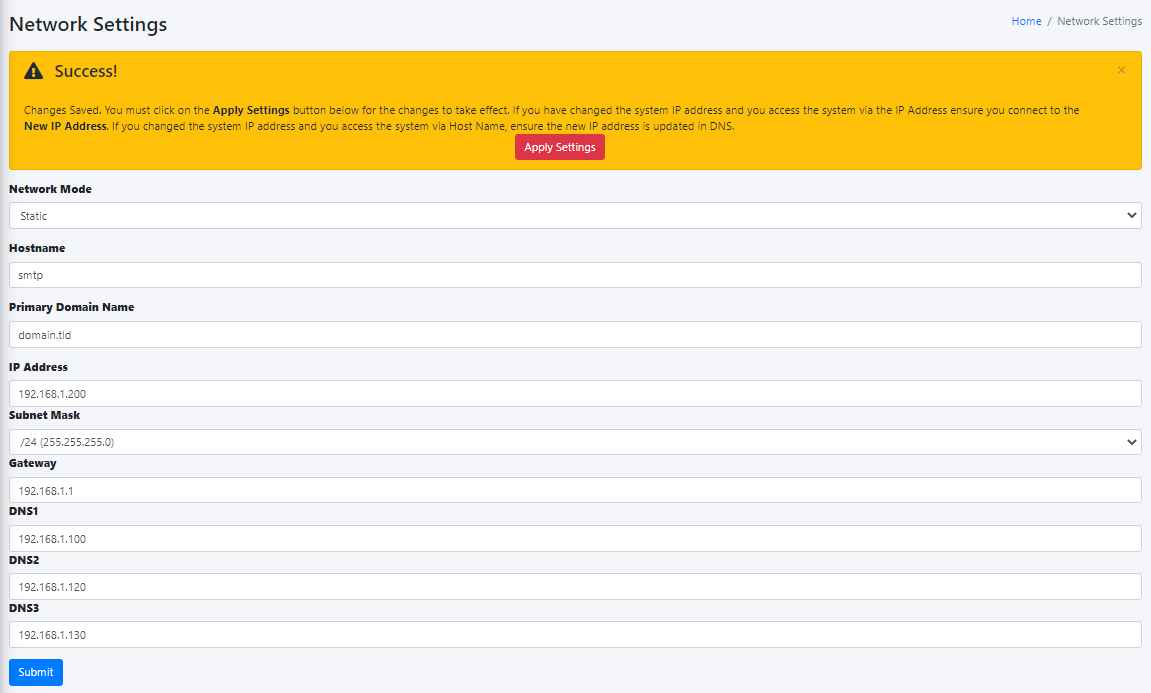
- If you changed Hermes SEG IP Address, your browser will most likely time out. Remember, to access the Hermes SEG Administrator Console Web GUI at https://<NEW_IP_ADDRESS/admin/ where is the <NEW_IP_ADDRESS> is the IP you set above.
Console Settings
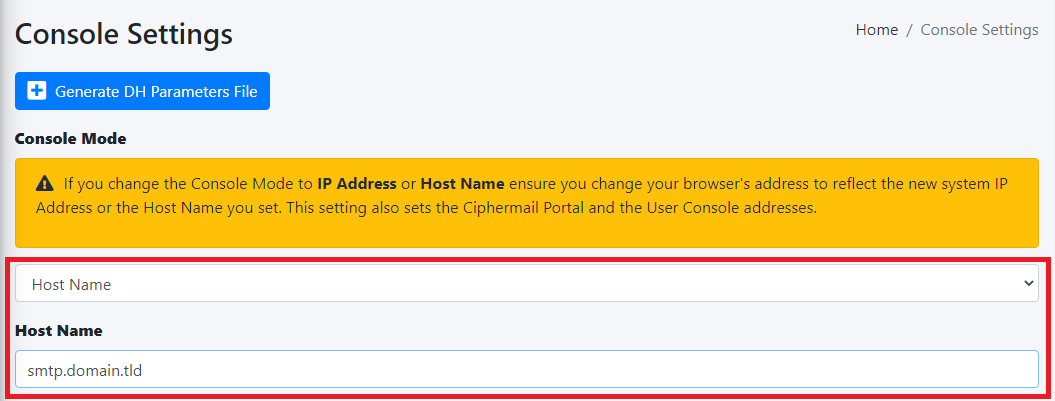
The Hermes SEG Console Settings sets the method you wish to access Hermes SEG machine which includes the Admin Console, User Console and the Ciphermail Console. By default, the Console Mode is set to IP Address, however, an IP address is not contusive to using SSL certificates. Therefore, if you plan to use a SSL certificate to access the Hermes SEG machine, you must set the Console Mode to Host Name. The Host Name you set it does NOT necessarily have to the the same Host Name you set in Network Settings above. The Host Name and Primary Domain Name you set in the Network settings is used for SMTP transactions such as SMTP TLS and it's not related to Hermes SEG console access.
Figure 1
- The Console Certificate field is pre-populated with the system-self-signed certificate. If you wish to use a SSL certificate you set in the Set System Certificates section above, simply delete the system-self-signed entry and start typing the friendly name of the certificate you setup previously that matches the host name. The system will locate the certificate and display it in a drop-down list. Click on the certificate and the system will automatically populate all the rest of the Certificate fields such as the Subject, Issuer, Serial and Type (Figure 2):
Figure 2

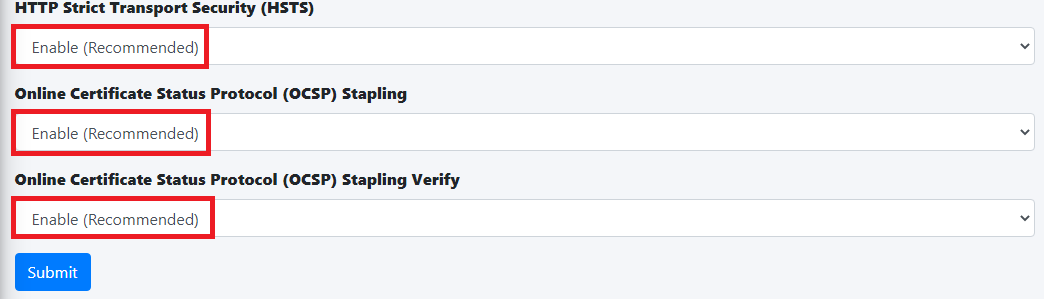
- We highly recommend that you enable HTTP Strict Transport Security (HSTS), Online Certificate Status Protocol (OCSP) Stapling, Online Certficiate Status Protocol (OCSP) Stapling Verify and click the Submit button (Figure 3):
Figure 3
After clicking the Submit button and you changed the Console Mode from IP Address to Host Name, your browser will NOT automatically redirect you to the new console address. Ensure you enter the new address in your browser as https://<HOST_NAME>/admin/ where <HOST-NAME> is the new Host Name you set above.
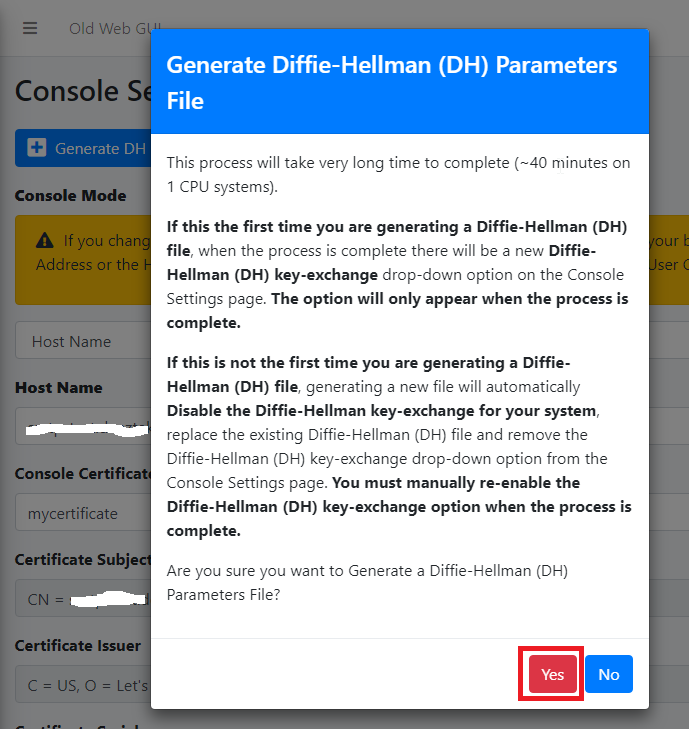
- Additionally, we recommend that you generate a DH (Diffie-Hellman) Parameters file by clicking the Generate DH Parameters File button and on the resultant Generate Diffie-Hellman (DH) Parameters File confirmation window, click on Yes (Figure 4):
Figure 4
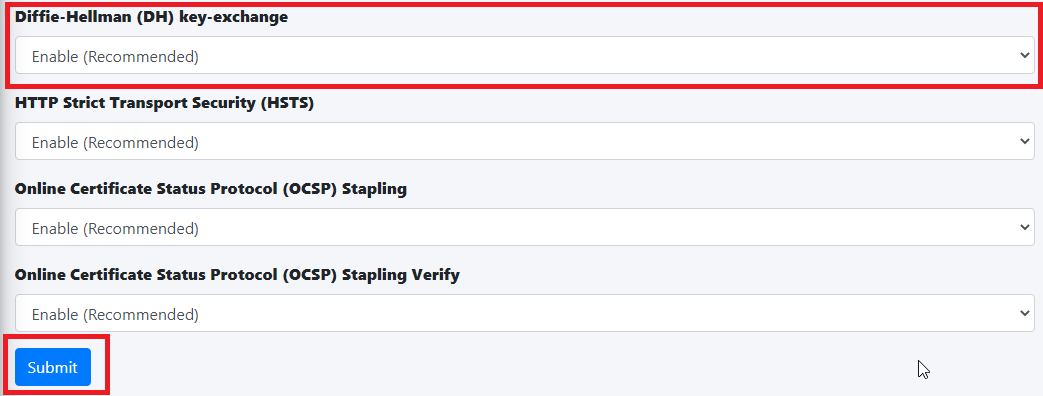
- Generating a DH Parameters file can take a very long time to complete (~40 minutes on 1-CPU systems). You can proceed to configure the rest of your system (DO NOT reboot the system while it's generate a DH Parameters file) and check back under System --> Console Settings to see if a new Diffie-Hellman (DH) key-exchange drop-down appears set it to Enable and click the Submit button below (Figure 5).
Figure 5
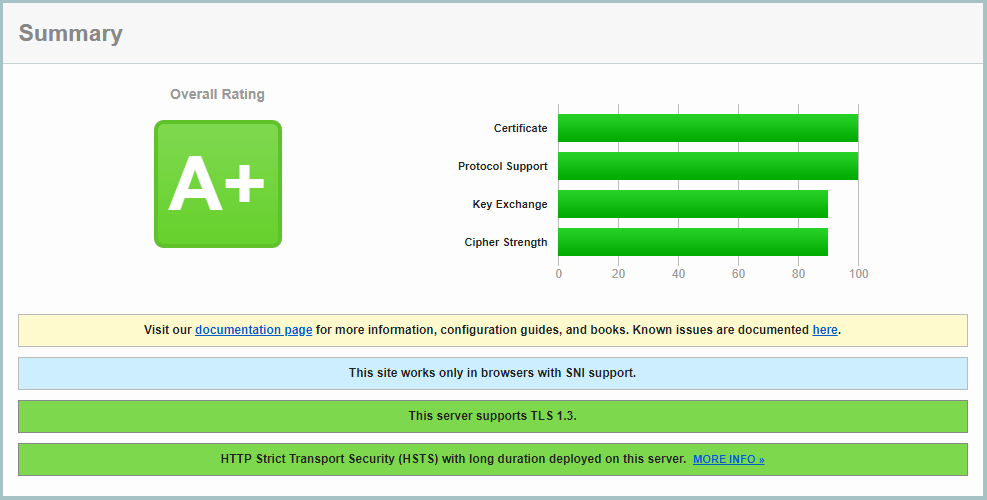
If you follow the above recommendations, you should be able to achive an A+ rating on the Qualys SSL Labs SSL Server Test (Figure 6):
Figure 6
Mail Queue
In this page, you can adjust the the Bounce and Max Queue Lifetime settings, Flush Mail Queue, View Messages, Requeue Messages, Hold Message, Delete Messages and Search Messages.
Normally, the Mail Queue should be empty, since the SMTP server should deliver the email as soon as they arrive in the queue. If messages arrive and stay undelivered in the queue for long periods of time, that usually indicates a problem with either the local system or the remote receiving system.
Reload Mail Queue
Click the Reload Mail Queue button to refresh the mail queue message list (Figure 1).
Figure 1

Flush Mail Queue
Click the Flush Mail Queue button to force the system to attempt to re-deliver all email in the mail queue (Figure 2). This is usually done after resolving an e-mail delivery issue.
Figure 2

Message Actions
Select messages in the mail queue, click the Message Actions button, in the resultant window select an Action to Take from the drop-down and click the Submit button. Selecting Hold Message(s) will hold the message(s) in the queue indefinitely unless they are set to Unhold. Selecting Unhold Message(s) will allow the messages to be delivered again. Selecting Re-Queue Message(s) will force the system to try to deliver the selected message(s). (Figure 3).
Figure 3

Delete Message(s)
Select messages in the mail queue and click the Delete Message(s) button to permanently delete message(s) from the mail queue (Figure 4).
Deleting messages from the queue should be carefully considered. If users were expecting those emails to be delivered, removing them from the queue will ensure that they will never get delivered.
Figure 4

Search Messages
Enter a search term in the Search field and the system will automatically filter messages matching the term you entered. You can enter multiple search terms separated by a space (Figure 5).
Figure 5

Bounce Queue Lifetime and Max Queue Lifetime
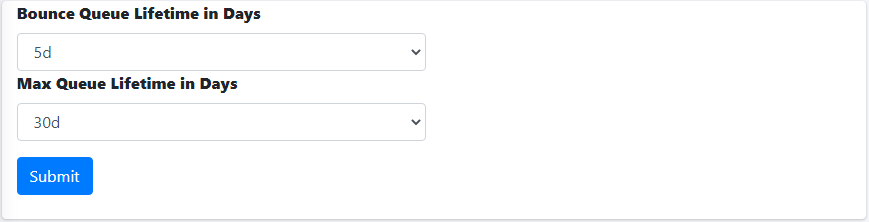
The Bounce Queue Lifetime determine how long a MAILER-DAEMON messages stays in the queue before it's considered undeliverable. This setting strictly controls non-delivery messages generated by the SMTP server. Once the lifetime expires the MAILER-DAEMON messages are automatically removed from the queue by the system. The default is 5 Days. If this is set to 0 Days, delivery will be tried only once and then removed from the queue.
The Max Queue Lifetime determines how long all other messages stay in the queue before the SMTP server considers them undeliverable and sends a bounce message back to the sender. This setting controls how long the system will hold on and try to deliver messages to other mail servers. Ideally, this setting should be set high enough so that the system holds on to messages as long as possible before bouncing them. This is especially important if you are relaying messages to external email servers that may go down for long periods of time. The default is 14 days. If this is set to 0 days, delivery will be tried only once and then a bounce message will be sent to the sender (Not recommended).
- Select the Bounce Queue Lifetime setting you wish from the drop-down.
- Select the Max Queue Lifetime setting you wish from the drop-down.
- Click the Submit button (Figure 6).
Figure 6
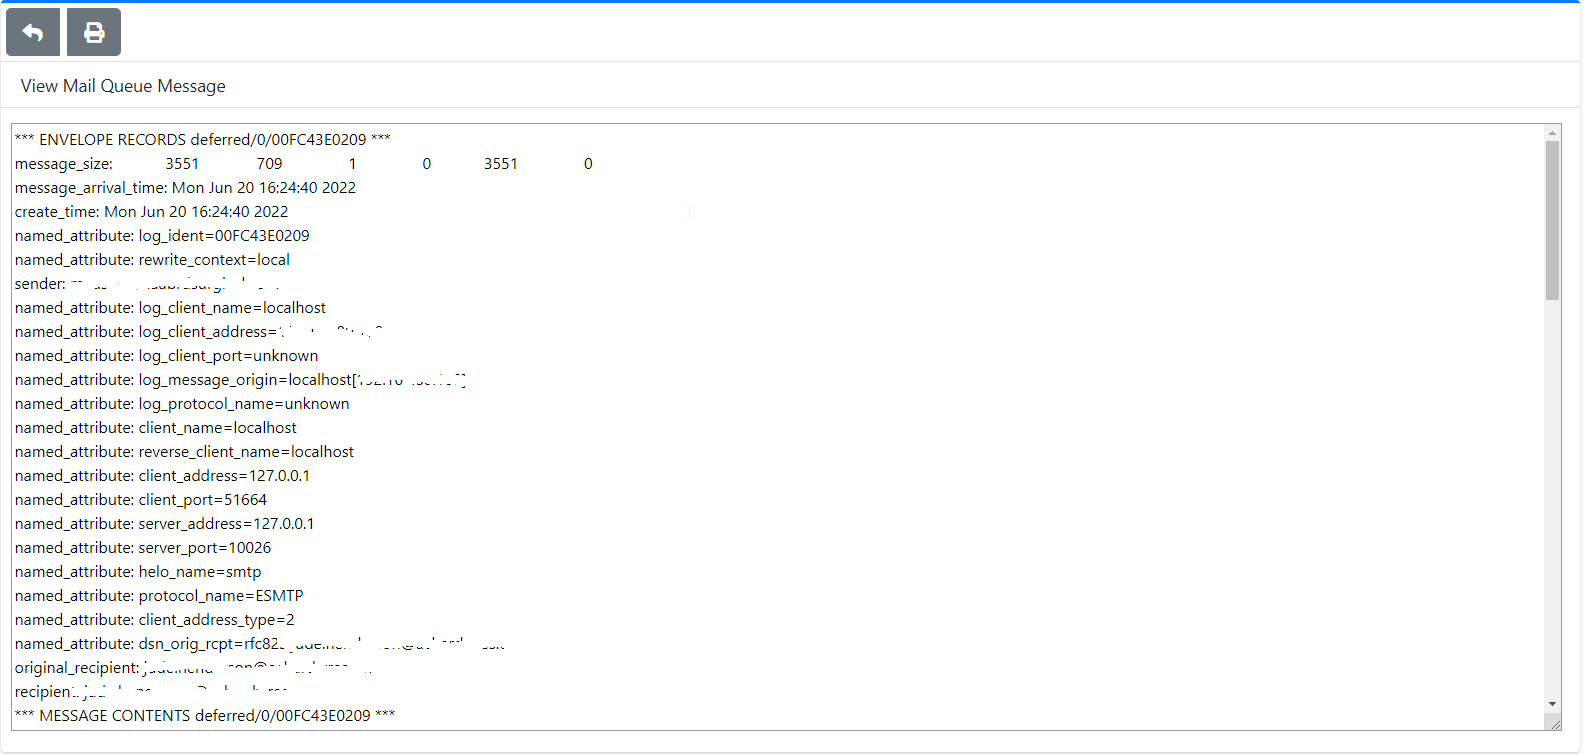
View Messages
Viewing a message reveals detailed information which can assist in determining why the message is stuck in the mail queue.
- Click on the
 icon of the message you wish to to view.
 - You will be directed to the View Mail Queue Message page where you will be able to view all the detailed information about the message.
- Click the
 icon to go back to the Mail Queue.
 - Click the
 icon to print the message contents (Figure 7).
Figure 7
System Logs
System Logs allows you to set the Log Retention period, fetch system logs by date range/time and search.
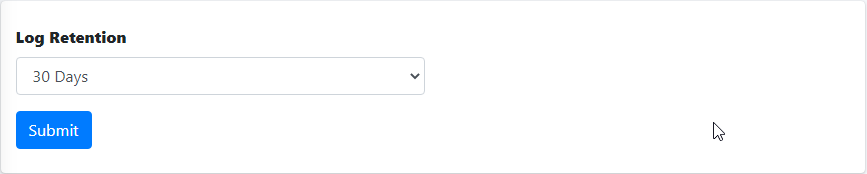
Log Retention
By default Hermes SEG stores logs up to 30 days before automatically purging older entries. This setting can be adjusted by selecting 30 Days, 60 Days, 90 Days, 120 Days or 180 Days intervals and clicking the the Submit button (Figure 1)
Figure 1
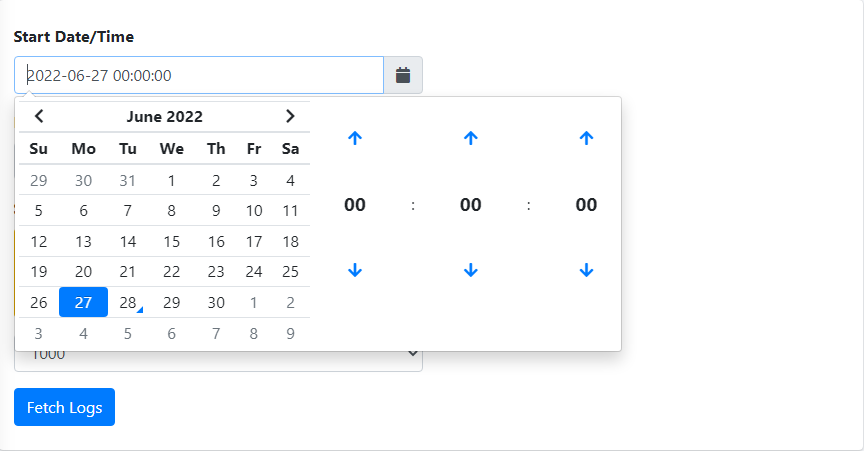
Fetch Logs by Date Range/Time
Click the ![]() icon on the or manually enter date/time in the format yyyy-mm-dd hh:mm:ss in Start Date/Time and the End Date/Time fields to select a Date/Time range and click the Fetch Logs button to search for logs matching your criteria (Figure 2).
icon on the or manually enter date/time in the format yyyy-mm-dd hh:mm:ss in Start Date/Time and the End Date/Time fields to select a Date/Time range and click the Fetch Logs button to search for logs matching your criteria (Figure 2).
Figure 2
Search Logs
Enter a search term in the Search field and the system will automatically filter logs matching the term you entered. You can enter multiple search terms separated by a space (Figure 3).
Figure 3

System Backup and Restore
System Backup and System Restore are configured and ran in the CLI as root. There is a Backup script located at /opt/hermes/scripts/system_backup.sh and a Restore script located at /opt/hermes/scripts/system_restore.sh. These scripts should not be moved/copied to other locations. System Backups should be scheduled via Cron or other mechanism to point to /opt/hermes/scripts/system_backup.sh.
Before scheduling system_backup.sh, it's highly recommended that you run it manually to ensure proper operation before scheduling it. The backups can be stored to any mount that you have previously configured in your system such as local, SMB, NFS etc...
System Backup
The /opt/hermes/scripts/system_backup.sh script accepts several flags with corresponding values enclosed in single quotes in order to configure its behavior.
- The -D flag sets the number of days of backups to retain. For example, -D '7' would configure it to delete any backups older than 7 days.
- The -P flag sets the path to store the backups WITHOUT the trailing slash. For example -P '/mnt/backups' configures the backup to store all backups in the /mnt/backups path. Please note that backup logs are also automatically stored in that path.
- The -E flag sets the recipient to send backup success/failure notifications. For example, -E 'to@domain.tld' configures the backup to send notifications to to@domain.tld.
- The -F flag sets the sender where the backup success/failure notifications would come from. For example, -F ' 'from@domain.tld' configures the backup to send notications from from@domain.tld.
- The -B flag sets the backup mode. The backup mode can be either system (backs up all Hermes related files and databases EXCLUDING the e-mail archive), archive (backs up ONLY the e-mail archive) or all (backups all Hermes related files including the databases as well as the e-mail archive). For example, -B 'system' sets the backup mode to back up all Hermes related files and databases.
- The -R flag sets the MySQL root password that the backup will need in order to back up all the Hermes databases. For example, - R 'supersercretpass' sets the MySQL root password to supersercretpass.
Putting it all together, if you wanted to run an all backup, you can run a command similar to below:
/opt/hermes/scripts/system_backup.sh -D '7' -P '/mnt/backups' -E 'to@domain.tld' -F 'from@domain.tld' -B 'all' -R 'supersercretpass'Please note that depending on what Backup Mode you use, the system will store an appropriately named backup file in the backup location. For example, hermes-system-220410-08-16-2024-0920.tar.gz backup file is system backup as noted by the word system in its name. In case of an all Backup Mode, the system will generate two backup files, one backup file will contain the system backup and the other backup file will contain the e-mail archive backup. In addition to the type of backup, the backup file also includes the build number (in this case 220410) as well as the date/time the backup was created. The build number becomes very important when you attempt to perform a System Restore.
System Restore
System Restore WILL NOT install any programs, therefore, it requires that you have an already existing and fully updated Ubuntu 20.04 LTS Server plain "vanilla" machine with a /mnt/data directory for database and email archive storage. Then, you install the same build of Hermes SEG as the build number of the backup file you are attempting to restore.
System Preparation
Please note that Hermes SEG will NOT run in a LXC Environment
Required Information
Ensure you have that information available before you begin:
- MySQL(MariaDB) root user password you wish to use
- MySQL(MariaDB) username you wish to use with the hermes database (Example: hermes)
- MySQL(MariaDB) password you wish to use with the hermes database user
- MySQL(MariaDB) username you wish to use with the Syslog database (Example: rsyslog)
- MySQL(MariaDB) password you wish to use with the Syslog database user
- MySQL(MariaDB) username you wish to use with the cipermail database (Example: ciphermail)
- MySQL(MariaDB) password you wish to use with the ciphermail database user
- MySQL(MariaDB) username you wish to use with the opendmarc database (Example: opendmarc)
- MySQL(MariaDB) password you wish to use with the opendmarc database user
- Lucee Server and Web Administrator password you wish to use
- System Mailname (Example: smtp.domain.tld)
The Configure /mnt/data partition directions below assume you have a 250GB secondary drive which you will partition, format and mount as /mnt/data.
Technically a secondary drive for the /mnt/data directory is not a requirement but it's highly recommended for performance reasons. If you don't wish to use a secondary drive for the /mnt/data directory, simply create a /mnt/data directory in your system.
Configure /mnt/data partition
sudo mkdir /mnt/datasudo fdisk -lLook for 250 GB drive you created earlier device ID, usually /dev/sdb. Ensure you select correct device ID before running the commands below)
Create partition:
sudo fdisk /dev/sdb- Hit "n" to add new partition
- Hit "p" for primary partition
- Hit "Enter" for partition 1
- Hit "Enter" for default first sector
- Hit "Enter" for default last sector
- Hit "w" to write changes to disk and exit
Format Partition:
sudo mkfs.ext4 /dev/sdb1Mount Partition to /mnt/data:
sudo mount /dev/sdb1 /mnt/dataGet disk UUID:
ls -l /dev/disk/by-uuidEdit /etc/fstab:
sudo vi /etc/fstabAdd the following in /etc/fstab where DEVICE_ID is the UUID from the command above:
UUID=DEVICE_ID /mnt/data ext4 errors=remount-ro 0 1Verify drive is mounted:
sudo df -hShould yield output similar to below:
Filesystem      Size  Used Avail Use% Mounted on
udev            1.9G     0  1.9G   0% /dev
tmpfs           395M  1.1M  394M   1% /run
/dev/sda2        79G  5.5G   69G   8% /
tmpfs           2.0G     0  2.0G   0% /dev/shm
tmpfs           5.0M     0  5.0M   0% /run/lock
tmpfs           2.0G     0  2.0G   0% /sys/fs/cgroup
/dev/loop0       87M   87M     0 100% /snap/core/4917
/dev/loop1       90M   90M     0 100% /snap/core/8039
tmpfs           395M     0  395M   0% /run/user/1000
/dev/sdb1       246G   61M  233G   1% /mnt/data
Reboot and ensure /mnt/data gets mounted automatically.
Install Hermes SEG using specific build number
The instructions below have ONLY been tested on Hermes SEG build-220410 and above. Do not use on any builds lower than build-220410.
Identify the build number from the restore file you wish to restore. For example, the build number for restore file hermes-system-220410-08-16-2024-0920.tar.gz is 220410.
After identifying the build number, from the CLI as root git clone the desired build using the following command where build-220410 is the desired build:
git clone --depth 1 --branch build-220410 https://github.com/deeztek/Hermes-Secure-Email-GatewayThis will clone the repository into directory Hermes-Secure-Email-Gateway.
Change to the Hermes-Secure-Email-Gateway directory:
cd Hermes-Secure-Email-Gateway/If you are installing Hermes Build 220410 and below, download ubuntu_hermes_old_install.sh and overwrite existing one. Do NOT run the command below if you are installing Hermes Build 231130 and above:
wget https://raw.githubusercontent.com/deeztek/Hermes-Secure-Email-Gateway/master/ubuntu_hermes_old_install.sh -O ubuntu_hermes_install.shMake script executable:
sudo chmod +x ubuntu_hermes_install.shRun the script as root and follow the prompt to install Hermes SEG:
sudo ./ubuntu_hermes_install.shOnce installation is complete, reboot your computer, ensure everything is running and then continue below to perform a System Restore.
Perform a Restore
Before you can perform a restore, you must have already mounted the location where all you backup files are stored accessible to the /opt/hermes/scripts/system_restore.sh script. Additionally, be aware that once you restore a backup, all existing Hermes SEG credentials including the database credentials will be replaced by the credentials in the backup.
If you have a Hermes SEG Pro installation with a valid license, please be aware that your license will have to be re-installed and re-activated in the restored system. Please send the serial number to support@deeztek.com and let us know that you wish to activate the license on a new system.
The recommended order of restoring backups is to first perform a system restore and once that completes, reboot your computer and then perform an archive restore. Archive restores can take a very long time to complete depending on the size of the data being restored, thus it's best to have your system already up and running and processing e-mail while the archive restore is running. This method will minimize down time.
The /opt/hermes/scripts/system_restore.sh script accepts several flags with corresponding values enclosed in single quotes in order to configure its behavior.
- The -F flag sets the full path to the backup file you wish to restore. For example, -F
'/mnt/backups/hermes-system-220410-08-16-2024-0920.tar.gz'.
- The -M flag sets the Restore Mode you wish to perform. It should be either 'system' or 'archive' For example -M 'system' sets to restore a system backup. The mode you wish to use depends on the file you wish to restore.
- The -R flag sets the MySQL root password that the backup will need in order to restore up all the Hermes databases. For example, - R 'supersercretpass' sets the MySQL root password to supersercretpass.
Putting it all together, if you wanted to run a system mode restore, you can run a command similar to below:
/opt/hermes/scripts/system_restore.sh -F '/mnt/backups/hermes-system-220410-08-11-2024-0822.tar.gz' -M 'system' -R 'supersecretpass'Once the restore is complete, reboot your computer and ensure everything has been restored and your machine is processing e-mail as intended.
System Certificates
Hermes SEG allows you to manage SSL certificates in order to be used for console access over HTTPS as well as SMTP TLS transactions.
Hermes SEG Community Version
Hermes SEG Community Version will allow you to create Certificate Signing Requests to submit to 3rd party CAs and import certificates from 3rd party CAs.
- Click the Import Certificate button, enter a friendly name for the certificate in the Certificate Name field, paste the contents of the certificate including the -----BEGIN CERTIFICATE----- & -----END CERTIFICATE----- lines in the Certificate field, paste the contents of the unencrypted key including the -----BEGIN PRIVATE KEY----- & -----END PRIVATE KEY----- lines in the Unencrypted Key field, paste the contents of the root and Intermediate CA certificates including the -----BEGIN CERTIFICATE----- & -----END CERTIFICATE----- lines in the Root and Intermediate CA Certificates field and click the Import button (Figure 3):
Figure 3

Hermes SEG Pro Version
Hermes SEG Pro Version will allow you to create Certificate Signing Requests to submit to 3rd party CAs, import certificates from 3rd party CAs as well as Request Lets Encrypt (Acme) Certificates.
If you wish to import a 3rd party CA certificate, please follow the Hermes SEG Community instructions above to import a certificate. If you wish to request a Lets Encrypt (Acme) certificate, follow the instructions below:
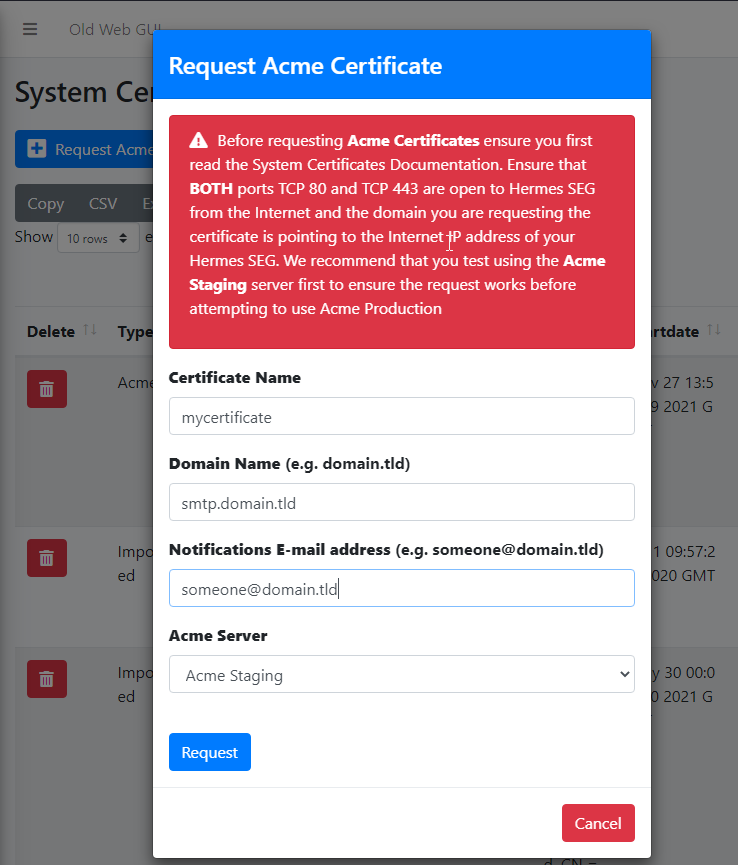
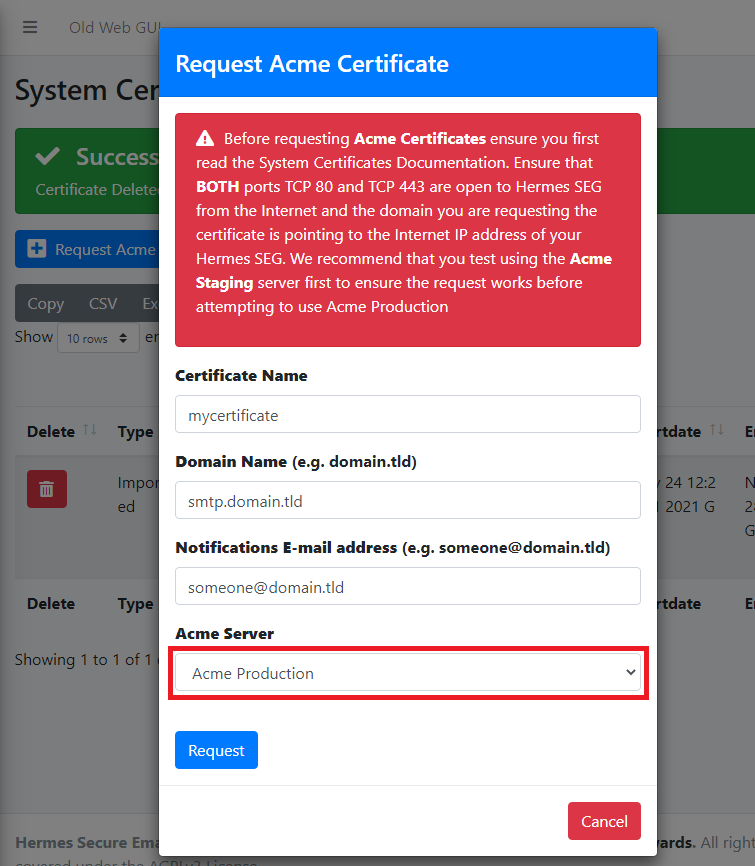
Before requesting Acme Certificates ensure that BOTH ports TCP 80 and TCP 443 are open to Hermes SEG from the Internet and the domain you are requesting the certificate is pointing to the Internet accessible IP address of your Hermes SEG machine. We recommend that you test using the Acme Staging server first to ensure the request works before attempting to use Acme Production. The reason we initially Request Acme Certificate utilizing the Acme Staging server is because Lets Encrypt is much more lenient with rate limits with failed requests in their staging environment than their production environment, click here for details.
- Click the Request Acme Certificate button, enter a friendly name in the Certificate Name field, enter the FQDN (domain name) you wish to request a certificate, enter a valid e-mail address in the Notifications E-mail address field, leave the Acme Server drop-down field set to Acme Staging and click the Request button (Figure 4):
Figure 4
- If the Acme Certificate Request fails, double-check that the FQDN (domain name) points to the Internet accessible IP of your Hermes SEG machine and that BOTH ports TCP/80 (HTTP) and TCP/443 (HTTPS) are allowed through your firewall and try again.
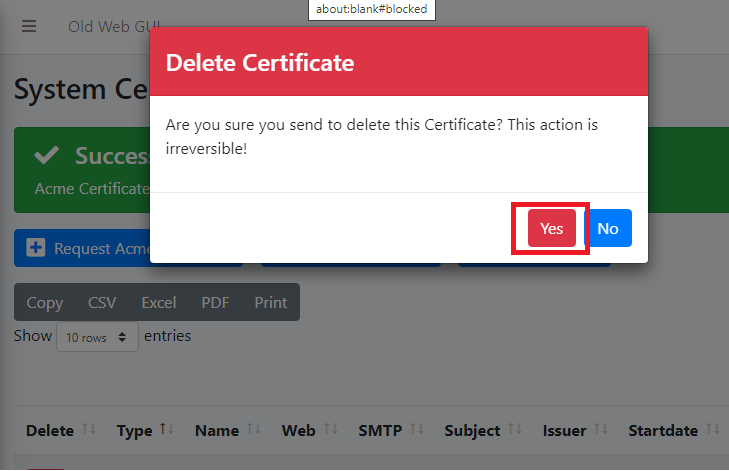
- If the Acme Certificate Request succeeds, locate the newly created certificate in your certificate list, click the
 icon and on the resultant Delete Certificate confirmation click on Yes (Figure 5):
Figure 5
- Click the Request Acme Certificate button again, enter a friendly name in the Certificate Name field, enter the FQDN (domain name) you wish to request a certificate, enter a valid e-mail address in the Notifications E-mail address field, this time set the Acme Server drop-down field set to Acme Production and click the Request button (Figure 6):
Figure 6
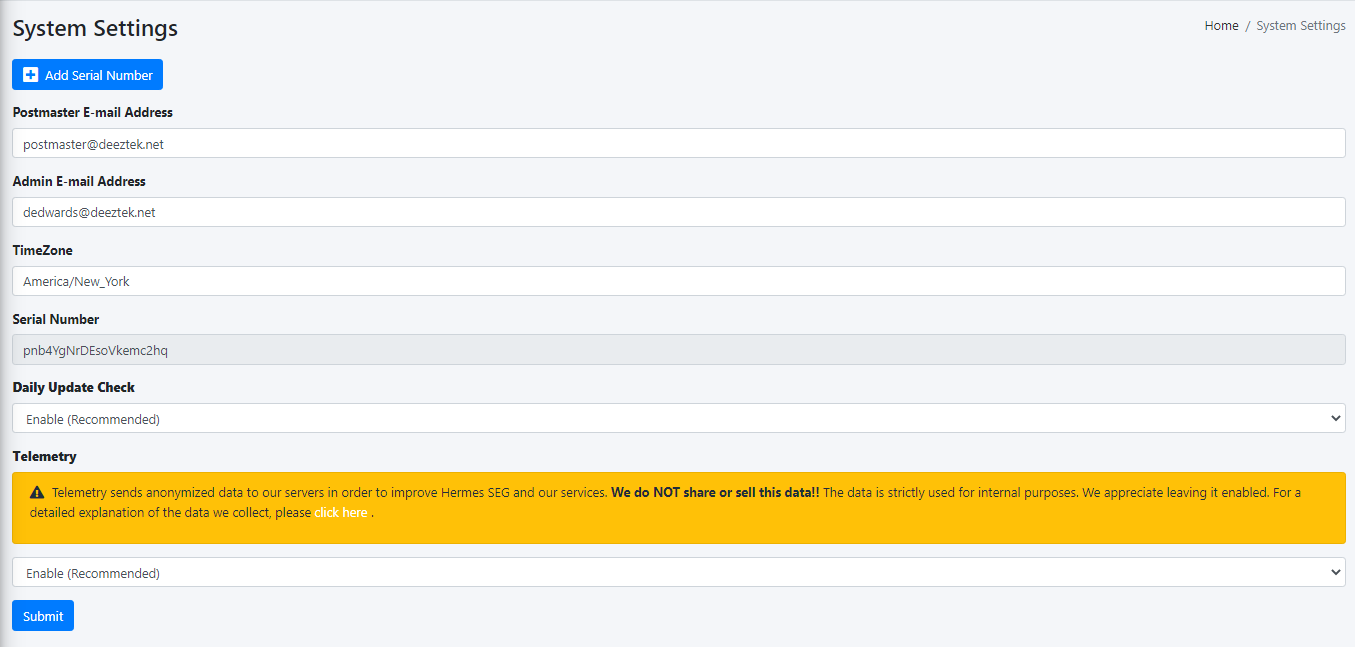
System Settings
- The Postmaster E-mail Address MUST BE on a domain that the system currently delivers email for and the Admin E-mail Address SHOULD BE an email address for a domain that Hermes SEG does NOT deliver email for. Even though the system will allow you to enter an Admin E-mail Address for a domain that Hermes SEG deliver email for, it's not recommended. The Admin E-mail Address should be an external to the system e-mail address.
- The system will automatically create virtual addresses for postmaster, abuse and root based on the Postmaster E-mail Address you set. For example, if your Postmaster E-mail Address is postmaster@domain.tld and your Admin E-mail Address is someone@otherdomain.tld, the system will automatically create the following virtual address:
- postmaster@domain.tld ---> someone@otherdomain.tld
- The system will also create the following two virtual addresses and related mappings based on the postmaster e-mail address domain part:
- abuse@domain.tld ---> someone@otherdomain.tld
- root@domain.tld ---> someone@otherdomain.tld
- The virtual address the system creates can be viewed under Gateway ---> Virtual Recipients.
- Adding a Serial Number is not required. However, if you are going to add a Serial Number, ensure Hermes SEG has access to the Internet over ports TCP/80 and TCP/443. Serial Numbers are validated over the Internet with our activation service).
- If you have a Serial Number, click the Add Serial Number button and in the resultant window enter it in the Serial Number field, check the license convert checkbox and click the Submit button (Figure 1).
Figure 1

- In the Postmaster E-mail Address field enter the email address you want to use
- In the Admin E-mail Address field enter the email address you want to use
- In the TimeZone field, set your local timezone by deleting the default America/New_York and start typing the name of your continent. The system will automatically display a drop-down with all the relevant timezones for your continent (Figure 2).
Figure 2

- If you have activated a Hermes SEG Pro Serial Number, the Daily Update Check field will be available for you to Enable/Disable. If you enable the Daily Update Check, the system will automatically check for Hermes SEG updates on a daily basis and if it finds one, it will send an e-mail to the postmaster E-mail Address you set above.
- In the Telemetry field, set to Enabled (By default it's enabled) if you wish to allow the sending of anonymized data to our servers in order to improve Hermes SEG and our services. Rest assured, that we do NOT share or sell this data and it's strictly used for internal purposes. Please see the list below for the data we collect:
- Hermes SEG unique system ID
- The total number of Internal Recipients (NOT the actual internal recipients)
- The total number of Domains (NOT the actual domains)
- The total number of Virtual Recipients (NOT the actual virtual recipients)
- Hermes SEG version
- Hermes SEG build
- Hermes SEG timezone
- Hermes SEG edition
- Whether or not you use the internal build-in certificate for the Console or SMTP (NOT the actual certificate)
- The total number of Clean messages (NOT the actual messages)
- The total number of Spam messages (NOT the actual messages)
- The total number of Virus messages (NOT the actual messages)
- Your IP address (ONLY used to determine your Geo location)
- Click the Submit button to save your changes (Figure 3).
Figure 3
System Status
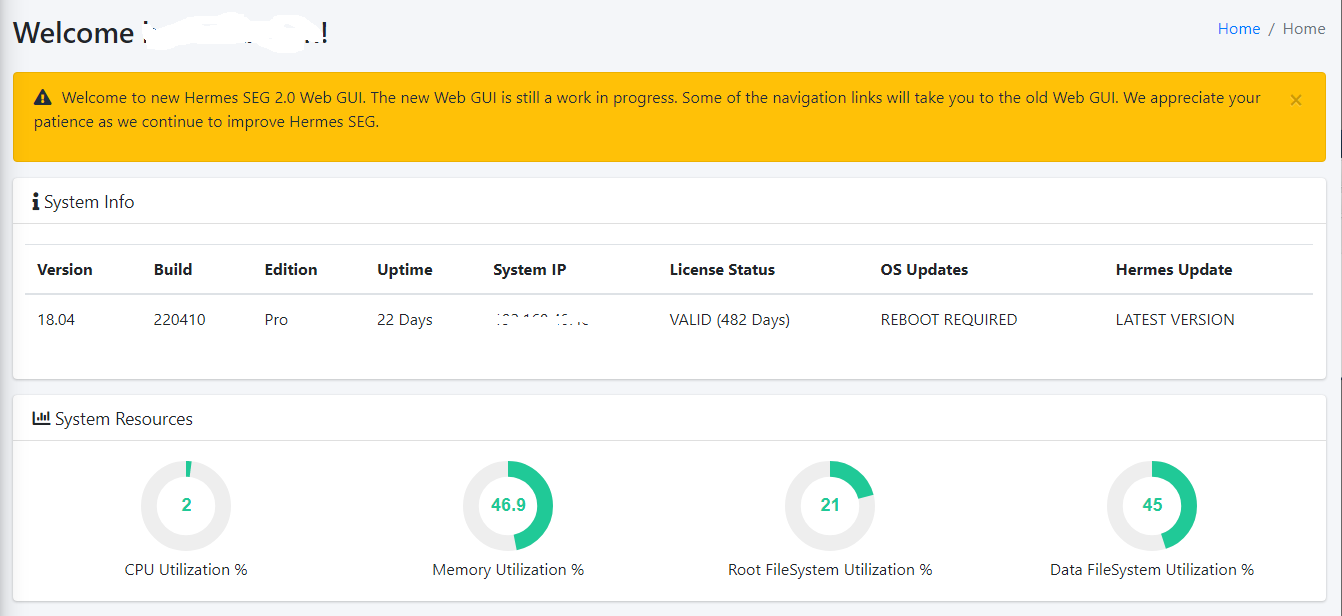
System Status displays the following information:
- Version
- Build
- Edition
- Uptime
- System IP
- License Status (Hermes SEG Pro Only)
- If system needs to be rebooted to install OS Updates
- If there is a Hermes SEG Update (Hermes SEG Pro Only)
- CPU Utilization
- Memory Utilization
- Root FileSystem Utilization
- Date FileSystem Utilization
System Update
Hermes SEG requires outbound TCP/80 and TCP/443 access to our update servers in order to check and download updates.
Ensure you have a recent and valid backup of your system before installing updates.
Updates may contain breaking changes and/or additional steps that must be taken after the update gets installed, therefore ensure you check out the Release Notes for each update BEFORE installing. Updates are provided with absolutely no guarantees or warranties of any kind explicitly or implied and we are not liable for any damage that may occur to your system, service, cat, dog, car, house etc.. Simply stated, you are installing updates at your own risk.
Hermes SEG updates are installed in order of release, in other words, System Update will not allow you to skip updates. If your system is behind more than one update, each update will have to be downloaded and installed individually.
System Update has moved from Hermes SEG Pro Edition to Hermes SEG Community Edition. A valid license is no longer a requirement to run System Update. Hermes SEG installations build-221211 or build-231130 must now manually download the system_update.sh script and perform a system update. Hermes SEG installations build-240815 or higher already include the system_update.sh script thus there is no need to manually download.
Each time you run the /opt/hermes/scripts/system_update.sh script, it will check for newer versions of itself as well as other required files. If new versions of the files are needed, it will download them automatically and exit. You must then restart /opt/hermes/scripts/system_update.sh in order to proceed with the update.
The script will initially ask you whether to to check for DEV updates. You should always answer NO to this prompt unless support has instructed you to check for DEV updates as part of troubleshooting. Installing DEV updates without support guidance will most likely break your system. Next, the script will ask you for the MariaDB/MySQL root password. You must provide the correct password before the update will proceed.
Hermes SEG build-221211 or build-231130 installations
From the CLI as root run the following command to download the system_update.sh script:
wget https://gitlab.deeztek.com/dedwards/hermes-seg-18.04/-/raw/master/dirstructure/opt/hermes/scripts/system_update.sh?ref_type=heads -O /opt/hermes/scripts/system_update.shMake it executable:
chmod +x /opt/hermes/scripts/system_update.shRun the script and follow the prompts to install the latest update:
/opt/hermes/scripts/system_update.shHermes SEG build-240815 and above installations
From the CLI as root run the update script:
/opt/hermes/scripts/system_update.shSystem Users
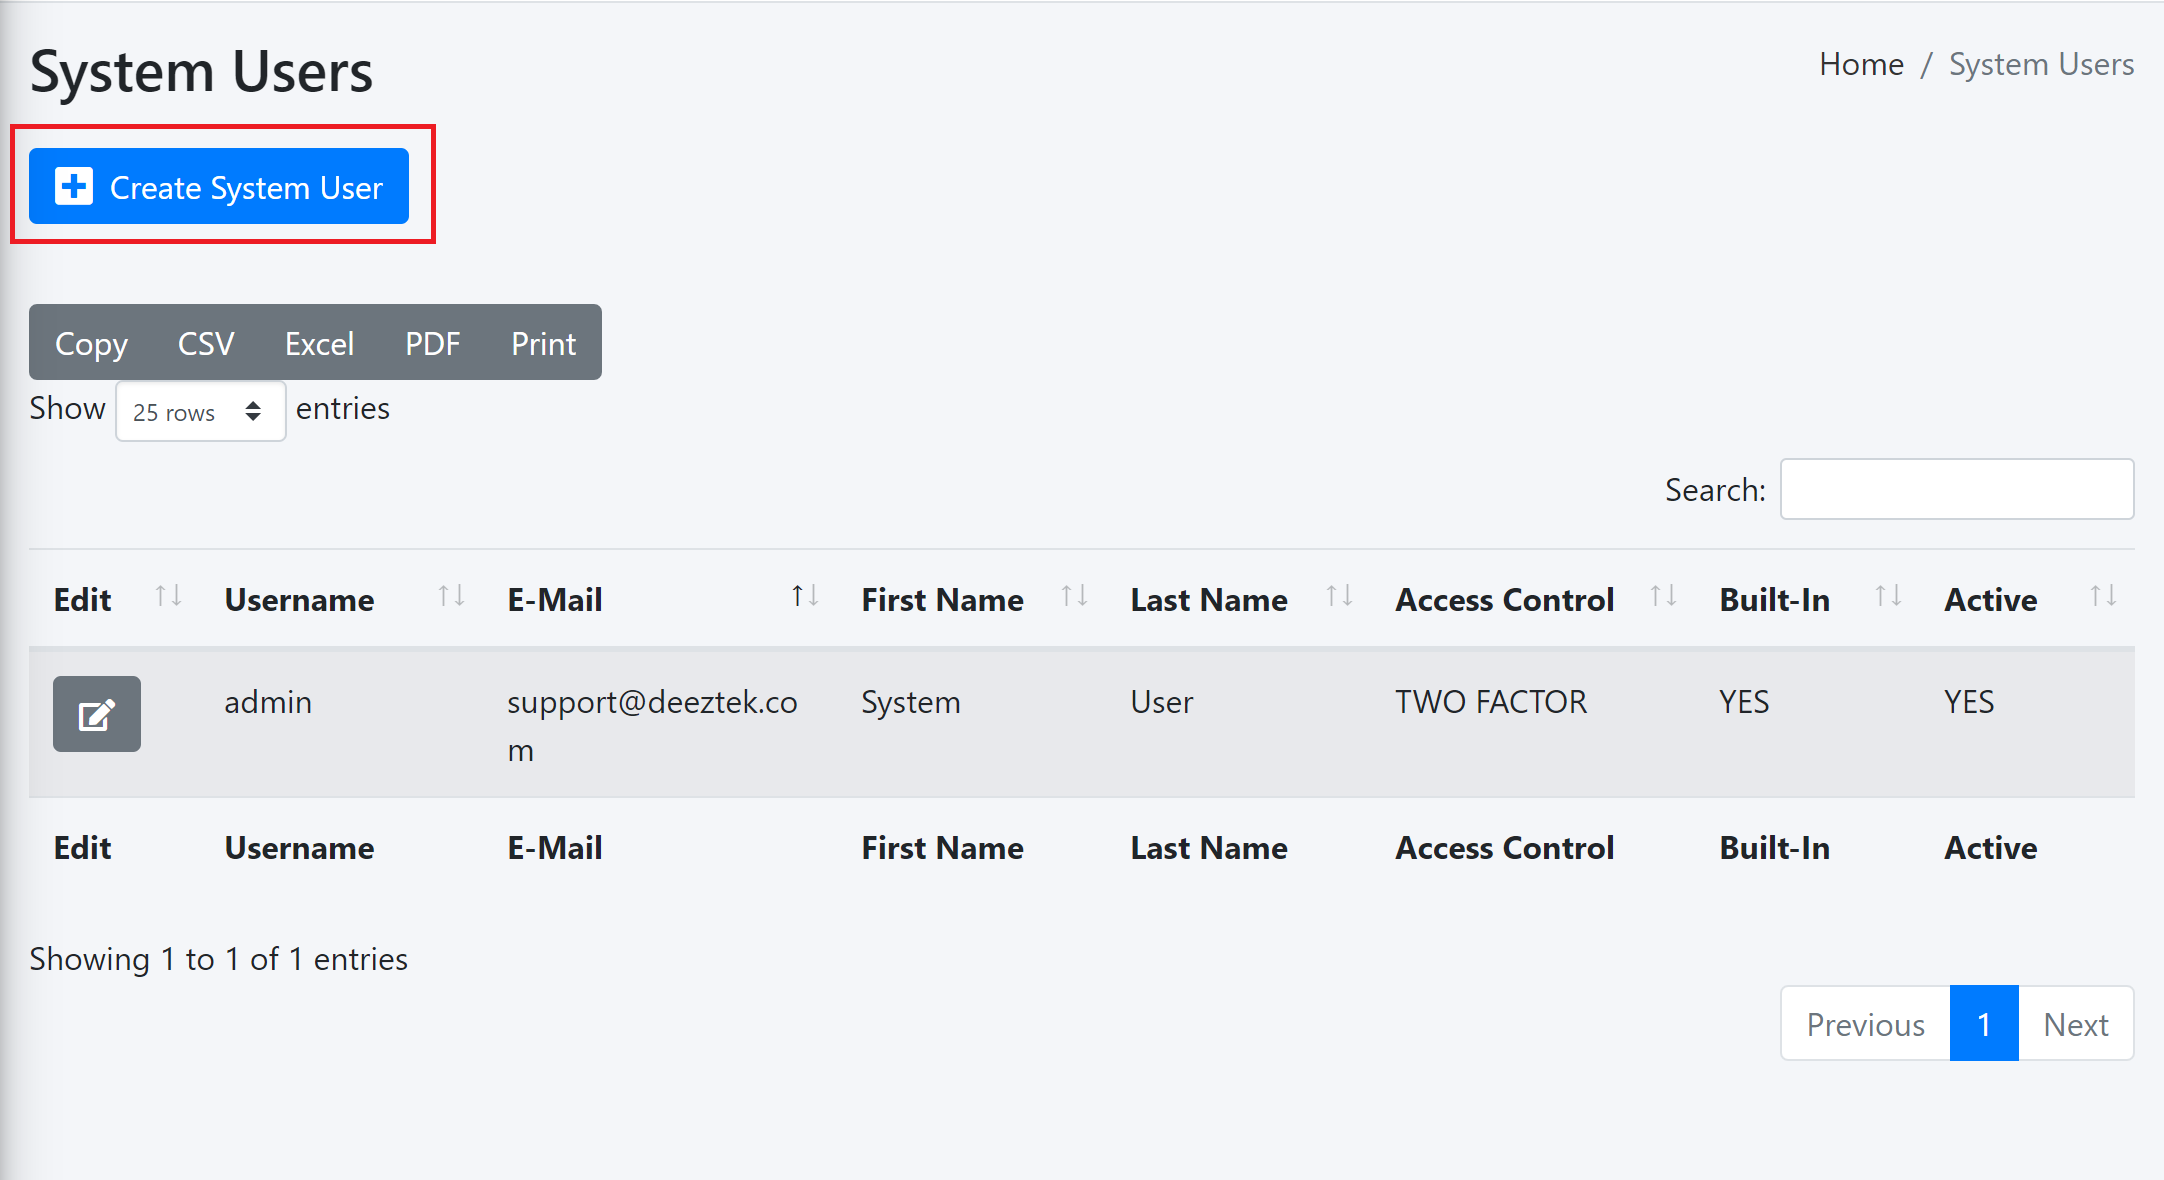
The System Users screen allows you to create, add and delete System Users (Figure 1).
Figure 1

By default, Hermes SEG comes pre-configured with the the System User account with the following default credentials:
- Username: admin
- Password: ChangeMe2!
Create System User
If you wish to create a new System User, click the Create System User button on top of the screen (Figure 2).
Figure 2
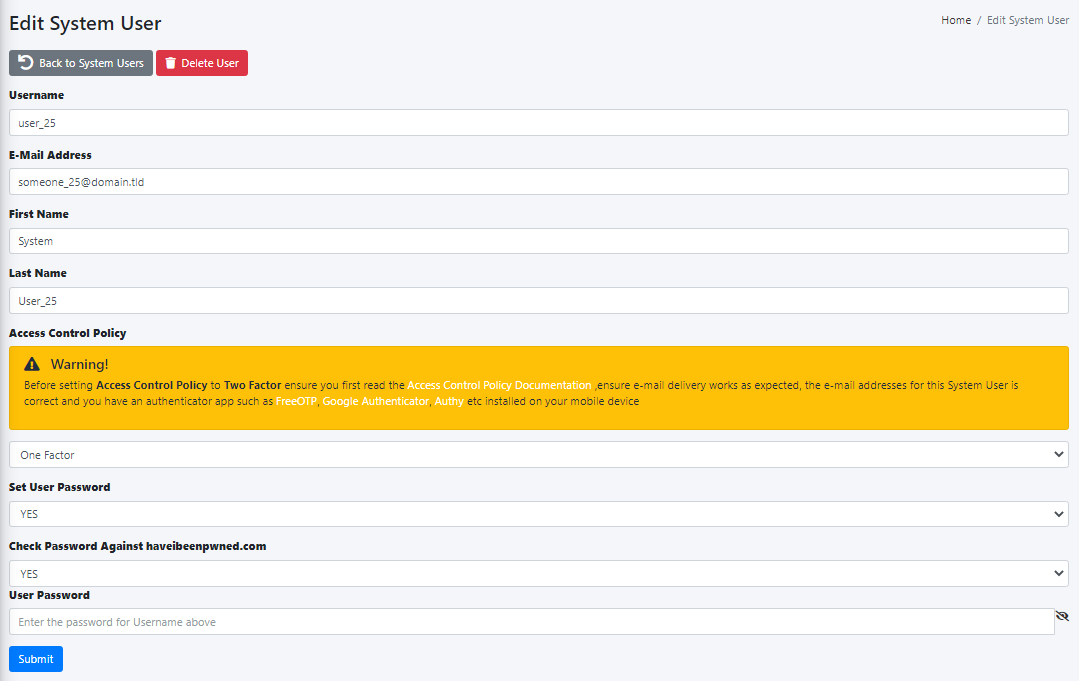
You will be directed to the Edit System User screen where the system has already pre-filled the Username, E-Mail Address, First Name and Last Name fields. The Access Control Policy field has been set to One Factor, the Set User Password field has been set to YES and the Check Password Against haveibeenpwned.com has been set to YES. Adjust fields as necessary, enter a password in the User Password field and click the Submit button (Figure 3).
Figure 3
Access Control Policy
The Access Control Policy field allows you to switch between One Factor Authentication (1FA) which consists of Username and Password authentication (Default) OR Two Factor Authentication (2FA) which consists of Username and Password AND an additional Timed One Time Password (TOTP) generated on your mobile device for additional security.
Two Factor requires the following pre-requisites before enabling:
- Hermes SEG Outbound E-mail Flow must be working correctly
- The System User Account you enable Two Factor authentication must have a valid e-mail address.
- You must have an Authenticator app installed on your mobile device such as FreeOTP, Google Authenticator, Authy etc.
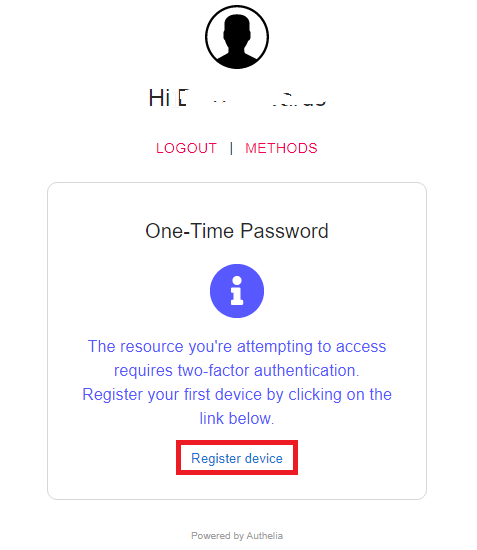
Once you set the Access Control Policy to Two Factor and click the Submit button, logout and then log back in with the same System User you enabled Two Factor authentication. After successfully authenticating, the system will prompt to register your mobile device. Click the Register device link on the One-Time Password screen (Figure 4).
Figure 4
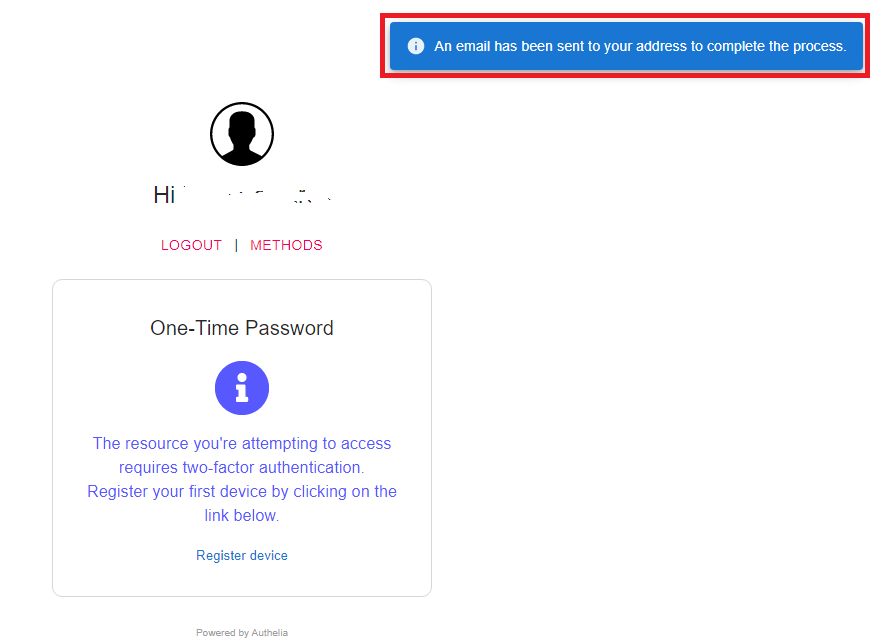
The system will display An email has been sent to your address to complete the process on the upper right-hand corner of the screen (Figure 5).
Figure 5
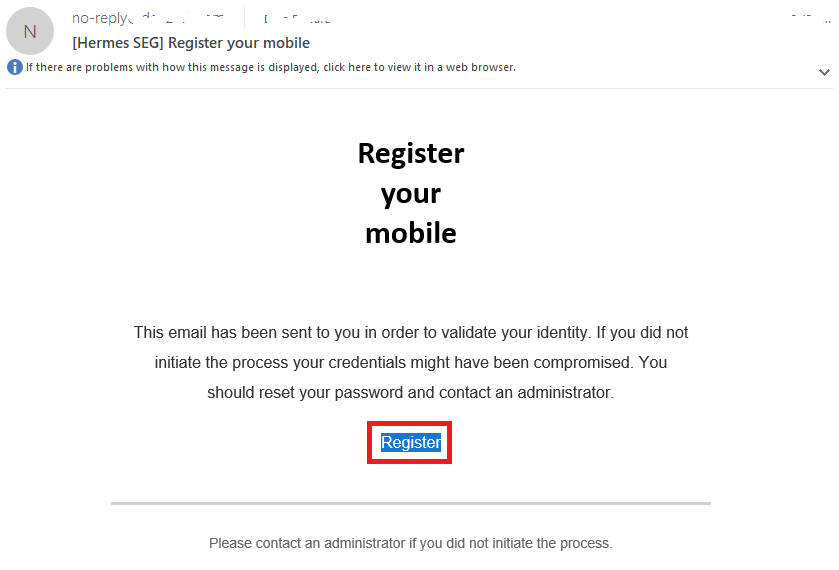
Check the mailbox of the e-mail address associated with your account and look for an e-mail that contains the subject Register your mobile and click the Register button at the bottom of the e-mail (Figure 6).
Figure 6
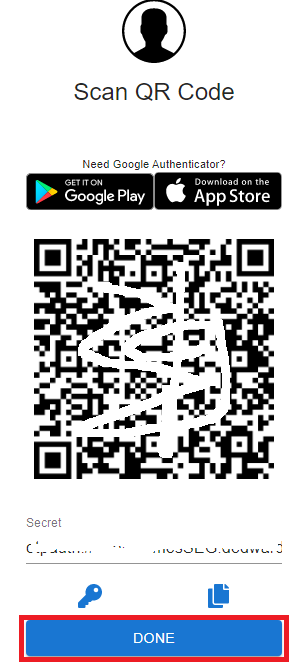
You will be taken to the Scan QR Code page. Using the Authenticator app you previously downloaded and installed on your mobile device, scan the QR Code from the page and click the DONE button (Figure 7).
Figure 8
On the following One-Time Password screen enter the passcode generated by your authenticator app (Figure 9).
Figure 9
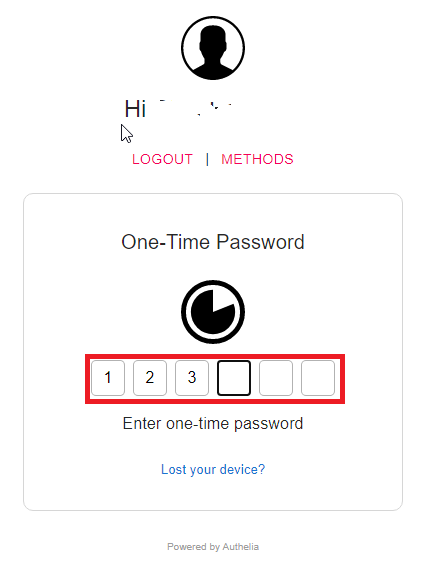
If everything goes well and you typed in the correct passcode within the allotted time, you should be able to successfully login to Hermes SEG Administration Console.
If you run into a problem and the Two Factor authentication did not work for any reason, you can reset authentication back to One Factor by running the following script from the console with root privileges:
/opt/hermes/scripts/disable_authelia_2fa.shPasswords
Hermes SEG implements the following NIST 800-63 Password Guidelines:
- 8 character minimum password.
- 64 character maximum password.
- Able to check against known breached passwords via the use of the haveibeenpwned.com API.
- Implementation of Multifactor Authentication via the use of Time-Based One-Time Password (TOTP) , Duo Security and Webauthn Security Keys.
- Passwords are hashed with the Argon2 KDF.
Email Archive
In this section will be able to configure a scheduled archive jobs for your Hermes SEG.
An Email Archive Job will create a separate email archive on external storage by creating a directory named /mnt on that share, copying all the emails stored on the appliance to that directory, verifying that the emails copied correctly and then delete them from the appliance local storage in order to free up space.
Archived emails can still be viewed and downloaded form the Hermes SEG Administration Console or User Self-Service Console as long as the external storage is mounted on the appliance. However, archived emails cannot be released to user mailboxes.
In addition to archiving the email on the appliance to external storage, an archive job will also allow you to create a compressed 7-zip snapshot of the latest archive on the external storage . The 7-zip snapshot is useful for having multiple backup copies of the e-mail archive.
Each time an Email Archive Job runs, it creates a detailed log of each and every message that is moved and deleted from the appliance local storage. At the end of the job, this log is compressed as a 7-zip file and then moved to the external archive storage. For Email Archive Jobs configured without a compressed 7-zip snapshot of the latest archive, the system will automatically prune logs older than 14-days by default. For Email Archive Jobs configured with a compressed 7-zip snapshot of the latest archive, the system will automatically prune logs following the Compressed 7-zip Snapshot Retention Period setting of the job.
Hermes SEG requires a CIFS (Windows Share) share to an external storage in order to perform scheduled email archives. Shares have to be successfully validated first before an Archive Job can be saved. Only one Archive Job can be created.
Note: It is highly recommended that you archive email to an external deduplicating storage.
Note: Windows Server 2012 and above has support for deduplication, however if you are planning on utilizing Windows Server deduplication, you must disable Windows Kernel Case Insensitivity and you must NEVER use Windows file tools to manage the email archive because case sensitivity will not be preserved and the appliance will not able to access the archived emails.
Note: Email Archive Jobs can be a very time consuming process depending on the number of emails stored on the appliance. The initial Archive Job can take days or even weeks to complete.
Validate Share
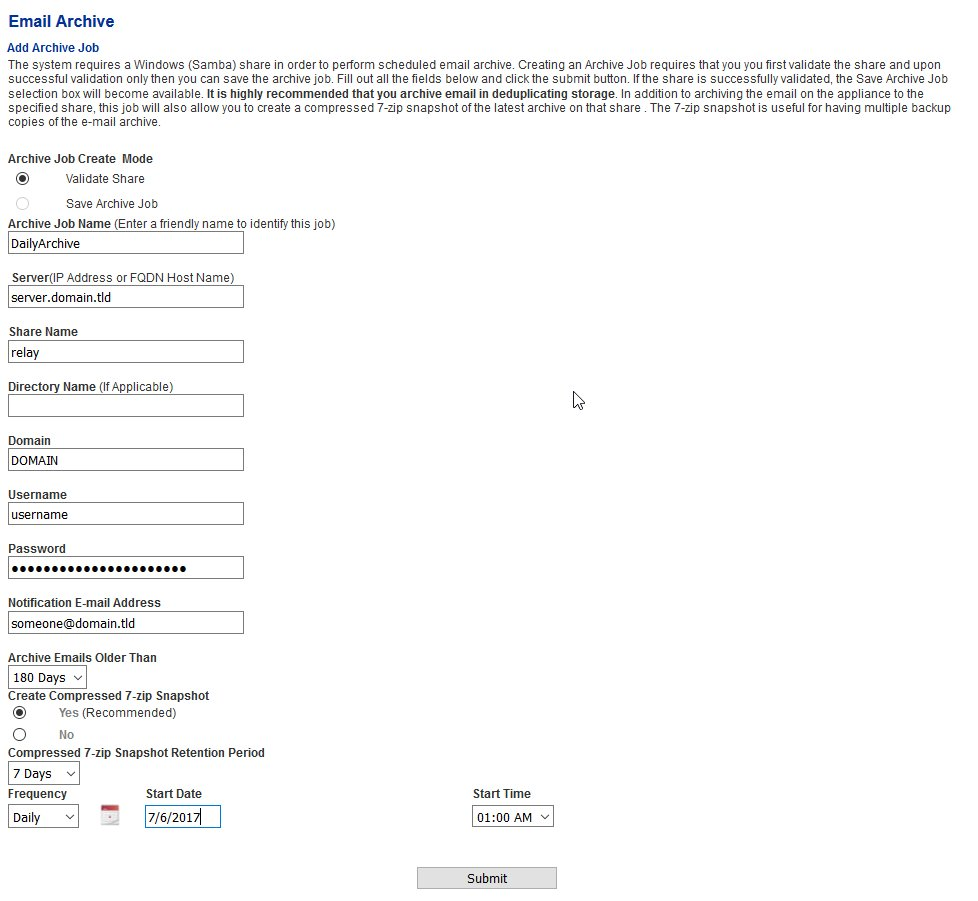
By default, when creating a new Archive Job, the Archive Job Create Mode field is automatically set to Validate Share and the Save Archive Job field is disabled. The Save Archive Job field only gets enabled when a share is succesfully validated.
- Enter a friendly name under the Archive Job Name field
- Enter an IP Address or a FQDN Host name of the server hosting the share under the Server field
- Enter the name of the share under the Share Name field
- Enter the name of a directory under the share if applicable under the Directory Name field
- Enter domain name under the Domain field
- Enter the username who has access to that share under the Username field
- Enter the password for the username from Step 6 under the Password field
- Enter a valid email address in order to get success or failure notifications from the backup job under the Notification E-mail Address field
- Select the number of days to archive email older than in the Archive Emails Older Than drop-down box. For instance, if you want to have 3 months worth of archive emails stored on the appliance and archive the rest, you would select 90 Days from the drop-down box.
- Select Yes on the Create Compressed 7-zip Snapshot field if you want the system to create Compressed 7-zip format snapshots of the email archive stored on the share. If you select Yes, after all the emails have been archived on the share, the system will additionally create a 7-zip compressed archive of all the emails on the share. This is useful for having multiple copies of the email archive for retention purposes.
- Select the number of days to retain Compressed 7-zip Snapshot files on the Compressed 7-zip Snapshot Retention Period drop-down field. Available options are, 7 Days, 14 Days, 21 Days and 28 Days. The system will use the Compressed 7-zip Snapshot Retention Period you selected to automatically delete older snapshot files so that your external storage doesn't get filled up.
- Select the job frequency from the Frequency drop-down field. Available options are Daily, Weekly and Monthly.
- Enter a date for the archive job to start by either selecting a date by clicking the calendar button or by manually entering a date in the form of mm/dd/yyyy in the Start Date field.
- Select a time for the archive job to start by selecting a time from the Start Time drop-down field
- Click the Submit button to validate the share (Figure 1)
Figure 1
Share Validation Succesful
If the validation is succesful, you will receive the following message (Figure 2)
Figure 2

You will also notice that the Save Archive Job option will be enabled under the Archive Job Create Mode on top of the page. Select the Save Archive Job option and click the Submit button to save the job (Figure 3).
Figure 3

The job will be saved under the Existing Archive Job section on the bottom of the page (Figure 4)
Figure 4

Share Validation Unsuccessful
If the validation is unsuccesful, you will receive the following message (Figure 5).
Figure 5

Check the information supplied and share permissions and try validating the share again.
Manually Run Archive Job
The saved archive job will run according to the schedule you set. Alternatively if you wish to run it immediately:
- Click on the green arrow button
 under the Run/Stop column to run the job immediately (Figure 6)
Figure 6

- In the Confirmation Window, click the Yes button (Figure 7). Clicking No, will take you back to the Email Archive page.
Figure 7

If the Archive Job is in progress, the button under the Run/Stop column will become a red square ![]() (Figure 8)
(Figure 8)
Figure 8

Stop an Active Archive Job
If you wish to stop an active Archive Job:
- Click on the red square button
 under the Run/Stop column (Figure 9)
Figure 9

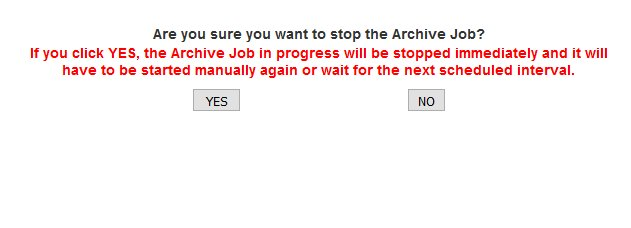
- In the Confirmation Window, click the Yes button (Figure 10). Clicking No, will take you back to the Email Archive page.
Figure 10
Delete Archive Job
If you wish to delete the existing Archive Job and the job is NOT running:
- Click on the red X
 under the Delete column (Figure 11)
Figure 11

- In the Confirmation Window, click the Yes button (Figure 12). Clicking No, will take you back to the Email Archive page.
Figure 12

Remount Archive Share
Note: You cannot remount the Archive share if the Archive Job is in progress.
Figure 13

Restore External Storage Archive from Compressed 7-zip Snapshot File
As mentiond above, if you are storing your email archive on an external storage share on a Windows server, you must NEVER use Windows file tools to manage the email archive because case sensitivity will not be preserved and the appliance will not able to access the archived emails. This includes, attempting to restore the email archive from a Compressed 7-zip Snapshot file. The restore process should always be done from the Hermes SEG appliance.
- Login to Hermes SEG via SSH or the virtual console and become root and then type the hermes account password when prompted:
sudo su- Ensure the email archive share is mounted:
df -h- Look for the /mnt/hermesemail_archive mount (Figue 14)
Figure 14

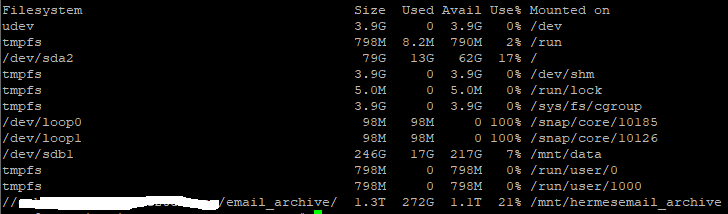
- Change to the /mnt/hermesemail_archive directory:
cd /mnt/hermesemail_archive- List files in that directory
lshermesemail_archive_07-06-2017-0224.7z hermesemail_archive_07-11-2017-0303.7z
hermesemail_archive_07-07-2017-0201.7z hermesemail_archive_07-12-2017-0304.7z
hermesemail_archive_07-08-2017-0153.7z hermesemail_archive_07-13-2017-0246.7z
hermesemail_archive_07-09-2017-0313.7z hermesemail_archive_07-14-2017-0149.7z
hermesemail_archive_07-10-2017-0315.7z mntIf the mnt directory exists
Change to that directory:
cd mnt/If the mnt directory does NOT exist
Create the directory:
mkdir mntChange to that directory:
cd mnt/- Restore the email archive to the share by running the following command where hermesemail_archive_mm-dd-yyyy-hhmm.7z is the name of the Compressed 7-zip Snapshot file from the listing in Step 6:
7za x ../hermesemail_archive_mm-dd-yyyy-hhmm.7z
System Reboot & Shutdown
Reboot System
- Click on the Reboot System button and wait for the system to finish the reboot process (Figure 1).
Figure 1

Shutdown System
- Click on the Shutdown System button. Please note that manual intervention will be required in order to turn the system back on (Figure 2).
Figure 2
