General Information
- Introduction
- Getting Started
- Upgrade and Migrate Hermes SEG 18.04 to 20.04
- Requirements and Recommendations
- OVA/Hyper-V Appliance URL and Default Credentials
- Hermes SEG E-mail Flow
- Encryption
Introduction
Hermes Secure Email Gateway is a Free Open Source (Hermes SEG Community Only) Email Gateway that provides Spam, Virus and Malware protection, full in-transit and at-rest email encryption as well as email archiving.
Hermes Secure Email Gateway combines Open Source technologies such as Postfix, Apache SpamAssassin, ClamAV, Amavisd-new and CipherMail under one unified web based Web GUI for easy administration and management of your incoming and ougoing email for your organization.
It can be deployed to protect your in-house email solution as well as cloud email solutions such as Google Mail and Microsoft Office 365.
Getting Started
Access Hermes SEG Administrator Console
Using a browser, access the Hermes SEG Administrator Console at https://<IP_ADDRESS>/admin/ where <IP_ADDRESS> is the IP address of your server.
If you have recently rebooted your system, you may get a 500 Internal Server Error when attempting to access the Hermes SEG Administrator Console. This usually means that the Authentication Server has not initialized yet. This error usually goes away on its own. Wait a couple of minutes and try refreshing your browser again.
Login with the following default credentials
- Username: admin
- Password: ChangeMe2!
Set Network Settings
Figure 2
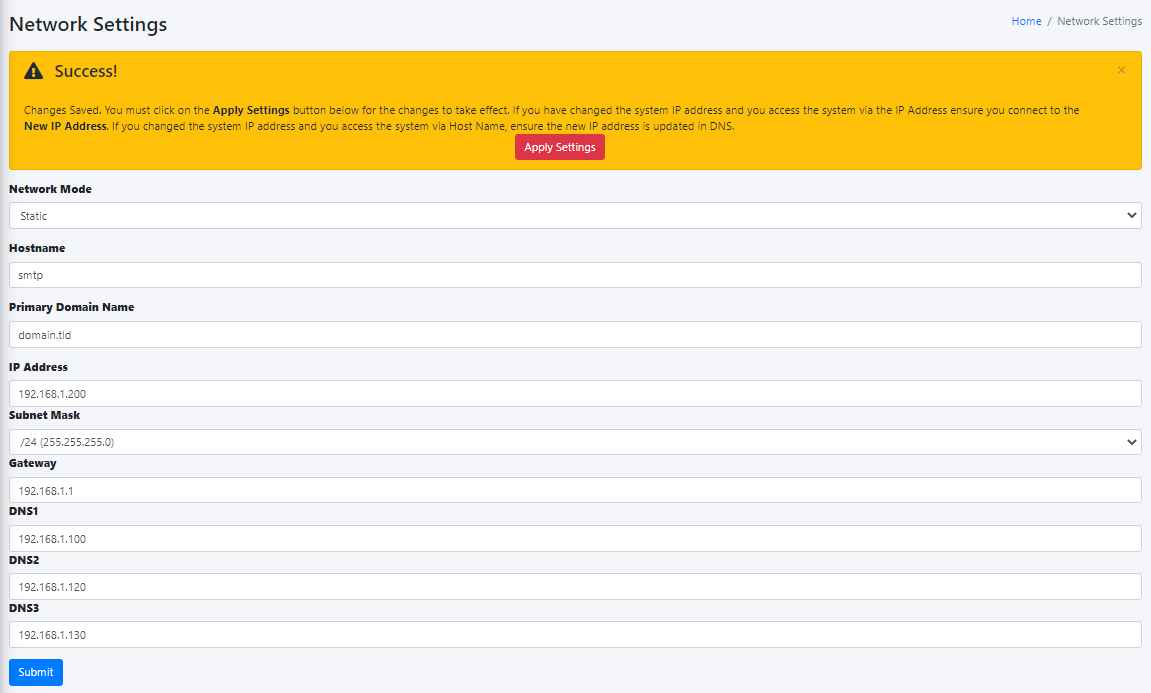
- If you changed Hermes SEG IP Address, your browser will most likely time out. Remember, to access the Hermes SEG Administrator Console Web GUI at https://<NEW_IP_ADDRESS/admin/ where is the <NEW_IP_ADDRESS> is the IP you set above.
Set System Certificates
Hermes SEG Community Version
Hermes SEG Community Version will allow you to create Certificate Signing Requests to submit to 3rd party CAs and import certificates from 3rd party CAs.
- Click the Import Certificate button, enter a friendly name for the certificate in the Certificate Name field, paste the contents of the certificate including the -----BEGIN CERTIFICATE----- & -----END CERTIFICATE----- lines in the Certificate field, paste the contents of the unencrypted key including the -----BEGIN PRIVATE KEY----- & -----END PRIVATE KEY----- lines in the Unencrypted Key field, paste the contents of the root and Intermediate CA certificates including the -----BEGIN CERTIFICATE----- & -----END CERTIFICATE----- lines in the Root and Intermediate CA Certificates field and click the Import button (Figure 3):
Figure 3

Hermes SEG Pro Version
Hermes SEG Pro Version will allow you to create Certificate Signing Requests to submit to 3rd party CAs, import certificates from 3rd party CAs as well as Request Lets Encrypt (Acme) Certificates.
If you wish to import a 3rd party CA certificate, please follow the Hermes SEG Community instructions above to import a certificate. If you wish to request a Lets Encrypt (Acme) certificate, follow the instructions below:
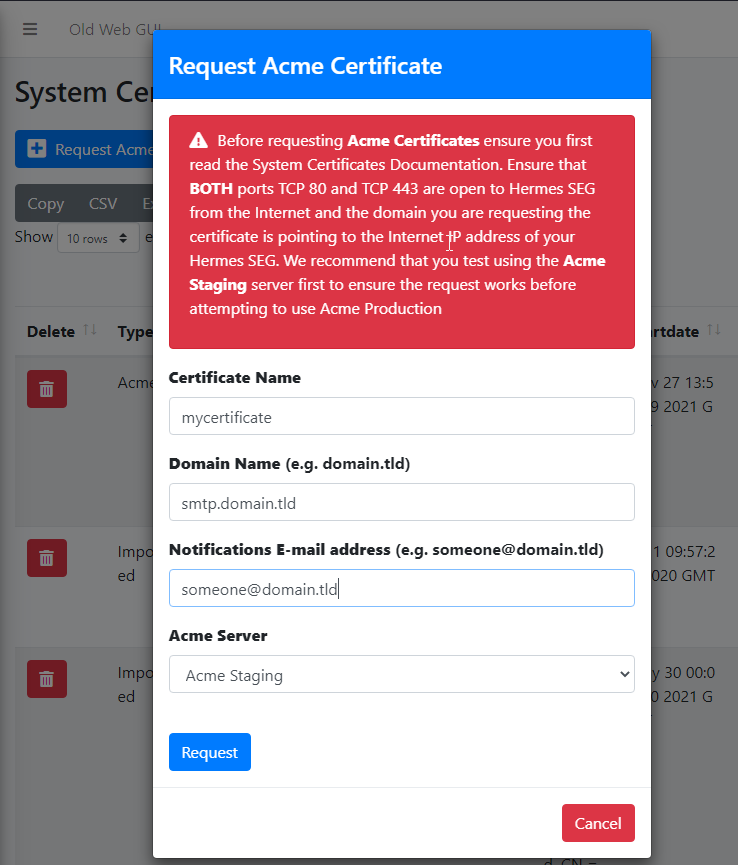
Before requesting Acme Certificates ensure that BOTH ports TCP 80 and TCP 443 are open to Hermes SEG from the Internet and the domain you are requesting the certificate is pointing to the Internet accessible IP address of your Hermes SEG machine. We recommend that you test using the Acme Staging server first to ensure the request works before attempting to use Acme Production. The reason we initially Request Acme Certificate utilizing the Acme Staging server is because Lets Encrypt is much more lenient with rate limits with failed requests in their staging environment than their production environment, click here for details.
- Click the Request Acme Certificate button, enter a friendly name in the Certificate Name field, enter the FQDN (domain name) you wish to request a certificate, enter a valid e-mail address in the Notifications E-mail address field, leave the Acme Server drop-down field set to Acme Staging and click the Request button (Figure 4):
Figure 4
- If the Acme Certificate Request fails, double-check that the FQDN (domain name) points to the Internet accessible IP of your Hermes SEG machine and that BOTH ports TCP/80 (HTTP) and TCP/443 (HTTPS) are allowed through your firewall and try again.
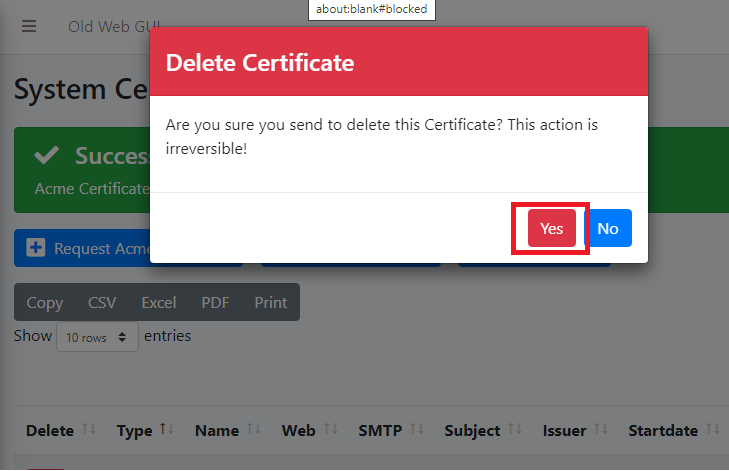
- If the Acme Certificate Request succeeds, locate the newly created certificate in your certificate list, click the
 icon and on the resultant Delete Certificate confirmation click on Yes (Figure 5):
Figure 5
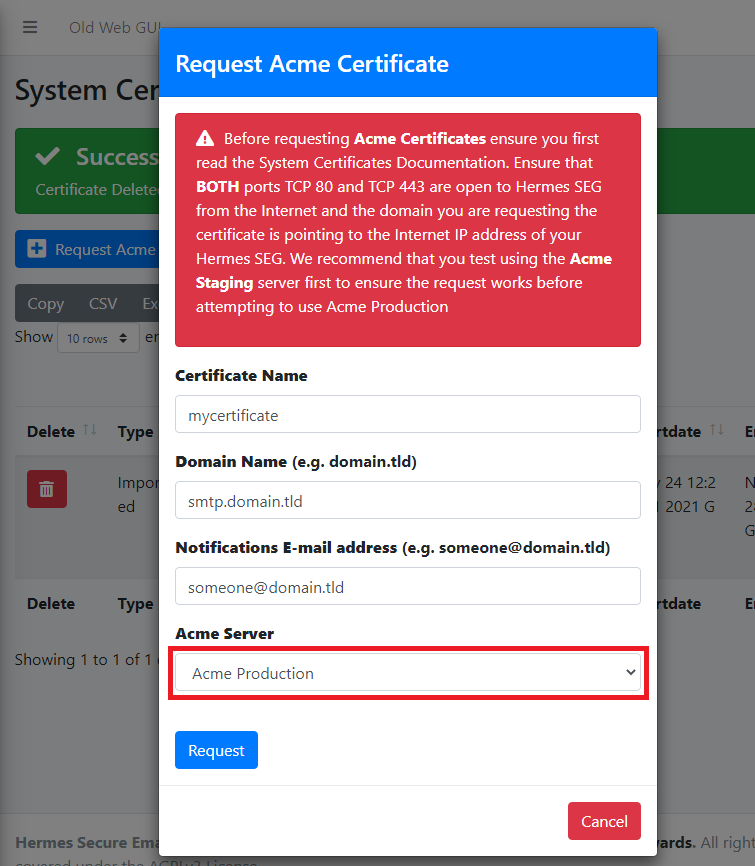
- Click the Request Acme Certificate button again, enter a friendly name in the Certificate Name field, enter the FQDN (domain name) you wish to request a certificate, enter a valid e-mail address in the Notifications E-mail address field, this time set the Acme Server drop-down field set to Acme Production and click the Request button (Figure 6):
Figure 6
Set Console Settings
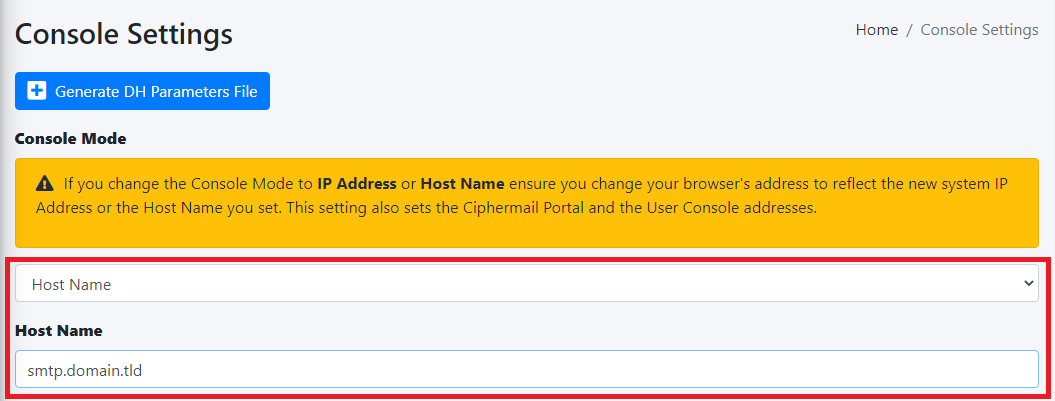
The Hermes SEG Console Settings sets the method you wish to access Hermes SEG machine which includes the Admin Console, User Console and the Ciphermail Console. By default, the Console Mode is set to IP Address, however, an IP address is not contusive to using SSL certificates. Therefore, if you plan to use a SSL certificate to access the Hermes SEG machine without getting certificate errors, you must set the Console Mode to Host Name. The Host Name you set does NOT necessarily have to the the same Host Name you set in Network Settings above. The Host Name and Primary Domain Name you set in the Network settings is used for SMTP transactions such as SMTP TLS and it's not related to Hermes SEG console access.
Figure 7
- The Console Certificate field is pre-populated with the system-self-signed certificate. If you wish to use a SSL certificate you previously set in the Set System Certificates section above, simply delete the system-self-signed entry and start typing the friendly name of the certificate you setup previously that matches the host name. The system will locate the certificate and display it in a drop-down list. Click on the certificate and the system will automatically populate all the rest of the Certificate fields such as the Subject, Issuer, Serial and Type (Figure 8):
Figure 8

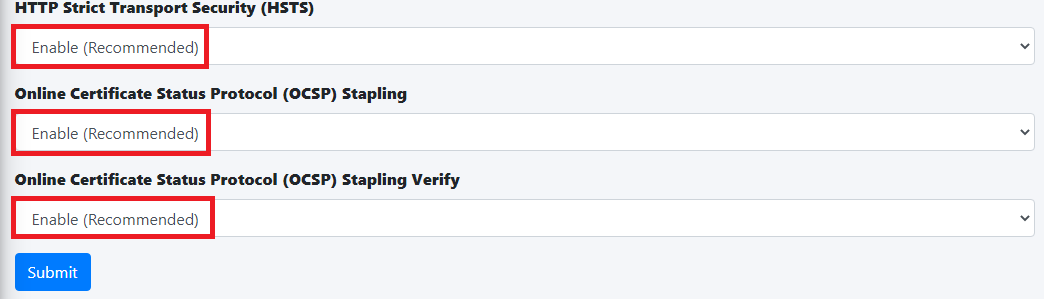
- We highly recommend that you enable HTTP Strict Transport Security (HSTS), Online Certificate Status Protocol (OCSP) Stapling, Online Certificate Status Protocol (OCSP) Stapling Verify and click the Submit button (Figure 9):
Figure 9
After clicking the Submit button and you changed the Console Mode from IP Address to Host Name, your browser will NOT automatically redirect you to the new console address. Ensure you enter the new address in your browser as https://<HOST_NAME>/admin/ where <HOST-NAME> is the new Host Name you set above.
- Additionally, we recommend that you generate a DH (Diffie-Hellman) Parameters file by clicking the Generate DH Parameters File button and on the resultant Generate Diffie-Hellman (DH) Parameters File confirmation window, click on Yes (Figure 10):
Figure 10
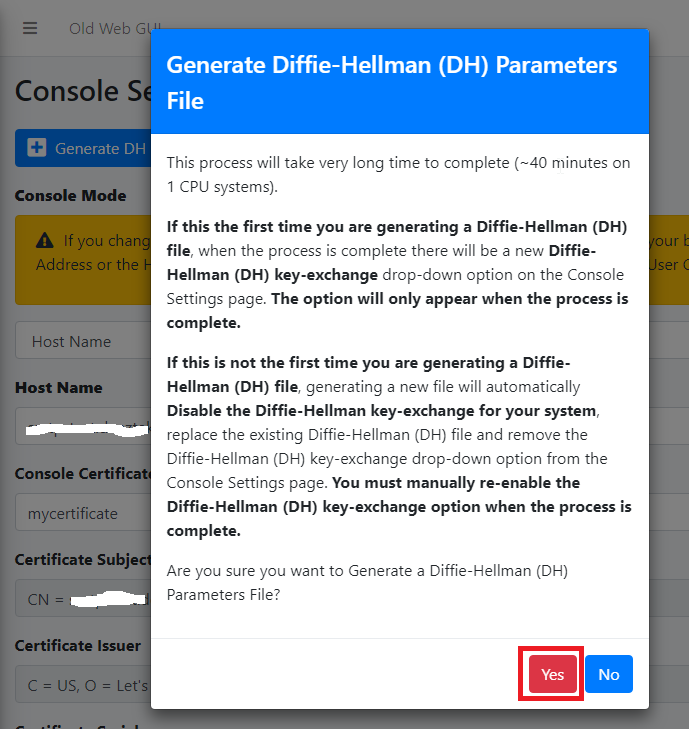
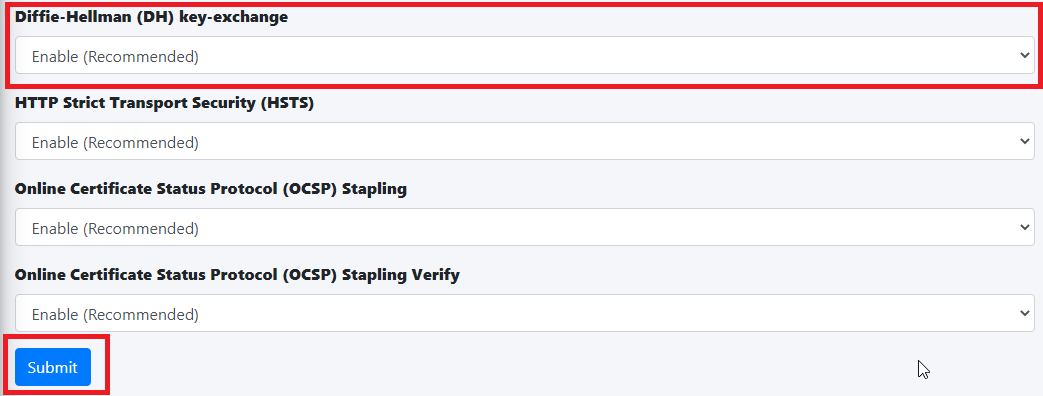
- Generating a DH Parameters file can take a very long time to complete (~40 minutes on 1-CPU systems). You can proceed to configure the rest of your system (DO NOT reboot the system while it's generate a DH Parameters file) and check back under System --> Console Settings to see if a new Diffie-Hellman (DH) key-exchange drop-down appears set it to Enable and click the Submit button below (Figure 11).
Figure 11
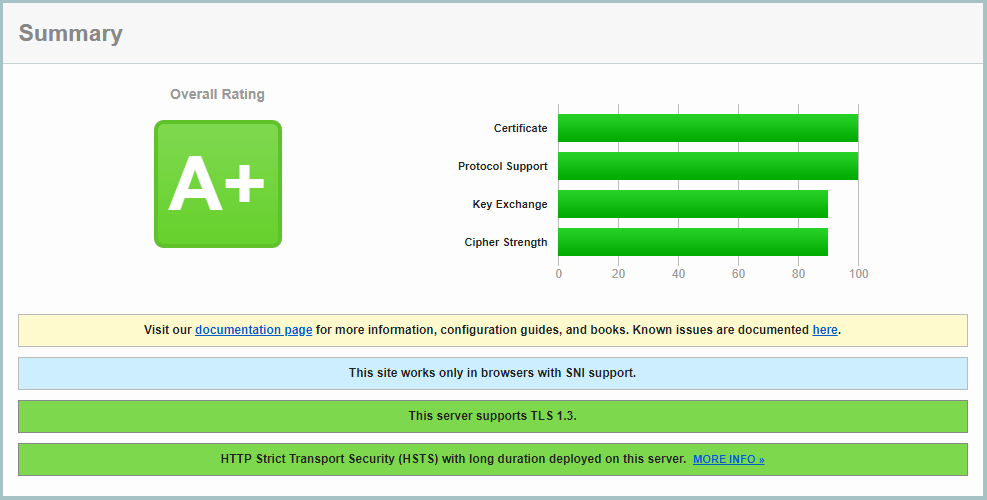
If you follow the above recommendations, you should be able to achieve an A+ rating on the Qualys SSL Labs SSL Server Test (Figure 12):
Figure 12
Set SMTP TLS Settings
It's important to set SMTP TLS in order to transmit e-mail messages between your Hermes SEG machine and other e-mail servers using TLS encryption.
Before you can set SMTP TLS, you must first have either imported or requested a SSL Certificate in the Set System Certificates section above for the Hostname and Primary Domain Name you set in the Set Network Settings above.
- Navigate to Gateway --> SMTP TLS Settings.
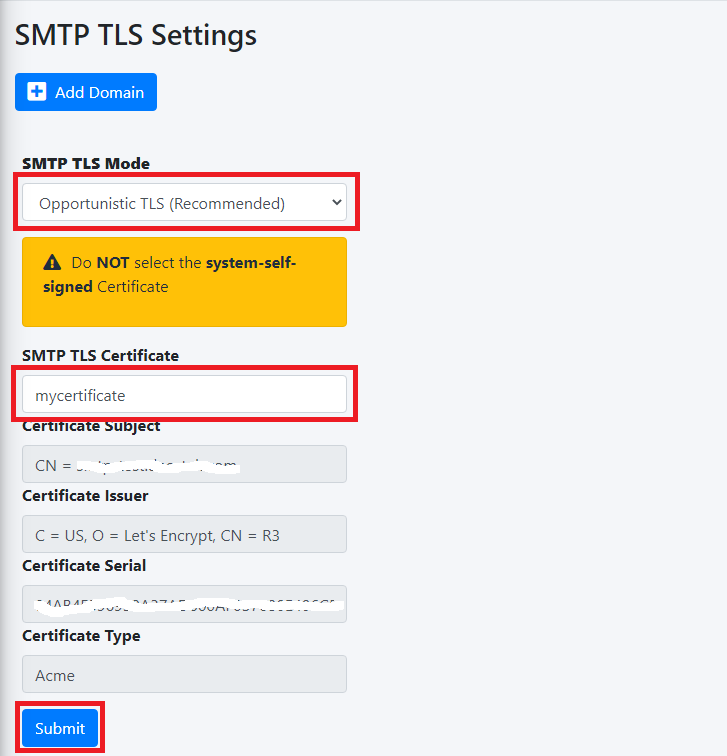
- Set the SMTP TLS Mode drop-down to Opportunistic TLS.
- The SMTP TLS Certificate field is pre-populated with the system-self-signed certificate. If you wish to use a SSL certificate you set in the Set System Certificates section above, simply delete the system-self-signed entry and start typing the friendly name of the certificate you setup previously that matches the Hostname and Primary Domain Name you set in the Set Network Settings above. The system will locate the certificate and display it in a drop-down list. Click on the certificate and the system will automatically populate all the rest of the Certificate fields such as the Subject, Issuer, Serial and Type (Figure 13):
Figure 13

- Click the Submit button (Figure 14):
Figure 14
Change admin System Account Password
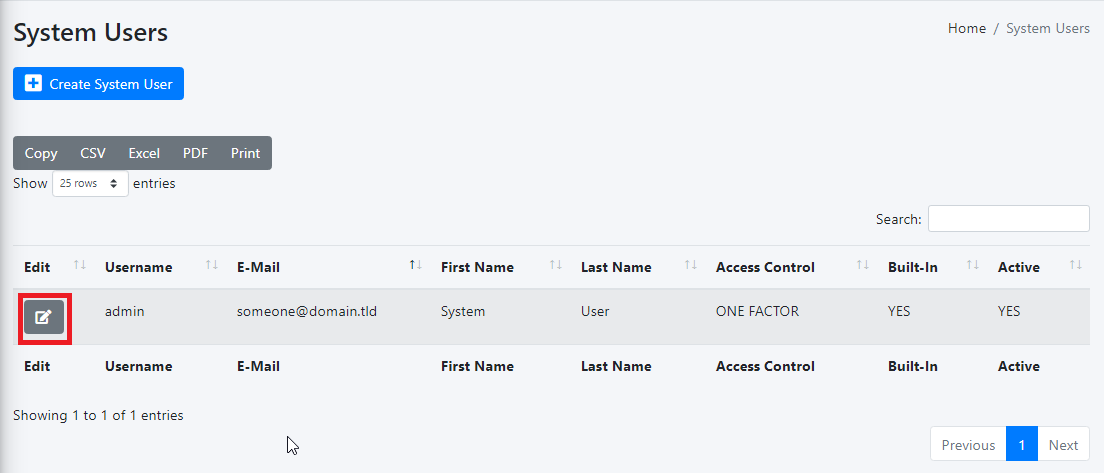
- Navigate to System --> System Users.
- In the System Users screen, click the
 icon next to the admin Username (Figure 15).
Figure 15
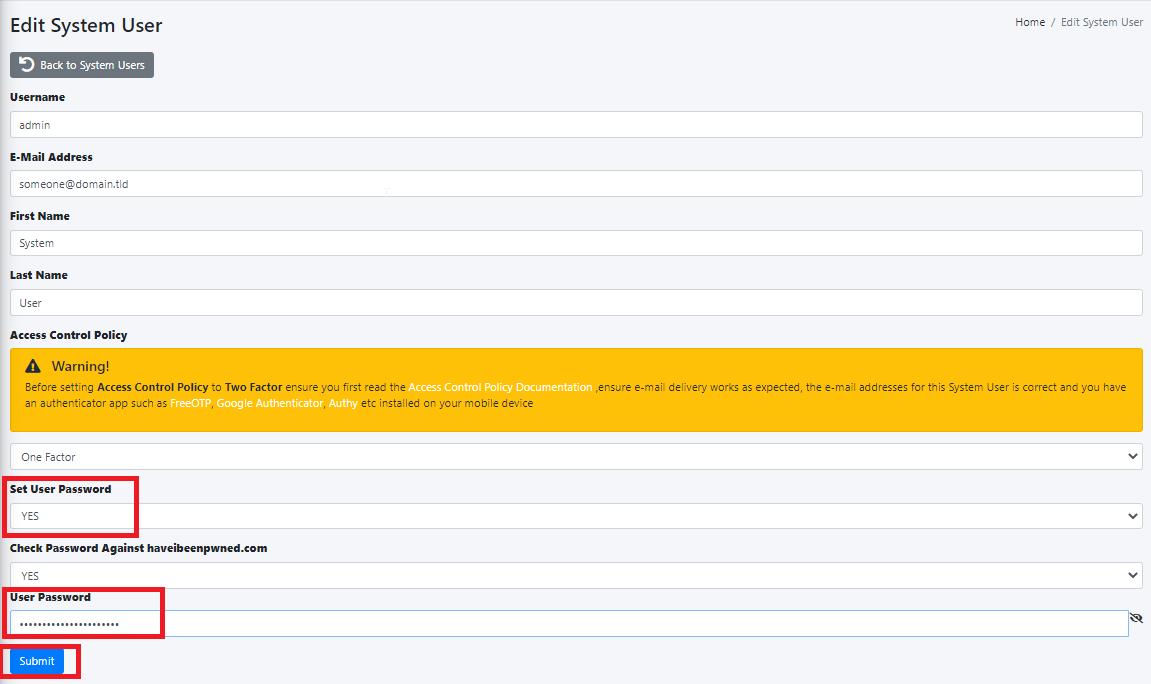
- In the Edit System User screen, set the Set User Password drop-down to YES, enter a new password in the User Password field that appears and click the Submit button (Figure 16).
Figure 16
- We highly recommend that you also set Two Factor authentication (2FA) for the System User account by following the instructions on the System Users documentation.
Setup Domains
In order for Hermes SEG to deliver email, you must first set the domain(s) that Hermes SEG will process email for along with their corresponding destination email server(s). You can add as many domains and destination email servers as required. An email server can be configured as an IP address or a Host Name as long as the Hermes SEG can reach it over the TCP port you set. Multiple domains can be pointed to the same email server if necessary.
-
Navigate to Gateway --> Domains.
-
Click the Create Domain button (Figure 17):
Figure 17

Figure 18

Add Internal Recipients
If you have setup any domains in the Setup Domains section above with the Recipient Delivery field set to SPECIFIED, then you MUST add either Internal Recipients or Virtual Recipients in order to process incoming e-mail and relay that email to the correct recipient mailboxes which are located on the destination email server(s) for the domain(s) you setup in the Setup Domains section above. This section will guide you with adding Internal Recipients.
-
Navigate to Gateway --> Internal Recipients.
-
Click the Create Recipient(s) button (Figure 19):
Figure 19

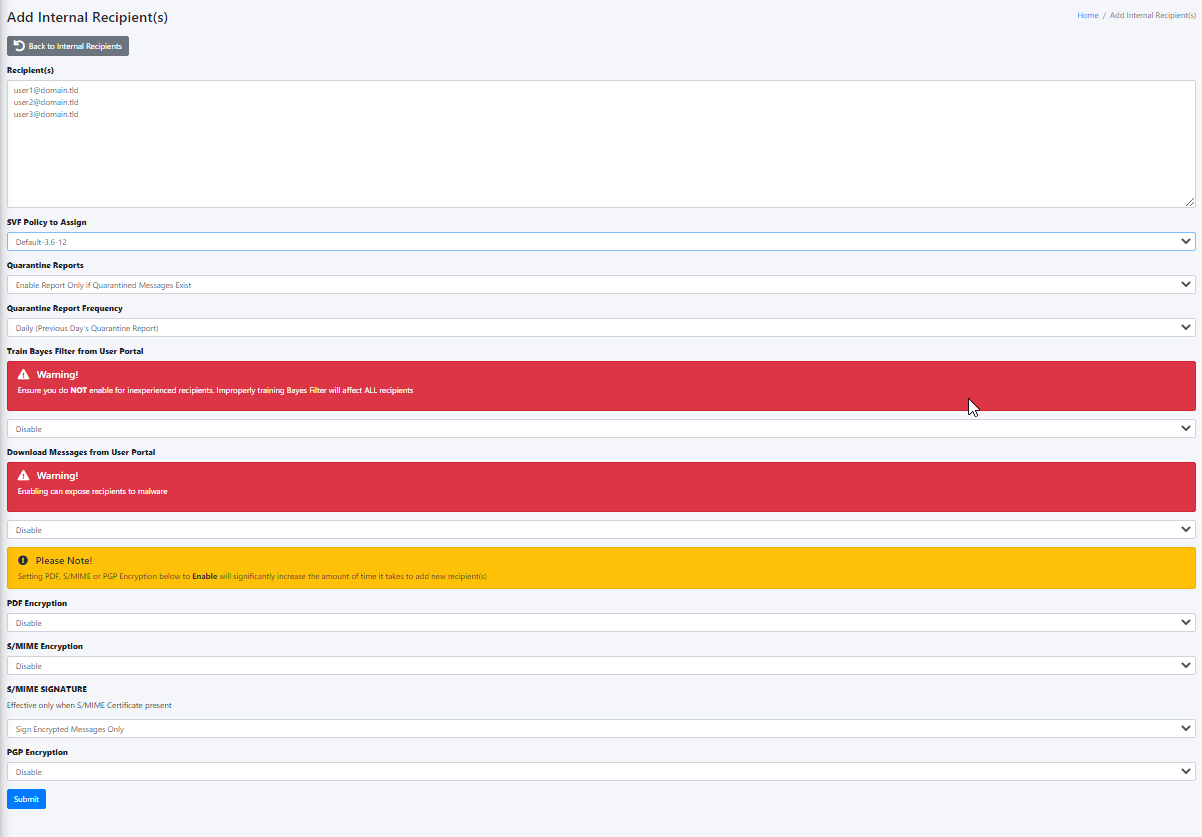
In the Add Internal Recipient(s) page, in the Recipient(s) field, enter an e-mail address each in each own line, select the appropriate options in the SVF Policy to Assign, Quarantine Reports, Quarantine Report Frequency, Train Bayes Filter from User Portal, Download Messages from User Portal, PDF encryption, S/MIME Encryption, S/MIME SIGNATURE, PGP Encryption drop-downs and click the Submit button (Figure 20):
Figure 20
Set Postmaster, Admin E-mail Address and TimeZone
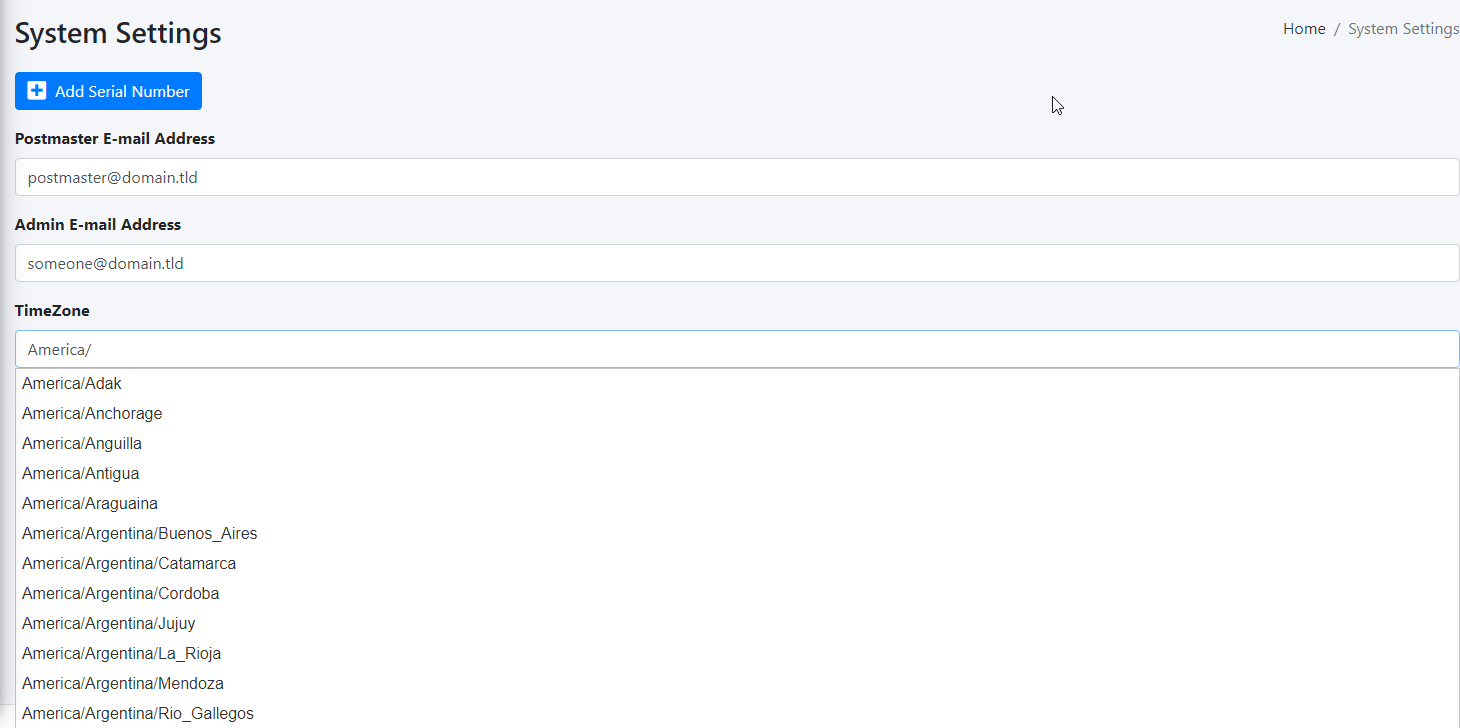
- Navigate to System --> System Settings.
- Fill in Postmaster E-mail Address field with an email belonging to a Relay Domain you setup above.
- Fill in the Admin E-mail Address field with an email of domain outside of the system (i.e. a domain that the system does not relay email Ex: someone@hotmail.com).
- Delete the America/New_York default TimeZone entry and start typing your continent and a drop-down with the available TimeZones for that continent will appear where you can select the appropriate one for your location (Figure 21).
Figure 21
- Click the Submit button.
Set Relay Networks
In addition to inbound email, if the email server(s) you added will also be sending outbound email through the Hermes SEG (recommended), you must allow their IP address(es) to send (relay) email through the Hermes SEG.
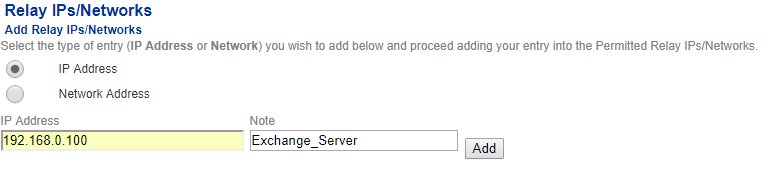
- Navigate to Gateway --> Relay Networks.
- Ensure IP Address is selected and the under the IP Address field enter the IP Address of the email server that you want to allow to send email through the Hermes SEG, under the Note field, enter a short description identifying the email server (ensure that you don't use any spaces or special characters in the Note field) and click the Add button (Figure 22)
Figure 22
- Repeat as necessary for every email server that you want to allow to send outbound email through the Hermes SEG.
- As you add entries, you will notice that each entry shows up under the Permitted Relay IPs/Networks to be added section (Figure 23)
Figure 23
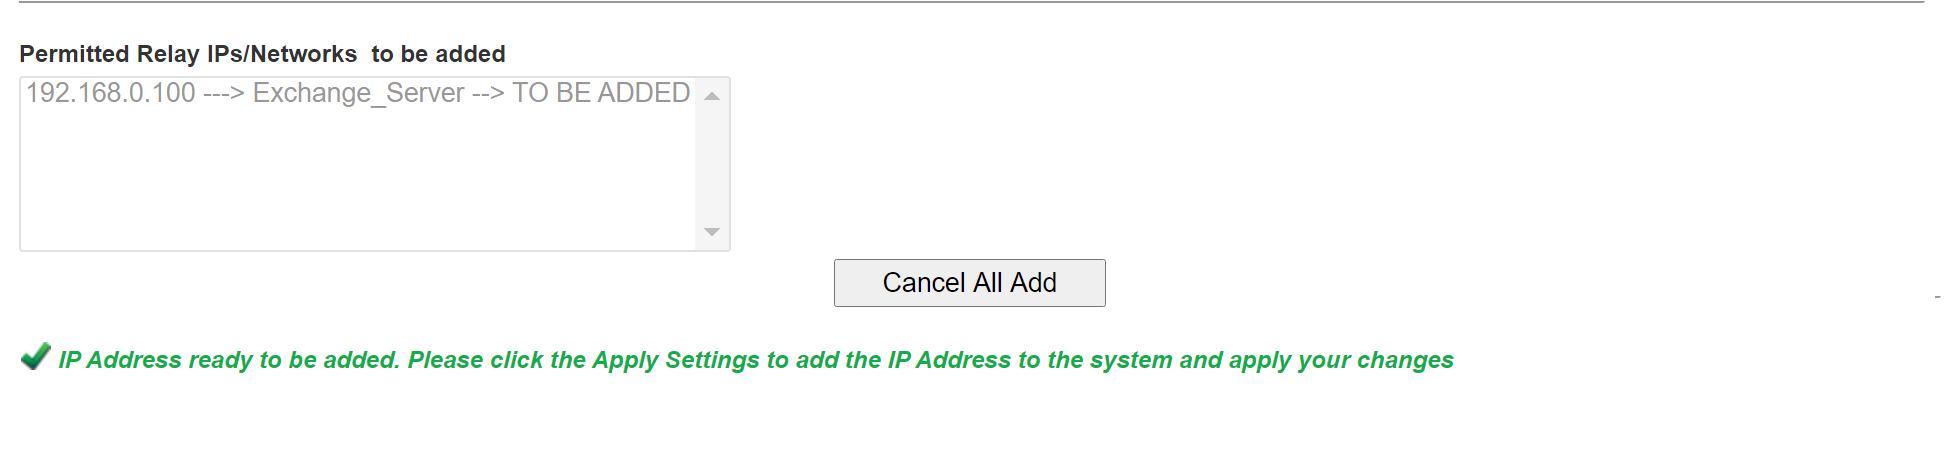
- After you are finished adding all your permitted email servers, you must apply the settings in order for the changes to take effect. On the bottom of the page, click on the Apply Settings button (Figure 24)
Figure 24
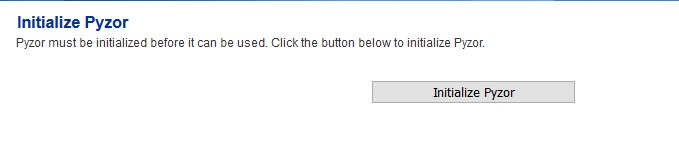
Initialize Pyzor
Pyzor is a collaborative, networked system to detect and block spam using digests of messages. Vipul's Razor is a distributed, collaborative, spam detection and filtering network.
Hermes SEG uses both of these components for better spam detection. Both of these components must be initialized before Hermes SEG can use them.
-
Navigate to Content Checks --> Initialize Pyzor and click on the Initialize Pyzor button. Wait for successful completion before proceeding further (Figure 25).
Figure 25
Initialize Vipul's Razor
Before attempting to initialize Vipul's Razor, ensure the Hermes SEG has outbound Internet access. Initialization can take a few minutes to complete, so please be patient.
-
Navigate to Content Checks --> Initialize Vipul's Razor and click on the Initialize Razor button. Wait for successful completion before proceeding further (Figure 26).
Figure 26

Clear Bayes Database
The Bayes Database tries to identify spam by looking at what are called tokens; words or short character sequences that are commonly found in spam or ham.
On a new Hermes SEG installation, it's always best to ensure a clean Bayes Database before you start processing email.
- Navigate to Content Checks --> Clear Bayes Database and click on the Clear Database button. Wait for successful completion before proceeding further (Figure 27).
Figure 27

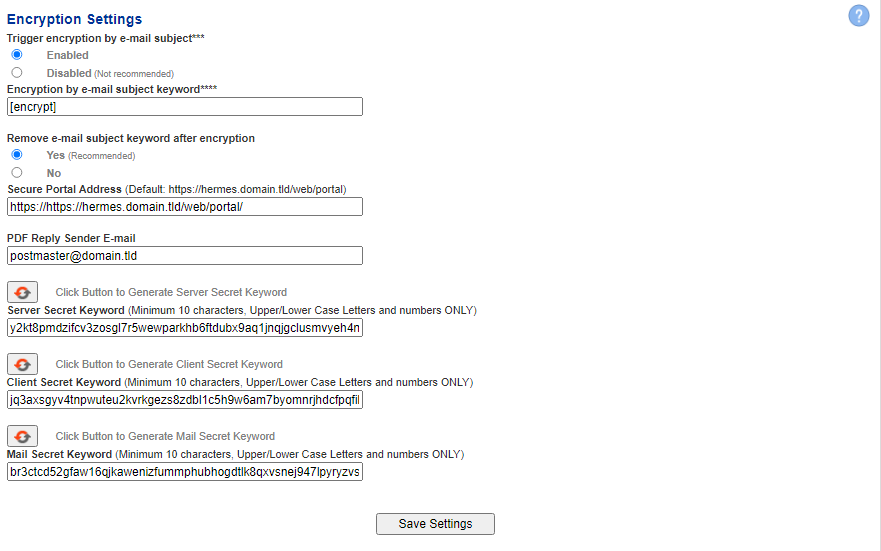
Set Encryption Settings
- Navigate to Encryption --> Encryption Settings.
- Fill in Encryption by e-mail subject keyword field or leave it set to default [encrypt].
- Select whether you wish to Remove the e-mail subject keyword after encryption or leave it to default Yes.
- Fill in the PDF Reply Sender E-mail field. This must be an email address with a domain that Hermes SEG relays email. Ex: postmaster@domain.tld
- Click the button for the Server, Client and Mail Secret Keyword fields to generate random keywords, or set your own 10-character minimum uppler/lower case letter/number keywords.
- Click on the Save Settings button and after the settings are saved, click the Apply Settings button(Figure 28).
Figure 28
Change the Ciphermail admin Account Password
Figure 29
- Once logged in, click on the Admin entry on the top menu and on the Administrators page, click on the admin username (Figure 30).
Figure 30
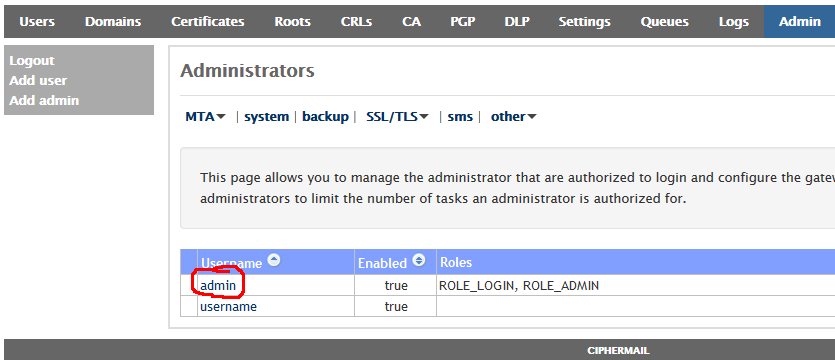
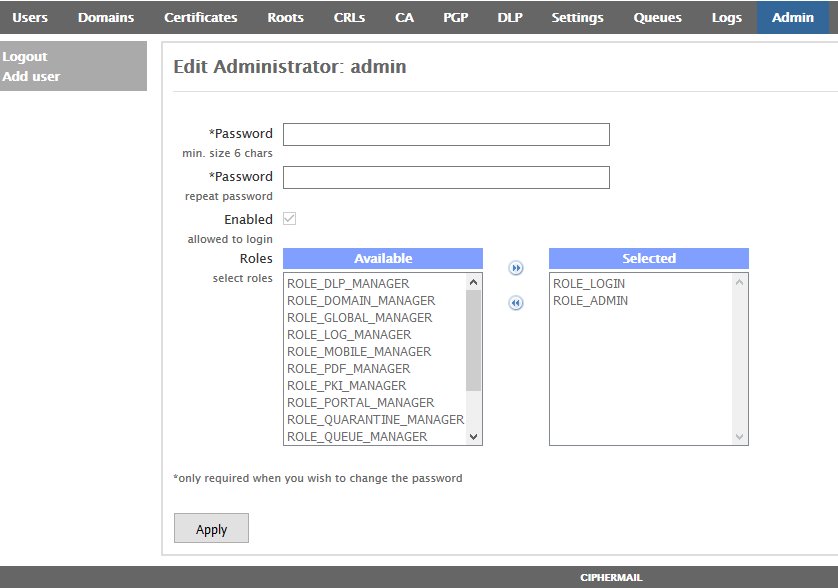
- In the Edit Administrator: admin page, enter a new password in the first Password field and then verify it in the second Password field and then click on the Apply button at the bottom of the page (Figure 31). Passwords must be at least 8 characters long, they must contain letters, numbers and special characters.
Figure 31
Recommendations
Register for Barracuda Central Account
Hermes SEG comes pre-configured to use the Barracuda RBL (Realtime Block List), however you must first register for an account and provide your DNS Server IPs at Barracuda Central before you will be allowed to use it.
Upgrade and Migrate Hermes SEG 18.04 to 20.04
Introduction
Hermes SEG version 18.04 is based on Ubuntu Server 18.04 LTS (Bionic Beaver). On May 31, 2023, Ubuntu will reach the end of the standard five year maintenance window for Long Term Support (LTS) for 18.04 which means there will be no more bug fixes or security patches unless you opt to upgrade to Ubuntu Pro which will extend support to 2028 or upgrade your Ubuntu installation to a higher version. Consequently, Hermes SEG is no longer supported on Ubuntu 18.04 LTS.
Fortunately, if you have an existing Hermes SEG installation on Ubuntu 18.04 LTS, you can perform a release upgrade to Ubuntu Server 20.04 LTS (Focal Fossa) which will extend the standard maintenance window to May 31, 2028.
Ensure that you have a recent and valid backup of your Hermes SEG installation before attempting any of the steps below. These instructions are offered with absolutely no warranty or guarantee of any kind. We cannot be held liable for any damage that my occur to your system by following the instructions below!
Install the latest updates and patches on Ubuntu Server 18.04 LTS
- Before you install the latest updates and patches it's a good idea to reboot your system in order for any automatic security updates that may have previously installed to take effect.
- Login to a console prompt as a user in the admin group (it's not recommended to attempt to perform the upgrade from a SSH session) and become root by running the following command and then typing your password when prompted:
sudo su- Run the following command to update the repositories, run the latest updates and remove any obsolete packages:
apt-get update && apt-get dist-upgrade -y && apt-get auto-remove -y- After the updates have been successfully installed reboot your system.
Perform a release upgrade of Ubuntu Server 18.04 LTS to Ubuntu Server 20.04 LTS
- In a console prompt as root, run the following command to begin the upgrade:
do-release-upgrade- You will be prompted to continue with a message regarding disabled third party entries in your sources.list. Press [ENTER] to continue:
Third party sources disabled

Some third party entries in your sources.list were disabled. You can
re-enable them after the upgrade with the 'software-properties' tool
or your package manager.

To continue please press [ENTER]
- Before any changes are made, you will be prompted with a summary of the upgrade before proceeding. enter y to continue:
Do you want to start the upgrade?


18 installed packages are no longer supported by Canonical. You can
still get support from the community.

20 packages are going to be removed. 190 new packages are going to be
installed. 752 packages are going to be upgraded.

You have to download a total of 616 M. This download will take about
2 minutes with your connection.

Installing the upgrade can take several hours. Once the download has
finished, the process cannot be canceled.

 Continue [yN]  Details [d]
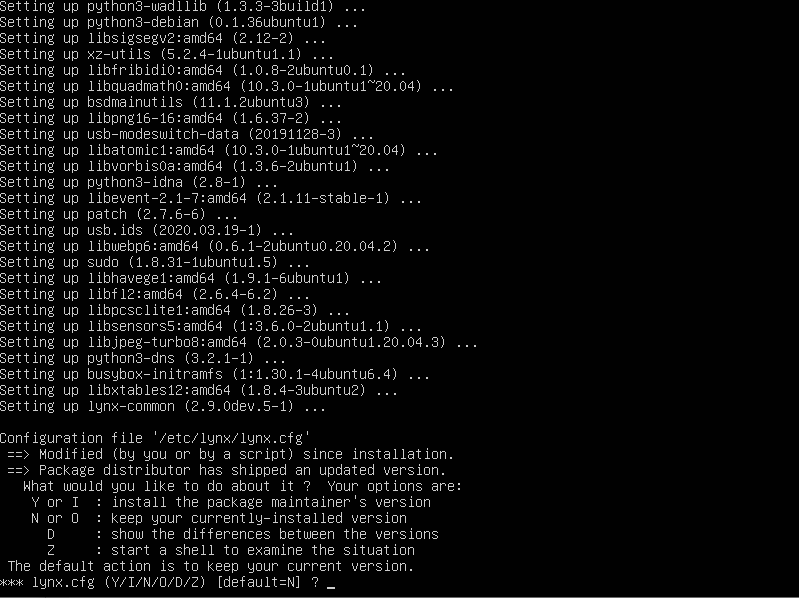
- During the upgrade you will be repeatedly prompted to install the newer package configuration files. It's highly recommended that you always pick the default option by either pressing ENTER or N always keep the currently-installed version:
Figure 1
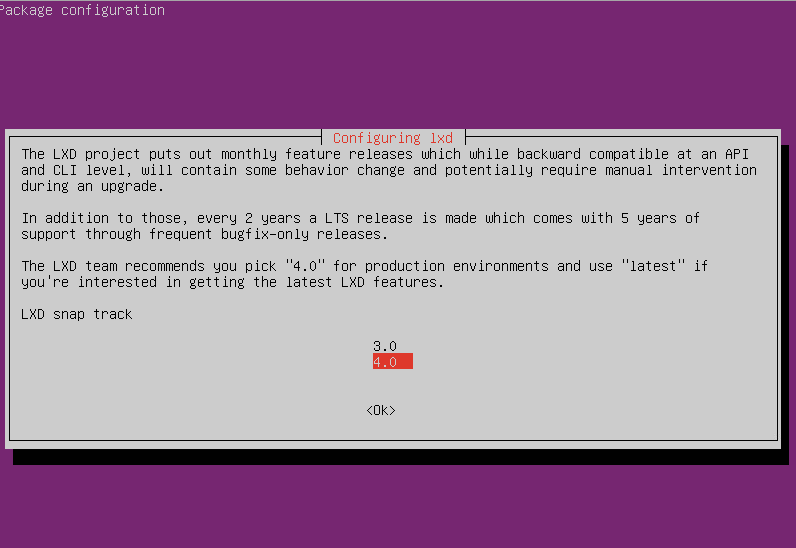
- On the Configuring lxd prompt, ensure you select the 4.0 LXD snap track to continue:
Figure 2
- Once the upgrade has completed successfully, reboot your system.
Run the Hermes SEG Migrate 18.04 to 20.04 Script
During the release upgrade, several obsolete packages are removed including packages that Hermes SEG requires to operate correctly. You must run the Hermes SEG Migrate 18.04 to 20.04 script in order to install newer versions of those packages and migrate the necessary settings.
- In a console prompt as root, remove any existing Hermes-Secure-Email-Gateway repositories from your system by running the command below:
rm -rf Hermes-Secure-Email-Gateway/- Git clone a fresh copy of the Hermes SEG Github repository by running the command below:
git clone https://github.com/deeztek/Hermes-Secure-Email-Gateway.git- Change to the newly created Hermes-Secure-Email-Gateway directory:
cd Hermes-Secure-Email-Gateway/- Make the hermes_migrate_1804_2004.sh script executable:
chmod +x hermes_migrate_1804_2004.sh- Run the hermes_migrate_1804_2004.sh script:
./hermes_migrate_1804_2004.sh- Follow the prompts to proceed with installation. Once the script has ran successfully, reboot your system.
- Ensure your system is operating successfully i.e. sending/receiving unencrypted/encrypted e-mail, the Hermes SEG admin/user consoles are working etc.
- Ensure that Ciphermail Web-GUI is operational and you can login successfully by navigating to https://[HERMES-SEG]/ciphermail where [HERMES-SEG] is the IP or FQDN of your Hermes SEG machine.
Hermes SEG Pro installations will display an INVALID license after the release upgrade due to a mismatch in the device ID. Please send your serial number to support@deeztek.com and we can help you re-activate it.
Issues
If you run into any issues with the upgrade, you can post your question on our Github Issues page or our Matrix Community Chat channel.
Requirements and Recommendations
- Hermes SEG should be behind a network perimeter firewall for best security.
- Network Firewall rule to allow inbound traffic to Hermes SEG IP address over TCP/25 (SMTP), TCP/80 (HTTP) and TCP/443 (HTTPS)
- Network Firewall rule to allow the Hermes SEG IP address outbound Internet access over the following Ports:
- UDP/53 (DNS)
- TCP/53 (DNS)
- TCP/80 (HTTP)
- TCP/443 (HTTPS)
- TCP/25 (SMTP)
- TCP/2703 (Cloudmark)
- UDP/6277 (DCC Antispam)
- TCP/123 (NTP)
- UDP/123 (NTP)
- TCP/873 (Rsync)
- UDP/873 (Rsync)
- TCP/24441 (Pyzor)
- TCP/2703 (Razor)
- 8 GB of RAM and at least 4 CPUs
- At least 275 GB of storage space on virtual host. Hermes SEG Appliance hard drives are thin provisioned. The 275 GB of storage will be needed once the email archive starts filling up. The rate the archive fills up greatly depends on the amount of email traffic. For low to medium email traffic a 5 year email retention is not out of the question.
- Your e-mail users will inevitably use the Junk and Not Junk buttons in their Outlook to report Spam and Ham to Microsoft. This is undesirable because it will create frustration with your users since no action will be taken with those reports as it relates to Hermes SEG. The best way to deal with this problem is to create rules in Hermes SEG to intercept e-mails destined for the following Microsoft e-mail addresses:
and redirect them to e-mail address(es) of your choice so that you can take action.
More information on this topic can be found in the article below:
Take Action on E-mail Based on Headers in Hermes SEG
OVA/Hyper-V Appliance URL and Default Credentials
The following URL and default credentials are provided for reference, backup, restore and migration operations of the OVA/Hyper-V appliance. It's highly recommended that the default credentials are changed on the OVA/Hyper-V appliances.
MySQL Root
- Username: root
- Password: T4issSW0XHV0Mf5h3NsR
MySQL Hermes Database
- Username: hermes
- Password: pdT63m5C205AiuSu1bey
MySQL Ciphermail/Djigzo Database
- Username: djigzo
- Password: DwRV08foKDrZCeYIvfIm
MySQL Syslog Database
- Username: rsyslog
- Pasword: fs82UL4oFtwzk6vGclvV
MySQL Opendmarc Database
- Username: opendmarc
- Password: ToZBmxElmvwzY8OBtV11
Lucee Server and Web Administrator
The Lucee Server and Web Administrator should NOT be accessible from the Internet
- Server URL: http://<ipaddress>:8888/lucee/admin/server.cfm
- Web URL: http://<ipaddress>:8888/lucee/admin/web.cfm
- Password: 7tqirca0jtByn73unHir
Hermes SEG Administration Console
- URL: https://<ipaddress>:9080/admin/logon.cfm
- Username: admin
- Password: ChangeMe2!
Djigzo/Ciphermail Web GUI
- URL: https://<ipaddress>:9080/ciphermail/login
- Username: admin
- Password: admin
Hermes SEG E-mail Flow
Incoming Normal Mail Flow
Postfix TCP/25 --> SPF --> DKIM(Milter) TCP/8891 --> (Reinject)Postfix TCP/10026 --> DMARC TCP/54321 --> Amavis TCP/10021 --> James SMTP(Ciphermail) TCP/10025 --> (Reinject)Postfix TCP/10027 --> Postfix TCP/25 --> Destination
Incoming Bypassed Sender Mail Flow
Postfix TCP/25 --> SPF --> DKIM(Milter) TCP/8891 --> (Reinject)Postfix TCP/10026 --> DMARC TCP/54321 --> Amavis TCP/10030 --> James SMTP(Ciphermail) TCP/10025 --> (Reinject)Postfix TCP/10027 --> Postfix TCP/25 --> Destination
Encryption
Hermes SEG leverages the capabilities of Ciphermail in order to perform encryption/decryption of email messages. Ciphermail comes already installed and configured with the Hermes SEG appliance. Hermes SEG and Ciphermail have their very own Web GUI based approaches on managing encryption. We feel that our Web GUI is simpler and easier to manage, however if you prefer to utilize Ciphermail's Web GUI, it can be easily accessed at the following URL:
https://<IP_ADDRESS>/ciphermail/
where <IP_ADDRESS> is the IP address of your Hermes SEG appliance.
The Ciphermail Web GUI credetnails should had been changed if you followed the Getting Started guide. If not, ensure you change them right away.
Hermes SEG utilizes three methods for encrypting email:
S/MIME - S/MIME is a method for encrypting emails along with associated attachments as well as a method of digitally signing emails. Encrypting emails keeps them safe from unwanted access while digitally signing emails ensures that the sender of the email is legitimate thus reducing the effectiveness of phishing attacks. S/MIME is based on asymmetric cryptography, meaning that two separate keys are used. A private key which is used for decrypting the email and a public key which is used for encrypting and digitally signing the email.
PGP Encryption - PGP encryption encrypts and signs messages using asymetric key pairs which are uniquely created for each user. Public keys can be exchanged with others users via many means including public key servers. In this regard, PGP encryption is very similar to S/MIME encryption.
PDF Encryption - PDF Encryption converts the email along with any attachments to a PDF which in turn is encrypted with a password. This method is the easiest to implement because no special email clients that must support S/MIME have to be used. PDF readers are almost universally installed on user PCs.
Hermes SEG makes a distinction between two types of recipients:
Internal Recipients - These are internal recipients that have been created in Hermes SEG under Gateway --> Internal Recipients.
External Recipients - These are recipients that are not internal to Hermes SEG, in other words any recipient that the system does handle email for.