Gateway
- SMTP TLS Settings
- Relay Host
- Relay Domains
- Relay IPs & Networks
- Internal Recipients
- Virtual Recipients
SMTP TLS Settings
It's important to set SMTP TLS in order to transmit e-mail messages between your Hermes SEG machine and other e-mail servers with TLS encryption.
By default, SMTP TLS support in Hermes SEG is disabled. In this section you can enable Hermes SEG TLS support as well as associate the SSL certificate you previously imported or requested.
Hermes SEG supports two SMTP TLS methods:
Opportunistic TLS
In this mode, any time a remote SMTP server makes a connection, Hermes SEG announces that it supports STARTTLS, however it does not require TLS encryption. This mode, is the recommended mode if you need TLS encryption.
Mandatory TLS
In this mode, any time a remote SMTP server makes a connection, Hermes SEG announces STARTTLS and it will NOT accept email without TLS encryption. This mode should NEVER be used on a public Internet facing Hermes SEG.
Before you can set SMTP TLS, you must first have either imported or requested a SSL Certificate in the System --> System Certificates section for the Hostname and Primary Domain Name you set in the System --> Network Settings.
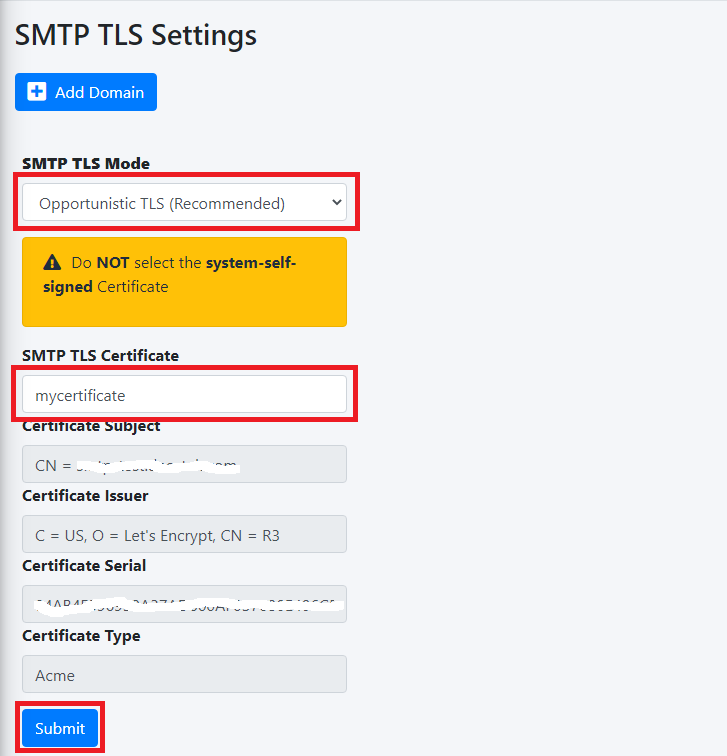
- Set the SMTP TLS Mode drop-down to Opportunistic TLS or or Mandatory TLS as required.
- The SMTP TLS Certificate field is pre-populated with the system-self-signed certificate. If you wish to use a SSL certificate you set in the System Certificates section above, simply delete the system-self-signed entry and start typing the friendly name of the certificate you setup previously that matches the Hostname and Primary domain Name you set in the Network Settings. The system will locate the certificate and display it in a drop-down list. Click on the certificate and the system will automatically populate all the rest of the Certificate fields such as the Subject, Issuer, Serial and Type (Figure 1):
Figure 1

- Click the Submit button (Figure 2):
Figure 2
Verify TLS Encryption and Certificate
The easiest way to verify whether or not your Hermes SEG TLS encryption is working correcly as well as verify the certificates you installed, is to go to https://www.checktls.com/TestReceiver and run the TestReceiver test.
TLS Encryption Policies
Hermes SEG allows you to create a policy to force TLS encryption when sending/receiving email from specific remote domains. TLS encryption along with S/MIME, PDF or PGP encryption will allow for the absolute best security.
- Before attempting to force TLS encryption for a specific remote domain, you must first ensure that the remote domain's SMTP hosts are able to support TLS encryption.
- Send a test email to a recipient on the remote domain.
- Navigate to System --> System Logs.
- In the Simple Search section, under the Search Text field, enter the email address of the recipient and press the Go button.
- In the search results, look for a line similar to the one below where smtp.remotedomain.tld is the remote smtp server hostname:
1872E41D60: to=<someone@domain.tld>, relay=server.remotedomain.tld[75.xxx.xxx.xxx]:25, delay=0.52, delays=0.05/0/0.17/0.29, dsn=2.0.0, status=sent (250 2.0.0 Ok: queued as 46C274158E)</someone@domain.tld>- Next, again in the Simple Search section, under the Search Text field, enter the following string and press the Go button where server.remotedomain.tld is the smtp server hostname from above:
Host offered STARTTLS: [server.remotedomain.tld]- If you find Host offered STARTTLS for the hostname you searched in the logs then it's pretty safe to assume that the remote smtp server support TLS encryption and you can proceed with adding the remote domain.
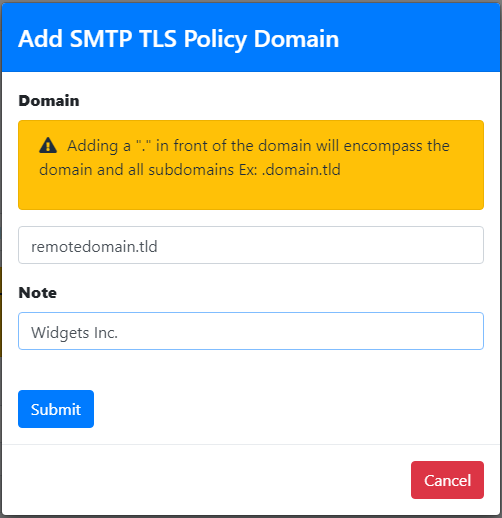
- Click the Add Domain button and in the resultant window, enter the remote domain in the Domain field (if you add a "." in front of the domain, it will encompass the primary domain and any subdomains. Example: .remote.domain.tld), enter a note for your own use in the Note field and click the Submit button (Figure 3):
Figure 3
Relay Host
Normally, Hermes SEG delivers email directly to remote SMTP hosts over the Internet. Sometimes, this configuration may not work for certain scenarios. For example, your ISP may not allow outbound SMTP over port TCP/25.
In those scenarios it is necessary to configure a Relay Host e.g., an external SMTP host that will receive emails from your Hermes SEG and relay them to their final destination.
Enable Relay Host
- Select the Relay Host Enabled option (Figure 1).
Figure 1

- Selecting the Relay Host Enabled option from Step 1, will enable the options Relay Host Authentication Required and Relay Host Authentication NOT Required options below (Figure 2)
Figure 2

Relay Host Requires Authentication
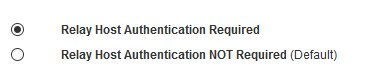
- Select the Relay Host Authentication Required option (Figure 3).
Figure 3
- Selecting Relay Host Authentication Required from Step 1, will enable the Relay Host Username and the Relay Host Password fields below (Figure 4).
Figure 4
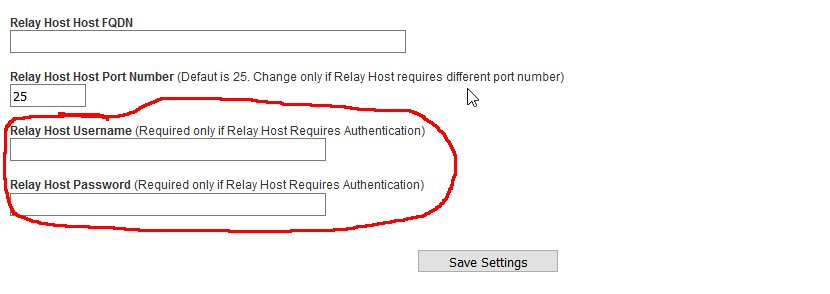
- Enter the relay host FQDN hostname or IP address in the Relay Host Host FQDN field.
- If the relay host requires a port other than 25, enter it in the Relay Host Port Number. Otherwise, leave it at default 25.
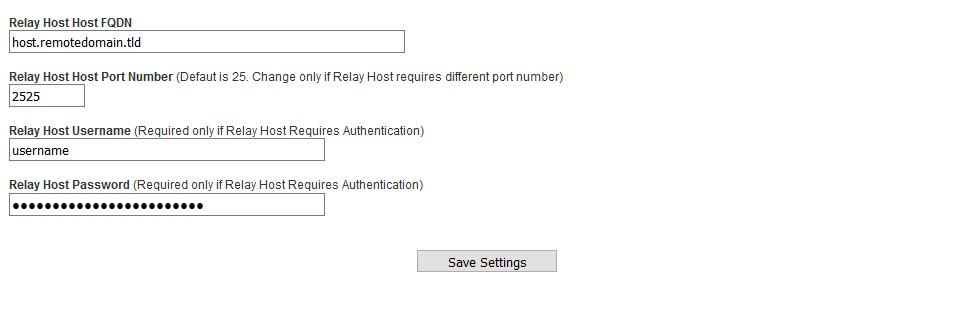
- Enter the relay host username in the Relay Host Username field and enter the password for that username in the Relay Host Password field and click on the Save Settings button (Figure 5).
Figure 5
- Click on the Apply Settings button on the bottom of the page for your changes to take effect (Figure 6)
Figure 6

Relay Host does NOT Require Authentication
- Select the Relay Host Authentication NOT Required option (Figure 7).
Figure 7

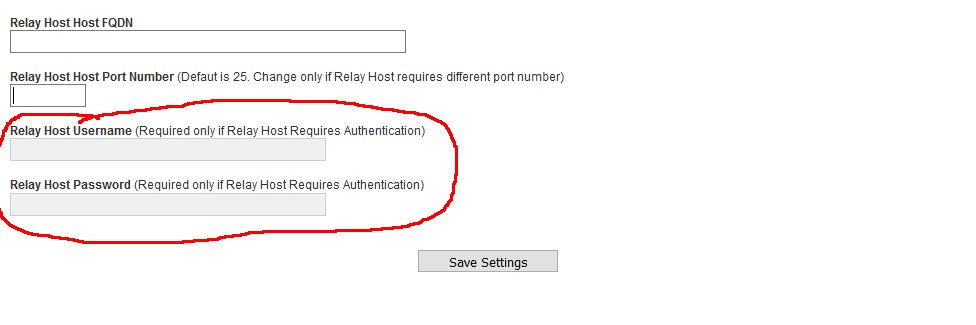
- Selecting Relay Host Authentication NOT Required from Step 1, will disable the Relay Host Username and the Relay Host Password fields below (Figure 8).
Figure 8
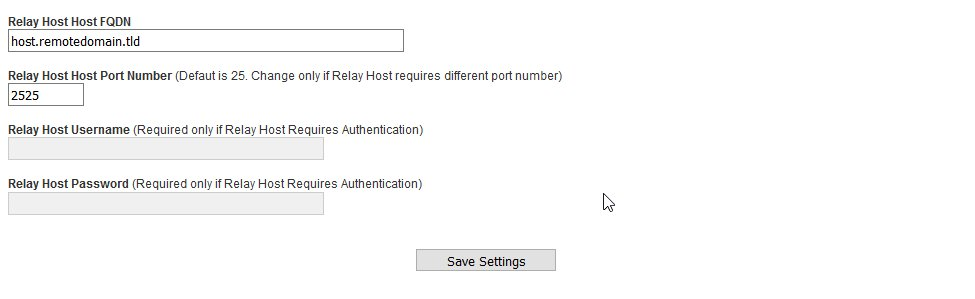
- Enter the relay host FQDN hostname or IP address in the Relay Host Host FQDN field.
- If the relay host requires a port other than 25, enter it in the Relay Host Port Number. Otherwise, leave it at default 25.
- Click on the Save Settings button (Figure 9).
Figure 9
- Click on the Apply Settings button on the bottom of the page for your changes to take effect (Figure 10).
Figure 10

Relay Domains
In order for Hermes SEG to deliver email, you must first set the domain(s) that Hermes SEG will process email for along with their corresponding email server(s). You can add as many domains and email servers as required. An email server can be configured as an IP address or a Host Name as long as the Hermes SEG can reach it over Port TCP/25. Multiple domains can be pointed to the same email server if necessary.
Add Relay Domain with IP Address Destination
- Under the Relay Domain Destination Type, select the IP Address Destination option.
- In the Relay Domain field enter the domain name and in the Dest IP fields, enter the email server's IP address and click the Add button (Figure 1).
Figure 1

- After adding a Relay Domain and IP Address Destination, the entry will show up below the Edit/Delete domains & Destinations section (Figure 2).
Figure 2
Add Relay Domain with Host Name Destination
- Under the Relay Domain Destination Type, select the Host Name Destination option.
- In the Relay Domain field enter the domain name, in the Dest Host Name field, enter the email server's Host Name part of the FQDN address (without the domain part), in the Dest Host Domain field, enter the email server's domain part of the FQDN address and then click the Add button (Figure 3).
Figure 3

- After adding a Relay Domain and Host Name Destination, the entry will show up below the Edit/Delete domains & Destinations section (Figure 4).
Figure 4
Edit Existing Relay Domain Mapping
- Click on the edit icon
 under the Edit column of the Domain you wish to edit.
 - On the Edit Existing Relay Domain Mapping page, select either the IP Address Destination or the Host Name Destination option (Figure 5).
Figure 5

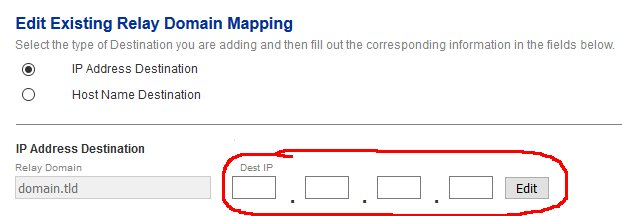
IP Address Destination
Selecting IP Address Destination will enable the IP Address Destination entry. Enter the IP Address of the destination email server under the Dest IP field and click the Edit button to save your changes (Figure 6). Note that the Relay Domain field is already pre-filled and cannot be changed.
Figure 6
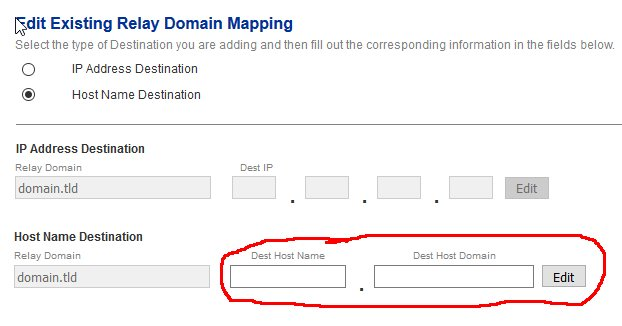
Host Name Destination
Selecting Host name Destination will enable the Host Name Destination entry. Enter the host name (without the domain) of the destination email server under the Dest Host Name field, enter the domain of the destination email server under the Dest Host Domain field and click the Edit button to save your changes (Figure 7). Note that the Relay Domain field is already pre-filled and cannot be changed.
Figure 7
- When finished making your changes, click on the Back to Relay Domains button on the bottom of the page to return to the Relay Domains page (Figure 8).
Figure 8

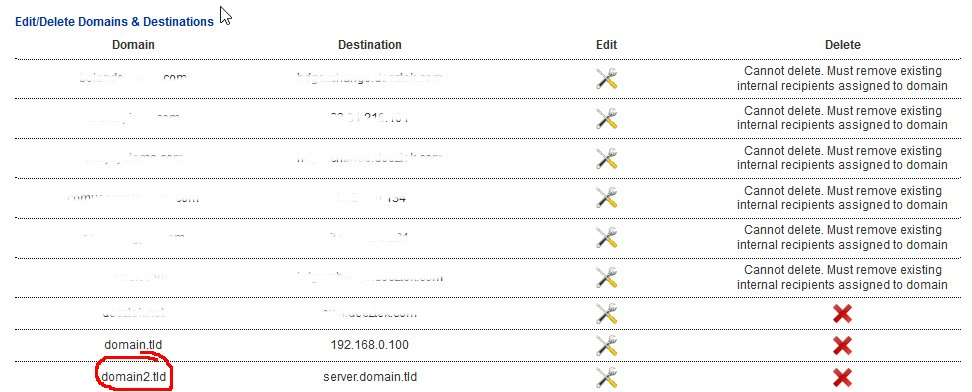
Delete Existing Relay Domain Mapping
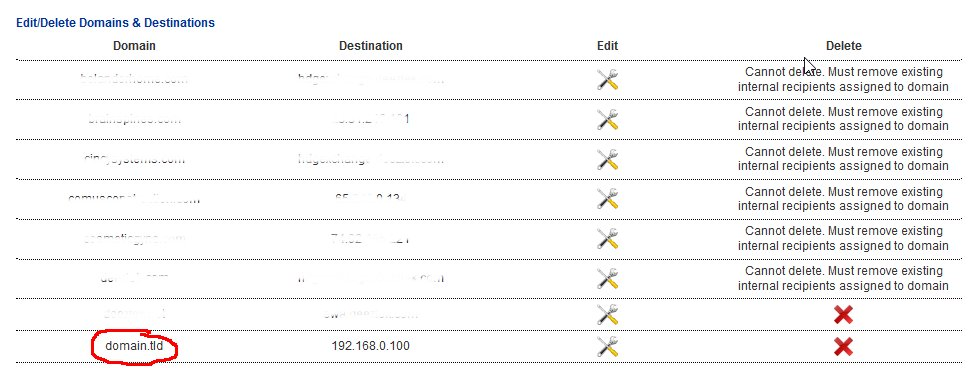
Note: Deleting existing Relay Domain mappings can only be accomplished if there are are no existing Internal Recipients assigned to that domain. If there are existing Internal Recipients assigned to the domain, you will receive the following message under the Delete column of the Edit/Delete Domains & Destination section (Figure 9). In order to delete the domain, you must first navigate to Gateway --> Internal Recipients, delete all the Internal Recipients for that domain and then return to this section to delete the domain.
Figure 9

- Click on the
 icon under the Delete column of the Domain you wish to delete.
 - On the confirmation page, click on the Yes button to proceed with deleting the domain. Clicking on the No button will take you back to the Relay Domains page (Figure 10).

Figure 10

Relay IPs & Networks
In this section, you can add which individual IPs or networks will be allowed to send (relay) email through Hermes SEG.
Best security practice is to never allow entire networks to send email through Hermes SEG and instead only allow specific IPs.
Add Relay IP
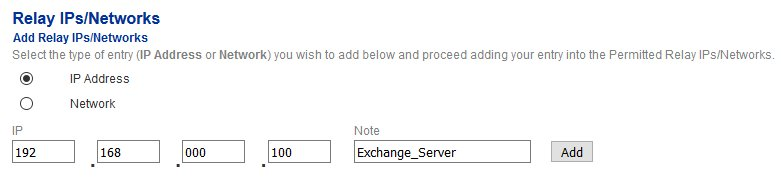
- Under the Select the type of entry... section, Select IP Address option.
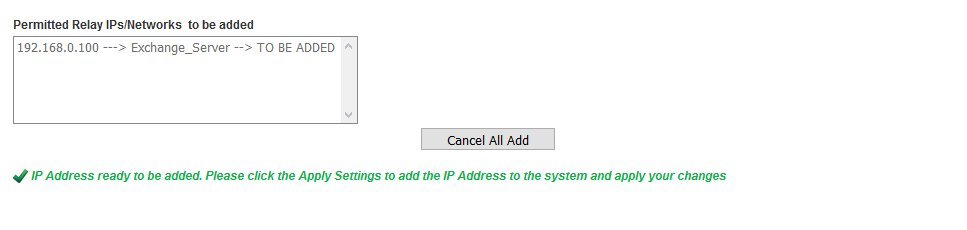
- Under the IP field, enter the IP Address that you want to allow.
- Under the Note field, enter a note identifiying the IP address and click the Add button (Figure 1).
Figure 1
- Each IP address you add shows up in the Permitted Relay IPs/Network to be added section (Figure 2)
Figure 2
- Continue adding IP addresses as needed. When finished, click on the Apply Settings button on the bottom of the page (Figure 3).
Figure 3

Add Relay Network
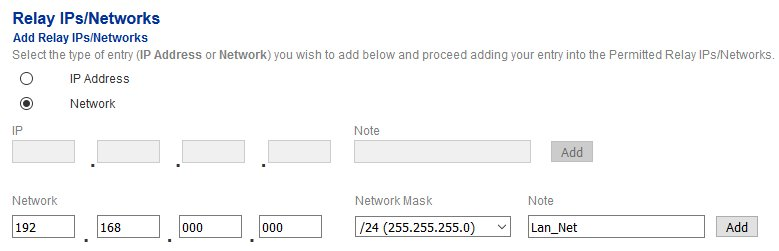
- Under the Select the type of entry... section, Select Network option.
- Under the Network field, enter the Network Address that you want to allow.
- Under the Network Mask drop-down field, select the mask (subnet mask) of the network
- Under the Note field, enter a note identifiying the network address and click the Add button (Figure 4).
Figure 4
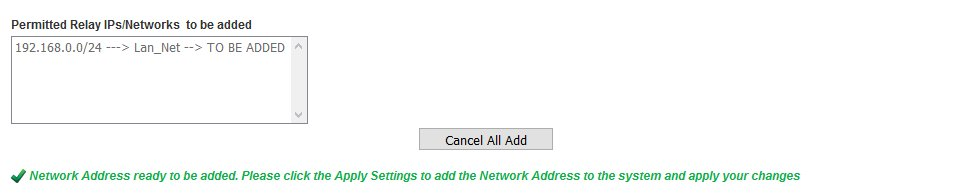
- Each network address you add shows up in the Permitted Relay IPs/Network to be added section (Figure 5)
Figure 5
- Continue adding Network addresses as needed. When finished, click on the Apply Settings button on the bottom of the page (Figure 6).
Figure 6

Delete Relay IPs/Networks
- Under the Delete Relay IPs/Networks section, select the entry you wish to delete and click the Delete button below (Figure 6). Note that only one entry can be selected to be deleted at a time.
Figure 6

- Each entry you select to be deleted shows up in the Permitted Relay IPs/Network to be deleted section (Figure 7).
Figure 7

- Continue selecting entries to be deleted as needed. When finished, click on the Apply Settings button on the bottom of the page (Figure 8).
Figure 8

Internal Recipients
Hermes SEG requires a listing of Internal Recipients in order to process incoming email and deliver that email to the correct recipient mailboxes which are located on an email server(s) which must be previously specified in the Gateway --> Relay Domains. The system will ONLY allow you to add recipients with domains that are specified in the in the Gateway --> Relay Domains.
Manually Add Internal Recipients
This method will allow you to add Internal Recipients manually one by one. Hermes SEG also supports automatic import of recipients via AD (Active Directory) but that feature is only available with Hermes SEG Pro License. If you have a SEG Pro License and you wish to utilize AD Recipient import, please see Import Internal Recipients from Active Directory section below.
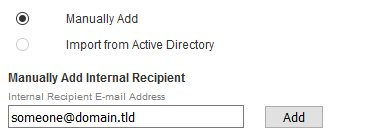
- Ensure the Manually Add option is selected.
- Under the Manually Add Internal Recipient section, enter a valid email address in the Internal Recipient E-mail Address field and click the Add button (Figure 1).
Figure 1
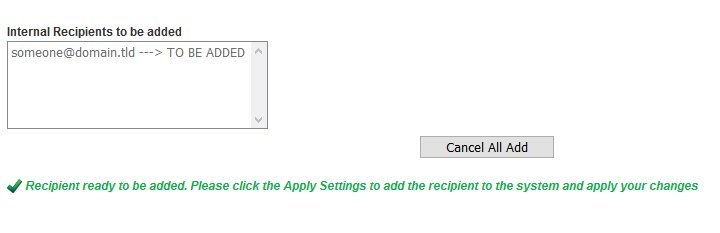
- Each Internal Recipient you add shows up in the Internal Recipients to be added section (Figure 2)
Figure 2
- Continue adding Internal Recipients as needed. When finished, click on the Apply Settings button on the bottom of the page (Figure 3).
Figure 3

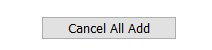
- If you make a mistake, click on the Cancel All Add button to cancel (Figure 4).
Figure 4
Import Internal Recipients from Active Directory
This method will allow you to add Internal Recipients automatically via an AD (Active Directory) connection. Please note, this feature is ONLY available if you have a Hermes SEG Pro License.
In order to import Internal Recipients via AD (Active Directory), you must have previously created an AD connection under System --> AD Integration.
Note: Only once an AD connection is created, the Import from Active Directory option will become enabled.
- Select the Import from Active Directory option under the Add Internal Recipients section.
- Selecting the Import from Active Directory option will automatically populate the Import Internal Recipients from Active Directory drop-down containing the Active Directory connection(s) you previously added (Figure 5).
Figure 5

- Ensure the correct connection is selected from the drop-down and click the Import button.
- The Internal Recipients to be added section, will automatically be populated with SMTP address(es) from Active Directory (Figure 6)
Figure 6

- Click the Apply Settings button at to the bottom of the page (Figure 7).
Figure 7

- If you make a mistake, click on the Cancel All Add button to cancel (Figure 8).
Figure 8

Filter Internal Recipients
Setting a filter will assist you in narrowing down specific recipients by email address or domain in order to manage them easily.
- In the Filter By field, enter a complete or partial email address or domain and click the Set Filter button. If any matches are found, the Existing Internal Recipients listing will be populated with only the entries matching the filter you set (Figure 9).
Figure 9
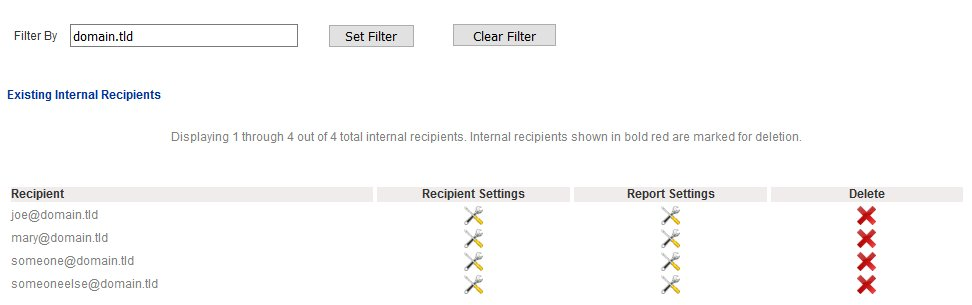
- You can clear a filter you set by clicking the Clear Filter button at any time (Figure 9).
Edit Internal Recipient Settings
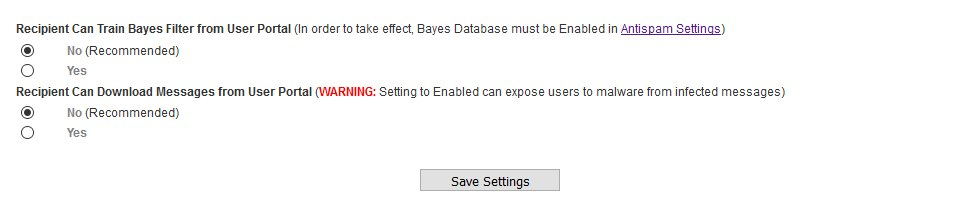
When Internal Recipients are added, by default, they are not allowed to Train the Bayes Filter and they are not allowed to Download Messages from the User Self-Service Portal.
Training the Bayes Filter should ONLY be performed by individuals who have a firm grasp on the concepts of Spam, Ham, marketing email etc. Incorrectly training the Bayes Filter will have bad consequences on ALL of the users of your system. Thus, it's highly recommended not to allow individuals to train the Bayes Filter.
Note: Setting Recipient Can Train Bayes Filter from User Portal will have no effect unless the Bayes Database is set to Enabled under Content Checks --> Antispam Settings.
Additionally, allowing users to Download Messages from the the User Self-Service Portal can expose those users to malware from infected messages. Thus, it's highly recommended not to allow individuals to download messages.
- Click on the
 icon under the Recipient Settings column of the Internal Recipient you wish to edit.
 - In the Recipient Settings page, select the option(s) you want to enable for this recipient by selecting Yes on the corresponding option and click on the Save Settings button (Figure 10).

Figure 10
- Once finished, click on the Back to Recipients button on the bottom of the page (Figure 11).
Figure 11

Edit Internal Recipient Report Settings
Every night starting at 12:30 a.m., Hermes SEG sends Daily Quarantine Reports to all the Internal Recipients in the system. The Daily Quarantine Reports functionality is two fold. First, it provides customized links to the User Self-Service Portal for the particular recipient and if any messages that were destined for that recipient were quarantined, they are also included in the report. This default functionality can be changed by editing the Internal Recipient Report Settings.
- Click on theicon under the Report Settings column of the Internal Recipient you wish to edit.

- In the Quarantine Report Settings page, select the option(s) you want to enable for this recipient by selecting the corresponding option.
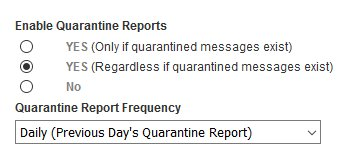
Enable Quarantine Reports Regardless if quarantined messages exist
This option is the default option the system sets when an Internal Recipient is added to the sytem. With this option set, Hermes SEG will send a quarantined report of the previous day's quarantined messages to the recipient. If there are no quarantined messages from the previous day, the report will be empty (Figure 12).
Figure 12
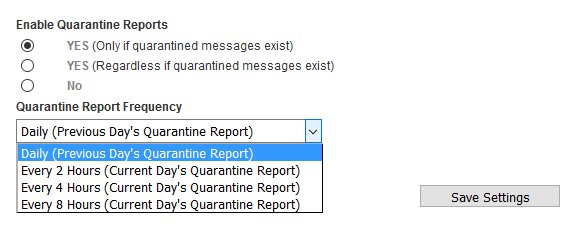
Enable Quarantine Reports Only if quarantined messages exist
By setting this option Hermes SEG will only send a quarantine report only if there are quarantined messages for that recipient. If there are no quarantined messages, Hermes SEG will not send a report. Setting this option will also enable you to set the Quarantine Report Frequency. The Quarantined Report Frequency can be set as follows (Figure 13):
- Daily. Report will contain the previous day's quarantined messages.
- Every 2 Hours. Report will contain the current day's quarantined messages.
- Every 4 Hours. Report will contain the current day's quarantined messages.
- Every 8 Hours. Report will contain the current day's quarantined messages.
Figure 13
The drawback of this option is users will not have links to the User Self-Service Portal unless there are quarantined messages for that particular recipient. If you set this option for any recipients, they should be advised to save any previous quarantine reports as a gateway to the User Self-Service Portal.
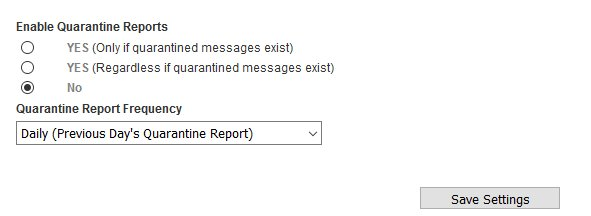
Disable Quarantine Reports
By setting the NO option, Hermes SEG will not send a quarantine report for that recipient regardless if quarantined messages exist or not. This option is not recommended unless you have a special need for a specific recipient (Figure 14).
Figure 14
- When finished setting the options needed, click on the Save Settings button (Figure 15).
Figure 15

- Click on the Back to Recipients button to return to the Internal Recipients page (Figure 16).
Figure 16

Delete Internal Recipients
Note: Deleting Internal Recipients is irreversible. Addtionally, deleting an Internal Recipient will also delete any recipient certificates, any recipient block/allow entries and any virtual recipients assigned to that internal recipient.
- Click on the
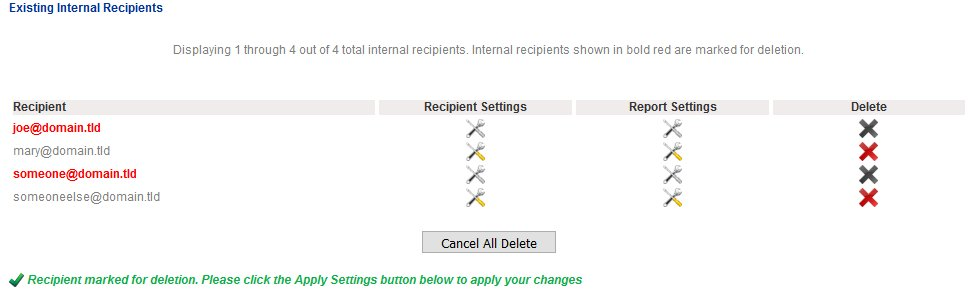
 icon on the Delete column of the particular recipient you wish to delete.
 - The Recipient email address will turn red under the Recipient column (Figure 17).

Figure 17
- Repeat for any additional recipients you wish to delete and then click on the Apply Settings button to delete the recipients from the system (Figure 18).
Figure 18

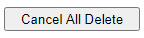
- If you make a mistake, click on the Cancel All Delete button to cancel (Figure 19).
Figure 19
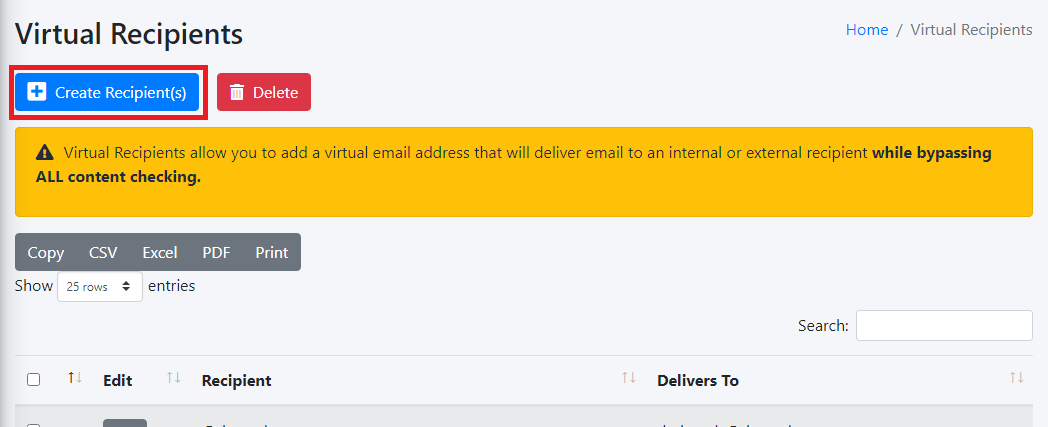
Virtual Recipients
If you have an Internal Recipient joe@domain.tld but you also want the email address joe.smoe@domain.tld to deliver email to joe@domain.tld, you would set up a virtual address of joe.smoe@domain.tld to deliver to joe@domain.tld. Please note, Virtual Recipients are not only limited to Internal Recipients. You can also create a Virtual Recipient to deliver email to an outside email address not handled by Hermes SEG. In the above example, we can easily setup joe.smoe@domain.tld to deliver to someone@gmail.com.
Any email destined for a virtual recipient are NOT checked by the spam filter.
Create Virtual Recipient(s)
- Click on the Create Recipient(s) button (Figure 1).
Figure 1
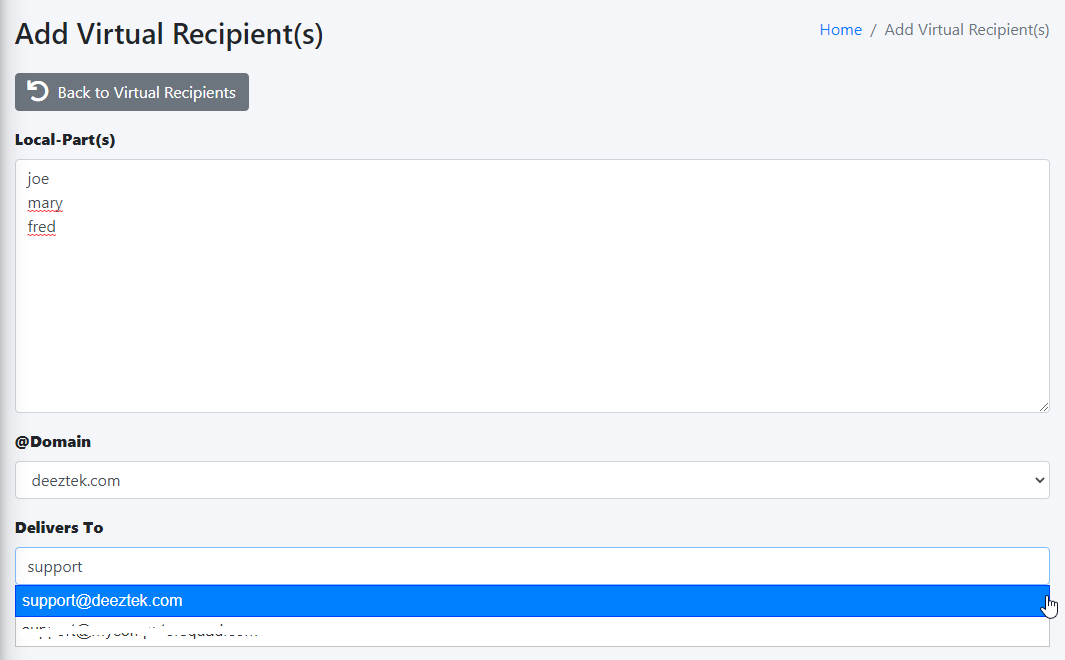
- On the Add Virtual Recipient(s) page, under the Local-Part(s) field, enter as many local-part(s) as required each in its own line (part before the @symbol of an e-mail address). You can also leave the Local-Part(s) field empty if you wish to forward an entire domain.
- Under the @Domain drop-down field, select the domain you wish to use.
- Under the Delivers to field, start typing the e-mail address of an existing Internal Recipient and the system will show a drop-down listing of Internal Recipients matching the e-mail address you are typing or enter an external email address.
- Click the Submit button (Figure 2).
Figure 2
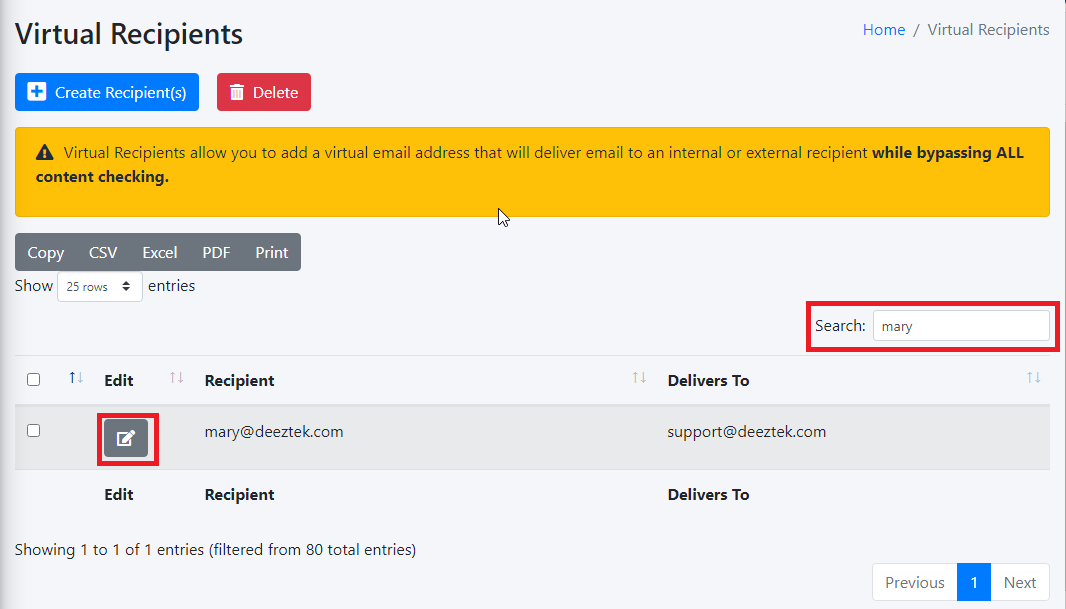
Edit Virtual Recipient
- On the Virtual Recipients page, locate the virtual recipient you wish to edit by typing any part of the e-mail address in the Search: field and then click the
 button next to the virtual recipient (Figure 3).
Figure 3
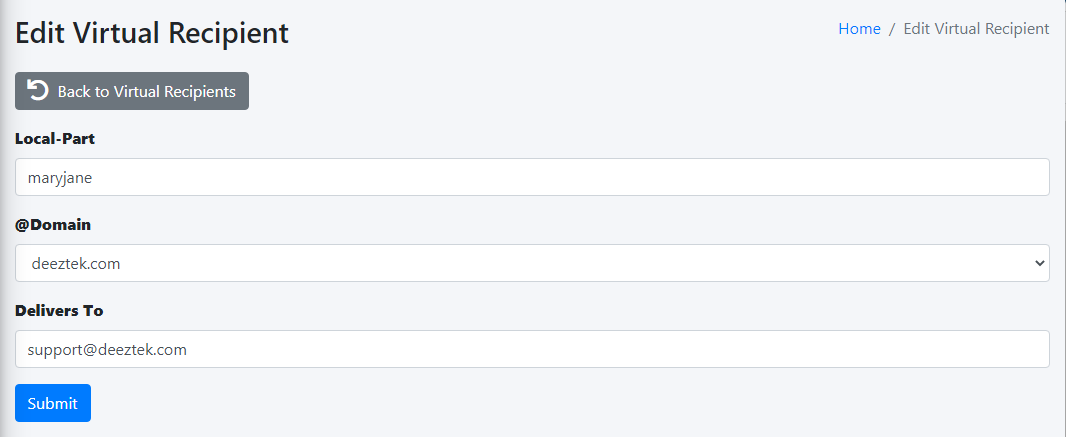
On the Edit Virtual Recipient page, make the necessary changes and click the Submit button (Figure 4).
Figure 4
Delete Virtual Recipient(s)
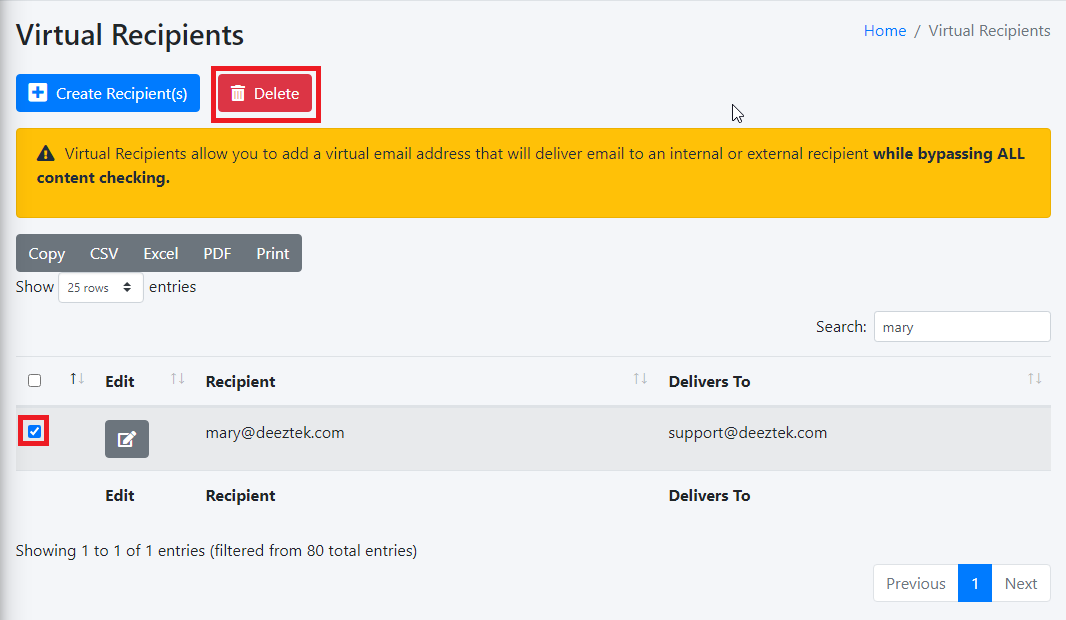
- On the Virtual Recipients page, locate the virtual recipient(s) you wish to delete by typing any part of the e-mail address(es) in the Search: field, place a checkmark on the checkbox next to the virtual recipient and then click the Delete button on top of the page (Figure 5).
Figure 5
On the Delete Recipient(s) confirmation page, click the Yes button to delete the recipient or No to cancel (Figure 6)
Figure 6
